Kia niro plug-in hybrid 2018 Parts list manual


GETTING TO KNOW YOUR NIRO PLUG-IN HYBRID
Congratulations on Your New Kia Purchase!
Your new Kia vehicle has been designed, engineered and manufactured to provide you with years of comfortable and dependable driving.
Kia is committed to quality, innovation, safety and — above all — your satisfaction.
Using This Guide
The information contained in this guide is a brief overview that will help you become familiar with the operation and features of your new Kia
vehicle. The flipbook format facilitates information access, while the detailed illustrations help to ensure the instructions are easy to follow.
This Features & Functions Guide, and the specific operational and safety information it provides, is not a substitute for your Owner’s Manual.
In the interest of your safety and that of your family, and to help you avoid risks that may result in death or serious injury, Kia reminds you to
carefully read your Owner’s Manual in order to fully familiarize yourself with the important information it contains.
While the information contained in this guide is accurate at the time of printing, Kia may change vehicle specifications without notice in
advance or after the fact, and assumes no liability in connection with such changes.
www.kia.com
Consumer - Roadside Assistance
1-800-333-4KIA (4542)
See Back Pages for Vehicle
Maintenance Schedule
Always check the Owner’s Manual for complete
operating information and safety warnings.
Available on the App Store, the Kia AR Owner’s Manual
App uses AR (Augmented Reality) technology to
provide tips and useful information about your vehicle.
To use the Kia AR Owner’s Manual App:
• Simply scan the interior or engine (motor) room of
your vehicle with your smart phone or tablet, select
feature/component and view the video guide.
• If you are unable to scan the vehicle, use the
AR Manual (without scan) menu, select feature/
component and view the video guide.

VIDEOS & QR CODES . . . . . . . . . . . . . . . . .02
INSTRUMENT CLUSTER
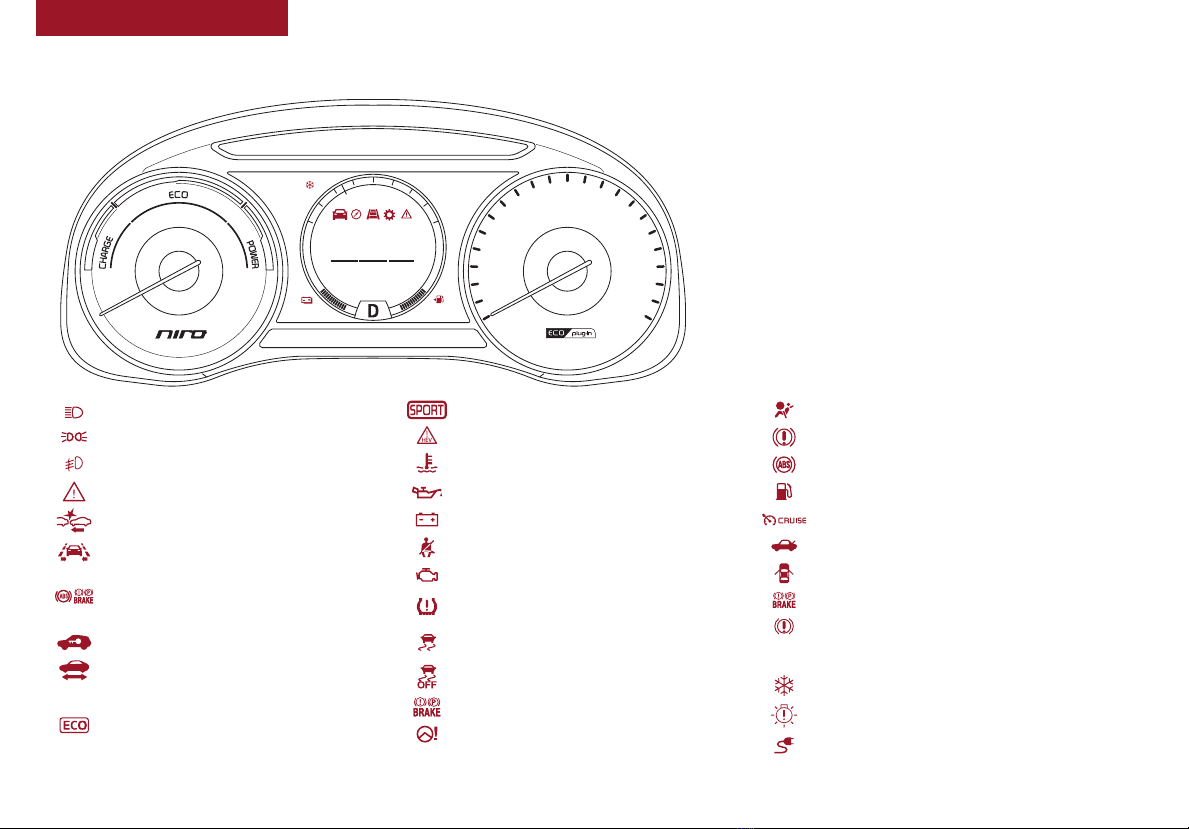
Instrument Cluster Overview . . . . . . . . . . . . . . . 03
Indicators & Warning Lights . . . . . . . . . . . . . . . 04
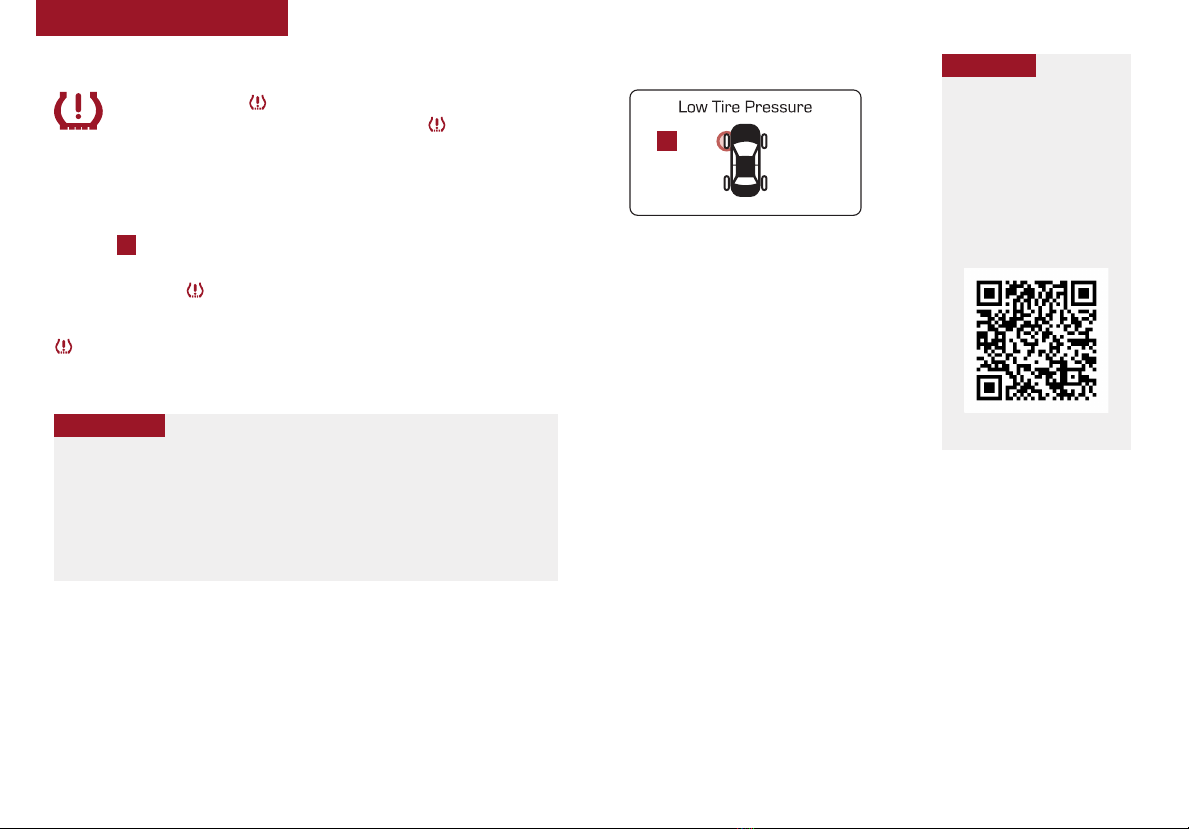
Tire Pressure Monitoring System (TPMS) . . . . . . . . 05
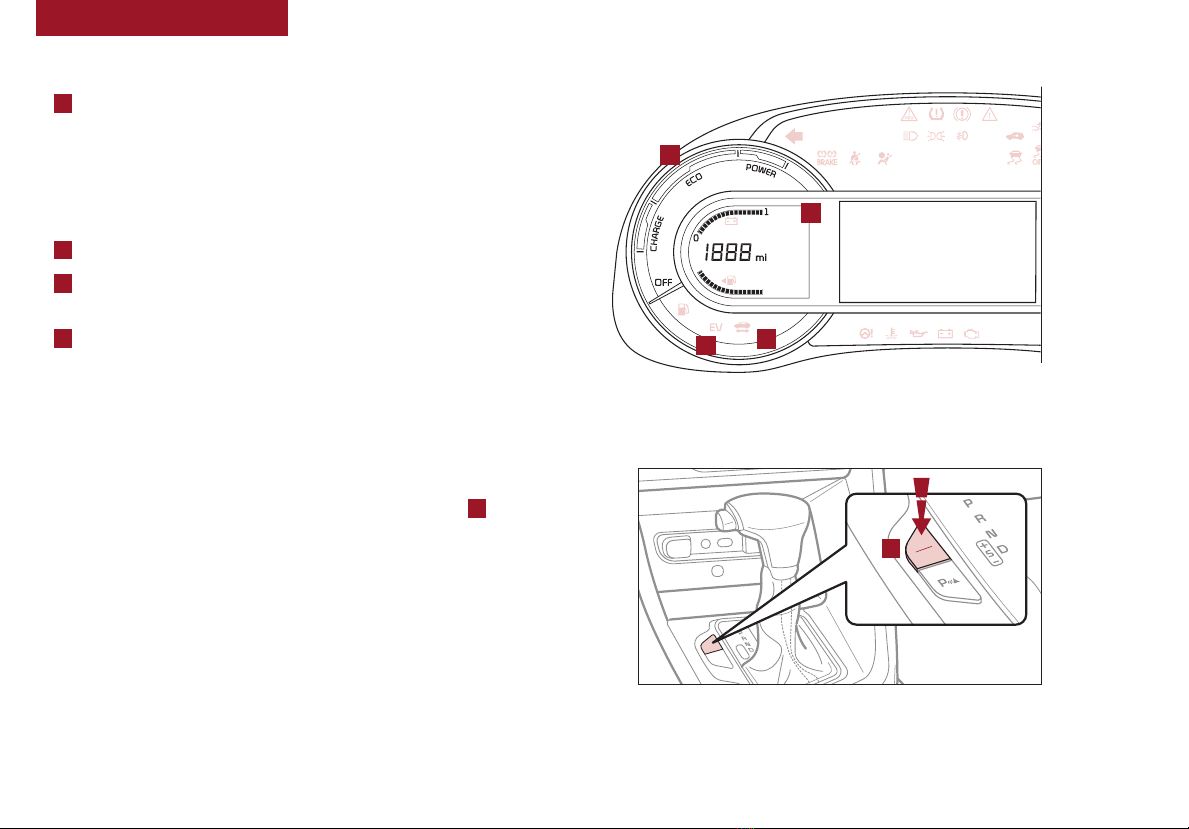
Plug-In Hybrid Indicators at Startup . . . . . . . . . . . 06
Plug-In Hybrid Modes. . . . . . . . . . . . . . . . . . . 06
LCD Instrument Cluster Modes . . . . . . . . . . . . . . 07
Trip Modes / Trip Computer. . . . . . . . . . . . . . . . 07
Fuel Economy. . . . . . . . . . . . . . . . . . . . . . . 08
User Settings . . . . . . . . . . . . . . . . . . . . . . . 09
Service Mode . . . . . . . . . . . . . . . . . . . . . . . 09
Sport/ECO Modes . . . . . . . . . . . . . . . . . . . . 10
PLUG-IN HYBRID SYSTEM
UVO eco* / UVO eco with Navigation* Display . . . . . . 11
Instrument Cluster - Energy Flow. . . . . . . . . . . . . 12
Charging the Plug-In Hybrid Vehicle . . . . . . . . . . . 14
Charging Connector Auto/Lock Mode . . . . . . . . . . 16
ScheduledCharging* . . . . . . . . . . . . . . . . . . . 16
DRIVER’S PANEL
Blind Spot Collision Warning*. . . . . . . . . . . . . . . 17
Lane Keeping Assist (LKA) . . . . . . . . . . . . . . . . 18
Forward Collision-Avoidance Assist (FCA) /
Forward Collision Warning (FCW) . . . . . . . . . . . 18
Instrument Panel Dimmer . . . . . . . . . . . . . . . . 19
Electronic Stability Control (ESC) . . . . . . . . . . . . . 19
Hill-Start Assist Control (HAC) . . . . . . . . . . . . . . 19
Reverse Parking Aid Function* . . . . . . . . . . . . . . 20
Engine Start/Stop Button. . . . . . . . . . . . . . . . . 20
Power Windows, Window Lock & Central Door Lock . . . 21
Automatic Door Lock/Unlock . . . . . . . . . . . . . . . 21
Power/Heated Outside Mirrors* . . . . . . . . . . . . . 21
Power Folding Outside Mirrors* . . . . . . . . . . . . . 21
STEERING WHEEL CONTROLS
Headlights & High Beams. . . . . . . . . . . . . . . . . 22
Turn Signals & Fog Lights* . . . . . . . . . . . . . . . . 22
Windshield / Rear Wipers & Washers . . . . . . . . . . . 23
Heated Steering Wheel Button*. . . . . . . . . . . . . . 23
Bluetooth®Wireless Technology . . . . . . . . . . . . . 24
Audio Controls . . . . . . . . . . . . . . . . . . . . . . 26
Standard Cruise Control . . . . . . . . . . . . . . . . . 26
Smart Cruise Control (SCC). . . . . . . . . . . . . . . . 27
Tilt/Telescoping Steering Wheel . . . . . . . . . . . . . 28
AUDIO SYSTEMS
UVO eco / Android Auto™/ Apple CarPlay®Setup . . . . 29
UVO eco* . . . . . . . . . . . . . . . . . . . . . . . . . 30
UVO eco with Navigation* . . . . . . . . . . . . . . . . 31
CENTER PANEL
Digital Clock . . . . . . . . . . . . . . . . . . . . . . . 32
USB Charger*. . . . . . . . . . . . . . . . . . . . . . . 32
Aux/USB/iPod®Port & Power Outlets . . . . . . . . . . 32
AC Inverter*. . . . . . . . . . . . . . . . . . . . . . . . 32
Wireless Smartphone Charging System* . . . . . . . . . 33
Automatic Climate Control . . . . . . . . . . . . . . . . 34
Automatic Gear Shift with Sportmatic®Shifting . . . . . 35
Dual Clutch Transmission* . . . . . . . . . . . . . . . . 35
Seat Warmers / Ventilated Seats* . . . . . . . . . . . . 36
SEATING
Driver Position Memory System* . . . . . . . . . . . . . 36
Front Seat Headrest Adjustment . . . . . . . . . . . . . 36
Power Adjustable Driver’s Seat* . . . . . . . . . . . . . 37
6-Way Manual Adjustable Driver’s Seat* . . . . . . . . . 37
OTHER KEY FEATURES
Smart Key* . . . . . . . . . . . . . . . . . . . . . . . . 38
Double-Turn Lock/Unlock All . . . . . . . . . . . . . . . 38
Map/Room Lamps . . . . . . . . . . . . . . . . . . . . 39
Sunvisor . . . . . . . . . . . . . . . . . . . . . . . . . 39
Hood Release Lever and Latch . . . . . . . . . . . . . . 40
Fuel Cap / Malfunction Indicator . . . . . . . . . . . . . 40
Fuel Filler Lid . . . . . . . . . . . . . . . . . . . . . . . 40
Parking Distance Warning* . . . . . . . . . . . . . . . . 41
Rear-Camera Display* . . . . . . . . . . . . . . . . . . 41
Driver Attention Warning (DAW)* . . . . . . . . . . . . . . 42
High Voltage Battery Air Intake . . . . . . . . . . . . . . . . . 42
Child-Protector Rear Door Lock . . . . . . . . . . . . . 43
Tire Mobility Kit. . . . . . . . . . . . . . . . . . . . . . 43
SAFETY FEATURES
Occupant Detection System (ODS) /
Passenger Airbag Off Indicator . . . . . . . . . . . . . . 44
Seat Belts. . . . . . . . . . . . . . . . . . . . . . . . . 44
Seat Belt Retractor Locks . . . . . . . . . . . . . . . . 44
NORMAL MAINTENANCE SCHEDULE. . . . 45
LEGAL DISCLAIMERS. . (See Back Inside Cover Page)
ESSENTIAL FEATURES
*IF EQUIPPED
NIRO PLUG-IN HYBRID
FEATURES & FUNCTIONS GUIDE
Air Conditioning / Climate Control . . . . . . . . . . . . . 34
Audio System - UVO eco / Android Auto™/
Apple CarPlay®Setup . . . . . . . . . . . . . . . . . . 29
Audio System – UVO eco*. . . . . . . . . . . . . . . . . . 30
Audio System – UVO eco with Navigation* . . . . . . . . .31
Aux/USB/iPod®Port & Power Outlets . . . . . . . . . . . . 32
Bluetooth®Wireless Technology . . . . . . . . . . . . . . 24
Charging the Plug-In Hybrid Vehicle. . . . . . . . . . . . . 14
Cruise Control. . . . . . . . . . . . . . . . . . . . . . . . 26
Digital Clock. . . . . . . . . . . . . . . . . . . . . . . . . 32
Sport/ECO Modes . . . . . . . . . . . . . . . . . . . . . . 10
Fuel Economy . . . . . . . . . . . . . . . . . . . . . . . .08
Plug-In Hybrid Displays – UVO eco with Navigation* . . . .11
Instrument Cluster / Plug-In Hybrid Displays . . . . . . . .12
Passenger Airbag Off Indicator . . . . . . . . . . . . . . .44
Tire Mobility Kit . . . . . . . . . . . . . . . . . . . . . . .43
Tire Pressure Monitoring System (TPMS) . . . . . . . . . . 05
Windshield Wipers & Washers . . . . . . . . . . . . . . . 23
Driving while distracted can result in a loss of vehicle control
that may lead to an accident, severe personal injury and
death. The driver’s primary responsibility is in the safe and
legal operation of a vehicle, and use of any handheld devices,
other equipment or vehicle systems which take the driver’s
eyes, attention and focus away from the safe operation of a
vehicle or that are not permissible by law should never be
used during operation of the vehicle.

NIRO PLUG-IN HYBRID FEATURES & FUNCTIONS GUIDE
2*IF EQUIPPED
1. If you’re having trouble scanning codes, check the following:
•The code should be centered and focused in your mobile device’s camera screen
•Consider moving your device closer to or farther away from the code
•The code should be well lit, without significant shadow
2. After scanning, if a “connecting” message appears and then nothing happens or there’s a “connection error” message, this typically indicates that your device is having trouble
connecting to the Internet
QUICK TIPS
VIDEOS & QR CODES - SMARTPHONES, TABLETS AND COMPUTERS
One Click Fuel Cap Video
To view a video on your
mobile device, snap this
QR Code or visit the listed
website.
www.youtube.com/KiaFeatureVideos
QR CODE
Kia provides a number of video resources at your disposal to assist you with becoming familiar with the features and
functions found in your Kia vehicle. You can access these resources by snapping the QR Codes with your smartphone/tablet
(mobile devices) or by visiting the following website: www.youtube.com/KiaFeatureVideos. Continue reading for a more
in-depth look at QR Codes and for instructions on how to use them.
What are QR Codes?
A QR Code is a square, 2-dimensional barcode that can be
read by mobile devices loaded with an appropriate barcode
or QR Code Reader App. The app reads the barcode image
and then launches/uploads the specific information the
code contains, such as URLs, text, photos, videos and so
much more.
How to Use QR Codes
If you have a mobile device with a QR Code Reader App, you
can snap the code with your phone and you’ll be provided a
video with additional information pertaining to the topic. For
example, in the Fuel Cap section, if you would like additional
information, just snap the code with your mobile device to
view the selected Kia Features & Functions Video.
How to Snap a QR Code
1. With your mobile device, download a QR Code Reader
App. With many devices, you can do this through an app
store or marketplace
2. Open the QR Code Reader App on your mobile device
3. The app will utilize your device’s camera. Center the code
in the camera viewing area:
•With some apps, as soon as the app recognizes the
code, it will launch the corresponding video
•With other apps, you will have to snap or take a
picture of the code. The app will then launch the
corresponding video
•For operation specifics, refer to the instructions that
come with the QR Code Reader App
•Avoid scanning from a significant angle
•Confirm that the device’s app supports 2D QR Code scanning
•Try another QR Code Reader App; not all apps are created equal
REMINDER: When accessing videos
on your mobile device, standard
cellular data rates may apply.

3
*IF EQUIPPEDALWAYS CHECK THE OWNER’S MANUAL FOR COMPLETE OPERATING INFORMATION AND SAFETY WARNINGS.
AHybrid system gauge
BFuel gauge
CSpeedometer
DWarning and indicator lights
ELCD display (including Trip computer)
FHybrid Battery SOC (State of Charge)
gauge
GDistance to empty 220
20020
20 120
140
40 100
60 80
18040
16060
14080
120100
E
F
A
G
F
B
E
D
D
C
Instrument Cluster Overview
Your vehicle’s instrument cluster & indicator light locations may differ from those in the
illustrations. For more information on the instrument cluster, the LCD Warning Messages
and the function of all indicator and warning lights, please refer to the Owner’s Manual.
INSTRUMENT CLUSTER
(Type A shown)

NIRO PLUG-IN HYBRID FEATURES & FUNCTIONS GUIDE
4*IF EQUIPPED
010 20
0 220
20 200
40 180
60 160
80 140
100 120
30
52.4 mpg
OK
250
mi
250
mi
OFF
1276538mi60
°
F
km/h
Indicators & Warning Lights
High Beam Indicator
Light ON Indicator
Front Fog Light Indicator*
Master Warning Indicator
FCA/FCW Indicator*
Lane Keeping Assist (LKA) Indicator
Electronic Brake Force (EBD) System Warning Indicator
(Two separate indicators on Instrument Cluster
lit at same time)
Immobilizer Indicator*
READY Indicator
EV EV Mode Indicator
ECO Indicator
ORT Mode Indicator
Hybrid System Warning Indicator
Engine Coolant Temperature Warning
Engine Oil Pressure Warning Indicator
Charging System Warning Indicator
Seat Belt Warning Indicator
Malfunction Indicator
Low Tire Pressure Light / Tire Pressure Monitoring
System (TPMS) Malfunction Indicator
Electronic Stability Control (ESC) Indicator / ESC
Malfunction Indicator
Electronic Stability Control (ESC) OFF Indicator
Parking Brake & Brake Fluid Warning Indicator
Electronic Power Steering (EPS) Warning Indicator
Airbag Warning Indicator
Parking Brake Indicator
Anti-lock Braking System (ABS) Warning Indicator
Low Fuel Level Warning Indicator
Cruise Indicator*
Trunk Open Warning Indicator
Door Ajar Warning Indicator
(red color)
(yellow color)
Regenerative Brake Warning Indicator (Two separate
indicators on Instrument Cluster lit at same time)
SET Cruise SET Indicator
Icy Road Warning Indicator
LED Headlamp Warning Indicator*
Charging Cable Connection Indicator (Plug-In Hybrid)
Your vehicle’s instrument cluster & indicator
light locations may differ from those in the
illustrations. For more information on the
instrument cluster, the LCD Warning Messages
and the function of all indicator and warning
lights, please refer to the Owner’s Manual.
INSTRUMENT CLUSTER
(Type B Sport shown)

5
*IF EQUIPPEDALWAYS CHECK THE OWNER’S MANUAL FOR COMPLETE OPERATING INFORMATION AND SAFETY WARNINGS.
25
32
32
PSI32
A
Tire Pressure Monitoring
System Video
To view a video on your
mobile device, snap this
QR Code or visit the listed
website.
Refer to page 2 for more
information.
QR CODE
www.youtube.com/KiaFeatureVideos
Tire Pressure Monitoring System (TPMS)
The TPMS indicator functions as both Low Tire Pressure Light
and TPMS Malfunction Indicator. The indicator will illuminate
if one or more tires is significantly underinflated, the vehicle has a
spare tire installed without TPMS or the outside temperature becomes
significantly lower.
The LCD screen in the instrument cluster will display the Low Tire Pressure
indicator Ashowing which tire(s) are underinflated. Inflate tire(s) to
specifications using an accurate digital tire pressure gauge to turn off Low
Tire Pressure Light . See front driver’s door jamb for PSI specification.
When there is a problem with the TPMS, the TPMS Malfunction Indicator
will blink for approximately one minute then illuminate - See dealer
for service.
•Even with TPMS, tire pressure should be checked manually at least once a
month. Only adjust tire pressure on “cold tires”
•For proper maintenance and optimal fuel economy, maintain recommended
tire inflation pressures and stay within the load limits and weight distribution
recommended for your vehicle
•In winter or cold weather, the TPMS light may illuminate if the tire pressure was
adjusted to the recommended tire inflation pressure during warm weather
QUICK TIP
REMINDERS:
• Check the recommended tire pressure label located on the left side of driver's door jam,
visible when the door is open.
• Consult your dealer for service if Low Tire Pressure Light remains illuminated after inflating
your tire(s).
INSTRUMENT CLUSTER

NIRO PLUG-IN HYBRID FEATURES & FUNCTIONS GUIDE
6*IF EQUIPPED
Plug-In Hybrid Indicators at Startup
AHybrid System Gauge —Indicates how economically the vehicle is
being driven.
•CHARGE (Blue zone): High-efficiency range
•ECO (Green zone): Normal-efficiency range
•POWER (Grey zone): Low-efficiency range
BEV Mode —Illuminates when the electric motor is powering the vehicle.
CReady —Illuminates when the hybrid system is operational. Even if the
engine is off, the vehicle can be driven.
DState of Charge (SOC) —Displays the hybrid battery charge status.
Plug-In Hybrid Modes
To change the Plug-In Hybrid Mode, press the EV/HEV button E; switch
between Electric (EV) mode and Hybrid (HEV) mode each time button
is pressed. The LCD on the Instrument Cluster will display the following
messages:
•EV Electric Mode - Charge Depleting: The high-voltage
(hybrid) battery is used to drive the vehicle.
•HEV Hybrid mode - Charge Sustaining: The high-voltage (hybrid)
battery and gasoline engine used to drive the vehicle.
220
20020
20 120
140
40 100
60 80
18040
16060
14080
120100
E
F
A
B
D
C
REMINDER: Avoid starting or driving the vehicle when the fuel tank is empty.
As the engine will be incapable of charging the high-voltage hybrid battery,
the battery will lose its charge and may be damaged.
EV
HEV
E
INSTRUMENT CLUSTER
(Type A cluster shown)

7
*IF EQUIPPEDALWAYS CHECK THE OWNER’S MANUAL FOR COMPLETE OPERATING INFORMATION AND SAFETY WARNINGS.
Trip Modes / Trip Computer
The Trip Computer is a driver information system that displays information
related to driving. It appears on the display when the Engine Start/Stop
button is in the ON position.
To cycle through the Trip modes, press the Mode button A.
When in the Trip Computer mode , press the Select/Reset (OK) button
Bto cycle through the screens. When displaying ACCUMULATED INFO or
DRIVE INFO screens, press and hold the OK button Bto reset to zero.
LCD Instrument Cluster Modes*
Press Mode button Ato scroll through different LCD Instrument Cluster
Modes.
Trip Computer Mode: Displays driving information for tripmeter,
fuel economy, MPH, energy flow, etc.
Turn-by-Turn Mode*: Displays the state of the navigation
LKA/DAA/SCC* Mode: Displays the state of the Smart Cruise
Control, Lane Keeping Assist and Driver Attention Alert
Audio Mode*: Displays the state of the A/V System
Service/Master Warning/Door Open Modes: Informs on
upcoming service intervals, tire pressure status, warning
messages related to TPMS, BSD malfunction and when any door
is not securely closed.
User Settings Mode: Change settings of the Driving Assist,
Doors, Lights, Sound, Convenience and Service Interval
Your vehicle’s steering wheel buttons may differ from those in the illustrations.
REMINDERS:
•Appearance of Trip Computer display may differ
as equipped
•All stored driving information (except Odometer and
Range) is reset if the battery is disconnected
INSTRUMENT CLUSTER
ACCUMULATED INFO
•Trip Information
•Average MPG
•Elapsed Time
DRIVE INFO
•Trip Information
•Average MPG
•Elapsed Time
DIGITAL SPEEDOMETER
DRIVING STYLE
ENERGY FLOW
ENGINE TEMPERATURE
Accumulated Info
Trip
Average
Timer
247.5
15.7
17:42
mi
MPG
h
(Buttons located on Steering Wheel – Type A shown)
MODE
RES
CRUISE
CANCEL
OK
SET
MODE
RES
CRUISE
CANCEL
OK
SET
MODE
A
B

NIRO PLUG-IN HYBRID FEATURES & FUNCTIONS GUIDE
8*IF EQUIPPED
Fuel Economy Video
To view a video on your
mobile device, snap this
QR Code or visit the listed
website.
Refer to page 2 for more
information.
QR CODE
www.youtube.com/KiaFeatureVideos
Fuel Economy
There are several factors that contribute to your vehicle’s fuel
economy, including maintenance of your vehicle, driving style,
environmental conditions, vehicle weight and vehicle aerodynamics.
Below are tips on how to help improve fuel economy:
•Keep your vehicle in good condition with regular maintenance
•Don’t let the engine idle longer than necessary
•Drive at a moderate speed, accelerating smoothly and at a
moderate rate
•Keep tires inflated to the recommended pressure
•Travel lightly, without carrying unnecessary weight in your vehicles
•Avoid placing large or heavy items on roof racks
•Avoid hilly, winding or poorly maintained roads
REMINDER: Driving range can vary depending on your vehicle’s fuel tank size,
e.g., 12-gal. vs. 24-gal., even though the MPG may be the same
For more information on Fuel Economy, you can snap the QR Code above to view a video
or refer to the Owner's Manual.
(Actual vehicle's LCD screen may vary)
INSTRUMENT CLUSTER
When the Instrument Cluster LCD screen is in
the Trip Computer mode, the screen displays fuel
economy information related to the driving range
and average fuel economy.
To change modes, go to User Settings in the LCD
Instrument Cluster modes.
Average Fuel Consumption - Calculates
average* fuel consumption from the distance
driven and amount of fuel injected into the
engine / total fuel used.
FUEL ECONOMY
•
Trip Information /
Trip Computer
•
Average MPG
•
Instant MPG
TRIP A/B
•
Tripmeter
•
Average MPH
•
Elapsed Time (E/T)
DIGITAL SPEEDOMETER
DRIVING STYLE
ENERGY FLOW

9
*IF EQUIPPEDALWAYS CHECK THE OWNER’S MANUAL FOR COMPLETE OPERATING INFORMATION AND SAFETY WARNINGS.
Service Mode
To enter Service mode, press the Mode button A,
scroll to Service Mode and press OK button B.
System will display number of miles remaining until
next service is due, as well as type of service.
When service is required, the
following will be displayed:
Service Required
To reset the Service mode
system, press and hold the
OK button Bfor more than
1 second.
To turn Service In OFF,
go to User Settings.
Service Interval Setting
To set the service interval
when in User Settings mode:
•Press the OK button B
up/down and scroll to Service Interval.
Press the OK button Bto enter
•Press the OK button Bup/down and toggle to
ON, then press the OK button Bagain. Then
press the OK button Bto scroll and select the
desired miles or months for your next service
•Press the OK button Bagain to enter
User Settings
To enter the User Settings mode in the LCD Instrument Cluster Modes,
press the Mode button Awhen the vehicle is at a standstill and the
Engine Start/Stop button and select User Settings .
You can navigate the selections on the display by pressing the OK
button Bup/down, and then selecting the item by pressing the
OK button Bagain.
Driving Assist*:
•Lane Keeping Assist System*
•Driver Attention Alert (DAA)*
•Smart Cruise Control
•Forward Collision-Avoidance Assist (FCA) /
AEB (Autonomous Emergency Braking)*
•FCW (Forward Collision Warning)*
•BSD (Blind Spot Detection) with RCTA*
•Coasting Guide*
Door:
•Automatically Lock
•Automatically Unlock
•Two Press Unlock
Service Interval:
•Service Interval ON/OFF
•Set Mileage/Month
Reset
•Choosing reset will restore defaults
for all User Settings menus
Lights:
•One-Touch Turn Signal
•Headlamp Delay
•Welcome Light
Convenience:
•Seat Easy Access*
•Wireless Charging System*
•Wiper/Light Display*
•Gear Pop-Up*
Sound:
•Park Assist System Volume*
Other features:
•Fuel Economy Auto Reset
•Fuel Economy Unit
•Temperature Unit
•Tire Pressure Unit
•Instrument Cluster Layout
•Aux. Battery Saver+
To view a video on your
mobile device, snap these
QR Codes or visit the listed
website.
Refer to page 2 for more
information.
LCD Display Video
LCD Display:
Maintenance Video
QR CODES
www.youtube.com/KiaFeatureVideos
(Buttons located on Steering Wheel – Type B)
MODE
RES
CRUISE
CANCEL
OK
SET
MODE
RES
CRUISE
CANCEL
OK
SET
MODE
A
B
Service in
Off
Service Required
0000 mi.
0000 mi.
INSTRUMENT CLUSTER

NIRO PLUG-IN HYBRID FEATURES & FUNCTIONS GUIDE
10 *IF EQUIPPED
Sport/ECO Modes
The mode can be change Aby moving the shift lever from
D to the left gate and back:
(D) - ECO Mode
(S) - Sport Mode - When shift lever is moved into the
left gate from (D). If shift lever is not moved through the
gears, then the vehicle will shift automatically. Sport
Mode changes the Niro’s shift points and steering feel,
and makes it more fun to drive vs. other hybrid vehicles
The LCD screen Bon the instrument cluster will display the
mode the vehicle is in.
(Located in Instrument Cluster)
B
ECO Mode (Active ECO)
Active ECO helps improve fuel economy by controlling
several vehicle components. When in ECO Mode, it
optimizes drivetrain operations such as engine power and
transmission to help improve fuel economy.
To help improve your fuel economy:
•Drive at a moderate speed, accelerating smoothly and at a
moderate rate
•Keep tires inflated to the recommended pressure
•Be sure the wheels are properly aligned
QUICK TIPS
For more information on Active ECO, refer to your Owner’s Manual or
contact your local dealership.
A
ECOSPORT
A
ECOSport
REMINDER: Steering effort may be slightly increased in Sport mode.
INSTRUMENT CLUSTER

11
*IF EQUIPPEDALWAYS CHECK THE OWNER’S MANUAL FOR COMPLETE OPERATING INFORMATION AND SAFETY WARNINGS.
UVO eco and UVO eco with Navigation* Display
When equipped, UVO eco with Navigation screen also provides information on economical operation and hybrid system modes. To enter the Plug-In Hybrid
display mode, press the PHEV button. Then select one of the menus A- ECO Driving, Energy Information, Charging Settings, Charging Stations, Gas Stations
and EV Range* (UVO eco with Navigation only).
Energy Flow - Displays the current flow of power between the
NIRO's main powertrain components.
ECO Level - The more economically and environmentally-friendly
you drive, the more the ECO Level increases.
Plug-In Hybrid System Home Screen -
Fuel Economy, ECO Driving and Energy Flow
A
Fuel Economy - Displays the average fuel economy
over the duration of a trip.
Energy Information
Feb. 39:31AM
ECO Driving
EV Range Charging
Settings
Charging
Stations
Gas Stations
Feb. 312:26AM
Feb. 312:31AM
Feb. 39:31AM
Idle Mode
Electric
Motor
Battery
l
Average
MPG
15
Now 10 20 30 min.
30
45
--.- MPG
Reset
l
Hybrid Fuel
Economy
l
Electric
Motor Use
ECO Driving
Plug-In Hybrid
ECO Level 4
Fuel Economy HistoryECO Level
kW
5
Now 10 20 30 min.
10
15
Engine
Energy Flow
ECO Driving
Fuel Economy HistoryECO Level Battery Information Energy Flow
EV
Energy Information
Feb. 39:31AM
ECO Driving
EV Range Charging
Settings
Charging
Stations
Gas Stations
Feb. 312:26AM
Feb. 312:31AM
Feb. 39:31AM
Idle Mode
Electric
Motor
Battery
l
Average
MPG
15
Now 10 20 30 min.
30
45
--.- MPG
Reset
l
Hybrid Fuel
Economy
l
Electric
Motor Use
ECO DrivingPlug-In Hybrid
ECO Level 4
Fuel Economy HistoryECO Level
kW
5
Now 10 20 30 min.
10
15
Engine
Energy Flow
ECO Driving
Fuel Economy HistoryECO Level
Battery Information Energy Flow
EV
Energy Information
Feb. 39:31AM
ECO Driving
EV Range Charging
Settings
Charging
Stations
Gas Stations
Feb. 312:26AM
Feb. 312:31AM
Feb. 39:31AM
Idle Mode
Electric
Motor
Battery
l
Average
MPG
15
Now 10 20 30 min.
30
45
--.- MPG
Reset
l
Hybrid Fuel
Economy
l
Electric
Motor Use
ECO Driving
Plug-In Hybrid
ECO Level 4
Fuel Economy HistoryECO Level
kW
5
Now 10 20 30 min.
10
15
Engine
Energy Flow
ECO Driving
Fuel Economy HistoryECO Level Battery Information Energy Flow
EV
The images shown are for
illustration purposes only. Not
all available displays are shown.
Screens may vary.
PLUG-IN HYBRID SYSTEM

NIRO PLUG-IN HYBRID FEATURES & FUNCTIONS GUIDE
12 *IF EQUIPPED
Instrument Cluster - Energy Flow
The instrument cluster LCD screen displays the following plug-in hybrid system modes to inform the driver of its
status. To change modes, go to User Settings in the LCD Instrument Cluster modes.
EV Propulsion - The electric motor is moving
the vehicle.
Engine-Only Propulsion - The engine is moving
your vehicle.
Power Assist - Both the electric motor AND the
engine are moving the vehicle.
Engine Generation - While the vehicle is stopped,
the engine is charging the hybrid battery.
PLUG-IN HYBRID SYSTEM

13
*IF EQUIPPEDALWAYS CHECK THE OWNER’S MANUAL FOR COMPLETE OPERATING INFORMATION AND SAFETY WARNINGS.
Instrument Cluster - Energy Flow
The instrument cluster LCD screen displays the following plug-in hybrid system modes to inform the driver of its
status. To change modes, go to User Settings in the LCD Instrument Cluster modes.
Vehicle Stop - The vehicle’s hybrid system is
standing by.
Engine Generation/Regeneration - The engine
and the regenerative braking system are both
recharging the hybrid battery.
PLUG-IN HYBRID SYSTEM
Power Reserve - While the engine powers the
vehicle, it is also recharging the hybrid battery.
Engine Brake/Regeneration - The regenerative
braking system is recharging the hybrid battery.

NIRO PLUG-IN HYBRID FEATURES & FUNCTIONS GUIDE
14 *IF EQUIPPED
PLUG-IN HYBRID SYSTEM
B
A
C
D
E
Charging the Plug-In Hybrid Vehicle
Level 1 Charging – “Trickle” Charge
A Level 1 or “trickle” charger is the most common type of charging system for a Plug-In Hybrid. This type of
charger uses 110 volts of household electricity and takes up to 9 hours for a full charge.
Trickle Charger Indicators:
AICCB – In-Cable Control Box
BPower – Indicates that the charger is plugged in
and functioning.
CCharge – Indicates that the vehicle is charging.
DFault – Indicates charge failure.
ECharge Level – Indicates the level of charge -
L (8A), M (10A), or H (12A)
REMINDER: Do not use an extension cord. Plug Trickle charger directly into wall socket. Do not charge to a receptacle that is old,
damaged, corroded or cracked.
Level 2 Charging – “Normal” Charge
A Level 2 or “normal” 240-volt charger is the recommended charging system for your Optima Plug-In Hybrid.
This type of charger uses 240 volts of electricity and takes approximately 2.5-3 hours for a full charge
(Based on Kia Motors Corporation testing with SAE J1772 charger performed at 3.3kW). This charger
can be installed at your home or found at a public charging station.
REMINDER: Shape of charger and how to use the charger may be different for each manufacturer.
Please see Owner’s Manual for more information.
A Level 2 or “normal” 240-volt charger is recommended for regular charging of the vehicle.
QUICK TIP
REMINDER: For more detail and/or subsequent steps in charging your vehicle, please see the Owner's Manual.
POWER
CHARGE
FAULT
!
LEVEL
L M H

15
*IF EQUIPPEDALWAYS CHECK THE OWNER’S MANUAL FOR COMPLETE OPERATING INFORMATION AND SAFETY WARNINGS.
PLUG-IN HYBRID SYSTEM
F
G
POWER
CHARGE
FAULT
E
REMINDER: For more detail and/or subsequent steps in charging your vehicle, please see
the Owner’s Manual.
Charging the Plug-In Hybrid Vehicle (Continued)
To charge the Optima Plug-In Hybrid vehicle using a normal/trickle charger:
1. Connect the ICCB Aplug to an electrical outlet
2. Check if the power light (green) Bon the ICCB turns on
3. Press the brake pedal and engage the parking brake
4. Turn off all switches, put the shift lever in P (Park), and turn off
the vehicle
5. Open the charging door Eby pressing the charging door
(Ensure doors are unlocked).
6. Remove any dust on the charging connector and charging inlet F.
7. Hold the charging connector handle Gand connect it to the vehicle’s trickle
charging inlet Fby pushing the connector until you hear a “clicking” sound
8. Charging begins automatically (Ensure the charge indicator light is
illuminated on your instrument cluster, indicating the vehicle is charging)
Checking the Charging Status
The charging status can be checked by viewing the charging status indicator
on the dash panel. The lights will progressively become lit as the vehicle
approaches a full charge.
After charging has started, the estimated charging time is displayed on the
Instrument Cluster LCD Hfor about 1 minute. It is also displayed, when the
driver’s door is opened with charging in progress.
Remaining charge time
6h 14m
50%
H

NIRO PLUG-IN HYBRID FEATURES & FUNCTIONS GUIDE
16 *IF EQUIPPED
AUTO OFF
(Buttons are located left
of the Steering Wheel)
A B
PLUG-IN HYBRID SYSTEM
Charging Connector Auto/Lock Mode Scheduled Charging
Charging times can be set using the UVO eco with Navigation* settings
when in EV Mode. You can also use the Scheduled Charging* App on your
smartphone.
Charging with the UVO eco Smartphone App:
The UVO eco smartphone app can help you find the nearest charging station,
displays charging-status and the Scheduled Charging information. On your
Smartphone, go to an app store or marketplace to download the UVO eco
Smartphone app.
REMINDER: When Scheduled Charging is set and the charger is plugged in, charging ofthe
electric vehicle will not begin until the time and date set.
Deactivate Scheduled Charging - Depress the Deactivate Scheduled
Charging button Bto disable the scheduled charging feature when
immediate charging isrequired.
The Charging Connector can be set to be locked or unlocked while in the
charging inlet. Press the AUTO button A(LED lit) for the connector to
lock while charging and unlock automatically when charging is complete.
When the AUTO button Ais not pressed (LED not lit), the mode will
be set to LOCK. The connector will be locked when charging and remain
locked until all doors are unlocked.
REMINDER: For more detail and/or subsequent steps in charging your vehicle, please see the
Owner’s Manual.
When you press the Deactivate Scheduled Charging button for immediate charging,
the scheduled charge setting is not completely deactivated. If you need to completely
deactivate the scheduled charge setting, use the Plug-In Hybrid menu or UVO eco*.
QUICK TIP
• If charging connector unlocks but charging cable is not disconnected within 10
seconds, the connector will be automatically locked again.
• If charging connector is unlocked but all doors are locked again, immediately,
the connector will be automatically locked again.
QUICK TIPS

17
*IF EQUIPPEDALWAYS CHECK THE OWNER’S MANUAL FOR COMPLETE OPERATING INFORMATION AND SAFETY WARNINGS.
Blind-Spot Collision Warning (BCW)*
The BCW system uses radar sensors to help alert the driver before changing
lanes. The light on the BSD button Awill illuminate when turned ON. The
outside rearview mirror warning lights will also illuminate for 3 seconds.
The system will become active when the vehicle is traveling more than
approximately 18 mph and will alert the driver if another vehicle is detected
by the radar sensor.
Blind-Spot Collision Warning / Lane Change Assist
1st-stage alert: When another vehicle is detected within the BCW boundary B, or
when a vehicle is detected with the LCA boundary Capproaches at a high speed,
a yellow indicator will illuminate on the outside rearview mirrors.
2nd-stage alert: When 1st-stage alert is on and the driver activates a turn signal,
a flashing yellow indicator will illuminate on the outside rearview mirrors and the
system will sound an alert.
RCTA (Rear Cross Traffic Alert)
If the RCTA system sensors detect approaching vehicles from the left or right
side D, the system will sound an audible alert, the warning indicators on the
outside rearview mirror will illuminate and a message will appear on the LCD
screen, with these conditions:
•When gear shift is in Reverse
•When the vehicle is moving less than 6 mph
REMINDERS:
•The BCW system will not show a warning if the vehicle speed is only 6 mph
above the surrounding vehicles
•If the BCW is turned ON and the ignition is cycled, the BCW system returns to ON
•The RCTA feature can be turned OFF/ON in User Settings
For more information on the Blind-Spot Collision Warning*, please refer to the Owner’s Manual.
Blind Spot Detection
w/RCTA Video
To view a video on your
mobile device, snap this
QR Code or visit the listed
website.
Refer to page 2 for more
information.
QR CODE
B
C
D
REMINDER: The above images are for
illustration purposes only and may not reflect
actual operation.
AUTO OFF
A
www.youtube.com/KiaFeatureVideos
(Buttons are located left
of the Steering Wheel)
DRIVER'S PANEL

NIRO PLUG-IN HYBRID FEATURES & FUNCTIONS GUIDE
18 *IF EQUIPPED
(Located left of
Steering Wheel)
Lane Keeping Assist
Lane Keeping Assist
Lane Keeping Assist
Lane Keeping Assist
Lane Keeping Assist
Lane Keeping Assist
Lane Keeping Assist
Lane Keeping Assist
DRIVER'S PANEL
Lane Keeping Assist (LKA)
With the Engine Start/Stop button in the ON position, press the LKA button Ato turn
system ON. The instrument cluster indicator will illuminate.
If the LKA detects that you are veering outside of your
lane, the system may issue a warning on the LCD screen
and an alert may sound, while applying a slight adjustment
to the steering, trying to prevent the vehicle from moving
outside its lane.
Standard LKA is the operating mode by default when
the button is depressed to ON. To switch to Active LKA
mode, go to User Settings in the Instrument Cluster.
All systems will operate under the following conditions:
•The vehicle exceeds approximately 40 mph
•The LKA system recognizes the lane the vehicle is traveling in
REMINDERS:
• LKA will not issue a warning if the turn signal or hazard signal is activated.
• LKA will stay on when the ignition is cycled
The LKA is not substitutes for safe and proper driving. Always drive safely
and use caution. LKA may not always alert the driver if the vehicle is driven
outside of its lane.
Forward Collision-Avoidance Assist (FCA) / Forward Collision Warning (FCW)
The FCA helps to alert the driver when rapidly approaching a vehicle that is slowing down, braking or stopped B.
A warning message will appear on the LCD screen and a chime will sound. The FCA/FCM will become active
when the vehicle is traveling more than 5 mph.
Select alert settings (Early, Normal, Late) in the
User Settings in the instrument cluster LCD
display. To turn the FCA/FCW off, go to User
Settings in the LCD Instrument Cluster modes.
When the LKA sensor detects the lane
traveling in, both lanes are illuminated
When the LKA sensor does not detect the
lane traveling in the lanes are not illuminated
When the LKA sensor detects the vehicle veering outside of the lane traveling in, a yellow
indicator will illuminate either on the left or right lane (shown in both images above)
B
Lane Keeping Assist
Lane Keeping Assist
Lane Keeping Assist
Lane Keeping Assist
Lane Keeping Assist
Lane Keeping Assist
Lane Keeping Assist
Lane Keeping Assist
AUTO OFF
A
The Forward Collision-Avoidance Assist (FCA) / Forward Collision
Warning (FCW)* are not substitutes for safe and proper driving.
Always drive safely and use caution. FCA/FCW may not always
alert the driver when the vehicle is approaching another vehicle.
REMINDERS:
• The FCA will be activated by default when vehicle
power is cycled on, even when previously set to off
• The FCW will not operate when the vehicle is
traveling more than approximately 50 mph
Lane Keeping Assist
Video
To view a video on your
mobile device, snap this
QR Code or visit the listed
website.
Refer to page 2 for more
information.
QR CODE
www.youtube.com/KiaFeatureVideos
Table of contents
Other Kia Automobile manuals

Kia
Kia Sportage Parts list manual

Kia
Kia Spectra User manual

Kia
Kia Optima 2020 Assembly instructions

Kia
Kia Sorento Parts list manual

Kia
Kia CADENZA 2017 Parts list manual

Kia
Kia EV9 User manual

Kia
Kia sedona 2015 Parts list manual

Kia
Kia Rio 2021 Assembly instructions

Kia
Kia EV6 2022 User manual

Kia
Kia Carnival MPV 2023 User manual