Kia Sportage HEV 2024 Assembly instructions

The 2024 Kia Sportage HEV/PHEV.
Voice Recognition1 and Bluetooth®2
Using Voice Recognition
Improve Bluetooth® Voice Recognition (VR) performance
by making a few simple changes to your phone contacts:
• Use full names (first and last names) vs. short or single-
syllable names (“John Smith” vs. “Dad,” “Smith Residence”
vs. “Home”).
• Avoid using special characters, emojis, and hyphenated
names (@, &, #, /, -, *, +, etc.).
• Avoid using acronyms (“Emergency” vs. “ICE” or “In Case
of Emergency”) or words with all capital letters.
• Spell words completely; system will not recognize
abbreviations (“Doctor Smith” vs. “Dr. Smith”).
• Always wait for the beep before speaking any commands.
• When using VR to place a call, speak in a natural, moderate
tone, with clear pronunciation. The system may have trouble
recognizing commands if you speak too softly or too loudly.
• Open windows, sunroof, weather (wind/rain), or an A/C fan
operating at higher speeds can interfere with VR accuracy.
• Your VR system may have difficulty understanding some
accents or uncommon names.
• Press the talk button and say “Help” to get a list of available
commands.
Pairing or Connecting Your Phone with Bluetooth®
• Select “Device Connections” in the infotainment system
display1 or “Call” button on the steering wheel to begin the
pairing process if no phone has previously been paired.
• During the pairing process, please make sure you accept
all requests for phonebook download and future auto-
connection on your phone.
• To pair a second phone or subsequent phones, reference
the manuals and guides supplied with your Sportage as
steps vary by infotainment system.
• If you experience any issues with auto-connection,
try the following:
• Reboot your phone (turn the phone off and then on).
• Update the phone operating system to the most recently
released version.
• Delete the phone from the list of Bluetooth® devices
on the infotainment system display and delete Kia
device from the list of Bluetooth® devices on your
phone, and re-pair.
• Ensure the phone has the Bluetooth® feature activated.
• If some contacts are not downloading to the infotainment
system display, check to confirm that the contact has
been entered correctly and that it has been stored under
the categories (HOME, MOBILE, WORK, iPhone®3) that are
supported by the infotainment system display. Some contact
categories (MAIN, PAGER, OTHER) may not be supported. If
the number of contacts exceeds the maximum number allowed
on the infotainment system display, contacts will be partially
downloaded. Ensure that only the “phone contact list” is
selected for contact download on your phone (not social media
or email contact lists as these contacts may not download to
the infotainment system display).
• Phone operating systems change frequently and some phones
may have varying compatibility levels with the Bluetooth®
system. For any questions regarding the features of your
vehicle, please contact your preferred Kia dealer or contact
Kia Consumer Assistance at 1-800-333-4542.
Other Bluetooth® Tips
• Bluetooth® reception is affected by carrier coverage and is
dependent on the phone.
• If streaming audio through Bluetooth® from a device, ensure
the listening volume on the device is turned up.
Smartphone Connectivity1
Apple CarPlay®3
Your vehicle offers you command of your compatible iPhone® when you connect through Apple CarPlay® on your
infotainment system display. This will enable you to make calls, send hands-free texts, access many of your favorite
apps and music, and get navigation help with Siri® voice control.
To connect Apple CarPlay, visit https://youtu.be/98TNWMOQfdU
Android AutoTM4
Your vehicle allows you to connect to your compatible AndroidTM phone via Android AutoTM on your infotainment
system display. Through this feature, you can access music, your phone’s dialer, navigation help, and more with an
intuitive interface and voice commands. You can even access your phone through your steering wheel controls.
To connect Android Auto, visit https://youtu.be/sTR4KotSOzU
For select models equipped with wireless Apple CarPlay and Android Auto, visit https://youtu.be/oUXXuAZAOEI
Kia Access App*5
• Your cell phone and your vehicle have to be connected to a cellular network with a good wireless signal strength
in order to use Kia Connect (formerly UVO link). If these conditions are not met, remote commands may not
execute or may take longer to execute.
• To use Remote Start or Remote Start with Climate Control feature, all doors, hood and trunk/liftgate must be
closed and locked. Remote Start or Remote Start with Climate Control feature will operate for 10 minutes, and
then the vehicle shuts off automatically.6
• Activate Remote Start or Remote Start with Climate Control feature a few minutes before you plan to get into the
vehicle. This will allow vehicle interior to reach a desired temperature.
• The quickest way to obtain an accurate vehicle status is by pressing the refresh icon on your app or customer
web portal.
• In order to help preserve vehicle battery, Kia Connect will not work seven days after the ignition was last turned on.
You will need to re-start your vehicle with a key fob in order to use Kia Connect again.
Vehicle Feature Tips
Many of the Tips presented below are covered in greater detail in the
Owner’s Manual, Multimedia System Manuals, Features and Functions
Guide, and Quick-Start Guide hangtag supplied with your new vehicle.
Feature Videos
To view a video on your mobile device, snap this QR Code or visit the listed website:
https://www.youtube.com/KiaFeatureVideos

Charging Your Plug-In Hybrid*
To charge the Plug-In Hybrid vehicle using an AC charger:
1. Ensure Scheduled Charging is not set on the infotainment system or the Kia Access App.5
2. Press the brake pedal and engage the parking brake.
3. Turn OFF all switches, put the shift lever in P (Park), and turn OFF the vehicle.
4. With vehicle unlocked, press the rear center edge of the charging door A to open.
5. Remove any dust or water on the charging connector and charging inlet B.
6. Remove the charging inlet cover C.
7. Press the charging connector handle D to the charging inlet B until you hear a clicking sound.
8. Charging will begin automatically. (Ensure the charging indicator E is illuminated.)
Checking the Charging Status:
Blinking YELLOW indicates currently charging between 0-65%. Blinking GREEN indicates currently
charging between 65-100%. Blinking RED indicates an error while trying to charge. The indicator
will turn OFF within 5 seconds of charging completion.
Smart Cruise Control (SCC) with Stop and Go*7 and
Navigation-Based Smart Cruise Control (NSCC)*8
SCC is designed to detect a vehicle ahead and help maintain the set speed and the distance
from the vehicle ahead. With SCC ON and activated, and the vehicle distance set, when SCC
detects a vehicle slowing or stopping, it can bring the vehicle to a complete stop. When the
vehicle ahead starts to move forward, SCC re-engages. If the vehicle ahead stops for more
than 3 seconds, SCC must be re-engaged by depressing the accelerator pedal or operating
the [+] or [-] switch A.
To engage SCC and set/adjust the speed:
• Press the Driving Assist button B to turn the system ON and set to the current speed. The
CRUISE indicator, set speed, and vehicle distance will illuminate on the Instrument Cluster.
• Increase the set speed by pressing the [+] switch A up.
• Decrease the set speed by pressing the [-] switch A down.
To pause or resume SCC operation: Press the Pause/Resume button A. The SCC indicator on
the Instrument Cluster will turn OFF.
To set the vehicle-to-vehicle distance: Press the Vehicle Distance button C on the steering
wheel. The image on the LCD screen D will change when scrolling through the settings.
To turn SCC system OFF: Press the Driving Assist button B.
NSCC can automatically adjust the SCC’s set vehicle speed according to speed limits and known
curves on limited-/controlled-access highways using information from the navigation system.
To enable NSCC: Go to Vehicle Settings in the infotainment system, select Driver Assistance >
Driving Convenience > Highway Auto Speed Change.
When SCC is on and operating, and the vehicle is driving on limited-/controlled-access highways,
NSCC will be indicated by the illuminated WHITE NAV icon E on the Instrument Cluster. If SCC is
set to the current speed limit on the highway during NSCC operation, the set speed is changed
automatically whenever the speed limit changes.
Reminders:
• NSCC requires an active Kia Connect subscription.5
• NSCC is only available on limited-/controlled-access roads and highways.
Lane Keeping Assist (LKA)7 and Lane Following Assist (LFA)7
LKA is designed to detect lane markings (or road edges) and can warn the driver if the vehicle
leaves the lane without using the turn signal and can assist with steering to prevent the vehicle
departing from its travel lane. LFA is designed to help ensure that the vehicle stays centered in
its lane A by monitoring the detected lane markings ahead and vehicles on the road, and may
provide steering inputs.
To enable LKA and/or LFA: Go to User Settings in the Instrument Cluster LCD, OR press
and hold the Mode button B on the right side of the steering wheel, OR press the SETUP key/
button on the infotainment system. Select the VEHICLE button to enter the Vehicle Settings,
then Driver Assistance > Lane Safety.
Once enabled, press and hold the Lane Safety Button C to turn LKA ON or OFF. When on, the
Lane Safety icon on the Instrument Cluster will illuminate WHITE while the system does not
detect the lane markers. When the system detects the lane markers and can assist the steering,
the icon will turn GREEN D.
To set/adjust Volume and Priority: Go to Vehicle Settings* in the infotainment system or User
Settings in the Instrument Cluster display and in Driver Assistance, press Warning Methods and
adjust the Warning Volume.
LKA will operate only when the vehicle speed exceeds approximately 40 mph, LKA recognizes
the lane the vehicle is traveling in, and the vehicle is between the lane markers.
LFA will operate only when LFA recognizes both sides of the lane markers the vehicle is traveling
in and the vehicle is traveling slower than 90 mph.
Forward Collision-Avoidance Assist (FCA)7
FCA is designed to warn the driver when a collision with a vehicle, pedestrian, or cyclist in the
roadway is imminent and, if necessary, temporarily apply emergency braking.
Initially, FCA provides a Forward Collision Warning (FCW) when it detects a potential collision
with a vehicle, pedestrian, or cyclist in front by emitting an audible warning and visual alert on
the Instrument Cluster A. If the system detects that the collision risk has increased, FCA can
automatically apply the brakes to reduce your speed, potentially helping to reduce the effects
of a possible collision. Junction Turning function* B may apply emergency braking to help
avoid a collision with an oncoming vehicle detected in an adjacent lane when turning left at
a crossroad with the turn signal on.
To enable/disable FCA: Go to User Settings, select the VEHICLE button > Driver Assistance >
Forward Safety.
To adjust the FCA initial warning activation time: Press the SETUP key/button on the
infotainment system. Select the VEHICLE button to enter the Vehicle Settings* > Driver
Assistance > Warning Timing > Standard or Late, depending on your preference.
FCA/FCW will operate only when: The Ignition is ON or the Power button* is ON, the vehicle
is traveling faster than 3 mph, and Electronic Stability Control (ESC) is ON.
Smart-Power Liftgate*9
When the Smart Key is on your person and you are within close proximity to the back of the vehicle, the hazard lights will blink and
a chime will sound for about 3 seconds as an alert that the Smart Power Liftgate is about to open. Then the alert system will blink
and chime 2 additional times before opening the Smart Power Liftgate.
To enable the Smart Power Liftgate: Go to Vehicle Settings OR press the SETUP key/button on the infotainment system, select
VEHICLE > Door > Smart Liftgate.
Quick Tips: During the Smart Power Liftgate alert, the Smart Power Liftgate can be deactivated with the Smart Key by pressing any
button on the key fob or moving away from the detection area.
OK
.
60
D
OK
.
60
A
C
B
(Buttons located on right side of
steering wheel)
60 MPH
DNAV E
(Displays on LCD screen)
2))
A
A
B
D
C
E
OK
A
D
OK
(Buttons located on right side of
steering wheel)
C
B
.
Collision Warning
Emergency Braking
A
(Junction Turning)
(For illustration purposes only)
B

Scheduled Charging*
Charging time can be set in the Plug-In Hybrid infotainment system, under Charge Management,
or by using the Kia Access App.5
Charging with the Kia Access App:
The Kia Access App can help you find the nearest charging station and displays charging status
and the Scheduled Charging information. On your smartphone, go to an app store or marketplace
to download the Kia Access App.
Reminder: When Scheduled Charging is set and the charger is plugged in, charging will not begin
until the set time and date are met to complete the charging. The GREEN charge indicator A will
temporarily flash ON/OFF to show that Scheduled Charging is set.
To deactivate Scheduled Charging: Depress the Deactivate Scheduled Charging button OFF B to
disable the Scheduled Charging feature when immediate charging is required.
Infotainment System / Climate Control Mode Switch Button*
Press A to toggle between infotainment system and Climate
Control Modes. Press and hold the Climate Control button
to set the default button display mode.
Driver Attention Warning (DAW)10
DAW is designed to alert the driver if it detects inattentive driving practices and,
in certain situations, can give a warning signal to take a break from driving.
To enable/disable DAW: Go to User Settings in the Instrument Cluster, OR press
and hold the Mode button
A on the right side of the steering wheel, OR press
the SETUP key/button on the infotainment system. Select Driver Assistance > Driver
Attention Warning > Inattentive Driving Warning.
If DAW is activated, the DAW information will appear on the Instrument Cluster B
when you select the Assist mode.
Leading Vehicle Departure Alert (LVDA)7
LVDA is a feature of Driver Attention Warning (DAW), and is designed to inform the driver when
it detects that the vehicle ahead starts moving away or departs from a stop.
When DAW is ON and your vehicle is stopped behind another vehicle, the system can detect
when the leading vehicle is driving away, and an alert will sound to let you know you can start
driving. If no action is taken, a message A will appear on the Instrument Cluster.
To enable/disable LVDA: Go to User Settings in the Instrument Cluster, OR press and hold the
Mode button
B on the right side of the steering wheel, OR press the SETUP key/button on
the infotainment system. Select Vehicle Settings > Driver Assistance > Driver Attention Warning >
Leading Vehicle Departure Alert.
To adjust the DAW/LVDA initial warning activation time: Go to Vehicle Settings on the
infotainment system, select SETUP > Driver Assistance > Warning Timing > Standard or Late,
depending on your preference.
Parking Collision-Avoidance Assist-Reverse (PCA-R)*7
PCA-R is designed to detect certain objects/pedestrians behind the vehicle and issues an audible
warning and/or applies emergency braking to help reduce the possibility of a collision when
the vehicle is in reverse. When PCA-R activates, lines appear behind the vehicle image A in the
Instrument Cluster.
To enable/disable PCA-R: Go to User Settings* in the Instrument Cluster, OR press and hold
the Mode button
B on the right side of the steering wheel, OR press the SETUP key/button
to go to Vehicle Settings in the infotainment system. Select Vehicle Settings > Driver Assistance >
Parking Safety.
PCA-R User Settings:
• Rear Active Assist: PCA-R will warn the driver with an audible alert and may apply
temporary braking.
• Rear Warning Only: PCA-R will warn the driver with an audible alert.
• Off: PCA-R is disabled.
To adjust the warning volume: Go to Vehicle Settings on the infotainment system, select SETUP >
Vehicle > Driver Assistance > Warning Volume.
To adjust the warning activation time: Go to Vehicle Settings on the infotainment system,
select SETUP > Vehicle > Driver Assistance > Warning Timing > Standard or Late, depending on
your preference.
Panoramic Sunroof Operation with Power Sunshade*
The sunroof operation is controlled through a multidirectional switch. The ignition or Engine
Start/Stop button needs to be in the ON position to operate the sunroof.
To slide the sunshade and sunroof:
• Auto Open: Slide the switch A backward to the farthest position and release.
• Auto Close: Slide the switch A forward to the farthest position and release.
To slide the power sunshade only:
• Auto Open: Slide the switch A partially backward to the first detent position and release.
• Auto Close: Slide the switch A partially forward to the first detent position and release.
To slide the sunroof (with power sunshade open):
• Open: Slide the switch A backward to the first detent position and release.
• Close: Slide the switch A forward to the first detent position and release to close sunroof glass only. Slide the switch A
backward to the farthest position and release to close sunroof glass and sunshade.
To tilt the sunroof:
• Raise: Push switch A upward.
• Lower: Push switch A forward.
Electronic Parking Brake (EPB)*
The EPB system utilizes an electric motor to engage the parking brake.
To apply the parking brake: Depress the brake pedal and pull up the EPB switch A. Ensure
that the indicator light is illuminated on the Instrument Cluster. If parked on a steep incline/
decline, pull up the EPB switch for more than 3 seconds for a firmer EPB application.
To release the parking brake: The EPB will automatically release when the shifter is placed in
R (Reverse) or D (Drive). To release EPB manually, depress the brake pedal, then press the EPB
switch A, with the ignition switch in the ON position. Ensure that the indicator light is OFF.
MAPNAV SEEK TRACK RADIO MEDIASETUP
PWR
VOL
TUNE
FILE
AUTO
CLIMATE
3
75 °F 76 °F
AUTO
PWR AUTO
CLIMATE
A/C SYNC
MEDIUM
A
A
.
.
.
OK
Hold OK Reset
L ast Break 3:42
Attention Level
Low
.
.
.
OK
Hold OK Reset
L ast Break 3:42
Attention Level
Low
A B
OK
A
B
2))
3$66(1*(5
$,5%$*
A
'
A
(Button located on
Driver’s Panel)
2))
A
B
Leading vehicle
is driving away
2.
A
OK
B

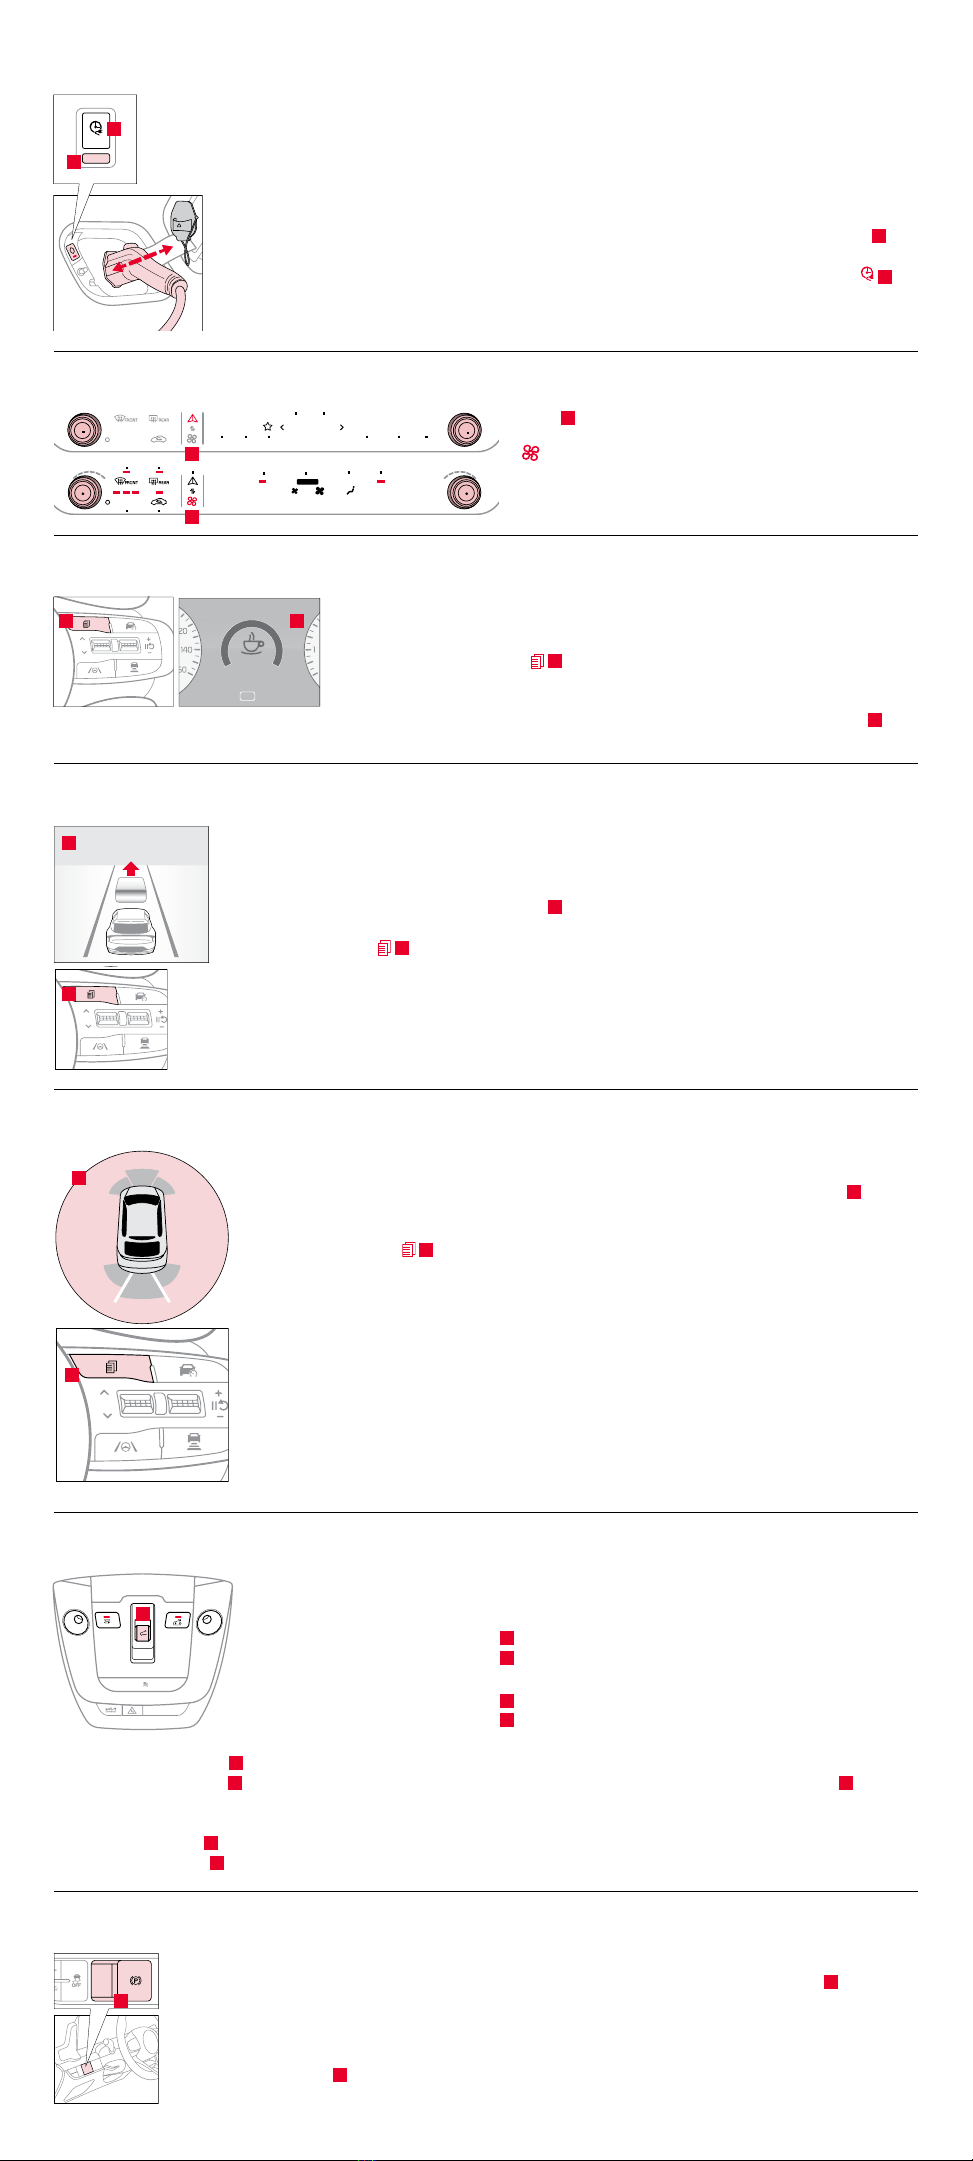
Surround View Monitor (SVM)*1,7
SVM is a parking support system that shows the areas around the front, rear, left, and right sides
of the vehicle, as well as a 3D view of the vehicle via the four cameras that’s displayed onto the
infotainment screen.
To enable/disable SVM Auto On: Press the SETUP key/button on the infotainment system, select
Vehicle Settings > Driver Assistance > Parking Safety.
To manually engage SVM: Press the Parking/View button A.
To change the SVM settings: Press the onscreen settings icon C, while SVM is operating.
To view other modes: Touch the Views icon B on the SVM screen.
Power Outlets, Multimedia USB Port, and USB-C Charger Port
Power Outlets A: Charge mobile phones and other devices designed to operate on a 12V
(180W max.) power outlet.
Multimedia USB Port B: Access media and other files on smart devices or USB sticks.
USB-C Charger Port C: Charge mobile phones and other devices using a USB-C cable. The Engine
Start/Stop button needs to be in the ACC/ON/START position to operate the USB-C Charger Port.
Wireless Smartphone Charging System11
Charge a compatible smartphone wirelessly by placing it on the charging pad A at the front of
the console, near the Multimedia USB ports and the charging indicator.
To enable Wireless Charging: Go to User Settings in the Instrument Cluster or Vehicle Settings
in the infotainment system. Then select Convenience > Wireless Charging System.
The indicator light B may change to AMBER once wireless charging begins, then to GREEN once
charging is complete.
For wireless charging to occur: All doors (excluding the Liftgate) must be closed, the Smart Key
must be detected inside the vehicle, and the Engine Start/Stop button needs to be in the ACC/
ON/START position.
Blind-Spot View Monitor (BVM)*12
BVM is designed to display the vehicle’s rear and side blind spot areas in the Instrument Cluster A.
To enable/disable BVM: Go to User Settings in the Instrument Cluster, OR press and hold the
Mode button B on the right side of the steering wheel to go to Vehicle Settings, OR press the
SETUP key/button on the infotainment system, select Vehicle Settings > Driver Assistance > Blind-
Spot Safety > Blind-Spot View Monitor.
When operating the turn signal, BVM displays video of the blind-spot view for the direction indicated.
BVM will not operate when the Power button is OFF, a turn signal is deactivated, or another
warning screen comes up on the Instrument Cluster.
Energy Flow Instrument Cluster Screens
The Instrument Cluster screen displays the following Hybrid/Plug-In system modes to inform the driver of its status. To change modes,
go to User Settings in the Instrument Cluster.
(Button located
below gear shift)
$872
+2/'
OFF
'
5
,
9
(
0
2
'
(
A
B
C
12V
180W
USB
A
B
C
12V
180W
USB
A
B
EV Propulsion: The electric motor is moving
the vehicle.
Power Reserve: While the engine powers the vehicle,
it is also recharging the Hybrid/Plug-In battery.
Engine-Only Propulsion: The engine is moving
the vehicle.
Engine Brake/Regeneration: The regenerative
braking system is recharging the Hybrid/
Plug-In battery.
Power Assist: Both the electric motor AND the
engine are moving the vehicle.
Vehicle Stop: The vehicle’s Hybrid/Plug-In system
is standing by.
Engine Generation: While the vehicle is stopped,
the engine is charging the Hybrid/Plug-In battery.
Engine Generation/Regeneration: The engine and
the braking system are both recharging the Hybrid/
Plug-In battery.
Electric Mode ChargingEngine Mode Charging
Hybrid Mode Idle ModeCharging Charging
OK
A
(Buttons located on right
side of steering wheel)
OK
B
2024 Sportage Turbo-Hybrid EX shown on cover. Images or graphics for illustration only. *If equipped. 1Driving while distracted can result in a loss of vehicle control that may lead to an accident,
severe personal injury, and death. The driver’s primary responsibility is in the safe and legal operation of a vehicle. Remain attentive to driving and be cautious when using steering wheel-
mounted controls while driving. Use of any handheld devices, other equipment, or vehicle systems that take the driver’s eyes, attention, and focus away from the safe operation of a vehicle or
which are not permissible by law should never be used during the operation of the vehicle. 2The Bluetooth® word mark and logos are registered trademarks owned by Bluetooth SIG, Inc. and
any use of such marks by Kia is under license. A Bluetooth® enabled cell phone is required to use Bluetooth® Wireless Technology. 3Apple CarPlay, iPhone, and Siri are registered trademarks of
Apple Inc., registered in the U.S. and other countries. CarPlay runs on your smartphone cellular data service. Normal data rates will apply. 4Android Auto vehicle user interface is a product of
Google and its terms and privacy statements apply. Requires the Android Auto app on Google PlayTM store and an Android compatible smartphone running Android 5.0 Lollipop or higher. Data
plan rates apply. Android, Android Auto, and Google Play are trademarks of Google LLC or its affiliates. 5Purchase/lease of certain 2024 and newer Kia vehicles with Kia Connect (formerly known
as UVO link) includes a complimentary 1-year subscription to Kia Connect Ultimate, our most comprehensive Kia Connect package, starting from the new vehicle retail sale/lease date as recorded
by the dealer. After your complimentary 1-year Kia Connect Ultimate subscription expires, continued access to the full suite of Kia Connect features available on your Kia will require a paid
subscription at the then-current subscription rate or your use of certain Kia Connect features may immediately terminate. Use of Kia Connect is subject to agreement to the Kia Connect Privacy
Policy and Terms of Service. Complimentary Kia Connect subscriptions are transferable to subsequent owners during the original Kia Connect service term. Only use Kia Connect when safe to
do so. Kia Access App is available from the Apple® App Store® or Google Play.TM Kia America, Inc. reserves the right to change or discontinue Kia Connect at any time without prior notification or
incurring any future obligation. Message and data rates may apply. Cellular and GPS coverage is required to use most features. Kia Connect features may vary by model, model year, and trim
level. Features, specifications, and fees are subject to change. Kia Connect is currently unavailable for Model Year 2022 and newer vehicles sold in Massachusetts; please see the Kia Owners
Portal for updates on availability. For more on details and limitations, visit www.kia.com or your authorized Kia dealer. Apple and App Store are registered trademarks of Apple Inc. Google and
logos are trademarks of Google, LLC. 6Do not use remote climate control or remote start if vehicle is in an enclosed area (e.g., closed garage) or a partially enclosed area without ventilation. Close
all doors leading from adjacent living areas to the vehicle area before executing a remote climate control or remote start command. 7Driver-assist technologies are not substitutes for safe driving,
and may not detect all objects surrounding vehicle. Always drive safely and use caution. 8When engaged, Navigation-Based Smart Cruise Control (NSCC) is not a substitute for safe driving and
cruise-control procedures. This is not an auto-pilot feature. It may not detect every object around the vehicle. Always drive safely and use caution. 9Driving with the liftgate open may be unlawful
and can draw dangerous exhaust fumes into your vehicle; if you choose to do so, keep air vents and all windows open for proper ventilation. 10When engaged, Driver Attention Warning is not
a substitute for safe driving and may not detect all instances of inattentive driving practices. Failure to pay attention to travel conditions and vehicle operation could result in loss of vehicle
control. Always drive safely and use caution. 11Charging system only works with select devices. Refer to the vehicle’s Owner’s Manual for warnings and instructions. 12When engaged, Blind-Spot
View Monitor is not a substitute for safe driving and may not display all objects around vehicle. Always drive safely and use caution. 132023 Kia EV6 GT-Line, 2024 K5 GT, 2023 Sportage Plug-in
Hybrid X-Line, and 2023 Telluride SX X-Pro shown with optional features. Not all optional features available on all trims. Some features may vary. Kia received the fewest reported problems
among mass market brands in the J.D. Power 2021-2023 U.S. Vehicle Dependability Study. 2023 Study based on 2020 models. See jdpower.com/awards for 2023 details.
©2023 Kia America, Inc., 111 Peters Canyon Road, Irvine, CA 92606
#1 for Long-Term Dependability
among Mass Market Brands for 3 Years in a Row (2021-2023)13
This manual suits for next models
1
Table of contents
Other Kia Automobile manuals