KICK ASS KAF-75DZ User manual

Please read all instructions and the safety section carefully
®
before using your new KickAss refrigerator.
V2.5
FRIDGE / FREEZER
OPERATION MANUAL
KAF-75DZ

- - - - - - - - - - - - - - - - - - - - - - - - - - - - - - - - - - - - - - - -
- - - - - - - - - - - - - - - - - - - - - - - - - - - - - - - - - - - - - - - -
- - - - - - - - - - - - - - - - - - - - - - - - - - - - - - - - - - - - - - - -
- - - - - - - - - - - - - - - - - - - - - - - - - - - - - - - - - - - - - - - -
- - - - - - - - - - - - - - - - - - - - - - - - - - - - - - - - - - - - - - - -
- - - - - - - - - - - - - - - - - - - - - - - - - - - - - - - - - - - - - - - -
- - - - - - - - - - - - - - - - - - - - - - - - - - - - - - - - - - - - - - - - - - - -
- - - - - - - - - - - - - - - - - - - - - - - - - - - - - - - - - - - - - - - -
- - - - - - - - - - - - - - - - - - - - - - - - - - - - - - - - - - - - - - - -
- - - - - - - - - - - - - - - - - - - - - - - - - - - - - - - - - - - - - - - -
- - - - - - - - - - - - - - - - - - - - - - - - - - - - - - - - - - - - - - - -
- - - - - - - - - - - - - - - - - - - - - - - - - - - - - - - - - - - - - - - -
- - - - - - - - - - - - - - - - - - - - - - - - - - - - - - - - - - - - - - - -
- - - - - - - - - - - - - - - - - - - - - - - - - - - - - - - - - - - - - - - -
- - - - - - - - - - - - - - - - - - - - - - - - - - - - - - - - - - - - - - - -
- - - - - - - - - - - - - - - - - - - - - - - - - - - - - - - - - - - - - - - -
- - - - - - - - - - - - - - - - - - - - - - - - - - - - - - - - - - - - - - - -
- - - - - - - - - - - - - - - - - - - - - - - - - - - - - - - - - - - - - - - -
- - - - - - - - - - - - - - - - - - - - - - - - - - - - - - - - - - - - - - - -
- - - - - - - - - - - - - - - - - - - - - - - - - - - - - - - - - - - - - - - -
- - - - - - - - - - - - - - - - - - - - - - - - - - - - - - - - - - - - - - - -
- - - - - - - - - - - - - - - - - - - - - - - - - - - - - - - - - - - - - - - -
TABLE OF CONTENTS
IntroductionIntroduction
FeaturesFeatures
Important Safety FeaturesImportant Safety Features
Care & Maintenance InstructionsCare & Maintenance Instructions
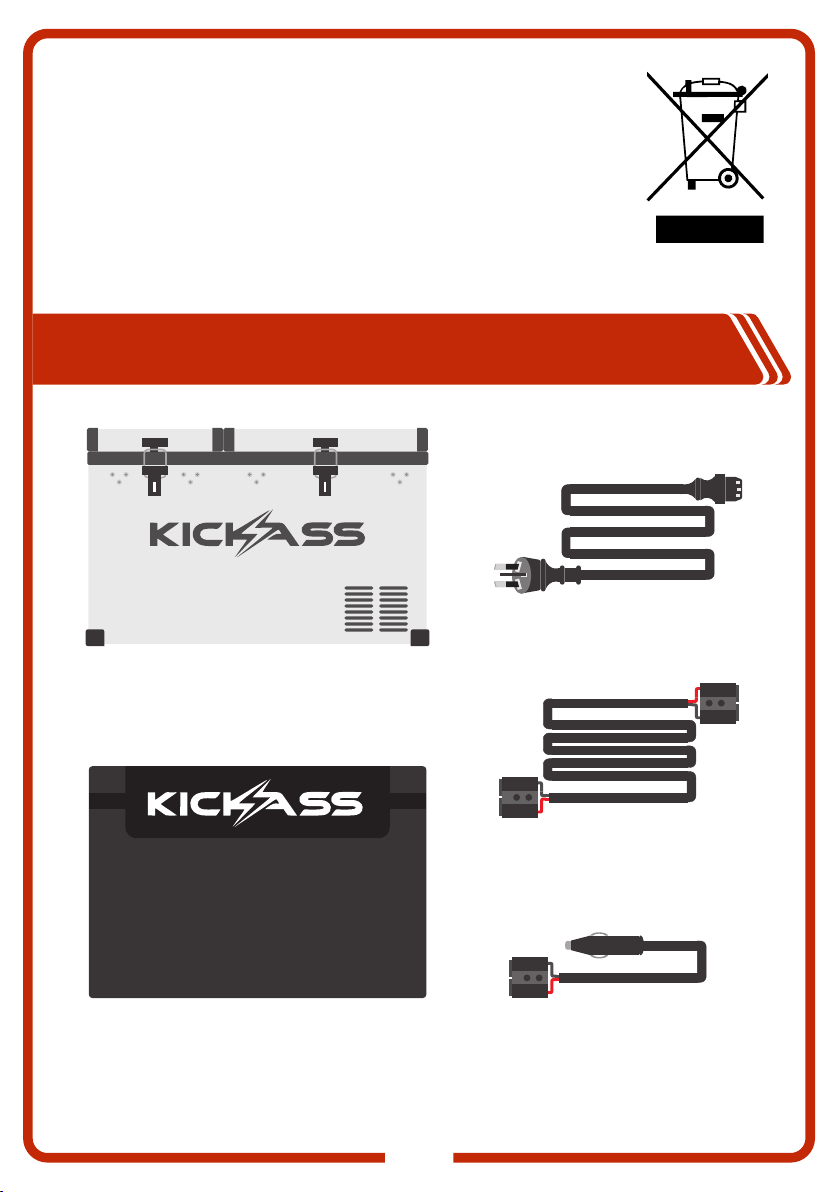
Correct Disposal of this Product Correct Disposal of this Product
Contents of the BoxContents of the Box
SetupSetup
Connecting the Fridge to Power Connecting the Fridge to Power
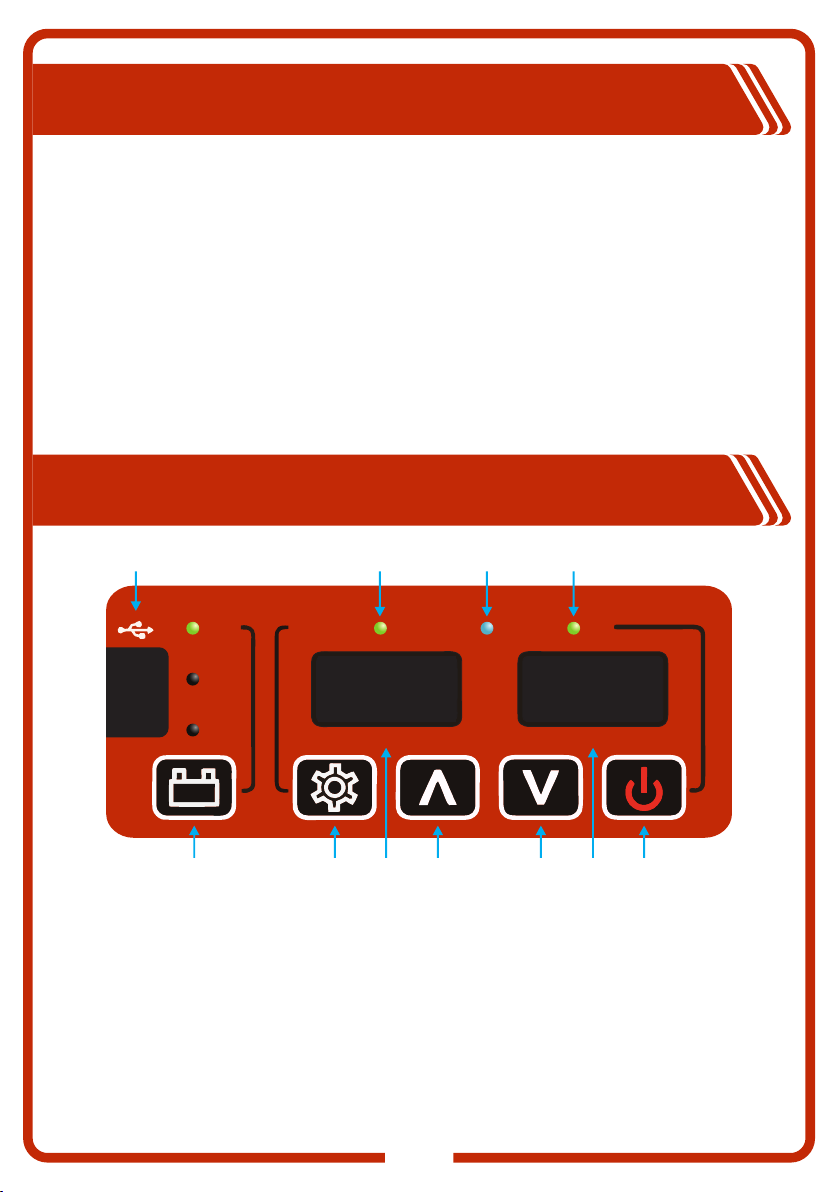
Control PanelControl Panel
Control Panel Lights Control Panel Lights
Low Battery Protection Settings Low Battery Protection Settings
Using the Control Panel Using the Control Panel
BluetoothBluetooth
Bluetooth App Bluetooth App
Connecting to the Fridge Connecting to the Fridge
Using the App Using the App
Troubleshooting the Bluetooth App Troubleshooting the Bluetooth App
Rotating the LidsRotating the Lids
Emergency Override SwitchEmergency Override Switch
TroubleshootingTroubleshooting
Error CodesError Codes
Warranty InformationWarranty Information
Introduction
Features
Important Safety Features
Care & Maintenance Instructions
Correct Disposal of this Product
Contents of the Box
Setup
Connecting the Fridge to Power
Control Panel
Control Panel Lights
Low Battery Protection Settings
Using the Control Panel
Bluetooth
Bluetooth App
Connecting to the Fridge
Using the App
Troubleshooting the Bluetooth App
Rotating the Lids
Emergency Override Switch
Troubleshooting
Error Codes
Warranty Information
1
1
2
2
2
3
4
4
4
4
5
5
6
6
6
6
8
9
11
11
12
13

1
Thank You For Purchasing A
®
KickAss Fridge / Freezer
Digital electronic thermostat with LED temperature display
Bluetooth for remote control and monitoring of the fridge with your smartphone
Reliable refrigeration system using the Secop compressor
Efficient electronic technology, low energy consumption
Multi-voltage system (DC 12-24 Volt) and (AC 100-240 Volt)
Anderson style power connection
Adjustable low voltage battery protection, reverse polarity protection and high temperature
protection
Please ensure all safety and operational instructions are read carefully to get the
maximum benefit from your new fridge.
USB Charging port for quick charging of mobile devices
FEATURES
Warning! - Safety Directive
Failure to observe this directive could lead to serious injury.
Caution! - Safety Directive
Failure to observe this directive could lead to injury or damage to the
appliance.
Note! - Important Information
Failure to observe this note may lead to damage to the appliance or
impede performance.
IMPORTANT SAFETY SYMBOLS

2
WARNING: Do not touch exposed cables.
WARNING: When positioning the appliance, ensure the supply cord is not trapped or damaged.
WARNING: Do not use or attempt to repair damaged power cords. If the AC power cord is
damaged, it must be replaced by KickAss Products or an Authorised service agent.
WARNING: Do not locate multiple portable socket-outlets or portable power supplies at the rear of
the appliance.
CAUTION: Any installation of DC power systems should be handled by a qualified professional,
ensuring the source voltage is correct.
WARNING: Do not place any electrical devices inside the refrigerator as moisture could harm
these devices.
CAUTION: Disconnect both DC and AC power supplies when cleaning or when not in use.
WARNING: The refrigerator should only be maintained by a KickAss Products authorised repair
centre. Improper or unauthorised maintenance work may void the products warranty.
WARNING: The fridge must not be used to store aerosols, flammable or corrosive materials. Do
not store explosive substances such as aerosol cans with a flammable propellant in this appliance.
WARNING: The fridge should be placed in a dry place. Ensure the fridge is not exposed to water
splash, rain and excessive moisture. Do not immerse it into water. The appliance shall not be
exposed to rain.
CAUTION: This appliance is not intended for use by persons (including children) with reduced
physical, sensory or mental capabilities, or lack of experience and knowledge, unless they have
been given supervision or instruction concerning use of the appliance by a person responsible for
their safety.
WARNING: Children should be supervised to ensure that they do not play with the appliance.
WARNING: The appliance contains fluorinated greenhouse gasses. Chemical name of the gas:
R134a Fluorinated greenhouse gasses are contained in hermetically sealed equipment. An
electrical switchgear has a tested leakage rate of less than 0.1 % per year as set out in the
technical specification of the manufacturer. Please refer to local regulations regarding the correct
disposal of the appliance due to the flammable insulation blowing gas used.
WARNING: This appliance is not intended to be used in household and similar applications such as:
ŸStaff kitchen areas, offices and other working environments.
ŸCommercial hotels, motels and other residential type environments.
ŸCatering and similar retail applications.
ŸSuitable for camping use
IMPORTANT SAFETY INSTRUCTIONS
CARE AND MAINTENANCE INSTRUCTIONS
Clean the appliance inside and out with a damp cloth after every use. If it is dirty, use sodium
bicarbonate dissolved in lukewarm water to clean the unit. Note:
ŸNever use abrasive products, detergents or soap. After washing, rinse with clean water and dry
carefully. Do not leave the refrigerator off with food inside or lid closed.
ŸNever clean the appliance under running water. Do not use abrasive cleaning agents or hard
objects during cleaning as these can damage the refrigerator.

3
12 Volt DC Anderson Style
to Cigarette Plug Adapter
®
KickAss Fridge / Freezer - Main Unit
Heavy Duty Protective Fridge Cover
AC Power Cable
12 Volt DC Anderson Style
Power Cable
CONTENTS OF THE BOX
CORRECT DISPOSAL OF THIS PRODUCT
This marking indicates that this product should not be disposed with other
household wastes throughout the EU. To prevent possible harm to the
environment or human health from uncontrolled waste disposal, recycle it
responsibly to promote the sustainable reuse of material resources. To return
your used device, please use the return and collection systems.

4
SETUP
CONNECTING THE FRIDGE TO POWER
Connecting to AC
To connect to AC Power, connect the supplied AC Plug to the input port on the fridge and switch on
the power. Ensure the mains power supply is adequately protected with a residual current device.
Connecting to DC
To connect to DC power, use the supplied 2.1m Anderson to Anderson style extension lead,
ensuring the end with fuse is furthest away from the fridge. If using the Cigarette socket extension
cable, ensure the wiring between the battery and socket is capable of handling up to 10A.
AC/DC Priority
With both AC and DC sockets connected, the internal power supply board will prioritise AC power
over DC power, ensuring the battery powering the fridge is not discharged.
CONTROL PANEL
8888
-22C
-22C
8888
14C
14C
HIGH
MED
LOW
USB SMALL BIN LARGE BIN
RED/QUICK
GREEN/NORM
BLUE/ECO
COOLING SPEED BLUETOOTH RUN
USB
Cooling Speed
Light
Bluetooth
Connection Light
Compressor
Run Light
Small Bin
LCD
Large Bin
LCD
Settings Up DownLow Voltage
Protection Settings
On/Off
Button
Cooling Speed Light: The cooling speed light will illuminate red if set on quick, green if set on
normal and blue if set on eco. The cooling speed controls the compressor run speed.
Bluetooth Light: The Bluetooth light will illuminate blue when a Bluetooth connection is
established.
Run Light: The run light indicates when the compressor is running. If power is connected, the
light will turn red. If the compressor is running, the light will turn green.
Battery Protection Light: The selected battery protection setting light will illuminate green
CONTROL PANEL LIGHTS

5
The fridge is equipped with three battery protection settings; high, medium and low. The below
settings should be set for the specific battery type being used.
Note: With the compressor running, due to voltage drop, it is likely the voltage used for these
protections is 0.3-0.5 volts below the voltage of the battery, this will depend on the wiring used to
connect the battery to the fridge. On some battery types, voltage may drop when a load is
applied. This can affect the reading and cutout voltage of the fridge.
LOW BATTERY PROTECTION SETTINGS
DC SOURCE LOW BATTERY
PROTECTION
MEDIUM BATTERY
PROTECTION
HIGH BATTERY
PROTECTION
12V
24V
Cut Out Voltage
Cut Out Voltage
Cut In Voltage
Cut In Voltage
10.1V +/-0.3V
11.4V +/-0.3V
21.5V +/-0.3V
23.0V +/-0.3V
11.4V +/-0.3V
12.2V +/-0.3V
24.1V +/-0.3V
25.3V +/-0.3V
11.8V +/-0.3V
12.6V +/-0.3V
24.6V +/-0.3V
26.2V +/-0.3V
USING THE CONTROL PANEL
When fridge is off, hold power button for 3 seconds to turn off.
TURN FRIDGE
ON OR OFF When fridge is on, hold power button for 3 seconds to turn off.
TURNING ONE
COMPARTMENT
ON OR OFF
(DUAL ZONE ONLY)
If only one compartment is required, each bin can be individually isolated.
To turn the small compartment of the fridge on/off, Press and simultaneously
for 3 seconds or until the small bin display shows OFF.
To turn the large compartment of the fridge on/off, Press and simultaneously
for 3 seconds or until the large bin display shows OFF.
Both bins follow the above step.
SETTING THE
TEMPERATURE
UNITS
To change the temperature display between Fahrenheit and Celsius, press the
3 times simultaneously until only the unit (C or F) is flashing. Select Fahrenheit or
Celsius using the and buttons. Wait until the LCD screen stops flashing and
the setting will be saved.
SETTING
COMPRESSOR
SPEED
To change the compressor speed between quick, normal and eco, press the 4
times simultaneously until both displays are flashing with the current selection. Navigate
through the options using the and buttons. Wait until the LCD screen stops
flashing and the setting will be saved.
SETTING THE VOLTAGE
PROTECTION LEVEL
To set the voltage protection level, press and hold the button for 3 seconds
or until the light indicator moves to the next setting.
VIEWING THE
BATTERIES VOLTAGE
To display the voltage of the battery connected, press the button. Note: If the
compressor is running, indicated by the run light illuminating green, the voltage
displayed may be misrepresented by up to 0.5V due to voltage drop between the
battery and the control board.
VIEWING THE FRIDGES
BLUETOOTH CODE
To view the fridges Bluetooth code, press the button to display a 4 digit
number.

6
BLUETOOTH CONNECTION
BLUETOOTH APP
To get started please download the
KA Products Main App from the
Google Play Store or the Apple
iTunes Store. If the App is already
downloaded on your device, you must
ensure that any updates to the App
are installed prior to connecting.
CONNECTING TO THE FRIDGE
On the App, find the device with the ID KickAss00xxxx that matches the fridges device ID. This
can be found by pressing the button on the control board. Clicking on the device should
prompt the user to enter a password. The password for the fridge is “00xxxx” where xxxx
corresponds to the device ID. Once connected, the user will not need to enter the password
when connecting to the fridge on the App.
USING THE APP
Home Page
The home page can be used to view the current status,
battery protection and cooling speed settings of the
fridge. The voltage of the battery can also be viewed via
the App. Note: If the compressor is running, indicated by
the run light illuminating green, the voltage displayed may
be misrepresented by up to 0.5V due to voltage drop
between the battery and the control board.
Large Bin Small Bin

7
Settings Page
The settings page can be used to set the
left and right bin temperatures or individually
turn them on or off. It can also be used to
adjust battery protection, cooling speed and
change the unit of temperature display.
Graphical Display Page
The graphical display page can be used to
map the 24 hour temperature of both bins as
well as the 24 hour voltage of the battery being
used.

8
TROUBLESHOOTING THE BLUETOOTH APP
Question: I cannot see or connect the Bluetooth App
ŸMake sure Bluetooth is turned on, on your device
ŸMake sure you are in range of the fridge (normally around 10 meters)
ŸMake sure you are using the correct verification code for the Bluetooth App
ŸTry turning the Bluetooth off and on
If the above failed, then follow the below steps:
ŸEnsure the App is the current version and there are no outstanding updates
ŸUninstall the App or close all Apps in the background
ŸTurn both the fridge and the phone off for a couple of minutes
ŸReinstall the App
ŸIf you are still having problems please do not hesitate to contact Kickass

9
ROTATING THE LIDS
The lids can be rotated such that they can be opened from either side of the fridge. to do this,
simply:
Unbolt the hinges and the
latches from the base of
the fridge and remove the
screws covering the blank
holes on either side
Lift lids away from
fridge base
Rotate the lids and match
the latches & hinges to
their respective threaded
holes. If using the case,
the lid covers will also
need to be rotated with the
lids

10
Place lids in place
Screw the hinge and
latches in place and return
the screws covering the
blank holes

11
EMERGENCY OVERRIDE SWITCH
The emergency override switch is to be used in the event of an electronic control or display
board failure. For normal operation the switch should be left in the OFF position. If an electronic
failure occurs, slide the switch to the ON position. In this case, the fridge will run at full cooling
capacity in one bin only.
OVERRIDE SWITCH
OFF ON
TROUBLESHOOTING
The appliance is not turning on
ŸHold ON button
ŸCheck the power supply is sufficient
ŸCheck the cable and Anderson style plug have a good connection
ŸIf using a DC connection, attempt to plug in an AC connection
ŸIf using an AC connection, attempt to plug in an DC connection
ŸCheck if the fuse in both the Anderson to Anderson and the Cigarette socket requires
replacement
The food inside is frozen
ŸThe setting temperature is too low, check the set temperature on the control board noting that
the temperature of the fridge may be +/-3 degrees of the displayed temperature
ŸCheck to ensure the override switch is in the off position
Bad performance in refrigeration
ŸThe temperature setting is inappropriate
ŸThe lid is unlocked/or open
ŸThe lid seal is broken
ŸProblems arising from poor ventilation
ŸToo much warm product has been placed inside the refrigerator, it may take longer than usual
to cool down
ŸThe ambient temperature is to high or there is a heat source near the unit
The sound of water can be heard from inside the unit
ŸThis is normal, due to the flow of the refrigerant
Unusual noise when refrigerator is working
ŸEnsure the refrigerator is on a level surface
ŸLoose componentry inside the refrigeration compartment (contact KickAss Products)

12
ERROR CODES
ERROR CODE Error type as displayed on control board
ERROR 1 Battery protection cut-out
ŸPlease check the source voltage to ensure it is above the cut out. Try lowering the
voltage cut out setting to LOW
ŸThe vehicle cabling may be inadequate/unsuitable.
ŸTry on a different power source
ERROR 2 Fan is drawing too many Amps(Over 1 Amp)
ŸDisconnect the fridge for 30 minutes and reconnect
ŸAttempt to plug it in with both AC and DC power sources
If this does not resolve issue, Contact KickAss Products
ERROR 3 Possible electronic box or compressor fault
ŸUnplug for 10 minutes
ŸAttempt to plug it in with both AC and DC power sources
If this does not resolve issue, Contact KickAss Products
ERROR 4 Compressor speed is too low
ŸUnplug for 10 minutes
ŸMove unit to a lower ambient temperature
ŸAttempt to plug it in with both AC and DC power sources
If this does not resolve issue, Contact Kickass Products
ERROR 5 Ambient Temperature too high
ŸClean vents/ensure clear air flow
ERROR 6 Thermostat open circuit fault
ŸThe control board is not detecting the thermostat, there may be a loose wire or the
thermostat may have failed, contact KickAss Products to diagnose fault
Note: The other bin will continue to function as normal
ERROR 7 Thermostat short circuit fault
ŸThe thermostat has likely failed, Contact KickAss Products
Note: The other bin will continue to function as normal

13
WARRANTY INFORMATION
Warranty Period:
KickAss Products Pty Ltd (KickAss) of 2 Mallet
Street, Kunda Park, QLD, 4556, offers a 60
month warranty from date of purchase against
manufacturing defects.
Warranty Inclusions:
Under ordinary usage conditions, this warranty
covers any defect in design or manufacture
which results in our product failing to perform
as described in our advertising or literature (i.e.
product manuals).
Where we are at fault during the warranty
period, we will either repair or replace the
product (or part of the product) at our discretion.
When a product is repaired or replaced under
this warranty, the original warranty period is not
renewed or extended.
This warranty is provided in addition to your
other rights and remedies under the Australian
Consumer Law and does not exclude, restrict,
modify, limit or override your rights under the
Australian Consumer Law.
Warranty Exclusions:
Our warranty is non-transferable and is only
offered to the original purchaser of our
product.
Our warranty does not apply to:
1. damage caused by any improper use of
our product(s);
2. damage caused by faulty installation or
modification made during installation;
3. damage caused by mould, insects,
animals, misuse, incorrect operation,
adverse weather, accidents and fair wear
and tear;
4. damage caused by exposure to excessive
sunlight;
5. costs, losses or charges:
6. of removing and reinstalling the product;
7. directly or indirectly associated with the
product failing to operate.
8. commercial use of KickAss products by
government organisations or commercial
fleet applications;
9. KickAss Products that are on-sold by the
customer or exported for use outside of
Australia.
How to Claim:
To make a claim visit supportportal.kickassproducts.com.au, or email [email protected].
Please provide your proof of purchase (i.e. sales receipt) to assist with your warranty claim.
Once we approve your warranty claim, we will arrange (at our cost) return shipping of the faulty
product to an assessment facility of our choice. Once we have determined the cause of the defect,
we will contact you with the outcome of our assessment and advise whether the faulty product will be
repaired or replaced.
Australian Consumer Law:
Our goods come with guarantees that cannot be excluded under the Australian Consumer Law. You
are entitled to a replacement or refund for a major failure and compensation for any other reasonably
foreseeable loss or damage. You are also entitled to have the goods repaired or replaced if the goods
fail to be of acceptable quality and the failure does not amount to a major failure.
This manual suits for next models
2
Table of contents
Other KICK ASS Refrigerator manuals