KICK ASS UNI ZONE User manual

FRIDGE / FREEZER
OPERATION MANUAL
Please read all instructions and the safety section carefully
®
before using your new KickAss refrigerator.

TABLE OF CONTENTS
1
1
2
3
4
4
6
7
8
8
8
9
10
11
12
12
13
14
15
16
FEATURESFEATURESFEATURES
IMPORTANT SAFETY SYMBOLS IMPORTANT SAFETY SYMBOLS IMPORTANT SAFETY SYMBOLS
IMPORTANT SAFETY INSTRUCTIONS IMPORTANT SAFETY INSTRUCTIONS IMPORTANT SAFETY INSTRUCTIONS
CONTENTS IN THE BOXCONTENTS IN THE BOXCONTENTS IN THE BOX
SETUPSETUPSETUP
CABLE SPECIFICATIONSCABLE SPECIFICATIONSCABLE SPECIFICATIONS
CONTROL PANEL CONTROL PANEL CONTROL PANEL
OPERATION - GENERAL OPERATION - GENERAL OPERATION - GENERAL
MAIN POWER PANELMAIN POWER PANELMAIN POWER PANEL
ACCESSORY SOCKET PANEL ACCESSORY SOCKET PANEL ACCESSORY SOCKET PANEL
DRAINAGE BUNGDRAINAGE BUNGDRAINAGE BUNG
FRIDGE COVERFRIDGE COVERFRIDGE COVER
OPERATION - BLUETOOTH OPERATION - BLUETOOTH OPERATION - BLUETOOTH
TROUBLESHOOTING BLUETOOTH APPTROUBLESHOOTING BLUETOOTH APPTROUBLESHOOTING BLUETOOTH APP
CLEANING AND MAINTENANCE CLEANING AND MAINTENANCE CLEANING AND MAINTENANCE
TROUBLESHOOTINGTROUBLESHOOTINGTROUBLESHOOTING
ERROR CODESERROR CODESERROR CODES
WIRING DIAGRAM - SINGLE ZONEWIRING DIAGRAM - SINGLE ZONEWIRING DIAGRAM - SINGLE ZONE
WIRING DIAGRAM - DUAL ZONEWIRING DIAGRAM - DUAL ZONEWIRING DIAGRAM - DUAL ZONE
WARRANTY STATEMENTWARRANTY STATEMENTWARRANTY STATEMENT
ELECTRICALELECTRICALELECTRICAL
BATTERY PROTECTION VOLTAGESBATTERY PROTECTION VOLTAGESBATTERY PROTECTION VOLTAGES 5
5

Thank You For Purchasing A
KickAss® Fridge / Freezer
Digital electronic thermostat with LED temperature display
Bluetooth for remote control and monitoring of the fridge with your smartphone
Reliable refrigeration system using the Secop compressor
Efficient electronic technology, low energy consumption
Multi-voltage system (DC 12-24 Volt) and (AC 100-120/220-240 Volt)
Anderson power connection and accessory socket outlets
Adjustable low voltage battery protection
Features:
Please ensure all safety and operational instructions are read carefully to get the
maximum benefit from your new fridge.
IMPORTANT SAFETY SYMBOLS
Warning! - Safety Directive
Failure to observe this directive could lead to serious injury.
Caution! - Safety Directive
Failure to observe this directive could lead to injury or damage to the
appliance.
Note! - Important Information
Failure to observe this note may lead to damage to the appliance or
impede performance.
1

IMPORTANT SAFETY INSTRUCTIONS
WARNING: Do not touch exposed cables.
WARNING: Do not use fridge if you suspect any connections could be wet.
WARNING: When using the fridge in the vehicle or boat, please make sure the circuit being used is
fused. If using a 240V AC power source ensure the supply is fitted with a residual current device.
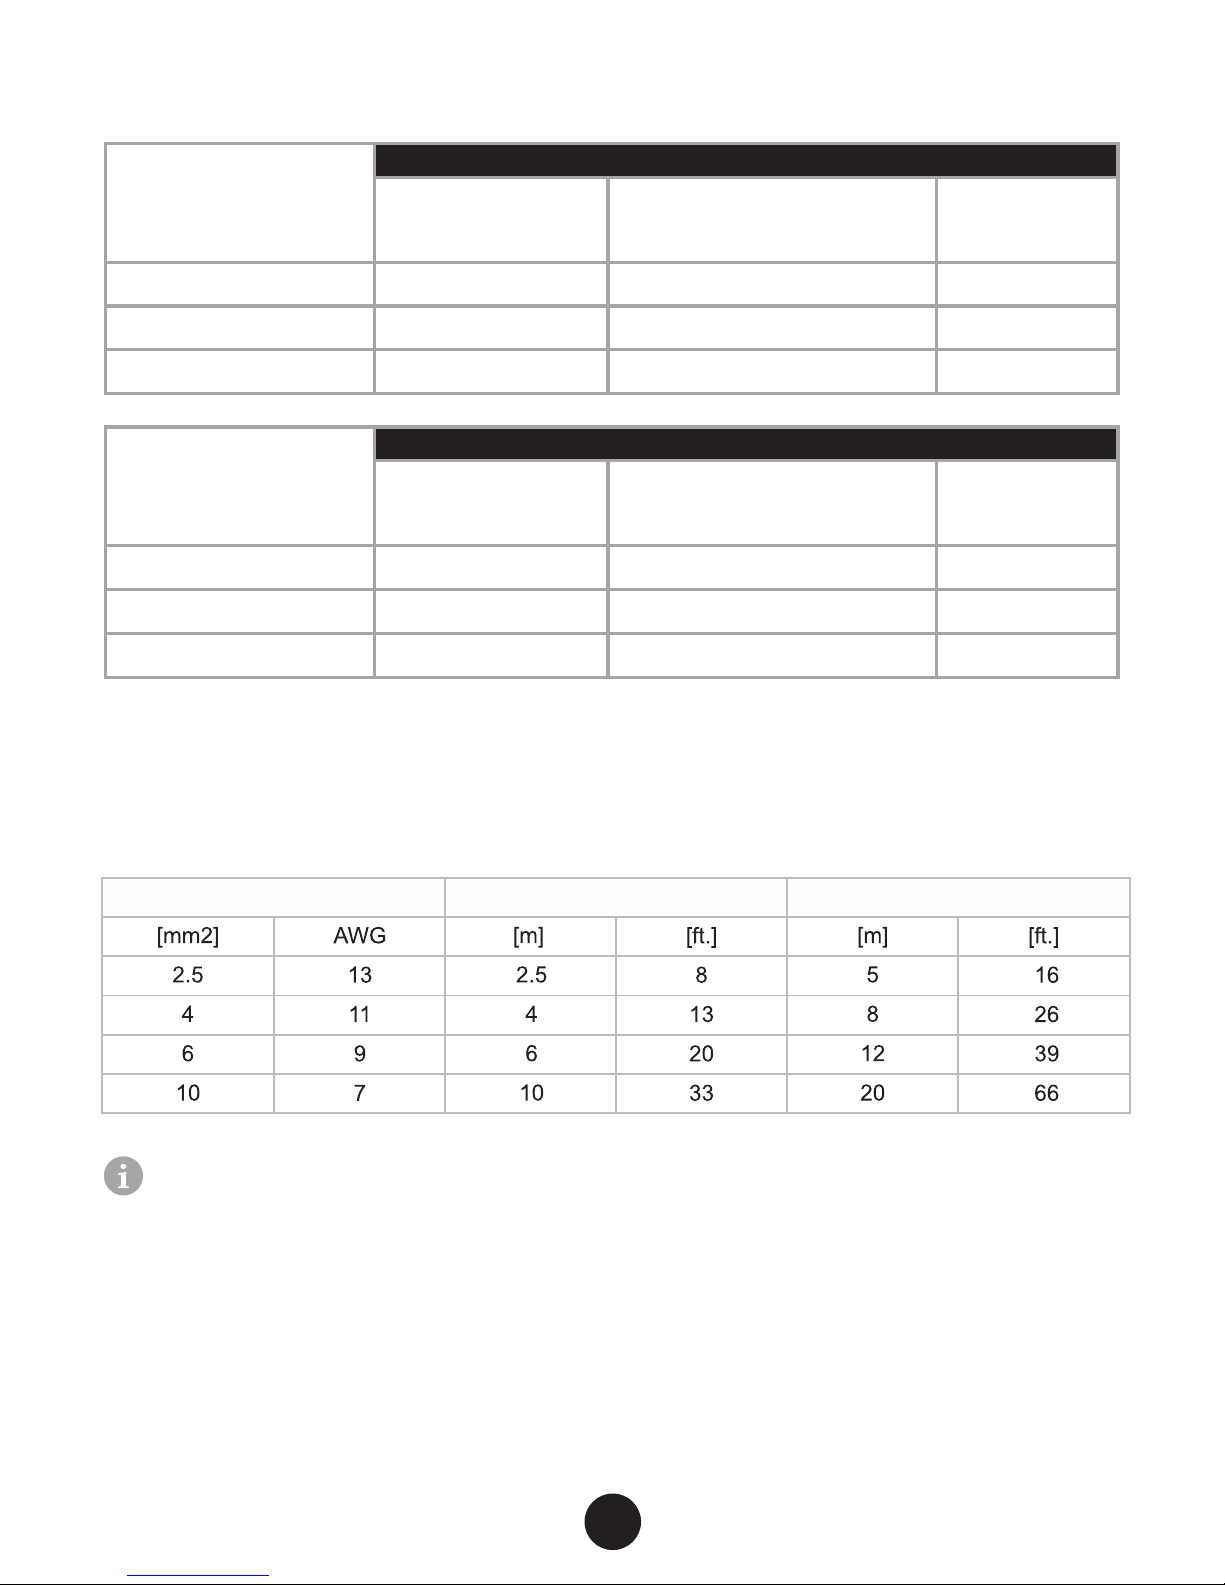
CAUTION: Any installation of DC power systems should be handled by a qualified professional.
Make sure the source voltage is correct. The technical data label has the voltage data. Do not
place any electrical devices inside the refrigerator as moisture could harm these devices.
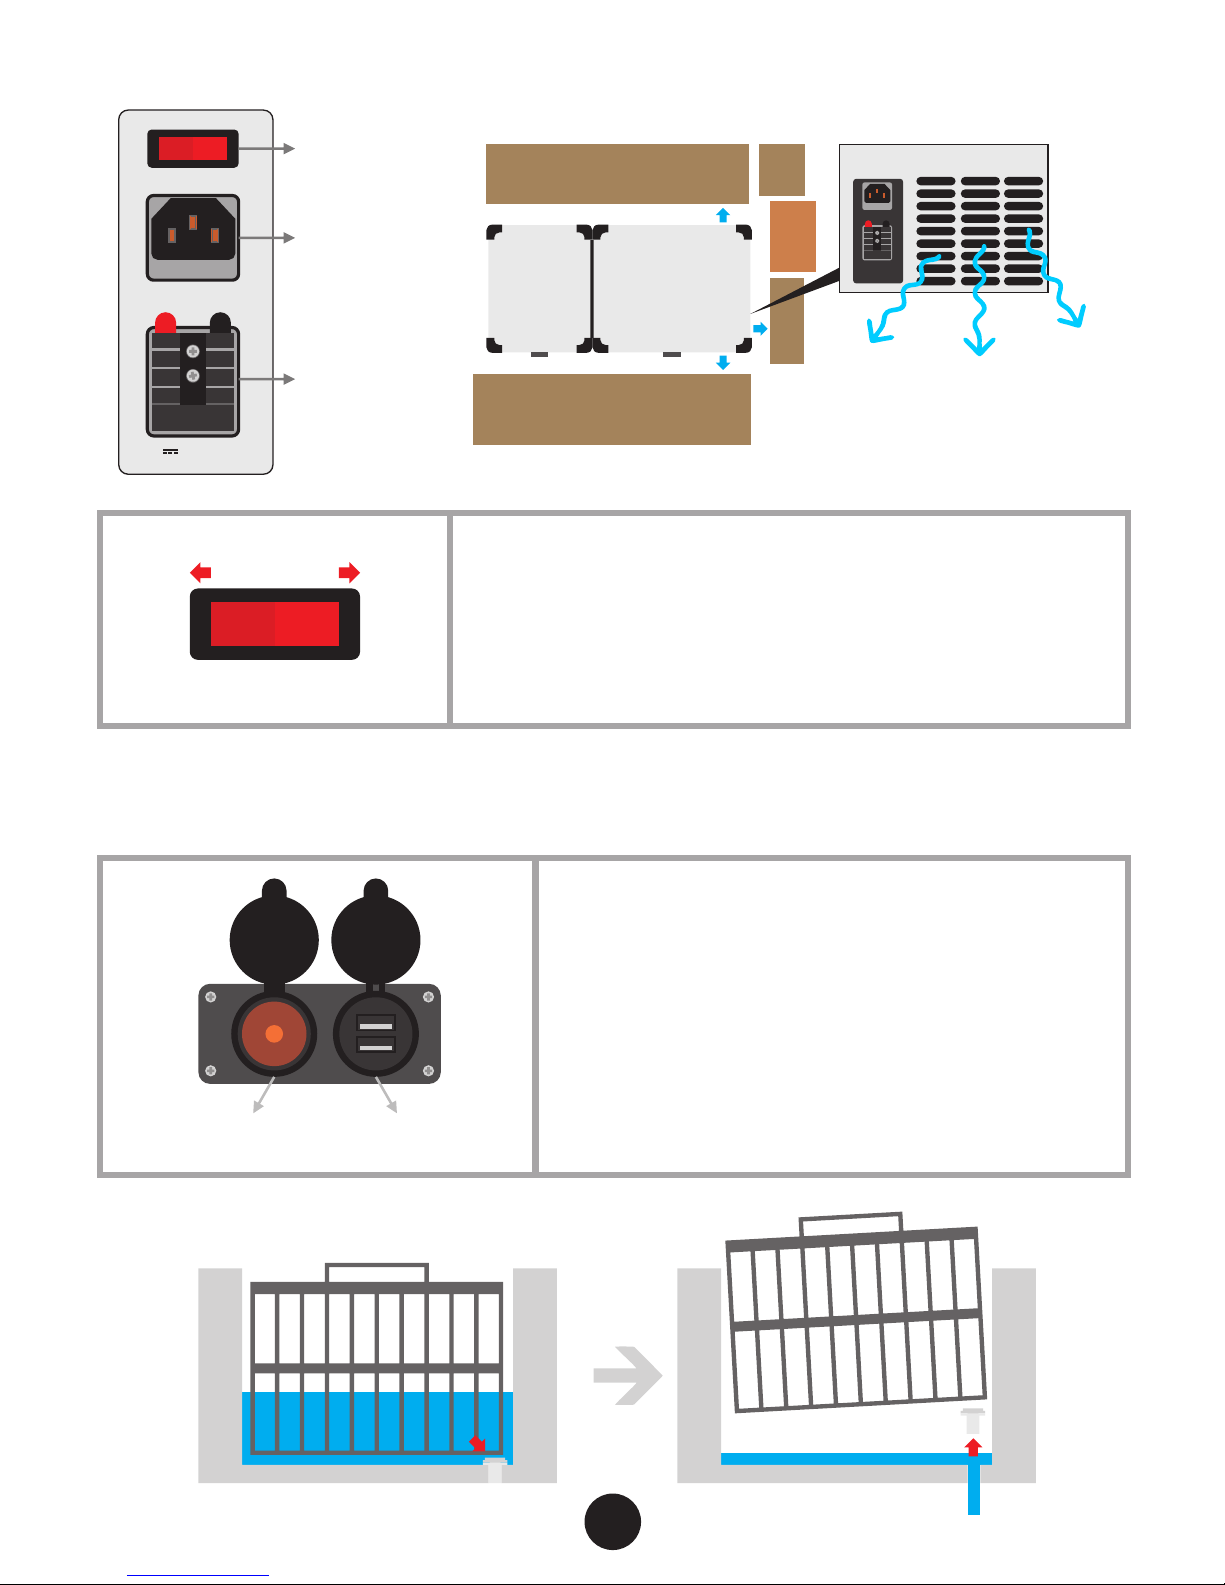
WARNING: When positioning the appliance, ensure the supply cord is not trapped or damaged.
WARNING: Do not locate multiple portable socket-outlets or portable power supplies at the rear
of the appliance.
WARNING: fill with potable water only.
2
This appliance is not intended for use by persons (including children) with reduced physical,
sensory or mental capabilities, or lack of experience and knowledge, unless they have been
given supervision or instruction concerning use of the appliance by a person responsible for
their safety. Children should be supervised to ensure that they do not play with the appliance.
Do not store explosive substances such as aerosol cans with a flammable propellant in
this appliance.
This appliance is intended to be used in household and similar applications such as
– staff kitchen areas in shops, offices and other working environments;
– farm houses and by clients in hotels, motels and other residential type environments;
– bed and breakfast type environments;
– catering and similar non-retail applications.
The appliance contains fluorinated greenhouse gases.
Chemical name of the gas: R134a
Fluorinated greenhouse gases are contained in hermetically sealed equipment.
An electrical switchgear has a tested leakage rate of less than 0.1 % per year as set out in the
technical specification of the manufacturer.
CORRECT DISPOSAL OF THIS PRODUCT
This marking indicates that this product should not be disposed with other
household wastes throughout the EU. To prevent possible harm to the
environment or human health from uncontrolled waste disposal, recycle it
responsibly to promote the sustainable reuse of material resources. To return
your used device. Please use the return and collection systems or contact the
retailer where the product was purchased. They can take this
product for environmental safe recycling.

3
CONTENTS IN THE BOX
12 Volt DC Anderson to
Cigarette Plug Adapter
KickAss® Fridge / Freezer - Main Unit
Heavy Duty Protective Fridge Cover
240 Volt AC Power Cable
12 Volt DC Anderson Power Cable

4
SETUP
GENERAL
Caution! -Humidity inside the appliance can form frost and impair cooling. Do not allow
frost to build up. Never clean the appliance using a hose and never submerge the unit in
any liquid.
Avoid placing your refrigerator near a heat source. This helps the refrigerator to work
more efficiently and keep the contents cool.
Note! - Your refrigerator requires good ventilation, especially around the vents of the
refrigerator; allow a gap of at least 200mm around the vents.
Place the refrigerator on a flat surface and away from any edges. When using the
fridge in a vehicle, please use a fastening device to secure it.
Note! - Water resistant rating IPX4.
Caution! - The appliance can only be connected to one power source at
a time.
Note! - Suitable for camping use.
ELECTRICAL
Power: The electronic control module controls the compressor motor and
includes three stage battery protection. When the input voltage drops below
the minimum, the compressor will cut out; when the voltage rises to the cut-in
value, the compressor will restart automatically.
Battery Protection: The Secop Compressor requires approximately 10.6Volts
(12Volt System). Note: The early warning alarm will sound off every 4 seconds
for 30 minutes before the compressor shuts off. If an alternative power source
is not found, the early warning alarm will sound off every 8 seconds for 30 mins
until the unit has no more power.

CABLE SPECIFICATION
The DC cables must have a suitable cross-section for their length, according to this table:
Note! The length is from the battery to the refrigerator.
5
Cable Area 12V Max Cable Length* 24V Max Cable Length*
BATTERY PROTECTION VOLTAGES
12V Battery Protection
Voltage Setting Turn Off Compressor
(to protect battery)
Early warning alarm system
will notify before turning off
compressor (to protect battery)
Turn On
Compressor
Low Level
Medium Level
High Level
10.3V
11.1V
11.6V
10.6V
11.3V
11.9V
11.4V
12.2V
12.7V
24V Battery Protection
Voltage Setting Turn Off Compressor
(to protect battery)
Early warning alarm system
will notify before turning off
compressor (to protect battery)
Turn On
Compressor
Low Level
Medium Level
High Level
21.5V
23.3V
24.5V
23.6V
24.8V
23.0V
25.3V
26.2V

COMPRESSOR
8888
14C
14C 8888
-22C
-22C
HIGH
MED
LOW
HIGH
MED
LOW
COM
COMPRESSOR
8888
14C
14C
DUAL ZONE
SINGLE ZONE
CONTROL PANEL
6

OPERATION - GENERAL
WHEN FRIDGE IS OFF, HOLD POWER BUTTON FOR 3 SECONDS TO TURN ON.
TURN FRIDGE
ON OR OFF WHEN FRIDGE IS ON, HOLD POWER BUTTON FOR 3 SECONDS TO TURN OFF.
TAP THE BATTERY BUTTON AND THE LCD DISPLAY WILL SHOW THE CURRENT VOLTAGE
OF THE FRIDGE.
CHECK VOLTAGE OF
THE FRIDGE
8888 8888.2747
TAP THE COOLING SPEED BUTTON AND THE LCD DISPLAY WILL SHOW THE FRIDGE’S BLUETOOTH ID.
CHECK FRIDGE
BLUETOOTH ID
8888 888800CS
HOLD THE COOLING SPEED BUTTON FOR 3 SECONDS, YOU WILL HEAR A BEEP, RELEASE THEN TAP THE
COOLING SPEED BUTTON TO SCROLL TO THE OPTIONS (QUICK, NORM & ECO). WAIT TO SAVE CHANGES.
SET FRIDGE
COOLING SPEED
QUICKLY COOL THE FRIDGE WITH MUCH MORE BATTERY DRAIN.
NORMAL COOLING SPEED WITH NORMAL BATTERY DRAIN.
SLOWEST COOLING SPEED WITH THE MOST ECONOMICAL BATTERY DRAIN.
HOLD THE BATTERY BUTTON FOR 3 SECONDS, YOU WILL HEAR A BEEP, THEN TAP THE BATTERY
BUTTON TO SCROLL TO THE OPTIONS (HIGH, MED & LOW). THEN WAIT TO SAVE CHANGES.
SET BATTERY
PROTECTION LEVEL
HIGH SETTING WILL ALLOW THE FRIDGE TO DRAIN THE BATTERY ONLY IF THE BATTERY LEVEL IS HIGH.
MED SETTING WILL ALLOW THE FRIDGE TO DRAIN THE BATTERY ABOUT HALFWAY
LOW SETTING WILL ALLOW THE FRIDGE TO DRAIN THE BATTERY TO LOW TO KEEP ITSELF RUNNING.
BEEPBEEP
HIGH
MED
LOW
HIGH
MED
LOW
HIGH
MED
LOW
BEEPBEEP
SETTING
TEMPERATURE
FOR A ZONE
8888-20C 8888-17C
LEFT BIN RIGHT BIN
8888-20C 8888-17C
LEFT BIN RIGHT BIN
OR
8888-20C 8888-15C
LEFT BIN RIGHT BIN
8888-20C 8888-17C
LEFT BIN RIGHT BIN
OR
8888-22C 8888-15C
LEFT BIN RIGHT BIN WAIT
WAIT
WAIT
TO CHANGE TEMPERATURE SETTINGS FOR EACH ZONE, START BY HOLDING THE SETTINGS BUTTON FOR
3 SECONDS THEN THE RIGHT BIN LCD NUMBERS WILL FLASH. TAP UP OR DOWN BUTTONS TO ADJUST
TO THE DESIRED TEMPERATURE FOR THE RIGHT BIN. TAP THE SETTINGS BUTTON AGAIN AND THE LEFT
BIN LCD NUMBERS WILL NOW FLASH. TAP UP OR DOWN BUTTONS TO ADJUST THE LEFT BIN TO THE
DESIRED TEMPERATURE. AFTER YOU ARE SATISFIED, JUST WAIT TO SAVE THE CHANGES YOU MADE.
TURNING ON OR OFF
THE LEFT BIN
8888-20C 8888-15C
LEFT BIN RIGHT BIN
8888---- 8888-15C
LEFT BIN RIGHT BIN
PRESS BOTH THE SETTINGS BUTTON AND THE UP BUTTON FOR 3 SECONDS. THE LEFT BIN LCD DISPLAY
WILL SHOW DASHES TO INDICATE THE LEFT BIN IS TURNED OFF. REPEAT THE SAME PROCESS TO TURN THE
LEFT BIN BACK ON.
8888-20C 8888-15C
LEFT BIN RIGHT BIN
TURNING ON OR OFF
THE RIGHT BIN
8888-20C 8888-15C
LEFT BIN RIGHT BIN
8888-20C 8888----
LEFT BIN RIGHT BIN
PRESS BOTH THE SETTINGS BUTTON AND THE DOWN BUTTON FOR 3 SECONDS. THE RIGHT BIN
LCD DISPLAY WILL SHOW DASHES TO INDICATE THE RIGHT BIN IS TURNED OFF. REPEAT THE SAME
PROCESS TO TURN THE RIGHT BIN BACK ON.
8888-20C 8888-15C
LEFT BIN RIGHT BIN
YOU CAN ONLY TURN OFF ONE BIN AT A TIME. TRYING TO TURN OFF BOTH BINS WITH THIS METHOD WILL
AUTOMATICALLY TURN ON THE OTHER BIN. IF YOU WANT TO TURN OFF BOTH BINS SIMPLY TURN OFF THE
FRIDGE.
NOTE ON TURNING
OFF BOTH BINS
8888-20C 8888----
LEFT BIN RIGHT BIN
8888---- 8888-15C
LEFT BIN RIGHT BIN
8888-20C 8888----
LEFT BIN RIGHT BIN
PRESS AND HOLD BUTTON TAP BUTTON BEEPBEEP HOLD AND WAIT FOR THE BEEP
WAIT
WAIT AND DON'T PRESS ANYTHING

12/24V
~100-240V
MAIN POWER PANEL
ACCESSORY SOCKET PANEL
AC 240V
SOCKET AC
DC 12/24V
ANDERSON
CONNECTOR
12V/24V ACCESSORIES/
CIGARETTE SOCKET 15A
DUAL USB
SOCKET 2A
The front accessory panel comes with a cigarette socket and
2 usb sockets. This will only work if the DC 12/24V Anderson
Connector on the side is attached to a power source.
The output of these sockets are dependant on the power supply
attached to the DC 12/24V Anderson Connector on the side. If it’s
connected to a 12V source, the output is 12V, if its connected to a
24V source, the output will be 24V.
WARNING * If it is connected to a 24V source, ensure that all
12V devices are disconnected that are not rated for 24V.
OVERRIDE
SWITCH
MAKE SURE YOU DON'T HAVE ANY OBSTRUCTIONS
NEAR THE FRIDGE VENT HOLES TO AVOID OVER
HEATING. ABOUT A MINIMUM OF 5 INCHES OF
CLEARANCE IS NEEDED.
TOP VIEWTOP VIEW
FRONT
BACK
For emergency purposes (faulty operation or control panel not working
properly) there’s an override switch users can use. To access the override
switch you need to remove the cover, the override switch is not visible or
accessible until the cover is removed. You can flick the override switch to
bypass the control panel and force the fridge to cool up and freeze what
you have in the fridge. This will however only freeze the zone of the fridge
that is currently turned on before flicking the override switch.
NOTE: If the override switch is turned on, the control panel will show
the temperature and voltage but you will not be able to set them
DRAINAGE BUNG
OVERRIDE SWITCH
OFF ON
8

VELCRO
VELCRO
VELCRO
HOW TO PUT THE FRIDGE COVER ON
We recommend having 2 people lift
the fridge together when putting the
fridge cover on as the unit is heavy.
9

OPERATION - BLUETOOTH
This fridge has been designed with the latest bluetooth technology to remote control and monitor temperature
from your smartphone. To get started please download the KA FRIDGE app from the Google Play store or the
Apple iTunes Store.
Once the APP is installed please follow these easy instructions to be able to control and monitor your fridge.
Turn on your phone’s bluetooth and location services.
Tap on the “Connect To Fridge” on the phone when the fridge
appears in the app.
Connect with the fridge by entering an alias for the fridge and then
enter the verification code. The verification code will be located on
the rear of the fridge and is unique to each fridge.
myfridge
123456
POWER
myfridge
BATTERY PROTECTION
Device Connected
USER
MANUAL
FRIDGE
CONNECTED
LEFT BIN
TEMP DOWN TEMP UP
10°C
RIGHT BIN
TEMP DOWN TEMP UP
HIGH
MED
LOW
VOLTAGE
24.80V
SWITCH BATTERY
PROTECTION
COOLING SPEED
TOGGLE COOLING
SPEED ADVANCED
SETTINGS
ADVANCED
SETTINGS
Help
CURRENT
TEMP
24°C
CURRENT
TEMP
24°C
10°C
Tap to turn off
the bin
Tap to turn off
the bin
POWER ON/OFF
FRIDGE ALIAS
FRIDGE ZONE TEMP
FRIDGE ZONE TEMP
ADJUST
ADVANCE SETTINGS
SWITCH BATTERY
PROTECTION LEVEL
COOLING SPEED
ADJUST
Fig. 1.1 - Single Zone
App Screen
Fig. 1.2 - Dual Zone
Graph Screen
Fig. 1.3 - Single Zone
Graph Screen
ŸPOWER ON/OFF - Turn off the fridge
ŸFRIDGE ALIAS - Bluetooth connection name
ŸFRIDGE ZONE TEMP - Display current zone
temperature.
ŸFRIDGE ZONE TEMP ADJUST BUTTONS - Adjust a
zone’s current temperature with the TEMP UP and
TEMP DOWN buttons.
ŸSWITCH BATTERY PROTECTION LEVEL - Adjust the
level of drain allowed for the fridge on the connected
battery.
ŸCOOLING SPEED ADJUST - Adjust the compressor
cooling speed for the fridge.
ŸADVANCE SETTINGS BUTTON - Switch to the graph
screen to check the fridge performance
ŸTEMPERATURE METRIC - Switch view of the graph
screen to either show as Fahrenheit or Celsius.
Fig. 1.4 - Temperature
Metric
10

Question : I can not see or connect the Bluetooth APP
● Make sure Bluetooth is turned on, on your device.
● Make sure you are in range of the fridge (normally around 10-20meters)
● Make sure you are using the correct verification code for the Bluetooth APP
● Try turning the Bluetooth off and on.
If the above failed then follow the below steps:
● Uninstall the APP or close all APPs in the background
● Turn both the fridge and the phone off for a couple of minutes.
● Re-install the APP
If you are still having problems please do not hesitate to contact Kickass.
TROUBLESHOOTING THE BLUETOOTH APP
11

CLEANING AND MAINTENANCE
Clean the appliance inside and out with a damp cloth after every use. If it is
dirty, use sodium bicarbonate dissolved in lukewarm water to clean the unit.
Note! Never use abrasive products, detergents or soap. After washing, rinse
with clean water and dry carefully. Do not leave the refrigerator off with food
inside or lid closed.
Caution! Never clean the appliance under running water. Do not use abrasive
cleaning agents or hard objects during cleaning as these can damage the
refrigerator.
TROUBLESHOOTING
The appliance is not turning on
Hold ON button
Check the power supply
Check if the plug and the socket have a good connection
Check if the fuse requires replacement
The food inside is frozen
The setting temperature is too low
** Check the set temperature and if above freezing, please contact us.
Bad performance in refrigeration
The temperature setting is inappropriate
The lid is unlocked/or open
The lid seal is broken
Problems arising from poor ventilation
Too much food has been placed inside the refrigerator
There is too much warm product inside
There is a heat source near the unit
The sound of water can be heard from inside the unit
This is normal, due to the flow of the refrigerant
Unusual noise when refrigerator is working
Check if the surface the refrigerator is on is level
Loose componentry inside the refrigeration compartment (see a service agent)
PLEASE NOTE : This fridge is fitted with an automatic 60 second re-start delay.
This will be activated if your fridge enters an error mode. This is to protect the
fridge if an error has occurred.
12

ERROR CODES
Error Code Error type can be read out on the control display
Error 1
Battery protection cut-out
● Please check the source voltage to ensure it is above the cut out.
Try lowering the voltage cut out setting to LOW
● The vehicle cabling may be inadequate/unsuitable. Please refer
to cable specification table for correct cable thickness (Page3)
● Try on a different power source
Error 2
Fan issue
● Fan is drawing too many Amps(Over 1 Amp)
Contact Kickass
Error 3
Compressor Start Issues
● Unplug for 10 minutes
● Try on a different power source
● Possible electronic box or compressor fault
Contact Kickass
Compressor speed is too low
● Unplug for 10 minutes
● Reduce product load inside unit
● Move unit to a lower ambient temperature
● Clean vents/ensure clear air-flow over compressor
Error 4
Ambient Temperature too high
● Clean Vents/ensure clear air flow
Error 5
Thermostat failure
● Check if the NTC thermistor has a short circuit or has
no connection
Error 6/7
13

WIRING DIAGRAM - SINGLE ZONE
14
DOOR SW LAMP
RD BK
DOOR SW LAMP
AC 100-240V
50/60HZ
L
N
DC 12/24V
-
+
12V
USB
ADAPTER
-
+
F+
F-
D
C
P
T
CONTROL AND OPERATION UNIT
DCPT21
2
1P5
P3
21+-
P1 P2
2121
P7 P4
MOTOR FAN
21BK
BK
TEMP. SENSOR
COMPRESSOR UNIT
RD
BK

15
WIRING DIAGRAM - DUAL ZONE
AC 100-240V
50/60HZ
L
N
DC 12/24V
-
+
12V
USB
ADAPTER
-
+
F+
F-
D
C
P
T
DCPT21
2
1
2
1P5 P9
P3
2121+-
P6 P1 P2
2121
P7 P4
MOTOR FAN
ELECTROMAGNETIC
VALVE
21
TEMP. SENSOR
BK
BK
21BK
BK
TEMP. SENSOR
DOOR SW LAMP DOOR SW LAMP
RD
BK
RD
BK
COMPRESSOR UNIT
CONTROL AND OPERATION UNIT

FRIDGE/FREEZER RANGE
WARRANTY STATEMENT
TERMS AND CONDITIONS
ŸThe warranty period commences from the date of purchase by the original
purchaser from an authorised KickAss® dealer.
ŸKickAss® will honour this warranty on presentation of proof of purchase of the
unit to KickAss® or its approved service agent. The service agent may be
requested to provide KickAss® with a photocopy of the proof of purchase to
obtain approval to proceed prior to warranty being honored.
ŸPlease submit a warranty form via warranty.australiandirect.com.au for details and
the name of an authorized service agent or refer to list provided. It is the
purchaser's responsibility to freight the unit to and from the service agent.
ŸKickAss® will not be held responsible for any damage or loss suffered or cost
incurred whilst fridge is in transit.
ŸWarranty repairs may only be carried out by an authorised service agent.
ŸKickAss® will not reimburse repair claims carried out by unauthorized service
agents. Any unauthorized tampering with any part of the unit will automatically
void the warranty.
ŸService agents may charge a fee for viewing or testing the unit. This is not
covered by KickAss® or this warranty and is payable at the service point unless
authorized by KickAss®.
ŸAny KickAss® authorized service centre in Australia will be able to carry out the
service of your unit. If a repair needs to be undertaken and is covered in terms of
this warranty a Warranty Authorization Number must be obtained prior to
commencement of any work.
KickAss® undertakes to the original purchaser that this product is sold free of defect
in materials and/or workmanship under normal use for a period of 5 YEARS. Subject
to the following: -
16

For warranty, please visit
kickass.com.au/warranty
®
KickAss will not accept a warranty claim if:
1. Modifications have been carried out to the unit without KickAss® written authority.
2. Damage to or failure of the unit has been caused in KickAss® opinion by incorrect, extreme or
unreasonable use.
3. Damage to or failure of the unit has been caused in KickAss® opinion by misuse, neglect, accident,
impact or similar cause. Refer the preventative maintenance guidelines.
ŸKickAss® has total discretion on the variation of the warranty terms.
ŸOur goods come with guarantees that cannot be excluded under the Australian Consumer Law.
You are entitled to a replacement or refund for major failure and for compensation for any other
reasonably foreseeable loss or damage. You are also entitled to have the goods repaired or
replaced if the goods fail to be of acceptable quality and the failure does not amount to a major
failure.
ŸThe above warranty conditions are in addition to any other rights and/or remedies as per the
applicable law.
ŸFailure to follow the guidelines/recommendations in this manual may void the warranty.
ŸThis warranty cannot be varied by others.
17
This manual suits for next models
2
Table of contents
Other KICK ASS Refrigerator manuals
Popular Refrigerator manuals by other brands

Admiral
Admiral AD1001/W owner's manual

True
True RESIDENTIAL TR-30BEV-R-SG-A Installation & user guide

Waeco
Waeco CoolMatic CRX50 operating manual

Polar Refrigeration
Polar Refrigeration CD080-A instruction manual

Bosch
Bosch KGE39XW20R installation instructions

Electrolux
Electrolux ENB 5298 X Care and use instructions