KIDDY Adventure Pack Manual

Stand 02/2012 US
ENG Directions for use
ES nstrucciones de uso

1
5
3
2
6
4

7
11
9
8
12
10

13 14

Introduction..................................................................... 3
1. General sa ety instructions........................................ 3
2. Unpacking........................................................................ 5
3. Adjustments.................................................................... 5
3.1 Adjusting the height of the shoulder strap........................... 5
3.2 Adjusting the shoulder strap link......................................... 5
3.3 Adjusting the sunshade....................................................... 6
3.4 Adjusting the belt height of the child seat belt system........ 6
3.5 Adjusting the seat height of the child seat.......................... 6
3.6 Adjusting the width of the child seat.................................... 7
4. Securing the child......................................................... 7
4.1 Opening and closing the belt system.................................. 7
4.2 Adjusting the belt system.................................................... 7
5. Putting on and removing the child carrier............. 8
6. Caring and storage....................................................... 8
7. Limited Warranty............................................................ 9
ENG

3
ENG
‘kiddy adventure pack’ directions or use
MPORTANT! KEEP FOR
FUTURE REFERENCE!
Thank you very much for choosing the child carrier by kiddy.
Your ‘kiddy adventure pack’ is a high-quality product that will give you a long
service life when used properly. Children are generally comfortable in the
‘kiddy adventure pack’ and are very happy to be carried around in it.
Before using your ‘adventure pack’ for the first time, explain its use to your
child and put it on your back empty to show the child.
Keep in mind that when you go walking or hiking with the ‘kiddy adventure
pack’, you will get warm and will experience the ambient temperature
differently than the inactive child. Always check if it’s hands and feet are
warm enough, especially when the child is asleep.
Before doing longer walking tours with the ‘kiddy adventure pack’, make a
few practice runs with your child to learn how to handle the carrier.
Your ‘kiddy adventure pack’ was tested and approved according to
EN (D N) 13209-1. Always use the ‘kiddy adventure pack’ as described in
these directions for use!
Check to assure all buckles, snaps, straps and adjustments are secure
before each use.
1. General sa ety instructions
WARNING - FALL OR STRANGULAT ON HAZARD.
WARNING - This carrier is only suitable for the carrying of children by adults.
WARNING - Care should be taken when putting on or removing the carrier.
WARNING - Do not use until the child can sit unaided.

ENG
4
WARNING - Do not leave the child unattended in this carrier.
WARNING - The carrier is suitable for a maximum load of 44 lbs (20 kg)
(child + kit ≤ 44 lbs (20 kg)).
-child weight: min. 16.09 lbs (7.3 kg) - max. 39.68 lbs (18 kg);
-child size: 27.56 inch (70 cm) - 41.34 inch (105 cm)
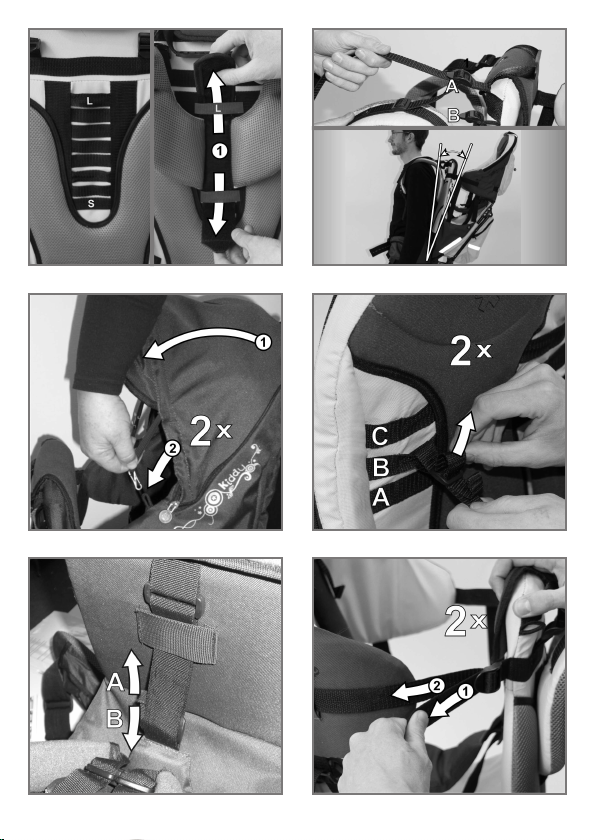
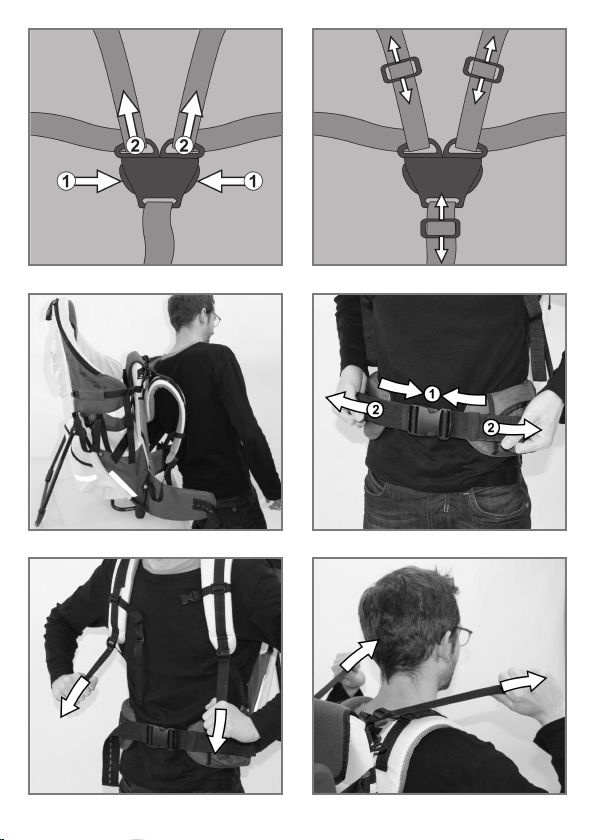
WARNING - Always fasten the child with the safety belt according to these
directions for use.
WARNING - Never place the carrier on high surfaces (e.g. tables, chairs,
changing unit, etc.).
WARNING - Always fold out the stand before placing the carrier on the
ground.
WARNING - Sitting for long periods can cause fatigue and it may restrict the
blood circulation, especially on cold days. We recommend frequent breaks
during long walks or trips.
WARNING - When the child is in the carrier, it could be in a position higher
than the carer. Care should therefore be taken to be aware of hazards; e.g.
door frames, low branches of trees etc.
WARNING - When using the carrier the carer shall be aware of the following:
- the carer’s balance may be adversely affected due to
movement of the child and also the carer;
- the carer will need to take great care when bending or leaning
forward;
- the carrier is suitable for use when undertaking leisure
activities but not for sports activities;
- care should be taken when putting on or removing the carrier.
WARNING - The extra compartments may only be loaded with up to 4 lbs
(2 kg) additional weight (upper compartment 1 lbs (0.5 kg), lower
compartment 3 lbs (1.5 kg)).
WARNING - The carrier may not be used as a toy under any circumstances.
WARNING - Be aware that the child in the carrier may suffer from the effect
of the weather and temperature before you do.
WARNING - Avoid serious injury from falling or sliding out. Always use child
retention system.

ENG
5
Care should be taken to avoid injury to the child’s feet when the
carrier is on or near the floor.
Please take care in extreme heat or cold that there are no metal parts
within the child’s reach to avoid skin damage when the child touches
it.
2. Unpacking
Due to the risk of suffocation the packaging material must be kept out of the
reach of children.
3. Adjustments
3.1 Adjusting the height o the shoulder strap
Open the two flaps which attach the shoulder straps to the ‘kiddy adventure
pack’. Feed the flaps in again at the appropriate height (Fig. 1. No. 1).
The height of the straps is adjusted properly when the lap belt sits above the
waist of the adult. f this is set correctly, your ‘kiddy adventure pack’ will sit
very comfortably, sparing your back.
Make sure that both flaps are firmly closed before using!
3.2 Adjusting the shoulder strap link
The child carrier can be adjusted to 2 heights (Fig. 2, A & B) for the linking of
the shoulder straps. To change the height of the belt, thread the strap out of
the adjusters and the same way back into the higher or deeper adjuster
again.
After the adjustment, both straps must be inserted at the same height
and tightened evenly.

ENG
6
3.3 Adjusting the sunshades
n order to use the sunshade, open the zipper on the headrest of the child
carrier.
Pull out the sunshade (Fig. 3, No. 1) and clip the two sunshade hooks into
the respective loops of the child carrier (Fig. 3, No. 2).
3.4 Adjusting the belt height o the child seat belt system
The shoulder straps of the 5-point harness can be adjusted to 3 heights in
order to fit your child (Fig. 4, A, B & C).
The strap height is correct when the shoulder straps are slightly above the
shoulders of your child.
To use the shoulder straps at a different height, thread both straps out from
the adjusters, insert into both loops at the appropriate height and feed the
straps back into the adjuster (Fig. 4).
After the adjustment, both shoulder straps must be inserted at the
same height and it must be ensured that the straps are held tightly by
the adjusters.
3.5 Adjusting the seat height o the child seat
The seat height can be adjusted to in order to fit your child (Fig. 5).
The seat height can be adjusted with the adjustment strap, tightening will lift
up the seat (Fig. 5; A) and loosening will lower the seat (Fig. 5; B).
The child’s chin should be about level with the top of the chin pad.
The seat height also affects the 5-point harness. f this is adjusted,
the correct position of the shoulder straps must be checked and
readjusted if necessary.

ENG
3.6 Adjusting the width o the child seat
The width of the child seat is adjustable and can be adjusted by the two side
straps.
Always make sure that the child cannot slip through the side
openings when being carried!
To adjust the width, tighten (Fig. 6, No. 1.) or loosen (Fig. 6, No. 2), the two
straps in the adjusters.
4. Securing the child
4.1 Opening and closing the belt system
Always fold out the stand when you are not carrying the ‘kiddy
adventure pack’.
Always use the belt system as prescribed when you carry your child
in the ‘kiddy adventure pack’.
To release the harness, press the buckle button (Fig. 7. No. 1) and remove
the belt tongues from the buckle (Fig. 7, No. 2).
To secure the harness, push the belt tongues into the buckle.
Make sure that the buckle is properly clipped in, and that the belts are
optimally adjusted and not twisted.
4.2 Adjusting the belt system
The shoulder straps and lap belt can be adjusted by moving the respective
belt adjuster according to the size of your child. Slide the belt adjuster in the
respective direction to adjust the length of the belt system (Fig. 8).
7

ENG
8
The harness is correctly adjusted when there is a maximum of one finger
width space between the belts and the child.
5. Putting on and removing the child carrier
Secure the child as described in the ‘kiddy adventure pack’.
Let a second person help you to put the child carrier on and take it off.
Slip the shoulder straps over one after the other (Fig. 9).
Clip the lap belt in (Fig. 10, No. 1) and tighten it by tightening the two loose
straps on the left and right (Fig. 10, No. 2).
Now tighten both shoulder straps by pulling on the two loose straps (Fig. 11).
To adjust the position of the child seat in relation to your back (pull baby seat
closer), tighten the two straps over your shoulders (Fig. 12, No. 1).
This feature ensures that the weight is evenly distributed to the shoulders
and hips.
Now clip in the chest belt (Fig. 13) and tighten it (Fig. 14).
Fold in the stand.
Always fold the stand out when you place the child carrier on the
ground!
Never leave your child in the carrier for a long time when it is
standing on the floor. Never leave your child unattended.
6. Caring and storage
Check the child carrier for ripped seams, loose screws or rivets and other
damage before every trip. f necessary, retighten loose screws. Other spare
parts can be obtained from the specialist dealer or manufacturer.

ENG
The zippers, adjusters and buckles must be kept clean of all dirt.
The cover cannot be removed and can be cleaned with mild soapy water and
a cloth. Also use mild soapy water to clean the frame of the seat. Never use
an aggressive detergent or solvent. Never place the carrier in a washing
machine, tumble drier and don’t iron it.
The mouth guard can be washed at 30°C using the gentle cycle of the
washing machine. Fasten the Velcro® fasteners beforehand! Never dry it in
a tumble drier.
Dry off the child carrier after each trip! When the carrier is stored, clip in all
belts and place the ‘kiddy adventure pack’ completely dried off in a well-ven-
tilated and sun-protected site.
7. Limited Warranty
We provide a 2-year guarantee on the child carrier for manufacturing or
material defects. The guarantee period commences on the day of purchase.
A receipt is required for all claims. kiddy USA nc. takes pride in the quality
of our products and guarantees a 2 year warranty that materials and
workmanship will be free from defects
The guarantee is limited to child carriers which have been handled
appropriately and are returned in a clean and sound condition.
The guarantee does not extend to:
- Normal wear and tear and damage due to excessive load during use.
- Damage caused by inappropriate or improper use.
Fabrics: All our fabrics meet the highest standards regarding colourfastness
against UV radiation. However all materials discolour when they are exposed
to UV light. This will be considered as normal wear and tear and not as a
material defect. No guarantee can be assumed in this case.
Additional or replacement parts should be obtained from the manufacturer or
distributor. Please contact your specialist dealer immediately in the event of
a warranty claim.
9

Introducción.................................................................... 3
1. Instrucciones generales de seguridad.................... 3
2. Desembalaje.................................................................... 5
3. Ajustes.............................................................................. 5
3.1 Ajuste de la altura de la correa sujetadora......................... 5
3.2 Ajuste de la articulación de la correa sujetadora................ 5
3.3 Ajuste de la altura del toldo................................................. 6
3.4 Ajuste de la altura de las correas del sistema de correas
del asiento infantil................................................................ 6
3.5 Ajuste de la altura de asiento de la silla infantil.................. 6
3.6 Ajuste de la anchura del asiento infantil............................. 7
4. Cómo asegurar al niño................................................. 7
4.1 Apertura y cierre del sistema de correas............................ 7
4.2 Ajuste del sistema de correas............................................ 7
5. Poner y quitar el portabebés de espalda................ 8
6. Cuidados y almacenamiento...................................... 8
7. Garantia limitada............................................................ 9
ES

3
Instrucciones de uso “kiddy adventure pack”
¡ATENC ÓN! ¡GUARDAR PARA
POSTER ORES CONSULTAS!
Muchas gracias por haberse decidido por el portabebés de espalda
“adventure pack” de kiddy.
Su portabebés de espalda “kiddy adventure pack” es un producto de alta
calidad que hace posible un tiempo de uso prolongado si se usa
apropiadamente. Por lo general, los niños se encuentran cómodos en el
“kiddy adventure pack” y les gusta ir de paseo en él.
Antes de utilizar su “adventure pack” por primera vez, explíquele las
ventajas a su hijo y póngase el portabebés vacío.
Cuando vaya de paseo o de excursión con su “kiddy adventure pack” tenga
en cuenta que usted sentirá calor y que percibirá la temperatura ambiente
de forma distinta que el niño inactivo. Compruebe siempre, especialmente si
su hijo está durmiendo, que los pies del niño estén suficientemente
calientes.
Antes de realizar largos recorridos con el “kiddy adventure pack” “practique”
con su hijo el manejo del portabebés.
Su “kiddy adventure pack” ha sido revisado y autorizado según la norma
EN (D N) 13209-1. ¡Utilice su “kiddy adventure pack” siempre tal como se
describe en estas instrucciones de uso!
Asegurar todas las hebillas, los broches, tirantes y ajustamientos antes de
cada uso.
1. Instrucciones generales de seguridad
ADVERTENCIA - PEL GRO DE CA DA O STRANGULAM ENTO.
ADVERTENCIA - Tome la máxima precaución cuando se ponga o se quite
el portabebés.
ADVERTENCIA - Lea minuciosamente estas instrucciones de uso antes de
la utilización y consérvelas.
ES

4
ADVERTENCIA - No use este portabebés hasta que el niño se pueda
sentar correctamente y mantener la cabeza estable.
ADVERTENCIA - No deje al niño en el portabebés sin vigilar.
ADVERTENCIA - El portabebés puede soportar como máximo 44 lbs (20 kg)
de peso (niño + equipaje ≤ 44 lbs (20 kg)).
-peso del niño: mín. 16.09 lbs (7.3 kg) - máx. 39.68 lbs (18 kg);
-tamaño del niño: 27.56 inch (70 cm) - 41.34 inch (105 cm)
ADVERTENCIA - Póngale siempre al niño el cinturón de seguridad
conforme a estas instrucciones de uso.
ADVERTENCIA - No coloque nunca el portabebés en superficies elevadas
(p. ej., mesas, sillas, cómodas para cambiar pañales, etc.).
ADVERTENCIA - Despliegue siempre el estribo de apoyo antes de quitarse
el portabebés.
ADVERTENCIA - El niño puede fatigarse si permanece mucho rato sentado
y, especialmente en días fríos, se pueden provocar restricciones de la
circulación sanguínea. Para recorridos largos recomendamos hacer paradas
frecuentes.
ADVERTENCIA - Cuando el niño está sentado en el portabebés podría
superar en altura a otros adultos. Por tanto, hay que tener mucho cuidado
con marcos de puerta, ramas bajas de árboles, etc.
ADVERTENCIA - Hay que proceder con la máxima precaución al quitarse y
ponerse el portabebés.
ADVERTENCIA - Debido al movimiento tanto del niño como del adulto
puede verse reducido el equilibrio del adulto que porta al niño.
ADVERTENCIA - El adulto que porta al niño debe tener mucho cuidado al
inclinarse o apoyarse.
ADVERTENCIA - El portabebés es apto para usarlo en actividades de
tiempo libre, pero no para actividades deportivas.
ADVERTENCIA - Los compartimentos para equipaje se pueden cargar con
4 lbs (2 kg) como máximo de peso adicional (compartimento superior 1 lbs
(0,5 kg); compartimento inferior 3 lbs (1,5 kg)).
ADVERTENCIA - Queda estrictamente prohibido utilizar el portabebés como
un juguete.
ADVERTENCIA - Sea consciente de que el niño en el portabebés puede
sufrir las condiciones meteorológicas y la temperatura antes que usted.
ADVERTENCIA - Evite heridas serias por causa de caidas o
deslizamientos. Siempre utilize el sistema de retención para el niño.
ES

5
Hay que prestar atención para evitar lesiones a los pies del niño
cuando el portabebés está en el suelo o cerca de éste.
En caso de calor o frío extremos cerciórese de que no se encuentren
piezas metálicas al alcance del niño, ya que al tocarlas podría sufrir
heridas en la piel.
2. Desembalaje
El material del embalaje debe mantenerse necesariamente fuera del
alcance de los niños, debido al peligro de asfixia.
3. Ajustes
3.1 Ajuste de la altura de la correa sujetadora
Abra las dos lengüetas con las que las correas de transporte están fijadas a
su “kiddy adventure pack”. Enhebre las lengüetas de nuevo a la altura
correspondiente (fig. 1; cif. 1).
La altura de las correas estará correctamente ajustada cuando el cinturón
abdominal se sitúe por encima de las caderas del adulto. Una vez
efectuado este ajuste correctamente, su “kiddy adventure pack” presenta la
mayor comodidad de transporte y la espalda queda descargada.
Asegúrese de que las dos lengüetas estén firmemente cerradas
antes de la utilización.
3.2 Ajuste de la articulación de la correa sujetadora
El portabebés de espalda tiene 2 alturas (fig. 2; A y B) para la articulación de
las correas de transporte. Para cambiar la altura de las correas desenhebre
la correa de los ajustadores y enhébrela del mismo modo en los ajustadores
situados más arriba o más abajo.
Después del ajuste ambas correas deben quedar montadas a la
misma altura y estar tensadas de forma equilibrada.
ES

6
3.3 Ajuste de la altura del toldo
Para utilizar el toldo abra el cierre de cremallera en el reposacabezas del
portabebés de espalda.
Saque el toldo (fig. 3; cif. 1) y fije los dos ganchos del mismo a los
pasadores correspondientes del portabebés de espalda (fig. 3; cif. 2).
3.4 Ajuste de la altura de las correas del sistema de correas del asiento in antil
Las correas de los hombros del sistema de correas de 5 puntos se pueden
ajustar al tamaño corporal de su hijo en 3 alturas (fig. 4; A, B y C).
La altura de las correas se habrá elegido correctamente cuando las correas
de los hombros se sitúen ligeramente por encima de los hombros de su hijo.
Para utilizar las correas de los hombros en otra posición de altura
desenhebre ambas correas de los ajustadores, insértelas a la altura
correspondiente en ambos pasadores e introduzca las correas de nuevo por
los ajustadores (fig. 4).
Tras el ajuste, ambas correas de los hombros deben quedar
montadas a la misma altura y debe asegurarse que las correas se
mantienen en los ajustadores.
3.5 Ajuste de la altura de asiento de la silla in antil
La altura del asiento se puede ajustar al niño.
La altura del asiento puede ser ajustada con las cintas de ajuste, tirando se
eleverá el asiento (fig. 5; A) y soltando se bajará el asiento (fig. 5; B).
La barbilla del niño debe estar al nivel de la parte superior del forro de
protección.
La altura de asiento afecta también al sistema de correas de 5
puntos. Si ésta se desajusta, hay que revisar la posición correcta de
las correas de los hombros y volver a ajustar, en caso necesario.
ES

3.6 Ajuste de la anchura del asiento in antil
La anchura del asiento infantil es ajustable y se puede regular por medio de
las dos correas laterales.
¡Asegúrese de que el niño no pueda deslizarse a través de las
aberturas laterales durante el transporte!
Para ajustar la anchura, tense (fig. 6; cif. 1) o afloje (fig. 6; cif. 2) ambas
correas en los ajustadores.
4. Cómo asegurar al niño
4.1 Apertura y cierre del sistema de correas
Despliegue la base de soporte siempre que no lleve su “kiddy
adventure pack”.
Utilice el sistema de correas siempre que transporte a su hijo en el
“kiddy adventure pack”.
Para abrir el sistema de correas, presione los botones de cierre (fig.7; cif. 1)
y saque las lenguas de las correas de la cerradura (fig. 7; cif. 2).
Para cerrar el sistema de correas, introduzca las lenguas de las correas en
la cerradura.
Preste atención para que la cerradura esté correctamente cerrada y
que las correas no queden retorcidas y estén ajustadas de forma
óptima.
4.2 Ajuste del sistema de correas
Las correas de los hombros y el cinturón abdominal se pueden adaptar al
tamaño corporal de su hijo moviendo los ajustadores correspondientes.
Desplace los ajustadores de las correas en la dirección correspondiente
para influir en la longitud del sistema de correas (fig. 8).
7
ES

8
El sistema de correas quedará ajustado correctamente cuando quede una
distancia máxima de un dedo entre la correa y su hijo.
5. Poner y quitar la mochila portabebés
Asegure a su hijo en el “kiddy adventure pack” según se ha descrito.
Deje que una segunda persona le ayude al quitarse o ponerse la mochila
portabebés.
Pase los brazos, de forma sucesiva, por las dos correas de los hombros (fig. 9).
Cierre el cinturón abdominal (fig. 10; cif. 1) y ténselo a la vez que tensa a
izquierda y derecha las dos correas sueltas (fig. 10; cif. 2).
Tense ahora ambas correas de los hombros tirando de las dos correas
sueltas (fig. 11).
Para ajustar la posición del asiento infantil a su espalda (“capturar” el
asiento), tense ambas correas por encima de sus hombros (fig. 12; cif. 1).
Esta función se encarga de que el peso se reparta uniformemente sobre los
hombros y la espalda.
Cierre ahora el cinturón de pecho (fig. 13) y ténselo (fig. 14).
Pliegue la base de soporte.
¡Preste atención para desplegar la base de soporte siempre que se
quite la mochila portabebés!
Saque a su hijo de la mochila portabebés únicamente cuando ésta
esté en el suelo. De ningún modo deje a su hijo sin vigilar.
6. Cuidados y almacenamiento
Antes de cada excursión compruebe que la mochila portabebés no tenga
costuras abiertas, tornillos o remaches sueltos y otros deterioros. En caso
necesario, apriete los tornillos sueltos; las demás piezas de recambio podrá
obtenerlas en el distribuidor especializado o en el fabricante.
ES

Los cierres de cremallera, ajustadores y cerraduras deben mantenerse
limpios a toda costa.
La funda no se puede quitar, pero se puede limpiar con una solución
jabonosa suave y un trapo. Para limpiar el armazón del asiento use
igualmente una solución jabonosa suave. Bajo ningún concepto utilice
disolventes o productos de limpieza agresivos. No introduzca nunca la
mochila portabebés en una lavadora o una secadora, y tampoco la planche.
El protector de boca se puede lavar a 30 °C en la lavadora, en el programa
de lavado suave. ¡Para ello cierre los cierres de velcro! Nunca lo seque en
la secadora.
¡Seque su mochila portabebés después de cada excursión! Para guardar la
mochila portabebés, cierre todas las correas y coloque su “kiddy adventure
pack” completamente seco en un lugar bien ventilado y protegido de la luz
solar.
7. Garantia limitada
Para la mochila portabebés ofrecemos una garantía de 2 años en defectos
de fabricación o material. El periodo de garantía se inicia el día de la
compra. La base de la reclamación es el ticket de compra. kiddy USA nc. se
enorgullece en la calidad de nuestros productos y garantiza el material y su
confección libre de defectos en una garantia de 2 años.)
La prestación de la garantía se limita a las mochilas portabebés que se han
tratado de forma apropiada y se envían de vuelta limpias y en buen estado.
La garantía no se extiende a:
- desgastes naturales y daños causados por utilización excesiva
- daños causados por un uso inadecuado o indebido
Materiales: todos nuestros materiales cumplen requerimientos estrictos
referentes a la resistencia de los colores frente a la radiación UV. Sin
embargo, todos los materiales se decoloran cuando se exponen a radiación
UV. Por consiguiente, no se trata de ningún fallo del material, sino de la
aparición del desgaste normal, para el cual no se asume ninguna garantía.
Únicamente está permitido adquirir piezas de repuesto o adicionales al
distribuidor especializado o al fabricante. Para utilizar la garantía diríjase
inmediatamente a su distribuidor.
9
ES
Table of contents
Languages:
Other KIDDY Baby Carrier manuals

KIDDY
KIDDY Evolution Pro Manual

KIDDY
KIDDY Evolution Pro 2 User manual

KIDDY
KIDDY MAXI PRO Manual

KIDDY
KIDDY SMILEFIX PRO Manual

KIDDY
KIDDY RELAX PRO - ANNEXE 438 User manual

KIDDY
KIDDY RELAX PRO - Manual

KIDDY
KIDDY NEST - Manual

KIDDY
KIDDY SMILEFIX PRO User manual

KIDDY
KIDDY kiddy carry system Manual

KIDDY
KIDDY EVO-LUNA I-SIZE Manual