Kielder KWT-013 User guide

1
Kielder WT Ltd KWT-013-IMH22
ORIGINAL INSTRUCTION MANUAL
For use with all variants of KWT-013 Cordless Angle Grinder TYPE18
KIELDER 18V BATTERY SYSTEM
KWT-013
Kielder
18V CORDLESS ANGLE GRINDER
www.kielder.co

2
KWT-013-IMH22 Kielder WT Ltd
Warranty & Support
The Kielder 3 Year Warranty
To take advantage of the Kielder
3 year warranty the product must
be registered within 30 days of
Purchase or Delivery.
Please register your product by
completing the online form at:
www.kielder.co
...or call customer services on:
0114 242 3794
Why is Registration a Requirement?
For Kielder to be able to fully support & service
a product warranty over a 3 year period it is
imperative that the product is registered.
If the product hasn’t been registered we’re
simply not able to fully administer a warranty
of this duration and therefore can only oer
a standard 12 month guarantee for any
unregistered product.
Note: Batteries are excluded from the 3 Year
Warranty. Battery packs are classed as being
a consumable item and they have a separate
xed period warranty of 12 months.
Warranty Statement
• Each Kielder product is thoroughly inspected
during production and is guaranteed to
perform as specied. The product will be
free of defects, in both workmanship and
materials, for the duration of the warranty
from the date the product is purchased.
• The warranty becomes eective at the date
of purchase (or the date of delivery if this is
later).
• In the event that your machine needs
repairing or replacing, you must provide proof
of purchase/delivery before any work can be
carried out on your machine. Without this,
any work carried out may be chargeable.
• If your product requires attention from our
engineers, we aim to have it collected &
repaired within 7-10 working days.
• The repair or replacement of your machine
under warranty will not extend the period of
warranty.
• The warranty provides benets which are
additional to and do not aect your statutory
rights as a consumer.
What is covered?
• The repair or replacement of your machine
(at Kielder’s discretion), if your machine is
found to be defective due to faulty materials,
workmanship or function within the warranty
period (if any part is no longer available or out
of manufacture, Kielder will replace it with a
functional replacement part).
• Use of the machine in the UK only, overseas
users should contact the ocial importer or
retailer for that country.
What is not covered?
• Kielder does not guarantee the repair or
replacement of a product incurred as a result
of normal wear and tear.
• Accidental damage, faults caused by
negligent use or care, misuse, neglect,
careless operation or handling of the product
which is not as instructed in Kielder’s
Instruction manual.
• Batteries are excluded from the 3 Year
warranty.
• Use of parts not assembled or installed in
accordance with the instructions of Kielder.
• Use of parts which are not Kielder genuine
components.
• Faulty installation (except installation by
Kielder).
• Repairs or alterations carried out by parties
other than Kielder.
How to contact Kielder
If you have any queries over your product,
please don’t hesitate to contact us via:
tools@kielder.co
or call customer services on:
0114 242 3794.
...and we’ll be happy to help.

3
Kielder WT Ltd KWT-013-IMH22
Noise & Vibration Data
Acoustic Pressure: <84 dB(A) K=3dB
Acoustic Power: <95 dB(A) K=3dB
Maximum Vibration (surface grinding): 7.0m/s2
/ K = 1.5m/s2
Sound emission values determined according
to EN60745-2-3. The declared vibration total
value has been measured in accordance with a
standard test method used to compare one tool
with another and according to EN60745. Both
sound and vibration values have an uncertainty
factor of K. The declared total values may be used
in a preliminary assessment of exposure.
WARNING!
The vibration emission during
actual use of the power tool can
dier from the declared total
value depending on the ways in which the tool is
used. The need to identify safety measures and to
protect the operator are based on an estimation
of exposure in the actual conditions of use (taking
account of all parts of the operating cycle, such
as the times the tool is switched o, when it is
running idle, in addition to trigger time). Identify
additional safety measures to protect the operator
such as proper maintenance of the tool, keeping
hands warm and organisation of work patterns.
CONTENTS
Safety Rules & Instruction 4
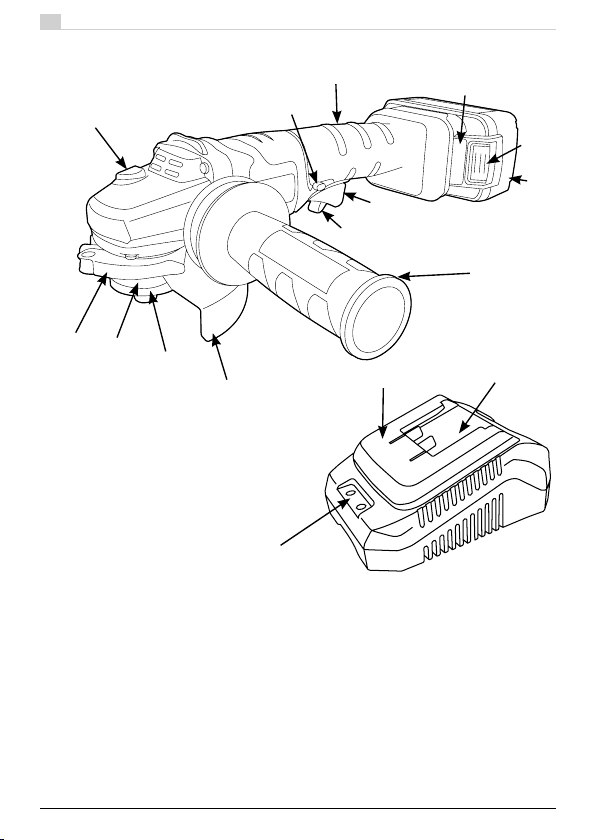
Product Overview Diagram 10
Specication Table 11
Usage
Angle Grinder 12
Battery 16
Charger 18
Warranty & Support 20
EC - Declaration Of
Conformity
We declare that under our responsibility the
product under part number:
KWT-013 18V Cordless Angle Grinder complies
with the applicable EU directives:
2011/65/EU, 2014/30/EU, 2006/42/EC
including the amendments and are manufactured
in accordance following standards or
standardised documents:
EN 60745-1
EN 60745-2-3
All documentation is held in KWT-013 Technical
File and is available, on request for review.
Authorised Signatory:
Steven Bulloss
Director
Dated: 10/05/22
Kielder WT Ltd, Unit 14 Carlisle Business Park,
40 Chambers Lane, Sheeld S4 8DA
IMPORTANT!
Please read these operating and
safety instructions carefully and
completely. For your own safety,
before using this equipment check that all
external parts are rmly secured and the machine
in tact. If you are uncertain about any aspect of
using this equipment, or require support please
contact Kielder WT customer services and we’ll
be happy to help:
Tel: 0114 242 3794 Email: tools@kielder.co
Plug Type
• The appliance is supplied with a moulded three
pin mains plug for your safety and convenience.
• Only use this plug in the socket it is intended.
• A 3 amp fuse is tted in this plug. Should
the fuse need to be replaced please ensure that
the replacement fuse has a 3 amp rating and it is
approved by ASTA or BSI to BS1362.
• Check for the ASTA mark or the BSI mark on the
fuse.
• If the plug contains a removable fuse cover, you
must ensure that it is retted when the fuse
is replaced.
• If you lose the fuse cover the plug must not be
used until a replacement cover is obtained.
Intended Use
With the appropriate disc tted, this tool is
intended for surface preparation and nishing.
DANGER!
This tool has a rotating disc,
which is capable of cutting
you and causing serious injury
or death, if not used correctly. Please read this
manual and the cautionary markings on the tool
and obey the safety instructions to avoid injury.
If you allow someone else to use the tool please
ensure that they have read this manual or have
been fully trained in its proper and safe use.

4
KWT-013-IMH22 Kielder WT Ltd
WARNING!
This product uses Lithium
Battery cells, do not use if
the battery has been damaged in transit
or becomes damaged during use. If
Lithium-ion cells are damaged they
present a ammable hazard.
General Safety
Warning: when using electric tools, basic
safety precautions should always be
followed to reduce the risk of re, electric
shock and personal injury. Please read all
of these instructions before attempting to
operate this machine. Save this manual for
future reference.
• Keep work area clear. Cluttered work
areas invite accidents.
• Consider work area environment. Do not
expose tools to rain. Do not use tools in
damp or wet locations. Keep work area
well lit. Never use tools near ammable
liquids or gases.
• Protect yourself against electric shock.
Avoid body contact with earthed or
grounded surfaces.
• Keep other people away. Do not let others,
especially children, come close to the
work, and touch the tool or power cable.
Keep them away from the work area.
• Store idle tools. When not in use, tools
should be stored in a dry locked-up place,
out of children’s reach.
• Never force the tools. Your tools will be
more ecient and safer when used at the
rate for which they were intended.
Personal Safety
• Stay alert, watch what you are doing and
use common sense when operating a
power tool. Do not use a power tool while
you are tired or under the inuence of
drugs, alcohol or medication. A moment
of inattention while operating power tools
may result in serious personal injury.
• Use personal protective equipment.
Always wear eye protection. Protective
equipment such as dust mask, non-
skid safety shoes, hard hat, hearing
protection, anti-vibration gloves used
for appropriate conditions will reduce
personal injuries.
• Prevent unintentional starting. Ensure
the switch is in the o-position before
connecting to power source and/or
battery pack, picking up or carrying the
tool. Carrying power tools with your
nger on the switch or energising power
tools that have the switch on invites
accidents.
• Remove any adjusting key or wrench
before turning a power tool on. A wrench
or a key left attached to a rotating part
of the power tool may result in personal
injury.
• Do not overreach. Keep proper footing
and balance at all times. This enables
better control of the power tool in
unexpected situations.
• Dress properly. Do not wear loose
clothing or jewellery. Keep your hair,
clothing and gloves away from moving
parts. Loose clothes, jewellery or long
hair can be caught in moving parts.
• If devices are provided for the connection
of dust extraction and collection facilities,
ensure these are connected and properly
used. Use of dust collection can reduce
dust-related hazards.

5
Kielder WT Ltd KWT-013-IMH22
Safe Use Of Power Tools
Do not force the power tool. Use the correct
power tool for your application. The correct
tool will do the job better and safer at the
rate for which it was designed.
• Do not use the power tool if the switch
does not turn it on and o. Any power tool
that cannot be controlled with the switch
is dangerous and must be repaired.
• Disconnect the plug from the power source
and/or the battery pack from the power
tool before making any adjustments,
changing accessories, or storing power
tools. Such preventive safety measures
reduce the risk of starting the power tool
accidentally.
• Store idle power tools out of the reach
of children and do not allow persons
unfamiliar with the power tool or these
instructions to operate the tool. Power
tools are dangerous in the hands of
untrained users.
• Maintain power tools. Check for
misalignment or binding of moving parts,
breakage of parts and any other condition
that may aect the power tool’s operation.
If damaged, have the power tool repaired
before use. Many accidents are caused
by poorly maintained power tools.
• Keep cutting tools sharp and clean.
Properly maintained cutting tools with
sharp cutting edges are less likely to bind
and are easier to control.
• Use the power tool, accessories and
tool bits etc. in accordance with these
instructions, taking into account the
working conditions and the work to be
performed. Use of the power tool for
operations dierent from those intended
could result in a hazardous situation.
Battery & Charger
Recharge battery only with the charger
specied by the manufacturer. A charger that
is suitable for a certain type of battery pack
may create a risk of re when used with
another battery pack.
• Use power tools only with specically
designated battery packs. Use of any
other battery packs may create a risk of
injury and re.
• Keep battery pack and charger away
from other metal objects, like paper clips,
coins, keys, nails, screws or other small
metal objects, that can make a connection
from one terminal to another. Shorting the
terminals together may cause burns or a
re.
• Under abusive conditions, liquid may be
ejected from the battery; avoid contact.
If contact accidentally occurs, ush with
water. If liquid contacts eyes, additionally
seek medical help. Liquid ejected from the
battery may cause irritation or burns.
Service
Have your power tool serviced or repaired
by Kielder or a qualied technician using
only identical replacement parts. This will
ensure that the safety of the power tool is
maintained.

6
KWT-013-IMH22 Kielder WT Ltd
• Wear ear protectors.
Exposure to noise can
cause hearing loss.
• Wear eye protection to
protect from loose particles
which may be thrown from
the workpiece.
• Wear a dust mask or
respirator if the work
creates dust.
•
Wear anti-vibration or
vibration absorbing gloves.
• This power tool is intended as a grinder.
Please read all safety warnings and
instructions before using this machine.
Failure to follow all instructions given may
result in an electric shock, serious injury or
re.
• The power tool should only be used for
operation for which it has been designed
- other operations are not recommended
and may result in damage to the tool and/
or personal injury.
• The rated speed of any accessory must
be at least equal to the maximum speed
marked on the power tool. Accessories that
are run faster than their rated speed may
break and cause damage.
• The size and thickness of the accessory
used must be within the capacity rating of
the power tool. Wrongly sized accessories
cannot be correctly controlled or safely
guarded.
• The threaded mounting of accessories must
match the spindle thread of the grinder.
Any accessories mounted by anges must
t the locating diameter of the tool’s ange
by way of the arbour hole of the accessory.
Additional Safety & Working
Instructions
Accessories not matching the mounting
hardware of the tool will run o balance,
with excessive vibration and cause loss of
control.
• Do not use any damaged accessory. All
accessories should be inspected before use
and checked for chips and cracks. If the tool
or accessory is dropped, please inspect for
damage before using. After inspecting and
installing an accessory, place yourself and
anyone else in close proximity, away from
the rotating accessory and run the tool for
one minute at maximum load speed.
• Wear personal protective equipment i.e.
hearing protectors, eye protection (face
shield, safety goggles or safety glasses),
gloves, dust mask and a workshop apron
that is capable of stopping small abrasive
or workpiece fragments. The dust mask or
respirator must be able to ltrate particles
produced by the operating tool. Please note
that prolonged exposure to high intensity
noise may cause hearing loss.
• Any person entering the work area must
also wear personal protective equipment.
Fragments of the workpiece of form a
broken accessory may y o and cause
injury to persons beyond the immaculate
area of operation.
• Do not activate the power tool while it is
being carried. Accidental contact with the
rotating accessory could snag on your
clothes and cause serious injury.
• The air vents of the power tool should be
cleaned regularly as the motor’s fan will
draw dust into the housing. Accumulation of
powdered metal will cause damage to the
motor and may cause electrical hazards.
• Do not use the power tool near ammable
materials. Any sparks produced could ignite
such materials.
• Do not use any accessories that require
liquid coolants as this may result in
electrocution or shock.
• If necessary, fully secure the workpiece in
a vice or clamp. Never hold a workpiece by
hand.

7
Kielder WT Ltd KWT-013-IMH22
•Always wait until the tool has stopped
completely before setting it down.
•Hold power tools by the insulated gripping
surface as the tool may contact hidden wiring
when working into areas such as walls or
oors. Contact with a ‘live’ wire will make
exposed metal parts of the tool ‘live’ and
shock the operator.
•Be aware that this tool is always in an
operating condition as it does not have to be
plugged into an electrical socket.
Operational Safety - Kickback
& Related Warnings
• Kickback is a sudden reaction to a snagged
rotating wheel or any other accessory.
Snagging causes the rotating accessory
to stall sharply, which in turn results in the
uncontrolled power tool to be forced in the
opposite direction of the accessory rotation.
If an abrasive wheel is snagged or pinched
by the workpiece, the edge of the wheel
that enters the pinch point can dig into the
material’s surface causing the wheel to kick
out. The wheel may jump toward or away
from the operator, depending on the direction
of the wheel’s movement at the point of
pinching. Abrasive wheels may break as a
result.
Kickback is the result of power tool
misuse/incorrect operating procedures
and can be avoided by taking the
following precautions:-
•Maintain a rm grip on the power tool and
position your body and arm to allow you to
resist kickback. The operator can control
torque reactions or kickback forces if the
proper precautions are followed.
• Do not put your hand near the rotating
accessory as the accessory may kickback
over your hand.
• Do not position your body in an area where
the power tool will move if kickback happens.
A kickback will move the tool in the opposite
direction to the wheel’s movement at the
point of snagging.
• Use special care when working on sharp
edges and corners to avoid bouncing or
snagging the accessory which may cause
kickback or loss of control.
• Do not attach a toothed saw blade or saw
chain woodcarving blade as these blades
frequently cause kickback and loss of
control.
Warnings Specic to Abrasive
Disc Operations
• Use only wheel types that are compatible
with your power tool together with the
specially designed guard for the selected
wheel. Wheels that haven’t been designed
for use on the tool are not safe as they
cannot be guarded securely.
• The grinding surface of centre recessed
wheels must be mounted below the plane
of the guard lip to provide adequate
protection.
• The guard should be securely attached
to the power tool and positioned so that
the least amount of wheel is exposed.
The guard protects the operator from
any broken wheel fragments as well as
preventing accidental contact with wheel
and sparks that could ignite clothing.
• Wheels must only be used for specied
applications. Do not grind with the side of
the cut-o wheel. Side forces applied to
abrasive cut-o wheels may cause them to
shatter.
• Use undamaged wheel anges of the
correct size and shape for the selected
wheel. Wheel anges support the wheel and
reduce the possibility of breakage. Flanges
for cut-o wheels may be dierent from
grinding wheel anges.
• Don’t use worn down wheels from larger
power tools as these are not suitable for the
higher speed of a small tool and may break.

8
KWT-013-IMH22 Kielder WT Ltd
• When the battery pack is not being used,
the battery should be stored so that foreign
substances like dust and water do not
contaminate the unit.
• When the battery pack is being charged,
ensure that the terminals are free of dust
and water. Clean the terminals before using
the battery if any foreign substances are
seen.
• During charging the charger and battery
may become slightly warm. This is normal.
DO NOT charge the battery for a long
period.
• The life of the battery pack may be
adversely aected by dust or water during
operation.
• If the motor or battery becomes hot, the
protection function will activate and the
motor or battery will stop operating.
• Before inserting the battery pack, always
check to ensure that the tool is turned o.
• For safe use ensure that the battery pack is
installed properly and securely to the main
unit before operating.
• Do not use other than the Kielder battery
packs that are designed for use with this
rechargeable tool.
• Kielder is not responsible for any damage
or accident caused by the use
of recycled or counterfeit battery
packs.
• Do not dispose of the battery
pack in a re or expose it to excessive heat.
• Do not attempt to dismantle or modify the
battery pack.
• Do not subject the battery pack to shocks or
drive nails or similar items into it.
• Do not allow metal objects to touch the
terminals on the battery pack.
CAUTION!
This product is powered
by a rechargeable battery
system, please pay
attention to these additional instructions:
WARNING!
Do not touch grinding
disc, workpiece or any o-
cuts until they have cooled down. These
items can become extremely hot while
working and pose a signicant burn risk.
Additional Safety Warnings
Specic For Abrasive Cut
O Operations
• Do not apply excessive pressure or attempt
to make an excessive cut as this will ‘jam’
the cut-o wheel. Over-stressing the wheel
increases the load with potential for twisting
or binding of the wheel in the cut and the
possibility of kickback or wheel breakage.
• Do not position your body in line with and
behind the rotating wheel as the wheel,
at the point of operation, is moving away
from your body. The possible kickback may
propel the spinning wheel and the power
tool towards you.
• When the wheel is binding or when
interrupting a cut, switch o the power tool
and hold it motionless until the wheel comes
to a stop. Do not remove the cut-o wheel
from the cut while the wheel is in motion,
otherwise kickback may occur. If the wheel is
binding, investigate and take action to clear
the cause.
• Do not restart the cutting action in the
workpiece. The wheel may bind or kickback
if the power tool is restarted in the workpiece.
• Ensure any large workpieces are supported
to reduce the risk of wheel pinching and
kickback. Larger workpieces can sag under
their own weight and supports should be put
under the workpiece near the line of cut and
near the edge on both sides of the wheel.
• Take care when making a ‘pocket cut’ into
walls or other blind areas. The wheel may
cut into gas or water pipes, electrical wiring
or objects that can cause kickback.

9
Kielder WT Ltd KWT-013-IMH22
Collection And Disposal Of Old Equipment
And Used Batteries:
These symbols on the products, packaging
and accompanying documents mean that
used electronic products and batteries should
not be mixed with general household waste.
• Do not carry or store the battery
pack in the same container as
nails or small metal objects.
• Do not charge the battery pack in a high
temperature location e.g. next to a re or in
direct sunlight. The battery may overheat,
catch re or explode.
• Do not use other than the dedicated
charger to charge the battery pack as the
battery may leak, overheat or explode.
• When removing the battery pack from the
tool or the charger, always reattach the
pack cover as the battery contacts could
be shorted, leading to a risk of re.
• When the battery pack has deteriorated
replace it with a new one. Continued use
of a damaged battery pack may result in
heat generation, ignition or rupture of the
battery.
MAX 45ºC
Li-Ion
For proper treatment, recovery and recycling
of old products and used batteries, please
take them to applicable collection points, in
accordance with the national legislation and
the Directives 2002/96/EC and 2006/66/EC.
By disposing of these products and batteries
correctly, you will help to save valuable
resources and prevent any potential negative
eects on human health and the environment
which could otherwise arise from inappropriate
waste handling.
For more information about collection and
recycling of old products and batteries, please
contact your local municipality, your waste
disposal service or the point of sale where you
purchased the items.
Penalties may apply for the incorrect
disposal of waste in accordance with national
legislation.
Attaching The Side Support
Handle
CAUTION!
When attaching or removing
a support handle, disconnect
battery pack from tool.
CAUTION!
Always be sure that the support
handle is installed securely
before operation.
• Screw the side handle on securely as
shown (A)
• The handle can be mounted on the
opposite side of the tool to suit application
or user preference (B)
(A)
(B)

10
KWT-013-IMH22 Kielder WT Ltd
(16)
(15)
(14)
PRODUCT OVERVIEW
(1) Spindle Lock
(2) Guard Release Lever
(3) Upper Disc Plate
(4) Quick Release Nut
(5) Disc Guard
(6) Side Support Handle
(7) Trigger
(8) Trigger Safety Switch
(9) Lock-on button
(10) Hand Grip
(11) Battery; attached to tool
(12) Battery Release Button
(13) Battery Charge Level Indicator
(14) Charger
(15) Battery Insert Slide
(16) Charge Indicator
(1)
(2) (3)
(4)
(5)
(6)
(8)
(7)
(9)
(10)
(11)
(12)
(13)

11
Kielder WT Ltd KWT-013-IMH22
SPECIFICATIONS
Main Unit
Model KWT-013
Motor Voltage 18.0V - DC
Motor Type Digital Brushless
Spindle Thread M14
Weight (with battery KWT-003-25 tted) 2.3kg
Weight (without battery tted) 1.7kg
No Load Speed 4500 – 8000rpm
Speed Settings 5
Max Disc Diameter 115mm / 41/2"
Spindle Length 12.6mm
Battery Type Lithium-ion
Battery Pack
Model KWT-003
Cell Type Lithium-ion
Battery Voltage 18.0V DC
Weight (KWT-003-25) 0.6Kg
Battery Charger
Model KWT-004
Ratings See Rating Label on Base of Charger
Charge Time: KWT-003-25 (5.0AH) 90 mins
Weight 0.4Kg
VVolts
Direct Current
min-1 Revolutions Per Minute
Ah Electrical Capacity
Class II construction
(double insulated)
Indoor Use Only
Conforms to CE
standard
Do not burn or
incinerate
Maximum safe ambient
temperature for battery
MAX 45ºC
Read Instruction Manual
Before Use
Wear Hearing Protection
Wear Safety Glasses
Wear Vibration Absorbing
Gloves

12
KWT-013-IMH22 Kielder WT Ltd
USAGE
Fitting The Disc
WARNING!
Before any work on the
machine itself such as
maintenance or a disc change, remove the
battery from the tool as there is danger of
injury if the trigger is unintentionally actuated.
Pre Fitting Checks:
• Ensure that the correct grinding disc is being
used for the workpiece.
• Ensure the disc is the proper diameter for the
tool. Do not use spacers or reducers.
• Ensure the disc being tted complies with
relevant safety standards – EN if using in UK
& Europe.
• If applicable pay attention to the stated
rotation direction of the disc and match to
the direction arrow marked on the tool.
• If blotters are supplied with disc, ensure they
are tted to apply even pressure to the disc
mount area.
(E)
Fitting:
• Lift the ap (C) and unscrew until the quick
release nut comes loose. You then remove
the nut to reveal the spindle. Ensure you
depress the Spindle Lock (D) to prevent the
spindle from turning.
• With the quick release nut removed, locate
the disc over the spindle and onto the lower
ange, the bore of disc should be a perfect t
on to the spindle shoulder (E).
Note:
When tting a disc, ensure the spindle and disc
bore are clean and free from debris.
(C)
(C)
Note:
The Spindle Lock button (D) must be fully
depressed to properly engage with the gears
and lock the spindle.
(D)

13
Kielder WT Ltd KWT-013-IMH22
• To adjust the guard, release the cam-
lock lever (F) and rotate the guard into
appropriate position. Replace the cam-lock
lever to secure the guard in place.
CAUTION!
The Grinding Disc guard must
be adjusted on the tool so that
the closed side of the guard always faces
towards the operator.
WARNING!
Always use the supplied guard
when using the tool. The
disc could shatter during use
and the disc guard reduces the chance of
personal injury.
(F)
Attaching or Removing the
Battery Pack
Note:
The battery pack is not fully charged at the
time of purchase. Be sure to charge the
battery before use.
Connect The Battery Pack:
Line up the alignment channels and slide on
the battery pack.
Slide the battery pack until it locks into
position with an audible “CLICK”.
Remove The Battery Pack:
Depress the button (G) at the front of the
battery indication panel and slide the battery
pack out.
(G)

14
KWT-013-IMH22 Kielder WT Ltd
Operating the Tool
WARNING!
Do not force the tool as the
weight of the tool applies
adequate pressure. Forcing with excessive
pressure could cause the overload cut-out
system to be activated or even lead to the
grinding disc breaking.
• Always replace the grinding disc if the tool is
dropped while in use.
• Do not hit or bang the grinding disc.
• Avoid bouncing and snagging the grinding
disc, especially when working on corners
or sharp edges as this can cause loss of
control and kickback.
CAUTION!
Always wait until the disc has
come to a complete stop before putting the
tool down.
Before use carry out a visual Inspection
and run test on the disc:
• Ensure that the disc has no cracks or other
damage before use.
• Always conduct a run test on the disc as
follows.
- Newly tted disc: 3 minutes
- Used disc 1 minute
• To start the machine, move the trigger lock
back (H) and depress the trigger (I).
Grinding Operation
Hold the tool rmly - with one hand on the
main grip (J) and the other on the side support
handle (K). Switch on the tool and apply the
wheel or disc to the workpiece. Keep the edge
of the grinding disc at an angle of about 15-30
degrees to the workpiece surface.
• When using a new grinding disc, do not work
in a forward direction, only draw the grinder
in a backward direction away from the
leading edge of the disc, or it will cut into the
workpiece. Once the edge of the grinding
disc has been rounded o by use, it may be
used in both directions.
WARNING!
Never depress the Spindle
Lock button whilst the tool
is operating. Nor use the Spindle Lock to
stop the tool. If the Spindle Lock engages
whilst the tool is operating it could cause
catastrophic damage to the machine, with risk
of personal injury.
(H)
(I)
15-30º
(J)
(K)
Note:
Dual function switch can be operated as
a trigger or with lock-on.

15
Kielder WT Ltd KWT-013-IMH22
Variable Speed
This tool comes with a variable speed button
of 5 levels. Once the tool is started up, press
the speed button (L) until you reach your
desired speed.
Cut-O Operation
(cut-o guard available as an accessory,
not included)
WARNING!
• When using an abrasive cut-
o disc, only use a cut-o disc
guard designed for using with a cut-o disc.
• Never use a cut-o disc for grinding.
• Do not apply excessive pressure or jam
when making a cut.
• Don’t attempt to make an excessive depth
of cut in one go. Too much stress on the cut-
o disc increases the load and susceptibility
to twisting or binding of the cut-o disc
breakage and overheating of the motor may
also occur.
• Never start the tool when the disc is in the
workpiece. This can cause the cut-o disc
to bind or kickback. Allow the cut-o disc to
reach full speed and carefully oer into the
workpiece to carry out the cut.
• During cutting operations, do not change the
angle of the disc. Placing side pressure on
the cut-o disc (as per grinding) will cause
the disc to crack and break, resulting in
serious personal injury.
CAUTION!
• Do not close or block the
ventilation slots on the side of
the tool body as the function will be adversely
aected and can cause a failure.
• Do not put strain on the motor as this will
activate the overload protection system or
could cause permanent damage to the tool.
• Use the tool so that the air from the
ventilation slots does not blow onto you and
thus prevent being burned.
(L)

16
KWT-013-IMH22 Kielder WT Ltd
CAUTION!
Don’t operate the tool
continuously when switching
battery packs. The tool requires
time to cool down in between. In normal
operating ambient temperatures this should
take around 5 minutes, in hot working
conditions allow a longer time for the tool to
cool down.
Battery Level Indicator
• The Battery Level indicator is located on the
front of the battery. To check the amount of
power remaining, press and hold the small
circular button (M) on the indication panel.
• If the tool is started with little battery power
remaining, it may stop operating after a short
time. If this happens, check the battery power
remaining by pressing the small circular
button (M) on the indicator panel and charge
the battery pack accordingly.
•
When the battery pack becomes nearly
discharged the voltage decreases and the
power level drops.
• Excessive discharging of lithium-ion batteries
dramatically shortens their life. This tool
includes a battery protection feature to
prevent excessive discharging of the battery
pack. If the tool is subject to a sudden load
during use that causes the motor to lock, the
over-discharge prevention sensor may trigger.
If this happens, address the issue that caused
the motor to lock and cycle the trigger.
Note:
The battery level indicator is just a guide. The
indication may change due to the condition of
the battery or the ambient temperature.
Take note of which of the three lights are
illuminated.
Red, Yellow & Green illuminated = High
Charge
Red & Yellow illuminated = Med-Low Charge
Red light illuminated = No Charge
• If the battery is of low charge, it should be
charged before further use.
• The battery level indicator may be used
with battery connected or disconnected to
the tool.
Red Yellow Green
Battery Pack Life
The rechargeable batteries have a limited
life. If the operation time becomes short
after recharging, replace the battery pack.
ATTENTION!
Battery Recycling
For environmental protection
and recycling of materials, please ensure
that the battery pack is disposed of at an
ocially assigned location
(M)

17
Kielder WT Ltd KWT-013-IMH22
Battery Care
• For optimum battery life, store the battery
pack following use without charging it.
• Do not charge the battery pack when the
temperature is below 0°C or above 40°C.
• When charging the battery pack ensure
that the terminals on the battery charger
are free of foreign objects such as dust and
water. If any dirt is found on the terminals
clean the terminals before charging the
battery pack. The life of the battery pack
terminals may also be aected by foreign
objects during operation.
• Avoid storing the battery pack in a
container with other metal objects such as
nails, coins, etc. Metal objects can make
a connection from one terminal to another
and could short the battery terminals
resulting in overheating and irreparable
damage to the battery, sparks, burns or
re.
• Do not touch the terminals with any
conductive material.
• When operating the battery pack, ensure
that the work place is well ventilated.
• When the battery pack is removed from the
main unit, store the battery in a location to
prevent dust or dirt from contaminating the
battery terminals which may cause a short
circuit.
• Do not store the battery pack in locations
where the temperature may reach or
exceed 45°C.
• Do not incinerate the battery pack even if it
is severely damaged or is completely worn
out. The battery pack can explode in a re.
• Do not expose the battery pack to water
or rain.
• Be careful not to drop, shake or strike the
battery.
Maintenance
• This tool requires no major additional
lubrication or maintenance, only to keep the
tool in a good clean condition. In particular
around any moving parts such as the trigger
and around gaps in the housing such as air
vents. The spindle and anges should be
kept free from debris to ensure secure and
‘true’ tting of the disc.
• When cleaning use only a dry soft cloth or
brush for cleaning the tool or a gentle ow
of compressed air. Do not use a damp
cloth, thinner, benzene etc or other volatile
solvents for cleaning.
• If the inside of the tool or battery pack is
exposed to water, drain and allow to dry
thoroughly as soon as possible before using
again. If you experience any problems when
operating the tool, contact Kielder WT.

18
KWT-013-IMH22 Kielder WT Ltd
Charging The Battery Pack
CAUTION!
• The charger is designed to
operate on standard domestic
electrical power as shown on
the rating plate. Charge only on the voltage
indicated on the rating plate e.g. 230v/50Hz.
• Do not attempt to use it on any other voltage
or frequency rating!
• If the temperature of the battery pack is
extremely low, charging may automatically
stop to prevent degradation of the battery.
• The ambient temperature range for charging
is between 0°C and 40°C. The battery pack
may not work if the temperature is outside
these parameters.
• When charging a cool battery pack (below
0°C) in a warm place, leave the battery pack
at the place and wait for more than one
hour to warm up the battery to the ambient
temperature.
• Allow the charger to cool in between charges,
when charging more than two battery packs
consecutively.
• Do not insert your ngers onto the contact
area at any time.
• To prevent the risk of re or damage to the
battery charger, do not cover vent holes on
the charger and the battery pack.
• Unplug the charger when not in use.
• Take care to ensure metal objects such
as nails, coins etc are kept away from the
charger. Metal objects can make a connection
from one terminal to another and could short
the charging unit.
• Ensure that the terminals on the charger are
free of foreign objects such as dust and water.
If any dirt is found on the terminals clean the
terminals before charging the battery pack.
• When the charger is not in use, store in
a location to prevent dust or dirt from
contaminating the terminals which may cause
a fault or short circuit.
• Position the charger on a work bench or
similar in a well ventilated location and
ensure that the charger cannot be covered
by workshop cloths etc.
• Plug the charger into a suitable power
socket. The green LED (N) will illuminate.
Note:
Sparks may be produced when the plug is
inserted into the power supply but this isn’t
a problem in terms of safety.
• Connect the battery pack into the charger;
line up the alignment channels on the
battery (O) with the corresponding channels
on the charger (P) and slide the battery into
place.
WARNING!
When a battery becomes
discharged due to prolonged
use or exposure to direct sunlight or heat,
always allow the battery pack to cool down
before recharging. This will allow the battery
to be recharged to its full capacity.
(N)
(P)
(O)

19
Kielder WT Ltd KWT-013-IMH22
• The red charging LED (Q) will be illuminated
during charging. When charging is
completed an internal electronic switch
will automatically trigger to prevent
overcharging. Charging may not start if the
battery pack is warm (such as immediately
after sustained use).
• When charging is complete the red LED will
extinguish and the green LED will illuminate
(N).
• Once charging is complete slide the battery
out of the charger, disconnect the charger
from power supply and store.
Charging Times
Normal charging time for the KWT-003-25
5.0Ah battery pack is 90mins, but this can
vary depending upon circumstances.
• If the battery pack is not fully discharged
it may take less than 60 minutes to
recharge.
• If the battery pack and ambient
temperature are cold then recharging
could take up to and over 90 minutes.
• If the battery pack is very hot it may not
recharge. Allow it to cool right down
before beginning the charging process.
Charging Indicator
This charger is designed to detect problems
that can sometimes arise with rechargeable
battery packs. The status of the LED’s can
alert the operator to a potential problem
with the battery pack. This will be either
by the Green LED staying illuminated when
a discharged battery is connected i.e the
charger remains in standby mode, or by
the red LED failing to turn o at the end of
a charge. If any issue is suspected with the
battery do not attempt to re-charge or use it.
Note:
If battery pack failure is suspected, we
recommend that the operator inserts a new
battery of known quality into the charger to
check that the charger is working correctly.
If the new battery charges correctly, then
the original battery is probably defective
and should be sent for safe recycling. If
the new battery pack displays the same
problems as the original, have the charger
tested by a qualied person.
(Q)
(N)

KWT-013-IMH22 Kielder WT Ltd
Kielder
KIELDER WORKS TEAM
WT
Kielder WT Ltd
Sheeld, UK
T: +44 (0)114 242 3794
E: tools@kielder.co
W: http://www.kielder.co
Registered in England & Wales: 09426163
Kielder Tools
Table of contents