KIFFE GOLF K7 User manual

K7
OPERATING MANUAL

5 Charging the battery
6 Fitting the drive wheels / front wheel
7 Assembly / tting the battery
8 Attaching a golf bag
9 Control unit
10 Comissioning & handling
13 Battery & charger
14 Care & cleaning
14 Guarantee conditions
15 Acceptance of guarantee claims
16 Declaration of conformity
17 KIFFE trolley inspection
[Warranty extension]
2

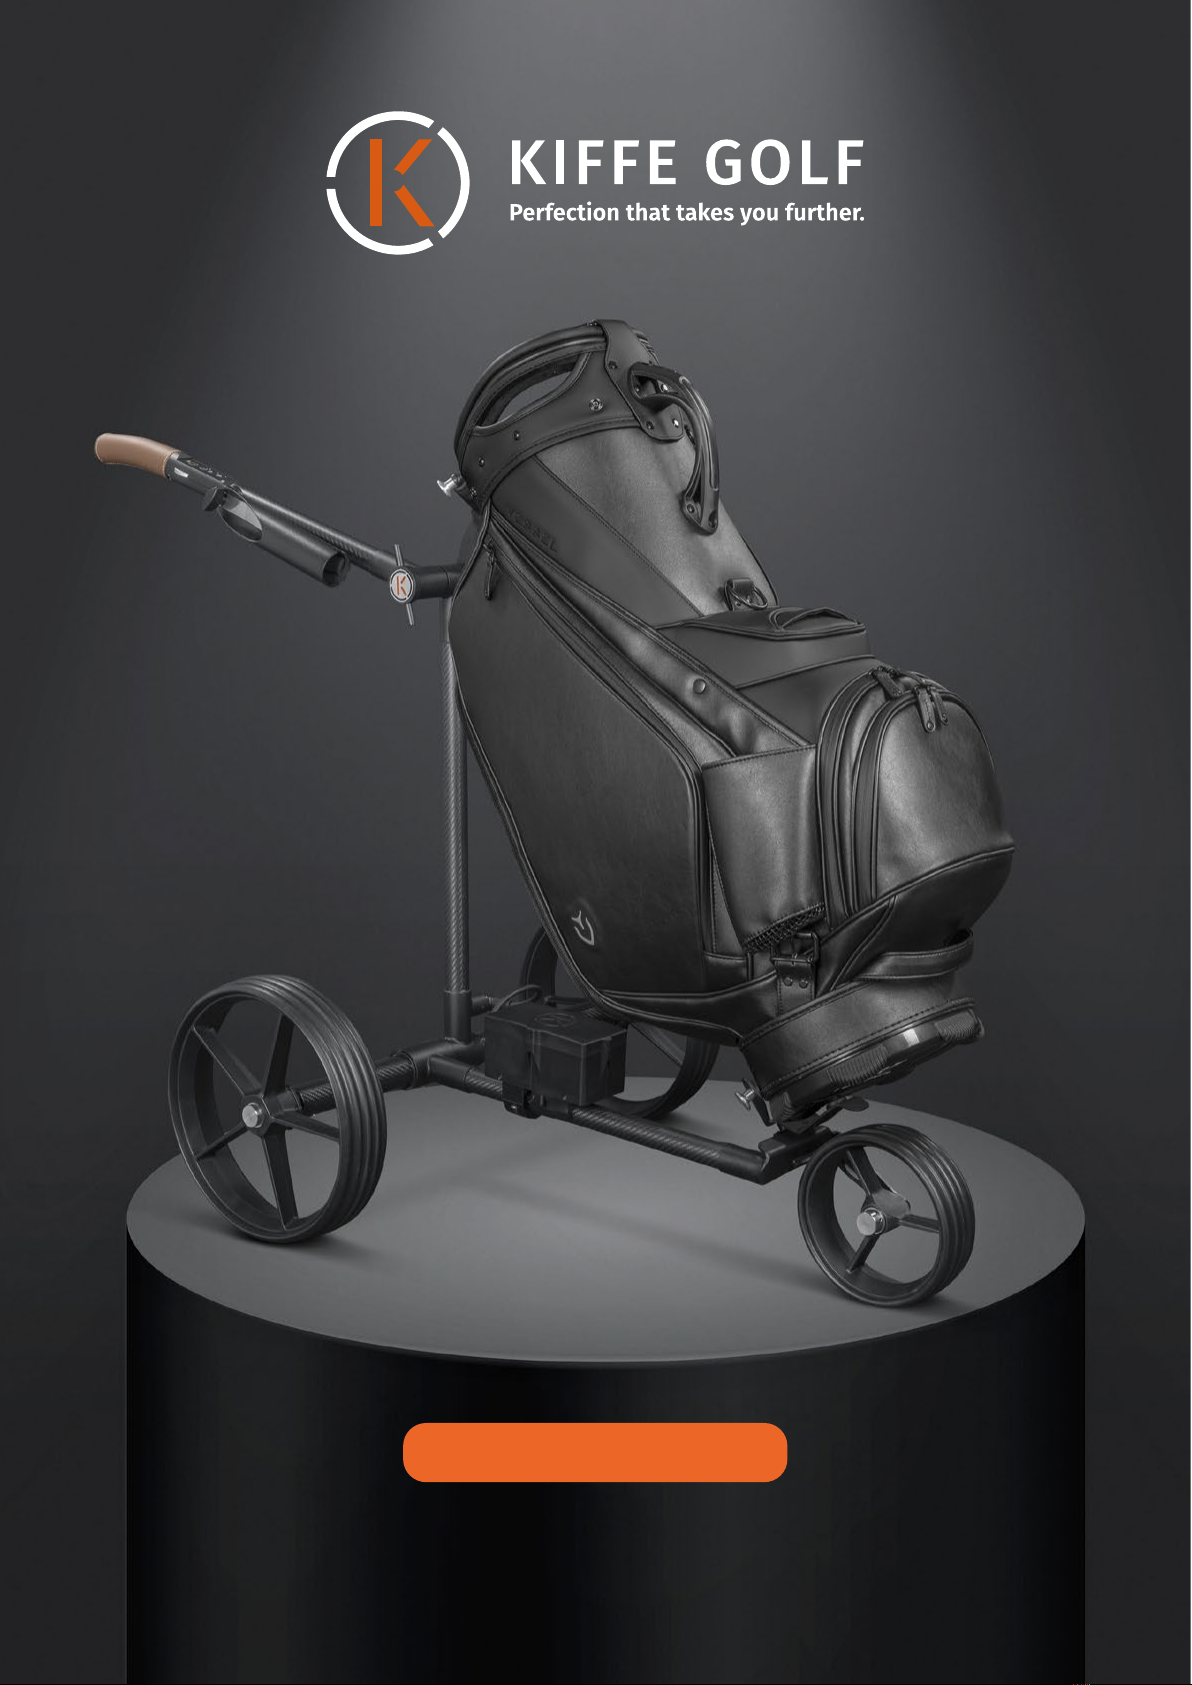
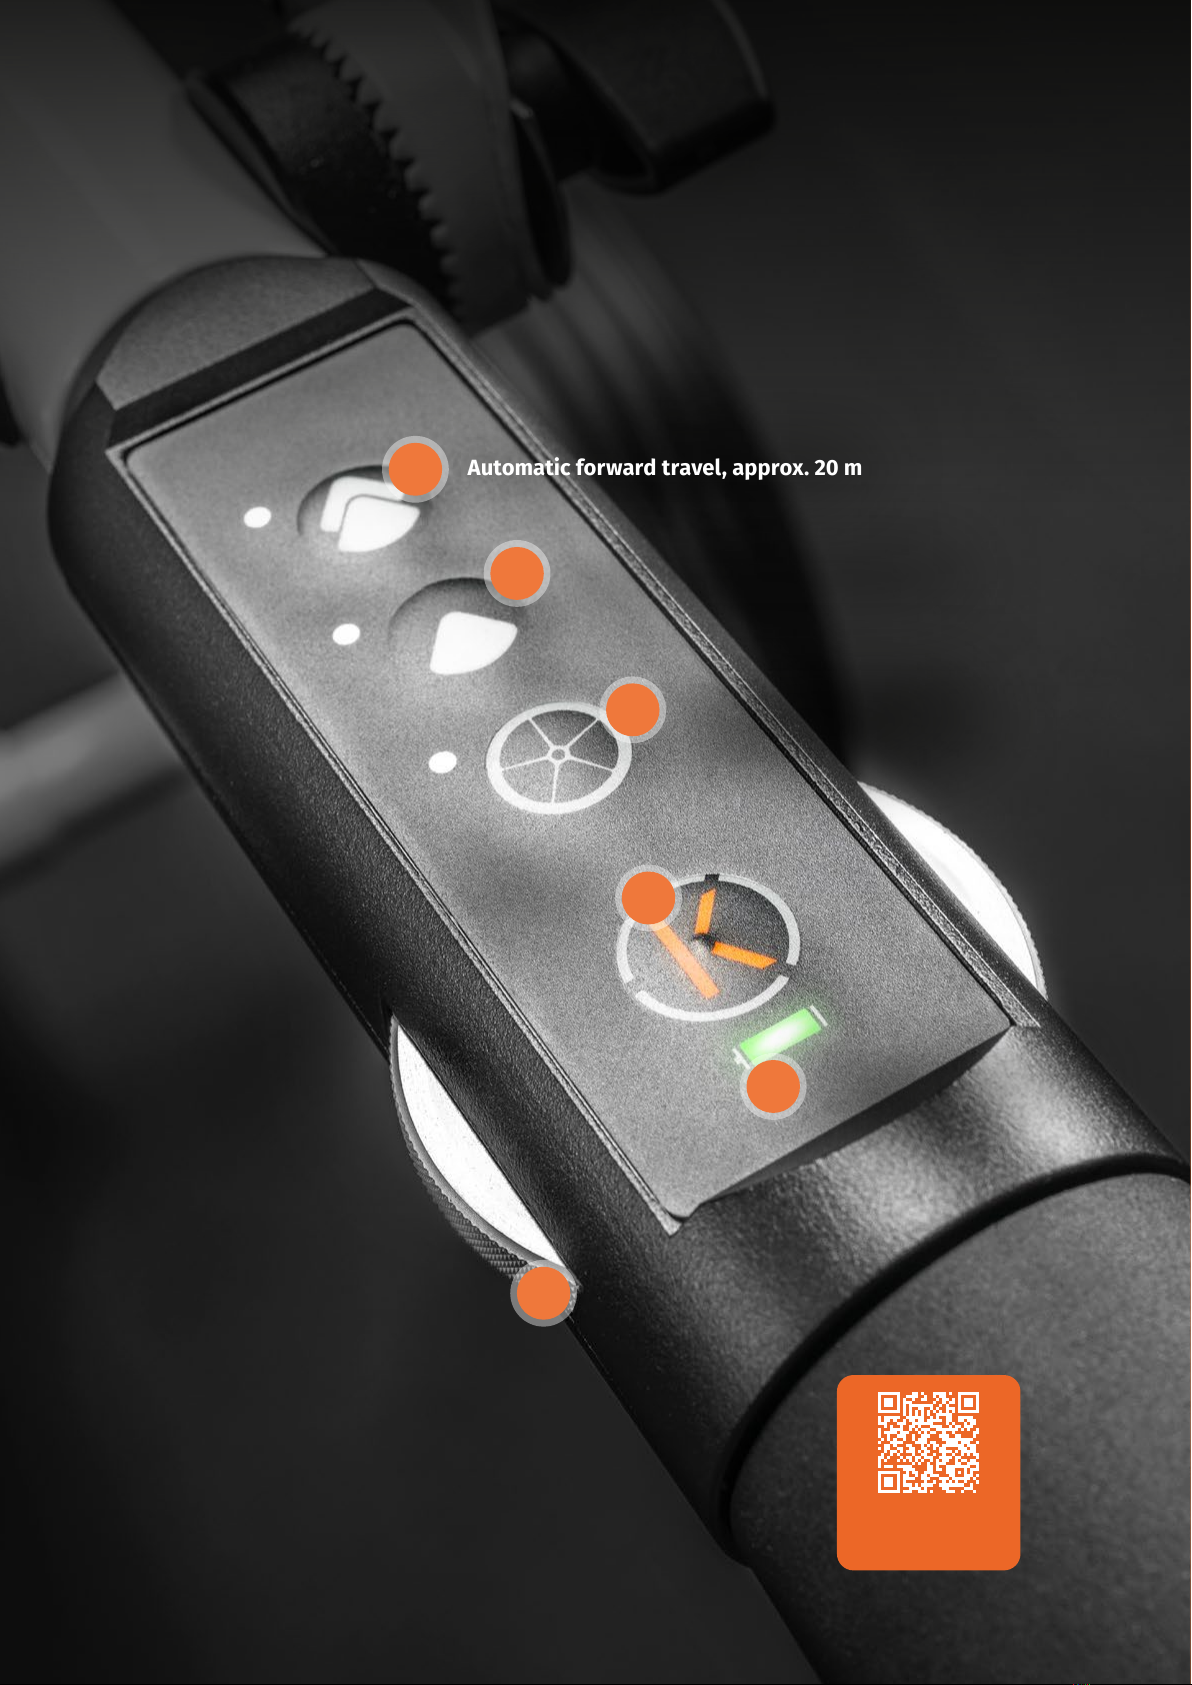
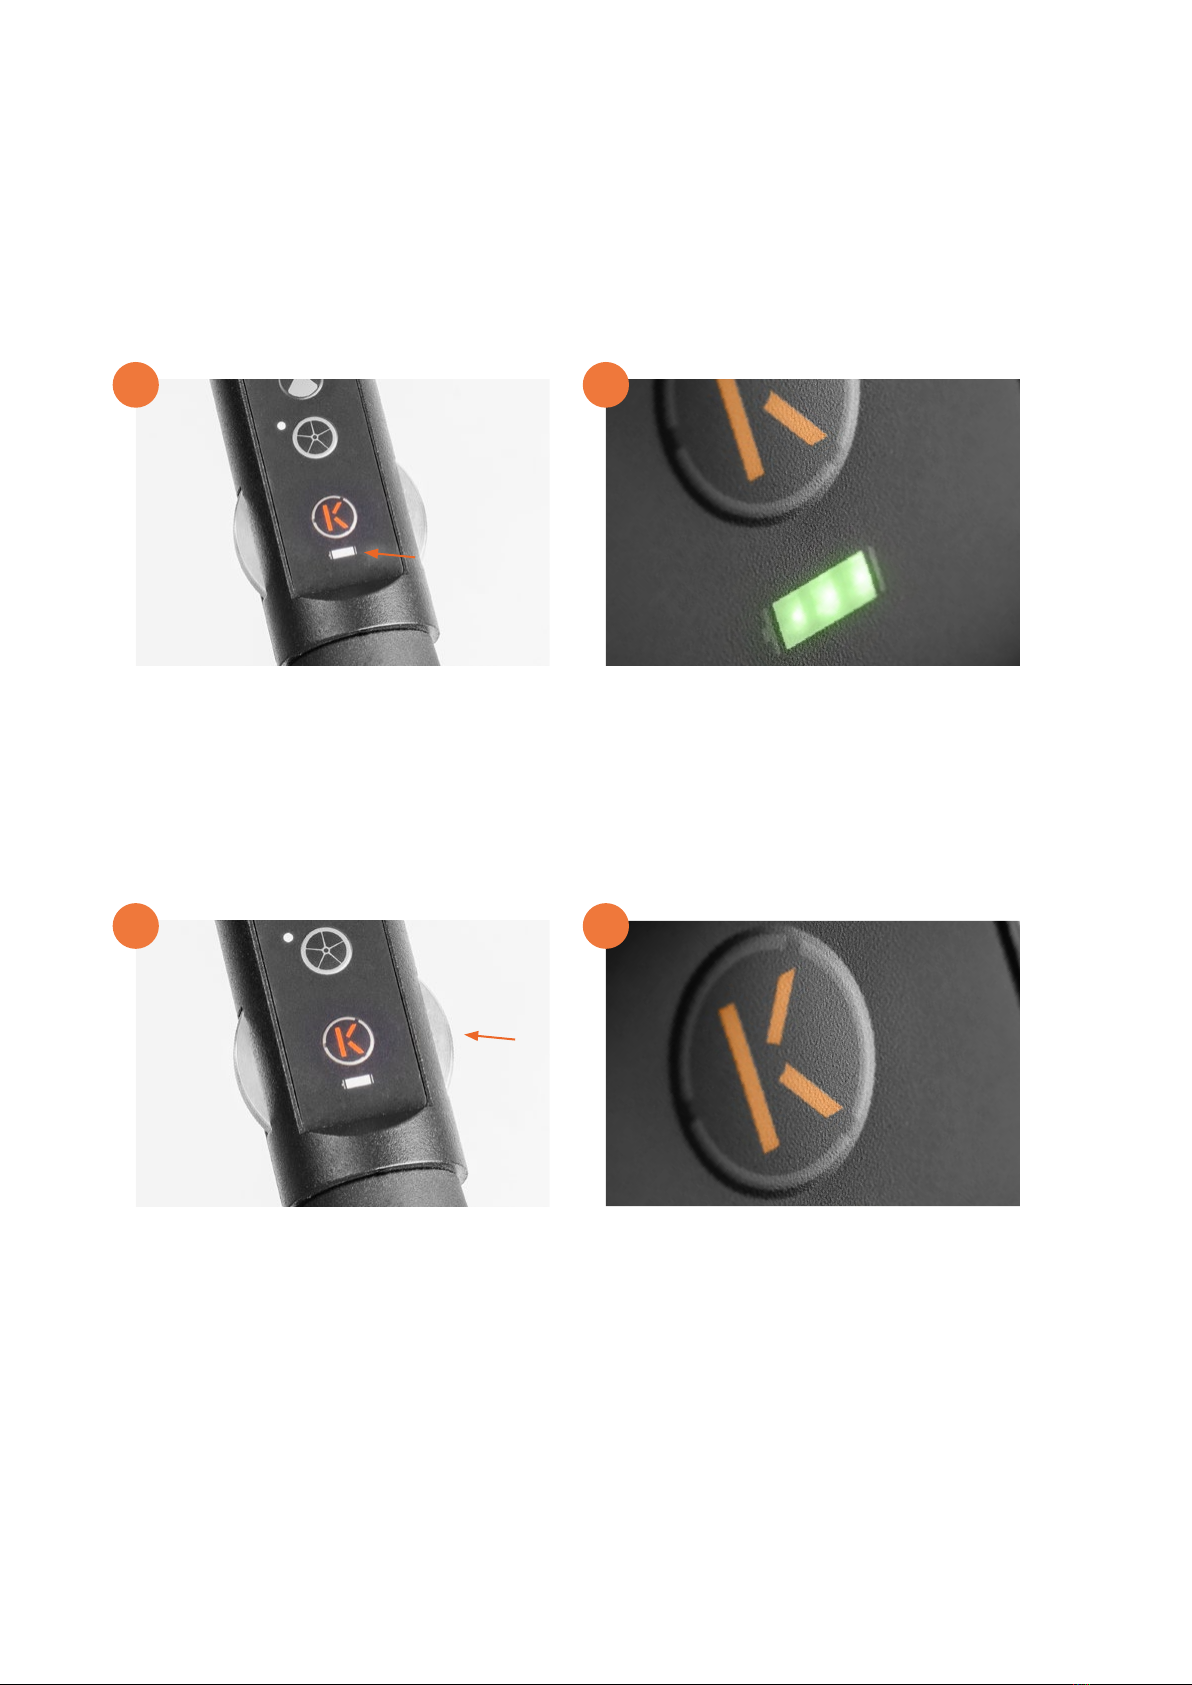
We believe that every golfer deserves better than mediocre
equipment. And that’s why we produce technically superior, hand-
made trolleys with outstanding workmanship here at KIFFE Golf
Manufaktur, focusing on a sophisticated feature set and simple
handling so you can concentrate on your game.
Please follow the instructions in this operating manual to enjoy
your product as long as possible. If you have any questions that
are not answered in the manual, our team will be happy to help.
You can reach them at: info@kiffe-golf.de.
Wishing you many special moments on the golf course with your
trolley and some great rounds!
Yours, KIFFE Golf Manufaktur
CONGRATULATIONS
ON CHOOSING A
KIFFE K7
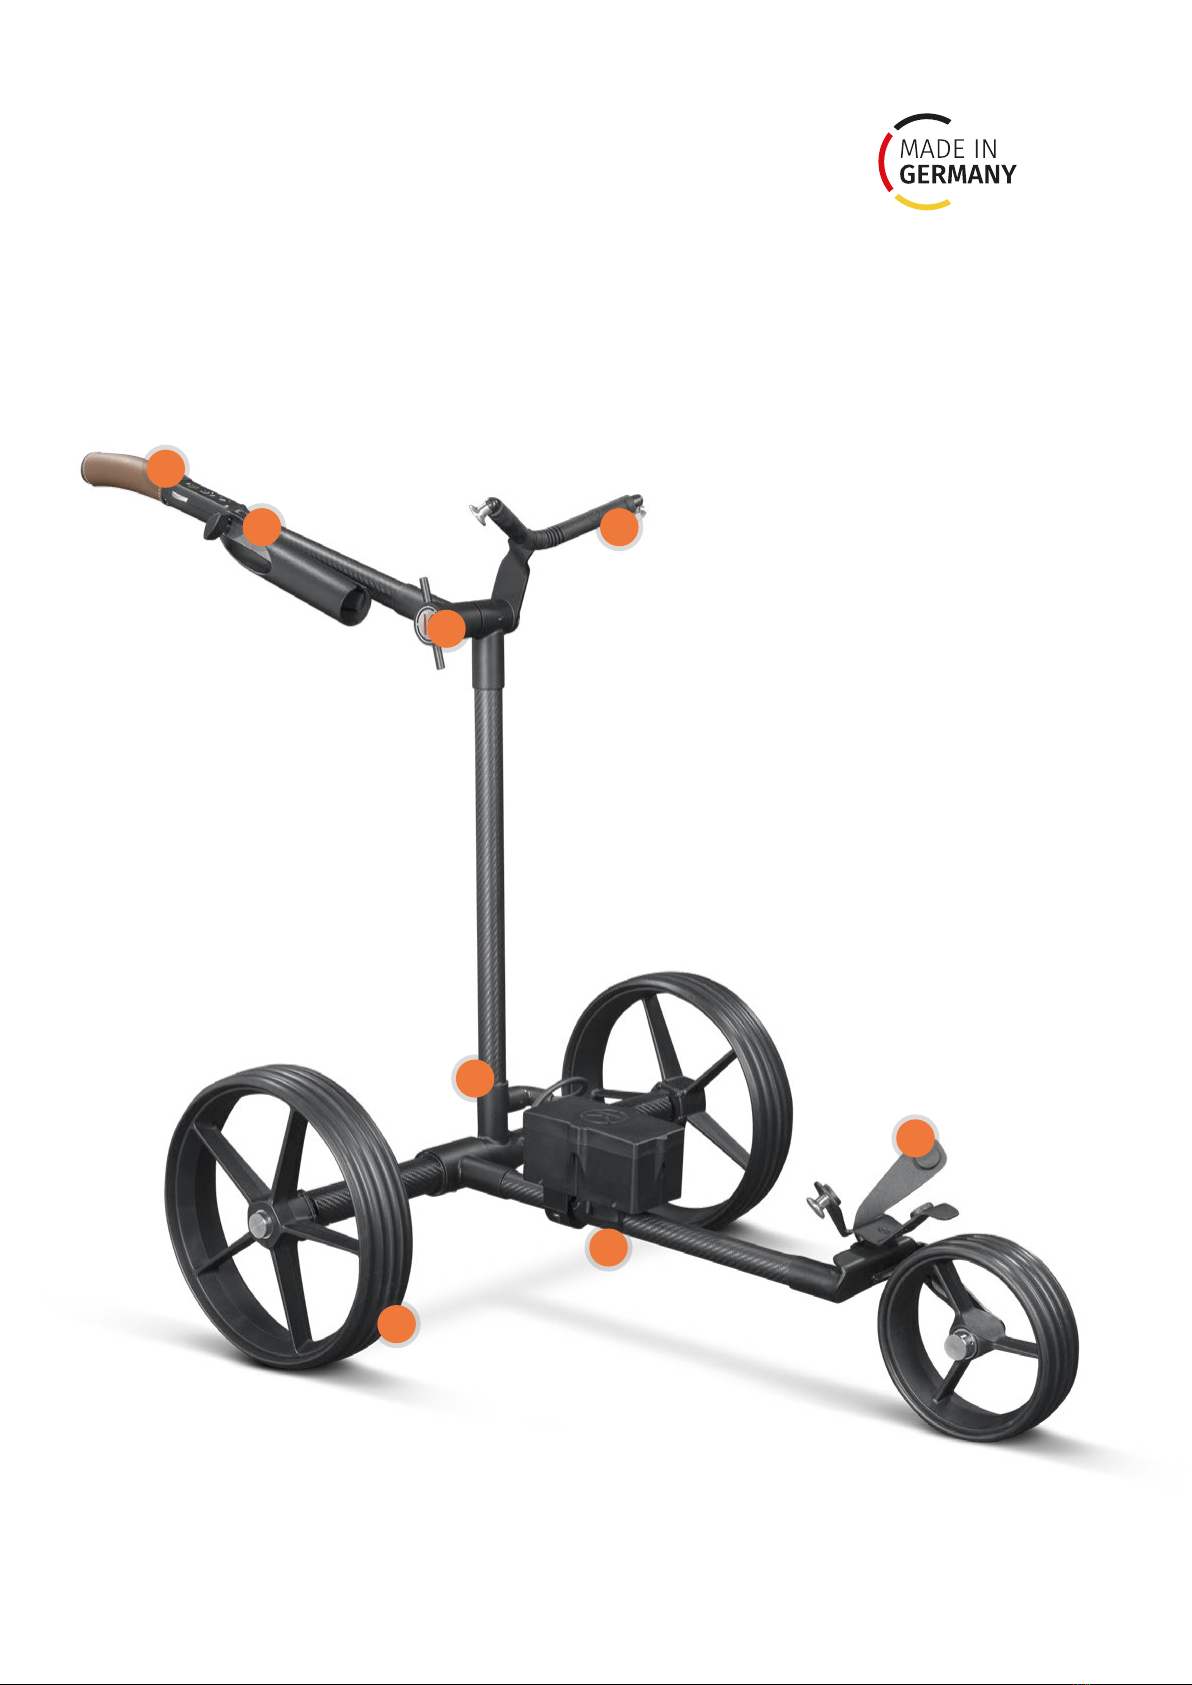
When you receive your trolley, please check
Please report all visible defects, transport damage or incomplete deli-
veries to your specialist dealer or in writing immediately, but at the
latest within two working days of delivery:
the packaging for any damage
caused in transit
that all items that should
be included are present
the trolley for visible
defects/damage
info@kiffe-golf.de
E-MAIL
Please note that we cannot accept complaints of this kind after this period.
3

6
5
Practical battery mounting
on the lower bar.
Convenient magnetic plug
for ultra-quick and secure
battery connection.
3
7
8
4
1
2Upper bag holder
with attachment points for xing
the bag using rubber cords at top
and bottom.
Lower bag holder
Unique, clear control unit
without double assignment
of the function keys.
Secure click fastener at
the press of a button
for easy mounting of the GRP wheels
with cushioning EVA foam treads.
Height-adjustable handlebar
with wing handle for
individual ne adjustment.
Umbrella holder
4

Charger connected to the mains power supply
The battery and charger are not connected properly
until a noticeable resistance at the battery connection
has been overcome. Charging can start.
Connecting the charger to the battery
Charge the battery for 24 hours non-stop before
using the trolley for the rst time.
CHARGING THE BATTERY
5

Drive pin: The engine meshes
with the wheel’s adapter plate.
Locking mechanism
Drive system
‘Freewheel’ locking
mechanism without
motor connection
FITTING THE DRIVE WHEELS
FITTING THE FRONT WHEEL
Attach the wheel. Press and hold the metal button
with the palm of your hand when attaching the
wheel. Slide in to the stop (axle groove).
Rear of drive wheel
When you release the button, the lock grips the axle.
Attach the wheels. Press and hold the metal button-
when attaching the wheel. Slide in to the stop (rear
axle groove).
When you release the button, the lock grips the axle.
The front groove on the axle is used as a locking
mechanism for freewheeling without using the motor.
6

Fastening the battery with the cable to the rear axle
on the lower bar.
Front edge ush with the permanently mounted batte-
ry support. Battery connection via magnetic plug. The plug points
horizontally to the front. Flashing signal on the upper
control unit indicates successful battery connection.
Do not allow the plug to touch the oor to avoid
contamination.
Securing the upper handlebar section All trolley components
ASSEMBLY
FITTING THE BATTERY
7

Place the golf bag on the trolley.
Secure the bag to the lower bag holder by attaching
the rubber cords to the mounting point.
Secure the bag to the upper bag holder by attaching
the rubber cords to the mounting point.
WARNING:
The bag rest is xed, i.e. it cannot be adapted to t
various bag sizes.
ATTACHING A GOLF BAG
8

VIDEO
watch on our youtube
channel
Automatic forward travel, approx. 20 m
Automatic forward travel, approx. 10 m
Electronic freewheel mode
Manoeuvre in the opposite direction
to the direction of travel
Start and stop
Battery capacity indicator
3 LEDs show the
battery charge status
Speed controller
Innitely variable and continuous
1
3
2
4
5
6
CONTROL UNIT
IN DETAIL
9

COMMISSIONING
AND HANDLING
1
3 4
2
The trolley is ready to start when the LEDs under
the ‘K’ are illuminated continuously. The battery
charge status indicator has 3 LEDs.
Turn the rotary knob to start moving your trolley.
This speeds up or slows down the trolley. The
speed controller (continuous wheel) can be con-
trolled either from the left or right.
Turn clockwise to make the trolley travel faster.
Turn counter-clockwise to slow down the trolley.
The trolley has a speed memory feature, which
saves the last speed of travel (when you press the
Start/Stop button). To travel at the preset speed,
all you have to do is press the Start/Stop button.
Switch on the trolley by pressing the Start/
Stop button ‘K’ briey. The battery charge status
indicator lights up. 3 x green = full charge. As the
trolley is used, this reduces to 2 x green, 1 x green,
orange, red = almost empty.
10

NOTE
To use the trolley without a battery or to move it
longer distances without using the drive, you must
activate the manual freewheel to prevent damage
to the trolley and make it easier to push and pull.
DECOUPLING
Press and hold the wheel lock
to pull the wheel approx. 5 mm
away from the drive plate and
release the button to lock it in
the freewheel groove.
5The trolley has both manual and electronic
freewheel modes.
The electronic freewheel is set by pressing a
button on the control unit. To activate it, press
the Freewheel button. The LED next to the button
lights up in white. The drive is deactivated and the
electronic braking effect is released.
This travel mode is necessary and particularly use-
ful when moving the trolley short distances in the
opposite direction or manoeuvring it in tight spac-
es, e.g. to turn around on the green or at the tee.
Manual freewheel
Set via both
rear wheels
›
11

6
20m
10m
With intelligent comfort
and safety technology.
DRIVING ASSISTANCE
SYSTEM
Slope compensationElectronic brake
SafeStop Automatic speed
adaptation
WITH SLOPE COMPENSATION
WITHOUT SLOPE COMPENSATION
VIDEO
watch on our YouTube
channel
The K7 has two forward buttons with which you can
drive either 10m or 20m.
When the selected distance is reached, the trolley
switches off automatically. The speed of the for-
ward travel mode is preset and cannot be adjusted
with the control unit.
If the trolley tilts to the side by 25° or more within
the selected distance, terrain sensors stop the trol-
ley automatically to prevent it toppling over. When
the anti-tilt protection is triggered, the LEDs on the
two forward travel buttons ash alternately.
12

BATTERY AND CHARGER
Before using the trolley for the rst time, please
charge your battery for 24 hours non-stop using
the enclosed original charger.
To do so, rst connect the charger to the mains
power supply and then connect the battery and
the charger.
The LED on the charger lights up in green
continuously when the charging process is
complete.
For best results, please charge the battery
fully after every use. This does NOT cause a
memory effect.
Remember to disconnect the battery and
charger when the charger is not connected
to the mains power supply. If the battery and
charger are connected for extended periods
without a power supply, the resulting deep
discharge can render the battery unusable.
Only charge the battery in well ventilated
rooms at a suitable temperature (between
5°C and 35°C). The charger must not be covered
during the charging process.
Before putting your trolley into storage at the
end of the season, charge your battery fully
using the enclosed original charger for 24 hours
(disconnect the battery and charger). Charge
the battery for a few hours every three months.
CHARGING
Check that the charger is in proper working or-
der. A defective charger can damage the battery!
The charger LED lights up in green continuously
when the battery is not connected. When the
battery is connected, the colour changes to red,
which means that charging has started.
Do not throw, drop, damage or tamper with
the battery (e.g. by drilling into it, soldering or
gluing it etc.)
The battery is housed in a hard cover that must
not be opened under any circumstances.
Do not immerse the battery in liquids or pour
any liquids over it.
Only use the battery to operate a KIFFE trolley.
Damaged batteries (whether the hard cover or
cable is damaged) must not be used or trans-
ported. Please inform KIFFE Golf Manufaktur
GmbH without delay.
Keep the battery away from naked ames and
do not expose it to extreme temperatures for
extended periods (e.g. in a parked car in sum-
mer or in unheated caddie halls in winter).
SAFETY INSTRUCTIONS AND WARNINGS
13

Regular care and maintenance can help
extend the life of your trolley. Ideally, you
should clean your trolley with compressed
air after each round. Alternatively, you can
clean it with a damp cloth. Remove the
battery before cleaning. Take care to avoid
water coming into contact with the control
unit, battery connection and electronic
components.
Please refrain from using abrasive and
harsh cleaning agents, oils and greases
when cleaning the trolley. All parts of the
trolley are designed in such a way that
greasing is unnecessary – in fact it would
be counterproductive.
Please note that failure to follow the safety instructions and heed the warn-
ings can cause damage to the battery. Doing so voids the warranty. Under
certain circumstances, this can even increase the risk of re.
CARE AND CLEANING
If you have a guarantee claim, please con-
tact the specialist dealer where you bought
the trolley. Please note that your dealer
needs the trolley along with the battery,
charger and other special accessories to
send them to the manufacturer. Please
also keep your purchase receipt for this
eventuality.
KIFFE Golf Manufaktur GmbH grants a
3-year warranty on frames & wheels of all
models of the K-Line from 2016. A 2-year
warranty is granted on the electronics and
the battery.
The manufacturer’s guarantee and warran-
ty do not cover wearing parts (e.g. wheels,
tyres, operating components, handles and
rubber cords) or damage to paintwork.
Batteries are affected by an irreversible
ageing process. Deterioration in perfor-
mance due to ageing is not a production
defect. KIFFE’s proprietary battery man-
agement system (BMS) maximises the bat-
tery life, with careful handling of the bat-
tery also helping to extend its life. Please
observe the charging instructions as well
as the safety instructions and warnings in
this operating manual.
Replacement of the trolley or parts of the
trolley as well as any repairs carried out
under guarantee do not extend the guar-
antee period.
MANUFACTURER’S
GUARANTEE CONDITIONS
14

Fundamental requirements for
ACCEPTANCE OF
GUARANTEE CLAIMS
Compliance with the instruc-
tions in this operating manual
Regular, appropriate care
Use of the trolley as intended
(for transporting a golf bag
on a golf course)
Use of KIFFE original batteries
and chargers only
in the event of use/handling of the trolley for
purposes other than the intended purpose
in the event of overloading i.e. by towing with
a buggy or golf cart or using the trolley to tow
other items
in the event of water damage
in the event of damage caused in transit
in the event of damage caused by a fall
in the event of a lack of care
in the event of system modications (mechan-
ical, electrical, changes to parameters and/or
software)
in the event of removal/destruction of afxed
serial numbers
in the event of interventions and/or repairs
without express written approval from the
manufacturer
in the event of defects and damage that can be
traced back to force majeure or accidents
in the event of defects and damage that can
be traced back to failure to use KIFFE original
replacement parts to replace components
if the battery and/or charger have marks that
indicate that they have been opened, disman-
tled, drilled into, dropped, crushed, exposed
to extreme temperatures, tampered with,
short-circuited, immersed in water or other
liquids (or had liquids poured over them),
deeply discharged or damaged in any other way
if there is mechanical damage to the connec-
tors or cables
in the event of improper transport or storage of
the trolley and/or battery
in the event of damage to the battery caused by
external environmental inuences
(e.g. lightning strike-induced surges)
THE GUARANTEE / WARRANTY EXPIRES
In the event of technical modications and further development of a model, there is no right to retrot.
15

K7
Series
DECLARATION OF
CONFORMITY
Manufacturer
KIFFE Golf Manufaktur GmbH
Sophie-Opel-Strasse 14
64625 Bensheim
Type designation
ELECTRIC GOLF TROLLEY
Applicable specications
DIN EN 6100 - 6 - 2: 2006.03 plus amendment 1:2001.06
DIN EN 55011:2011.04
RoHS Directive 2011/65/EU
The trolley is only suitable for transporting a golf bag on a golf course.
The manufacturer assumes no liability for retrospective changes made to
the device that have not been expressly approved by the manufacturer.
The manufacturer declares that the design and construction of the above-mentioned trolley as placed
on the market complies with the essential health and safety requirements of EC Directive 2004/108/EC.
16

DECLARATION OF
CONFORMITY
PLEASE FILL IN
Serial number
Model name
Purchase date
First name / Last name
Street / house number
Zip code / City
Telephone (for queries)
E-Mail (for queries)
KIFFE TROLLEY INSPECTION
Please only return your KIFFE trolley to us
in the original packaging for repairs or servicing.
In the event of damage due to poor packaging,
the warranty is void. In this case, any repair and
maintenance costs will be borne by the sender.
Please do not forget to include this service
booklet.
SHIPPING
Special price for the 1st KIFFE trolley inspection.
At the special price of 149 € instead of 199 €* .
The 1st KIFFE trolley inspection must be carried
out no later than 24 months after the date of
purchase.
* Trolley inspection fees are subject to change,
please always ask for the current costs in advance.
Send in for KIFFE trolley inspection:
Please download the service form at
www.kiffe-golf.com/kundendienst.
Fill out the form and send it to
service@kiffe-golf.de
Enjoy a 5-year warranty
from the date of purchase if you regularly (an-
nually or no later than 18 months) subject your
trolley to the original KIFFE trolley inspection.
5
YEAR
WARRANTY
17

Stamp & signature Inspection performed
1
Trolley inspection Date
Next trolley inspection
Stamp & signature Inspection performed
3
Trolley inspection Date
Next trolley inspection
Stamp & signature Inspection performed
2
Trolley inspection Date
Next trolley inspection
TROLLEY INSPECTION
TROLLEY INSPECTION
TROLLEY INSPECTION
18

Stamp & signature Inspection performed
4
Trolley inspection Date
Next trolley inspection
Stamp & signature Inspection performed
6
Trolley inspection Date
Next trolley inspection
Stamp & signature Inspection performed
5
Trolley inspection Date
Next trolley inspection
TROLLEY INSPECTION
TROLLEY INSPECTION
TROLLEY INSPECTION
19

RABATT
nur 44€
69€
25€
Registriere dich online unter
www.kiffe-golf.com/kiffe-card
und erhalte 25€ Rabatt auf unseren
KIFFE Golfschirm Windbuster.
HIER
registrieren
Deine persönliche Seriennummer
Gebe die Seriennummer bei
der Produktregistrierung an.
JETZT DEINEN
TROLLEY REGISTRIEREN
Deine persönliche Seriennummer
Gebe die Seriennummer bei
der Produktregistrierung an.
RABATT
nur 44€
69€
25€
JETZT DEINEN
TROLLEY REGISTRIEREN
Registriere dich online unter
www.kiffe-golf.com/kiffe-card
und erhalte 25€ Rabatt auf unseren
KIFFE Golfschirm Windbuster.
HIER
registrieren
KIFFE Golf Manufaktur GmbH
Sophie-Opel-Strasse 14 •64625 Bensheim
T: +49 625 18262700
info@kiffe-golf.de •www.kiffe-golf.com/en
Your personal serial number
Enter the serial number when
registering the product.
DISCOUNT
only 44€
25€
REGISTER YOUR
69€
TROLLEY NOW
Register online at
www.kiffe-golf.com/kiffe-card
and receive a €25 discount on our
KIFFE Windbuster golf umbrella.
Register
HERE
Table of contents
Other KIFFE GOLF Golf Trolley manuals