Cart-Tek GRX-860 User manual

GRX-860
Electric Golf Cart
User Manual

Electric Golf Cart User Manual
Page 1 of 15
Index
1 Introduction
2 Identification – main components
3 Assembly
4 Handle and LED display
5 Operating functions and modes
6 Drive wheels
7 Use and maintenance
8 Troubleshooting
9 Safety
10 Contact details

Electric Golf Cart User Manual
Page 2 of 15
1 Introduction
Thank you for purchasing this golf cart. Please read this manual carefully before use.
After unpacking please keep the carton and all internal sections in safe storage. In the unlikely
possibility that you need to return the whole unit due to a defective component, you will need to
repack the unit in the original manner to ensure safe and secure transit.
Check all components are included in the package –
•Main cart frame.
•Drive wheels
•Battery complete with battery bag
•Battery charger
•User Manual
•Tool kit
After unpacking the cart place the battery on charge whilst you assemble the unit. The battery will
be delivered with a charge but should always be placed on charge overnight before using.
Contents of this manual cover assembly from the delivery carton – operating instructions and
conditions – maintenance – and troubleshooting. Please note that our design and manufacturing
policy is aimed at continuous improvement – this can result in changes without notice to the
specifications contained in our websites and in this manual.

Electric Golf Cart User Manual
Page 3 of 15
2
Main component identification
1
On/off switch 5 Battery 9 Front wheel assembly
2
Handle 6 Drive wheel 10 Bag support and strap
3
Up bag support 7 Wheel hub 11 Battery support
4
Central hinge lock 8 Motor/Gearbox

Electric Golf Cart User Manual
Page 4 of 15
3 Assembly
Take cart and all of component parts
out of carton
Standing at the handle end of the cart,
put the wheel marked “L” on the left
end of the axle and the wheel marked
“R”on the right end of axle. And then
slide and hold the knob on the centre
hub cap and push the wheel fully on to
the axle.
Pull up on the handle and unfold the cart.
Erect frame by unfolding and
connecting the main frame tube
together at the central hinge and locking
the Y-shape lower support structure to
the main frame with the frame lock
catch

Electric Golf Cart User Manual
Page 5 of 15
Put the battery into the battery case.
Connect the battery plug
Flip the upper bag support down.
This is how the cart should look when
fully assembled.

Electric Golf Cart User Manual
Page 6 of 15
4 Operate your cart
Press & hold the centre knob for 3 seconds and then release to switch on your cart.
Display & Operating modes
The cart has 3 switches to operate the cart.
To switch the cart ‘on’, connect the battery and then press and hold the centre knob
for 3 seconds then release. The screen will light up.
There are 5 Operating Modes(Modes 0-4)
Mode 0--Competition Mode-no display of speed or distance
Mode 1—Speed Setting and normal use
Mode 2—Distance Measurement
Mode 3—Preset Distance Control
Mode 4—Counter
Yards/mph or
Meters/kph
& Counter
‘Mode’ switch
Command/adjustment
Distance travelled
Mode No.
Diagnostics
Battery Charge
Indicator
Speed setting Speed
Digital display
Command & Control Button Mode button

Electric Golf Cart User Manual
Page 7 of 15
Changing Modes
To change the Mode, press the right(Mode) button. The display will cycle through
the modes.
Change the Display/Measurement units
To change the display units from yards/mph to meters/kph, press the left button.
Starting your cart
When switched on, your cart will start in the last Mode you used. Your new cart will
start in Mode 0.
This is the Competition Mode and allows adjustment of speed without any distance
measurement.
Speed Adjustment
To start your cart in Mode 0, briefly press the Command button. Your cart will begin
to move forward. To adjust the speed , turn the Command Button clockwise to
increase speed. To reduce speed, turn the Command Button anti-clockwise. To
stop your cart, briefly press the Command Button. In Mode 0 there is no display of
the speed setting or the distance setting.
Cruise Control
When you wish to stop your cart, briefly press the Command Button. Your cart will
memorize the last you speed setting.
When you want to start again, briefly press the Command Button and your cart will
resume at the previous speed.
Constant Speed Feature
Your cart measures each revolution of the wheel to determine speed and distance.
This sensor will ‘feed-back ’ to the microprocessor and automatically increase or
decrease the motor power to suit the terrain. Your cart will automatically adjust

Electric Golf Cart User Manual
Page 8 of 15
when going uphill and thus maintain a constant speed. Please be aware that on
steep downhill slopes your cart will Not slow down due to freewheel function and
gravity! Please keep control of your cart when going downhill. The cart may slow
down on steep slopes due to the gearing.
Mode 1- Speed Setting
Press the Mode Button until Mode 1 is displayed.
Turn the Command button clockwise to set your speed. There are 10 settings, S0 to
S9 . Most users find setting S6 or S7 the most comfortable.
After setting the speed, briefly press the Command Button and your cart will move
forward and run at a constant speed. To adjust the speed, turn the Command
button to increase or decrease the speed.
When your cart is moving, the display will show the speed you are traveling in mph
or kph. This may vary slightly as you go up or down slope but will generally be a
constant speed.
To stop your cart, briefly press the Command Button. The cart will stop, the speed
display will revert to ‘0.00’ and the Motion Indicator arrow will turn off.
To resume, briefly press the Command button. Your cart will resume at the last
speed setting(Cruise Control).
Mode 2- Distance Measurement
When you access Mode 2, the distance Indicator will be set to ‘000’. As you move
forward the Indicator will count upwards for each yard/mere traveled . If you stop
Speed Setting
Speed Setting
(Only displayed when cart is
in motion
)
Motion Indicator
(Only shown when motor operates
)
Zero display Distance traveled

Electric Golf Cart User Manual
Page 9 of 15
your cart by briefly pressing the Command button, the counter will stop and then
resume counting when you move forward again.
If you move out of Mode 2, or switch off your cart, the Indicator will revert to ’000’.
If you want to calculate the distance to the green, set Mode 2 at, say, the 150yd
marker and measure the distance to your ball. Deduct this from 150 and it will give
you the yardage.
If you wish to reset the counter to zero, move out of Mode 2 or switch off your cart.
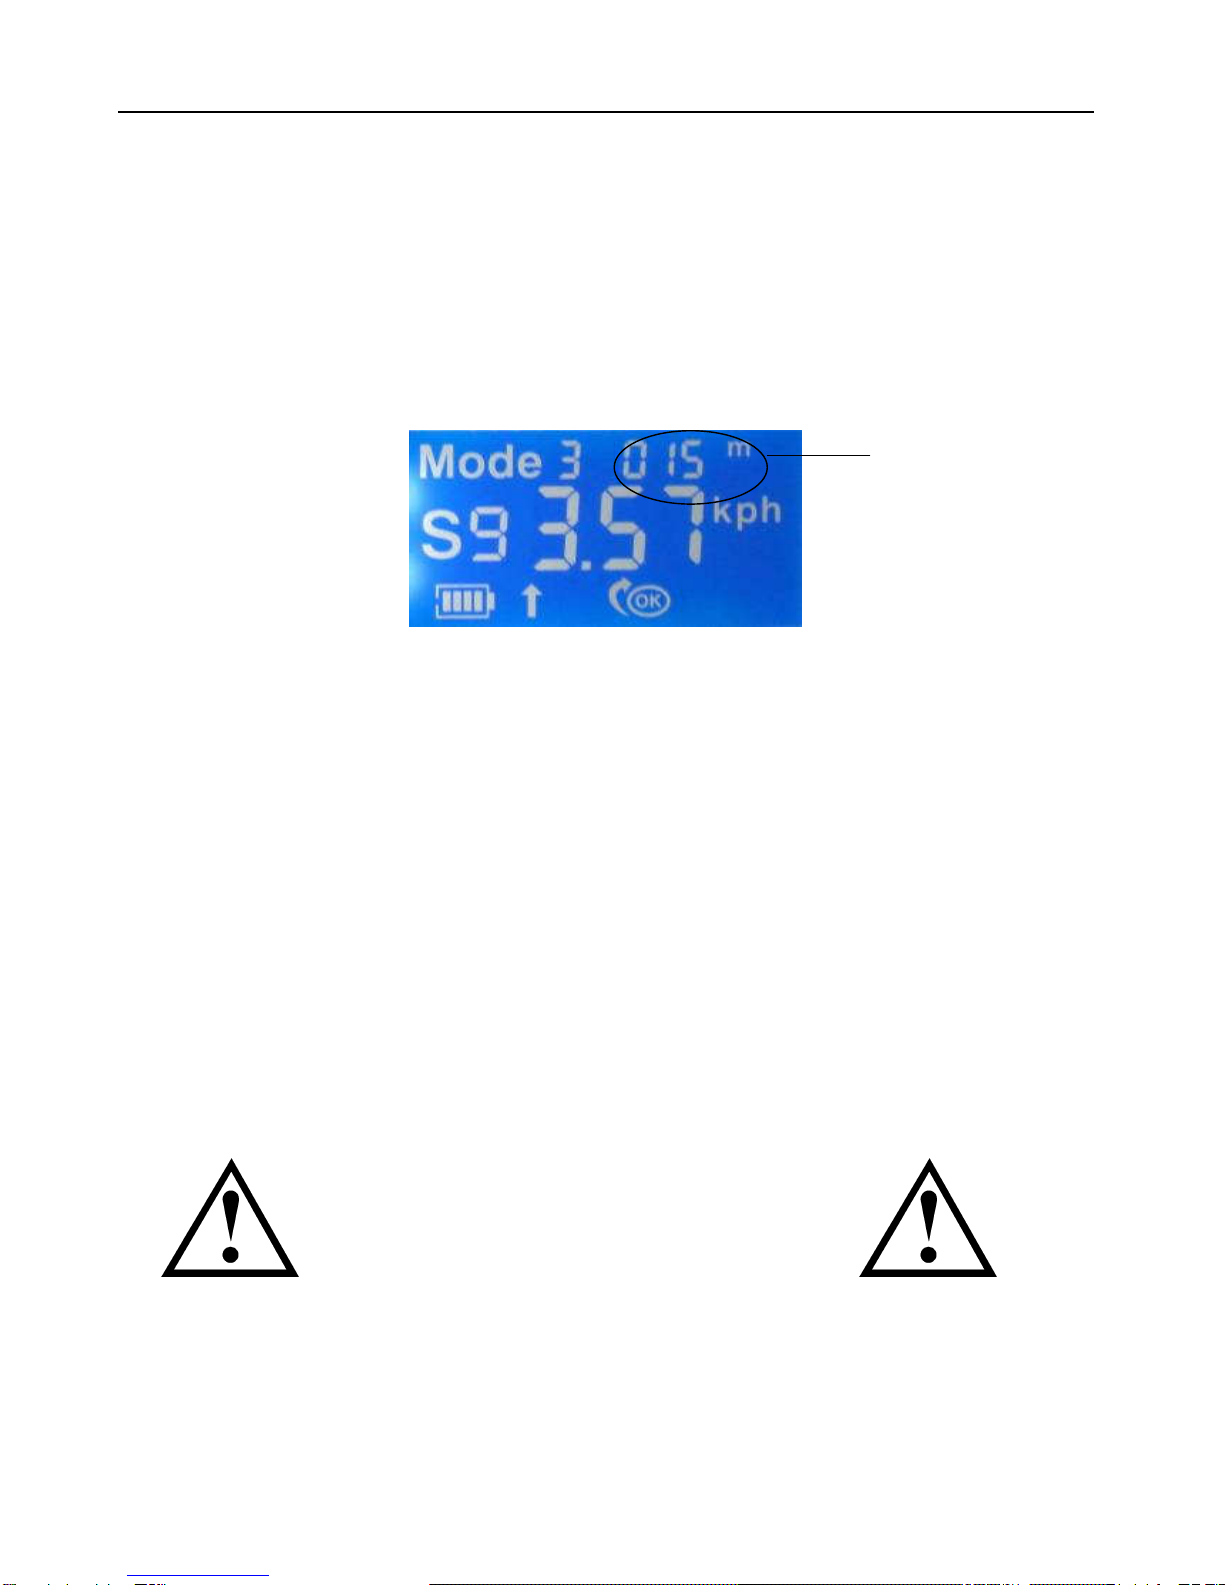
Mode 3-Distance Control
Access Mode 3 by pressing the right Mode Button.
With your cart stationary, rotate the Command button clockwise until the distance
you want to travel is displayed on the screen- from 1 to 999 yards/meters ! Please
note –if you try and turn the Command button too quickly, the display will count up
more slowly! A moderate turn is the optimum.
Point your cart in the right direction and briefly press the Command button. Your
cart will travel the set distance and then stop and wait for you.
Most users find this particularly good for sending their cart off to next tee , usually
around 50 yards. If you hit a super drive and want to walk ‘hands-free’ behind your
cart, set the distance to say, 250 yards ! The cart will stop after this distance.
When you want to reset a distance, the cart will start at the last setting, even though
the display shows ‘000’. If you had last set the distance to ‘55’ when you turn the
Command button it will count up or down from ‘55’.
Setting your cart to travel without your control can be hazardous. Always ensure
that the stabilizer wheel is fitted. If your cart goes up a steep incline and the
stabilizer wheel is not fitted, the cart may tip backwards damaging your cart, your
clubs and you vanity!
Set Distance
CAUTION

Electric Golf Cart User Manual
Page 10 of 15
A bump in the grand may know your cart off course and send your cart into a hazard
or a cart- please take care.
Finally, do not send your cart to stop on a down slope. Your cart has no brakes and
has a ‘freewheel’ so it will not stop on a down slope. Gravity will take over and your
cart may end up at the bottom of the hill !
Please use your cart sensibly and avoid damage to your cart, yourself and other
golfers.
Mode 4- Universal Counter
In Mode 4 you have access to a ‘Counter’. This is useful if you want to count strokes
taken, Stable ford points, number of putts taken or just about anything else.
To increase the counter, simply press the left button. Each press will add 1 to the
count. The total will be memorized.
To reset the Counter to ‘000’ , switch your cart off and back on again.
Battery Indicator
The Battery Indicator will show the amount of charge in your battery. When 4 bars
show, the battery is full. The number of bars will reduce as the battery charge drops.
When only one bar is shown, you will have only enough charge for 4 more holes.
When the charge drops below a critical level, your cart will automatically switch off
to prevent any damage to the battery or the electronics.
Automatic Switch-off
If you do not use your cart for a period of 10 minutes, the cart will switch off
automatically and any memory settings (Distance, Distance Control, Counter) will
be lost).
Battery Indicator
Counter
Diagnostics

Electric Golf Cart User Manual
Page 11 of 15
Diagnostics
The Diagnostics Indicator will show flashing arrows and the ‘OK’ symbol when your
cart is running normally.
6. Charging the battery.
Always start every round with a fully charged battery.
Charge your battery as soon as possible after every round (certainly within 24 hours)
even if you have played only a few holes. This will maximize the life of your battery.
To charge your battery, ensure your charger is not connected to the mains and
connect it to the battery. Connect the charger to the mains. If the green light on your
charger flashes, switch off immediately and check the polarity of the charger leads.
The charger light will turn red indicating that charging is taking place. When your
battery is charged, the light will turn from red to green. With a new or fully charged
battery, the red light may show only for a short time before turning green.
Ideally, you should charge your battery for a minimum of 8 hours, even if the red light
turns green before this. This will ensure that the maximum charge is put into the
battery and will increase battery life.
The charger supplied with your cart is a modern 3 stage charger. We recommend
that you leave the battery connected to the charger with the mains until the next time
you play golf. The electronic circuits in the charger will protect your battery from
over-charging and will ensure your battery is kept topped-up.
Switch the charger off at the mains before disconnecting the battery. If you do not
intend to use your cart for several months, fully charge the battery and then
disconnect from the charger. Recharge your battery every 30 to 45 days. Leaving the
battery on charge for an extended period may cause the battery to dry out and
shorten the life of both the battery and charger.
You must give your battery an initial ‘commissioning’ charge before using it for the first
time. Charge your battery for a minimum of 16 hours, even if the green light appears
soon after commencing charging.

Electric Golf Cart User Manual
Page 12 of 15
DO NOT leave the charger connected to the mains if the battery is not attached. This
will shorten the life of the charger.
DO NOT leave the charger connected to the battery if it is not connected to the mains.
This will discharge your battery.
DO NOT charge your battery on a concrete floor - always charge on a shelf/bench
or place the battery on a plank of wood.
7 Use & Maintenance
Battery
1) Regularly check to see if the battery is damaged
2) Keep the battery surface clean, and check underneath the battery cover to
make sure that no dirt or water has attached to it.
3) Check the battery connections – underneath the small plastic covers – for
any signs of corrosion or bad connection.
4) Check that the wires from the battery cover are firmly fixed to the terminal
posts.
5) After use always place the battery on charge – in warm dry conditions.
6) If the cart will be used again soon then you can leave the battery on charge
until that time. Always allow sufficient charging time to completely charge the
battery – overnight or 6 to 8-hours should be sufficient.
7) If the battery is to be stored – for instance over winter – and not used it can
be disconnected. If disconnected for storage always recharge the battery
completely at intervals – at least once every 30-45 days. Allowing the charge
of the battery to drop to a completely exhausted state can shorten the life of
the battery.
8) Do NOT charge the battery with a different charger that that supplied with
the cart.
9) If stored place the battery on a wooden shelf – not on a concrete floor. Keep
away from fire – flames – heaters – and do not allow it to be in a temperature
of over 45 deg C (113 deg F)

Electric Golf Cart User Manual
Page 13 of 15
Charger
1) Do not attempt to open the case of the charger
2) Only use the charger to charge the battery of this golf cart
3) Operate only indoors – in clean dry conditions
4) Immediately remove from the mains electrical supply in the event of the
charger overheating
(over 70 deg C)
Cart
1) Clean the whole cart as convenient. Remove any caked mud and grass
cuttings.
2) Store it indoors in dry conditions
3) Always remove the battery from the cart as soon as possible.
Fault Instruction (When the screen displays the following)
Mode 5 Indicates a fault in the sensor system from the drive system
to the controller. Could be a faulty sensor or could be a problem with the
wheel not engaging properly.
Mode 6 General problem alert. Turn cart off and restart.
Mode 7 indicates the cart is in the status of overload. Please do not
keep this situation too long. Shut down or push to assist. Meanwhile the
cart can reduce the speed(electricity output) to release the overload.
Mode 8 Indicates the cart is in the status of being badly overloaded
by weight. Please reduce the weight of the load and minimize this
situation.

Electric Golf Cart User Manual
Page 14 of 15
8 Troubleshooting
The following is general information for the customer. If you have a persistent
problem always call the service department. It will always help if you can tell them
the sequence and condition of the LED lights.
Indication Possible cause
With the ON/OFF switch turned ON
– the speed control knob is turned
for speed. The LED on the handle
does not illuminate. There is no
forward movement of the cart.
Bad wire connection. Either to the switch
in the handle – or at the connection plugs
to the controller
Same conditions as above – but the
LED is illuminated
Bad wire connection to the motor. Either
at the connection plugs to the controller –
or even internal to the controller.
The battery is not accepting a
charge.
Faulty charger. (The battery can easily be
checked at any auto-repair center). Check
for correct connection of the plugs into
and out of the charger.
9 Safety
•
Read this manual carefully so that you understand and are able to follow all
safety instruction and methods of use before you use the golf cart.
•
Do not let children use the cart.

Electric Golf Cart User Manual
Page 15 of 15
•
If you feel ill, tired or have been drinking alcohol or taken medication you
should not use the cart.
•
All repairs not described in this manual should only be carried out by trained
personal.
•
Only use original spare parts. This also applies to the battery.
•
Only lend the cart to people who are familiar with the use.
•
The cart must only be pushed. Never pull the cart until the wheels have been
changed
Waste electrical products must not be disposed of with the household
waste. This tool should be taken to your local recycling centre for safe treatment
10.
..
.Contact details:
http://www.carttek.com
Cart-Tek Golf Carts
Bend, Oregon
866-356-2278
Table of contents
Other Cart-Tek Golf Trolley manuals

Cart-Tek
Cart-Tek GRX-1250Li User manual

Cart-Tek
Cart-Tek GRI-1300 User manual

Cart-Tek
Cart-Tek GRX-950 User manual

Cart-Tek
Cart-Tek GRX-950 User manual

Cart-Tek
Cart-Tek GRI-975Li User manual

Cart-Tek
Cart-Tek GRi-1500LTD User manual

Cart-Tek
Cart-Tek GRI-975Li User manual

Cart-Tek
Cart-Tek GRI-1500Li User manual

Cart-Tek
Cart-Tek GRI-1500Li User manual

Cart-Tek
Cart-Tek GRI-1500Li User manual