Bat-caddy X3 Series User manual

User Manual
X3 Series
X3 Classic
X3 Sport
X3R
ATTENTION: Please follow all assembly instructions and read the instructions to
understand the operating procedure before you run your caddy, either manually or
remote control.

TABLE OF CONTENTS
Packing List
Standard Parts (X3 Classic /X3 Sport)………………...........................................………………...3
Standard Parts (X3R)…………………......…………...........................................................……...3
Accessories………….............…………………...................................................................………3
Parts Glossary
X3 Classic & X3 Sport…………………............……….......................................…………………..4
X3R……………………………..............………………......................................................………..5
Assembly Instructions
X3 Classic & X3 Sport X3R..……………….....……………………........................................…..6,7
Operating Instructions
T-Handle Control Functions ……............................……................................……..........……….8
X3 Classic, X3 Sport & X3R ...………………….…....................................................................8,9
Additional Functions……………….………………………...................................…………..….…10
Maintenance & Additional Instructions
Testing Your Caddy……………………………………………...................................………….….10
Remote Control Instructions (X3R Only)…………….................................…......………........10,11
Battery Charging and Maintenance…………………..............................................………….11,12
RecommendationsforEcientandSafeOperation……………...................................………..12
General Maintenance…………………………….………………....................................…………13
ElectronicSystems………….………………………………………....................................……….13
Technical Specications
X3 Classic & X3 Sport……………………………………………………….............……...………..14
X3R….………………………………………...………………………………............................……15
TroubleshootingGuide………..………..…………..........................................................………16
Frequently Asked Questions (FAQs)………..…………………………..............................……16

3
PACKING LIST
X3 Classic & X3 Sport
• 1 Caddy Frame included front wheel set
• 2 Rear Wheels (Left & Right)
• 1 Battery Pack (Lead Acid or Lithium Battery, Bag, Leads)
• 1 Charger
• 1 Tool Kit
• Operational guide, Battery Care Instructions
• User Manual, Warranty, Terms & Conditions,
X3R
• 1 Caddy Frame included front wheel set
• 1 Anti-Tip Wheel & Pin
• 2 Rear Wheels
• 1 Battery Pack (Lead Acid or Lithium Battery, Bag, Leads)
• 1 Charger
• 1 Tool Kit
• 1 Remote Control (needs 2 AAA Batteries)
• Operational guide, Battery Care Instructions
• User Manual, Warranty, Terms & Conditions
Included Accessories (X3 Sport & X3R) only.
• 1 Scorecard Holder
• 1 Cup Holder
• 1 Umbrella Holder
NOTE:
This device complies with part 15 of the FCC Rules and with Industry Canada license-exempt RSS
standard(s). Operation is subject to the following two conditions:
(1) This device may not cause harmful interference, and
(2) this device must accept any interference received, including interference that may cause unde-
sired operation.
NOTE: THE MANUFACTURER IS NOT RESPONSIBLE FOR ANY RADIO OR TV INTERFERENCE
CAUSED BY UNAUTHORIZED MODIFICATIONS TO THIS EQUIPMENT
SUCH MODIFICATIONS COULD VOID THE USER’S AUTHORITY TO OPERATE THE EQUIPMENT
Bat-Caddy X3R
FCC ID: QSQ GC827322
IC ID: 10716A

4
1. T-Handle w/power button
2. Speed dial (Rheostat)
3. Upper bag support (Bungee pigtails)
4. Locking hinge
5. Battery w/Bag & Lead
6. Rear wheel (Right)
7. Rear Wheel (Left)
8. Rear wheel rubber tread
9. Lower frame connector
10. Lower Bag Support
11. 110-240v Charger
12. Front wheel
6
PARTS GLOSSARY
X3 Classic, X3 Sport
3
4
7
5
8
9
12
10
1
2
11

5
PARTS GLOSSARY
1. T-Handle w/power button
2. Upper bag support (Bungee pigtails)
3. Frame Locking Hinge
4. Rear Wheels (2) (interchangeable)
incl. wheel hub & tread
5. Anti-tip wheel & Pin
6. Battery Tray w/ Plug Receptacle
7. Lower Bag Support
w/bungee pigtails,
8. Front Wheel Assembly
w/ TrackIng Adjustment
Mechanism & Quick
Release Axle
9. Lower Frame Connector
10. 110-240v Charger
11. Remote
X3R
1
2
3
4
5
6
7
8
9
11

6
4. Insert Anti-tip Wheel into frame holding bar and secure with pin.
ASSEMBLY INSTRUCTIONS
ATTENTION: Make sure that the right wheel (marked R) is attached to the right side and the left
wheel (marked L) to the left side (seen from behind the cart in driving direction), as the wheels have
built-in one-way clutches. The caddy will not move if the wheels are not on the proper side.
3. ErectFramebyrstunfoldingtheu-shapedframepiece(Pic1).Bringuptheframepiecewiththe
mainhingeattachmentandrstattachbottomofthehingetotheoutsideofthepinonthetopof
the u-shape frame (Pic 2). Open the top frame and with the hinge lever attach it to the inside of
the pin locking the entire joint together (Pic 3). Proceed in reverse for folding the caddy.
There is a video on how to assemble your X3 Series cart on the website under Product Info > Tech Tips
1. Unpack all items carefully and check inventory. Place frame structure (one piece) on soft and
clean ground to protect frame from being scratched
2. Attach Rear wheels to axles by sliding locking lever on the wheel hub to the right, opening
the internal lock. Inserting the axle into the wheel. Make sure to keep the locking lever in the
open position during this process (Pic. 1). Then insert the axle all the way onto the
wheel (Pic. 2). Align the axle pins so they fit into the inner core of the wheel (Pic. 3)
Then release the lever and let the wheel lock into the groove on the front of the axle to secure
it in place. If not locked in, the wheel will not be connected to the motor and will not be
propelledorevencomeo!Testthelockbytryingtopullthewheelout.Todisassemblethe
wheels, proceed in reverse order.
X3 Classic, X3 Sport, X3R
Pic-1 Pic-3
Pic-2
Pic-1 Pic-3
Pic-2

7
X3R Only
7. Unpack remote control and install batteries with plus and
minus poles as indicated in the diagram in the receiver
compartment of the unit. Now you are ready to learn
and understand the functions of the manual and remote
controls.
NOTE: Before connecting make sure that Rheostat
Speed Control on handle is in OFF position!
6. Install optional accessories, such as Scorecard/Beverage/Umbrella holder, below handle.
Instructions provided separately.
5. Place the battery pack on the battery
tray and fasten the Velcro strap
around the battery tightly. Insert the
3-prong battery plug into the caddy
outlet so the notch aligns properly. It
is recommended NOT to fasten the
screw on the plug to the outlet, so in
case of tip over the cable can unplug
from the socket.
ASSEMBLY INSTRUCTIONS (Continued)

8
OPERATING INSTRUCTIONS
X3 Classic - X3 Sport - X3R
X3 Series
T Handle Controls
X3 Classic
Faceplate
X3 Sport/X3R
Faceplate
X3 Classic Instructions
OnthehandlethetopredbuttonisyourON/OFFswitchwhichpowersup&turnsopowertocart.
The “lightning bolt” will light up indicate power is “ON”.
The speed control (rheostat) dial on the side of the handle rotates to sets the speed
desired. Clockwise increases the speed, counterclockwise reduces the speed.
The green button is our stop/go feature. It works with the speed control allow you
to stop the cart at the current speed. When you are ready to resume just press the button again and
the cart will return to the last speed set. This option saves you from turning the speed dial back to
zero and re-setting the speed control (Rheostat) each time.
Slow Fast
The X3 classic does not have a USB port or the Advance Distance Timer.
X3 Sport Instructions
1. It is the ON/OFF BUTTON controls the caddy’s power supply. Press and hold for ca. 3-5
seconds
in order to switch the caddy ON or OFF. A small light under the “lightning bolt” will light up
indicate power is “ON”.
2. STOP/GO BUTTON. Once the cart is powered up, you can use the power button in
conjunction with the speed dial (Rheostat) to stop the cart at the current speed and then
resume at that speed once you resume walking without resetting the rheostat. Set you desired
speed with the rheostat, when you want to stop, press the power button for one second and
the caddy will stop, press again caddy will resume at the same speed.
The top red button has a dual function.
Speed Control Dial (Rheostat)
The Speed Control Dial (Rheostat) is located on the side of the upper frame
adjacenttothecontrolpanel.Itshouldbeintheopositiontostart.Rotatingit
to the right (clockwise) will start your speed.

9
X3 Sport Instructions (Continued)
Timed Distance Advance Function (Only on X3 Sport & X3R)
Press once, the caddy will run caddy 10 Yards/Meters and stop.
Press twice, the caddy will run caddy 20 Yards/Meters and stop.
Press three times, the caddy will run caddy 30 Yards/Meters and stop.
ATTENTION:donotusethesefunctionswhenthecaddyisclosetowaterorotherhazards!
USB port is available for charging GPS and/or cell phones. It is located in the
end cap of the upper frame above the handle control.
X3R Instructions
The manual Controls are the same as the X3 Sport
Remote Control Features and Instructions
Functions:
Stop: The red button in the middle of the directional arrows should be used for stopping the caddy.
Timer: 10, 20, 30 yards/meters
Backward Arrow: Pressing the back arrow will set the caddy in backward motion. Increase
backward speed by pushing multiple times. Press also to decrease forward speed/slow down the
caddy
Forward Arrow: Pushing the forward arrow will set the caddy in forward motion. Pushing multiple
times will increase the speed.
Left Arrow: initiates left turns. When the arrow is released the caddy stops turning and continues
straight with the original speed prior to turning.
Right Arrow: initiates right turn When the arrow is released the caddy stops turning and continues
straight with the original speed prior to turning.
On/O Switch: New added feature. Situated on right side of device, should be in the “ON” posi-
tion for normal use. The “OFF” is a safety position recommended to be used to prevent accidental
engagement of caddy.
Antenna: internal
• Change the remote control batteries once the indicator LED light gets weak or does not light at all.
• The remote control uses two 1.5V AAA batteries available in any supermarket, drug store, or
electronics store
• It is recommended to keep a set of extra batteries ready as replacement
• To change the batteries, open up the battery compartment cover by pulling the lever and place the
batteries according to the diagram in the battery compartment
• The remote-control system is designed to not interfere with other electric caddies
• The maximum range of the remote control varies between 80-100 yards, depending on the battery
charge, obstacles, atmospheric conditions, power lines, cell phone towers, other electronic/natural
interference sources
• It is strongly recommended to operate the caddy at a maximum range not exceeding 20 - 30 yards
inordertopreventthelossofcontroloftheunit!
Important Notes

10
Additional Functions
Tracking Adjustment: Tracking behavior of all electric caddies is strongly dependent on equal
weight distribution on the caddy and slope/topography of the golf course. Test your caddy’s tracking
behavior by operating it on an even surface without the bag.
If changes are necessary, you can adjust the
tracking of your caddy by loosening the front
wheel axle and shifting the front wheel as
needed. After adjustment, fasten screws in
reverse order. Note: DO NOT over tighten the nuts.
Note: There is a video on the website under
“tech tips” that shows how to adjust tracking
Note: There is a video on the website under “tech tips” that shows how to adjust tracking
Testing Your Caddy
Test Environment
First,makesurethatyouperformyourrsttestofthecaddyinawideandsafearea,freeofobstruc-
tionsorvaluables,suchaspeople,parkedautomobiles,owingtrac,furnitureorwaterbodies(riv-
ers,swimmingpoolsetc.),Steephills,clisorsimilarhazards.
Manual Control Operation
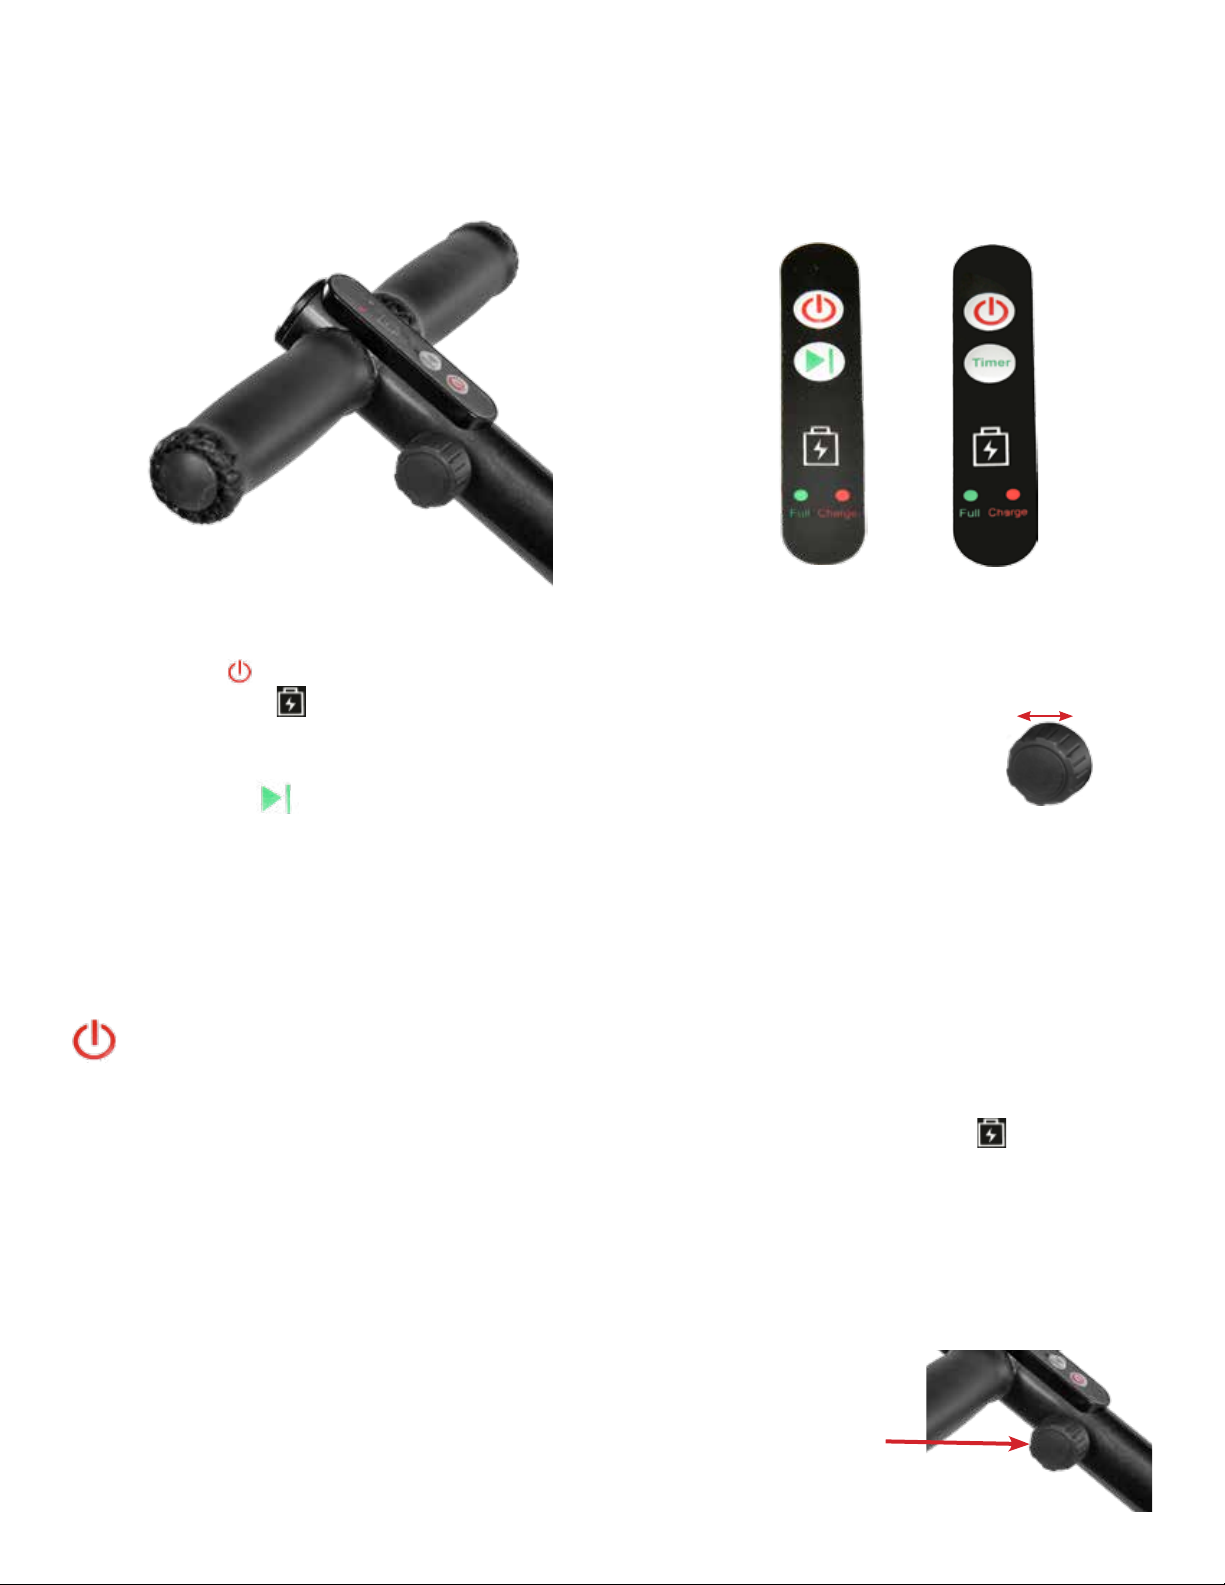
Testthemanualfunctionrst:PresstheOn/Obuttonfor2-5seconds.Themanualfunctionsofthe
caddy are controlled through the rheostat control wheel on the top of the handle. Pushing the wheel
clockwise will control the forward movement of the caddy. In order to slow down or stop the caddy,
turn the wheel counterclockwise.
Remote Control Operation (X3R Only)
Make sure you are close to the caddy at all times while testing it and familiarizing yourself
with the remote control! Now turn on the main power switch and make sure that the rheostat control
wheel is in OFF position. One touch of the Forward/Backward arrows on the remote control starts the
caddy in either direction. Further pushes increase the speed.
In order to stop the caddy, press round red STOP button in the middle of the remote! To turn
thecaddyineitherdirectionwhilemoving,pushtheleftorrightarrowsbriey.Onceyourelease
the button the caddy will continue in the current direction at the same speed prior to the turning
command.Youwillnoticethatthecaddyreactsdierentlyondierentsurfaces,soitwilltakesome
practice to get just the right touch for turning maneuvers. The remote is designed to have a reach of
approximately 80-100 yards, but we strongly recommend to operate the caddy in closer ranges of
10-30 yards (not exceeding 50 yards) to be able to react to any unforeseen events, such as other
golfers crossing your path or to avoid hidden obstructions (creeks, bunkers, GUR, etc.) or an unex-
Braking System:
The caddy drive train is designed to keep the wheels engaged with the motor, thus acting as a
brake that will control the caddy’s speed while going downhill.
AXLE ADJUSTMENT

11
BATTERY MAINTENANCE & ADDITIONAL INSTRUCTIONS
• Battery Charging and Maintenance(seespecicseparateinstructionsforsealedleadacid
(SLA) and lithium batteries)
• PLEASE OBEY THESE PRECAUTIONS FOR BATTERY USE & CHARGING:
• Please do not charge the battery in a sealed container or in upside down position. It is
recommended to charge the battery in a well-ventilated area.
• Please do not charge the battery near a heater, where heat accumulation may occur, or in direct
sunshine.
• In order to prolong the service life of the battery, please avoid complete discharge and charge the
battery after every use. Unplug the battery from the charger once the charge is complete. When
the trolley is not in use for an extended period of time, it is recommended to charge the battery
once every 6 weeks.
• The battery’s poles’ red color stands for positive, and the black for negative. In case of battery
replacementpleasereconnectthepolesofthebatterycorrectly;otherwiseyourcaddycouldsuer
severe damage.
• Pleasedonotdisassemblethebatteryorthrowitintoare;EXPLOSION HAZARD!
• NEVER TOUCH THE ELECTRIC POLES OF THE BATTERY AT THE SAME TIME! THIS IS A
Battery Charging Instructions SLA Batteries
Connect the battery cable plug with the charger and then plug the charger into an electrical outlet.
During the charging cycle the LED on the charger will show a red steady light. Once the charging
cycle is complete the red light, will turn into a steady green light. It is now okay to unplug the charger
and battery for reuse. The charging cycle can last up to 12 hours depending on the level of discharge.
Normallythebatterywillholditschargeforseveralmonths,anditdoesnothavea“memoryeect”,
and therefore can be recharged at any discharge level. It is not recommended to fully discharge the
batteries, as this will shorten battery life drastically. The battery has a normal lifespan of approx. 150
charges, depending on charging frequency, storage conditions, and time and discharge history, which
could reduce this lifetime. Before storing a battery for extended periods of time you must
fully charge it.
DO NOT store a discharged battery or else it might become unusable. Replacement batteries are
available from your authorized dealer or directly from Bat-Caddy.
Recommendations
• Fullychargethebatteryforca.5-9hoursbeforetherstuse
• Do not leave the battery on the charger if it is not used for extended periods of time; remove it
from the charger after charge is complete
• The battery will take approximately 2-3 rounds and charging cycles before it reaches its full
operatingpotential.Duringtherstcoupleofroundsitmightstillbebelowitsoptimalpower.
• Always keep your battery fully charged before another game
• Never keep your battery connected to the grid during prolonged power outages. It might be
irreversibly damaged.
Do not fully discharge the battery by “overplaying” it. It is recommended to recharge the battery after
every 18 holes.
*Life of sealed lead acid and any other batteries is dependent on a variety of factors, other
than purely the number of charges, including but not limited to frequency between charges,
duration of charge, level of drainage, idle time, operating temperature, storage conditions and
duration and overall shelf time. We cover our batteries according to our warranty policy and
any potential additional coverage is at our discretion”.

12
Battery Charging for Lithium Batteries
• SimilarinstructionstoSLAbatterywiththesedierencesandadditions.
• Do not expose the battery to excessive heat or direct sun for long periods of time or store it in hot
areas (car trunks, garages etc). LI batteries do not like high temperatures.
• Do not leave the battery on the charger for extended periods of time. Overcharging will void the
warranty. It is recommended to charge the battery shortly before you play again, instead of right
after you have played.
• Unlike SLA batteries, lithium batteries should be stored at a lower charge state during longer
periods of inactivity. The ideal charge state is 40-50% of capacity.
• NewLithiumchargerhasadierentsetofinstructions.Theredlightindicatethechargeisonly
plugged into a power source. The capacity is measured by a series of four(4) green lights. When
all four lights are lit, battery is charged.
• NeverexposeorthrowtheLithiumbatteryintoopenre.EXTREME FIRE HAZARD
Recommendations for Ecient and Safe Operation
• Be alert and act responsibly at all times while operating your caddy, just as you would when
operating a riding cart, motor vehicle, or any other type of machinery. We absolutely do not
recommend the consumption of alcohol or any other impairing substances while operating
our caddies.
• Do not operate the caddy carelessly in narrow or dangerous spaces, places with valuables or any
peoplegatheringareas,suchasparkinglots,closetoowingtrac,bagdrop-oareas,stores,
driving ranges, putting greens and practice areas, pro shops, restaurants, starter areas and other
areas where people or items could be harmed through an error or lack of skill in operation. In such
situations the caddy should be best operated manually with or without power. Also, please make
sure to always switch o the power and secure the caddy when you park and leave.

13
General Maintenance
The steps below will ensure that you get a prolonged and reliable life out of your Bat-Caddy.
• The Caddy has been designed so that the user can concentrate on playing golf, while the caddy
does the work of carrying your bag. In order to keep your Bat-Caddy looking its best, we advise
that you wipe any mud or grass from the frame, wheels and chassis after every round with a damp
cloth or paper towel.
• NEVER use water hoses or high-pressure jet washers to prevent moisture entering the
electronic systems, motors, or gear boxes of the caddy.
• Remove the rear wheels every few weeks and clean out any debris that might cause the wheels to
drag. You might also consider applying some lubricant, such WD-40, to keep moving parts smooth
and corrosion-free.
• A 4-5 hour round of golf played once a week for 12 months is equivalent to ca. four years’ use of
a lawn mower, so please thoroughly inspect your cart at least once a year, and if you notice any
symptoms of wear, contact your Bat-Caddy Service Center. Alternatively, you can have your caddy
inspected and tuned by our Service Center, so it’s always in great shape for the new season.
• Always disconnect the battery when you store the caddy, and always put your caddy together
before re-connecting the battery. If you are not planning to play for at least a month, store the
batteryinacoolanddryplace(notonconcreteoor)anddon’t leave it on the charger.
All of these recommendations and common sense will help keep your Bat-Caddy in top condition and
ensurethatitremainsyourreliablepartner,bothonandothelinks.
Electronic Systems
• Remote Control Range: We recommend not to exceed 20-30 yards distance. The greater the
distance between you and caddy, the greater the chance of losing contact with it
• Microcomputer:Theremotecaddyhas3microcomputercontrols:Therstisinmaincontroller
box. The second is in the remote control transmitter handset, and the third is in the receiver in the
handle.
• Safety Protection: When the temperature of the controller box reaches its upper limit in case of
anoverloaditwillautomaticallyshutdowntocoolo.
• Microprocessor Controlled Electronics System: When you connect the battery, the electronics
system will automatically run through a start-up routine. Then you can press the main OFF/ON
switch on the handle. The battery charge indicator lights will show you the charge level of the
battery from green (fully charged) to red (discharged).
• Important: The electronics controller box contains no user serviceable parts. Therefore, it is
sealed to reduce the risk of moisture entering and impacting the electronic system. Breaking this
seal increases the risk of damaging the electronics and decreasing the reliability of your caddy. DO
NOTattempttoopenthecontrollercase.Doingsowillvoidthewarranty!
• Battery Operation and Care: Follow battery charge and maintenance instructions. The battery
comes with leads and a 3-prong connector.
Note: Bat-Caddy reserves the right to modify/upgrade any components during a model year, so
illustrations on our website, brochures and manuals may slightly vary from the actual product shipped.
However,Bat-Caddyguaranteesthatspecicationsandfunctionalitywillbealwaysequalorbetter
from the advertised product. Promotional accessories may also vary from illustrations shown on our
website and other publications.

14
TECHNICAL SPECIFICATIONS
Model Name X3 Classic / Sport
Standard Battery 35/36Ah SLA
Dimensions SLA: 8 x 5 x 6 in (20 x 13 x 15 cm)
Weight: 21/24 Lbs
Average charge time: 3-6 hours
Lifetime: ca. 120 - 150 charges
Standard Battery Duration 27-36 holes per charge
Battery Upgrade Options 16 AH Lithium or 22AH Lithium
Average Charge time 3-6 hours
Lifetime Ca 500-750 charges
Folded Dimensions (w/o wheels) Length: X3: 31” (78.7 cm)
Width: X3: 19” (48.3 cm)
Height: X3:10” (25.2 cm)
Unfolded Dimensions Length: X3 40” (101.6 cm)
Width: 22” (55.9 cm)
Height: 38.5” (97.8 cm)
Weight Caddy X3:19 Lbs (8.6 kg)
Weight Battery 35Ah SLA: 25 lbs (10 kg)
16Ah LI: 5 lbs (2.3 kg)
20Ah Li: 6 lbs (2.7 kg)
Total Weight (standard battery 35Ah) X3: 48 lbs (18.2 kg)
Speed 5.4 mi/h (8.6 km/h)
Control Functions Manual Seamless Rheostat
Cruise Control/Stop/Go
Functions: Forward, Stop
Power Switch
Speed Indicator
X3 Sport only
USB Port
Timed Advance function (10,20,30 M/Y)
Distance/Range 15 mi (25 km)/27-36 holes
Climbing Ability 30 degrees
Maximum Load 70 lbs (32 kg)
Charger Input: 110-240V AC
Output: 12V/2A-3A Trickle Charger
Motor Power: 1 x 200 Watt (200 Watt)
12V DC Electric
Front Wheels Airless, rubberized tread
Tracking adjustment
Rear Wheels Airless, rubberized tread
Quick-release mechanism
Drive Train Rear Wheel Drive
Gear ratio (17:1)
Handle Height Adjustment N/A
Materials Aluminum/SS and ABS
Available Colors Iridium Silver, Matte Black, Glossy White
Complimentary Accessories
(Depending on promotions)
Scorecard Holder, Cup Holder, Umbrella Holder, Waiting Seat,
Carry Bag, Sand Dispensor, GPS/Cell Phone Holder, Remote
Clip Hanger
Introduced (year) 2009 revised 2012 & 2014
Warranty 1 Year on Parts and Labor
1 Year on SLA Battery/2 Years on LI Battery
2nd Year - Prorated

15
TECHNICAL SPECIFICATIONS
Model Name X3R
Standard Battery 35/36Ah SLA
Dimensions: 8 x 5 x 6 in (20 x 13 x 15 cm)
Average charge time: 4-8 hours
Lifetime: ca. 150 charges
Standard Battery Duration 27+ holes
Battery Upgrade Options 22Ah Lithium @ $400.00
Folded Dimensions (w/o wheels) Length: 31” (78.7 cm)
Width: 22.5 in (57.2 cm)
Height: 10 in (25.4 cm)
Unfolded Dimensions Length: 42 in (106.7 cm)
Width: 25 in (63.5 cm)
Height: 36.5 in (92.7 cm)
Weight Caddy 23 lbs (10.5 kg)
Weight Battery 35Ah SLA: 25 lbs (11 kg)
20Ah Lithium: 6 lbs (2.7 kg)
Total Weight (standard battery 33Ah) 48 lbs (21.8 kg)
Speed 5.4 mi/h (8.6 km/h)
Control Functions Manual Seamless Rheostat
Remote Control (range up to 80-120 yards)
Functions: Forward, Reverse, Left, Right, Stop
Timed forward advance function (10,20,30 yards)
Cruise Control
PowerOn/O
USB Port
Distance/Range 13 mi(20 km)/27+ holes
Climbing Ability 30 degrees
O-PowerFree-WheelingMode P
Maximum Load 77 lbs (35 kg)
Charger Input: 110-240V AC
Output: 12V/3A-4A Trickle Charger
Motor Power: 2 x 200 Watt (400 Watt)
12V DC Electric
Front Wheels Airless, rubberized tread
Tracking adjustment
Rear Wheels Airless, rubberized tread
Quick-release mechanism
Anti-tip wheel assembly
Drive Train Rear Wheel Drive
Dual independent transmission
Gear ratio (17:1)
Handle Height Adjustment N/A
Materials Aluminum/SS and ABS
Available Colors Iridium Silver, Black, White
Complimentary Accessories
(depending on promotions)
Scorecard Holder, Cup Holder, Umbrella Holder, Waiting Seat,
Carry Bag, Sand Dispenser, GPS/Cell Phone Holder, Remote
Clip Hanger
Introduced (year) 2006
Warranty 1 Year on Parts and Labor
1 Year on SLA Battery/2 Years on LI Battery
2nd Year - Prorated

16
TROUBLESHOOTING GUIDE
Caddy does not have power • Make sure battery is plugged correctly into cart
• Makesurebatteryissucientlycharged
• Depress and hold power button for at least 5 seconds
• Make sure battery leads are connected to proper
poles (red on red & black on black)
• Make sure power button is engaging circuit board
(you should hear a click)
Motor is running but wheels don’t turn • Check if wheels are attached correctly. You should
notbeabletopullowheel
• On X3C/X3S Check right and left wheel position they
must be on the correct side
• Check connection between controller and motor
• Check if wheels are secured to axle by axle pin
• Check right/left wheel clutches
Caddy pulls to left or right • Checkifwheelisttedoverclutch&latchedtoaxle
• Check if axle pin is visible at both sides of axle
• Check clutch: turn freely in one direction only
• Check tracking on level ground
• Check weight distribution in golf bag
Battery/Caddy lacks power • Check cable connections
• Check battery charge
• Check charger function
• Problems attaching wheels • Make sure you are holding the spring clip down
• Sand and smooth axle with Emery cloth to remove
excess paint or burrs
FREQUENTLY ASKED QUESTIONS (FAQs)
Please check our website at http://batcaddy.com/pages/FAQs.html for FAQs
For Technical Support please contact one of our Service Centers.
Contact info at
http://batcaddy.com/pages/Contact-Us.html
Check our website www.batcaddy.com
Other manuals for X3 Series
4
This manual suits for next models
3
Table of contents
Other Bat-caddy Golf Trolley manuals