KILN care Hobbyfuser 3 User manual

Instructions

Page Hobbyfuser 3 Manual
2
Thank you for choosing to purchase a Hobbyfuser 3 kiln for your
glasswork.
We hope you will have many years happy use out of your kiln.
This kiln underwent a huge amount of research and testing in order
to make it, what we believe, one of the most robust and
reliable kilns in the world.
Please read this manual fully to get to know your kiln before use.
Index
Page
Safety notices
Your Hobbyfuser 3 is designed and built to meet all European Directives and
British Standards. In addition, your kiln is designed specifically for Sweden.
2 Safety notices.
3 For your records. Where to site your kiln.
4 Optional stand.
5 Electrical connection. Initial firing. Lid vent.
7 Loading. Initial firing.
8 Looking after your kiln.
9 Damaged brick replacement.
10 Element replacement.
11 KCR2 instructions.
15 Trouble shooting.
16 Contact us.
17 Your Notes.
20 CE Certificate.

Hobbyfuser 3 Manual Page 3
However, as with all kilns, there are certain measures that you must take to
achieve optimum safety.
Electricity
The Hobbyfuser 3 meets all Electrical Safety Directives, including a lid safety
switch. However, the kilns are electric and as such certain measures should be
taken.
Keep the kiln dry.
Never attempt to remove any of the kiln cover panels or do any repair work
when the kiln is plugged into a mains electricity socket.
Never use the kiln if external cables are damaged.
Have the kiln tested by a competent person at least every 12 months.
Never turn the power on to the kiln when the KCR2 is not plugged in.
Hot Surfaces
The kiln will have hot surfaces. Do not touch the kiln when it has been on for
any period of time as the case temperatures will rise with time.
Keep pets clear at all times.
Keep the kiln clear of flammable items such as curtains etc.
Your new arrival
For your records
Date of purchase. ___________________
Company purchased from ____________________
First date of use _________________
Unpacking your kiln
Once unpacked, please show consideration to the environment when disposing
of your kiln packaging.

Page Hobbyfuser 3 Manual
4
Where to install your kiln
Position the kiln allowing a minimum of 30cm clearance around both sides.
The kiln casing will get hot and so any combustible material must be kept at a
safe distance. Never leave combustible materials on the kiln lid or touching the
kiln during a firing.
Do not site the kiln close to flammable items such as curtains etc.
The floor or bench must be capable of carrying the weight of the kiln. The
Hobbyfuser 3 does have air clearance under it and so there should be no need
to protect the bench top, however, if your firings are to be prolonged then it is
advisable to sit the kiln on a heat resistant material.
Consideration must also be given to the ceiling area above the kiln as heat will
radiate upwards from the kiln.
IMPORTANT. The top of the lid and the side cover boxes of the Hobbyfuser 3
will see high temperatures, so careful consideration must be given to siting with
regard to the safety of children and pets. It is advised that the kiln is left
untouched until the kiln has finished it’s given program and fully cooled.
Remember, whilst the kiln is cooling it may be possible that the external case
temperature actually increases.
Do not site the kiln outside.
It is advised to site the kiln in a room that has ventilation.
The floor or the bench that the kiln is to be sited on should be as flat as
possible. If there is a twist or unevenness in the surface it can cause the kiln lid
to sit slightly to one side or the other.
Although this will have no damaging effect to the kiln, it can cause the lid catch
to be difficult to operate as it may then be out of line.
Optional Stand
If you have chosen the optional stand it will have been delivered with the kiln in
“flat pack” guise.
You will have 2 x shelves, 4 x legs, 1 x Hex Key, 32 pins and 32 locking nuts.
Note that the fixing holes in one of the shelves are wider apart than in the other.
The shelf with the wider holes is the top shelf.
For best results in achieving the flattest possible stand for the kiln, we

Hobbyfuser 3 Manual Page 5
recommend that the stand is positioned in its final position with all of the pins
located and the locking nuts only “pinch” tightened.
Next, place the kiln onto the stand. The fact that the pins are not fully tightened
will allow the weight of the kiln to level the stand.
Once the kiln is in its final position the locking nuts can be fully tightened.
Electrical connection
The Hobbyfuser 3 comes fitted with a Euro Schuko plug top fitted. It is designed
to work from standard 230v socket outlets.
It is not advisable to use the kiln from an extension lead.
The electrical supply MUST have a sound earth connection.
It is advisable to have your chosen socket outlet tested by a qualified electrician
prior to use to ensure its sound condition.
Portable Appliance Testing
It is possible, depending on the type of establishment that the kiln is to be used
in that the kiln may be required to be Portable Appliance Tested along with other
electrical items.
It is important that the KCR2 controller is disconnected before testing or there is
a risk of the high voltage associated with the test effecting the controller
permanently.
On initial testing, the kiln may show a low insulation resistance reading, this is
normal and will improve as the kiln dries. Kilns are porous by nature and will
absorb moisture from the atmosphere, especial if the kiln is new or has had a
period of inactivity.
Periods of testing will be stipulated by the testing body.
KILNS AND R.C.D. “TRIPS”
Due to the reasons stated above and to insulation material properties, a certain
amount of leakage to earth will probably be evident, therefore the fitting of a
30ma R.C.D. in the circuit can create a fault condition at low temperatures if the
kiln is damp, at higher temperatures as the kiln insulation heats up, when first
fired or used after a long period of inactivity.
This problem is relatively rare but can be solved by the fitting of a 100ma R.C.D.
Consult us or a fully qualified electrician for advise.

Page Hobbyfuser 3 Manual
6
Initial firing
Leave the top bung out of the top vent.
This will dry and “settle” the kiln.
On the first firings, a slight odour will be emitted, this is the remnants of binding
resins in the boards and should stop after two or three firings depending on
temperature and duration of the firings.
There may also be the appearance of smoke coming from the panels on the
side of the lid. This the resins burning out from the end of the quartz element
tubes and should be gone within a firing or two.
For this initial firing we recommend that the kiln is in a well ventilated area.
We suggest that prior to the initial firing, that you use this instruction manual
and the controller manual to ensure you are familiar with all aspects of the kiln
and usage of the KCR2
Control
The KCR2 controller supplied with this kiln has already been set and the
characteristics of the kiln have been entered in to it.
The kiln and the KCR2 will have already been put through a test firing at the
factory.
Please read the instructions on control before starting to use your Hobbyfuser 3
The controller plugs into the kiln at the socket at the rear right hand side of the
kiln. It will only plug in one way.
Once fitted close the clamp to ensure sound connection.
The small blue stand supplied in your Hobbyfuser 3 is for the KCR2. It can be
used to sit the controller at a convenient angle on a bench top or to mount the
controller to an adjacent wall using the fixing holes in the rear of the stand.
Operation
The lid vent
Firstly it is best to decide if the bung is to be in or out at the start of the cycle.
Insert or remove the vent plug in the roof of the kiln while the lid is open, it is
advisable to lower the lid once before placing the fibre paper/ shelf/ board and

Hobbyfuser 3 Manual Page 7
the glass, as initially it is possible that the action of inserting and removing the
bung may produce a slight dust residue.
The kiln can be fired with the bung left in totally. If there is a concern that the
item to be fired may be a little damp then it is advisable to leave the vent out
until a temperature of around 550c is reached.
Cooling with the lid clasp.
When the kiln has cooled to a relatively low temperature the lid clasp can be used to aid
cooling in conjunction with removing the lid vent plug.
Undo the clasp, lift the lid slightly and sit the top half of the clasp onto the main base
section as shown below. The clasp with get hot in this position so take precautions when
returning to it..
We do not recommend cooling in this manner above 100c.
Loading
Load the kiln with the glass items that are to be fired.
Remember glass will stick to the bricks so a separating medium must be used.
This can take many forms including fibre paper or a refractory batt (shelf)
covered with batt wash.
It is not necessary that a kiln shelf is used and the work can be placed straight
on the kiln floor if a separator is used, such a fibre paper etc to keep the glass
from sticking to the kiln floor bricks when hot.
If a kiln shelf is to be used, it does not HAVE to be raised from the kiln floor and
the batt does not need to have a separator between itself and the kiln floor
bricks.
The glass will need a separator between itself and the batt for the same
reasons as it need to be separated from the brick.
The kiln bricks do not need to be painted with battwash, just protect the area

Page Hobbyfuser 3 Manual
8
where the glass can touch with a separator.
Once the kiln has been loaded with the glass to be fired, lower the lid and
clamp shut the clasp to ensure the lid seal remains tight throughout the firing.
Plug the kiln into a 13 amp wall socket outlet.
Enter the firing cycle and start the KCR2.
What to expect on the initial firing
Once the KCR2 has been stated and after a slight delay a red dot will appear
on the controller display and a quiet click will be heard from the KCR12 This is
the internal relay of the controller turning the kiln power on.
This click will be heard to click on and off at various points through the cycle as
the KCR2 regulates the kiln temperature.
As mentioned on previous pages, a slight odour will be released and the
insulation binders burn out.
Looking after your kiln
REMEMBER, the kiln is for stained glass applications, fusing and slumping. IT
IS NOT A MOULD DRYER.
Moulds used for slumping contain a huge amount of water, it is recommended
that the mould is thoroughly dried prior to insertion in the kiln. The kiln will
operate with a wet mould in it but the kiln was not designed to expel large
quantities of water vapour from its chamber. Continued use of wet moulds in
the kiln chamber could result in premature deterioration of the kiln structure.
Care must be taken not to load the kiln to a height that will result in the
elements being closed on to the load. This invariably results in broken element
tubes.
When shutting the kiln lid, gentle operation will also prevent accidents.
The lid insulation of your Hobbyfuser 3 is press cut and then machined together
under pressure to ensure that the insulation is fitted to its maximum strength
and to ensure many years of service. This process does mean that extra care is
needed to keep the brick tops clear of objects when closing the lid as repairs to
the lid seal are difficult and may result in the lid needing to be re-lined.

Hobbyfuser 3 Manual Page 9
Depending on use, it is advisable to check all electrical connections are tight
every 6 months or so and that no cables are discolouring due to heat.
Damaged Brick replacement
In the event of an accident during loading or an unfortunate mishap during the
firing, the bricks of the lower half are fully replaceable and are available pre-cut
to size.
To remove a brick, simply loosen it by hand and lift clear. Ensure that the
remaining hole is clear of any left behind pieces of brick then slide in the new
one. The kiln can then be used immediately.
Remember, always wear a dust mask and carry out work in a well ventilated
area when repairing or replacing refractory items that have been previously
fired.
Brick 9 in the Hobbyfuser 3 has the thermocouple passing through it.
To remove the thermocouple, firstly remove the rear box cover, then undo the
thermocouple retention bracket and slide out the thermocouple.
After the brick is replaced you will need to drill a 3.5mm hole through the brick
for the thermocouple to pass through.
Once inserted back into position, make sure the thermocouple is once again
clamped to the metal box tightly and securely.
.
Hobbyfuser 3
Brick Layout

Page Hobbyfuser 3 Manual
10
Element Replacement.
In the event of an element failure replacement is easy done.
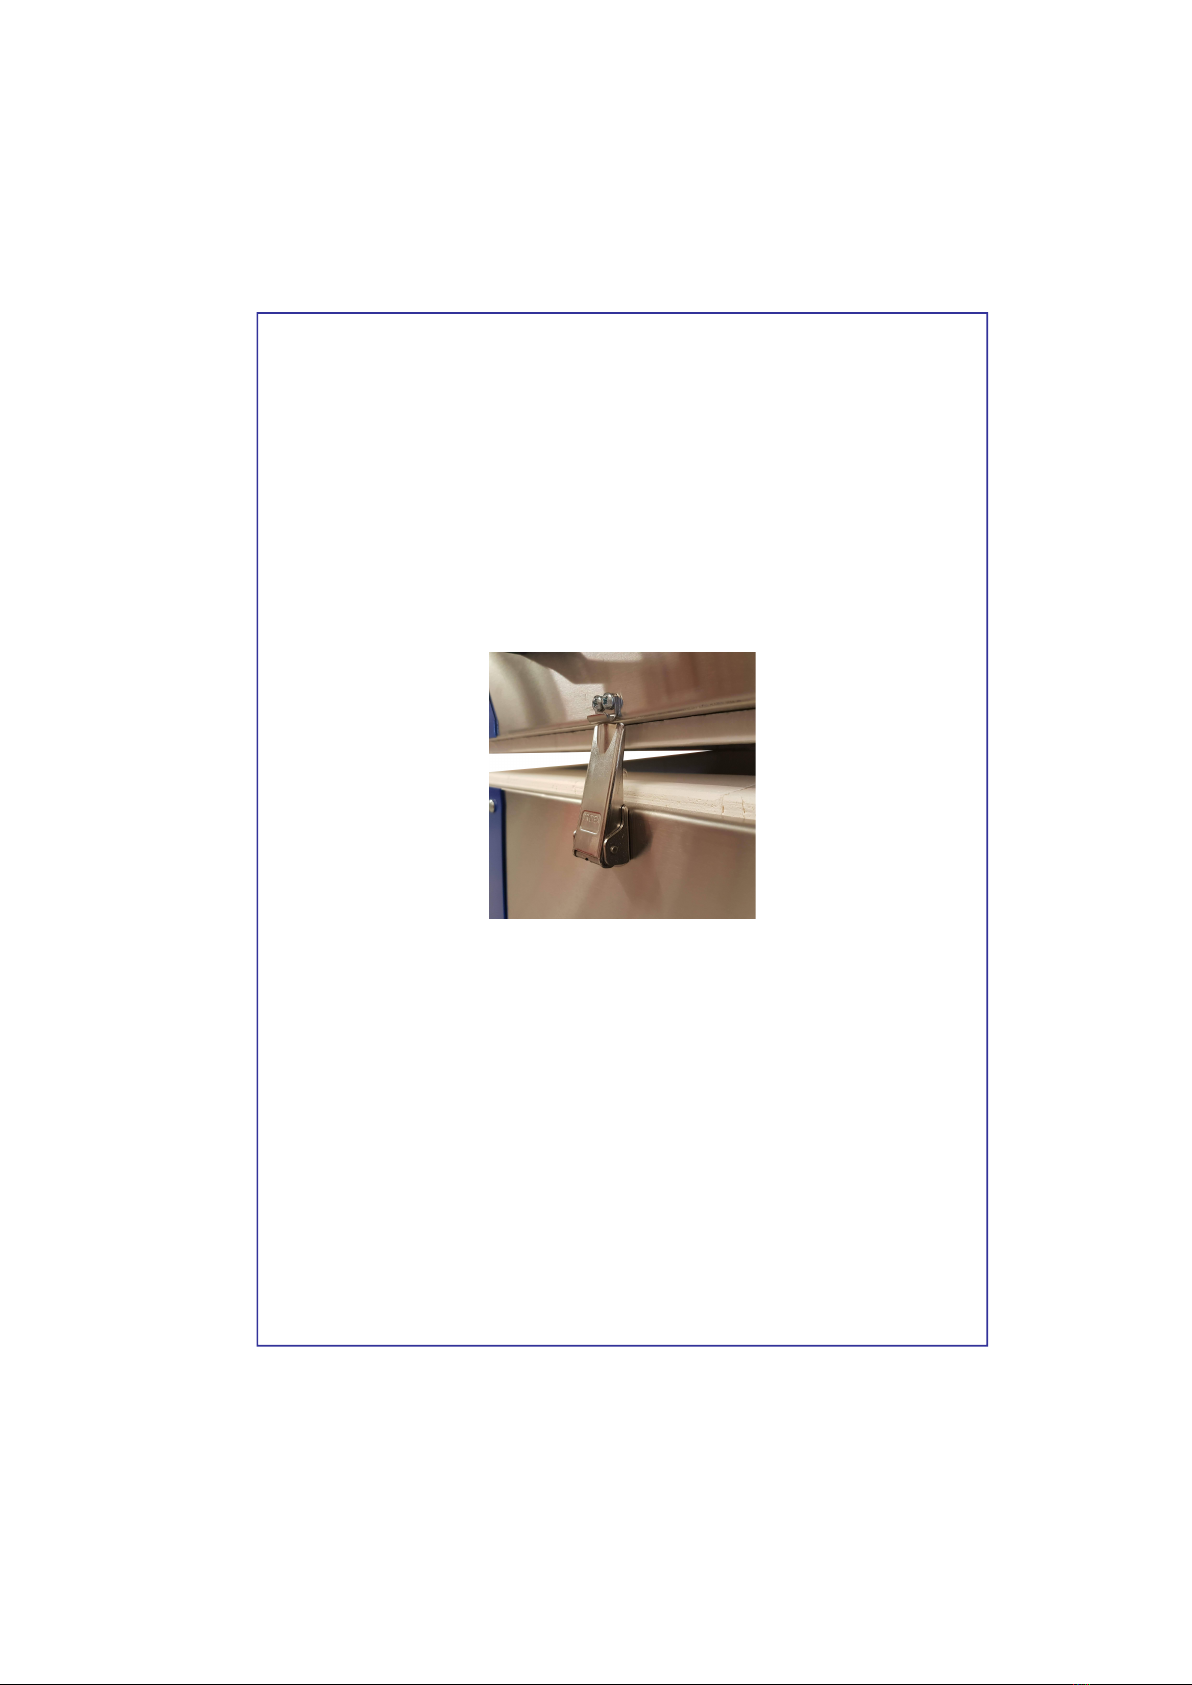
Firstly, unplug the kiln from the electrical supply then unscrew the two side
cover boxes that cover the element connections and let them hinge
downwards. It is now possible to replace the elements with the side boxes in
the lowered position and still attached to the kiln lid. If the cover boxes do need
to be removed take extreme care so as to not let the power cables pull at the
element tubes.
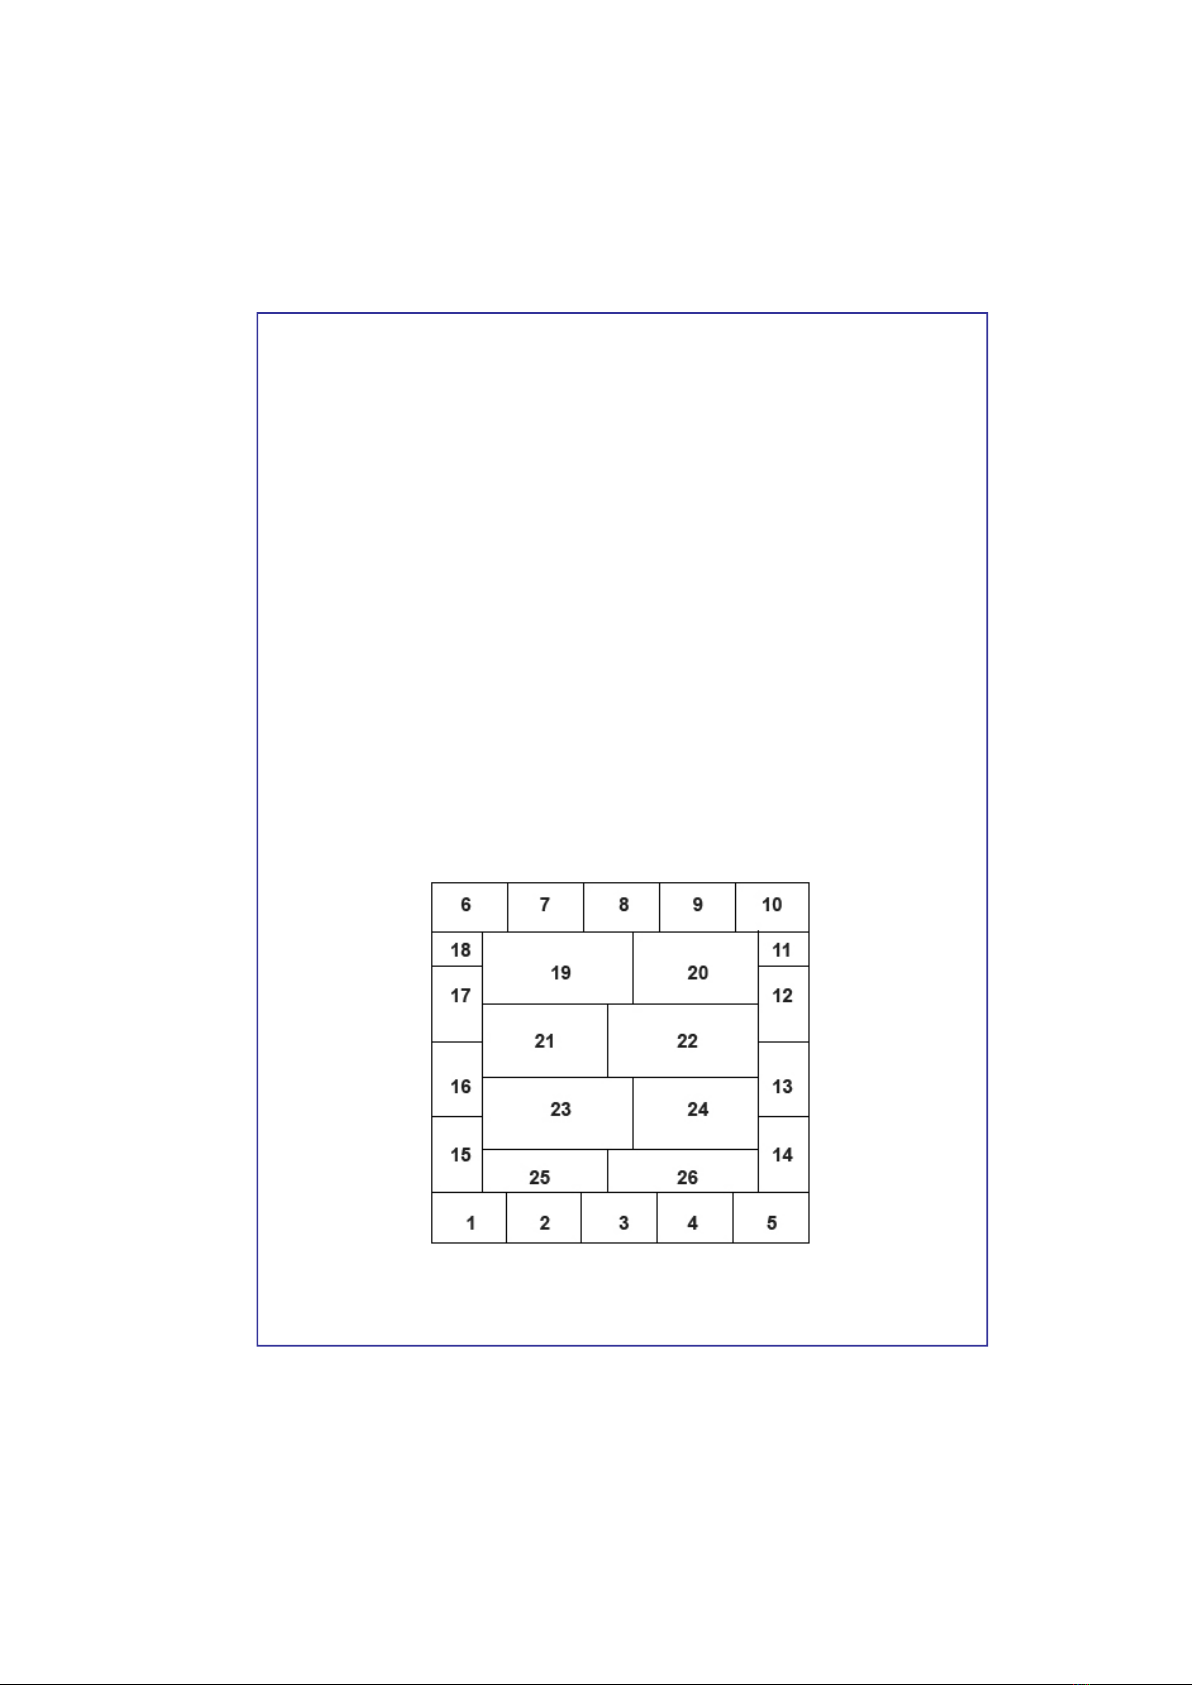
When it is determined which element has blown, (for this a circuit tester may be
required). There are three elements in the Hobbyfuser 3, each element
consists of a pair of tubes.
Disconnect both ends of the elements from their porcelain connector blocks.
Now slide out the element and both tubes out as one.
IMPORTANT. For this step it is strongly advised that the room is ventilated and
that a suitable P3 standard respiratory mask is used.
Never handle the element tubes with bare hands, use the disposable gloves
provided. From the left hand side of the kiln slide in the new element.
Take care and be gentle, even though the tubes have a high strength once in
position, they can be chipped or crack if handled carelessly.
Once the element is through both sides of the case then level up the element
and tubes so that the element which is visible through the tube is sitting central
in the roof space with the gap between the element and the fibre wall of the lid
being the same on both sides.
Before connection it is worth checking on the non-connection side of the kiln lid
that the element has stayed fully inserted into the tube, if not then apply gentle
pressure to the element where it links the two tubes together and ease the
element back to its fully inserted position in the tube.
Reconnect the element tails to each porcelain block as before.
Again take care to hold the porcelain connector block steady as you re-connect
to avoid cracking the end of the tube.
Re-fit both side cover boxes ensuring that any wires present are clear of the
protruding element tubes and connector blocks.
A slight odour will be emitted during the first firing as the element burns out
binders in the element seal compound.

Hobbyfuser 3 Manual Page 11
KCR2 instructions
On power up controller will go into test mode then after a few seconds will settle
down and show kiln temperature in the top display.
Before starting, make sure that only the top display is illuminated, if any other
lights are lit press the “start” key to extinguish them.
Buttons index
Start / stop
Step
Up
Down
Pause Hold for 4 seconds. To un-pause hold again for 4 seconds.
Energy used and when not in programming mode.
To set a program
The KCR2 has 9 settable programs. Each program has 9 segments.
Press the “step” key. The main display shows the program number, for
instance “Pr 1” . The segment display shows “1”. Use the “up” or “down” keys
to select the program required.
Press “step”. The main display will show a ramp rate, for instance “85”, “FULL”
or “END”. The segment display will show “1”, this is segment 1. The ramp light
will illuminate above the main display. This segment is how fast you would like
the kiln to reach its first temperature in degrees centigrade per hour. A slow
firing might require the first temperature to be reached “50” degrees per hour.
Whilst a fast firing would be set to reach temperature as quickly as possible so
the rate required would be “FULL”. “FULL” is above “1000” on the display.

Page Hobbyfuser 3 Manual
12
Press “step” .The main display will show a temperature for instance “600”. The
segment display will still show “1” and the temperature light will illuminate
above the main display. This temperature is in Celsius. This temperature is
your first temperature. Use the “up” or “down” keys to select.
Press “step”. The main display will show a time, for instance “0.30” or “PASS”.
The segment display will show “1” and the time light above the main display will
illuminate. Dwell is the time in hours and minutes that you require the kiln to
hold the first temperature.
Press “step”. The main display will show a temperature, for instance “85”,
“FULL” or “END”. The segment display will now show “2”, this is segment 2.
The ramp light will illuminate above the main display. This segment is how fast
you would like the kiln to reach its second temperature. At this point, if the kiln
is required to finish, press the ”down” key until “END” is shown in the top dis-
play. End is below 0000 on the main display.
All the above is segment 1 and the start of segment 2, the controller has 9
segments and so for more complicated firings carry on as above by setting the
next time, temperature and dwell. When you have programmed all you require,
select “END” at the start of the following segment.
After a few seconds the display will time out and show the kiln
temperature.
To run a program
Press ”step” the main display will show “Pr ” and the program number. Use the
“up” or “down” keys to select the program number required.
Press “start” and the main display will show a time, for instance “00.10” or
“PASS”. The segment display will show “ 1 “ and the time light above the main
display will illuminate.
Delay is the time in hours and minutes before the kiln will actually start. Set the
desired time using the “up“ and the “down“ keys. If no delay is required hold the
down key until the display shows “PASS”. Pass is below 0.00. The kiln starts
automatically after a few seconds if no time is entered.
If a delay has been set the main display will act as a count down timer showing
the hours and minutes remaining before the kiln starts to fire. A flashing dot in
the main display will indicate the timer is running.
As the kiln fires the main display will show the kiln temperature and the
segment display will show the segment number. If the kiln is climbing, the
upward facing ramp triangle will illuminate, the downward facing triangle will

Hobbyfuser 3 Manual Page 13
illuminate on a cooling ramp and when the kiln is holding temperature both will
illuminate.
To stop a program
Press “start/stop”.
To pause a program
Press and hold the “down” button. The top display will alternate between the
current temperature and “ Paused “. As the program pauses two confirmation
beeps will be heard.
This temperature will be held indefinitely or until the pause button is pressed
again. When the pause is stopped the kiln will continue through the program
from where it was paused. Again a confirmation beep will be heard.
To forward a program
At any time the controller can be made to skip to the next segment. To do this,
press and hold the “up” key for 4 seconds. This can be useful if the pause
button has been used. It may be that at the end of the manual pause you do
not require the kiln to finish the rest of that section and so the program can be
moved on to the next section or end using this key.
To view entered program data
This can be done whether the kiln is firing or not. Press the “step key”, each
press will forward the display to the next section.
To alter program data while the kiln is firing
Press the “step” key until the desired value is displayed. Alter it using the “up”
or “down” keys.
.
Example program
If you require the kiln to start a 7am, fire as fast as it can to 800c then hold for
10 hours. It would be programmed like so. We will presume that it is being
programmed at 5pm the evening before. We will make this program 4.
Press “step”. Use “up” or “down” to select “Pr 4” in the main display.
Press “step”. Use ”up” or “down” keys to enter “FULL” for ramp rate.
Press “step”. Use ”up” or “down” keys to enter “800” for temperature.
Press “step”. Use ”up” or “down” keys to select a dwell time of “10.00” hours.
Press “start” Use ”up” or “down” keys to select a delay time of “14.00” hours.
Main display will show “14.00” with a flashing dot as the time counts down.
After 14 hours the kiln will start.
For more detailed KCR2 instructions consult the KCR2 manual supplied
separately.

Page Hobbyfuser 3 Manual
14
Prog
No.
Program
Description
Seg 1
Ramp
Rate
C/Hr
Seg 1
Soak
Temp
C
Seg 1
Soak
Time
Hr.
mins
Seg 2
Ramp
Rate
C/Hr
Seg 2
Soak
Temp
C
Seg 2
Soak
Time
Hr.
mins
Seg 3
Ramp
Rate
C/Hr
Seg 3
Soak
Temp
C
Seg 3
Soak
Time
Hr.
mins
Seg 4
Ramp
Rate
C/Hr
Seg 4
Soak
Temp
C
Seg 4
Soak
Time
Hr.
mins
1 4-6mm Float
Glass Fuse 150 538 00:10 FULL 840 00:20 FULL 538 00:45 182 427 00:15
2 4-6mm Float
Glass Slump 150 538 00:00 200 700 00:15 FULL 538 00:15 182 427 00:00
3 6mm Bullseye
Fuse 222 677 00:30 333 795 00:10 FULL 482 01:00 83 371 00:01
4 6mm Bullseye
Slump 167 640 00:10 FULL 482 01:00 56 371 00:01 END
5 6mm System 96
Fuse 200 500 00:20 FULL 804 00:12 FULL 540 00:40 150 510 00:20
6 6mm System 96
Slump 155 704 00:00 FULL 540 00:30 FULL 510 00:10 26 371 00:00
7 Bottle Firing
Cycle 170 510 00:00 250 780 00:10 FULL 510 00:00 70 400 00:30
8 Low Stain 200 570 00:10 FULL 516 00:30 100 300 00:00 END
9 High Stain 200 665 00.10 FULL 550 00.20 FULL 516 00.30 100 300 00.00
Seg 5
Ramp
Rate
C/Hr
END
END
END
END
END
END
END

Hobbyfuser 3 Manual Page 15
Kiln trouble shooting
KCR2 has no lights
Check that the socket outlet that the kiln is plugged into is turned on.
With the kiln unplugged, check the control plug attached to the KCR2 is correctly
inserted into the control socket at the rear of the kiln and that it is secured with
the socket clamp.
If the above appear correct contact Kilncare.
KCR2 is working correctly, is showing that the kiln is receiving power but
the kiln is not heating up and orange light is not illuminating.
With the kiln unplugged, check the control plug attached to the KCR2 is correctly
inserted into the control socket at the rear of the kiln and that it is secured with
the socket clamp.
Are the lid safety switches operating correctly? Inside the right hand lid element
panel there are two tilt switches which shut off as the lid opens. The lid has to be
in the closed position before the tilt switches will allow the elements to heat.
If the above appear correct contact Kilncare.
KCR2 is working correctly, is showing that the kiln is receiving power but
the kiln is not heating up even though the orange light is illuminating.
A kiln element problem. Either the kiln has lost an element or there is a faulty
connection on an element.
Contact Kilncare.
KCR2 shows an ERROR message.
Consult the KCR2 manual and contact Kilncare.
Plug top is getting hot.
The plug top will get slightly warm with use but if it is getting hot consult a
qualified electrician to test the condition of the socket outlet.
A crackling noise can be heard when the kiln is firing.
This will be a loose connection and needs to be fixed immediately by a
competent person.
Continued use will almost result in the connection failing.

Page Hobbyfuser 3 Manual
16
The door catch doesn’t line up
Check the surface that the kiln is sitting on. It is almost certain that it is uneven or
twisted.
Level the surface or relocate the kiln and the catch will line up.
Damaged lid seal
There are no repairs available for a damaged lid seal. If glow from the inside of
the kiln is not visible whilst the kiln is firing it is unlikely that the work will see any
ill effects.
If the inside of the kiln is clearly visible when the kiln is at temperature then you
may need to return the lid or hole kiln to Kilncare for relining.
Back up
We pride ourselves on our back up and after sales service and so in the unlikely
event of any problems please do not hesitate to call our staff for friendly help and
advise.
Contact us at
Kilncare ltd, The Kiln Works,
907 Leek New Road, Baddeley Green,
Stoke on Trent, Staffordshire, ST2 7HQ,
Tel 01782 535915, Fax 01782 535338
E-mail sales@kilncare.co.uk, Web www.kilncare.co.uk

Hobbyfuser 3 Manual Page 17
Notes
—————————————————————————————
—————————————————————————————
—————————————————————————————
—————————————————————————————
—————————————————————————————
—————————————————————————————
—————————————————————————————
—————————————————————————————
—————————————————————————————
—————————————————————————————
—————————————————————————————

Page Hobbyfuser 3 Manual
18
—————————————————————————————
—————————————————————————————
—————————————————————————————
—————————————————————————————
—————————————————————————————
—————————————————————————————
—————————————————————————————
—————————————————————————————
—————————————————————————————
—————————————————————————————
—————————————————————————————
—————————————————————————————

Hobbyfuser 3 Manual Page 19
European Declaration of Conformity.
Kilncare Limited, The Kiln Works, 907 Leek New Road, Baddeley Green,
Stoke on Trent, Staffordshire, England, ST2 7HQ.
We declare that the equipment described below was manufactured ourselves to comply
with directives listed.
We do not give any assurance that the equipment is suitable for any purpose other than
that listed below and must be operated and maintained in
accordance with our operating instructions.
Products.
Hobbyfuser 3 kiln.
Directives.
LVD - Low Voltage Directive 2006/95/EC.
EMC - Electromagnetic Compatibility Directive 2004/108/EC#
#The equipment is intended for use only in premises having a service current capacity of 100 A per
phase, supplied from a distribution network having a nominal voltage of 400/230 V,
The user should determine in consultation with the supply authority, if necessary, that the service
current capacity at the interface point is sufficient for the equipment.
Harmonized Standards.
BS EN 1088:1995+A2:2008, BS EN 55014-1:2006, BS EN 55014-2:1997.
Description.
General Glass Kiln.
Purpose of use.
Glass fusing, slumping and colouring up to the maximum temperature
stated on the kiln data plate.
Product serial number.
As per affixed data plate.
Manufacture year.
2019.
Technical documentation is held for this product.
Lee Sherwin,
Director,

Hobbyfuser 3
Instruction Manual
2019
Table of contents
Other KILN care Measuring Instrument manuals
Popular Measuring Instrument manuals by other brands

Intelligent Recording
Intelligent Recording Xtension Recorder Universal Adapter 3.0 Installation and user guide

Observint
Observint ALIBI ALI-QVR5116H Quick setup guide

SDR-Kits
SDR-Kits DG8SAQ VNWA 3 Assembly

Precaster
Precaster LDM60 Operation manual

Lascar
Lascar Wireless Alert TP Setup guide

Agilent Technologies
Agilent Technologies 2200 TapeStation quick guide