KiloVault HAB 7.5 User manual

KiloVault HAB / Sol-Ark
Closed Loop Communication
Introduction
KiloVault has worked with Sol-Ark to enable closed loop communication between the Sol-Ark hybrid
inverter and the KiloVault HAB.
What is closed loop communication and why do I want it? Closed loop communication is active 2-way
communication between the Sol-Ark and the HAB. This communication greatly reduces the amount of
manual setup and allows the HAB and the Sol-Ark to work together more closely and efficiently.
Hardware and Software Needed
●Sol-Ark
○Sol-Ark 8K / 12K Indoor, or 5K / 8K / 12K Outdoor - Updated to the most recent
firmware.
○Tools for stripping and cutting wires if needed.
●KiloVault
○HAB - Updated to the most recent firmware using the HAB iT mobile app
○The HAB iT mobile app
■Apple iOS - https://apps.apple.com/us/app/kilovault-hab-it/id1528264614
■Android - https://play.google.com/store/apps/details?id=com.kilovault.battery
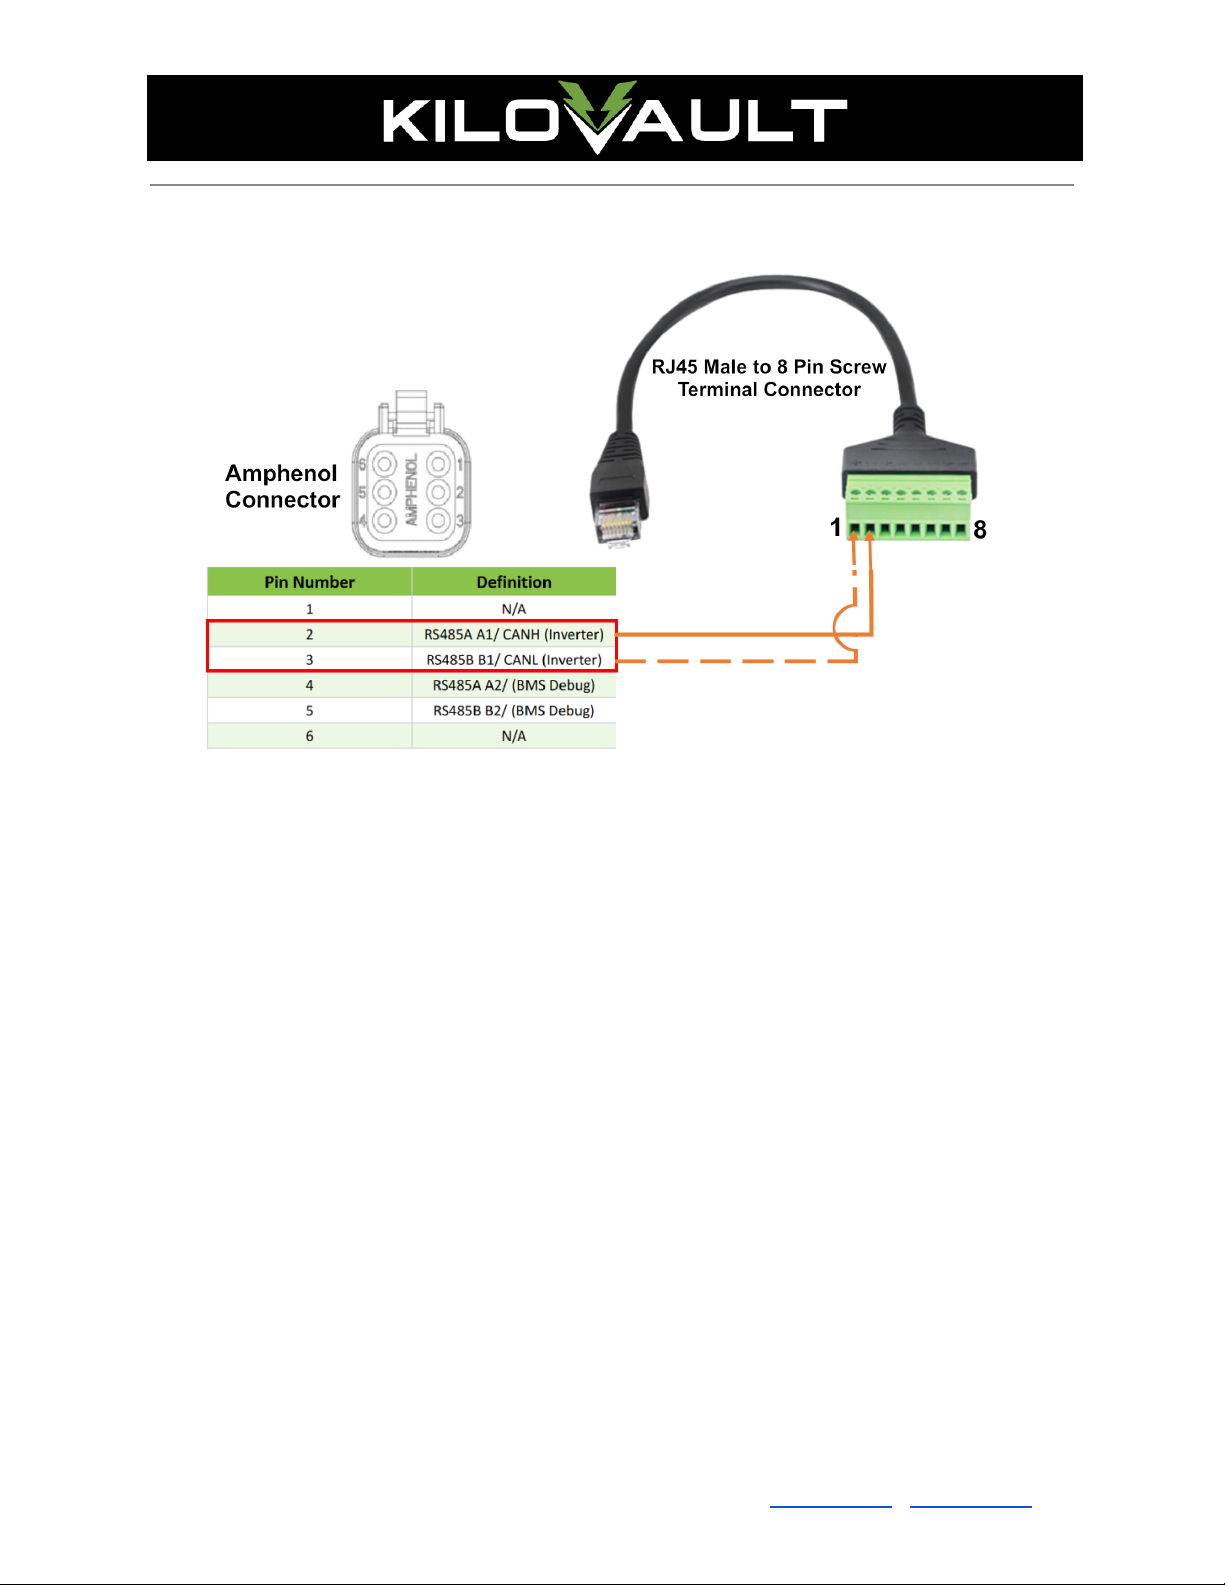
○V1, V2 & Early V3 HABs - HAB to Inverter Amphenol AT06 6S Modbus Cable.
■You will have to build the HAB to Sol-Ark cable using the supplied
communications cable, plus an RJ45 Male to 8 Pin Screw Terminal Connector.
RJ45 Male to 8 Pin Screw Terminal Connectors can be found online.
The instructions are below.
■Small screwdriver for the Screw Terminal Connector
●If you are not using the suggested RJ45 Male to 8 Pin Screw Terminal
Connector you will need
○An RJ45 connector.
○Crimping tool for RJ45 connectors.
■Early V1 HABs cannot be updated through the cloud. Contact KiloVault for a kit
to update the HABs locally using a personal computer.
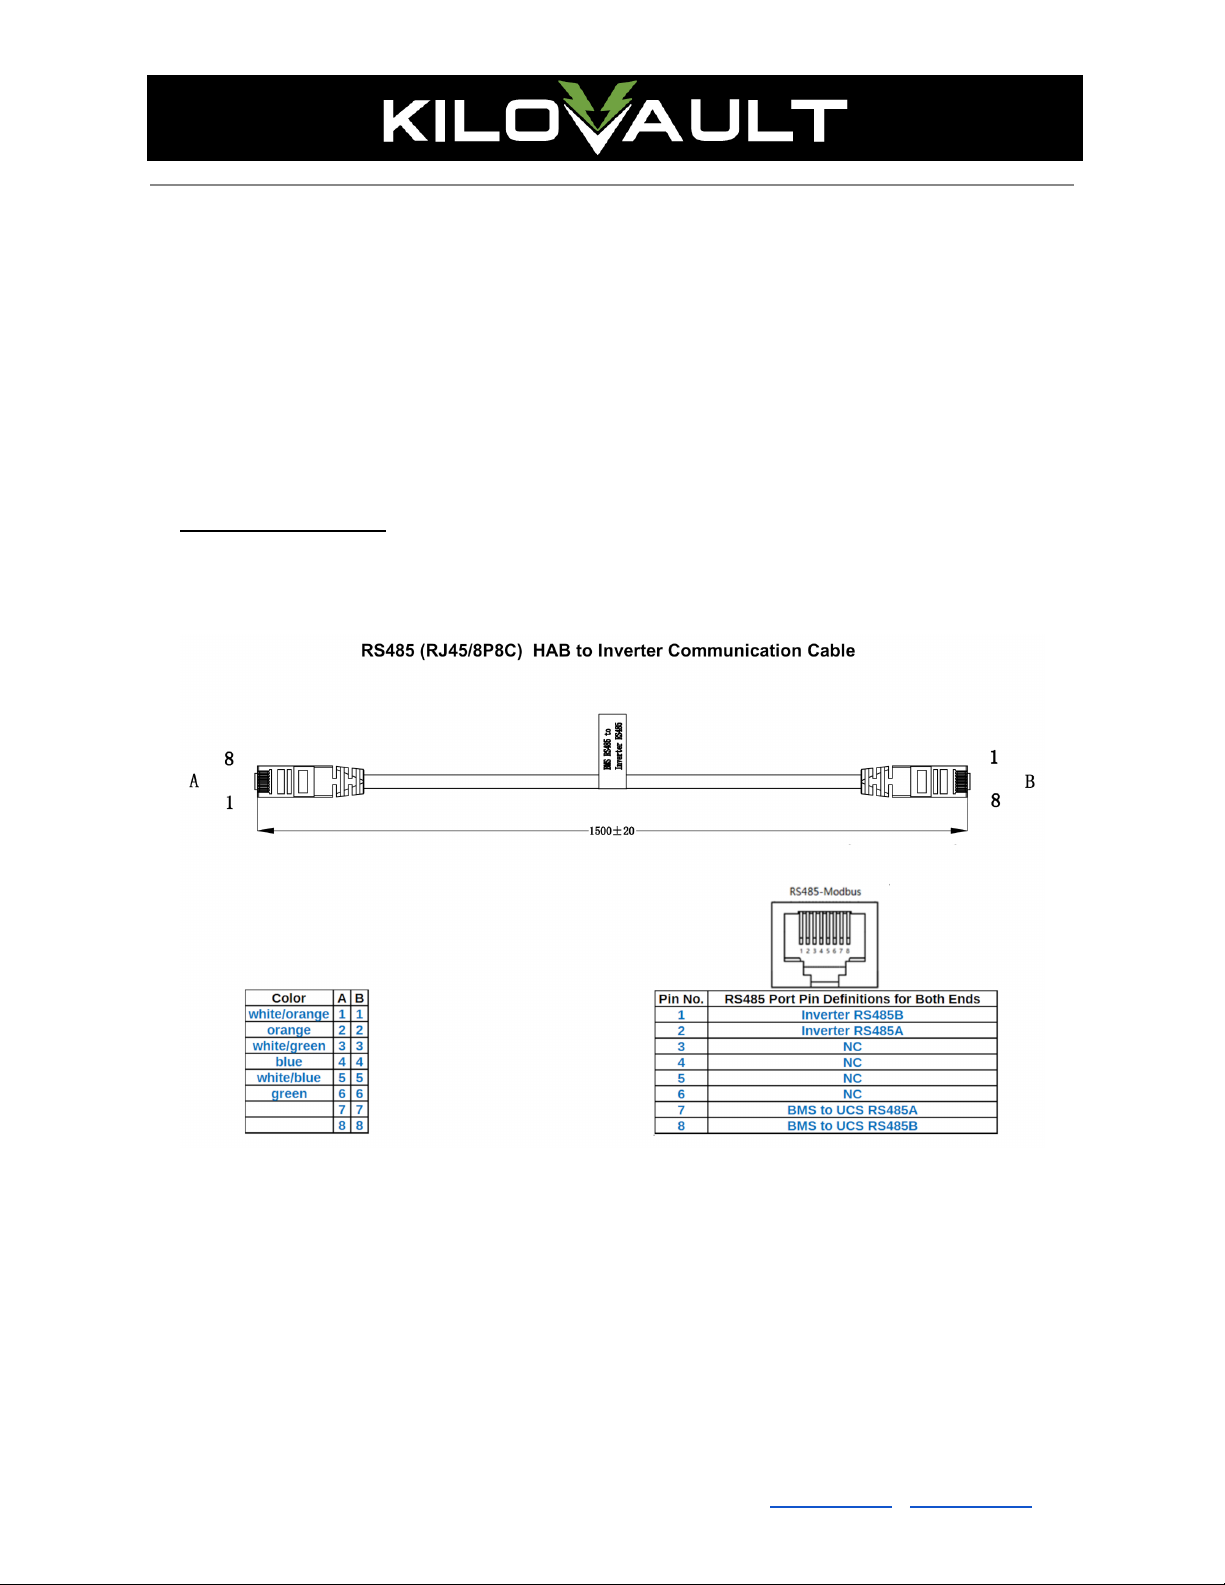
○Late V3, V4 HABs - RJ485 HAB to Inverter Modbus Cable. It is labeled “RS485
communication cable between battery & inverter.” The ends are identical.
You can download documentation for the KiloVault HAB and HAB iT mobile app here -
https://kilovault.com/kilovault-hab-series/.
You can download documentation for the Sol-Ark hybrid inverters here -
https://www.sol-ark.com/support/.
V1.02 - July 2022
KiloVault®LLC • 330 Codman Hill Road, Boxborough, MA 01719 • +1 (888) 218-5924 • info@kilovault.com •www.kilovault.com

Instructions
Types and Locations of Sol-Ark RS485 Connections
The connection circuit board in the Sol-Ark inverter is located in the same place, but different models
have different circuit board configurations.
Circuit Board Location
Figure 1
This is in the same place in all Sol-Ark models.
V1.02 - July 2022
KiloVault®LLC • 330 Codman Hill Road, Boxborough, MA 01719 • +1 (888) 218-5924 • info@kilovault.com •www.kilovault.com

Circuit Board Types
Sol-Ark 8K (Indoor)
Figure 2
Use the port on the left labeled “RJ45_485”
Sol-Ark 12K (Indoor)
Figure 3
Use the port on the right labeled “RS-485”
Sol-Ark 5K / 8K / 12K Outdoor
V1.02 - July 2022
KiloVault®LLC • 330 Codman Hill Road, Boxborough, MA 01719 • +1 (888) 218-5924 • info@kilovault.com •www.kilovault.com

Figure 4
Use the port on the far right.
Do not use any of the ports on the left hand side.
HAB V1, V2 + Early V3
The HAB to inverter cable that shipped with V1, V2 & early V3 HABs has an Amphenol AT06 6S connector
on one end and bare wires on the other.
Figure 5
Pin
Definition
Wire Color (may
be different than
what it says
below)
1
N/A
Black
2
RS485A A1 (inverter comms)
Yellow
3
RS485B B1 (inverter comms)
Green
4
RS485A A2/ (BMS Debug)
Not Used
5
RS485B B2/ (BMS Debug)
Not Used
6
N/A
Amphenol AT06 6S Connector
Pinouts
V1.02 - July 2022
KiloVault®LLC • 330 Codman Hill Road, Boxborough, MA 01719 • +1 (888) 218-5924 • info@kilovault.com •www.kilovault.com

Wiring Diagram
Figure 6
Steps
1. Make sure that all the HABs in your bank are off.
2. If you have more than one HAB, connect them using the included HAB to HAB communication
cables. Please see the HAB user manual for detailed instructions on setting up multiple HABs.
a. If you have a mixture of HAB versions in your battery bank, make the most recent
version HAB the Leader.
3. Identify wires #2 & #3 on the stripped end of the HAB to Inverter communications cable. Make
sure you have enough stripped wire to work with. Safely secure the other wires to get them out
of your way and to prevent shorts.
4. If you are using the suggested RJ45 Male to 8 Pin Screw Terminal Connector
a. Insert the Amphenol pin 2 wire into position 2 of the screw terminal connector and
tighten
b. Insert the Amphenol pin 3 wire into position 1 of the screw terminal connector and
tighten
5. If you aren’t using the suggested RJ45 Male to 8 Pin Screw Terminal Connector, you will connect
a male RJ45 connector onto the bare wires of the supplied Amphenol cable.
a. Connect the Amphenol pin 2 wire to pin 2 of the RJ45 connector.
b. Connect the Amphenol pin 3 wire to pin 1 of the RJ45 connector.
c. Crimp to securely fasten.
6. Plug the amphenol plug into the Leader HAB.
7. Open up the lower section of the Sol-Ark case. Please see Figure 1 above to locate the Sol-Ark’s
communication circuit board.
V1.02 - July 2022
KiloVault®LLC • 330 Codman Hill Road, Boxborough, MA 01719 • +1 (888) 218-5924 • info@kilovault.com •www.kilovault.com

8. If you have a Sol-Ark 8K Indoor
a. Insert the RJ45 end of the communication cable into the communication port on the left
side. It is labeled “RJ45_485.” Please see Figure 2 above.
9. If you have a Sol-Ark 12K Indoor
a. Insert the RJ45 end of the communication cable into the communication port on the right
side. It is labeled “RS-485.” Please see Figure 3 above.
10. If you have a Sol-Ark 5K / 8K / 12K Outdoor
a. Insert the RJ45 end of the communication cable into the communication port on the right
side. It is labeled “Battery CAN Bus.” Do not use the port labeled “Modbus
RS-485.” Please see Figure 4 above.
HAB V3 & HAB V4
The RS485 HAB to Inverter cable that ships with the later V3 HABs and ships with all V4 and newer HABs
has RJ45 connectors on both ends. The ends are identical.
Figure 7
V1.02 - July 2022
KiloVault®LLC • 330 Codman Hill Road, Boxborough, MA 01719 • +1 (888) 218-5924 • info@kilovault.com •www.kilovault.com

Figure 8
Pin
Modbus Definition
Wire Color (may be
different than what
it says below)
1
RS485B (inverter comms)
white/orange
2
RS485A (inverter comms)
orange
3
NC
white/green
4
NC
blue
5
NC
white/blue
6
NC
green
7
BMS debug RS485A
Not Used
8
BMS debug RS485A
Not Used
Pinouts
Steps
1. If you have more than one HAB, connect them using the HAB to HAB communication cable.
Please see the HAB user manual for details.
a. If you have a mixture of HAB versions in your battery bank, make the newest version
HAB the Leader.
b. If your mixture of HABs includes one or more V4, along with older versions, you’ll need a
special communication cable to connect the V4 with the older HABs. Please contact your
distributor for the cable.
2. If you have a Sol-Ark 8K Indoor
a. Insert the RJ45 end of the communication cable into the communication port on the left
side. It is labeled “RJ45_485.” Please see Figure 2 above
3. If you have a Sol-Ark 12K Indoor
a. Insert the RJ45 end of the communication cable into the communication port on the right
side. It is labeled “RS-485.” Please see Figure 3 above.
4. If you have a Sol-Ark 5K / 8K / 12K Outdoor
a. Insert the RJ45 end of the communication cable into the communication port on the right
side. It is labeled “Battery CAN Bus.” Do not use the port labeled “Modbus
RS-485.” Please see Figure 4 above.
All HAB Models
1. Following the instructions in the HAB manual, turn on your batteries
2. If you have not done so already, download and install the HAB iT mobile app to the mobile device
you will use for setting up your HAB.
a. Following the instructions in the HAB iT mobile app manual, if you have not already done
so, use the mobile device to connect the Leader and Follower HABs to the internet and
update it to the latest firmware version
b. Follow the instructions below to set the Leader HAB to the correct HAB to inverter
communication protocol. You do not need to do this to the Follower HABs.
i. On the “Basic” tab of the HAB iT there is a circle containing 3 dots in the upper
right hand corner. Tap that circle to open the HAB iT “More” screen. Please see
Figure 9.
V1.02 - July 2022
KiloVault®LLC • 330 Codman Hill Road, Boxborough, MA 01719 • +1 (888) 218-5924 • info@kilovault.com •www.kilovault.com

Figure 9
ii. On the “More” screen, make sure that the “Inverter protocol setting” is set to
“0011”. Please see Figure 10.
Figure 10
3. Program the Sol-Ark using the settings in the KiloVault HAB manual.
4. On the “Batt” tab of the Sol-Ark’s Battery Setup menu
a. Check “BMS Lithium Batt”
b. Set the BMS Lithium Batt to “00”
V1.02 - July 2022
KiloVault®LLC • 330 Codman Hill Road, Boxborough, MA 01719 • +1 (888) 218-5924 • info@kilovault.com •www.kilovault.com

Figure 11
5. On the “Discharge” tab of the Sol-Ark’s Battery Setup Menu
a. Uncheck “BMS_Err_Stop” so that a momentary loss of communication with the battery
does not cause the Sol-Ark to go into fault.
Figure 12
Sol-Ark Set-Up: HAB 10Y Extended Life or 7.5Y Extended Charge Warranty
Sol-Ark Batt Tab
Batt Capacity = 150A per HAB
Max A Charge =
120A Per HAB for the 7.5Y warranty
50A Per HAB for the 10Y warranty
Max A Discharge =
150A Per HAB for the 7.5Y warranty
60A for the 10Y warranty
Tempco = 0mV / °C/Cell
V1.02 - July 2022
KiloVault®LLC • 330 Codman Hill Road, Boxborough, MA 01719 • +1 (888) 218-5924 • info@kilovault.com •www.kilovault.com

Use Batt % Charged = checked
BMS Lithium Batt = checked
BMS Lithium Value = 00
Sol-Ark Charge Tab
Float V = 54.4 V
Absorption V = 56 V
Equalization V = 56 V
Equalization Hours = 0.0 Hours (disables equalization)
Sol-Ark Discharge Tab
Shutdown = 8%
Low Batt = 20%
Restart = 30%
Batt Empty V = 49V
Batt Resistance = Use this formula - n * (1/r) = 1/total resistance. n = Number of HABs, r = 1 HAB
internal resistance
1 HAB = 20mΩ, 2 HABs = 10mΩ, 3 HABs = 6.67mΩ, etc.
Example: How was the 3 HAB value calculated?
Single HAB internal resistance = 20mΩ
1/20 = 0.05
3 * 0.05 = 0.15 = 1/total resistance
Total resistance = 6.67mΩ
Batt Charge Efficiency = 98%
BMS_Err_Stop = un-checked (so the Sol-Ark doesn't go into fault if comms stop)
V1.02 - July 2022
KiloVault®LLC • 330 Codman Hill Road, Boxborough, MA 01719 • +1 (888) 218-5924 • info@kilovault.com •www.kilovault.com
This manual suits for next models
3
Table of contents
Other KiloVault Storage manuals