Kimax HD03WF Operational manual

HD03WF Product User Manual
Catalog
Section 1. Product Introduction
Section 2. Product Feature
Section 3. Structure Description
Section 4. Operating Steps
Section 5. Setting instructions of router function
Section 6. RFQ

Product Introduction
1. This product is not only a wireless WIFI mobile HDD enclosure ,but also a portable wireless
router. The product is large-capacity mobile storage devices which can have a high-speed data
exchange through the USB port or WIFI wireless network, at the same it increased WIFI wireless
transmission function base on the traditional mobile hard disk, also have their own APP software for
management of local area network and wide area network (remote), moreover it can support third-
party APP and bring a more convenient use experience for customers. Support WindowsAndroid
IOS market mainstream system.
1. Product Feature
※High speed USB3.0 HDD Enclosure
※WIFI Wireless storage device, private cloud disk
※Wireless router
※NAS Function
※Read external, such as U disk, mobile hard disk and other external storage devices through
※Support several devices simultaneously
※Support samba and FTP server functionality shared perfectly.
※Supports EXFAT/FAT32 / NTFS / EXT4 four kinds of disk format for wireless data read and
write
(Wireless storage can only support these four formats, please check the disk format in advance )
※Wireless repeater function

1. Structure Description
Operating Steps
Step One: Install the hard disk
Attention: Wired USB storage and wireless storage can not be used at the same time.(All the disk data of
connect the USB cable will be transferred to the USB data cable priority, wireless will not be able to get to the
disk data)
Step two: Turn on and access to WIFI
1. Access to power, press the switch button to turn on;;
2. To wait for about 2 minutes WIFI open, and then use computer or phone access to the WIFI which name is
begin of KIMAX - ***** ;
3. WIFI Password:00000000
1. Insert the hard drive into the corresponding socket.
2.Access to power, then connect the computer with a USB cable,
you can manage the files on the storage disk (the new use of the first
hard disk needs to be initialized, otherwise no disk, only the disk
manager can see the specific steps can be Baidu It is recommended
to format EXFAT or FAT32 / NTFS / EXT4 when initializing the
disk. Other formats will cause the wireless can not be stored, or only
can not be written. After the initialization, unplug the USB cable)

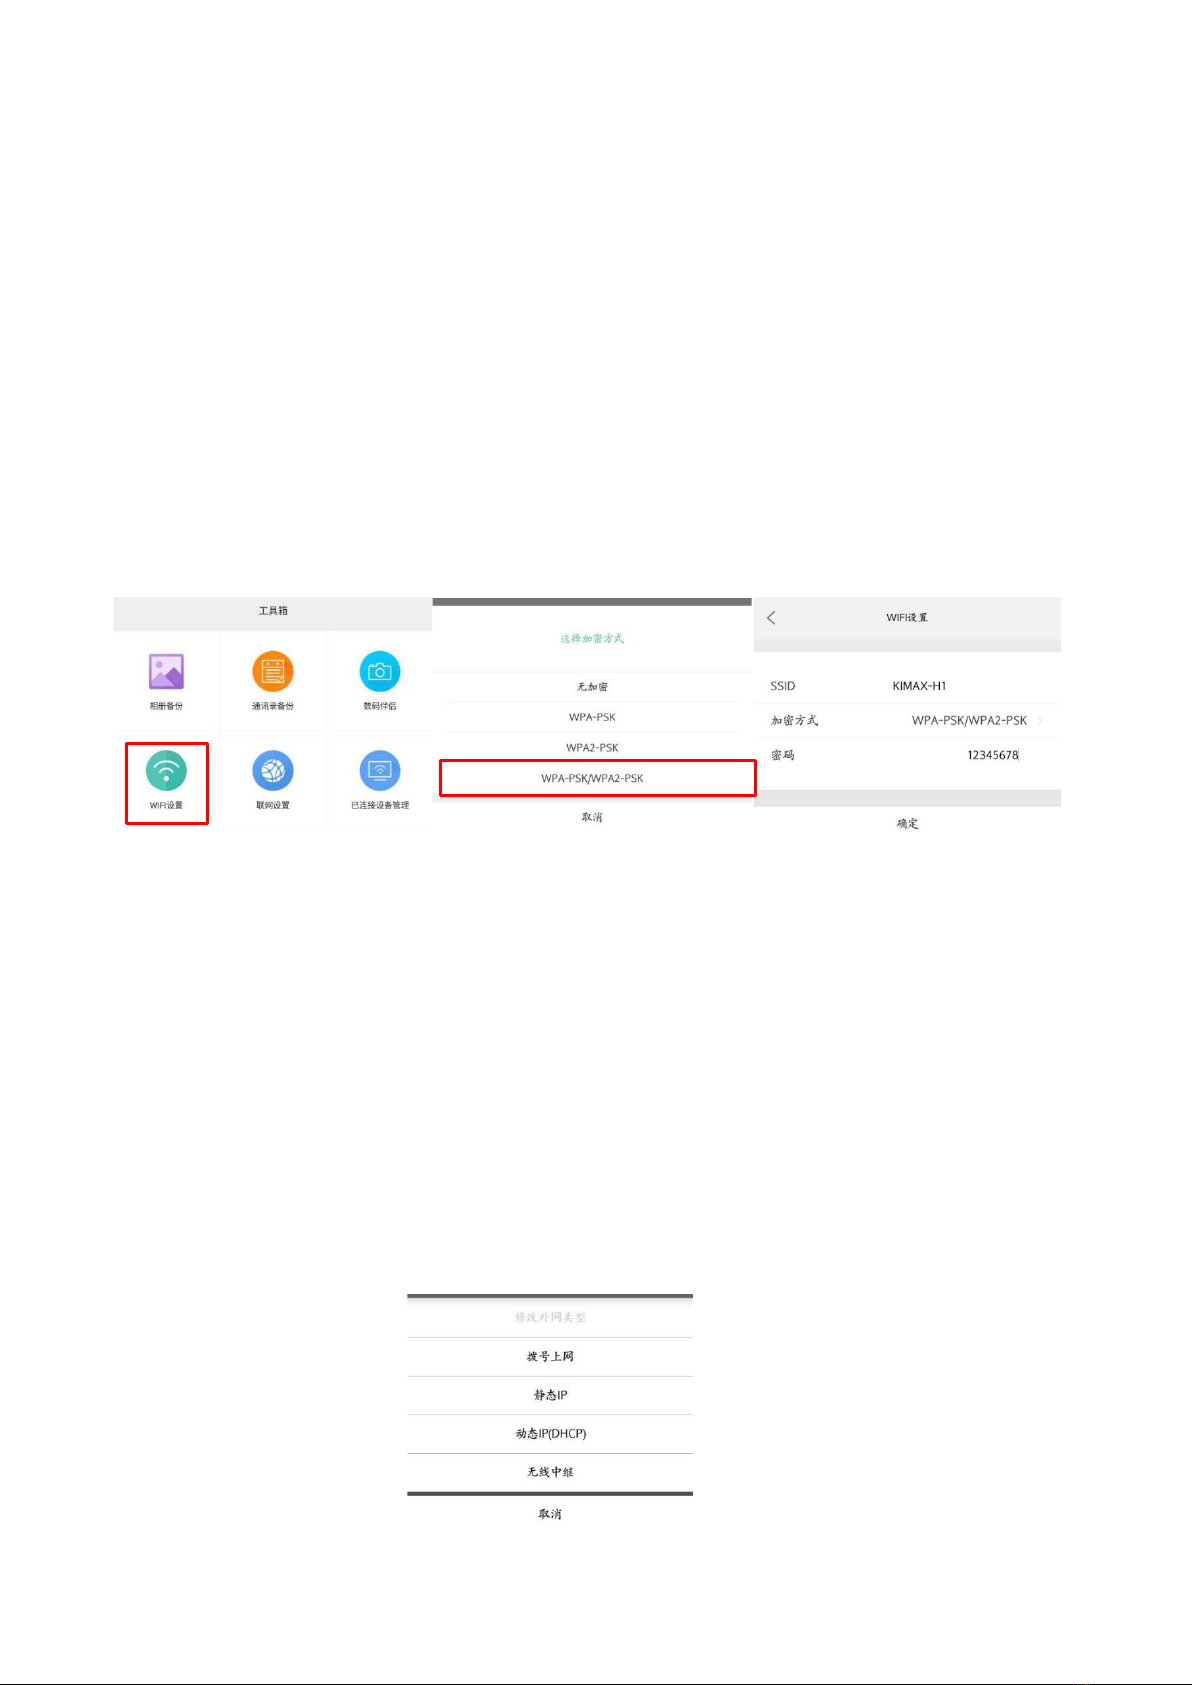
4. For computer or mobile phone to open a browser, enter 192.168.169.1 enter, enter the password kimax login in
the interface. (Specific steps can be read in this manual "Router Function Setting Description"
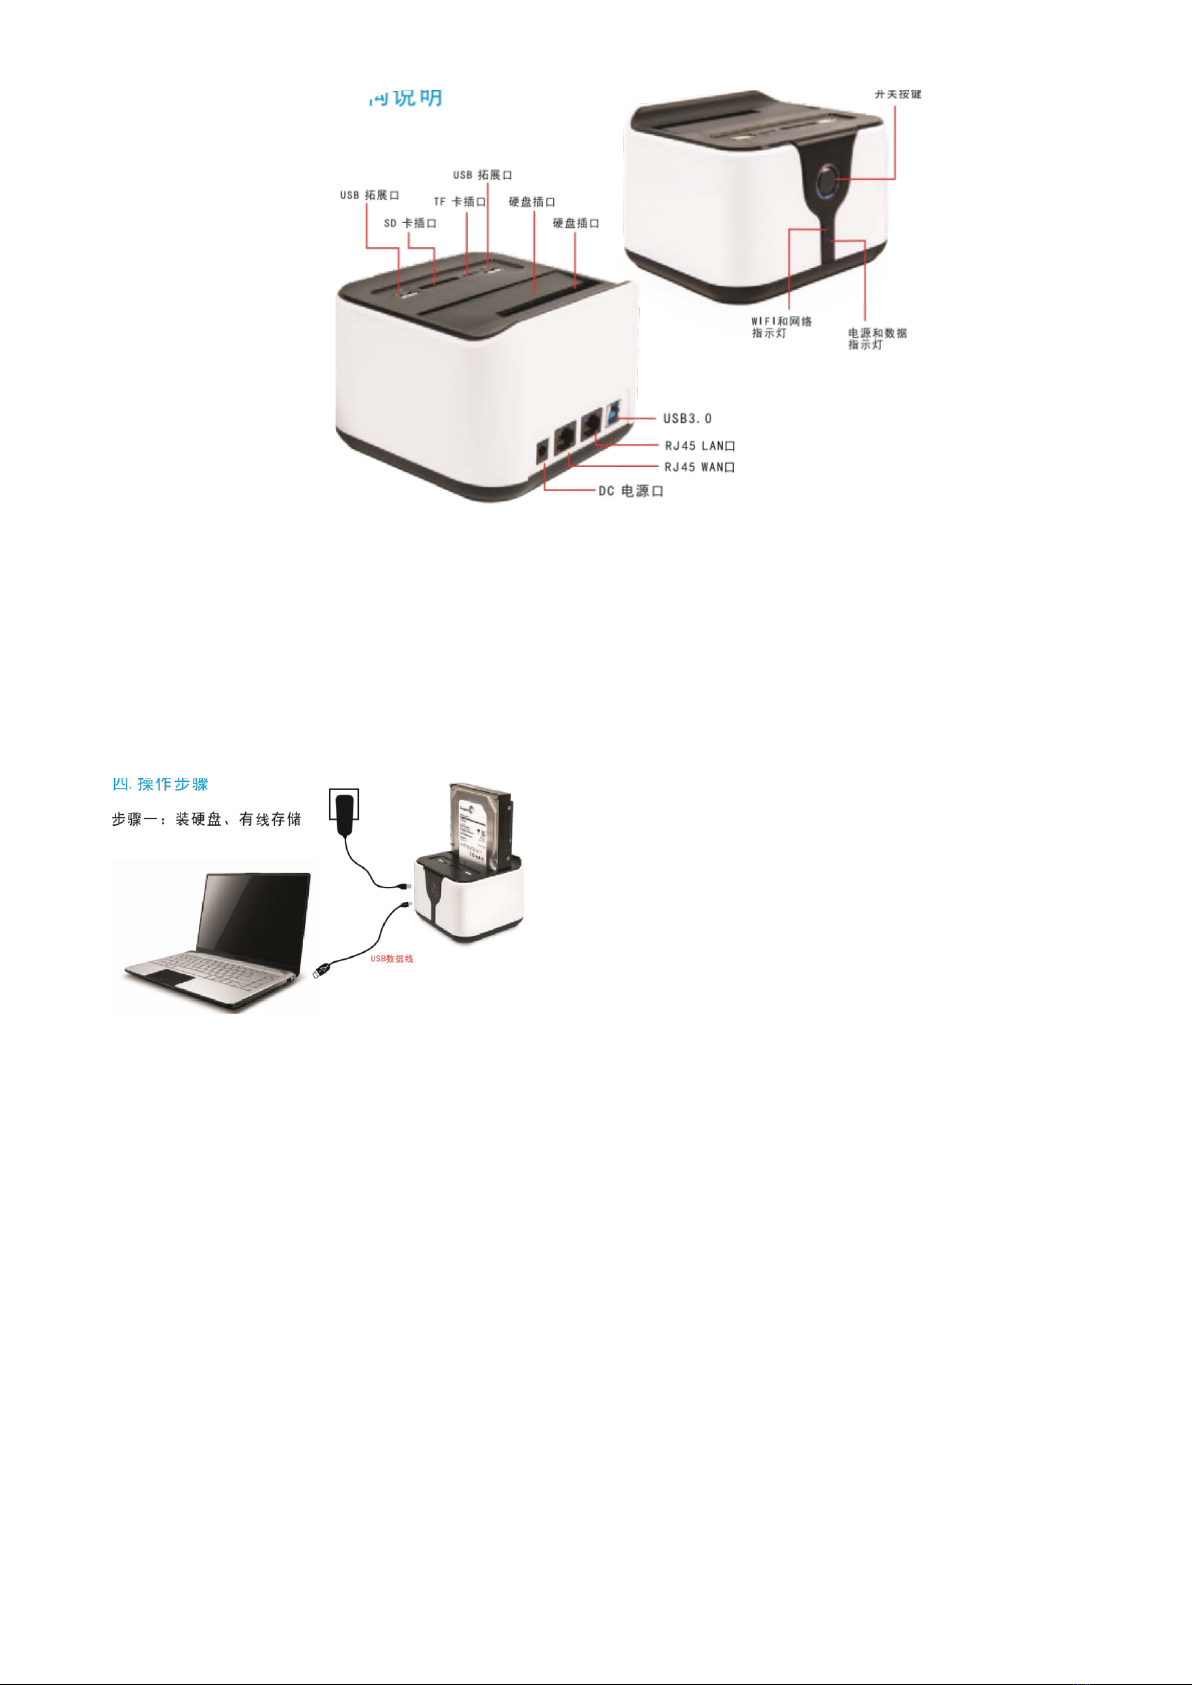
Step Three: Wireless storage and management
MobileAPP Instruction Manual
1. Download method
Download APP
In order to prevent users from being affected by the complicated application module when
using, we designed the function of the LAN and remote operation were applied to two pieces of
software, KI DISK and KI Cloud,to make the functions more simplified; The operation is simple,
saves tedious operation, easy to understand. The installation package is only 3.97MB and the memory
footprint is smaller.
KI DISK is anAPPdeveloped for KI intelligent routing based on KI intelligent routing. It handles
LAN management and shares files by connecting WIFI signals sent by KI intelligent routing.At
the same time, it is set up by parameters to bring more convenient use experience for customers.
KI Cloud is an APP that operates a remote operation for KI smart routing. By registering a login
account, you can bind the account to your KI device, and you can view and manage the disk files
Make sure your computer / phone / tablet has
connected to the WIFI of the box.
Computer version: Open "My Computer"
and enter \\ 192.168.169.1 into the address bar
to manage the files in the storage disk.
Username: admin Password: AAAAA

remotely.
KI DISK 软件图标(局域网)
Ki Cloud 软件图标(远程)
Use your browser to scan the QR code and download the software.
KI DISK features:
Open ki disk and enter the login interface. This interface is divided into the visitor login interface
and the administrator login interface, and the administrator login to the default password is kimax;
The second password can be modified; Visitor login password is 00000000, this password can not be
modified.
KI DISK(Android)
KI DISK(iphone)
Ki cloud(Android)
Ki cloud(iphone)

1. WIFI Setting
Encrypt the WIFI signal to prevent the disk file from being leaked.
After confirming that the mobile phone is connected to the device WIFI, find WIFI settings in
the toolbox menu bar (other settings are in the toolbox, as shown below), modify your SSID and
WIFI password;
Click encryption and select the last one.
Enter the password you want to set and click OK.
2. Networking settings
According to your network , choose the router to connect to the Internet.
(1). Click on the Internet settings, select the router access to the Internet. (You can also set the Internet
access router instructions)
(2) . Select the appropriate way of networking. (See routing instructions for details)

3. Connected device management
Control the connected device and check if it has Internet access and access to the disk.
(1). Select connected device management;
(2). Click the device that needs to set permissions to enter the admin page, and control the use of the
device by turning on and off the Internet and the switch on the back of the Shared disk.
KI Cloud features:
1. Register an account
2.File Management:Same as KI DISK file management.
3.APP Account registration and binding:
(1)Click on the new user to sign up after opening the APP, and then use the phone number or email
account to sign up.
1) Open the APP and click on the new user registration in the default interface;
2) Enter the phone number you want to register and then set up more than six login passwords. Then
click "get the verification code" button to get the text verification code; Enter the verification
code after receiving the verification code and click register.
3) If you use email, you can also sign up for a remote operation on your hard disk. The method is
the same; Click "use mailbox registration" below the mobile registration interface, enter the email
number you want to register, set up the password of six or more, enter the verification code, and
click register.
(2)If the registered account is successful, login and bind your device to your device, you can view
and manipulate the contents of the storage tray remotely. (you need a box to connect to the Internet
when you operate remotely; Wireless relay network does not support remote functions)

①Open the APP, click the ellipsis icon in the upper right corner and add the new device.
②According to the prompt connection, the WIFI connection needs to be bound, and then click "I
am connected" after successful connection;
③Click "I have connected", again confirm your device has been successfully connected to the
Internet, click "connected" button after confirmation.
1
2
3
First, open the APP and click on the new
user registration in the default interface;
Second, enter the phone number you want to
register and then set up more than six login
passwords. Then click "get the verification
Use
mailbox also can
register account to carry on
remote operation to hard
disk. The method is the
same; Click "use email
registration" below the
mobile phone registration
interface, set up more than
six passwords and click
i

Remote address: www1.kimax.net.cn
Five. Setting instructions of router function
1.Methods of the router connects to the Internet
DHCP
DHCP is access to IP dynamically: If your network
cable can automatically obtain IP (such as the
network cable from the router ), if non-dial type,
then do not need any settings to connect to the
Internet
PPPOE
(
dial-up
)
In correspondence to the the picture, input the
Internet account and password
s which
telecommunications company provide to connect
to the Internet.
Wireless relay
Click on the scan, the product will search
the surrounding wifi hot, select the
network you want to relay, enter the
connection passwords
to connect the
Internet.
Open APP and click the ellipsis icon in
the upper right corner to add a device

1. Router security Settings
Security Settings you
an modify the
administrator ‘s passwords
, the default
passwords is kimax, is also the passwords of

WIFI settings
Here you can modify the WIFI name, passwords
and encryption way. The default password is

2. Privilege management of the router
3. Firmware Upgrade
de
Click "Auto Detect" , it can upgrade automatically if
a new version is updated.
Or click "Local Update", then click "Browse" to add
the local computer to be upgraded firmware,
upload it.The process is about 5 minutes, it will be
restart after refresh successfully. And can not power
General switch: here you can control all the
permissions of the default file’s sharing and
connection to Internet of the connected
devices.
Note
:
If the switch is on, the connected devices
of current and subsequent will open
permission by default. Off state will cancel the
permissions by default. When the main switch
is off, you need to open a device privilege, and
Device switch: can change the file sharing
permissions and networking privileges of
the corresponding devices singly.

Click "Add", click the "Add seed" after
adding the task interface. Find the
seed file to open and add, it began to
download.
Note: It is recommended to use the
360 browser (speed mode), Google
Chrome and Microsoft Edge to log in
for offline downloads
1
2
3
1
2
3
5. Off -line Download


5. RFQ
Awired USB computer can't make a disk
The first use of the new hard drive requires hard disk initialization, otherwise the disk will not
be used. Only the disk manager can see that the specific steps can be used to "initialize the disk".
Wireless cannot recognize disks
If you can't read the hard drive through WIFI wireless, use a USB cable to connect to the
computer, check the disk properties, see if the disk is not formatted, and whether the disk attributes
are NTFS or FAT32 format. If there is no problem is generally disk fragments too much disk format
(such as the previous computer system disk removed from the old disk, a few partitions as long as
there is a bad partition disk will affect the entire disk mount failed), you need to re-partition the hard
disk or reformat.
Other cable USB storage and wireless storage cannot be used at the same time (link USB data will be
transferred to USB cable wireless will not be able to access disk data).
Wireless relay (if the wireless relay is not successful, it must be the following conditions
which are not satisfied, please check carefully)
First of all, you need to ensure that the upper-layer routing does not have any settings such as
Smart Speed Limit, IP Bonding, MAC Binding, and other restrictions on the client's ability to obtain
Internet access. In addition,the superior routing WIFI password needs to be in more than eight. The
upper-layer routing SSID can not contain spaces and the SSID can not contain characters that contain
Chinese and special symbols. If there is no problem with the above, check whether theWIFI password
of the higher-level route is correct. If there is no problem, configure the relay is complete, please
restart the KI power equipment to see if it can boot automatically connect successfully.
The individual TP-LINK routers need to set the bandwidth and channel in the upper-level routing
wireless settings to be fixed. The default automatic individual router will cause the wireless relay to
fail.
360 free WIFI, advertising commercial WIFI, mobile hot spots and other support unknown.
Wireless trunks can not be used simultaneously with the wired Internet connection.After the wireless
relay is successful If you connect the Internet to a KI device using a wired connection, you need to
go to the KI device first Route Management Interface - Wireless Relay Settings Page - Click the
Disconnect button next to the Trunk Network List. After disconnecting the wireless relay settings, the
power-off reboots the network cable connecting the Internet that can be connected to the KI device
to the KI device WAN port.

You can login our company KIMAX website "http://www.blueendless.cn" or scanning to
The next qr code to learn more about our company products and information, thank you!
Table of contents