Kinderkraft AVEO User manual

MODEL: AVEO
Rev. 1.1
AVEO
CZ TROJKOLKA
DE FAHRRADS
EN TRICYCLE
ES BICICLETA
FR TRICYCLE
IT TRICICLO
PL ROWEREK
RO BICICLETĂ
SK TROJKOLKA
CZ NÁVOD K OBSLUZE
DE BEDIENUNGSANLEITUNG
EN USER MANUAL
ES MANUAL DE USUARIO
FR GUIDE D’UTILISATION
IT ISTRUZIONI PER UTENTE
PL INSTRUKCJA OBSŁUGI
RO MANUAL DE UTILIZARE
SK NÁVOD NA POUŽITIE


3

4

5

6

CZ
7
Vážený zákazníku!
Děkujeme za zakoupení výrobku značky Kinderkraft.
Tvoříme výrobky pro vaše dítě – vždy dbáme o bezpečnost a kvalitu a zajišťujeme tak
pohodlí toho nejlepšího výběru.
DŮLEŽITÉ! UCHOVEJTE PRO POZDĚJŠÍ POUŽITÍ.
UPOZORNĚNÍ TÝKAJÍCÍ SE BEZPEČNOSTI A
BEZPEČNOSTNÍCH OPATŘENÍ
VAROVÁNÍ!:
•Maximální užitečná hmotnost – 25 kg.
•Používejte osobní ochranné prostředky (především helmu, rukavice, chrániče
kolen a loktů).
•Nepoužívejte v silničním provozu.
•Hračku používejte na rovných plochách bez překážek.
•Během používání doporučujeme dohled dospělé osoby.
•V závislosti na věku a montážní verzi musí děti disponovat vhodnými
psychomotorickými dovednostmi pro zaručení bezpečného používání kola.
•Pro prevenci vzniku nehod a kolizí, které by mohly způsobit úraz uživatele nebo
třetích osob, musí rodiče/dohled upozornit děti na dodržování bezpečnostních
opatření. Před použitím je třeba dětem vysvětlit, jak bezpečně používat
výrobek.
Určeno pro děti ve věku od 9 měsíců. Nejbezpečnější terény pro jízdu na odrážedle
jsou oblasti s omezeným nebo žádným provozem aut, jako jsou soukromé terény,
dětská a školní hřiště, rekreační terény.

CZ
8
Hlavní části:
Číslo části
Název
Číslo části
Název
1
Rám
13
Sedátko
2
Zadní kola
14
Bezpečnostní zábradlí
3
Přední kolo
15
Opěradlo
4
Přední vidlice
16
Kryt sedátka
5
Blatník
17
Stříška
6
Šrouby pro uchycení
přední vidlice
18
Rukojeť pro rodiče
7
Šroub pro uchycení řídítek
19
Držák na lahev
8
Řídítka
20
Táhlo
9
Montážní klíč
21
Šroub pro uchycení
blatníku
10
Zvonek
22
Přední košík
11
Koš
23
Matice sedátka
12
Šroub pro uchycení košíku
24
Montážní klíč
Montáž kola:
Zasuňte zadní kola (2) do rámu (1), až uslyšíte zacvaknutí (rys. A). Připevněte blatník
(5) k rámu (1) pomocí šroubu (21). Přední kolo (3) zasuňte do vidlice (4) a přišroubujte
šrouby pro uchycení přední vidlice (6) (obr. B). Zasuňte přední košík (22) na rám (1).
Použijte klíč (9) a upínací šrouby (7), přišroubujte řídítka (8) k rámu (1). Upevněte
zvonek (10) na řídítkách (8). Vložte táhlo (20) do otvoru na levé straně vidlice (4), a
druhý konec přišroubujte pod rám (1) u osazení rukojeti pro rodiče (obr. C). Upínacím
šroubem (12) připevněte košík (11) k rámu (1) (obr. D). Připevněte k sedátku (13)
opěradlo (15) a bezpečnostní zábradlí (14). Následně nasaďte kryt sedátka (16),
nezapomeňte protáhnout bezpečnostní pásy (obr. E). Umístěte smontované sedátko
zadní nebo přední částí do směru jízdy na rám a dotáhněte matici (23) na spodní části
rámu (obr. F). Zasuňte stříšku (17) na boky opěradla (15). Upevněte držák na láhve
(19) na rukojeti pro rodiče (18) a zasuňte jej do otvoru na rámu, až do zablokování
západky (obr. G).

CZ
9
Nastavení:
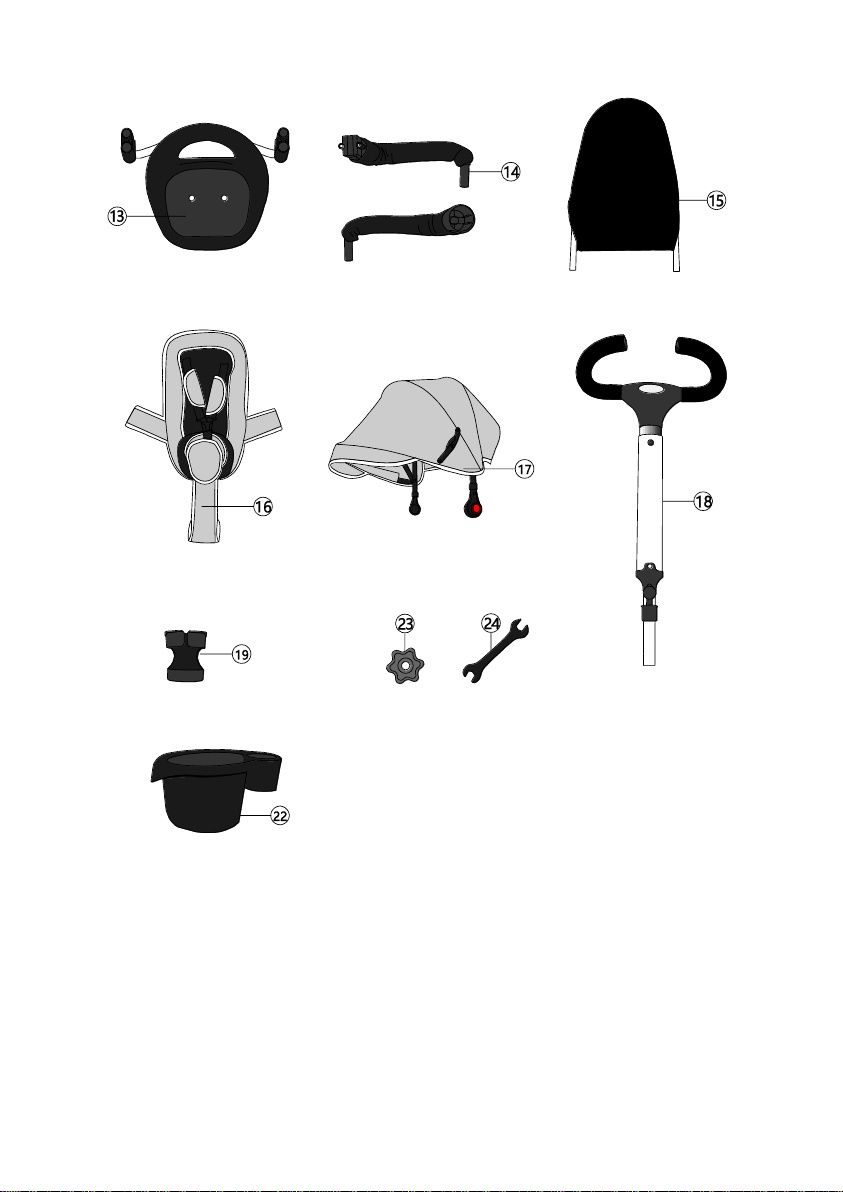
Poloha stříšky – stiskněte červená tlačítka po obou stranách stříšky a nastavte do
vhodné polohy. Můžete rovněž použít sponu na vrcholu stříšky.
Opěrky nohou – podle stupně vývoje dítěte můžete sklopit opěrky nohou tak, aby se
dítě mohlo samo odrážet. Vždy, když jsou opěrky rozložené, zapněte blokování
pedálů v předním kole (červené tlačítko).
Bezpečnostní pásy – upravte jejich délku tak, aby pevně držely dítě, ale aby mu
umožnily pohyb.
Pozice sedátka – sedátko může být nastaveno dopředu nebo dozadu a také obráceno
do opačného směru jízdy. K tomu je nutné odšroubovat matici (22) a nastavit
vhodnou polohu. Po přišroubování se ujistěte, zda je sedátko pevně přichyceno.
Skládání zadních koleček – nadzvedněte odrážedlo a stiskněte červené tlačítko pod
rámem, přetočte zadní kolečka dopředu.
Starší děti mohou jezdit bez opěradla – odsuňte kryt sedátka, sundejte opěradlo
odblokováním páčky na bocích, otočte zábradlí o 90° dozadu a vysuňte. Pro jízdu bez
opěradla by mělo mít dítě zapnuto doplňující pásy, které se nachází pod sedátkem.
Nastavení délky rukojeti pro rodiče – roztáhněte a zacvakněte v pohodlné poloze.
Údržba a čištění
Kryt sedátka, opěradlo, kryt řídítek: Demontujte z rámu. Praní při teplotě max. 30 °C,
šetrné praní. Nebělte. Nesušte v bubnové sušičce. Nežehlete. Nečistěte chemicky.
Stříška: Neperte. Nebělte. Nesušte v bubnové sušičce. Nežehlete. Nečistěte
chemicky. Vyčistěte čistým a navlhčeným hadříkem a jemným mýdlem. Nechte
vyschnout na vzduchu. Neponořujte do vody.
Rám: Kovový rám vyčistěte měkkým, čistým a navlhčeným hadříkem a jemným
mýdlem.
Uskladnění
Výrobek skladujte na místě nedostupném dětem.

DE
10
Sehr geehrter Kunde!
Wir danken Ihnen für den Kauf des Produkts der Marke Kinderkraft.
Dieses haben wir für Ihr Kind hergestellt –und dabei sorgen wir uns immer um
Sicherheit und Qualität und damit den Komfort der besten Wahl.
WICHTIG! ZUR SPÄTEREN ANWENDUNG AUFBEWAHREN.
ANMERKUNGEN ZU SICHERHEIT UND
VORSICHTSMASSNAHMEN
WARNUNG!
•Das Maximalgewicht des Nutzers beträgt 25 kg.
•Es sind persönliche Schutzmittel einzusetzen (insbesondere Helme,
Handschuhe, Knie- und Ellenbogenschützer).
•Nicht im Straßenverkehr anwenden.
•Das Spielzeug darf ausschließlich auf ebenen Flächen ohne Hindernisse
eingesetzt werden.
•Bei der Verwendung wird eine ständige Überwachung durch einen Erwachsenen
empfohlen.
•In Abhängigkeit vom Alter und der Montageversion müssen die Kinder über
entsprechende psychomotorische Fähigkeiten verfügen, um das Fahrrad sicher
nutzen zu können.
•Zur Vermeidung von Unfällen und Kollisionen, die zu Verletzungen der Nutzer
oder Dritter führen können, müssen die Eltern / Betreuer die Kinder auf die
notwendigen Sicherheitsmaßnahmen hinweisen. Vor Beginn der Nutzung ist
den Kindern zu erläutern, worin die sichere Nutzung des Produkts besteht.
Empfohlen für Kinder im Alter ab 9 Monaten. Die sichersten Bereiche für Fahrten auf
dem Fahrrad sind Gebiete mit beschränktem oder verbotenem Fahrzeugverkehr, wie
Privatgelände, Kinderspielplätze, Sportplätze von Schulen, Erholungsgebiete.

DE
11
Hauptteile:
Nummer
des Teils
Name
Nummer
des Teils
Name
1
Rahmen
13
Sattel
2
Hinterräder
14
Sicherheitsstange
3
Vorderräder
15
Lehne
4
Vordere Gabel
16
Abdeckung des Sattels
5
Schutzblech
17
Dach
6
Befestigungsschrauben der
vorderen Gabel
18
Haltegriff für die Eltern
7
Befestigungsschraube des
Lenkrads
19
Getränkehalter
8
Lenkrad
20
Zugstange
9
Montageschlüssel
21
Befestigungsschraube des
Schutzblechs
10
Klingel
22
Vorderer Korb
11
Korb
23
Mutter des Sattels
12
Befestigungsschraube des
Korbs
24
Montageschlüssel
Montage des Fahrrads:
Hinterräder (2) in den Rahmen (1) schieben, bis ein Klicken zu hören ist (Abbildung
A). Schutzblech (5) am Rahmen (1) mit Hilfe der Schraube (21) befestigen.
Vorderräder (3) in die Gabel (4) schieben und mit den Befestigungsschrauben der
vorderen Gabel (6) befestigen (Abbildung B). Vorderen Korb (22) auf den Rahmen (1)
setzen. Mit Hilfe des Schlüssels (9) und der Befestigungsschraube (7) das Lenkrad (8)
am Rahmen (1) befestigen. Klingel (10) am Lenkrad (8) befestigen. Zugstange (20) in
die Öffnung auf der linken Seite der Gabel (4) stecken und das andere Ende unter
dem Rahmen (1) beim Einsatz des Haltegriffs für die Eltern anschrauben (Abbildung
C). Mit der Befestigungsschraube (12) den Korb (11) am Rahmen (1) befestigen
(Abbildung D). Am Sattel (13) die Lehne (15) und die Sicherheitsstange (14)
anbringen. Anschließend Abdeckung des Sattels (16) auflegen und an das
Durchziehen der Sicherheitsgurte denken (Abbildung E). Montierten Sattel gegen
oder in Fahrtrichtung am Rahmen mit der Mutter (23) auf der Unterseite des
Rahmens befestigen (Abbildung F). Dach (17) auf die Seiten der Lehne (15) setzen.

DE
12
Getränkehalter (19) an der Haltstange (18) befestigen und diese in die Öffnung im
Rahmen stecken, bis sie einschnappt (Abbildung G).
Einstellungen:
Lage des Daches – rote Tasten auf beiden Seiten des Daches drücken und Dach in die
gewünschte Position stellen. Es können ebenfalls die Klammern an der Oberseite des
Daches verwendet werden.
Fußstützen – in Abhängigkeit vom Entwicklungsstand des Kindes können die
Fußstützen eingeklappt werden, damit das Kind selbst mit dem Fahrrad fährt. Bei
ausgeklappten Fußstützen ist immer die Pedalblockade im Vorderrad (rote Taste)
einzuschalten.
Sicherheitsgurte – Länge so anpassen, dass das Kind sicher gehalten wird, ohne seine
Bewegungen zu blockieren.
Lage des Sattels – Der Sattel kann nach vorn und hinten verschoben und entgegen
der Fahrtrichtung gedreht werden. Dazu Mutter (22) abschrauben und den Sattel in
die gewünschte Position bringen. Nach dem Festschrauben der Mutter ist
sicherzustellen, dass der Sattel korrekt befestigt wurde.
Einklappen der Hinterräder – Fahrrad etwas anheben und rote Taste unter dem
Rahmen drücken. Danach Hinterräder nach vorn drehen.
Ältere Kinder können ohne Lehne fahren – Abdeckung des Sattels abnehmen, Lehne
mit den Hebeln an ihren Seiten entsperren, Sicherheitsstange um 90⁰ nach hinten
drehen und Lehne abnehmen. Für die Fahrt ohne Lehne muss das Kind die
zusätzlichen Gurte unter dem Sattel anschnallen.
Einstellung der Länge der Haltestange – herausschieben und in der gewünschten
Position einschnappen lassen.
Wartung und Reinigung
Sattelabdeckung, Lehne, Abdeckung des Lenkrads: Vom Rahmen abnehmen. Bei
höchstens 30⁰C mit mildem Waschmittel waschen. Nicht bleichen. Nicht im
Trommeltrockner trocknen. Nicht bügeln. Nicht chemisch reinigen.
Dach: Nicht waschen. Nicht bleichen. Nicht im Trommeltrockner trocknen. Nicht
bügeln. Nicht chemisch reinigen. Mit sauberem und feuchtem Lappen sowie milder
Seife reinigen. Zum Trocknen an der frischen Luft belassen. Nicht in das Wasser
eintauchen.
Rahmen: Metallrahmen mit weichem, sauberem und feuchtem Lappen sowie milder
Seife reinigen.
Aufbewahrung
An einem Kindern nicht zugänglichen Ort aufzubewahren

EN
13
Dear Customer!
Thank you for purchasing a Kinderkraft product.
Our products are designed to help your child − we always care about safety and quality,
thus ensuring the comfort of the best choice.
IMPORTANT! KEEP FOR FUTURE REFERENCE.
SAFETY INSTRUCTIONS AND PRECAUTIONS
WARNING!
•Maximum user weight − 25 kg
•Use personal protective equipment (in particular, helmets, gloves, knee pads and
elbow pads).
•Do not use in traffic.
•The toy should be used on flat surfaces free from obstacles.
•During use, constant supervision of an adult is recommended.
•Depending on age and the assembly version, children should have the appropriate
psycho-motor skills to ensure that the tricycle is used safely.
•In order to avoid falls and collisions causing injuries to the user or third parties,
parents/guardians should instruct their children to observe the safety precautions.
Before your child starts using the tricycle, explain the rules of safe use of the
product.
Recommended for children from the age of 9 months. The safest areas to ride a tricycle
are areas with limited or excluded traffic such as private areas, playgrounds, school
playgrounds, recreation areas.

EN
14
The main parts:
Part
number
Name
Part
number
Name
1
Frame
13
Seat
2
Rear wheels
14
Guardrails
3
Front wheel
15
Backrest
4
Front fork
16
Seat cover
5
Bumper
17
Visor
6
Front fork fixing screws
18
Parent handle
7
Handlebars fixing screw
19
Cupholder
8
Handlebars
20
Pull rod
9
Mounting spanner
21
Mudguard fixing
screw
10
Bell
22
Front basket
11
Basket
23
Seat nut
12
Basket fixing screw
24
Mounting spanner
Installation of the tricycle:
Slide the rear wheels (2) in the frame (1) until you hear a click (Fig. A). Attach the
mudguard (5) to the frame (1) using a screw (21). Put the front wheel (3) in the fork (4)
and tighten the front fork fixing screws (6) (Fig. B). Place the front basket (22) on the
frame (1). Attach the handlebars (8) to the frame (1) using the spanner (9) and fixing
screw (7). Fix the bell (10) to the handlebars (8). Put the pull rod (20) in the opening on
the left side of the fork (4) and fix the other end under the frame (1) at the point of
attachment of the parent handle (Fig. C). Use the fixing screw (12) to attach the basket
(11) to the frame (1) (Fig. D). Attach the backrest (15) and the guardrails (14) to the seat
(13). Then place the seat nut (16) and do not forget to install the harness (Fig. E). Place
the assembled seat facing or back to the direction of travel on the frame and tighten
the nut (23) underneath the frame (Fig. F). Insert the visor (17) in the sides of the
backrest (15). Fix the cupholder (19) to the parent handle (18) and insert it in the hole
on the frame until the latch is locked (Fig. G).

EN
15
Adjusting:
Cover location − press the red buttons on both sides of the cover and set in a convenient
position. You can also use buckles on top of the cover.
Footrests − depending on the level of child development, the footrests can be folded to
enable the child to ride the tricycle. Whenever footrests are unfolded, enable the pedal
lock in the front wheel (red button).
Harness − adjust the length to hold the child firmly, but not to block movements.
Seat position − the seat can be adjusted forwards and backwards, and turned rearwards.
To do this, unscrew the nut (22) and set the appropriate position. After tightening, make
sure the seat is securely fastened.
Folding the rear wheels − slightly lift the tricycle and push the red button under the
frame, rotate the rear wheels forwards.
Older children can ride without a backrest − slide the seat cover down, remove the
backrest unlocking the levers on its sides, rotate the guardrails 90° backwards and pull
out. To ride without the backrest, the child should wear additional harness which is
located under the seat.
Adjusting the length of the parent handle − unfold and lock in a comfortable position.
Maintenance and cleaning
Seat cover, backrest, handlebars cover: Remove from the frame. Wash at max. 30°C,
gentle process. Do not bleach. Do not dry in a tumble dryer. Do not iron. Do not dry
clean.
Visor: Do not wash. Do not bleach. Do not dry in a tumble dryer. Do not iron. Do not dry
clean. Clean with a clean and damp cloth using mild soap. Allow to air dry. Do not
immerse in water.
Frame: Clean the metal frame with a soft, clean and damp cloth using mild soap.
Storage
Keep out of the reach of children.

ES
16
¡Estimado Cliente!
Gracias por comprar el producto de marca Kinderkraft.
Diseñamos pensando en su hijo, siempre nos preocupamos por la seguridad, la calidad y
garantizamos la máxima comodidad.
¡IMPORTANTE! GUARDAR PARA SU USO FUTURO.
OBSERVACIONES SOBRE LA SEGURIDAD Y LAS PRECAUCIONES
¡ADVERTENCIA!:
•Peso máximo de usuario - 25 kg.
•Se debe utilizar el equipo de protección individual (en particular: cascos, guantes,
rodilleras y coderas).
•No utilizar en el tráfico.
•El juguete debe ser utilizado en superficies planas y libres de obstáculos.
•Durante el uso se recomienda una supervisión constante de un adulto.
•Dependiendo de la edad y la versión de montaje, los niños debe tener las
habilidades psicomotoras necesarias para usar la bicicleta de forma segura.
•Con el fin de evitar caídas y colisiones que causan lesiones del usuario o de terceros,
los padres/tutores de los niños deben prestar atención a cumplir con las
precauciones de seguridad. Antes de empezar a usar el producto, se debe explicar a
los niños su uso seguro.
Se recomienda para niños a partir de 9 meses. Las zonas más seguras para usar la bicicleta
son las zonas de tráfico limitado o excluido, como áreas privadas, parques infantiles,
patios de colegios, zonas de recreo.

ES
17
Piezas principales:
Número de
pieza
Nombre
Número de
pieza
Nombre
1
Bastidor
13
Sillín
2
Ruedas traseras
14
Barreras protectoras
3
Rueda delantera
15
Respaldo
4
Horquilla delantera
16
Protector del sillín
5
Guardabarros
17
Capota
6
Tornillos para fijar la
horquilla delantera
18
Manillar de los
padres
7
Tornillo que fija el
volante
19
Portavasos
8
Volante
20
Varilla de tracción
9
Llave de montaje
21
Tornillo que fija el
guardabarros
10
Timbre
22
Cesta delantera
11
Cesta
23
Tuerca del sillín
12
Tornillo que fija la cesta
24
Llave de montaje
Montaje de la bicicleta:
Inserte las ruedas traseras (2) en el bastidor (1), hasta que oiga un clic (Fig. A). Fije el
guardabarros (5) al bastidor (1) con el tornillo (21). Inserte la rueda delantera (3) en la
horquilla (4) y apriétela con los tornillos de fijación de la horquilla delantera (6) (Fig. B).
Inserte la cesta delantera (22) en el bastidor (1). Con la llave (9) y el tornillo (7), apriete el
volante (8) al bastidor (1). Monte el timbre (10) en el volante (8). Inserte la varilla de
tracción (20) en el lado izquierdo de la horquilla (4) y el segundo extremo apriete debajo
del bastidor (1) junto al manillar de los padres (Fig. C). Con el tornillo de fijación (12)
monte la cesta (11) al bastidor (1) (Fig. D). Al sillín (13) fije el respaldo (15) y las barreras
protectoras (14). A continuación, ponga el protector del sillín (16) sin olvidarse de pasar
el cinturón de seguridad (Fig. E). Coloque el sillín montado mirando en el sentido de la
marcha o en el sentido contrario a la marcha en el bastidor y apriete la tuerca (23) en la
parte inferior del bastidor (Fig. F). Inserte la capota (17) en los laterales del respaldo (15).

ES
18
Fije el portavasos (19) en el manillar de los padres (18) e insértelo en el orificio en el
bastidor hasta que se bloquee el pestillo (Fig. G).
Ajuste:
Ubicación de la capota: pulse los botones rojos en ambos lados de la capota y póngala de
forma cómoda. También se puede usar la hebilla en la parte superior de la capota.
Reposapiés: dependiendo del nivel de desarrollo del niño, se puede plegar el reposapiés
para que niño impulse solo la bicicleta. Siempre que los reposapiés estén desplegados se
debe poner el bloqueo en los pedales en la rueda delantera (botón rojo).
Cinturón de seguridad: ajuste su longitud para que sujete bien al niño sin bloquear sus
movimientos.
Posición del sillín: el sillín se puede ajustar hacia delante y atrás, así como girar en el
sentido contrario a la marcha. Para ello, desenroscar la tuerca (22) y ajustar la posición
adecuada. Después de apretar la tuerca, asegúrese de que el sillín esté bien montado.
Plegar las ruedas traseras: levante ligeramente la bicicleta y pulse el botón rojo debajo
del bastidor, gire las ruedas traseras hacia adelante.
Los niños más grandes pueden montar la bici sin el respaldo: deslice el protector del sillín,
retire el respaldo al desbloquear la palanca en ambos lados, gire las barreras protectoras
90° hacia atrás y extráigalas. El niño que monta la bici son el respaldo debe ponerse el
cinturón adicional situado debajo del sillín.
Ajuste de la longitud del manillar parental: abrir y cerrar en una posición cómoda.
Mantenimiento y limpieza
Protector del sillín, respaldo, protector del volante: Desmontar el marco. Lavar a
temperatura máx. de 30°C, proceso suave. No usar blanqueador. No secar en secadora.
No planchar. No lavar en seco.
Capota: No lavar. No usar blanqueador. No secar en secadora. No planchar. No lavar en
seco. Limpiar con un paño limpio y húmedo con un jabón suave. Deje secar al aire. No
sumergir en agua.
Marco de metal: Limpiar con un paño suave, limpio y húmedo con un jabón suave.
Almacenamiento
Guardar fuera del alcance de los niños.

FR
19
Cher client!
Nous vous remercions d'avoir choisi le produit de la marque Kinderkraft.
Nous créons en pansant à votre enfant - nous nous soucions sans cesse de la sécurité et
de la qualité, garantissant ainsi le confort du meilleur choix.
IMPORTANT! À CONSERVER POUR UNE UTILISATION ULTÉRIEURE.
REMARQUES CONCERNANT LA SÉCURITÉ ET LES MOYENS DE
PRÉCAUTION
AVERTISSEMENT!
•Poids maximal utilisateur - 25 kg
•Il faut utiliser les moyens de protection individuelle (en particulier les casques, les
gants, les genouillères et les coudières).
•Ne pas utiliser dans le trafic routier.
•Le jouet doit être utilisé sur des surfaces planes et libres d'obstacles.
•Pendant l'utilisation du vélo, la surveillance permanente d'un adulte est
recommandée.
•En fonction de l'âge et de la version d'assemblage, les enfants doivent avoir les
compétences psycho-motrices appropriées pour faire du vélo en toute sécurité.
•Afin d'éviter les chutes et les collisions causant des blessures à l'utilisateur ou à des
tiers, les parents /les surveillants doivent sensibiliser les enfants à respecter les
consignes de sécurité. Avant de commencer l'utilisation du produit, il faut expliquer
aux enfants en quoi consiste une utilisation en sécuritaire de celui-ci.
Recommandé pour les enfants à partir de 9 mois. Les meilleurs terrains pour faire du vélo
en toute sécurité sont ceux où le trafic routier est limité ou interdit, notamment les
terrains privés, les cours de recréation, les terrains de jeux scolaires, les aires de loisirs.

FR
20
Pièces principales:
Numéro de
la pièce
Nom
Numéro de
la pièce
Dénomination
1
Cadre
13
Selle
2
Roues arrières
14
Garde-corps
3
Roue avant
15
Dossier
4
Fourche avant
16
Housse de selle
5
Garde-boue
17
Pare-soleil
6
Vis de fixation de la
fourche avant
18
Canne parentale
7
Vis de fixation du guidon
19
Porte gobelet
8
Guidon
20
Tige de traction
9
Clé de montage
21
Vis de fixation du
garde-boue
10
Sonnette
22
Panier avant
11
Panier
23
Écrou se la selle
12
Vis de fixation du panier
24
Clé de montage
Assemblage du vélo:
Insérez les roues arrières (2) dans le cadre (1) jusqu’à ce que vous entendiez un clic (fig.
A). Fixez le garde-boue (5) au cadre (1) au moyen de la vis (21). Insérez la roue avant (3)
dans la fourche (4) et serrez les vis de fixation de la fourche avant (6) (fig. B). Insérez le
panier avant (22) dans le cadre (1). En se servant de la clé (9) et de la vis de fixation (7),
serrez le guidon (8) sur le cadre (1). Installez la sonnette (10) sur le guidon (8). Insérez la
tige de traction (20) dans le trou sur le côté gauche de la fourche (4), et serrez l'autre bout
de la tige sous le cadre (1) à l'endroit de la fixation de la canne parentale (fig. C). Fixez le
panier (11) avec la vis de fixation (12) au cadre (1) (fig. D). Attachez le dossier (15) et les
garde-corps (14) à la selle (13). Ensuite, mettez en place la housse de selle (16) sans
oublier de glisser les ceintures de sécurité (fig. E). Placez la selle assemblée face ou dos à
la route sur le cadre et serrez l’écrou (23) sur la partie inférieure du cadre (fig. F). Glissez
le pare-soleil (17) dans les côtés du dossier (15). Fixer le porte gobelet (19) sur la canne
Other manuals for AVEO
1
Table of contents
Languages:
Other Kinderkraft Bicycle manuals

Kinderkraft
Kinderkraft 4TRIKE User manual

Kinderkraft
Kinderkraft Freeway User manual

Kinderkraft
Kinderkraft SPINSTEP User manual

Kinderkraft
Kinderkraft SPINSTEP User manual

Kinderkraft
Kinderkraft ASTON User manual

Kinderkraft
Kinderkraft RUNNER User manual

Kinderkraft
Kinderkraft EASYTWIST User manual

Kinderkraft
Kinderkraft SPACE User manual

Kinderkraft
Kinderkraft MINIBI User manual

Kinderkraft
Kinderkraft AVEO User manual