Kinedo ICONIK 02 Quick start guide

Ed. 04/2021
ISTRUZIONI
INSTALLAZIONE, USO E MANUTENZIONE
IT
ICONIK 02
INSTRUCTIONS
INSTALLATION, USE AND MAINTENANCE
EN

Vi ringraziamo per aver scelto
un nostro prodotto
We thank You for choosing
one of our products
Indice - Index
- Dati tecnici e ingombri.......................................................... Pag. 3
- Prima dell’installazione ........................................................ Pag. 4
- Pre-installazione ...................................................................... Pag. 5
- Sequenza di installazione ................................................... Pag. 6
- Utilizzo della vasca.................................................................. Pag. 8
- Pulizia vasca ............................................................................... Pag. 9
- KIT di riparazione .................................................................... Pag.10
- Techinical data and overall dimensions
- Before installation
- Pre-installation
- Installation sequence
- Use of the bathtub
- Bathtub cleaning
- Repair KIT

ICONIK 02
pag. 3/12
11,4
61
70
160
45
56
134
A A
B
B - B
B
A - A
45
Senza sistema
Without system
Troppopieno
OK !
Overow
Piletta anti debordo
NO !
Anti overow drain
Supercie antibatterica
Antibacterial surface
Versione “unica” - “Single” version
Dimensioni in “cm” (tolleranza ± 5mm) - Dimensions in “cm” (tolerance ± 5mm)
Dati tecnici e ingombri
Techinical data and overall dimensions
DATI TECNICI TECHNICAL DATA
• Tensione • Voltage - - -
• Frequenza • Frequency - - -
• Potenza totale assorbita • Total power absorbtion - - -
• Corrente massima • Max current - - -
• Allaccio acqua fredda e calda • Cold and hot waret ttings - - -
• Scarico acqua • Water waste trop
ø 40 mm
• Dimensioni vasca • Bathtub dimensions 160 x 70 x h61 cm
• Capacità acqua • Water volume 310 l
• Spessore minimo vasca • Minimum bathtub thickness 1,5 cm
• Altezza interna vasca (lo bordo) • Bathtubinternalheight(ushwiththeedge) 45 cm
• Peso a vuoto • Empty weight 98,8 kg
• Durevole nel tempo • Durable over time Si / Yes
• Temperatura acqua costante • Constant water temperature Si / Yes
• Piletta Iconik (di serie) • Iconik drain (standard) Si / Yes
• Sifone • Siphon
Non fornita / Not supplied
• Rubinetteria • Tap
Non fornita / Not supplied
• Ottima capacità di trattenere il calore, con una temperatura ambiente di 22° l’acqua in 60 minuti passa da 55° a 47°.
• Excellent ability to retain heat, with an ambient temperature of 22° the water goes from 55° to 47° in 60 minutes.

ICONIK 02
pag. 4/12
- Dopo aver rimosso i componenti dagli imballi, vericare visivamente che gli stessi non
presentino difetti.
- Qualsiasi difetto deve essere segnalato al fornitore prima dell’assemblaggio delle varie parti
e dell’installazione.
- Qualsiasi reclamo relativo a imperfezioni del prodotto sarà accettato SOLO se segnalato
prima dell’assemblaggio delle varie parti e dell’installazione.
Vericare la presenza di tutti i componenti prima di iniziare il montaggio.
IMPORTANTE
Prima di iniziare l’installazione leggere il presente
libretto istruzioni.
- After removing the components from packaging, visually check they do not show any defect.
- Any defect must be reported to the supplier before assembling the various parts and before
installation.
- Any complaint related to imperfections of the product will be accepted ONLY if reported before
assembling the various parts and before installation.
Check for the presence of all components before assembly.
IMPORTANT
Read the following instruction manual before starting
installation.
Prima dell’installazione
Before installation
Rimozione imballo
Packaging removal
Rimuovere dalla vasca le protezioni
in spugna e il cellofhan
Remove the sponge protections and
cellophane from the bathtub
Gli elementi dell’imballaggio non devono essere lasciati alla portata dei
bambini in quanto potenziali fonti di pericolo.
The packaging materials must not be left within reach of children as they
can be dangerous.

ICONIK 02
pag. 5/12
max 30
min
16
74
X
Y
Y
V
ø4
V
60
50
50
6050 50
25
25
Z
20
60
50
50
25
Y
Min 5
INSTALLAZIONE CONTRO ALLA PARETE
INSTALLATION AGAINST THE WALL
INSTALLAZIONE IN CENTRO AL LOCALE
INSTALLATION IN THE MIDDLE OF THE ROOM
XArea per installazione rubinetteria a parete
Area for wall installation of taps
YArea per scarico a pavimento
Area for oor drain
ZArea per installazione rubinetteria a piantana
Area for oorstanding installation of taps
VScarico a pavimento da ø 40 mm
ø 40 mm oor drain
I dati e le caratteristiche indicate non impegnano IL COSTRUTTORE, che si riserva il diritto di apportare tutte le modiche ritenute opportune senza obbligo di preavviso o sostituzione
IL COSTRUTTORE NON E’ RESPONSABILE PER I DANNI DOVUTI AD UNA ERRATA O NON CONFORME INSTALLAZIONE.
IN NO EVENT SHALL THE MANUFACTURER BE LIABLE FOR ANY DAMAGES WHATSOEVER THAT MAY ARISE FROM INAPPROPRIATE AND NON-COMPLIANT INSTALLATION PROCEDURES.
Neither the information nor the characteristics reported are binding for THE MANUFACTURER. which reserves the right to make any improvements, as deemed necessary, without notice or with no liability to replacement.
Dimensioni in “cm” (tolleranza ± 5mm) - Dimensions in “cm” (tolerance ± 5mm)
Pre-installazione
Pre-installation

ICONIK 02
pag. 6/12
MAX. 40°
Ø70
G6/4” (Ø48)
43
72
Ø40
79 max 20
OK
NO
Sollevare la vasca e posizionare dei supporti
Lift the bathtub and place supports
Assicurarsi che la vasca non possa cadere
Make sure the bathtub can not fall
Posizionare la vasca nel punto
di installazione
Place the bathtub in the
installation point
Sequenza di installazione
Installation sequence

ICONIK 02
pag. 7/12
Almeno 5mm
At least 5mm
Vericare i supporti
Check the supports
Assicurarsi che la vasca non possa cadere
Make sure the bathtub can not fall
Appoggiare la vasca a pavimento con attenzione !
Carefully place the bathtub on the oor !
Assicurarsi che il tubo essibile non si pieghi in
modo anomalo
Make sure the exible hose does not bend abnor-
mally
Installare la vasca vericando che sia perfettamen-
te a livello tanto nel senso della lunghezza che in
quello della larghezza!
Install the bathtub making sure it is perfectly level
both in the length and in the width!
Servirsi dei piedini regolabili per mette-
re in bolla la vasca.
Use the adjustable feet to level the
bathtub.
Sequenza di installazione
Installation sequence

ICONIK 02
pag. 8/12
Chiuso
Closed
La pietra dolomitica assorbe e trattiene il calore man-
tendo la temperatura dell’acqua per almeno 60 minuti.
The dolomite stone absorbs and retains heat, maintaining
the water temperature for at least 60 minutes.
Aperto
Open
Terminato l’utilizzo della vasca, scaricare l’acqua apren-
do la piletta clik-clack.
After using the bathtub, drain the water by opening the
clik-clack drain.
Utilizzo della vasca
Use of the bathtub

ICONIK 02
pag. 9/12
Pulizia vasca
Bathtub cleaning
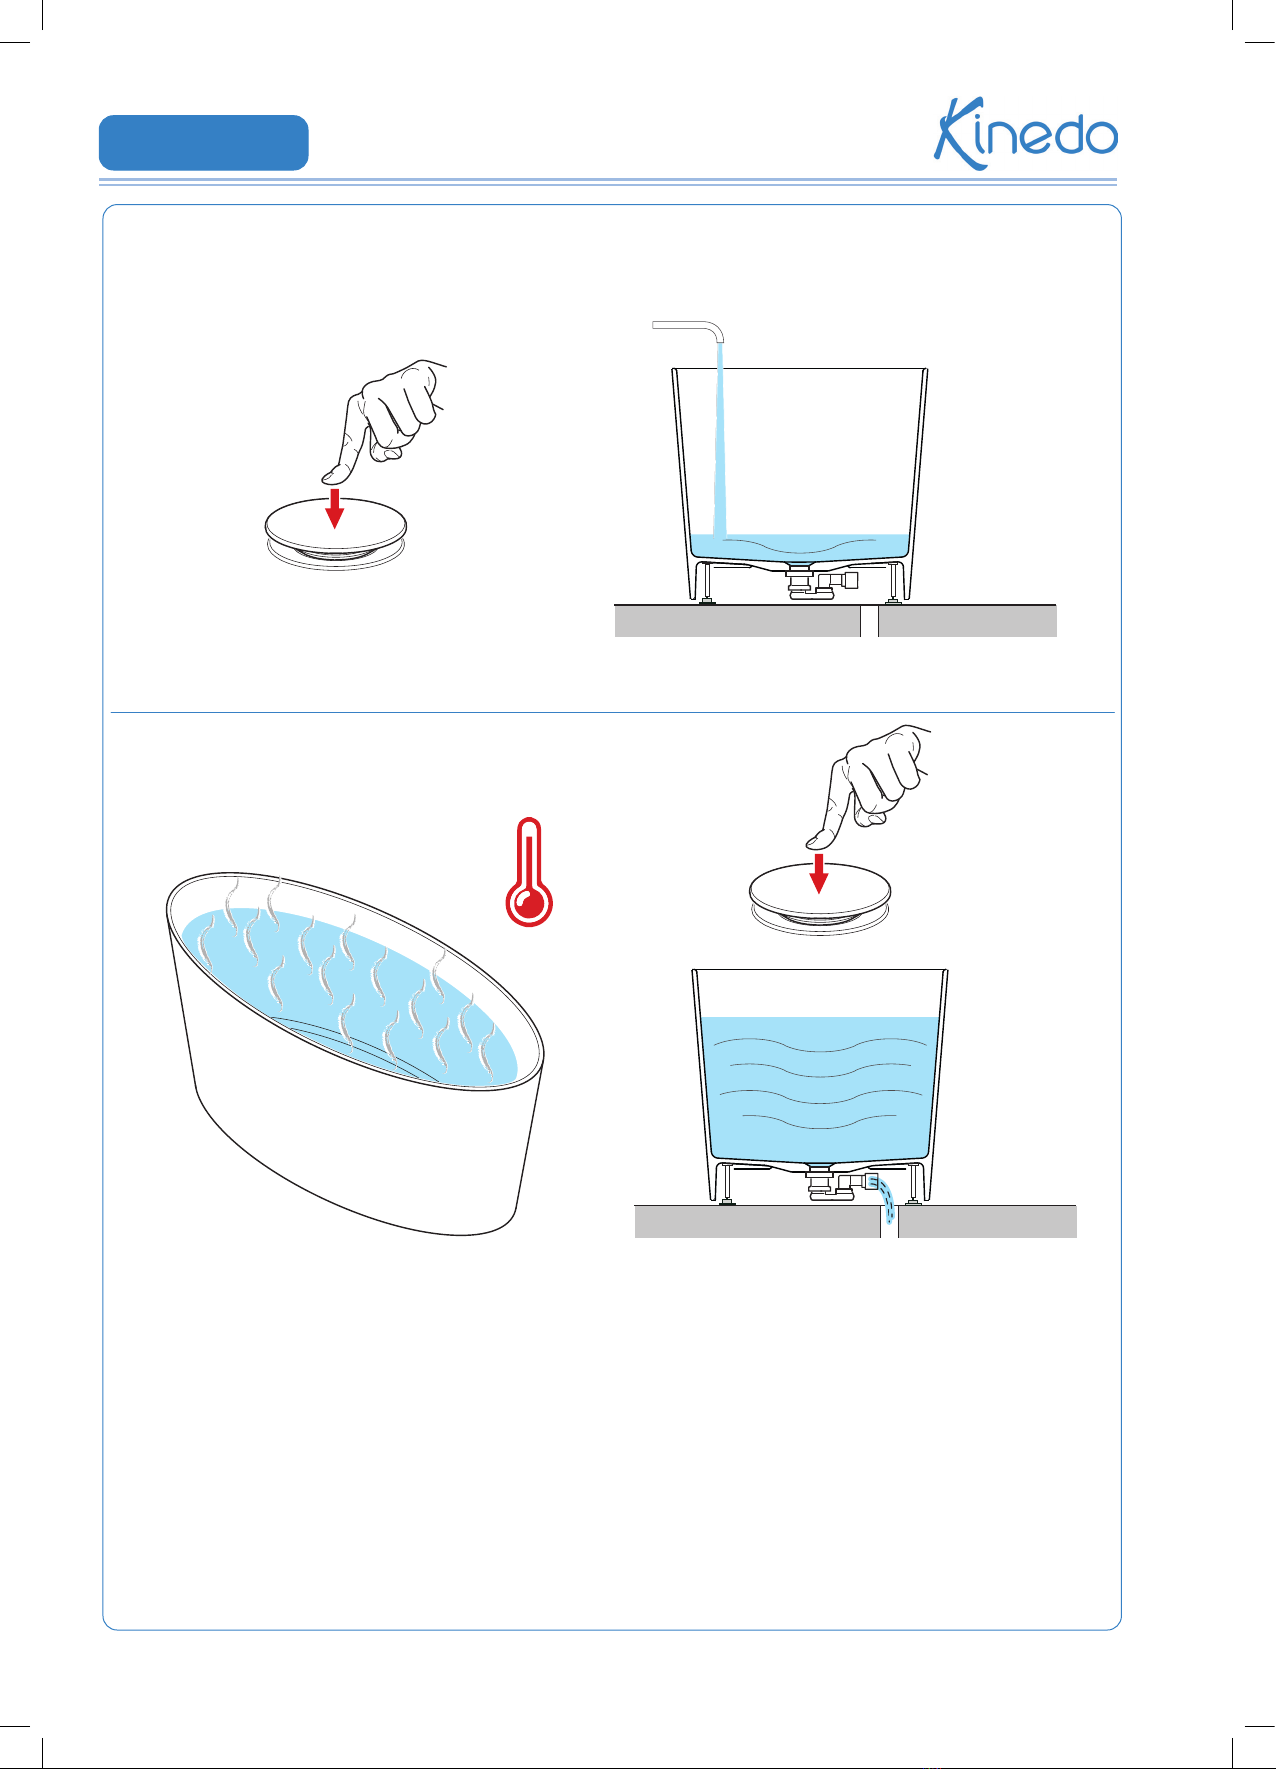
•Dopo l’uso risciacquare con acqua corrente. I residui
dei prodotti per la pulizia personale, sapone , shampoo,
doccia schiuma, etc. possono causare danni; sciaquare
abbondantemente.
•Pulire la vasca utilizzando solamente spugne per piatti
(solo dal lato morbido), spugne corpo, panni morbido o
spazzole morbida. Non utilizzare panni in microbra.
•Per una pulizia regolare utilizzare un detergente universale
con proprietà non abrasive, oppure acqua e sapone per
stoviglie non abrasivo. Dopo ogni utilizzo la supercie
interna deve essere risciacquata con acqua e asciugata con
un panno di cotone morbido.
Il calcare può essere trattato semplicemente
con una soluzione di acqua e aceto.
Evitare assolutamente l’utilizzo di tutti i pro-
dotti che contengono abrasivi!
Rimozione delle macchie dicili
Dicult stains removal
• After use, rinse with running water. Residues from personal
cleaning products, soap, shampoo, shower gel, etc. can cause
damage; rinse thoroughly.
• Clean the tub using only dish sponges (soft side only), body
sponges, soft cloths or soft brushes. Do not use microber
cloths.
• For regular cleaning, use an universal detergent with non-
abrasive properties, or water and non-abrasive dish soap.
After each use, the internal surface must be rinsed with water
and dried with a soft cotton cloth.
Limescale can be treated simply with a solution
of water and vinegar.
Absolutely avoid using all products that contain
abrasives!
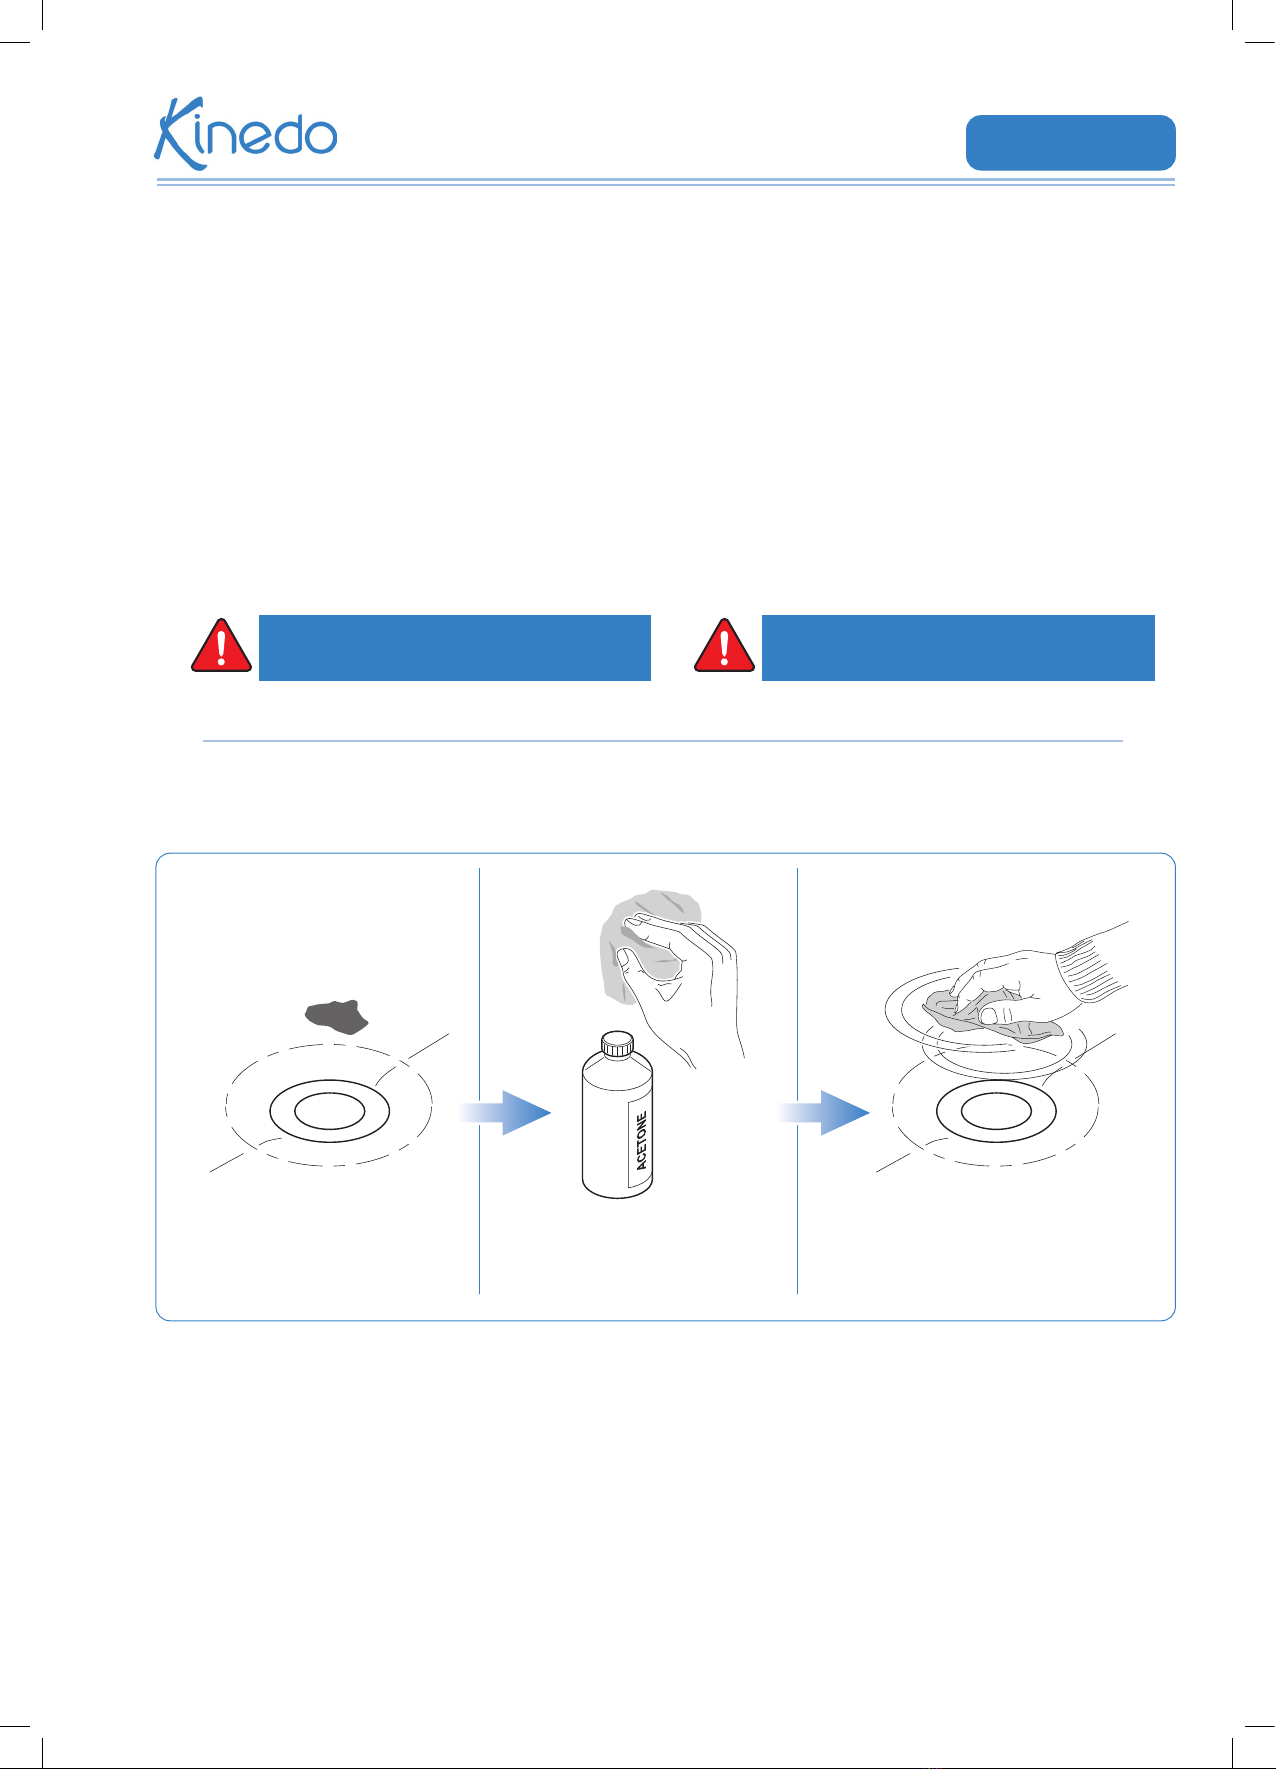
Smalto o tinta per capelli fresca
Fresh nail polish or hair dye
Bagnare un panno di carta o del
cotone con acetone
Wet a paper or cotton cloth
with acetone
Al termine stronare energicamente e sciac-
quare abbondantemente con acqua
At the end, rub vigorously and rinse thoroughly
with water
•Per le macchie più ostinate (macchie di grasso, olio, vernice
o inchiostro), utilizzare un detergente delicato abraviso.
Potrebbe essere necessario un pò più di stronamento per
rimuovere ecacemente le macchie.
•Le macchie di tintura per capelli essiccate non possono
essere rimosse totalmente con acetone o alcool.
Eettuare una leggera levigatura con spugna abrasiva
ne o carta vetrata di grana 3000. Poi impregnare con olio
idratante per bambini.
• For stubborn stains (grease, oil, paint or ink stains), use
a mild abrasive cleaner. A little more scrubbing may be
required to eectively remove stains.
• Dried hair dye stains cannot be totally removed with
acetone or alcohol.
Lightly sand with a ne abrasive sponge or 3000-grit
sandpaper. Then soak with moisturizing baby oil.

ICONIK 02
pag. 10/12
Contenuto del KIT
Content of the KIT
Sequenza operazioni
Sequenza operazioni
Prima dell’utilizzo del kit, leggere il volantino presente sotto le etichette delle confezioni.
For kit usage, read the note under the label on the packages.
Durante le operazioni di riparazione indossare sempre i guanti di gomma
The repair should be performed in rubber gloves
Gelcoat (20g)
Utensile alato
Spatola Blocchetto lucidante
* Conservare questa confezione - la pasta potrà essere utilizzata nel futuro per correggere piccoli difetti sulle superci sanitarie.
Keep the packaging - it can be used for polishing/removal of small scratches on cast marble surface.
Carta smerigliata rossa Carta smerigliata grigia
Gelcoat (20g)
Sharp tool
Spatula Polishing block Red emery paper Grey emery paper
Pasta lucidante (20)
Guanti
Polishing paste (20)
Gloves
Indurente (0,3g)
Sgrassante
Hardener (0,3g)
Degreaser
Panno morbido (100x100mm)
Soft cloth (100x100mm)
*
1. Con l’utensile alato
pulire la parte danneg-
giata togliendo i residui
di Gelcoat, polvere ed
altri contaminanti.
1. Use the sharp tool to clean
the damaged part remov-
ing Gelcoat residues, dust
and other contaminants.
2. Pulire la parte danneggia-
ta con lo sgrassante (es.
acetone, alcool).
2. Clean the damaged part
with the degreaser (es.
acetone, alcohol).
3. Aprire la confezione di
Gelcoat - per fare ciò
togliere con cautela il lm
protettivo.
3. Open the Gelcoat package
- remove the protective
lm with caution.
KIT di riparazione 1/3
Repair KIT 1/3

ICONIK 02
pag. 11/12
5. Usando la spatola,
mescolare energicamente
i componenti per 30
secondi.
5. Using the spatula,
energetically mix the
components for 30
seconds.
9. Riporre il prodotto
così preparato per
l’asciugatura.
Minimo 56 ore.
9. Store the product prepared
this way for drying.
Minimum: 56 hours.
6. Riporre la massa ed
attendere altri 30
secondi.
Attenzione: la massa
diventa dura.
6. Leave the mass and wait
another 30 seconds.
Warning: the mass
hardens.
10. Al termine dell’applicazione, chiudere le confezioni
usate di Gelcoat e indurente.
Gettarle insieme agli attrezzi utilizzati.
La confezione con la pasta può essere conservata per
un futuro utilizzo.
10.At the end of application, close the used packages of
Gelcoat and hardener.
Put them together with the tools you used.
The package with the paste can be stored for future use.
7. Con un’estremità della
spatola applicare la
massa preparata sulla
parte danneggiata.
7. With one end of the
spatula, apply the
prepared mass on the
damaged part.
8. Applicare una quantità
adeguata della massa
no ad avere una
eccedenza di 1mm sopra
la supercie.
8. Apply an appropriate
quantity of mass until you
obtain an excess of 1mm
above the surface.
4. Aprire il contenitore con
l’indurente.
4. Open the container with
the hardener.
KIT di riparazione 2/3
Repair KIT 2/3

ICONIK 02
pag. 12/12
11. Mettere a bagno in
acqua entrambi i pezzi di
carta smerigliata.
15. Mettere la pasta lucidante sul
panno morbido.
15.Apply the polishing paste to the soft
cloth.
16. Premere con il panno sulla parte
da lucidare e con movimenti
circolari lucidare la parte riparata.
16.Press the cloth on the part which
must be polished and polish the
repaired part with circular motions.
11. Soak both pieces of emery
paper in water.
12. Fissare la carta al blocchetto.
Con la parte rossa, smerigliare la zona riparata no a togliere la parte
in eccesso della massa ed ottenere una supercie uniforme (a).
Se la riparazione è stata eettuata su una supercie arrotondata,
usare la carta senza il blocchetto (b).
12.Fix paper to the block.
With the red part, grind the repaired zone until the part in excess of the
mass is removed and an even surface is obtained (a).
If the repair has been performed on a rounded surface, use the paper
without the block (b).
14. Togliere il lm protettivo
ed aprire la confezione di
pasta lucidante.
14.Remove the protective lm
and open the package of
polishing paste.
13. Mettere la carta per smerigliare grigia sul blocchetto.
Finire di smerigliare e rendere la parte trattata liscia (a).
Se la riparazione è stata eettuata su una supercie arrotondata,
usare la carta senza il blocchetto (b).
13.Put the grey emery paper on the block.
Finish grinding and make the treated part smooth (a).
If the repair has been performed on a rounded surface, use the paper
without the block (b).
KIT di riparazione 3/3
Repair KIT 3/3
Table of contents
Other Kinedo Bathtub manuals
Popular Bathtub manuals by other brands

Kohler
Kohler K-1124-LA Roughing-In Guide

Kohler
Kohler K-855 Roughing-In Guide

Marbletrend
Marbletrend ESTI 1700 installation instructions

DURAVIT
DURAVIT Architec 700353 Mounting instructions

Kohler
Kohler Mariposa K-1257-LA-96 Homeowner's guide

American Standard
American Standard Heritage 6' Whirlpool and Bathing Pool... Specifications

glass 1989
glass 1989 pop 170/70 manual

Luxier
Luxier FSB-01 Installation and care guide

Signature Hardware
Signature Hardware Arabella 930798 manual

JASON Hydrotherapy
JASON Hydrotherapy Integrity A6060 owner's manual

Mustee
Mustee Bigtub Utilatub 28CF quick start guide

noken
noken ARQUITECT 100311329 instructions