KitchenAid KCO124BM User manual

KCO124
W11407666C.indb 1W11407666C.indb 1 9/18/2020 3:43:00 PM9/18/2020 3:43:00 PM

2|
PARTS AND FEATURES
3
8
4
5
6
7
1
2
13
9
10
11
17
18
19
20
21
22
15
1Toughened glass window
2Removable crumb tray
3Cool down surface for removable
oven rack
4Chrome-plated steel broiling rack
5Enamel-coated pan
6Chrome-plated steel oven rack
7Door handle
8
Air fry basket
9Start: Start selected cooking mode
10 Cancel: Stops selected cooking mode
11 Convection: Temperature switch
mode
12 Temperature / Timer Knob
13 Mode knob: Cooking mode selector
14 Preheating icon
15 Shade icon
16 Shade number graphic
17 Convection icon
18 Fahrenheit icon
19 Celsius icon
20
Hours icon
21
Minutes icon
22
Slices icon
14
16
NOTE: Press and hold the Convection button for 3 seconds to switch between the
temperature units Fahrenheit (°F) and Celsius (°C).
12
12
W11407666C.indb 2W11407666C.indb 2 9/18/2020 3:43:01 PM9/18/2020 3:43:01 PM

ENGLISH
| 3
PRODUCT SAFETY
IMPORTANT SAFEGUARDS
When using electrical appliances, basic safety precautions should always
be followed, including the following:
1. Read all instructions.
2. Do not touch hot surfaces. Use handles or knobs.
3. To protect against risk of electrical shock, do not put cord, plugs, or any parts of
the Air Fryer in water or other liquid.
4. Close supervision is necessary when any appliance is used by or near children.
5. Unplug from outlet when not in use and before cleaning. Allow to cool before
putting on or taking off parts.
6. Do not operate any appliance with a damaged cord or plug, or after the
appliance malfunctions, or is dropped or damaged in any manner. Return
appliance to the nearest Authorized Service Facility for examination, repair, or
adjustment.
7. The use of accessory attachments not recommended by the appliance
manufacturer may cause injuries.
8. Do not let cord hang over edge of table or counter, or touch hot surfaces.
9. Do not place on or near a hot gas or electric burner, or in a heated oven.
10. Extreme caution must be used when moving an appliance containing hot oil or
other hot liquids.
11. Use extreme caution when removing Broiling Rack, Multipurpose Pan, Oven
Rack, or disposing of hot grease.
12. Oversize foods or metal utensils must not be inserted in a Air Fryer as they may
create a re or risk of electric shock.
13. A re may occur if Air Fryer is covered or touching ammable material, including
curtains, draperies, walls and the like, when in operation. Do not store any item
on top of the appliance when in operation.
W11407666C.indb 3W11407666C.indb 3 9/18/2020 3:43:01 PM9/18/2020 3:43:01 PM

4|
14. Do not clean with metal scouring pads. Pieces can break off the pad and touch
electrical parts, creating a risk of electric shock.
15. Extreme caution should be exercised when using containers constructed of
materials other than metal or glass.
16. Do not store any materials, other than manufacturer’s recommended
accessories, in this Air Fry when not in use.
17. Do not place any of the following materials in the Air Fry: paper, cardboard,
plastic, or anything similar.
18. Do not cover crumb drawer or any part of the Air Fry with metal foil. This will
cause overheating of the oven.
19. To disconnect, turn the Air Fry “off” by pressing Cancel button, then remove plug
from wall outlet.
20. Do not use outdoors.
21. Do not use appliance for other than intended use.
SAVE THESE INSTRUCTIONS
This product is designed for household use only.
PRODUCT SAFETY
ELECTRICAL REQUIREMENTS
Voltage: 120 VAC
Frequency: 60 Hz
Wattage: 1800 Watts
NOTE: If the plug does not fit in the outlet,
contact a qualified electrician.
Do not modify the plug in any way.
Do not use an adapter.
Do not use an extension cord. If the power
supply cord is too short, have a qualified
electrician or service technician to install an
outlet near the appliance.
The cord should be arranged so that it will
not drape over the countertop or tabletop
where it can be pulled on by children or
tripped over unintentionally.
W11407666C.indb 4W11407666C.indb 4 9/18/2020 3:43:01 PM9/18/2020 3:43:01 PM

ENGLISH
| 5
GETTING STARTED
Make sure all sides are positioned with at
least 4” (10 cm) distance.
1
Toast
Bagel
Proof
Air Fry
Bake
Broil
Reheat
Dehydrate
Start
Cancel
Convection
Preheating
Shade Slices
Convection
F
C
Hrs
Min
Keep Warm
Open the door and align the rack with the
grooves for desired positions
(see”Air Fryer rack position” section).
2
Before rst use, clean all parts and accessories (see “Care and Cleaning” section). Place the
Air Fryer on a dry and at level surface. Remove all packaging materials and labels, if present.
Plug into a grounded 3 prong outlet.
Your Air Fryer is now ready to use.
3
NOTE: Upon rst use, the Air Fryer may
produce light smoke. This is normal.
W11407666C.indb 5W11407666C.indb 5 9/18/2020 3:43:02 PM9/18/2020 3:43:02 PM

6|
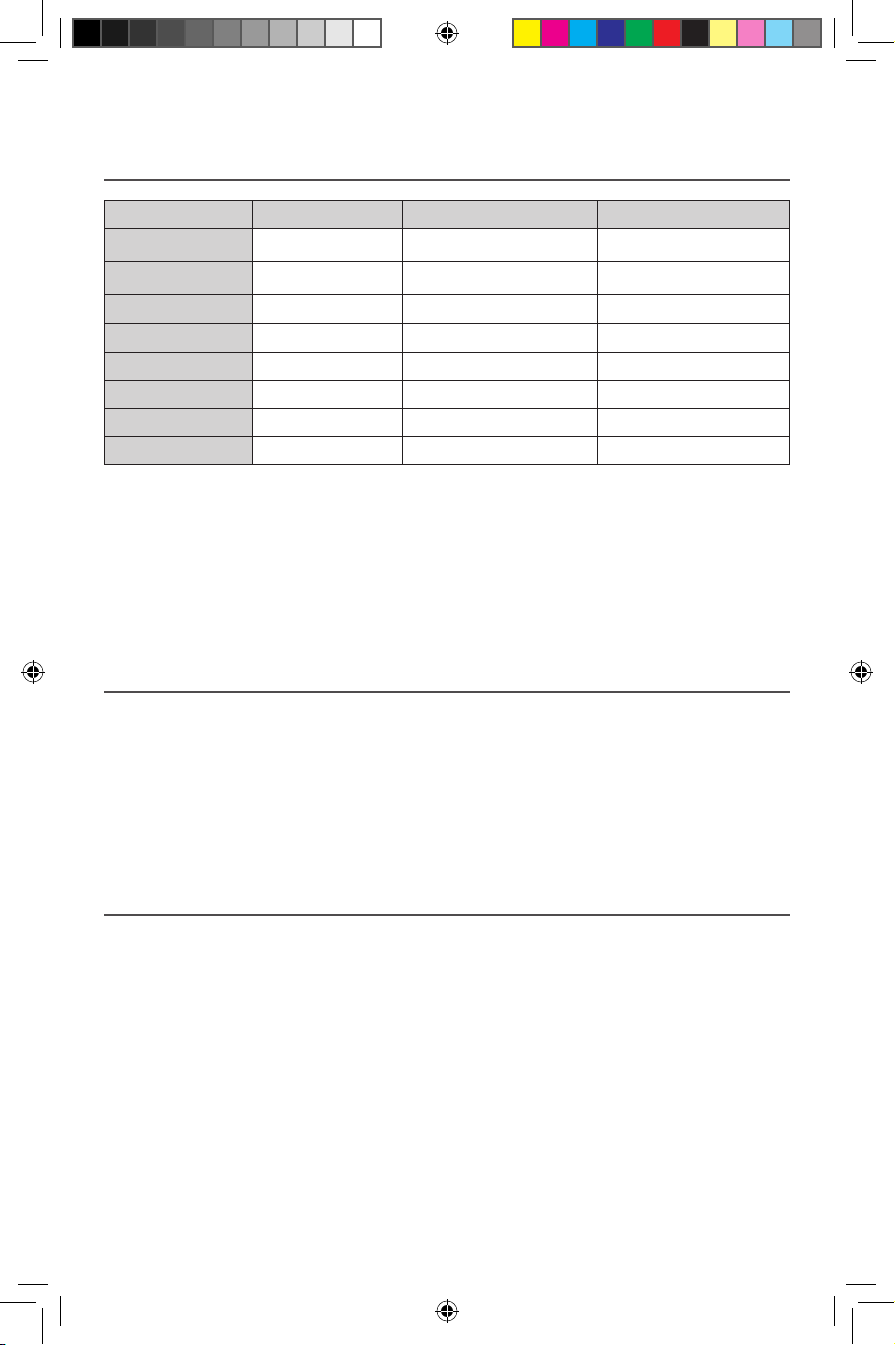
Food Portion Temperature Time
Chicken Nuggets 1 Layer 425 °F (218 °C) 8 - 10 minutes
Chicken Tenders 1 Layer 425 °F (218 °C) 13 - 15 minutes
Chicken Wings 1 Layer 425 °F (218 °C) 18 - 20 minutes
Fish Fillets 1 Layer 450 °F (232 °C) 12 - 14 minutes
Fish Sticks 1 Layer 450 °F (232 °C) 10 - 12 minutes
French Fries 1 Layer 425 °F (218 °C) 22 - 24 minutes
Mozarella Sticks 1 Layer 450 °F (232 °C) 5 - 7 minutes
Taquitos 1 Layer 400 °F (204 °C) 5 - 7 minutes
TIME RECOMMENDATION - AIR FRY FUNCTION
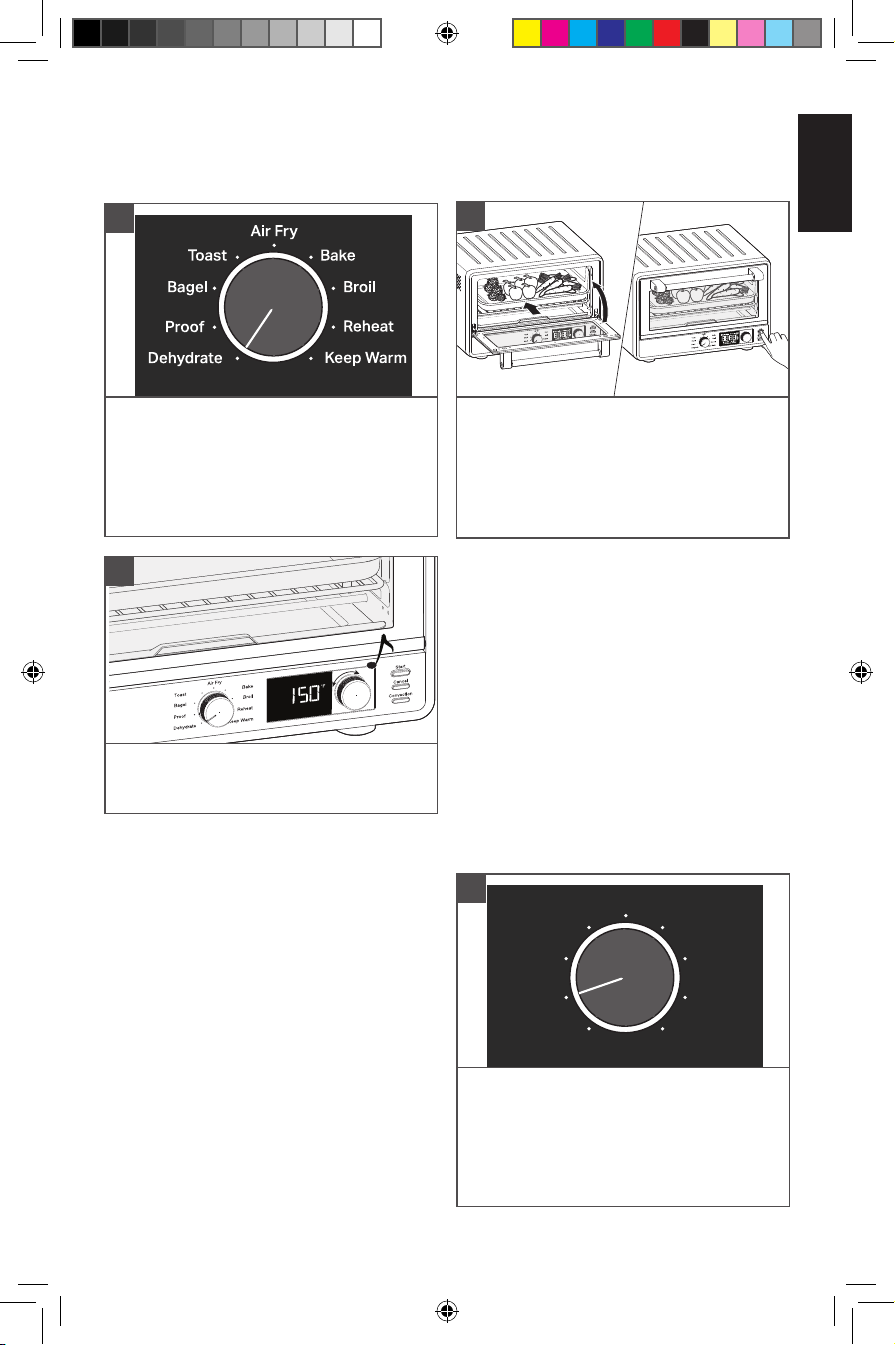
GETTING STARTED
PREHEATING
Preheating your Air Fryer is important for consistent and even results. Once you select your
desired cooking mode or any other settings, and press START.
The light ring around the Start button will be on, and the Preheat indicator will show on the
LCD. Once the oven has reached the set temperature, a tone will sound to let you know that
you can insert food and begin cooking. Preheating is NOT necessary in all cooking modes.
To skip the Preheat and start the timer directly, push the START button a second time.
The convection fan is controlled by the Convection button. Pushing the convection button will
toggle the fan on or off for Bake, Broil, Keep Warm, and Reheat functions. A “Convection”
label and fan icon will appear on the display when the convection fan is on. The Air Fry
function uses a high speed convection fan that cannot be turned off. The Dehydrate function
uses the high speed convection fan as preset, but it may be turned off by pushing the
convection button.
NOTE: Automatic Preheat is not programmed for Dehydrate, Keep Warm, Reheat, Toast and
Bagel functions.
CONVECTION
NOTE: Gently spray the basket with oil before each batch of food. No more oil is needed.
Results may vary with different food brands and sizes. Follow Toaster Oven instructions from
the back of the food package and reduce time.
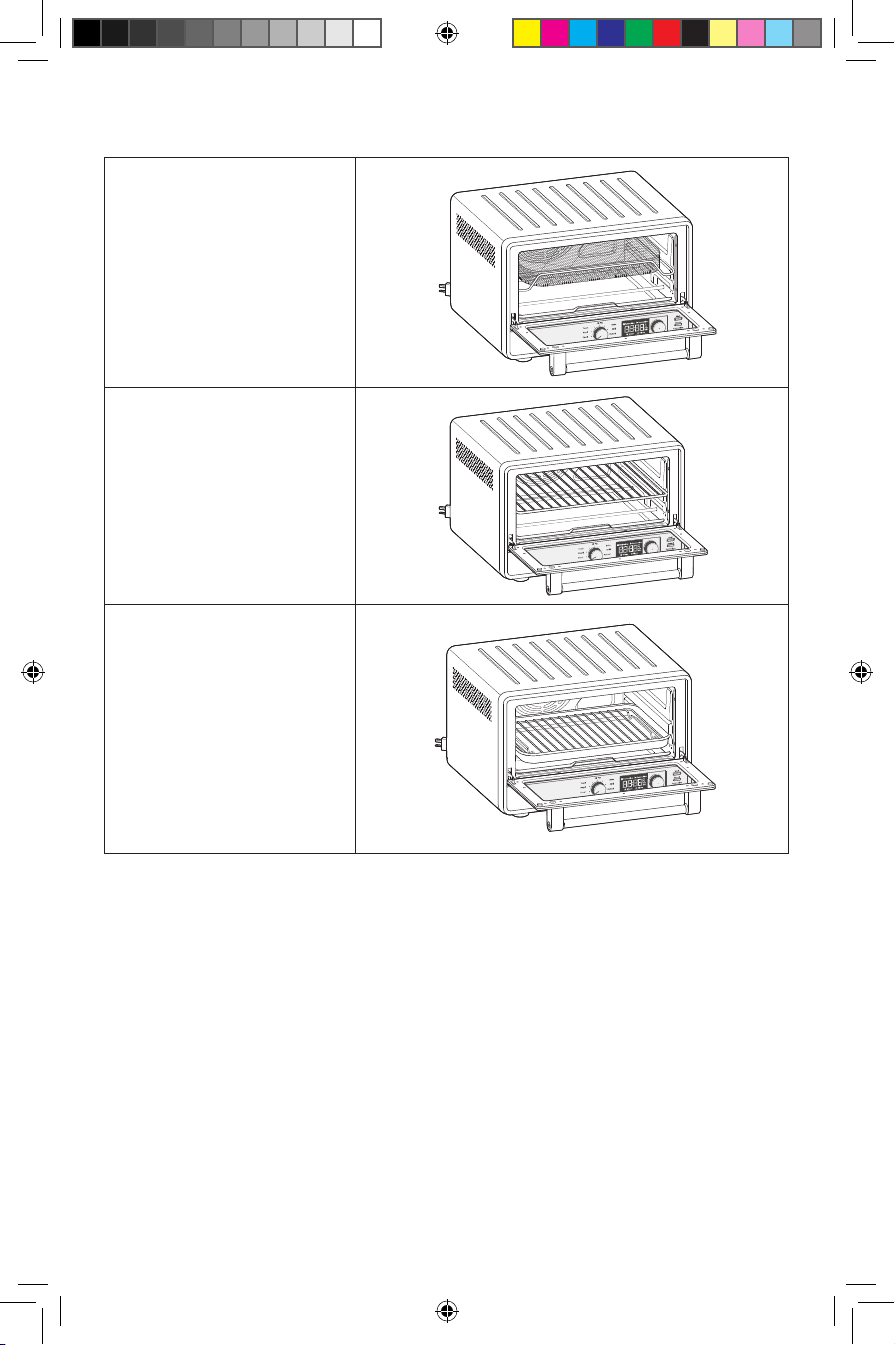
TIP: When cooking fatty foods, such as non breaded poultry with skin, use the baking pan
instead of the Air fry basket to catch excess oil that may drip from the food.
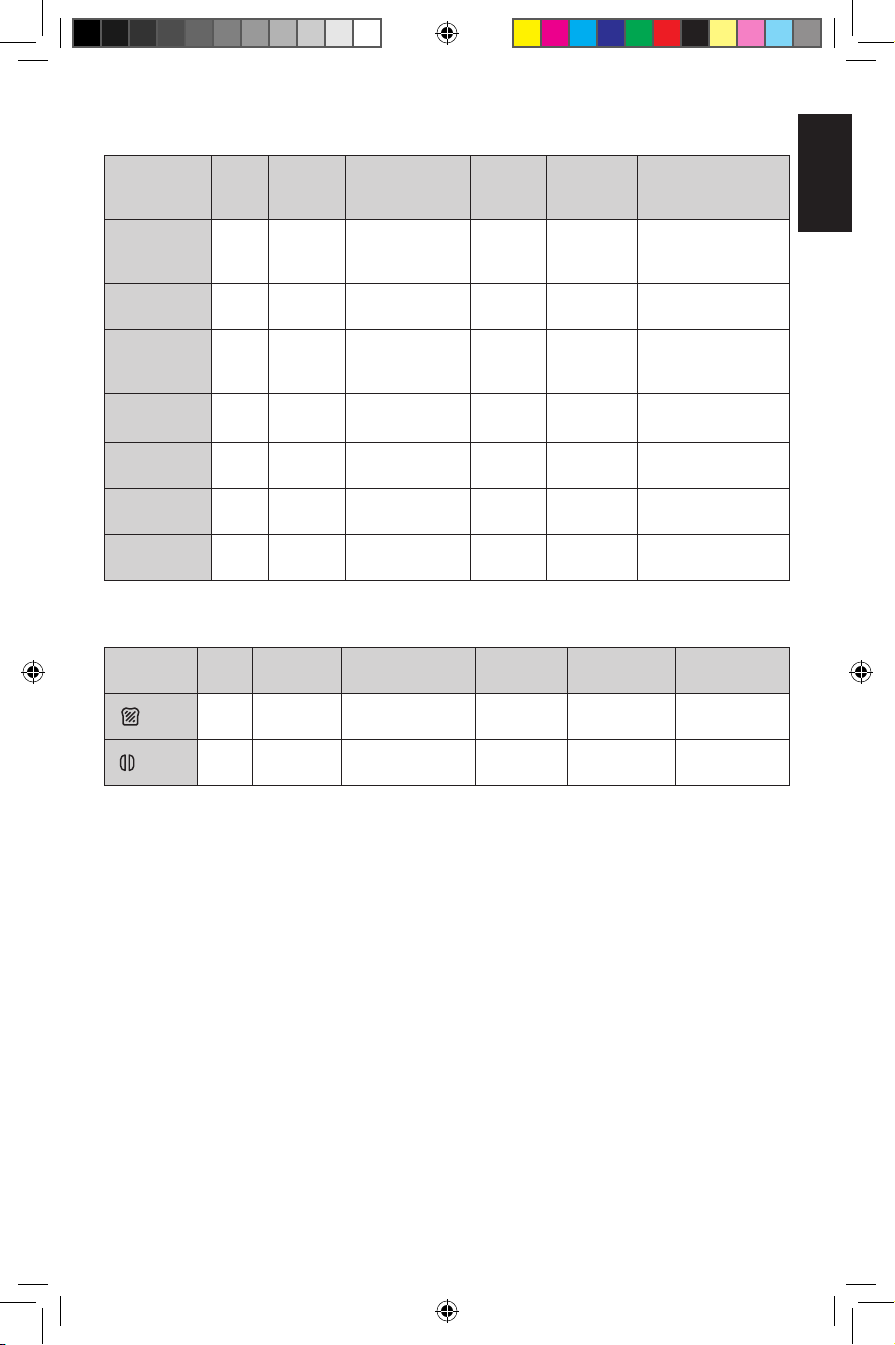
COOKING FUNCTIONS
W11407666C.indb 6W11407666C.indb 6 9/18/2020 3:43:02 PM9/18/2020 3:43:02 PM

ENGLISH
| 7
Cooking
function Rack
No.
Preset
Temp.
°C (°F)
Temperature
Range °C (°F)
Preset
Time
(Mins.)
Time
Range Elements Run
Dehydrate 1 - 2 150 °F
(66 °C) 80 – 180 °F
(27 – 82 °C) 6 hours 1 min – 12
hours
2 bottom;
high speed
convect
Proof 1 90 °F
(32 °C) 80 – 100 °F
(27 – 38 °C) 30 1 min – 1
hours 2 bottom
Air Fry 2 400 °F
205 °C 150 – 450°F
(66 – 232°C) 17 1 min – 1
hours
2 top, 2 bottom,
high speed
convect
Bake 2 350 °F
(176 °C) 150 – 450°F
(66 – 232°C) 30 1 min – 2
hours 2 top, 2 bottom,
convect available
Broil 2 450°F
(232 °C) 350°F (176°C)
450°F (232°C) 81 min – 30
mins 2 top,
convect available
Reheat 2 300 °F
(149 °C) 150 – 450°F
(66 – 232°C) 15 1 min – 2
hours 2 top, 2 bottom,
convect available
Keep Warm 2 170 °F
(77 °C) 150 – 450°F
(66 – 232°C) 1 hour 1 min – 2
hours 2 bottom,
convect available
COOKING FUNCTIONS
Cook all foods to minimum safe internal temperatures. Consuming raw or undercooked meats,
poultry, seafood, shellsh, or eggs may increase your risk of food borne illness.
Toasting
functions Rack
No. Preset
Shade Shade Range
(Light to Dark) Preset
Slices Range
(# of slices) Elements Run
Toast 2 4 1 - 8 2 1 - 6 Runs 4
elements
Bagel 2 4 1 - 8 2 1 - 6 Runs 4
elements
W11407666C.indb 7W11407666C.indb 7 9/18/2020 3:43:03 PM9/18/2020 3:43:03 PM

8|
AIR FRY RACK POSITION
Rack position for Air Fry
Rack position for Bake, Reheat,
Dehydrate, Proof, Bagel, Toast,
Keep Warm, Broil
Rack position for Baking large
items or items that are sensative
to over browning on top
W11407666C.indb 8W11407666C.indb 8 9/18/2020 3:43:04 PM9/18/2020 3:43:04 PM

ENGLISH
| 9
USING THE DEHYDRATE FUNCTION
Dehydrate option is to remove moisture content from veggies or fruits to dry and preserve
them.
Set the function knob to Dehydrate.
The preset temperature 150 °F will be
shown. If desired, rotate knob to adjust.
Press the knob to show preset time. The
preset time is 6 hours. If desired, rotate
knob to adjust.
1
Open the door and place the food on the
center of the rack. Close the door.
Press Start to start the cycle.
2
When the time has elapsed, the end
signal will sound and the Air Fryer will
shut off automatically.
3IMPORTANT: Always use oven mitts when
removing pans or racks.
USING THE PROOF FUNCTION
Dehydrate
Bagel
Proof
Toast
Air Fry
Bake
Broil
Reheat
Keep Warm
Set the function knob to Proof.
The preset temperature 90 °F will be
shown. If desired, rotate knob to adjust.
Press the knob to show preset time. The
preset time is 30 min. If desired, rotate
knob to adjust.
1
The Proof function maintains a warm
environment useful for rising yeast.
Use for dough. To speed up bread proong.
With a range of 80 – 100°F temperature and
lower heating elements, this setting can be
used to accelerate bread proong (rising).
W11407666C.indb 9W11407666C.indb 9 9/18/2020 3:43:05 PM9/18/2020 3:43:05 PM

10 |
USING THE PROOF FUNCTION
Open the door and place the food on the
center of the rack. Close the door.
Press Start to start the cycle.
2
When the time has elapsed, the end
signal will sound and the Air Fryer will
shut off automatically.
3
USING THE BAGEL FUNCTION
Set the function knob to Bagel. Shade and
slices will be shown.
1
In Bagel mode, the oven distributes power between the top and bottom heating elements to
nicely brown the top of cut bagels while gently warming the outside.
Open the door and place the food on the
center of the rack. Close the door.
2
Toast
Bagel
Proof
Air Fry
Bake
Broil
Reheat
Dehydrate
Start
Cancel
Convection
Preheating
Shade Slices
Convection
F
C
Hrs
Min
Keep Warm
When the time has elapsed, the end
signal will sound and the Air Fryer will
shut off automatically.
4
Start
Cancel
Convection
Preheating
Shade Slices
Convection
F
C
Hrs
Min
Toast
Bagel
Proof
Air Fry
Bake
Broil
Reheat
Dehydrate
Start
Cancel
Convection
Preheating
Shade Slices
Convection
F
C
Hrs
Min
Keep Warm
The shade icon starts flashing. Rotate the
knob to adjust shade. Press knob to select
slices. The slices icon will starts flashing. If
desired, rotate knob to adjust number of
slices.
Press Start to start the cycle.
3
W11407666C.indb 10W11407666C.indb 10 9/18/2020 3:43:07 PM9/18/2020 3:43:07 PM

ENGLISH
| 11
USING THE TOAST FUNCTION
Set the function knob to Toast. Shade and
slices will be shown.
1
In Toast mode, your oven distributes power to the top and bottom heating elements to
maintain the desired oven temperature.
Open the door and place the food on the
center of the rack. Close the door.
2
When the time has elapsed, the end
signal will sound and the Air Fryer will
shut off automatically.
4
USING THE AIR FRY FUNCTION
Set the function knob to Air Fry.
The preset temperature 400 °F will be
shown. If desired, rotate knob to adjust.
Press the knob to show preset time. The
preset time is 17 min. If desired, rotate
knob to adjust.
1
The Air Fry function uses a combination of
hot air and heating elements to prepare
crispy foods.
The shade icon starts flashing. If desired,
rotate knob to adjust shade. Press knob
to select slices. The slices icon will starts
flashing. If desired, rotate knob to adjust
number of slices.
Press Start to start the cycle.
3
W11407666C.indb 11W11407666C.indb 11 9/18/2020 3:43:09 PM9/18/2020 3:43:09 PM

12 |
USING THE AIR FRY FUNCTION
Open the door and place the food on the
center of the rack. Close the door.
Press Start to start the cycle.
2
When the time has elapsed, the end
signal will sound and the Air Fryer will
shut off automatically.
3
USING THE BAKE FUNCTION
Set the function knob to Bake.
The preset temperature 350 °F will be
shown. If desired, rotate knob to adjust.
Press the knob to show preset time. The
preset time is 30 min. If desired, rotate
knob to adjust.
1
In Bake mode, food will prepare in dry heat
like bread, cake, toast etc. Both the top and
bottom cooking elements cycle on and off
while baking. Recipes will vary and cooking
time should be monitored for desired
results. For better cooking results, select the
correct cooking pan to allow for proper air
circulation.
Open the door and place the food on the
center of the rack. Close the door.
Press Start to start the cycle.
2
When the time has elapsed, the end
signal will sound and the Air Fryer will
shut off automatically.
3
The convection fan can be turned on or off by
pressing the convection button.
W11407666C.indb 12W11407666C.indb 12 9/18/2020 3:43:11 PM9/18/2020 3:43:11 PM

ENGLISH
| 13
USING THE BROIL FUNCTION
Open the door and place the food on the
center of the rack. Close the door.
Press Start to start the cycle.
2
When the time has elapsed, the end
signal will sound and the Air Fryer will
shut off automatically.
3
Only the top cooking elements heat when the
Broil function is selected. Use the included
broil pan and grill directly on the oven rack
for even browning and easy cleanup. The
broil pan and grill may also be used for the
Bake and Warm settings.
Set the function knob to Broil.
The preset temperature 450 °F will be
shown. If desired, rotate knob to adjust.
Press the knob to show preset time. The
preset time is 8 min. If desired, rotate
knob to adjust.
1
USING THE REHEAT FUNCTION
In Reheat function oven distributes power to
the top and bottom elements to bring food
to serving temperature.
Set the function knob to Reheat.
The preset temperature 300 °F will be
shown. If desired, rotate knob to adjust.
Press the knob to show preset time. The
preset time is 15 min. If desired, rotate
knob to adjust.
1
The convection fan can be turned on or off by
pressing the convection button.
The convection fan can be turned on or off by
pressing the convection button.
W11407666C.indb 13W11407666C.indb 13 9/18/2020 3:43:12 PM9/18/2020 3:43:12 PM

14 |
USING THE REHEAT FUNCTION
When the time has elapsed, the end
signal will sound and the Air Fryer will
shut off automatically.
3
Open the door and place the food on the
center of the rack. Close the door.
Press Start to start the cycle.
2
USING THE KEEP WARM FUNCTION
Set the function knob Keep Warm.
The preset temperature 170 °F will be
shown. If desired, rotate knob to adjust.
Press the knob to show preset time. The
preset time is 1 hour. If desired, rotate
knob to adjust.
1
WARNING
Food Poisoning Hazard
Do not let food sit in oven more than one hour before
or after cooking.
Doing so can result in food poisoning or sickness.
In Keep Warm mode, your oven distributes
power to the bottom elements to keep food
warm after cooking, so it may be served hot.
The convection fan can be turned on by
pressing the convection button.
W11407666C.indb 14W11407666C.indb 14 9/18/2020 3:43:13 PM9/18/2020 3:43:13 PM

ENGLISH
| 15
When the time has elapsed, the end
signal will sound and the Air Fryer will
shut off automatically.
3
Open the door and place the food on the
center of the rack. Close the door.
Press Start to start the cycle.
2
USING THE KEEP WARM FUNCTION
CARE AND CLEANING
Unplug the Air Fryer from the outlet.
To remove the crumb tray, Air fry basket,
open the door, grasp the crumb tray
handle and slide straight out.
1
Empty and wash in warm, sudsy water, if
needed. Dry with a soft cloth. Open the
door and slide it back into place. A soft
bristle brush can be used to clean the
mesh on the Air fry basket.
2
NOTE: Allow the Air Fryer and accessories to cool completely before cleaning.
IMPORTANT: Do not use cleaning agents,
abrasive cleansers, or metal scouring pads
on the inner or outer surfaces of the Air
Fryer. They could scratch the surface.
INTERIOR: The inside walls of the oven
feature a nonstick coating. Remove heavy
spatter with a nylon or polyester mesh pad,
sponge, or cloth dampened with warm water.
Dry thoroughly.
EXTERIOR: Wipe the outside of the Air Fryer
with a clean, damp cloth and dry thoroughly.
IMPORTANT: Ensure all parts and surfaces
are completely dry before re-use.
The following parts are dish-washer safe,
but hand washing is recommended: Oven
rack, Multipurpose pan, and Broiling rack.
3
W11407666C.indb 15W11407666C.indb 15 9/18/2020 3:43:15 PM9/18/2020 3:43:15 PM

16 |
TROUBLESHOOTING GUIDE
WARNING
Electrical Shock Hazard
Plug into a grounded 3 prong outlet.
Do not remove ground prong.
Do not use an adapter.
Do not use an extension cord.
Failure to follow these instructions can result in death, fire, or
electrical shock.
Problem Solution
If the oven fails to start:
Check to see if the oven is plugged into a grounded 3
prong outlet.
Check to see if the fuse in the circuit breaker box to the
oven is in working order.
If the problem cannot be
corrected:
See the “KitchenAid®Warranty and Service” sections.
Do not return the Air Fryer to the retailer – retailers do not
provide service.
If the wrong temperature unit is
displayed:
Press and hold the Convection button for 3 seconds
to switch between Fahrenheit (°F) and Celsius (°C)
temperature units.
Upper cooking elements visibly
glow, but bottom cooking
elements do not:
The upper cooking elements use higher power for better
browning performance. The lower cooking elements
are on, but may not visibly glow like the upper cooking
elements. This is normal and your Air Fryer is working
properly.
If “E1 or E2” ashes on the
display and a chime sounds:
The NTC Sensor may not be working. This issue can not
be corrected. Please see the “KitchenAid®Warranty and
Service” sections.
If “PF” is shown on the display:
The oven will display “PF” when it is powered up for the
rst time, or has experienced a power failure. If a cooking
function was in process, dispose of food; it might not be
thoroughly cooked.
W11407666C.indb 16W11407666C.indb 16 9/18/2020 3:43:15 PM9/18/2020 3:43:15 PM

ENGLISH
| 17
WARRANTY AND SERVICE
KITCHENAID®COUNTERTOP OVEN WARRANTY FOR THE 50 UNITED
STATES, THE DISTRICT OF COLUMBIA, PUERTO RICO, AND CANADA
This warranty extends to the purchaser and any succeeding owner for Countertop Ovens
operated in the 50 United States, the District of Columbia, Puerto Rico, and Canada.
Length of Warranty: One Year Full Warranty from date of purchase.
KitchenAid Will Pay
for Your Choice of: Hassle-Free Replacement of your Countertop Oven. See the next
page for details on how to arrange for service, or call the Customer
eXperience Center toll-free at 1-800-541-6390.
OR
The replacement parts and repair labor costs to correct defects
in materials and workmanship. Service must be provided by an
Authorized KitchenAid Service Center.
KitchenAid Will
Not Pay for: A. Repairs when your Countertop Oven is used in other than
normal single family home use.
B. Damage resulting from accident, alteration, misuse or abuse.
C. Any shipping or handling costs to deliver your
Countertop Oven to an Authorized Service Center.
D. Replacement parts or repair labor costs for Countertop Oven
attachments operated outside the 50 United States, District of
Columbia, Puerto Rico, and Canada.
DISCLAIMER OF IMPLIED WARRANTIES; LIMITATION OF REMEDIES
IMPLIED WARRANTIES, INCLUDING TO THE EXTENT APPLICABLE WARRANTIES OF
MERCHANTABILITY OR FITNESS FOR A PARTICULAR PURPOSE, ARE EXCLUDED TO THE
EXTENT LEGALLY PERMISSIBLE. ANY IMPLIED WARRANTIES THAT MAY BE IMPOSED
BY LAW ARE LIMITED TO ONE YEAR, OR THE SHORTEST PERIOD ALLOWED BY LAW.
SOME STATES AND PROVINCES DO NOT ALLOW LIMITATIONS OR EXCLUSIONS ON
HOW LONG AN IMPLIED WARRANTY OF MERCHANTABILITY OR FITNESS LASTS, SO THE
ABOVE LIMITATIONS OR EXCLUSIONS MAY NOT APPLY TO YOU.
IF THIS PRODUCT FAILS TO WORK AS WARRANTED, CUSTOMER’S SOLE AND EXCLUSIVE
REMEDY SHALL BE REPAIR OR REPLACEMENT ACCORDING TO THE TERMS OF THIS
LIMITED WARRANTY. KITCHENAID AND KITCHENAID CANADA DO NOT ASSUME ANY
RESPONSIBILITY FOR INCIDENTAL OR CONSEQUENTIAL DAMAGES. This warranty gives
you specic legal rights and you may also have other rights which vary from state to state or
province to province.
W11407666C.indb 17W11407666C.indb 17 9/18/2020 3:43:15 PM9/18/2020 3:43:15 PM

18 |
®/™ ©2020 KitchenAid. All rights reserved. Used under license in Canada.
WARRANTY AND SERVICE
HASSLE-FREE REPLACEMENT WARRANTY—50 UNITED STATES, DISTRICT
OF COLUMBIA, AND PUERTO RICO
We’re so condent the quality of our
products meets the exacting standards of
KitchenAid that, if your Countertop Oven
should fail within the rst year of ownership,
KitchenAid will arrange to deliver an identical
or comparable replacement to your door
free of charge and arrange to have your
original Countertop Oven returned to us. Your
replacement unit will also be covered by our
one year limited warranty.
If your Countertop Oven should fail within the
rst year of ownership, simply call our toll-free
Customer eXperience Center at
1-800-541-6390 Monday through Friday.
Please have your original sales receipt
available when you call. Proof of purchase
will be required to initiate the claim. Give the
consultant your complete shipping address
(no P.O. Box numbers, please).
When you receive your replacement
Countertop Oven, use the carton, packing
materials, and prepaid shipping label to pack
up your original Countertop Oven and send it
back to KitchenAid.
HASSLE-FREE REPLACEMENT WARRANTY—CANADA
We’re so condent the quality of our
products meets the exacting standards of the
KitchenAid brand that, if your Countertop
Oven should fail within the rst year of
ownership, we will replace your Countertop
Oven with an identical or comparable
replacement. Your replacement unit will also
be covered by our one year limited warranty.
If your Countertop Oven should fail within the
rst year of ownership, simply call our toll-free
Customer eXperience Center at
1-800-807-6777 Monday through Friday.
Please have your original sales receipt
available when you call. Proof of purchase
will be required to initiate the claim. Give the
consultant your complete shipping address.
When you receive your replacement
Countertop Oven, use the carton, packing
materials, and prepaid shipping label to pack
up your original Countertop Oven and send it
back to KitchenAid.
ARRANGING FOR SERVICE AFTER THE WARRANTY EXPIRES,
OR ORDERING ACCESSORIES AND REPLACEMENT PARTS
In the United States and Puerto Rico:
For service information, or to order
accessories or replacement parts, call
toll-free at 1-800-541-6390 or write to:
Customer eXperience Center,
KitchenAid Small Appliances,
P.O. Box 218, St. Joseph, MI 49085-0218
Outside the United States and Puerto Rico:
Consult your local KitchenAid dealer or the
store where you purchased the Countertop
Oven for information on how to obtain
service.
For service information in Canada:
Call toll-free 1-800-807-6777.
For service information in Mexico:
Call toll-free 01-800-0022-767.
W11407666C.indb 18W11407666C.indb 18 9/18/2020 3:43:15 PM9/18/2020 3:43:15 PM

| 19
FRANÇAIS
PIÈCES ET CARACTÉRISTIQUES
3
8
4
5
6
7
1
2
13
9
10
11
17
18
19
20
21
22
15
1Hublot en verre trempé
2Ramasse-miettes amovible
3Surface de refroidissement pour grille
amovible du four
4Grille de cuisson au gril en acier chromé
5Plateau émaillé
6Grille en acier chromé du four
7Poignée de porte
8
Panier à friture à air
9Start (mise en marche): démarre le
mode de cuisson sélectionné
10 Cancel (annulation): arrête le mode
de cuisson sélectionné
11 Convection: Mode avec changement
de température
12 Bouton Température/minuterie
13 Bouton Mode: Sélecteur du mode
decuisson
14 Icône Preheating (Préchauffage)
15 Icône Shade (Degré de brunissement)
16 Graphique du degré de brunissement
17 Icône Convection
18 Icône Fahrenheit
19 Icône Celsius
20
Icône Heures
21
Icône Minutes
22
Icône Slices (tranches)
14
16
REMARQUE: Maintenir le bouton Convection enfoncé pendant 3 secondes pour passer des
unités de température Fahrenheit (°F) aux unités de température Celsius (°C) et vice versa.
12
12
W11407666C.indb 19W11407666C.indb 19 9/18/2020 3:43:16 PM9/18/2020 3:43:16 PM

20 |
SÉCURITÉ DU PRODUIT
CONSIGNES DE SÉCURITÉ
IMPORTANTES
Lors de l’utilisation d’appareils électriques, certaines précautions élémentaires
de sécurité doivent toujours être observées, incluant les suivantes:
1. Lire toutes les instructions.
2. Ne pas toucher les surfaces chaudes. Utiliser les poignées ou les boutons.
3. Pour éviter toute décharge électrique, ne pas mettre le cordon, les prises ou
uncomposant de la friteuse à air dans l’eau ou tout autre liquide.
4. Une surveillance attentive s’impose lorsqu’un appareil ménager est utilisé par
ouà proximité d’enfants.
5. Débrancher la prise lorsque l’appareil n’est pas utilisé et avant le nettoyage.
Attendre que l’appareil ait refroidi avant d’installer ou de retirer des pièces.
6. Ne pas faire fonctionner un appareil si le cordon ou la prise est endommagé,
si l’appareil ne fonctionne pas correctement, s’il tombe ou s’il est endommagé
d’une quelconque façon. Retourner l’appareil au centre de dépannage agréé le
plus proche pour examen, réparation ou réglage.
7. L’utilisation d’accessoires non recommandés par le fabricant de l’appareil peut
causer des blessures.
8. Ne pas laisser le cordon pendre par-dessus le bord d’une table ou d’un plan de
travail ou toucher une surface chaude.
9. Ne pas placer sur ou près d’un brûleur électrique ou à gaz chaud, ou dans un
four chaud.
10. Prendre d’extrêmes précautions lorsqu’on déplace un appareil ménager
contenant de l’huile chaude ou d’autres liquides chauds.
11. La plus grande prudence s’impose lorsqu’on déplace la grille de cuisson au gril,
le plat multifonction, la grille du four ou que l’on déverse de la graisse chaude.
W11407666C.indb 20W11407666C.indb 20 9/18/2020 3:43:16 PM9/18/2020 3:43:16 PM
This manual suits for next models
1
Table of contents
Languages:
Other KitchenAid Fryer manuals