Klepper Aerius User manual

FALTB
OO
TE
Congratulations!
You finally have your new boat, your KLEPPER:As you can see, this is the technical masterpiece. Built with the greatest care
and precision, known in many parts of the world, since 1907, as the BASIC boat of its kind.
Often called „ingenious“, that it is. But even more important: it is the result of practical experience in all possible and impos-
sible applications.The chosen materials are the proven materials for excellent service and long years of use.
„Mature design“ shows in the absolute simplicity: no tiny parts, no nuts, no bolts.All locks are attached in the right place, our
famous snaplocks. Outstanding materials: only air-dried Mountain Ash, long grained, selected for long parts; and precisely lami-
nated Finnish Birch are used, protected by our proprietary marine deep painting varnish system.
Through the years, the hull with built-in airsponsons retains a perfect fit, resists cold and hot conditions, fresh water and salt-
water, folding and storage. It is unique for insulating qualities in ice-water, providing a healthy interior climate (breathable, self-
drying properties of natural material).
Altogether: a combination of material which will serve you for many years.
Each boat has been carefully assembled at the factory, inspected and carefully packed. It will usually be re-inspected at the point
of sale. In case of shipment: all shipments are insured, please let us know, if part is unsatisfactory upon receipt.We want you
to have a Klepper you will be proud of, for your water activities and enjoyment.An important part of the system is YOU,THE
OWNER. Kindly study these pages, more information is available through further instructions, newsletters, magazines, and
books written by Klepper owners, through groups and clubs.
We realize, that all new owners will first do Sunday paddling, then weekends, then vacation trips - one after the other.You will
gain much experience, and become very comfortable with your Klepper.At this point it should be said, that the boat can take
a lot of use and abuse, but as a general rule: Stay away from powerful rivers and pounding surf, as sharp objects below water,
hit with force, could cause damage. Fortunately, a Klepper is well repairable by the owner, almost anywhere in the world.The
common sense and sensible care by the skipper is paramount: you choose the day, you choose the location and your partners.
Please do not forget: Boating in general is not free of risks. Risks can be reduced, almost eliminated through thoughtful, sensi-
ble trip planning.
Ask or read about basic safety rules: there would always be al life-jacket rule, in some cases a headgear is used.There are also
boating rules of the road. Please inform at convenient offices.We believe in club membership, if at all possible, learning from
others.As you advance, be sure to be familiar with boathandling and currents, with ebb and tide along the shore, with obstacles,
such as dams, trees, bridges. Great idea to learn step-by step - try to find experienced friends, who will help you.Always con-
sider your own-well-being and that of your crew, for which you are responsible. Consider your crew, your equipment, your
knowledge of wind and weather, your protective clothing. Stay away from over-ambitious adventures, do not take unneeded
risks.Temper your ambitions, stay within your capabilities.There is so much enjoyment and satisfaction in healthful, invigora-
ting paddling- out in unspoiled nature, far away from the maddening crowd, clean and recreational.We know you will greatly
enjoy it, with your KLEPPER - step by step.
Assembly Maintenance Aerius Klepper (all Modells)

Each Klepper Aerius has been developed for easy assemble.The frame is made of two frame halves.
These are assembled individually then inserted into the bow and stern of the hull (red markings on
the bow - blue markings on the stern section). Side panels at bow and stern are identical.
Für die Besitzer des Aerius – Einer
For AE 2000/Tramp/I Owners:
The Single is assembled almost the same as the double, but please take care of some additional instructions:
1. The front (and the rear) deckbar contain a crosspart, which must be put in between the gunwales before assembling them.
Please note: the ends (sloping) must be parrallel to the gunwales.
2. The AE I (2000,Tramp) contains only 6 (5) crossribs.
3. Please insert at assembly of the front frame half only crossrib # 1 and at the rear half only crossribs number 5 and 6.The
other crossribs are inserted after you have introduced and linked the two frame halves inside of the boat hull.
4. Please first introduce the longer rear frame half into the hull.
Mounting two gunwales:
Left and right gunwale are interchangeable (f). Near the front end are
red letters (Vorne-Bow), flat woodplates face the inside of boat. Lift a
gunwale with both hands, insert curved metal fitting into slot on wood
bow (fig. 2).Then fasten locks on side of ribs to gunwales. Now do the
other, on the other side and fasten locks too. Press front rods into
black rodholders located on bottom-side of ribs. Find deckbar (e) with
red cap. On wood bow, lift up metal track, slide red fitting into slot on
bow, holding deckbar slightly lifted, then press down metal track.
Engage tongue at end of deckbar to snaplock on top of rib # 2
Find two rods (no color marks) with sliding sleeves. Insert the plain female end over the male ends of the rods already in place.
Sliding sleeves point toward center of boat, then press rods into black rod holders, located on bottom-side of ribs. Front half
is done.
Assembly of rear half (=7 parts with blue markings, „Hinten“, „Stern“ - or blue color)
Rear half has parts which look almost like the front parts, but rear half of boat is a bit wider. Connect rear keelboard to rear
stern piece, using two hands as done before at the front part. Insert 2 blue rods with hooks from below. Place rib # 7 in loca-
tion # 7, place rib # 6 in location # 6. Remember: number on rib always matches & faces number on keelboard. Attach 2
blue gunwales and connect them to the ribs, add blue deckbar. Lock up deckbar on top of rib # 6 the same way as done at
front half.
Assembly of front half
(= 7 parts with red markings, „Vorne“, „Bow“ - or red color) Unfold the
keelboard. Insert the wood bow-piece (b) at the twin-headed rivet into
the slot at forward end of keelboard. Spread the keelboard fork, using
both hands, guiding with both thumbs, to let the bow piece pins snap
into the holes in wood (fig.1). From below, insert the two rods (with red
caps) with hooks into fitting (d) of wood bow piece.
Mounting first crossribs:
Find crossrib #1, place it on keelboard at #1 location.All numbers on all
ribs always have to match keelboard numbers and be visible to each
other. - Snaplocks slide over tongues (click). Find rib # 2, place on keel-
board into spot #2, engage locks.

Put frame halves into boathull:
Always look for a favorable level place, such as grass or a wooden dock. Lay out boathull all the way (about 17 feet long). Hull
is larger than woodwork, thus no forcing is needed. Rear end of hull has a metal rudderbracket.
Lift up front half (about 15 lbs.) and slide gently into front half of
hull, watching that sponson pockets rest evenly along the gunwales.
Lift up rear half (about 14 lbs) and slide gently through large cock-
pit opening towards the rear of boathull, again, watch sponsons. In
center of cockpit, woodparts will overlap. Lift up sections of keel-
board (fig. 3), and connect wooden tongue with metal horseshoe.
NOTE XXL model:You must connect an additional keelboard, gun-
wale (2) and rod extensions to the rear frame half. By pushing down
the extended keelboard, be sure both parts are pushed down simul-
taneously. Place your flat hand on the joint, and press down with
feeling - then hold down to avoid popping up. Gunwales are hinging
inward, connect wood tongue to horseshoe, press outward with
flat hand; pull filler tubes of sponsons through wood
structure to avoid squeeze. Now find the last two rods (51 in.), on
one end slide female over male sleeve, in the center pull sliding slee-
ve over short male, and locate head of screw to be visible to avoid damage at the hull.Take care at AE Tramp: Slide th rear
frame half into the hull this way, that the rear stern piece fits exactely into the notch of the hull. Make sure that the pushing
down of the two keelboards goes easily and the fitting for the rudder (outside) should not be pushed up or down.
Now put in the last three open crossribs # 3, 4 and 5. Begin with number 4 and connect the crossrib with the two snappers
at the keelboard at the same time. (numbers must face each other) Then click them into the gunwales and, after that, connect
the rods into the rod holders. Continue with crossrib # (4M, 5, 3)
Placement of cockpit coaming:
Coaming consists of folded wood parts (k, fig. 4) and a
metal mast bracket with mast hole. Look under mast bracket, see T-
fitting. On deck is a grommet, through the grommet you should see
a rectangular hole, with a little pulling. - Hold coaming at a 90
degree angle to the boat axis, and insert T-fitting into hole.
With feeling, swing coaming (horizontally!) to settle over
cockpit of boat. Spread coaming apart. At location of ribs 3 and 4
(4M), T-fittings now are pushed through grommets, to rest exactly
in top of center levers (fig. 5)
Swing rear sections of coaming towards cockpit, attach
T-fittings to top of rib 5, and join rear - end fitting to hook on top
of rib 6. When all T-fittings stick through all grommets, then push
(press) thick edge of deck into groove of coaming, from above, it is
best to start in center.
Sternpiece of coaming (boomerang):
Side with 4 screwheads has to face cockpit. Push one end
downward into track, until screwhead there settles into notch.
Hook up 4 grommets over 4
screwheads, then press other end into track, settle screwhead into
notch (fig. 6).

Inflation of airsponsons:
Important for good center positioning: On forward deck outside,
left & right of mast hole are two D-rings, below the D-rings are
two metal hooks. these have to engage below the top strut of
gunwale. this would be most important for use with sails, to
transfer stress to wood, else D-Rings might rip out. Reminder:
yes, you want to fill sponsons properly for good shaping of hull.
Before you inflate the tubes, please take care that the deck seam
lies on the deckbar and the gunwale tubes are not twisted. Now
inflate the air sponsons by turns right and left up to max 0.25 bar
this way, that the deck seam fits onto the deck bar. Mouth inflati-
on can never do harm, inflation with very simple foot bellows
(turtle, accordion type) is done with caution. Never, never use
compressed air.
Possible deformations of the tubes can be removed by milling
them by the hands. Be aware, that there is a natural variation of
air: in the cold air will shrink in volume, in hot sun air will expand
10%. Please do not overfill the tubes, especially if you have
an intensive sun. (tubes could explode because of too high
pressure)
While inflating, check that hooks inside (of D-rings) are secured
to frame. (IMPORTANT if sail gear is installed).
Only Quattro XT:
Inflate the upper sponsons first, lower ones next. Hull shape can
be altered by varying air pressures.
Placement of seats:
As you cannot look under the seat, it is best to place one finger at the thumbscreb, and one to the bolt screw in rear. Line up
thumb screw, let bolt screw drop into hole in bar, then lower front end. Push seat to rear, that thumbscrew gets into bar. Place
seat at comfortable position and secure it by turning the thumbscrew.
Attachment of backrests:
Front backrest is longer (17 _ in.), rear backrest is shorter (16 in.). the endcaps can do a quarter turn - open/close. Open end-
caps, slide from front to rear over T-fitting, then close with a quarter turn (fig. 9)
Attaching a spraycover:
All spraycovers are attached front first, rear next, then fasten the sides. Pointed front end (with strap below goes over mast-
hole bracket; rear end of cover over rear end of coaming, let 2 grommets go over the screwheads in rear. Press the velcro on
the coaming, spraycover is mounted.
Taking boat apart:
Deflate sponsons, which gives you slack, take out seats, backrests, stern of coaming. Use black rings (i. fig. 6) to pull edge out
of coaming slot (1, fig. 6). Remove coaming remember: 90 degree turn-out! Remove ribs 3,4 and 5, then 4 rods. Open up gun-
wales and keelboard, disengage. - Now pull out rear half, then front half.Take apart in reverse order of assembly.
How to pack boat into bags:
Logically, all long parts go into long bag. Place bag in grass, load from side. 2 keelboards on top of each other, hinges first. 4 gun-
wales side by side, hinges first. Coaming on top of keelboards (some wrap a towel around). 10 thin pieces as a bundle, with
outside of bag, held by cross-belts.
Hull bag: fold up hull first, pull bag over hull.Then soft sides of seats & bachrests against hull. Ribs, bow & stern, other small
items next.
Attaching a rudder assembly:
A good position for foot pedal is, if you are comfortable,
knees slightly bent, foot pedals rather vertical. Foot pedal: loo-
sen black starnut, open up moveable jaws on bottom, rubber
pad is heel rest, faces operator. Easiest: take out from seat,
keelboard is narrower there, attach to keelboard and slide
back towards rib 4, pad could rest on rib 4, now tighten black
starnut. - Hook up elastic band. Rudder blade: carry to stern
rudder bracket, match up teeth, push rudder pin from above,
there is a little catch spring. (fig. 8) Rudder cables: attach hook
at rear to holes in crosspiece, run chains through grommets
of boomerang (rear of coaming), stick plastic sleeve into
grommet like a

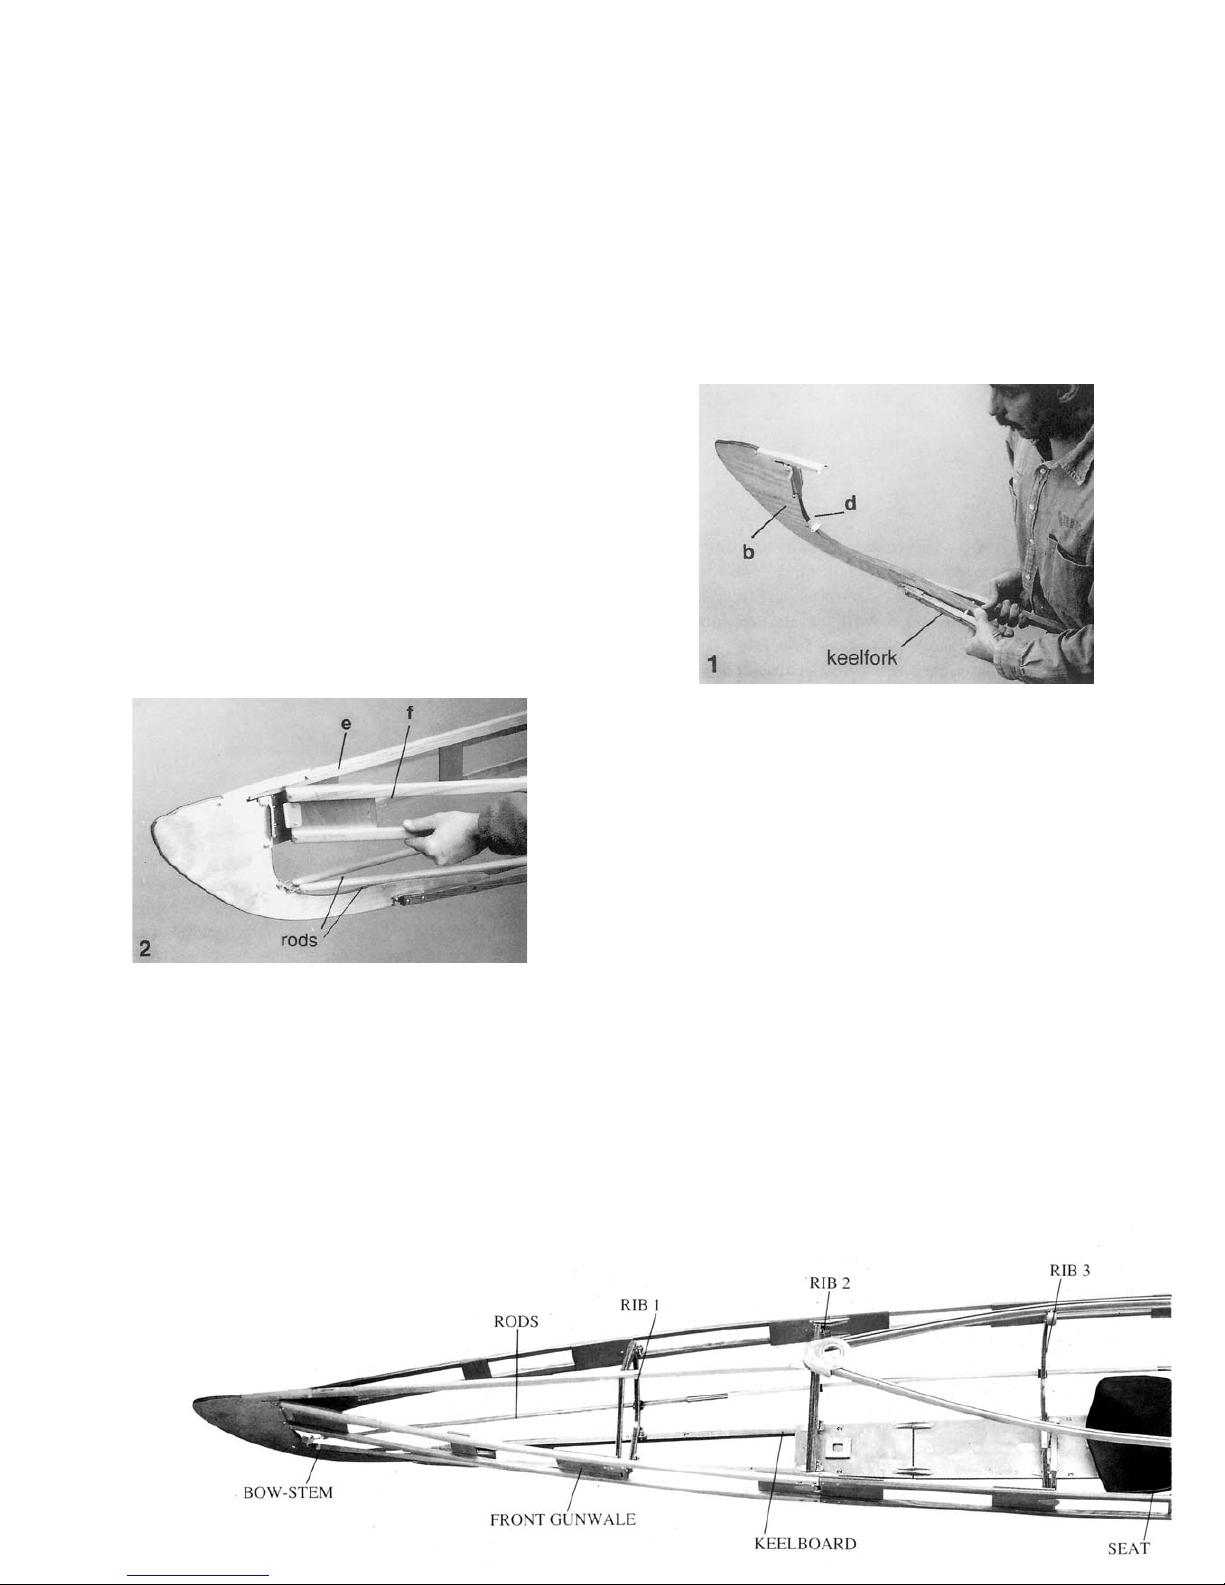
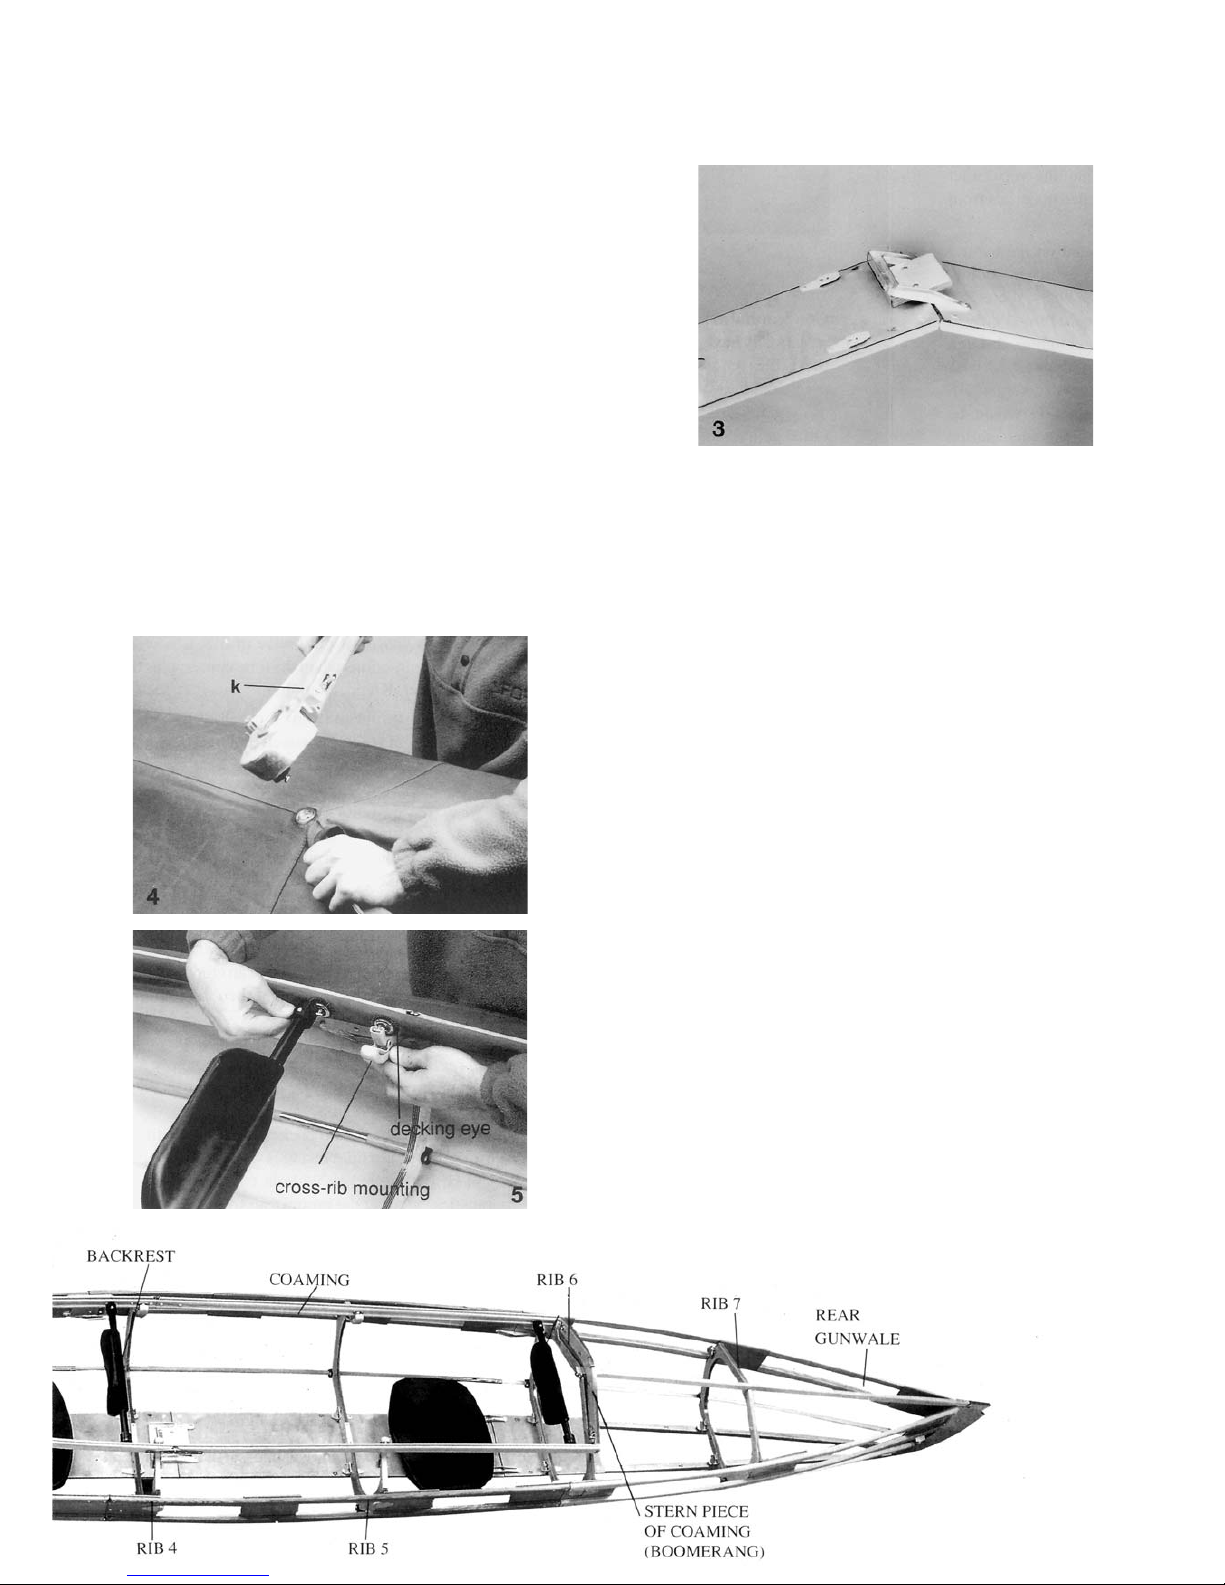
Proper folding of Boat Hull
1.) Lay out hull lengthwise (cockpit facing up) using a sponge, remove
sand and/or water from inside/outside of hull. If required, place rib
(vertical) under bow and stern deck to allow drying of material.
2.) Flatten hull once completely dry and clean, cockpit symmetrically
facing upwards.
3.a) Aerius XXL; II Expedition, Basic II, Magic II with keelstrips,
Quattro :
From the middle of long edge - fold edge of hull lengthwise toward cen-
ter, (approx. 20cm of hull bottom will be visible). Repeat at opposite side
and fold leaving 25cm lower keel protection unexposed.
b.) Aerius I Expedition, Basic I mit Kielstreifen, Aerius Tramp/2000 with
keelstrips Fold long edge toward center on both sides (approx. 20cm of lower hull material will show)
c.) Aerius Classic II (without keelstrips) + Basic II, Magic II without keelstrips Fold lengthwise toward center (both sides) equal
distances.
d.) Aerius Classic I, Basic I without keelstrips und AE Tramp/2000 without keelstrips Fold either side toward almost the cen-
ter of hull - without exposing the center keelstrip.
e.) Alu Lite
Close zipper and velcro enclosure. Fold (lengthwise) to almost halfway point (2 keelstrips are still totally visible).
4.) Flatten hull and remove unnecessary folds.
5.) Grab bow of hull and fold toward center. First folds: 135 cm (AE II) / 105 cm (AE I) / 90 cm (Alu-Lite) and so forth. Fold
this portion again in half to meet in center.
6. a.) Aerius I und Aerius II
Grab stern of hull and fold toward center. fold this portion again in half to meet in center.
b.) Alu-Lite Fold stern portion toward center of hull (approx. 90 cm) repeat folding bow section. Fold balance on top of each
other. Place in bag.
7.) To complete folding procedure, fold each half of folded hull on top of each other - creating a compact package that now
fits into hull carry bag.
How to care for a folding boat:
1) Typical storage:
Short-term or long term, clean and dry, in the packing bags, indoors, in a safe and favourable place. Do not avoid
assembly and take-apart, the more you do it, the easier it gets.
a) After the usual trip, boat would be somewhat wet here and there.Take out the woodwork, prop up front deck and rear
deck with a rib to allow better air circulation. Hull is self-drying, just needs air, little sun a little time.When dry, wipe out
sand and moisture, and take home dry and clean, in your car.
b) If it rains or if it is dark and can not dry outdoors, take it home wet - and in the next few days lay out the hull in backyard,
hallway or basement to let it dry properly. Under tightest conditions: 2 old chairs in small kitchen, lay hull over two chairs,
saves space.
c) Where to store? Usually store in a good section in basement, backroom, shop, or safe garage. Never on cement floor or
wall, always on a chair, carton, shelf, box, off the ground.Avoid extreme wetness or extreme heat. Not so good: in a barn,
woodshed, or open garage, there will be rodents!
d) Taking boat apart allows wood to relax, wood can dry nicely, sand comes out, hull material can dry. The most fastidious
owners keep a hull, gently folded, on a shelf in a dark room, but covered with a bed sheet.
2) Storage of assembled boat:This is not our favoured way to store, but we all do it during a busy season.We do not favor
it, as the assembled boat keeps sand, grit, moisture inside. But, if it suits your purposes, the preferred way is:
a) In basement, shop, garage, on 2 cartons or sawhorses, upside down, cockpit facing floor. Let the air out of sponsons, to
increase air circulation, and as you walk by, slap hull a little, which lets dry sand fall out.
b) Some owners store it „cockpit up, cockpit covered“: fine while on vacation , but long-term, there can be condensation
forming, and sand/grit stays in.
c) If you must keep it outdoors (no other choice), then get it off the ground (upside down) and find a good canvas cover, to
break UV rays. Plastic sticks.
d) If a boathouse is above the water, or next to the water (=high humidity), it would be most helpful to get boat out often
into wind and sun to avoid harm.
Thus: use the boat as much as you want, but keep it safe in long storage periods.Wet storage is harmful to the hull materials,
permanent wetness also causes harm to the wood.
This manual suits for next models
6
Table of contents
Other Klepper Boat manuals