Klip Xtreme KTM-500 User manual

Introduction:
1. Hardware kit
Thank you for purchasing the KTM-500 tabletop TV mount. This product is shipped with all
proper installation hardware and components. Upon opening the box, make sure that none
of these parts are missing and/or damaged before beginning installation.
KTM-500
Label
A
B
C
Item
Tempered glass
Bottom support pillar
Top support pillar
Quantity
1
1
1
Image
Tabletop TV mount
for flat and curved TVs.
User guide.

Note: The hardware provided is VESA compliant matching the whole specifications adopted by the
most widely known manufacturers of TV screens and monitors in the industry. However, certain devices
may require different sizes of screws and/or washers to attach the back panel to the mount. Any
additional hardware needed must be supplied separately by the user.
Label
D
E
F
G
H
I
J
K
L
M
M-A
M-B
M-C
M-D
M-E
M-F
M-G
M-H
N
O
P
Q
Item
Left TV plate
Right TV plate
TV mounting arms
Safety lock
Plastic plate
Plastic cover
Cable clips
Foot pads
M6x6 screws
M6x10 screws
M5x14 screws
M6x14 screws
M6x30 screws
M8x30 screws
M8x50 screws
Washers
5mm spacers
15mm spacers
M6x25 screws
M6x50 screw
Washers
M6 nuts
Quantity
1
1
2
2
1
1
2
4
4
3
4
4
4
4
4
4
8
8
3
1
3
3
Image
IMPORTANT:
At least two qualified people should perform the assembly procedure. Personal injury and/or
property damage can result from dropping or mishandling the display.
Maximum flat or curved panel weight: 88lb/40kg
III. WARNING!
• Prior to installing this product, you must read all instructions thoroughly. Keep these
installation instructions in an easily accessible location for future reference.
• Safety measures must be practiced at all times during the assembly of this product. Use
proper safety equipment and tools for the assembly procedure to prevent personal injury.
• KlipXtreme does not warrant against damage caused by the use of any Klip Xtreme mounts
for purposes other than those for which it was designed or damage caused by unauthorized
attachments or modifications, and is not responsible for any damages, claims, demands, suits,
actions or causes of action of whatever kind resulting from, arising out of or in any manner
relating to any such use, attachments or modifications.
IV. Assembling instructions
1. Peel the adhesive off the foot pads (K) and place each on the bottom of the tempered glass
(A) base at the corners.
Max load 88lb/40kg
40
kg
II. Tools required for installation
• Phillips screwdriver
K
A

2. Use the screwdriver to attach the M6x25 (N) screws to the glass base (A), the plastic plate
(H), and the bottom support pillar (B) using the M6 nuts (Q) and the washers (P).
3. Proceed to slide the top support pillar (C) into the bottom support pillar (B) and hold them
together using the screwdriver to fasten the M6x10 screws (M).
4. Attach the right TV plate (E) to the left TV plate (D) with the M6x6 screws (L).
5. Select the height at which you want to place your TV. Using the screwdriver, connect the
TV plate to the support pillar with the M6x50 screw (O). Then place the plastic cover (I)
on top of the support pillar.
B
H
P N
Q
C
M
L
D
E
O
I
OR OR

6. Attaching the TV mounting arms to the back of the screen
a Place your flat or curved TV side down on a soft, even surface, and identify the threaded
mounting points that are located on the back of the unit (VESA pattern).
b. Determine the correct screw size (M-A, M-B, M-C, M-D, M-E, M-F, M-G, M-H) by carefully
measuring the depth of the mounting point. Please note that not all the hardware included
will be used.
c. Place the TV mounting arms on the back of the TV and line up the screw holes.
d. Insert a mounting screw into a washer and plastic spacer, and hand tighten them onto the
mounting arm. Be careful not to overtighten the screws.
CAUTION: Verify the adequate thread engagement of the screw/spacer combination on
your TV to avoid damaging the unit.
Note: Please note that flat washers are not necessary when using M8 screws (M-D, M-E).
e. Finish tightening the screws using a screwdriver. Repeat this step for the other mounting arm.
7. Take the TV to the assembly area. Once the TV mounting arms are tightened to the TV,
proceed to place it on the TV stand selecting the height you wish to view.
8. Insert the safety locks on each side of the mounting arms and then tighten the screws.
Too long Too short
F
F
M-A
M-C
M-D
M-F
M-E
M-F
M-F M-F
M-B
M-G
M-H
M-G
M-H
OR OR
G

Technical specifications
MPN
Features
Mount type
TV type and size
Maximum load
Environment
Swivel angle
VESA standards (mm)
Cable management system
Physical appearance
Stand material
Base material
Color
Dimensions of the stand (LxW)
Dimensions of the base (LxW)
Weight
Additional Information
Warranty
KTM-500
Tabletop TV mount
37 - 70in flat and curved screens
88lb
Indoor
-35°~+35°
300×200, 200×200, 300×300, 400×200,
400×300, 400×400, 600×400
Yes
Steel
Tempered glass - glossy black
Black
23.6x17in
11x16.5in
14.7lb
Lifetime
KlipXtreme®is a registered trademark. All rights reserved.All other brand names and
trademarks are the property of their respective owners. Any mention of such is only intended
for identification purposes, and therefore shall not be construed as a claim to any or all rights
pertaining to those brands. Lifetime warranty against defects in materials and workmanship only.
Made in China.
9. Insert the cable clips (J) to the support pillar. Route the TV cable along the cable
management system, leaving enough slack to allow for proper movement.
10. Adjust the TV screen to the desired angle thus transforming your viewing experience.
J

Notas
Notes

KlipXtreme®es marca registrada.Todos los derechos reservados.Todas las demás marcas y
nombres comerciales son propiedad de sus respectivos dueños. Cualquier mención de los
mismos es por motivo de identificación solamente y por ende, no constituye reclamo alguno
a uno o a todos los derechos pertenecientes a tales marcas. La garantía de por vida es contra
defectos de fabricación y en los materiales solamente.
Fabricado en China.
Especificaciones técnicas
MPN
Características principales
Tipo
Tipo y tamaño de pantalla
Capacidad de carga
Características ambientales
Ángulo de rotación
Especificación VESA (mm)
Sistema de administración de cables
Características físicas
Material del soporte
Material de la base
Color
Dimensiones del soporte (LaxAn)
Dimensiones de la base (LaxAn)
Peso
Información adicional
Garantía
KTM-500
Soporte de sobremesa
Pantallas planas y curvas de 37 a 70 pulgadas
40kg
Para interior
-35°~+35°
300×200, 200×200, 300×300, 400×200,
400×300, 400×400, 600×400
Sí
Acero
Vidrio templado
Negro
60x43,4cm
28x42cm
6,68kg
De por vida
9. Inserte los ganchos para cables (J) en el pilar de soporte. Guíe los cables del televisor
dentro del sistema de administración de cables dejando suficiente espacio para habilitar los
movimientos adecuados.
10. Ajuste la pantalla del televisor al ángulo deseado para transformar su experiencia de
ver televisión.
J

6. Fijación de los brazos de montaje en la parte posterior de la pantalla
a Coloque la pantalla plana o curva hacia abajo sobre una superficie suave y lisa para localizar
los puntos de montaje en la parte posterior de la unidad (especificación VESA).
b. Mida cuidadosamente la profundidad de los agujeros en la parte posterior de la pantalla
para determinar el tornillo con la longitud adecuada (M-A, M-B, M-C, M-D, M-E, M-F, M-G,
M-H). Considere que no necesitará usar todos los herrajes que se suministran.
c. Coloque los brazos de montaje en la parte posterior de la pantalla y hágalos coincidir con
los agujeros de los tornillos.
d. Coloque un tornillo de montaje con una arandela y un espaciador, si fuera necesario, y
ajústelos manualmente en el brazo de montaje. Recuerde de no ejercer demasiada presión
al fijar los tornillos.
ADVERTENCIA: Verifique que la combinación entre el tornillo de rosca y el espaciador
sea la correcta para su televisor con el fin de evitar dañar la unidad.
Nota: Tenga en cuenta que no se necesitan arandelas planas cuando se usan tornillos M8
(M-D, M-E)
e. ara terminar ajuste los tornillos con un destornillador. Repita este paso para el otro brazo de
montaje.
7. Lleve el televisor al área de ensamblaje. Una vez que los brazos de montaje están ajustados
al televisor proceda a colocarlo en el soporte seleccionando la altura que desea.
8. Coloque las cerraduras de seguridad en cada lado de los brazos de montaje y luego apriete
los tornillos.
Too long Too short
F
F
M-A
M-C
M-D
M-F
M-E
M-F
M-F M-F
M-B
M-G
M-H
M-G
M-H
OR OR
G

2. Utilice el destornillador para fijar los tornillos M6x25 (N) a la base de vidrio templado (A), la
placa de plástico (H) y el pilar de soporte inferior (B) usando las tuercas M6 (Q) y las
arandelas planas (P).
3. Proceda a deslizar el pilar de soporte superior (C) en el pilar de soporte inferior (B) y
únalos usando el destornillador para apretar los tornillos M6x10 (M).
4. Fije la placa izquierda para el televisor (D) a la placa derecha para el televisor (E) con los
tornillos M6x6 (L).
5. Elija la altura en la cual desea instalar el televisor. Atornille la placa para el televisor al pilar
de soporte utilizando el tornillo M6x50 (O). Luego coloque la cubierta de plástico (I)
encima del pilar de soporte.
B
H
P N
Q
C
M
L
D
E
O
I
OR OR

Nota: Los herrajes suministrados son compatibles con VESA conforme a las especificaciones adoptadas
por los fabricantes más reconocidos de pantallas de televisión y monitores de la industria. Sin embargo,
es possible que ciertos dispositivos requieran diferentes clases de tornillos y arandelas para poder
asegurar la parte posterior del panel con el soporte. Cualquier accesorio de montaje adicional debe ser
suministrado por el usuario.
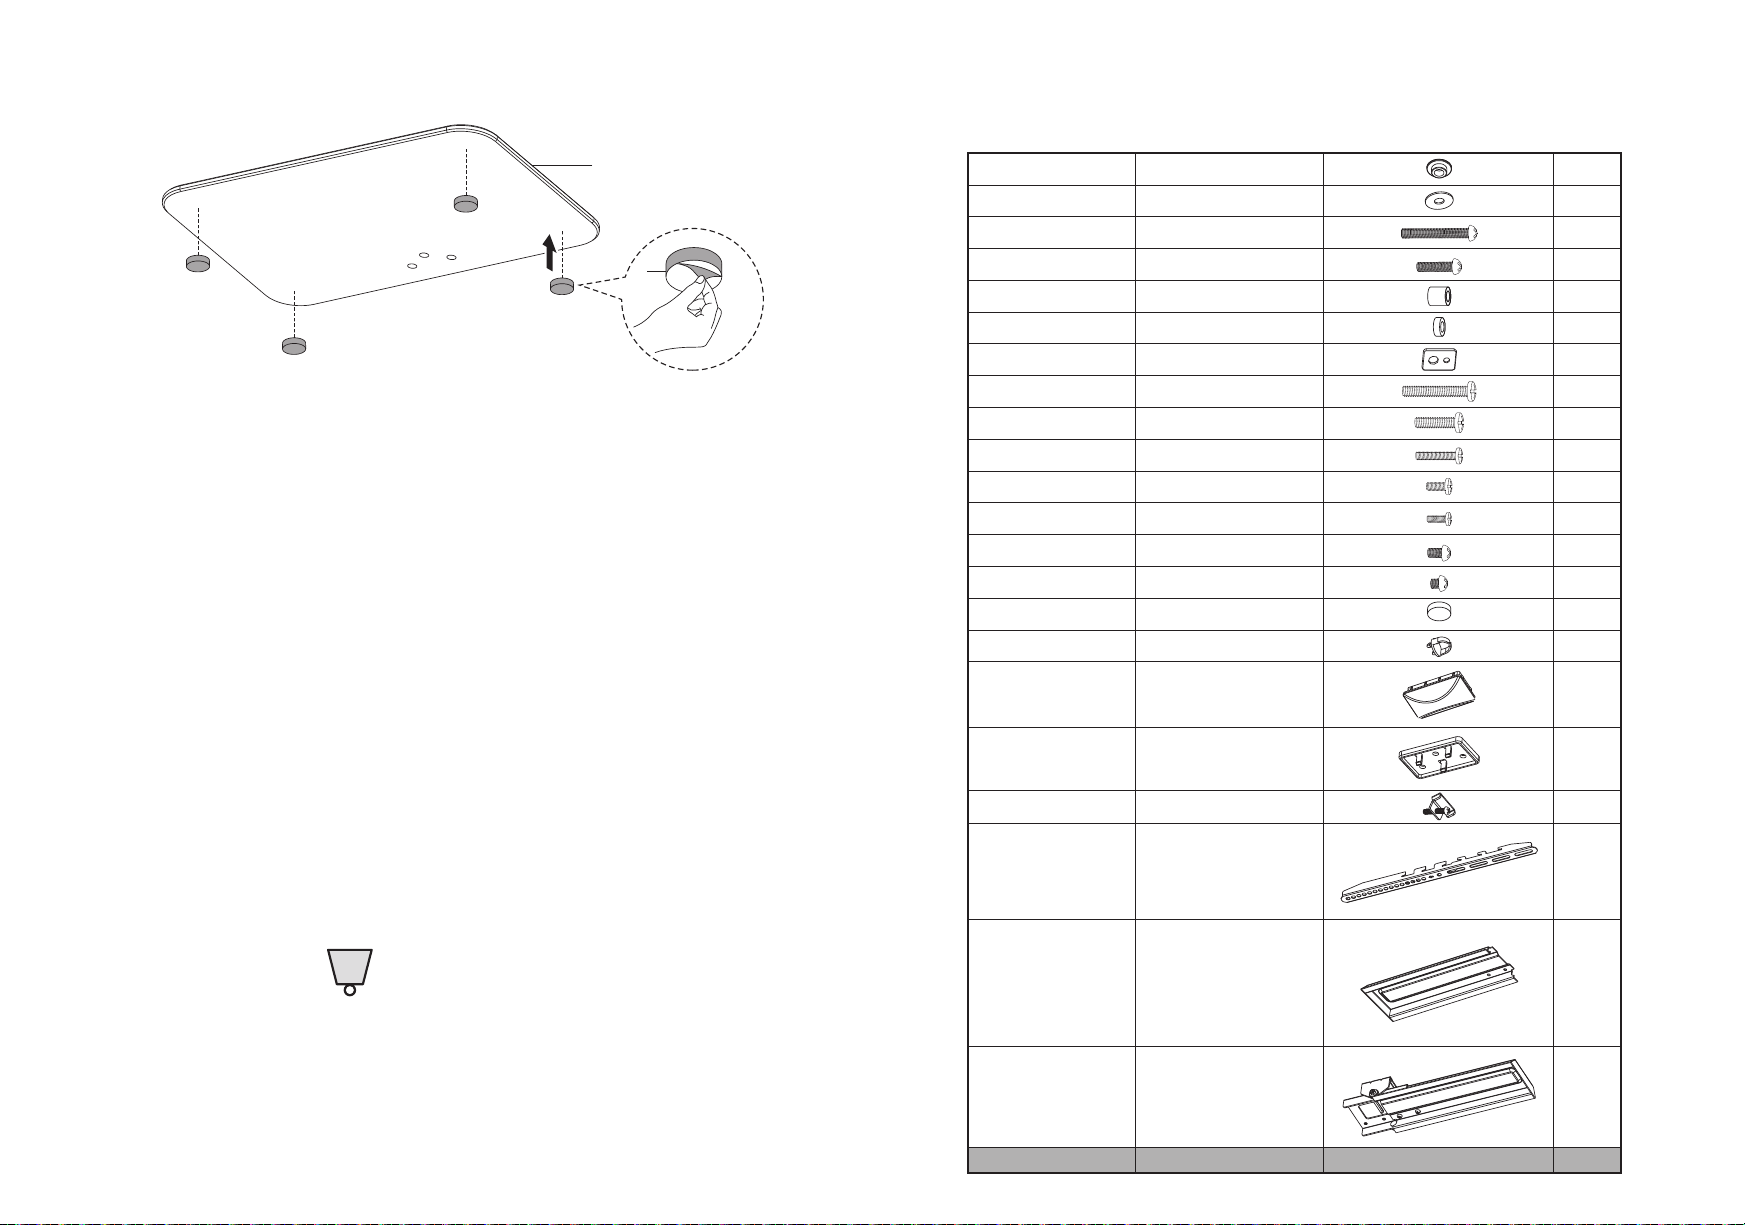
Label
D
E
F
G
H
I
J
K
L
M
M-A
M-B
M-C
M-D
M-E
M-F
M-G
M-H
N
O
P
Q
Item
Placa izquierda
para el televisor
Placa derecha
para el televisor
Brazos de montaje
para el televisor
Cerraduras de seguridad
Placa de plástico
Cubierta de plástico
Ganchos para cables
Almohadillas de silicona
Tornillos M6x6
Tornillos M6x10
Tornillos M5x14
Tornillos M6x14
Tornillos M6x30
Tornillos M8x30
Tornillos M8x50
Placas de anclaje
Espaciadores de 5mm
Espaciadores de 15mm
Tornillos M6x25
Tornillo M6x50
Arandelas planas
Tuercas M6
Quantity
1
1
2
2
1
1
2
4
4
3
4
4
4
4
4
4
8
8
3
1
3
3
Image
IMPORTANTE:
El proceso de ensamblaje debe ser ejecutado por al menos dos personas capacitadas. El
manejo inadecuado o el montaje defectuoso de la unidad pudiera ocasionar lesiones físicas o
daños materiales.
Peso máximo del panel plano o curvo: 88lb/40kg
III. ¡ADVERTENCIA!
• Antes de proceder con la instalación, lea todo el manual detenidamente. Mantenga estas
instrucciones de instalación en un lugar accessible, con el fin de utilizarlas como referencia
en el futuro.
• Debe practicar todas las medidas de seguridad pertinentes durante todo el proceso de
ensamblaje del producto. Con el objeto de evitar lesiones físicas, utilice herramientas y
equipos de protección adecuados para ensamblar el producto. Con el objeto de evitar
lesiones físicas, utilice herramientas y equipos de protección adecuados para ensamblar el
producto.
• KlipXtreme no se hace responsible de cualquier daño ocasionado por el uso indebido de
un soporte KlipXtreme o de cualquier daño product de una conexión o modificación no
autorizada como tampoco assume responsabilidad alguna por perjuicios, reclamos, demandas,
acciones judiciales o encausamientos de cualquier índole que surjan, se originen o de
cualquier otra forma estén vinculados con dicha utilización, conexión o modificación.
IV. Instrucciones de ensamblaje
1. Remueva la cinta adhesiva (K) de las almohadillas de silicona y colóquelas en las esquinas
del vidrio templado (A).
Max load 88lb/40kg
40
kg
II. Herramientas necesarias para la instalación
• Destornillador Phillips
K
A

Introducción:
1. Kit de herrajes
Gracias por preferir el soporte de sobremesa para televisores de pantalla plana o curva KTM-500.
Este producto viene con todos los herrajes y componentes necesarios para su instalación.Cuando
abra el empaque, verifique la condición y cantidad de las piezas mencionadas en la lista antes de
comenzar la instalación.
KTM-500
Etiqueta
A
B
C
Descripción
Vidrio templado
Pilar de soporte inferior
Pilar de soporte superior
Cantidad
1
1
1
Imagen
Soporte de sobremesa
para televisores de pantalla
plana o curva.
Manual del usuario.
Table of contents
Other Klip Xtreme TV Mount manuals
Popular TV Mount manuals by other brands

Mustang
Mustang MPA-M44U instruction manual

Ecco
Ecco EZ1012 Installation and operation instructions

Panasonic
Panasonic TY-WK42PV3U Service manual

KSL
KSL UKR2EP448 quick start guide

PEERLESS
PEERLESS Smartmount ST630P and assembly Installation and assembly manual

SIIG
SIIG Universal Tilting TV Mount - 23" to 42 installation instructions