Klugmann Luxus User manual

Lamira 481
Luxus
Cooker Hoods
INSTRUCTION MAN
Klugmann Hausgeraete GmbH.
Gropiusstraße 7,
48163 Münster, Deutschland
+49 (0)2501 - 963 5732
+49 (0)2501 - 963 1834
service@klugmann-hausgeraete.de
www.klugmann-hausgeraete.de

Instruction on mounting and use - 3
900
90
415
210
260
430 480 min 140
max 300
.
.
min. max.1050 - 1210
A
ELECTRICAL 550
GAS 650
Y
X
B
A=485
X=173
Y
X
1
5
3
2
6a
4

4- Instruction on mounting and use
X=80
B=520
Y
X
2 x 8
10mm
2x
8 x 40mm
2x
4.5 x 50mm
2 x 8
10 cm
16 cm
6b
9
8a
7
10
8b

Instruction on mounting and use - 5
>1 cm
>30 cm
16 cm
W cm
220-240V
50-60Hz
W -2 cm
>30 cm
>1 cm
11
14b
13
12
15a
14a

6- Instruction on mounting and use
3x
4 x 16mm
4x 3.9 x 9.5
15b
19
17
20
18
16

Instruction on mounting and use - 7
1
4
12V 3W LED
21
23
22

8- Instruction on mounting and use
Closely follow the instructions set out in this
manual. All responsibility, for any eventual incon-
veniences, damages or fires caused by not comply-
ing with the instructions in this manual, is declined.
The extractor hood has been designed exclusively
for domestic use.
The hood can look different to that illustrated in
the drawings in this booklet. The instructions for
use, maintenance and installation, however, re-
main the same.
! It is important to conserve this booklet for consul-
tation at any moment. In the case of sale, cession
or move, make sure it is together with the product.
! Read the instructions carefully: there is important
information about installation, use and safety.
! Do not carry out electrical or mechanical varia-
tions on the product or on the discharge conduits.
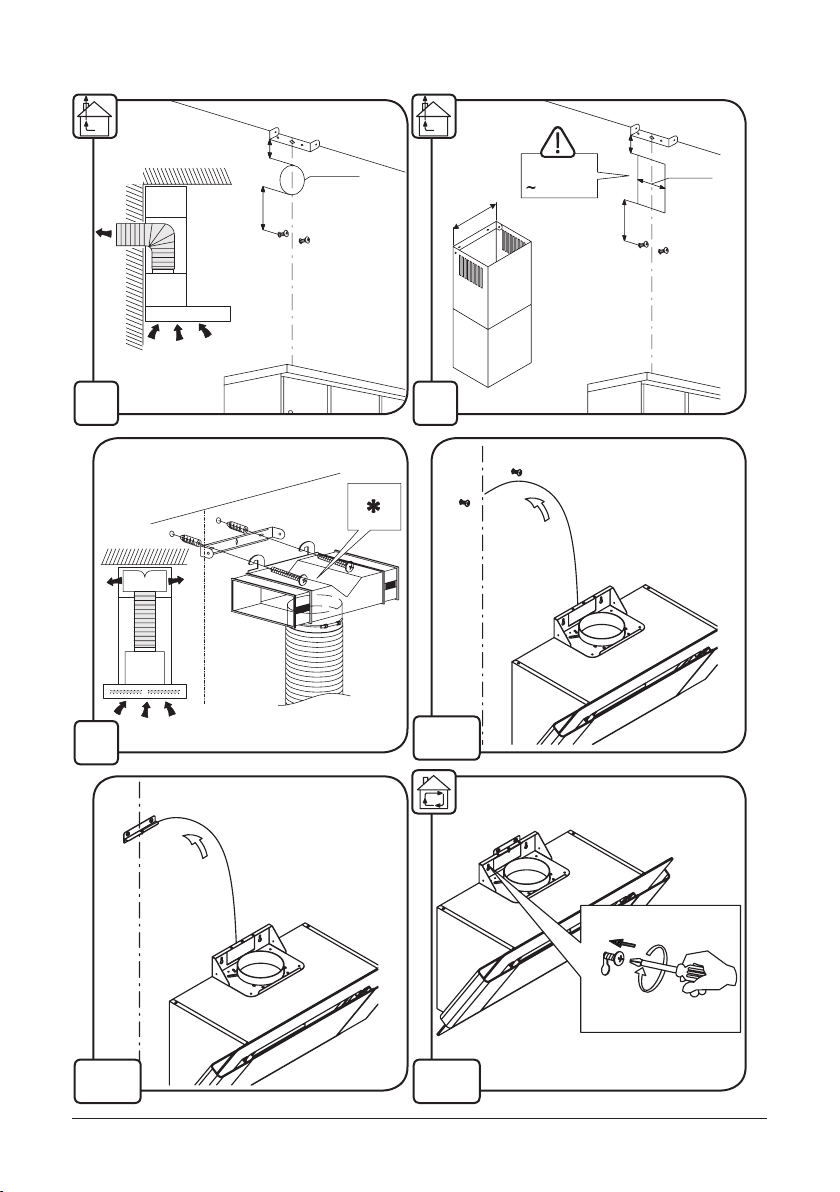
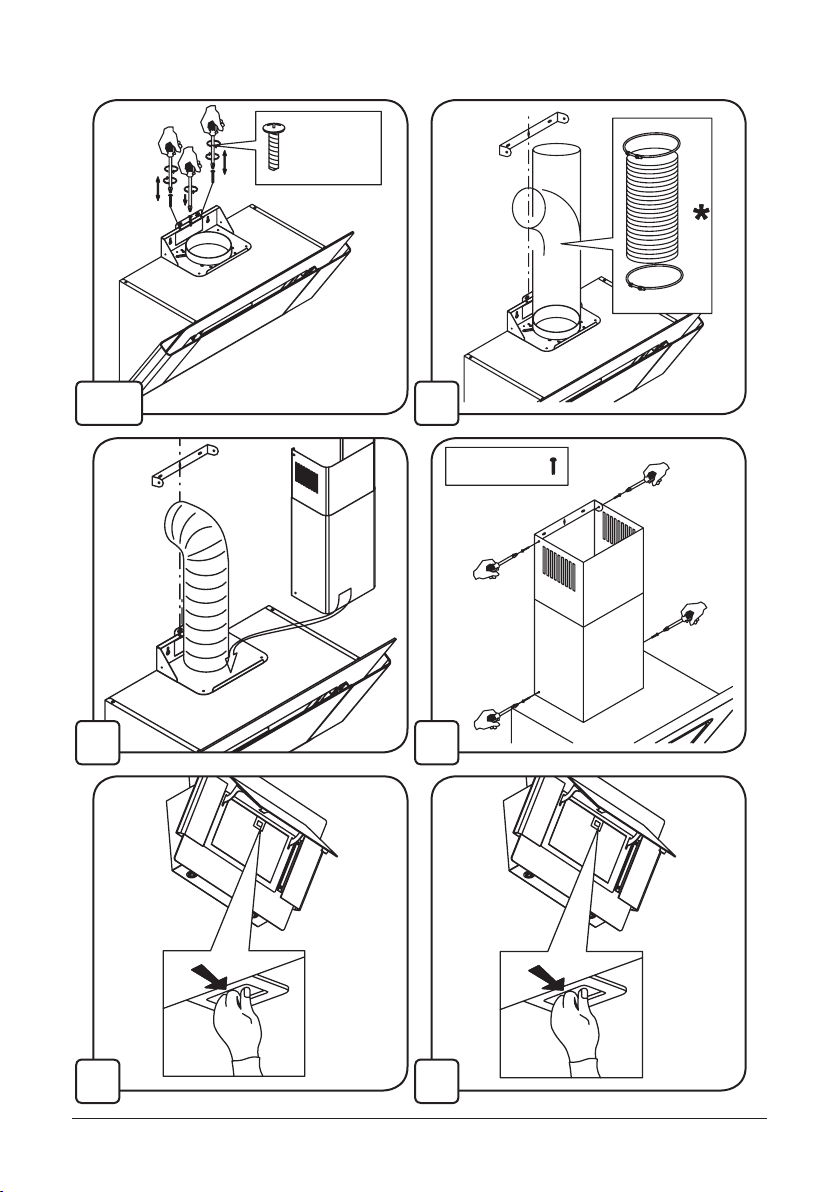
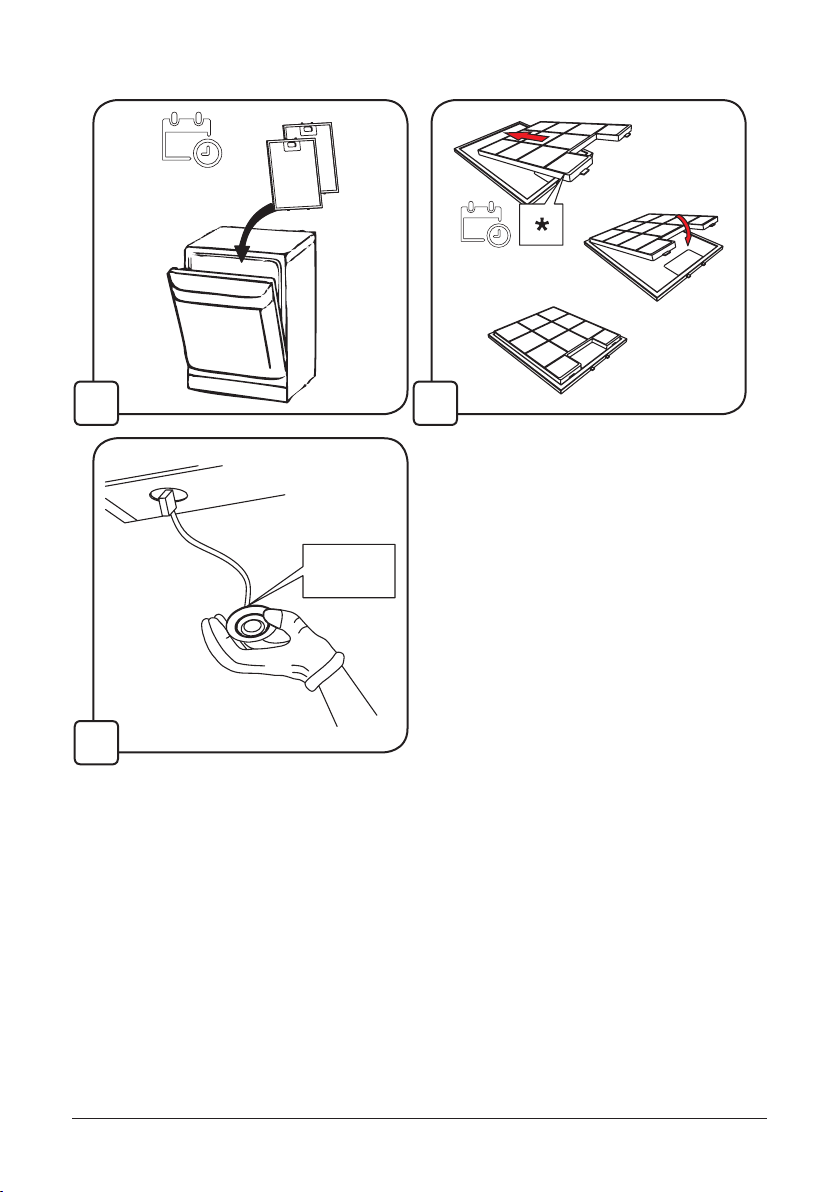
Note: the elements marked with the symbol “(*)”
are optional accessories supplied only with some
models or elements to purchase, not supplied.
Caution
• WARNING! Do not connect the appliance to the
mains until the installation is fully complete.
• Before any cleaning or maintenance operation,
disconnect hood from the mains by removing the
plug or disconnecting the mains electrical supply.
• Always wear work gloves for all installation and
maintenance operations.
• The appliance is not intended for use by children
or persons with impaired physical, sensorial or
mental faculties, or if lacking in experience or
knowledge, unless they are under supervision or

Instruction on mounting and use - 9
have been trained in the use of the appliance by
a person responsible for their safety.
• This appliance is designed to be operated by
adults, children should be monitored to ensure
that they do not play with the appliance.
• This appliance is designed to be operated by
adults. Children should not be allowed to tamper
with the controls or play with the appliance.
• Never use the hood without effectively mounted
grating!
• The hood must NEVER be used as a support sur-
face unless specifically indicated.
• The premises where the appliance is installed
must be sufficiently ventilated, when the kitchen
hood is used together with other gas combustion
devices or other fuels.
• The ducting system for this appliance must not
be connected to any existing ventilation system
which is being used for any other purpose such
as discharging exhaust fumes from appliances
burning gas or other fuels.
• The flaming of foods beneath the hood itself is se-
verely prohibited.
• The use of exposed flames is detrimental to the fil-
ters and may cause a fire risk, and must therefore
be avoided in all circumstances.
• Any frying must be done with care in order to make
sure that the oil does not overheat and ignite.
• Accessible parts of the hood may became hot
when used with cooking appliance.
• With regards to the technical and safety measures
to be adopted for fume discharging it is important
to closely follow the regulations provided by the

10 - Instruction on mounting and use
local authorities.
• The hood must be regularly cleaned on both the
inside and outside (AT LEAST ONCE A MONTH).
• This must be completed in accordance with the
maintenance instructions provided in this manu-
al). Failure to follow the instructions provided in
this user guide regarding the cleaning of the hood
and filters will lead to the risk of fires.
• Do not use or leave the hood without the lamp cor-
rectly mounted due to the possible risk of electric
shocks.
• We will not accept any responsibility for any faults,
damage or fires caused to the appliance as a re-
sult of the non-observance of the instructions in-
cluded in this manual.
This appliance is marked according to the European
directive 2012/19/UE on Waste Electrical and Elec-
tronic Equipment (WEEE). By ensuring this product
is disposed of correctly, you will help prevent poten-
tial negative consequences for the environment and
human health, which could otherwise be caused by
inappropriate waste handling of this product.
The symbol on the product, or on the documents accompanying
the product, indicates that this appliance may not be treated as household
waste. Instead it should be taken to the appropriate collection point for the
recycling of electrical and electronic equipment. Disposal must be carried
out in accordance with local environmental regulations for waste disposal.
For further detailed information regarding the process, collection and re-
cycling of this product, please contact the appropriate department of your
local authorities or the local department for household waste or the shop
where you purchased this product.

Instruction on mounting and use - 11
Use
The hood is designed to be used either for exhausting or filter version.
The models with no suction motor only operate in ducting mode, and must
be connected to an external suction device (not supplied).
The connecting instructions are supplied with the peripheral suction unit.
Ducting version
In this case the fumes are conveyed outside of the building by means of
a special pipe connected with the connection ring located on top of the hood.
Attention! The exhausting pipe is not supplied and must be purchased apart.
Diameter of the exhausting pipe must be equal to that of the connection ring.
In the horizontal runs the exhausting pipe must be slightly slanted (about
10°) and directed upwards to vent the air easily from the room to the outside.
Attention! If the hood is supplied with active charcoal filter, then it must be
removed.
Connect the hood and discharge holes on the walls with a diameter equiva-
lent to the air outlet (connection flange).
Using the tubes and discharge holes on walls with smaller dimensions will
cause a diminution of the suction performance and a drastic increase in
noise.
Any responsibility in the matter is therefore declined.
! Use a duct of the minimum indispensible length.
! Use a duct with as few elbows as possible (maximum elbow angle: 90°).
! Avoid drastic changes in the duct cross-section.
! Use a duct with an as smooth as possible inside.
! The duct must be made of certified material.
Filter version
One active charcoal filter is needed for this and can be obtained from your
usual retailer.
The filter removes the grease and smells from the extracted air before send-
ing it back into the room through the upper outlet grid.
Installation
The minimum distance between the supporting surface for the cooking
equipment on the hob and the lowest part of the range hood must be not
less than 50cm from electric cookers and 65cm from gas or mixed cookers.
If the instructions for installation for the gas hob specify a greater distance,
this must be adhered to.

12 - Instruction on mounting and use
Electrical connection
The mains power supply must correspond to the rating indicated on the plate
situated inside the hood. If provided with a plug connect the hood to a socket
in compliance with current regulations and positioned in an accessible area,
after installation. If it not fitted with a plug (direct mains connection) or if the
plug is not located in an accessible area, after installation, apply a double
pole switch in accordance with standards which assures the complete dis-
connection of the mains under conditions relating to over-current category
III, in accordance with installation instructions.
Warning! Before re-connecting the hood circuit to the mains supply and
checking the efficient function, always check that the mains cable is correct-
ly assembled.
The hood is provided with a special power cable; if the cable is damaged,
request a new one from Technical Service.
Mounting
Expansion wall plugs are provided to secure the hood to most types of
walls/ceilings. However, a qualified technician must verify suitability of the
materials in accordance with the type of wall/ceiling. The wall/ceiling must
be strong enough to take the weight of the hood. Do not tile, grout or silicone
this appliance to the wall. Surface mounting only.
Operation
Use the high suction speed in cases of concentrated kitchen vapours. It is
recommended that the cooker hood suction is switched on for 5 minutes
prior to cooking and to leave in operation during cooking and for another 15
minutes approximately after terminating cooking.
1. OFF motor
Pressing the button during functioning, the hood turns OFF.
2. Speed Increase
Pressing the button the hood passes from the OFF state to speed 1.
Pressing the button (hood in ON state) the motor speed is increased
from speed 1 to intensive.
To each speed corresponds the ignition of the respective led.
1234 5

Instruction on mounting and use - 13
Speed 1: 1
Speed 2: 2
Speed 3: 3
Speed 4: 4
Speed 5: 5
3. Function state indicator
4. Speed timing
5. ON/OFF lights
Speed Timing
Timer: to enable programming automatic switch off at any given time be-
tween 10 and 90 minutes, with 10-minute increments.
- To enable programming function, turn the engine on using the “+” button to
the level you want, and then press the button to program the switch-off time.
The display will show a blinking 0, which means, that the time programming
mode was entered.
- Select the automatic switch-off time using the “+” button, keeping in mind,
that the number on the display, multiplied by the 10-minut interval, means the
time of automatic switch-off (e.g. 1=10 min, 2=20 min, 3=30min, etc.)
- With the auto switch-off timer set, confirm the setting using the timer button,
the display will stop blinking and will show the previously selected speed,
and the blinking dot next to the speed will show the switch-off time. You can
cancel the automatic switchoff function by pressing the timer button again
while the time is counted down.
Caution: Timer programming should be completed within 20 sesonds, oth-
erwise no action will be taken, and the hood will resume operation in normal
mode.
Maintenance
ATTENTION! Before performing any maintenance operation, isolate the
hood from the electrical supply by switching off at the connector and remov-
ing the connector fuse.
Or if the appliance has been connected through a plug and socket, then the
plug must be removed from the socket.
Cleaning
The cooker hood should be cleaned regularly (at least with the same fre-
quency with which you carry out maintenance of the fat filters) internally and
externally. Clean using the cloth dampened with neutral liquid detergent. Do
not use abrasive products. DO NOT USE ALCOHOL!
WARNING: Failure to carry out the basic cleaning recommendations of the
cooker hood and replacement of the filters may cause fire risks.

14 - Instruction on mounting and use
Therefore, we recommend observing these instructions.
The manufacturer declines all responsibility for any damage to the motor or
any fire damage linked to inappropriate maintenance or failure to observe
the above safety recommendations.
Grease filter
Traps cooking grease particles.
This must be cleaned once a month (or when the filter saturation indication
system – if envisaged on the model in possession – indicates this necessity)
using non aggressive detergents, either by hand or in the dishwasher, which
must be set to a low temperature and a short cycle.
When washed in a dishwasher, the grease filter may discolour slightly, but
this does not affect its filtering capacity.
To remove the grease filter, pull the spring release handle.
Replacing lamps
Disconnect the hood from the electricity.
Warning! Prior to touching the light bulbs ensure they are cooled down.
See Figure 23 for details how to replace lights. Use incandescent / halogen
/ LED modules of the same specification as those factory-installed in the
appliance.
If the lights do not work, make sure that the lamps are fitted properly into
their housings before you call for technical assistance.

3

4
X
Y
2 x 8
6b 7
8a 8b
10 cm
16 cm
2 x 8
4 - Instruction on mounting and use
2x
2x
8 x 40mm
4.5 x 50mm
9
10

5
>1 cm
>1 cm
16 cm
220-240V
W -2 cm
50-60Hz
>30 cm
W cm
>30 cm
11 12
13 14a
14b 15a
Instruction on mounting and use - 5

6
3x
4 x 16mm
15b 16
4x 3.9 x 9.5
17 18
19 20
6 - Instruction on mounting and use

7
21 22
12V 3W LED
23

8
.بﺛﻛ نﻋ لﯾﻟدﻟا اذھ ﻲﻓ ةدراوﻟا تﺎﻣﯾﻠﻌﺗﻟا ﻊﺑﺗا
مازﺗﻟﻻا مدﻋ نﻋ ﺔﺟﺗﺎﻧ ﻖﺋارﺣ وأ رارﺿأ وأ تﺎﻘﯾﺎﺿﻣ ىأ نﻋ ﺔﻟوﺋﺳﻣ رﯾﻏ ﺔﻛرﺷﻟا
.لﯾﻟدﻟا اذھ ﻲﻓ ةدراوﻟا تﺎﻣﯾﻠﻌﺗﻟﺎﺑ
ﻲﻟزﻧﻣﻟا مادﺧﺗﺳﻼﻟ صﺻﺧﻣ وھو رﺎﺧﺑﻟاو ﻲﮭطﻟا ةرﺧﺑأ طﻔﺷ لﺟأ نﻣزﺎﮭﺟﻟا مﯾﻣﺻﺗ مﺗ
.طﻘﻓ
اذھ ﻲﻓ ةدوﺟوﻣﻟا تﺎﻣوﺳرﻟا ﻲﻓ ﺢﺿوﻣﻟا كﻟذ نﻋ ﺎًﻔﻠﺗﺧﻣزﺎﮭﺟﻟا ودﺑﯾ نأ نﻛﻣﯾ .بﯾﺗﻛﻟا
.ﻲھ ﺎﻣﻛ تﯾﺑﺛﺗﻟاو ﺔﻧﺎﯾﺻﻟاو مادﺧﺗﺳﻻا تﺎﻣﯾﻠﻌﺗ لظﺗ ، كﻟذ ﻊﻣو
وأ لزﺎﻧﺗﻟا وأ ﻊﯾﺑﻟا ﺔﻟﺎﺣ ﻲﻓ .ﺔظﺣﻟ يأ ﻲﻓ روﺎﺷﺗﻠﻟ بﯾﺗﻛﻟا اذھ ﻰﻠﻋ ظﺎﻔﺣﻟا مﮭﻣﻟا نﻣ !
.ﺞﺗﻧﻣﻟا ﻊﻣ ﮫﻧأ نﻣ دﻛﺄﺗ ، لﻘﻧﻟا
.ﺔﻣﻼﺳﻟاو مادﺧﺗﺳﻻاو تﯾﺑﺛﺗﻟا لوﺣ ﺔﻣﮭﻣ تﺎﻣوﻠﻌﻣ كﺎﻧھ :ﺔﯾﺎﻧﻌﺑ تﺎﻣﯾﻠﻌﺗﻟا أرﻗا !!
.ﻎﯾرﻔﺗﻟا تاوﻧﻗ ﻰﻠﻋ وأ ﺞﺗﻧﻣﻟا ﻰﻠﻋ ﺔﯾﻛﯾﻧﺎﻛﯾﻣ وأ ﺔﯾﺋﺎﺑرﮭﻛ تارﯾﯾﻐﺗ ءارﺟﺈﺑ مﻘﺗ ﻻ !!
، كﻟذ فﻼﺧ .تﺎﻧوﻛﻣﻟا ﻊﯾﻣﺟ فﻠﺗ مدﻋ نﻣ دﻛﺄﺗ ، زﺎﮭﺟﻟا تﯾﺑﺛﺗ ﻲﻓ عورﺷﻟا لﺑﻗ !!
لﯾﻛوﻟﺎﺑ لﺻﺗا.تﯾﺑﺛﺗﻟا ﺔﯾﻠﻣﻋ ﻊﺑﺎﺗﺗ ﻻو
ﺎھرﯾﻓوﺗ مﺗﯾ ﺔﯾرﺎﯾﺗﺧا تﺎﻘﺣﻠﻣ نﻋ ةرﺎﺑﻋ ﻲھ "(*)" زﻣرﻟا لﻣﺣﺗ ﻲﺗﻟا رﺻﺎﻧﻌﻟا :ﺔظﺣﻼﻣ
.ﺎھرﯾﻓوﺗ مﺗﯾ ﻻ ﻲﺗﻟاو ، ﺎھؤارﺷ مﺗﯾﺳ ﻲﺗﻟا رﺻﺎﻧﻌﻟا وأ تازارطﻟا ضﻌﺑ ﻊﻣ طﻘﻓ
رذﺣﻟا
• !رﯾذﺣﺗ
تﯾﺑﺛﺗﻟا لﻣﺗﻛﯾ ﻰﺗﺣ ﻲﺋﺎﺑرﮭﻛﻟا رﺎﯾﺗﻟﺎﺑ زﺎﮭﺟﻟا لﯾﺻوﺗﺑ مﻘﺗ ﻻ. •
ﺔﻟازإ ﻖﯾرط نﻋ ﻲﺋﺎﺑرﮭﻛﻟا رﺎﯾﺗﻟا نﻋ ءﺎطﻐﻟا لﺻﻓا ، ﺔﻧﺎﯾﺻ وأ فﯾظﻧﺗ ﺔﯾﻠﻣﻋ يأ لﺑﻗ
ﻲﺋﺎﺑرﮭﻛﻟا رﺎﯾﺗﻟا نﻋ ﻲﺋﺎﺑرﮭﻛﻟا رﺎﯾﺗﻟا لﺻﻓ وأ سﺑﺎﻘﻟا. •
ﺔﻧﺎﯾﺻﻟاو تﯾﺑﺛﺗﻟا تﺎﯾﻠﻣﻋ ﻊﯾﻣﺟﻟ ﺎًﻣﺋاد لﻣﻌﻟا تازﺎﻔﻗ دﺗرا.
•ﺑﻟا تاردﻘﻟا يوذ صﺎﺧﺷﻷا وأ لﺎﻔطﻷا لﺑﻗ نﻣ مادﺧﺗﺳﻼﻟ صﺻﺧﻣ رﯾﻏ زﺎﮭﺟﻟا وأ ﺔﯾﻧد
ﺔﯾﺳﺣﻟاوأ وأ ، ﺔﯾﻠﻘﻌﻟاﻲﻓﺔﻟﺎﺣصﻘﻧ فارﺷإ تﺣﺗ نﻛﺗ مﻟ ﺎﻣ ، ﺔﻓرﻌﻣﻟا وأ ةرﺑﺧﻟا
وأمﺗمﮭﺑﯾردﺗﻰﻠﻋمادﺧﺗﺳازﺎﮭﺟﻟانﻣلﺑﻗصﺧﺷلوؤﺳﻣنﻋمﮭﺗﻣﻼﺳ.

9
•مﺗمﯾﻣﺻﺗاذھزﺎﮭﺟﻟامﺗﯾﻟﮫﻠﯾﻐﺷﺗنﻣلﺑﻗنﯾﻐﻟﺎﺑﻟا،بﺟﯾوﺔﺑﻗارﻣلﺎﻔطﻷادﻛﺄﺗﻠﻟنﻣ مﮭﻧأﻻنوﺑﻌﻠﯾﻊﻣزﺎﮭﺟﻟا.
•مﺗمﯾﻣﺻﺗاذھزﺎﮭﺟﻟامﺗﯾﻟﮫﻠﯾﻐﺷﺗنﻣلﺑﻗنﯾﻐﻟﺎﺑﻟا.بﺟﯾمدﻋحﺎﻣﺳﻟالﺎﻔطﻸﻟبﻋﻼﺗﻟﺎﺑ رﺻﺎﻧﻌﺑمﻛﺣﺗﻟاوأبﻌﻠﻟازﺎﮭﺟﻟﺎﺑ.
•ﺧﺗﺳﺗ ﻻ مدﻗط ﺔﻌاﻐﻟطﺎأ ءﺑ نود اًد.ﺔﯾﻠﻋﺎﻔﺑ ﺔﻛﺑﺷﻟا تﯾﺑﺛﺗ
•بﺟﯾأ ﻻمﺗﯾ مﻟ ﺎﻣ ةددﺣﻣ مﻋد ةدﺣوﻛ ًادﺑأ مدﺧﺗﺳﯾاﺎﺷﻹإ ةر ﯽﻟذﻟ كﮐﺷﺑ لﺎﺧ.ص
•ﺐﺠﯾنأﻢﺘﯾﺔﯾﻮﮭﺗاﺎﻜﻤﻟناﺬﻟيﺪﺟﻮﯾﮫﯿﻓاﺎﮭﺠﻟزﺪﺑرﺔﺟﺎﻛﺔﯿﻓ،ﺎﻣﺪﻨﻋﺪﺨﺘﺴﯾمﺎﻄﻏءاﺦﺒﻄﻤﻟﻊﻣأﺰﮭﺟةاﺮﺘﺣﻻقااﺎﻐﻟزﺔﯾاﺮﺧﻷىوأأﻮﻧعااﻮﻗﻮﻟداﺮﺧﻷى.
•ﯾﺟ بﻋ مدلﯾﺻوﺗﻧظﺎا مﺗﻟوﺻﯾا لﺎﺧﻟ ص مﺗﯾ ﺔﯾوﮭﺗ مﺎظﻧ ىﺄﺑ زﺎﮭﺟﻟا اذﮭﺑ
اﺧﺗﺳادﮫﻣﻷ يﻏآ ضرﺧ رﺛﻣ لفﯾرﺻﺗأﺧﺑا ةرﺎﻌﻟ مدﻣ نةزﮭﺟﻷااﺣﺗ ﻲﺗﻟا قرﺎﻐﻟ وأ ز
أﻧا عاوﻟوﻗا دوﺧﻷ.ىر
•نإقرﺣﺔﻣﻌطﻷاتﺣﺗزﺎﮭﺟﻟاﮫﺳﻔﻧروظﺣﻣﺎًﻘﺣ.
•
ًارﺿﻣ فوﺷﻛﻣﻟا بﮭﻠﻟا مادﺧﺗﺳإ رﺑﺗﻌﯾﻟﺗﻔو ، تارﯾﮐﻣ نأ نبﺑﺳﺗﯾﺧ ﻲﻓ رطﺣرﯾ ، ق
وﯾﺟ ب ﻲﻟﺎﺗﻟﺎﺑﮫﺑﻧﺟﺗ ﻲﻓﻊﯾﻣﺟاﻟ.فورظ
•بﺟﯾﺔﯾﺎﻧﻌﻟاو رذﺣﻟا ذﺧأنﻣلﺟأدﻛﺄﺗﻟانﻣمدﻋعﺎﻔﺗراﺔﺟردةرارﺣتﯾزﻟاﮫﻟﺎﻌﺷإو.
•ﻗ د ﺢﺑﺻﺗاﺟﻷا ءاز ﻲﺗﻟ ﻦﻜﻤﻳاﻟوﺻ لوﺎﮭﯾﻟإﻣ ناﻟطﺎﻔﺷﺎﺣ ةرﻧﻋ د زﺎﮭﺟ ﻊﻣ ﺎﮭﻣادﺧﺗﺳإ
.ﻰﮭطﻟا
•ﺎﻣﯾﻓﻖﻠﻌﺗﯾرﯾﺑادﺗﻟﺎﺑﺔﯾﻧﻘﺗﻟاﺔﻣﻼﺳﻟاوﻲﺗﻟامﺗﯾﺳﺎﮭﯾﻧﺑﺗفﯾرﺻﺗﻟنﺎﺧدﻟا،نﻣمﮭﻣﻟاعﺎﺑﺗا ﺢﺋاوﻠﻟاﻲﺗﻟاﺎھرﻓوﺗ
تﺎطﻠﺳﻟاﺔﯾﻠﺣﻣﻟا.
Table of contents
Other Klugmann Ventilation Hood manuals
Popular Ventilation Hood manuals by other brands

Schweigen
Schweigen HN-20C installation guide

Teka
Teka DH2 ISLA 80 Series instruction manual

ELICA
ELICA MOON IS IX/A/60X90 Instruction on mounting and use

arietta
arietta ADK430SSA Installation instruction guide

Frigidaire
Frigidaire FHWC3055LS Guide d'utilisation

Whirlpool
Whirlpool AKR8551IX User and maintenance manual