manuals.online logo
Brands
  1. Home
  2. •
  3. Brands
  4. •
  5. Klus
  6. •
  7. Construction Equipment
  8. •
  9. Klus KIDES-DUO User manual

Klus KIDES-DUO User manual

Popular Construction Equipment manuals by other brands

Ammann AV23-2 manual

Ammann

Ammann AV23-2 manual

stellar labs Model 7628 owner's manual

stellar labs

stellar labs Model 7628 owner's manual

Hailo H-50 manual

Hailo

Hailo H-50 manual

Graco LineLazer ES 1000 Operation - repair - parts

Graco

Graco LineLazer ES 1000 Operation - repair - parts

Greenlee 555RSC instruction manual

Greenlee

Greenlee 555RSC instruction manual

Manitowoc Grove CD3340B Service manual

Manitowoc

Manitowoc Grove CD3340B Service manual

Lux Tools A-FMR-20 Set manual

Lux Tools

Lux Tools A-FMR-20 Set manual

SIP 03683 manual

SIP

SIP 03683 manual

Volvo L30G Operator's manual

Volvo

Volvo L30G Operator's manual

Grizzly G8712 instruction sheet

Grizzly

Grizzly G8712 instruction sheet

Case DV201 Service manual

Case

Case DV201 Service manual

Wacker Neuson DT05 Operator's manual

Wacker Neuson

Wacker Neuson DT05 Operator's manual

HYVA AMCO VEBA 81 Series WARNING, OPERATING AND MAINTENANCE MANUAL

HYVA

HYVA AMCO VEBA 81 Series WARNING, OPERATING AND MAINTENANCE MANUAL

Atlas Copco Dynapac V5100TV manual

Atlas Copco

Atlas Copco Dynapac V5100TV manual

Manitowoc National Crane 1400A Operator's manual

Manitowoc

Manitowoc National Crane 1400A Operator's manual

SGS EC1500 owner's manual

SGS

SGS EC1500 owner's manual

Turbosol BM 30 Use and maintenance manual

Turbosol

Turbosol BM 30 Use and maintenance manual

Fayat CC424CHF instruction manual

Fayat

Fayat CC424CHF instruction manual

manuals.online logo
manuals.online logoBrands
  • About & Mission
  • Contact us
  • Privacy Policy
  • Terms and Conditions

Copyright 2025 Manuals.Online. All Rights Reserved.

Parts needed to mount the KIDES-DUO extrusion
Mounting strip
(A)
Extrusion (B)
LED
strip (J)
Cover (P)
Cover
large (H)
Gasket (E)LED insert
(C)
Masking cover (G)Bracket (F)
Plastic rod
dia. 2.4 mm
(L)
M3 pressure
screws (M)
Bolt (I) Power supply
bracket (K)
Spacers (N)
Cable gland (O)
Decorative
cover (D)
Spring (R)
KIDES-DUO mounting instructions
Tools needed for mounting:
- drill
- screwdriver
- screws
- metal saw
- angle grinder / milling machine
www.klusdesign.eu 1
NOTE! All LED strips must be connected to a 12 V or 24 V power supply.
IMPORTANT: The manual presents the simplest mounting procedure.
More mounting procedures and related accessories can be found at klusdesign.eu
K
cross-section
side view
O
N
A
A
B
C
N O N
A
A
J
D
B
C
P
B
K
J
1. Drill holes in the mounting strip (A) (min. two) and for the gland. Drill
holes in the extrusion (B) and the LED insert (C) to run the power cables.
2. Insert the cable gland (O) and the spacers (N) into the holes in the
mounting strip (A).
3. Attach the mounting strip (A) to the mounting surface with screws
suitable for the mounting surface. Run the cable out through the gland.
4. Mount the LED strips (J), lead out the cable and insert the covers (H, P) in
the extrusion (B). Place the LED insert (C) in the extrusion (B).
5. Attach the selected power supply to the power supply bracket (K). 6. Insert the power supply bracket (K) in the extrusion (B).
KIDES-DUO mounting instructions
2
www.klusdesign.eu
M
cross-section
side view
2 cm
L L M
B
K
M
L
M
L
B
A
E E
cross-section
side view
cross-section
side view
E F
I I
I I
E
F F
I I
I
I
R
D
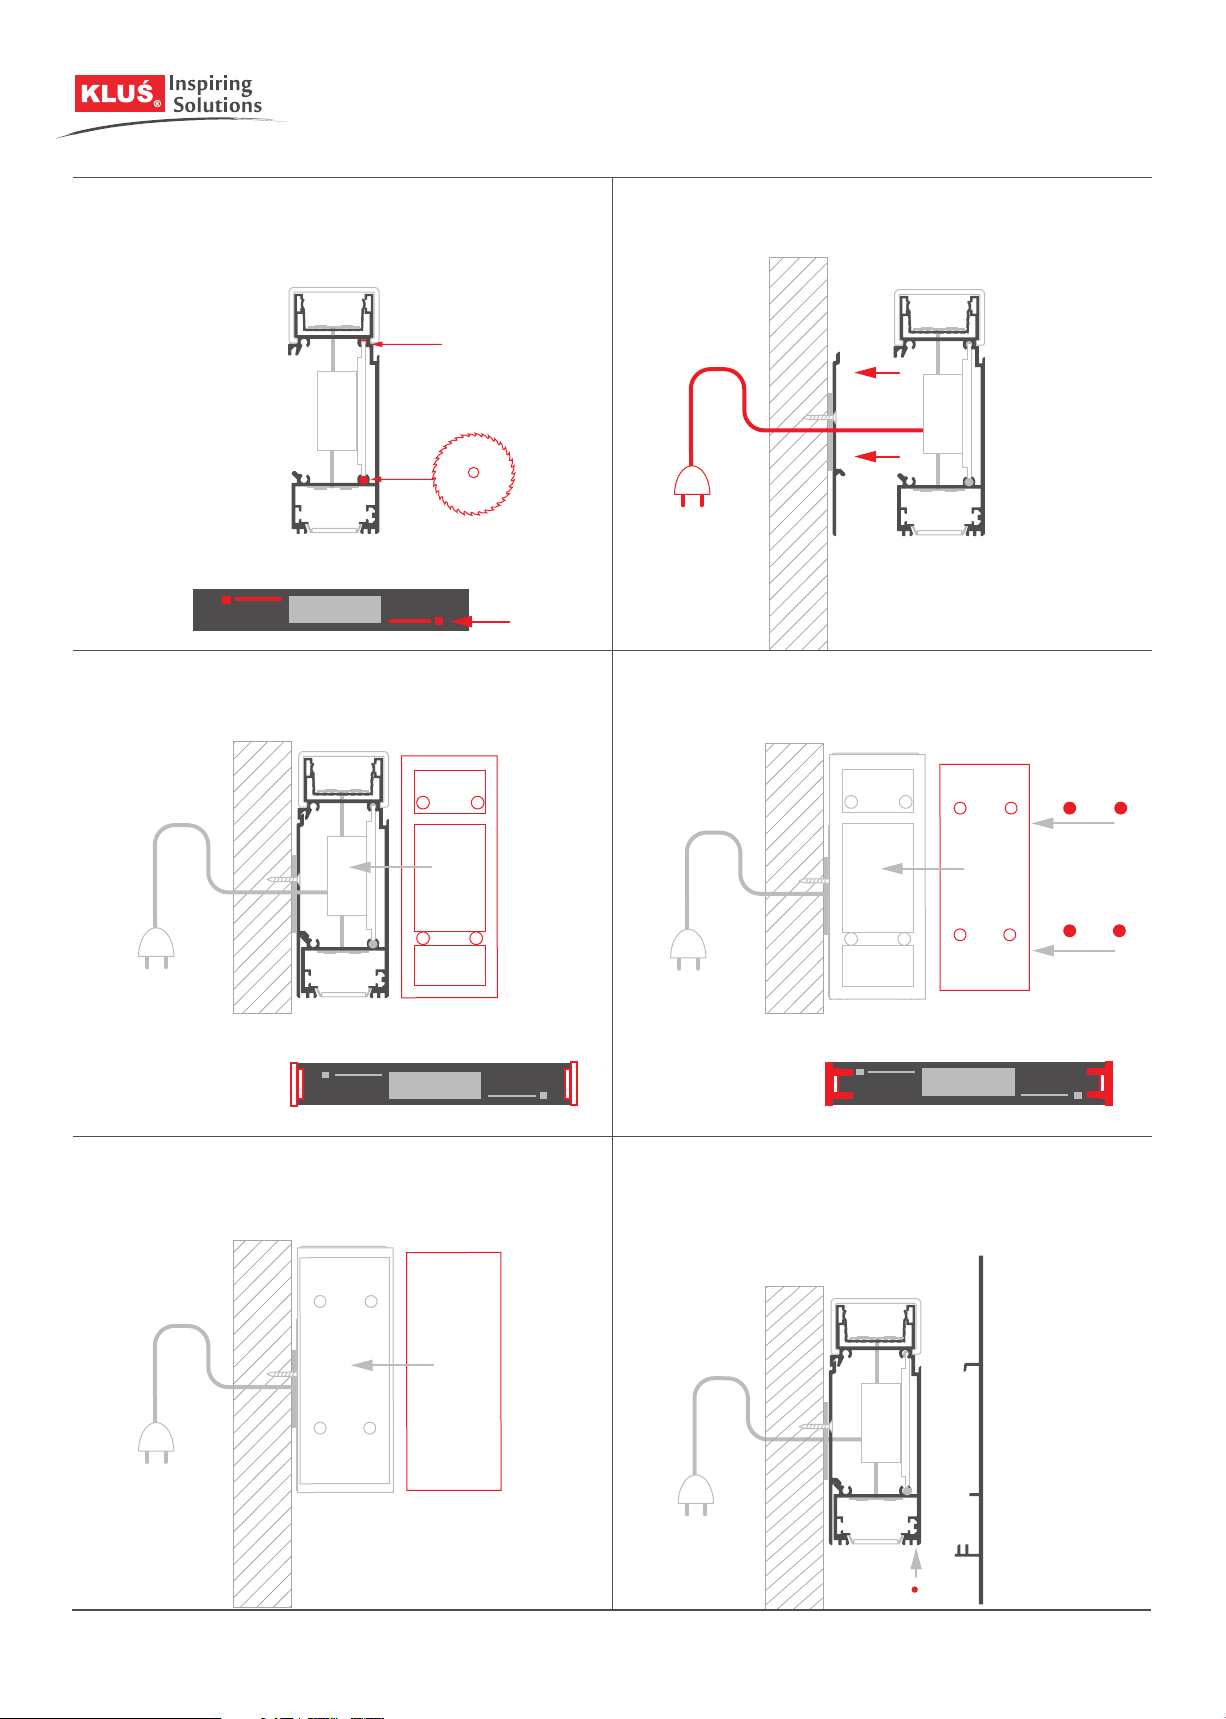
7. Secure the power supply bracket (K) by inserting one 2.4mm plastic rod
(L) into the guides on each side. Cut the rods to the required length. Next
secure the rods with M3 pressure screws (M), tightening them with the Allen
wrench to a min. depth of 2 cm.
8. Connect power and assemble the extrusion (B) with the mounting strip (A).
9. Insert the gaskets (E). 10. Insert the brackets (F) into the hollows of the gaskets (E) and mount
them with bolts (I).
11. Insert the masking cover (G) into the collar of the gaskets (E). 12. Install springs (R) in the marked groove (minimum two per meter)
where the lower hook of the decorative cover (D) is going to mount. The
number of springs should be: 2 for 1-meter long proles, 3 for 2-meters long
proles and 4 for 3-meters long proles. First and last spring should be placed
10-15 cm from the end of the prole.
KIDES-DUO mounting instructions
3
www.klusdesign.eu
D D
D
B
BD
R
cross-section top view
13. Mill o the hooks of the decorative cover (D) at the length that will
enable you to mount it to the extrusion (B) without cutting the actual cover.
14. (Optionally) Cover the surface of the diaphragm (D) with chosen
lining (e.g. veneer).
15. Insert the diaphragm (D) into the extrusion (B). The spring (R) will protect
it against falling o.
KIDES-DUO mounting instructions
4
www.klusdesign.eu