manuals.online logo
Brands
  1. Home
  2. •
  3. Brands
  4. •
  5. Koblenz
  6. •
  7. Vacuum Cleaner
  8. •
  9. Koblenz WD-2.5 L User manual

Koblenz WD-2.5 L User manual

Rubber Band
IMPORTANT SAFETY INSTRUCTIONS
WARNING
PRODUCT DESCRIPTION
Figure 1
Figure 2
OWNER’S MANUAL
2.5 gallon Wet/Dry Vac
For:
WD-2.5 L
WD-2.5 MA
CONGRATULATIONS!
You have just purchased a Koblenz ®. Vacuum Cleaner. Please read this manual carefully before
operating the machine. Model and serial number may be found on the side of your vac. You should
record both model and serial numbers and keep them in a safe place for future use.
Save these instructions for future reference.
Electrical Rating: 120 V~ 60 Hz 3 A
CONTENT
Important safety instructions
Warning
Product description
Polarized connection
Vac assembly
Filter assembly
Wall mount assembly
Operation
Cleaning the tank
Storage
Filter maintenance
Trouble shooting
Warranty
This vacuum cleaner is for domestic use only; it may be used for vacuuming wet or dry materials and as
a blower.
When using an electric vacuum cleaner, basic precautions should be followed.
Read all instructions before using this
vacuum cleaner.
1.
2.
3.
4.
5.
6.
7.
8.
9.
10.
11.
12.
13.
14.
15.
16.
17.
18.
19.
20.
To reduce the risk of fire, electric shock or injury:
Do not use to pick up flammable or combustible liquids, such as gasoline or use in areas
where such items may be present.
Use product only as described in this manual, use only manufacturer’s recommended
attachments.
Do not pick up anything that is burning or smoking; such as cigarettes, matches or hot
ashes.
Do not leave vacuum plugged in. Unplug from outlet when not in use and before
servicing.
Turn unit off before unplugging.
Do not put any object into openings. Do not use with any opening blocked. Keep free of
dust, lint, hair and anything that may reduce air flow.
Do not use without filter in place.
Do not allow vacuum to be used as a toy, or to run unattended at any time. If used near
children, close supervision is necessary.
Do not store outdoors.
Do not use with a damaged cord or plug. If vacuum is not working as it should, or if it has
been dropped, damaged, or submerged into water, return it to an authorized service
center.
Do not pull or carry by cord, use cord as a handle, close a door on a cord or pull cord
around sharp edges or corners, do not run vacuum over cord. Keep away from heated
surfaces.
Do not unplug by pulling on cord. To unplug, grasp the plug, not the cord.
Do not unplug or vacuum with wet hands. Use extra care when cleaning stairs.
Keep hair, loose clothing, fingers and all parts of body away from openings and moving
parts.
Never use vacuum cleaner as a pump.
If the line cord is damaged it must be replaced by the manufacturer or an authorized
service center.
Connect to a properly grounded outlet only. See grounding instructions.
Do not use without filter in place. See filter instructions.
Do not pick up soot, cement, plaster or drywall dust. These are very fine particles that
may pass through the filter and affect te performance of the motor or be exhausted back
into the air.
Use special care when emptying heavily loaded tanks.
WARNING! Do NOT use this vacuum cleaner to vacuum lead paint debris because this
may disperse fine lead particles into the air.
POLARIZED CONNECTION
This appliance is for use on a 120 V~ circuit, and has a polarized
plug as shown in figure A. A temporary adapter may be used to
connect this plug to Non-polarized outlet.Temporary adapter should
be used only until a properly polarized outlet can be installed by a
qualified electrician.
NOTE: In Canada, the use of a temporary adapter is not
permitted by the Canadian Electrical Code. Polarized plug
FIGURE.A
WARNING
Improper connection of the equipment grounding conductor can result in a risk
of electric shock. Check with a qualified electrician or service person if you are
in doubt as to whether the outlet is properly grounded. Do not modify the plug
provided with the appliance if it does not fit the outlet, have a proper outlet
installed by a qualified electrician.
VAC ASSEMBLY
Always unplug the vacuum from the outlet
current, before performing any maintenance.
WARNING
1. Close the locks on the side of the vacuum head with the
tabs on the sides of the tank. (fig. 1)
2. Press the hose end into the suction port. (fig. 2)
3. Place the desired accessory on the other end of the hose.
4. Operate the power button and the vacuum cleaner will be
ready for use.
5. To disconnect the hose from the vacuum cleaner, take it
from the connected end, turn it half-turn and pull out.
6. Familiarize yourself with the controls on your vacuum
cleaner.
19-1192-00-4
Filter
A) Ergonomic handle
B) Power button
C) Head
D) Suction port
E) Tank
F) Air blower port
G) Pick up nozzle
H) Crevice tool
I) Hose
J) Wall Mount
(available only for WD-2.5 L)
A
B
C
DF
E
G
H
I
Place filter above cage, and attach it with rubber band
as shown in figure.
1. This vacuum includes a paper filter for fine dust pick up.
2. The paper filter should always be removed for wet pick
ups.
3. When vacuuming liquids the unit has a float thatwill rise
to the top and shut off suction when thetank is full. This will
increase the motor’s rpm’s.
4. Turn off the vac and dump out liquids to continue using the
unit.
FILTER USE
WALL MOUNT ASSEMBLY
FILTER ASSEMBLY
J
Available only for WD-2.5 L
WARNING: Inadequate mounting could cause the unit to fall,
causing damage and / or injury on it.
1. Select the install location in a wall space and / or find a
strong surface to support the combined weight of the vacuum
with a full tank of debris and accessories.
2. Secure the base to the desired surface with the included
screws.
3. Once the base is positioned and secured to the desired
surface, install the vacuum by aligning the grooves on each
side of the base.
4. Always empty the tank and clean the filter before placing
the vacuum cleaner on the wall base, otherwise it may cause
the machine to fall, causing serious damage or injury.
5. Before removing the vacuum from the base to attach to the
wall, check the click-n-lock strong tank latches.
Note: The supplied screws are suitable for wood mounting
ONLY. Be sure to use proper fasteners to install the
vacuum to a surface other than wood.
Fig. 1
Fig. 2
Fig. 3
The appearance of the
vacuum may change
depending on the model.
Not all accessories are
included with all models.
Check panel on box for
more information.
Fig. 1
Fig. 2
Follow the instructions in "Filter Assembly" on this page.
AIR EXPULSION SYSTEM
Never eject air WITHOUT THE FILTER, this will damage the machine and invalidate the warranty.
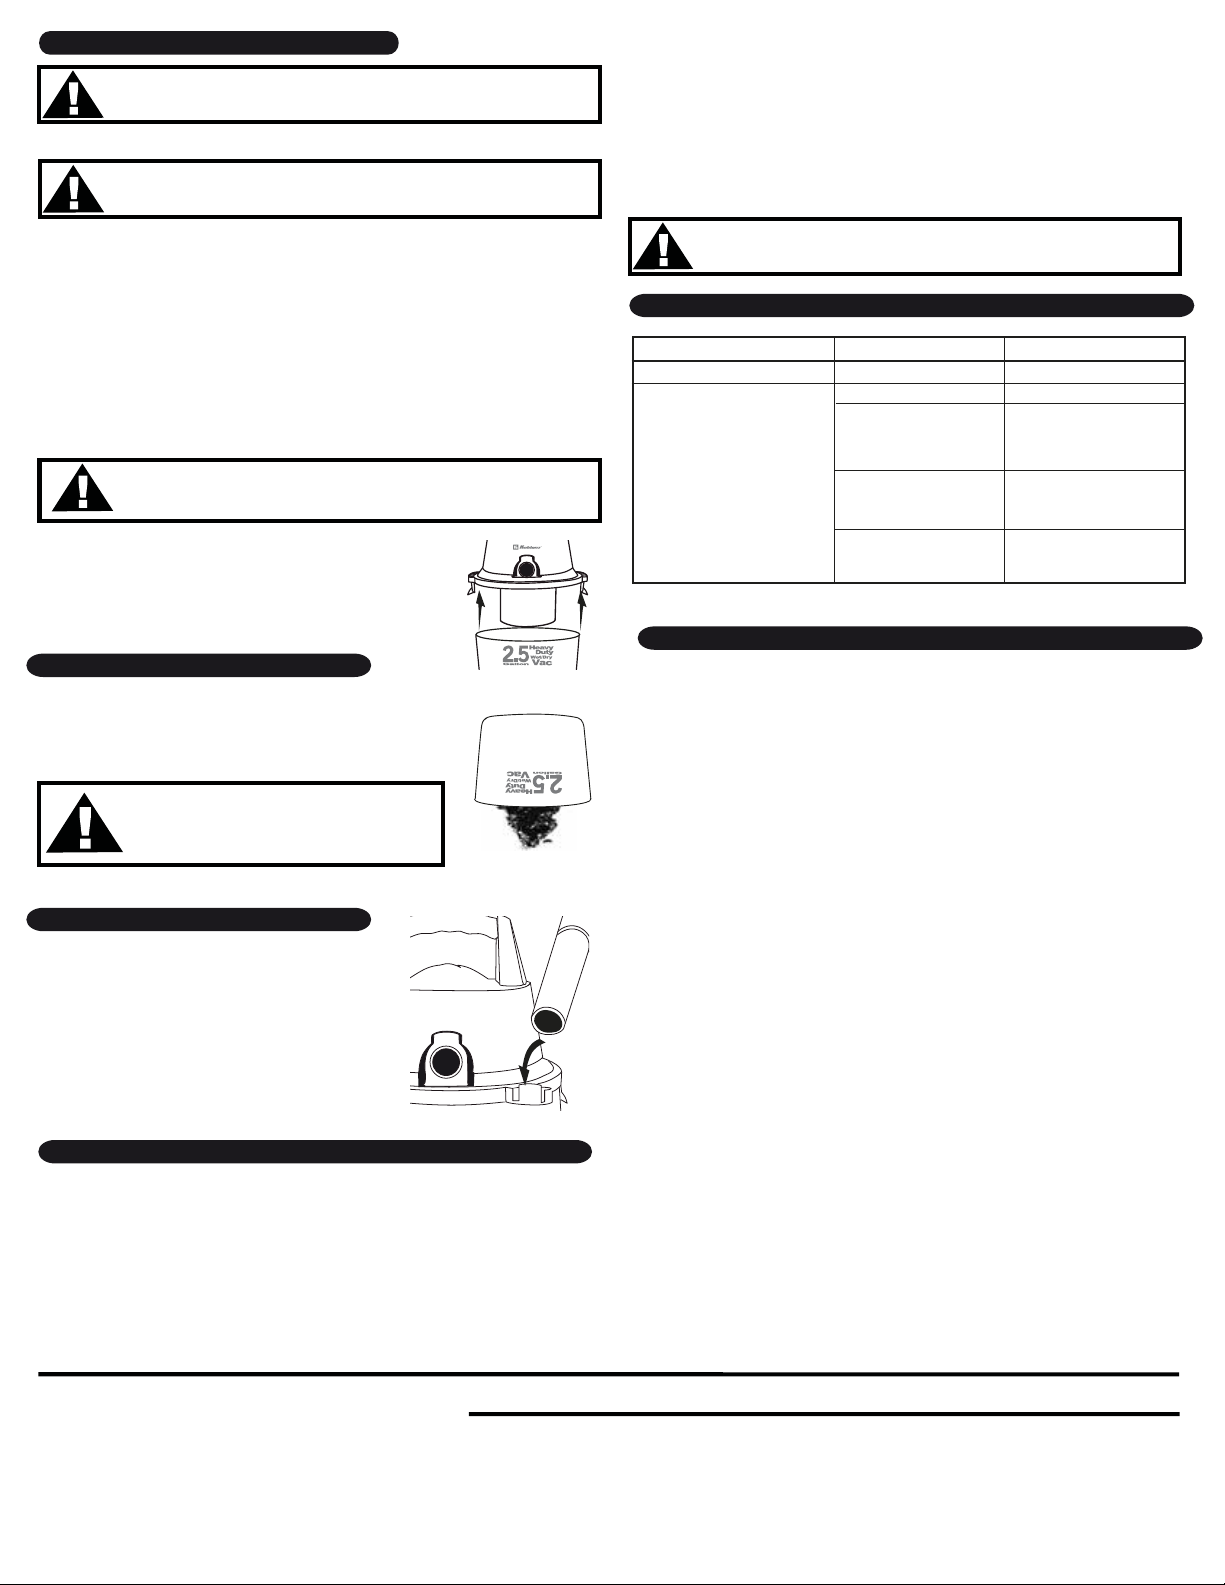
This Koblenz vacuum cleaner also functions as an air blower. It has the capability to blow sawdust and
other debris. It is excellent to use to blow dust and debrisout of garages or off patios and driveways.
WARNING:
To avoid injury to by standers, keep them clear of blowing debris. The operation of any utility vac can
result in foreign objects being blown into the eyes, which can result in severe eye damage. Always wear
safety goggles.
To use your Koblenz vacuum as a blower:
1. Locate the blowing port of your vac.
2. Insert flexible end of the hose into the blowing port.
3. Turn vac “ON” and you are ready to use your vac as a blower.
IMPORTANT:
To avoid damage to the unit do not let the motor run with a full tank.
TO VACUUM LIQUIDS Never vacuum liquids WITH THE FILTER
PLACED, this will damage the filter and invalidate the warranty.
Never vacuum liquids whith the filter
1. Separate the top part of the vacuum cleaner.
2. Remove the filter from the motor grille.
3. Place the top part in its place, until you hear the click of the sides.
4. Place the hose in the suction port, then the accessory, turn on and go.
CLEANING THE TANK
1. Unplug power cord.
2. Remove the hose.
3. Unlock the side latches.
4. Place cover upside down on a clean surface.
5. Dump tank contents into a waste container.
WARNING
To avoid back injury or falls, do not lift a vac heavy
with liquid or debris. Scoop or drain enough contents
out to make the vac light enough to lift comfortably.
VAC AND ACCESSORIES
Before storing your vac, the dust tank should be emptied
and cleaned.
Accessories should be stored on the tool caddy.
The vac should be stored in doors.
Always use the unit with the filter when vacuuming dry
debris and dust.
STORAGE
Thorne Electric, Co. Koblenz Eléctrica, S.A. de C.V. Canada Call:
Tel: (210) 590 1226
PRINTED IN MEXICO
U.S. Patent Numbers
US D 467,693S, US D467,694S,
US D 468,499S, US D470,633S.
Other patents pending.
Visit our website www.koblenz.com
FILTER MAINTENANCE
WARNING:
To avoid injury from accidental starting, unplug power cord before changing or cleaning filter.
CLEANING:
Your filter should be changed often to maintain peak vac performance.
NOTE: This filter is made of high quality materials designed to stop very small particles of dust.
Handle the filter carefully when removing to clean or installing it. Creases in the filter pleats
may occur from installation but creases will not affect the performance of the filter.
Always use the unit with the filter when vacuuming dry debris and dust.
IMPORTANT: After cleaning the paper filter, check for holes. If any holes are foundreplace the
filter immediately. Even small holes will permit dust to come out of the vac.
GENERAL MAINTENANCE
To keep your wet / dry vac looking its best, clean the outside with a cloth dampened with water
and mild soap.
To clean the tank: 1. Dump out debris.
2. Wash drum thoroughly.
3. Wipe out with dry cloth.
WARNING
To assure product SAFETY AND RELIABILITY, repairs and adjustments
should be performed by a Koblenz Service Center, always using
Koblenz replacement parts.
TROUBLE SHOOTING
WARRANTY
Av. Ciencia No. 28,
Parque Industrial Cuamatla
Cuautitlán Izcalli,
Edo. de México, México,
C.P. 54730, Tel. (55) 5864-0300
TO VACUUM SOLIDS
Never vacuum solids WITHOUT THE FILTER,this will damage the machine and invalidate the warranty.
OPERATION
P.O. Box 18636
San Antonio, TX.
78218-0363 U.S.A.
(210) 590-1226
1(800) 548-5741
This warranty gives you specific legal rights, and may also have other rights that vary
from state to state, province to province, or country to country.
Warranty coverage ends when the product becomes unusable for reasons other than
defects in workmanship or material for a period of 5 years for domestic use. Limited
warranty against manufacturing defects.
THIS WARRANTY SHALL NOT APPLY to any products or parts there of which have been
damaged by tampering, misuse or abuse or which have been altered or repaired by an
unauthorized person or service center.
THIS WARRANTY SHALL NOT APPLY to brushes or accessories since their life depends
upon the amount of use.
THIS WARRANTY SHALL NOT APPLY when picking up dust and dry materials without
filter in place.
THIS WARRANTY SHALL NOT APPLY when picking up liquids with filter in place.
THIS WARRANTY SHALL NOT APPLY when blowing sawdust and other debris without
filter in place.
FOR REPAIR the inoperative machine must be delivered with shipping and delivery charges
prepaid together with satisfactory evidence of the purchase date to an authorized service
center or Thorne Electric Company at the address that appears below. Koblenz will either
repair or replace, at its selection, all defective machines during the warranty period.
Some states do not allow the exclusion or limitation of incidental or consequential damages,
so the above limitation or exclusion may not apply to you.
This warranty is the sole and exclusive warranty for Koblenz products. No employee,
agent, dealer, or other person is authorized to alter this warranty or make other warranty
on behalf of Koblenz Electrica.
The foregoing obligations are in lieu of all other obligations and liabilities including
negligence and state Koblenz’s entire and exclusive liability and the purchaser’s
exclusive remedy. Koblenz will in no event be liable for any direct, indirect, special,
incidental or consequential damages or losses what so ever. Koblenz’s liability
under no circumstances will exceed the contract price for the goods or parts for
which liability is claimed.
Some states do not allow the exclusion or limitation of incidental or consequential damages,
so the above limitation or exclusion may not apply to you.
PROBLEM POSSIBLE CAUSE POSSIBLE SOLUTION
Vacuum does not start
Low suction
Not firmly plugged in. Plug in firmly.
Empty the tank.
Shake dust out of filter.
See “Filter Maintenance”
section.
Connect the hose to the
blowing port until hoseis
clear.
Be sure that the
motorhead seats
properlyon the tank.
Tank full.
Filter is dirty.
Obstruction in hose
Motor head not
installed correctly

This manual suits for next models

1

Other Koblenz Vacuum Cleaner manuals

Koblenz U-800 Troubleshooting guide

Koblenz

Koblenz U-800 Troubleshooting guide

Koblenz U-80 User manual

Koblenz

Koblenz U-80 User manual

Koblenz U-800 User manual

Koblenz

Koblenz U-800 User manual

Koblenz WD-5 K US User manual

Koblenz

Koblenz WD-5 K US User manual

Koblenz Designer Series User manual

Koblenz

Koblenz Designer Series User manual

Koblenz WD-16K User manual

Koblenz

Koblenz WD-16K User manual

Koblenz WD-402 KG4 US User manual

Koblenz

Koblenz WD-402 KG4 US User manual

Koblenz ECLIPSE AD-1400 A User manual

Koblenz

Koblenz ECLIPSE AD-1400 A User manual

Koblenz AI-1260-P User manual

Koblenz

Koblenz AI-1260-P User manual

Koblenz WD-350 K2M US User manual

Koblenz

Koblenz WD-350 K2M US User manual

Koblenz Acquapur AG-1200 User manual

Koblenz

Koblenz Acquapur AG-1200 User manual

Koblenz WD-9K User manual

Koblenz

Koblenz WD-9K User manual

Koblenz VACUUM CLEANER User manual

Koblenz

Koblenz VACUUM CLEANER User manual

Koblenz BP-1400 Troubleshooting guide

Koblenz

Koblenz BP-1400 Troubleshooting guide

Koblenz Gamma DE R-601 User manual

Koblenz

Koblenz Gamma DE R-601 User manual

Koblenz U-110 Troubleshooting guide

Koblenz

Koblenz U-110 Troubleshooting guide

Koblenz AK-1600 P User manual

Koblenz

Koblenz AK-1600 P User manual

Koblenz HV-12-HDN User manual

Koblenz

Koblenz HV-12-HDN User manual

Koblenz U-40 User manual

Koblenz

Koblenz U-40 User manual

Koblenz D-280 User manual

Koblenz

Koblenz D-280 User manual

Koblenz U-900 Troubleshooting guide

Koblenz

Koblenz U-900 Troubleshooting guide

Koblenz WD-350 K2M US User manual

Koblenz

Koblenz WD-350 K2M US User manual

Koblenz WD-6K2 User manual

Koblenz

Koblenz WD-6K2 User manual

Koblenz U-800 User manual

Koblenz

Koblenz U-800 User manual

Popular Vacuum Cleaner manuals by other brands

Dustcontrol DC 3800 H Turbo EX Original instructions

Dustcontrol

Dustcontrol DC 3800 H Turbo EX Original instructions

POLTI Unico MCV20 instruction manual

POLTI

POLTI Unico MCV20 instruction manual

Makita BCL140 instruction manual

Makita

Makita BCL140 instruction manual

Makita VC1310L instruction manual

Makita

Makita VC1310L instruction manual

Samsung POWERbot VR20R72 Series Quick reference guide

Samsung

Samsung POWERbot VR20R72 Series Quick reference guide

Miele S 558 operating instructions

Miele

Miele S 558 operating instructions

Fakir NT 21 operating instructions

Fakir

Fakir NT 21 operating instructions

Shark UV700 owner's guide

Shark

Shark UV700 owner's guide

Samsung POWERbot SR2AH905 Series user manual

Samsung

Samsung POWERbot SR2AH905 Series user manual

Jacuzzi JPV100 operating instructions

Jacuzzi

Jacuzzi JPV100 operating instructions

Miele S 300i operating instructions

Miele

Miele S 300i operating instructions

Bissell ReadyClean 47B2 SERIES user guide

Bissell

Bissell ReadyClean 47B2 SERIES user guide

Shark APEX DUOCLEAN POWERED LIFT-AWAY AX951 quick start guide

Shark

Shark APEX DUOCLEAN POWERED LIFT-AWAY AX951 quick start guide

AmazonBasics B0BN5F6MJY manual

AmazonBasics

AmazonBasics B0BN5F6MJY manual

KHIND VC66B instruction manual

KHIND

KHIND VC66B instruction manual

kincrome KP703 manual

kincrome

kincrome KP703 manual

Tacony Powr-Flite Comfort Pro FREEDOM 6 CPF6 Series Operator's manual & parts list

Tacony

Tacony Powr-Flite Comfort Pro FREEDOM 6 CPF6 Series Operator's manual & parts list

Bissell ProHeat Pro-Tech 7920 SERIES user guide

Bissell

Bissell ProHeat Pro-Tech 7920 SERIES user guide

manuals.online logo
manuals.online logoBrands
  • About & Mission
  • Contact us
  • Privacy Policy
  • Terms and Conditions

Copyright 2025 Manuals.Online. All Rights Reserved.