Kodiak X2 User manual

Solar Power Station
USER GUIDE v1.0
01/20/2023

Kodiak X2 User Guide
2
QUICK START GUIDE: FIRSTTHINGS FIRST
1. When you unbox your Kodiak X2, PLEASE DO NOT throw away the packaging. It may come
in handy down the road in case of damage from shipping or handling, or any other issues re-
quiring a return.
2. Charge your Kodiak X2 to 100% by connecting the wall adapter into the AC Charge Input
on the left side of the unit. Ensure that the Dualink Parallel Switch is in Solo Mode prior to
connecting to the wall to charge by pushing the switch fully to “S”. Charging can only be done
while in Solo Mode. Leave the Main Power Button on the LEFT side of the unit ON during
charging, this will allow the Kodiak X2 to reach 100% and balance the internal multi-cell battery
pack. Never charge a Kodiak X2 if the temperature is below 32°F. For instructions on connect-
ing 2 Kodiak X2’s together, see UsingYour Kodiak X2 in Dualink Parallel Mode.
3. When your Kodiak X2 is fully charged, plug a device into each output to make sure that
nothing was damaged in shipping and handling.
4. It is EXTREMELY IMPORTANT that the Kodiak X2 not be left stored at a very low battery lev-
el, or run until it turns off and not recharged within a day or two. Not doing so can permanent-
ly damage the battery and is not covered under warranty.

Kodiak X2 User Guide
3
IMPORTANT SAFETY GUIDELINES
NEVER connect an input exceeding 65 volts, i.e. the open circuit voltage (VOC) on solar input,
to the blue EC8 charging port (left side) on the Kodiak X2.
NEVER exceed output and input connector ratings. Failure to do so may result in unit damage,
fire, or electrical shock.You can find these ratings underTech Specs.
NEVER store a Kodiak X2 in hot environments, such as a hot vehicle. Lithium batteries are sen-
sitive to extremely high temperatures. For more information seeTech Specs.
NEVER touch, stick metal objects into, or otherwise come in contact with the interior of the AC
outlets on the Kodiak X2. Doing so risks death, serious injury, and electrical shock.These out-
lets supply power comparable to that of a normal home wall outlet and, while ungrounded,
still present many of the same dangers.
NEVER allow the Kodiak X2 to get wet. Allow any condensation to dry completely before pow-
ering-up or charging your Kodiak X2. If your system does get wet, contact us to ensure it’s safe
before attempting to use it again.
NEVER attempt to repair your Kodiak X2 or replace the internal battery yourself; any manipu-
lation or disassembly will void all warranties. Any tampering with the warranty stickers (black
dot with Inergy logo) may also void the warranty. For questions about repair/service, please
contact our U.S.-basedTech Support team (see Contact Us).There are no user-serviceable parts
inside.
ALWAYS keep your Kodiak X2 clean and dry. Regularly inspect for dirt, dust, or moisture.You
may clean connectors, outlets, and fans with canned air for electronics. Never use an air com-
pressor to clean or dust-off your system.
NEVER use a generic or off-brand charger to charge your Kodiak X2. Use only Inergy-supplied
chargers specifically for this device.
NEVER connect your Kodiak X2 AC outlets to another power source (i.e. attempt to charge your
Kodiak X2 via the AC outlets). Doing so will permanently damage your device and void your
warranty. These outlets are output only, and any such damage is easily detected when
diagnosing system failures.
BE AWARE that the Kodiak X2 can get hot when in use. Charge your Kodiak X2 in a well venti-
lated, dry area.
NEVER use or store a Kodiak X2 in any orientation other than standing straight up.The Kodiak
X2 is designed to be stored and operated while sitting on a flat, secure surface.
ALWAYS secure the Kodiak X2 with straps or cords when using it in a vehicle to protect against
excessive vibration or impacts.

Kodiak X2 User Guide
4
FAILURETO FOLLOWTHE ABOVE SAFETY GUIDELINES MAY RESULT IN PERMANENT DAM-
AGETOYOUR KODIAK X2, RISK OF FIRE, WARRANTY VOID, AND/OR BODILY HARM. IFYOU
HAVE ANY QUESTIONS, PLEASE CONTACT OUR U.S.-BASEDTECH SUPPORTTEAM (SEE CON-
TACT US).

Kodiak X2 User Guide
5
TABLE OF CONTENTS
Quick Start Guide 1
Important Safety Guidelines 2
Table of Contents Page 3
Getting to KnowYour Kodiak X2 4
Reading the LCD 5
ChargingYour Kodiak X2 Power Station 6
UsingYour Kodiak X2 Power Station 11
Tech Specs 14
Warranty Information 15
Contact Us 16

Kodiak X2 User Guide
6
GETTING TO KNOWYOUR KODIAK X2

Kodiak X2 User Guide
7
READING THE LCD
LCD Image Key
A Power Input Icon Appears anytime there is a power source connected
B Battery Level Dial Displays estimated battery level expressed as a dial
C Power Output Icon Appears anytime there is a load (AC or DC)
D Alarm Icon Appears whenever there is a fault or alarm (i.e. low
battery voltage)
E Power Output Reading Total combined power output (AC + DC) measured in
watts.
F Estimated RunTime Reading Estimated run time remaining at current output level
measured in hours. Run times >9.9 hours the display
will simply remain at 9.9 hours.
G Power Output Icon 2 Appears anytime there is a load (AC or DC)
H AC Frequency Reading Measures AC output frequency
I AC Voltage Reading Measures AC output voltage from the inverter
J Dualink Parallel Mode Icon Displays only when Dualink Parallel Mode is on
K State of Charge Reading Displays estimated state of charge (SoC) as a percentage
L Power Input Icon 2 Appears anytime there is a power source connected
M Est. Time Reading Estimated time until fully recharged at current input level
measured in hours. Recharge times >9.9 hours the
display will simply remain at 9.9 hours.

Kodiak X2 User Guide
8
CHARGINGYOUR KODIAK X2 POWER STATION
General Information
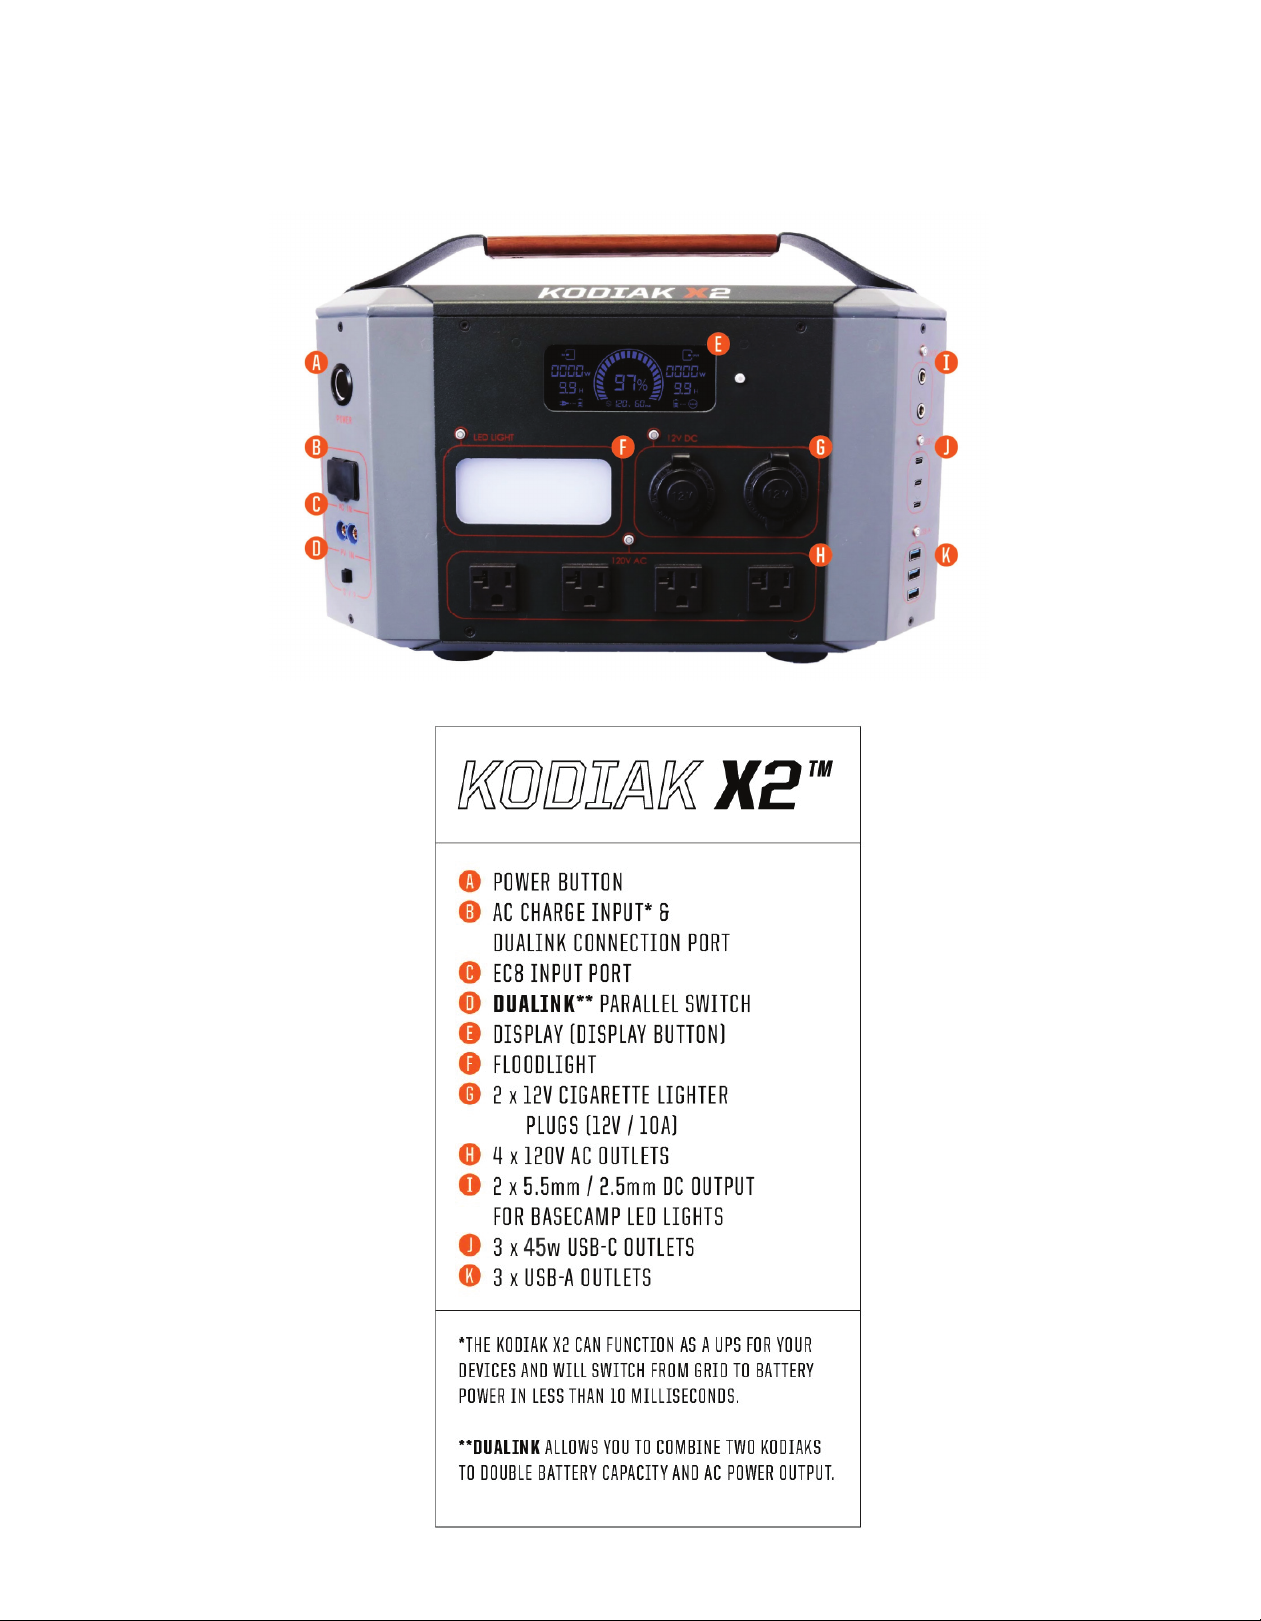
The Kodiak X2 can only charge in Solo Mode, as indicated by the Dualink Parallel Switch being
pushed completely to the right below the letter “S”. This switch is located below the charge
ports on the left side. Ensure this is done BEFORE connecting a charge source. Because the
Kodiak X2 must be charged in Solo Mode, never attempt to charge a Kodiak X2 while it is con-
nected to another Kodiak X2 in Parallel Mode, doing so will void the warranty and may result in
fire, property damage, or bodily harm. While charging, leave the Main Power Button in the ON
position, this will allow the Kodiak X2 to reach 100% and balance the internal multi-cell battery
pack.
Temperature
The Kodiak X2 should only be charged when the temperature of the battery is above 32°F. The
battery will suffer irreparable damage if charged when the temperature of the battery itself is
below 32°F. We have included temperature sensors in the Kodiak X2 battery pack that can be
read by our mobile app to help you if you suspect that the ambient temperature is close to that
level. If it is below freezing, simply allow the Kodiak X2 to warm up for an hour or two before
charging. Similarly, charging the Kodiak X2 when it’s too hot (above 104°F) can also degrade
and damage the battery.
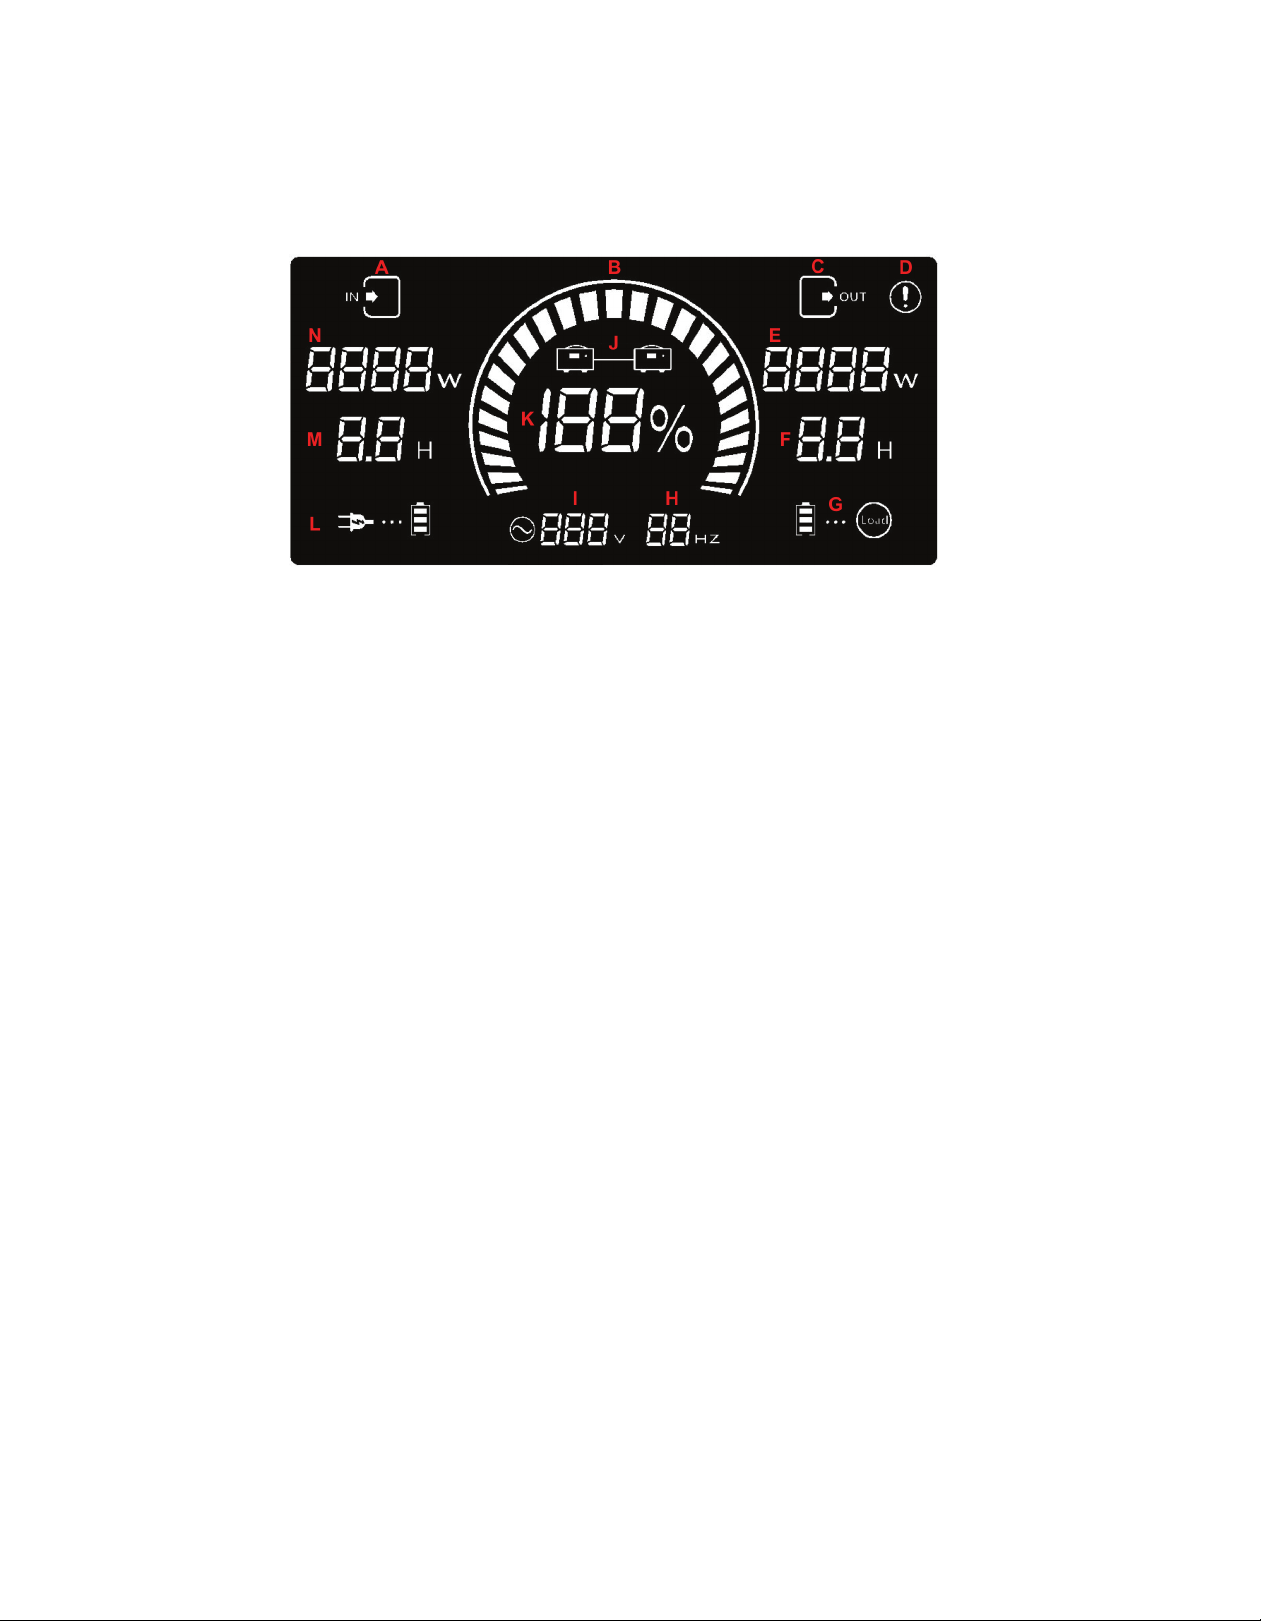
When charging your Kodiak X2, the LCD screen will indicate the amount of power being sent
to the battery and an estimated charge time. This estimated charge time is based on the re-
al-time power input and output shown on-screen, and it will change as the average charge or
discharge rates fluctuate.
Charging From the Grid (AC Wall Outlet)
You can charge your Kodiak X2 from normal AC power sources. The wall adapter provides up
to 1080 watts of charge power. Because of this extremely fast charge rate, only one charge
source at a time will charge the battery: either the grid OR solar input, not both at the same
time. If both are connected, AC charging will be prioritized and solar charging will be disabled.
In the event the grid goes down and AC charging is lost, solar charging will automatically be
re-enabled until the system is either charged or grid power is restored. Important Note: The
Inergy Quick Wall Charger that is used for the Flex 1500 Power Station or Apex Power Station is
NOT compatible with the Kodiak X2 and should not be used. It may damage your system.
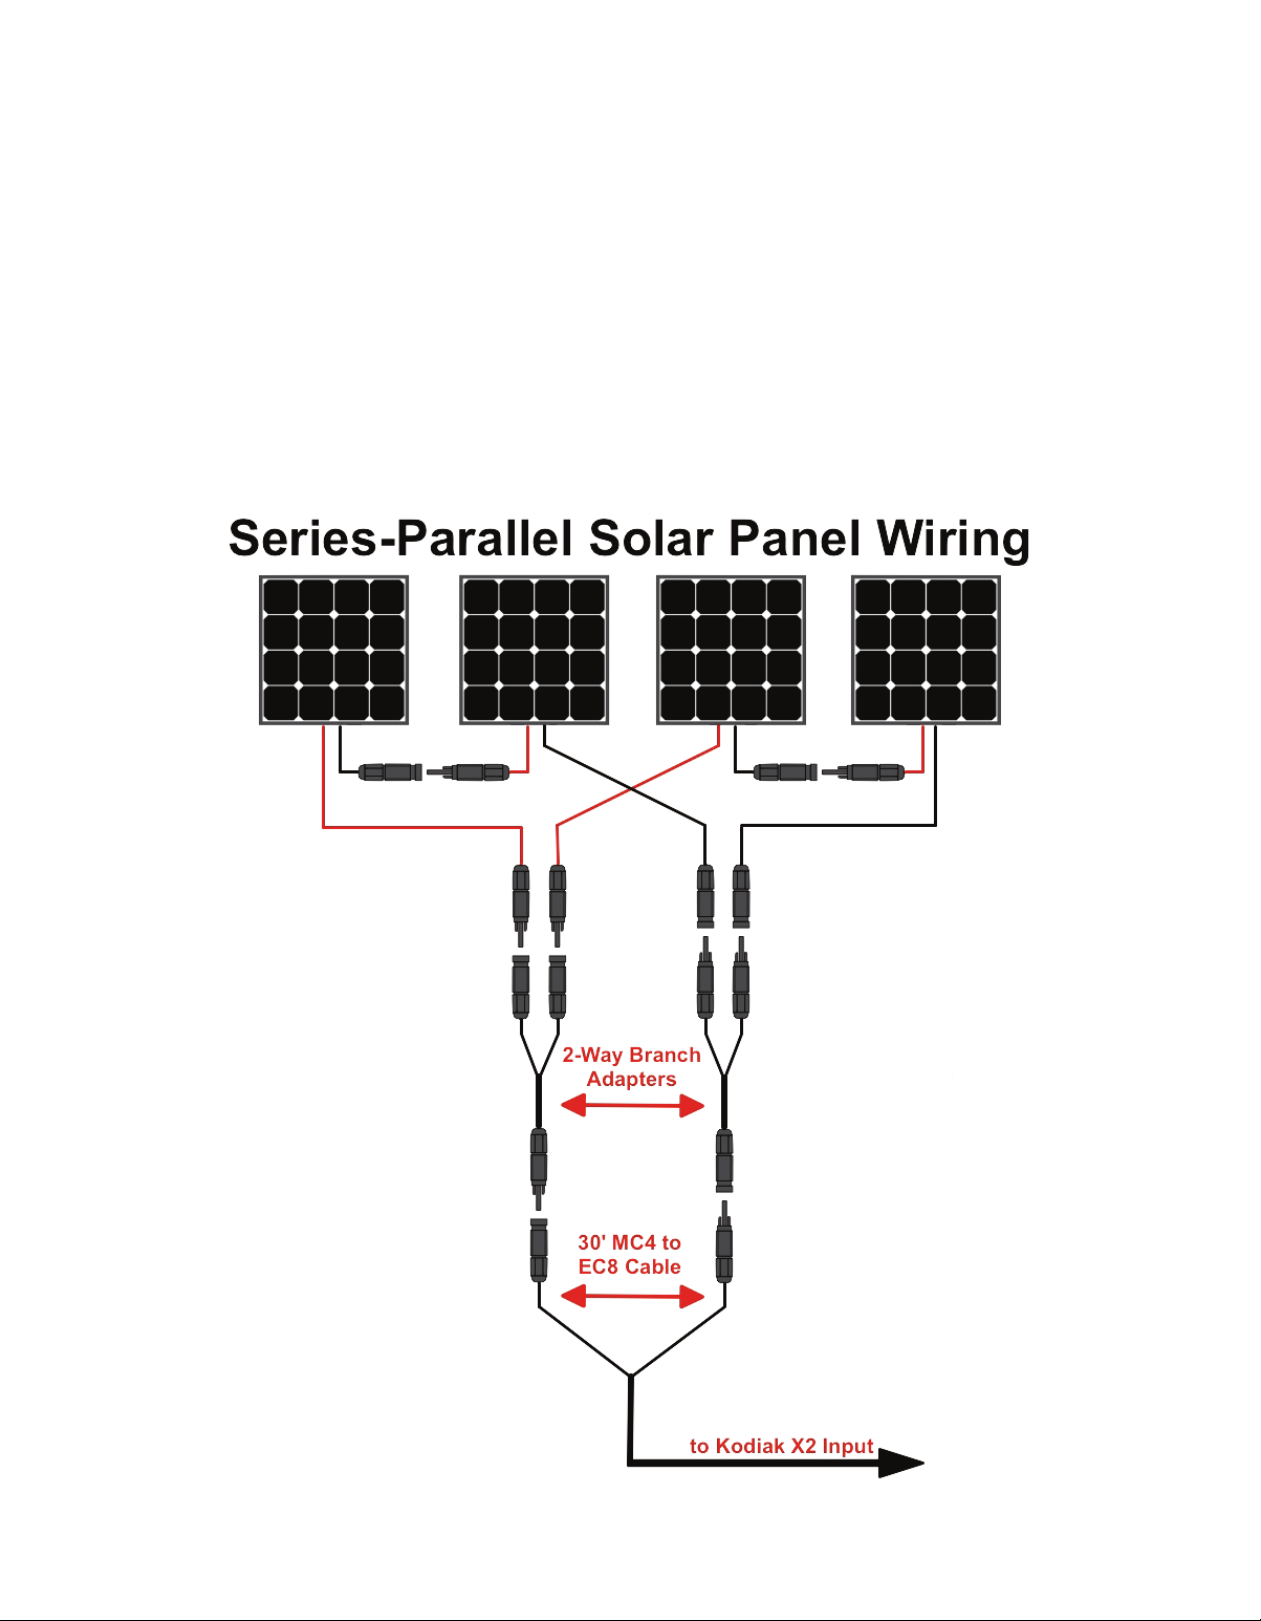
Charging With Solar Panels
In general, with solar panels in a shadow-free environment, no obstructions, and clear sunlight,
it’s common to see a charge rate of about 80% of the wattage of your solar panel array. Utiliz-
ing solar energy can be as simple as pointing your panels at the sun. However, there are many
variables that can affect the panel’s performance, and there are a few “best practices” to know.
For help charging with solar panels and configuring your solar arrays correctly, please call us
(see Contact Us) and we’ll be happy to help you out. Here are a few of the most common vari-
ables that affect performance, and some tips and tricks to help you maximize your results:

Kodiak X2 User Guide
9
Ideal Time of Day
As a general rule of thumb, the brighter the sun is shining, the better your solar panels will
work. Panels operate at peak efficiency when the sun is most direct— typically around midday.
Solar panels run off of light, not heat. In fact, solar panels produce the most during cold, clear
days rather than in extremely hot conditions. Even on a windy day, solar panels can still op-
erate at peak output. Cloud cover will significantly reduce the efficiency of the panels, though
they will still continue to generate some electricity.
Time of Year
The amount of daylight changes with the seasons, as the sun moves closer and farther away
from you. During summer months, overall solar production is generally higher due to more
daylight hours. Although the winter months have fewer daylight hours, cold temperatures pos-
itively affect a panel’s performance. In fact, cold temperatures in clear conditions can generate
the most solar production overall.
Panel Placement
Place your solar panel where it will get as much direct sunlight as possible. Shade on one or
more panels can reduce the performance of the whole string.Take care to avoid trees and other
shade that may move with the sun throughout the day.
Peak Your Panels
Pointing your panels directly at the sun and adjusting them throughout the day will yield the
best results.The angle will vary from month to month, but an angle of 30-60 degrees from flat
is generally considered ideal. As long as you point your panels at the sun, you should get good
results.
Safety Tips
The Kodiak X2 is designed for use with and rated for Inergy-brand solar panels, but you can
use third-party solar panels if you have them. In general, you should not mix different types
and ratings of panels; always use identical panels in a string. As a hard rule, any string of solar
panels must not exceed the open circuit voltage (VOC) rating of the Kodiak X2 (seeTech Specs).
If you have any questions or doubts about your solar panels’ open circuit voltage, please call
us. (See Contact Us.)
Clean Your Panels
Solar panels function through the interaction of many individual cells (see right). Output can
be greatly affected by even the slightest obstruction to a single cell of the panel. Make sure the
panel is free of any dirt, debris, or other objects like stickers and decals. Aftermarket protective
coatings, including clear films, plastic sheet/ paneling, and even glass, can also greatly reduce
panel performance.

Kodiak X2 User Guide
10
Panel Wiring - Series vs Parallel vs Series-Parallel
Wiring your panels correctly is key to getting the highest efficiency in your unique situation.
You can wire panels in parallel (connecting all positive wires together, and all negative wires
together) or series (connecting the positive wire of one panel to the negative wire of the next).
Another wiring method is series-parallel, which involves a single series string of multiple iden-
tical parallel strings. Because the Kodiak X2 has a 24V internal battery, parallel solar panel
wiring configurations with 12V solar panels will charge the battery, but may be slower and
underperform. 12V solar panels wired in a series (under 65 VOC) or a series-parallel configura-
tion will provide optimal charging performance. See the diagram below for how to wire 4 solar
panels in a series-parallel configuration.

Kodiak X2 User Guide
11
Inergy Solar Panels (or Other MC4 Panels) Connected in Series
Connecting solar panels in series increases the voltage of the string. A VOC over 45V can be
dangerous, risking electrical shock and personal harm if not handled properly. When using so-
lar panels in series, always follow this process when connecting them to your Kodiak X2:
Step 1. Plug the blue EC8 connector of your 30’ EC8-to-MC4 Ascent Panel Cable into the blue
EC8 connector on your Kodiak X2 Power Station.
Step 2. Connect the male and female MC4 connectors on your solar panels in one continuous
string, male to female and so on. When you are done connecting your panels, you will have
one open male connector on one end of your string, and one open female at the other end.
Step 3. Connect the MC4 connectors on your EC8-to-MC4 cable to the corresponding connec-
tors on each end of your string of solar panels.You should end up with a closed loop (a com-
pleted series connection). See the next page for an illustration of this process. If you have
questions or difficulty with this setup, please contact our support team (see Contact Us).
You will know the Kodiak X2 is charging from your solar panels when the LCD screen indicates
both a charge input on the LEFT side of the LCD and an estimated charge time appears. The
battery icon in the lower left side of the screen will blink, and the dial in the center of the screen
will blink as well to indicate charging. The estimated charge time will fluctuate as the power
input and output of the system changes in real-time. It can take up to 30 seconds for charging
to begin, while the smart charger detects your panels and the input voltage stabilizes.
WARNING: DO NOT connect your EC8-to-MC4 adapter cable to your solar panel string BEFORE
plugging the EC8 connector into your Kodiak X2 Power Station. Connecting the EC8 connector
first decreases the risk of severe electrical shock. Always follow the process described above.
When disconnecting your solar panels, always go in reverse order, removing the EC8 connec-
tor from the Kodiak X2 last.
Legacy Inergy Panels With EC8 Connectors
Remember that 12V solar panels with EC8 connectors are wired in a parallel configuration,
and may underperform with the Kodiak X2. If using legacy Inergy panels with EC8 connectors,
always use the following process when connecting your panels:
Step 1. Plug one of the blue EC8 connectors on your 30’ EC8 Solar Panel Cable into the blue
EC8 connector on your Kodiak X2 Power Station.
Step 2. Connect the other end of your 30’ cable to one of the EC8 leads on your Solar Storm or
Linx panels.
Step 3. Connect additional cables as desired using the 6’ EC8 Solar panel cables between pan-
els.
You will know the Kodiak X2 is charging from your solar panels when the LCD screen indicates

Kodiak X2 User Guide
12
both a charge input on the LEFT side of the LCD and an estimated charge time appears. The
battery icon in the lower left side of the screen will blink, and the dial in the center of the screen
will blink as well to indicate charging. The estimated charge time will fluctuate as the power
input and output of the system changes in real-time.
Cell Balancing
The Kodiak X2 uses multi-cell lithium battery packs, which can become unbalanced after heavy
use or after going a long time between full charges.This means that one cell group is at a high-
er or lower state of charge (SoC) than the others. In order to resolve this imbalance, the battery
needs to be charged while the intelligent management system balances each cell group.The
Kodiak X2 employs a rapid cell balancing system to address the issue while it charges, but this
process can take several hours.You may see the SoC remain at ~99% for extended periods
until balancing finishes.You can still use the Kodiak X2 without charging up those last few per-
centage points, but you won’t get the max capacity until the system reaches 100%. Just give
your unit a full overnight charge every now and then to ensure the maximum charge capacity
is reached.
Charging for Long-Term Storage
If you intend to store your Kodiak X2 for an extended period of time, we strongly recommend
you check the state of charge once every three months. If the state of charge dips below 30%,
we recommend charging it to about 50% before putting it back into storage.The ideal battery
SoC range for long-term storage is 30 - 50%.

Kodiak X2 User Guide
13
USING YOUR NEW KODIAK X2 POWER STATION
Powering Your Gear
The Kodiak X2 Power Station has a Main Power button located on the LEFT side of the unit.
Each group of outputs are then turned on/off with their own small power button connected to
the orange line that surrounds each group. The only exception to this is the 12V car ports and
5525 DC outputs, which turn on/off at the same time when the small power button for either
section is pressed. When activating AC output, there is a 8-10 second delay before AC power
begins. To maximize your run time, connect your Kodiak X2 to a charge source while using it.
You can charge your Kodiak X2 and run your gear at the same time as long as the Dualink Par-
allel Switch is in Solo Mode.
Using the Kodiak X2 as a UPS (Uninterruptible Power Supply)
The Kodiak X2 Power Station can be used as a UPS to provide constant, reliable power to
devices of your choosing as long as they are within specification (SeeTech Specs). Before
connecting anything, verify that the Dualink Parallel Switch is in Solo Mode (with the switch on
the left side of the Kodiak X2 being pushed completely to the LEFT under the letter “S”). The
Kodiak X2 can only function as a UPS while in Solo Mode.
Connect the wall adapter to the AC Charge Input on the Kodiak X2, then connect the other end
of the wall adapter to an AC power source. If the battery is depleted, it will automatically begin
charging. Next, connect whatever device you want to supply power to by plugging into any of
the AC outlets on the front of the Kodiak X2. Press the Main Power Switch to the ON position,
followed by the AC Power Button (the small button above the AC outputs). The Kodiak X2 will
automatically recharge the battery (if it’s depleted) AND begin providing uninterrupted power
to the device you have connected. Simply leave the power on in this configuration.
In the event of a power outage and grid power isn’t available, the Kodiak X2 will automatically
switch (within ≤10ms) to battery power and continue outputting reliable power to your device.
Should grid power be restored, the Kodiak X2 will again automatically switch to allow grid
power to flow to your device and begin recharging the battery at the same time.
Solar panels can also be connected while the Kodiak X2 is in this configuration. In the event
of a power outage and grid power isn’t available, solar charging will automatically enable AND
the Kodiak X2 will switch to battery power to continue outputting reliable power to your de-
vice. Once grid power is restored, solar charging will automatically disable and the battery will
recharge via the wall adapter while providing grid power to your device.

Kodiak X2 User Guide
14
Using the Kodiak X2 in Dualink Parallel Mode
The Kodiak X2 can be paralleled with another Kodiak X2 to provide double the battery capacity
and double the AC output. To use Dualink Parallel Mode, follow the step below to ensure safe
operation. Not doing so could result in permanent damage to your Kodiak X2, risk of severe
shock, fire, property damage, or bodily harm and will void the warranty.
1. Begin with both units turned off.
2. Push the Dualink Parallel Switch (located on the left side of the unit) completely to the RIGHT,
so the switch is below the letter “P” on BOTH units as seen in FIGURE 1.
3. Connect the wall adapter to the AC OUTPUTS on the secondary unit, and the other end to
the AC INPUT on the primary unit, as seen in FIGURE 2
4.Turn on the Main Power Button on both units, but NOT the AC Power Button.
5. Verify the Parallel Mode Icon appears on the LCD of BOTH units, as seen in FIGURE 3.
6. Connect the desired AC load to the PRIMARY unit ONLY.
7.Turn the AC Power Button on for the PRIMARY unit, then the SECONDARY unit. Any AC loads
connected to the primary unit will be shared equally between the two units.
Figure 1 Figure 2

Kodiak X2 User Guide
15
Figure 3
Getting the Most Out of Your Kodiak X2
When using the Kodiak to power your gear, pay attention to the LCD display. If you are using
appliances that draw a lot of power, like a space heater or heat gun, the state of charge can
decrease rapidly, and you may not be able to use the full system capacity.There will inevitably
be some energy loss between the battery and the outputs, which means you may not be able
to use the full storage capacity with heavy loads.This energy loss is common to all electronic
devices. If run times are shorter than you expect, this is probably why. As a general rule, higher
power output usually results in lower system efficiency. Another key fact is that the DC outputs
are much more efficient than the AC. For instance, it’s better to charge your mobile devices
from the DC ports when possible, rather than plug a wall charger into the AC outputs.The Ko-
diak X2 inverter consumes a few watts of power even with no load.
Using the Kodiak X2 in Extremely Hot or Cold Weather
Temperature extremes can affect the Kodiak X2’s capacity and even prevent charging. High
temperatures are notorious for decreasing the lifespan of not just the battery, but all electron-
ics. If you plan to use the Kodiak X2 in below freezing conditions, you may need to protect it
from the cold. Do not use the Kodiak X2 outside of the specified temperature ranges (seeTech
Specs).
Storing the Kodiak X2
Store the Kodiak X2 away from flammable items and combustion sources and on a cool, dry,
non-combustible surface. Proper maintenance and storage of lithium batteries will ensure not
only the safety of your battery, but also help you maximize cycle life and performance. When
handling lithium-ion batteries, do not short-circuit, crush, drop, mutilate, penetrate with foreign
objects or otherwise modify the battery or its enclosure. Do not expose them to extreme tem-

Kodiak X2 User Guide
16
peratures or disassemble packs and cells.The safe storage and operating temperatures of the
Kodiak X2 are found inTech Specs. If a Kodiak X2 is exposed to extremely high temperatures,
or it hisses, bulges, or pops, immediately move it away from flammable materials and place it
on a non-combustible surface for at least 48 hours, and call us immediately.
Although it is very unlikely, there is always a small risk of lithium batteries catching fire. If you
do experience a lithium battery fire, douse it with copious amounts of water until extinguished,
then remove anything flammable from the vicinity of the battery. Do not attempt to touch or
move the battery as it can reignite, putting you in danger.
If you cannot douse the fire with water, allow the fire to burn out on its own in a controlled and
safe manner, away from anything flammable. Allow the device to remain on a non-combustible
surface for at least 48 hours, as lithium batteries can potentially reignite.

Kodiak X2 User Guide
17
TECH SPECS
Battery Specifications
BatteryType Lithium - LFP (LiFePO4)
Nominal Storage Capacity 1,280 Wh (50Ah, 25.6V)
Cycle Life Up to 6000, 80% capacity
Inverter Specifications
Input Maximum (1) 12A, 120VAC 60Hz
AC Output (4) 1200W, 120VAC 60Hz Continuous, Pure sine wave
AC Overload 101~110% Overload, 3 minutes
111~130% Overload, 1 minute
131~149% Overload, 1 second
150~200% Overload, 100mS
UPS Line-interactive, ≤10ms switching time
Dualink Parallel Output 2 Kodiak X2’s in parallel maximum, 2400W (120VAC 60 Hz)
output maximum
Charging Specifications
Solar Charge Controller MPPT, 18-65VDC input, 10A maximum charge rate, 400W
maximum input
AC Charging Up to 1080W maximum
DC Output
12V Car Ports (2) 12V Regulated DC, 10A maximum
USB-A Outputs (3) 5V, 2.1A
USB-C Outputs (3) 5-12V, up to 45W maximum
5525 DC Outputs (2) 12V Regulated DC, 5A maximum
Environmental Operating Specifications
DischargingTemperature 14° - 104°F (-10° - 40°C)
ChargingTemperature 32° - 104°F (0° - 40°C)
Ingress Protection IP20
Physical Specifications
Dimensions 15” wide x 10.25” tall x 9” deep
Weight 34.8 lbs (15.8 kg)
Connectivity
Wireless Connectivity Bluetooth

Kodiak X2 User Guide
18
WARRANTY INFORMATION
INERGY HOLDINGS, LLC (“Inergy Solar” or “Inergy”) warrants to the original consumer pur-
chaser that this Inergy Solar product will be free from defects in workmanship and material
under normal consumer use during the applicable warranty period identified in Paragraph 2,
below, subject to the exclusions set forth in Paragraph 6, below.This warranty statement sets
forth Inergy’s total and exclusive warranty obligation. We will not assume, nor authorize any
person to assume for us, any other liability in connection with the sales of our products.
2. Warranty Period
In each case, the warranty period is measured starting on the date of shipment to the original
consumer purchaser.The sales receipt from the first consumer purchase, or other reasonable
documentary proof, is required in order to establish the start date of the warranty period. Reg-
istration is not required.
3. “No Lemon” Policy
Inergy Solar warrants to the original consumer purchaser that should this Inergy product re-
quire service (rendered only by Inergy) on (3) three separate occasions within the above stated
warranty period, the unit can be exchanged for a replacement product of comparable type,
quality, and functionality at the request of the original consumer purchaser. Validation by an
Inergy technician of product failure is required prior to replacement.Your warranty remains in
force for the duration of the original 24-month warranty period, and is in no way terminated by
replacement product under this No Lemon Policy.
4. Remedy
Inergy Solar will repair or replace (at Inergy Solar’s option and expense) any Inergy Solar
product that fails to operate during the applicable warranty period due to a defect in workman-
ship or material.
5. Limited to Original Consumer / Buyer
The warranty on Inergy Solar’s products is limited to the original consumer purchaser and is
not transferable to any subsequent owner.
6. Exclusions
Inergy’s warranty does not apply to (i) any product that is misused, abused, modified, neglect-
ed, damaged by accident, or used for anything other than normal consumer use as authorized
in Inergy’s then-current product literature, or (ii) any product purchased through an unautho-
rized seller. Inergy’s warranty does not apply to any battery cell or product containing a battery
cell unless the battery cell is fully charged by you at least once every six months.The Kodiak X2
records critical system event data.This data can be used to determine if a battery has been im-
properly used, including but not limited to improper charging/discharging, short-circuits, water
damage, and extreme temperature exposure.

Kodiak X2 User Guide
19
7. How to Receive Service
To obtain warranty service, you must contact our technical support team via telephone, on live
web chat on www. InergyTek.com, or via email. (See Contact Us.) If our technical support team
determines that further assistance is required, they will give you a Return Material Authoriza-
tion (“RMA”) number and return shipping label.You must package the product in original prod-
uct packaging, clearly marking the RMA number on the package and including proof of your
purchase with the product.
PLEASE DO NOT ATTEMPTTO SHIP LITHIUM BATTERY PRODUCTS BACKYOURSELF. CON-
SULT WITH OUR SUPPORTTEAM BEFORE ATTEMPTINGTO SHIP ANY INERGY PRODUCT FOR
SERVICE.
CONTACT US
If you have any questions about your Kodiak X2 or the above instructions, please contact our
support team using the information here:
Phone: (877) 891-2657
Web Chat: www.InergyTek.com / Use the web chat tool at the bottom right of the page.
Phone and Chat Hours: Monday - Friday, 9:00 AM to 6:00 PM MountainTime
Email: support@inergysolar.com
Designed in the U.S.A. and Made in China
This equipment has been tested and found to comply with the limits for a Class B digital de-
vice, pursuant to part 15 of the FCC Rules.These limits are designed to provide reasonable
protection against harmful interference in a residential installation.This equipment generates,
uses and can radiate radio frequency energy and, if not installed and used in accordance with
the instructions, may cause harmful interference to radio communications. However, there is
no guarantee that interference will not occur in a particular installation. If this equipment does
cause harmful interference to radio or television reception, which can be determined by turn-
ing the equipment off and on, the user is encouraged to try to correct the interference by one
or more of the following measures:
—Reorient or relocate the receiving antenna.
—Increase the separation between the equipment and receiver.
—Connect the equipment into an outlet on a circuit different from that to which the receiver is
connected.
—Consult the dealer or an experienced radio/TV technician for help.
This device complies with part 15 of the FCC Rules. Operation is subject to the following two
conditions: (1)This device may not cause harmful interference, and (2) this device must accept
any interference received, including interference that may cause undesired operation.
Table of contents