Kogan KAWRMTTHMRA User manual

WIRELESS REMOTE MEAT
THERMOMETER DUAL PROBE
KAWRMTTHMRA


Button Function
Standby
Press this button once to turn the unit on/off.
Cook / Timer
Press to switch between Cook Mode and Timer Mode.
Probe 1 Setting
Press this button to enter the setting mode of Probe 1.
Probe 2 Setting
Press this button to enter the setting mode of Probe 2.
Meat
Press this button to select meat type.
Ta s t e
Press this button to select meat “done” setting.
Start / Stop
In Timer mode, press this button to start or stop the countdown.
Light / Decrease
In normal mode, press this button to light the LCD.
In PROG mode (“Program”) alarm setting, press it to decrease the
value.
°C/°F / Increase
In normal mode, press it to switch the units to Celsius or Fahrenheit.
In PROG mode, press it to increase the value.
OVERVIEW

Battery Replacement
When the LCD display of transmitter or receiver show the Low Battery icon, follow the steps
below to replace:
Transmitter:
1. Open the battery compartment cover located at the bottom of the transmitter by
pushing the elastic clasp
2. Take off the used batteries and install x2 new AAA batteries according to the
polarity sign (+/-) shown in the battery compartment.
3. Close the battery compartment cover back in place.
Receiver:
1. Slide the rear clip following the direction of arrow at first, then will see a screw on
the battery cover, using a screwdriver to screw out the screw to open the battery
compartment cover.
2. Take off the used batteries and install x2 new AAA batteries according to the
polarity sign (+/-) shown in the battery compartment.
3. Screw the battery compartment cover back and slide back the clip in place.
REPLACING BATTERIES

Using the Transmitter
•Remove the protective film on the front panel.
•Turn on the Transmitter by pressing the Standby button once.
•Plug the probes into the socket of Probe 1 and Probe 2 respectively, the LCD display
will show the temperatures of both probes immediately.
•Press the °C/°F button to switch between Celsius and Fahrenheit, the unit will
remember the preset display unit when off.
•Press the button Light to light the LCD.
Using the Receiver
•Remove the protective film on the front panel.
•Tu r n on the Receiver by pressing the Standby button once.
•Press the °C/°F button to switch between Celsius and Fahrenheit.
•Light the LCD by pressing the Light button.
•Press the Probe 1 Setting button to enter the settings of Probe 1, press the Probe 2
Setting button to enter the settings of Probe 2.
Meat/Program Setting Mode
1. When in the setting mode, Press the Meat button to select the type of meat to be
cooked. The preset meat types will be displayed as follows:
GBEEF (Ground Beef)->GPOUL (Ground Poultry)—►BEEF—►VEAL—►CHCKE
(Chicken)—►PORK—►P O U LT (Poultry) —►LAMB—►FISH—►PROG (Program)
2. Press the Ta s t e button to select the desired meat “done” level, selection from Rare,
Medium Rare, Medium, Medium Well, and Well Done). The programmed
temperature to reach for the selected doneness is displayed on the LCD above
“ALERT TEMP”.
3. When you choose PROG (program) mode, you can preset any alert temperature
within the range -50°C to 300°C (-58°F to 572°F). Press the Increase and Decrease
buttons to adjust the desired temperature value.
OPERATION

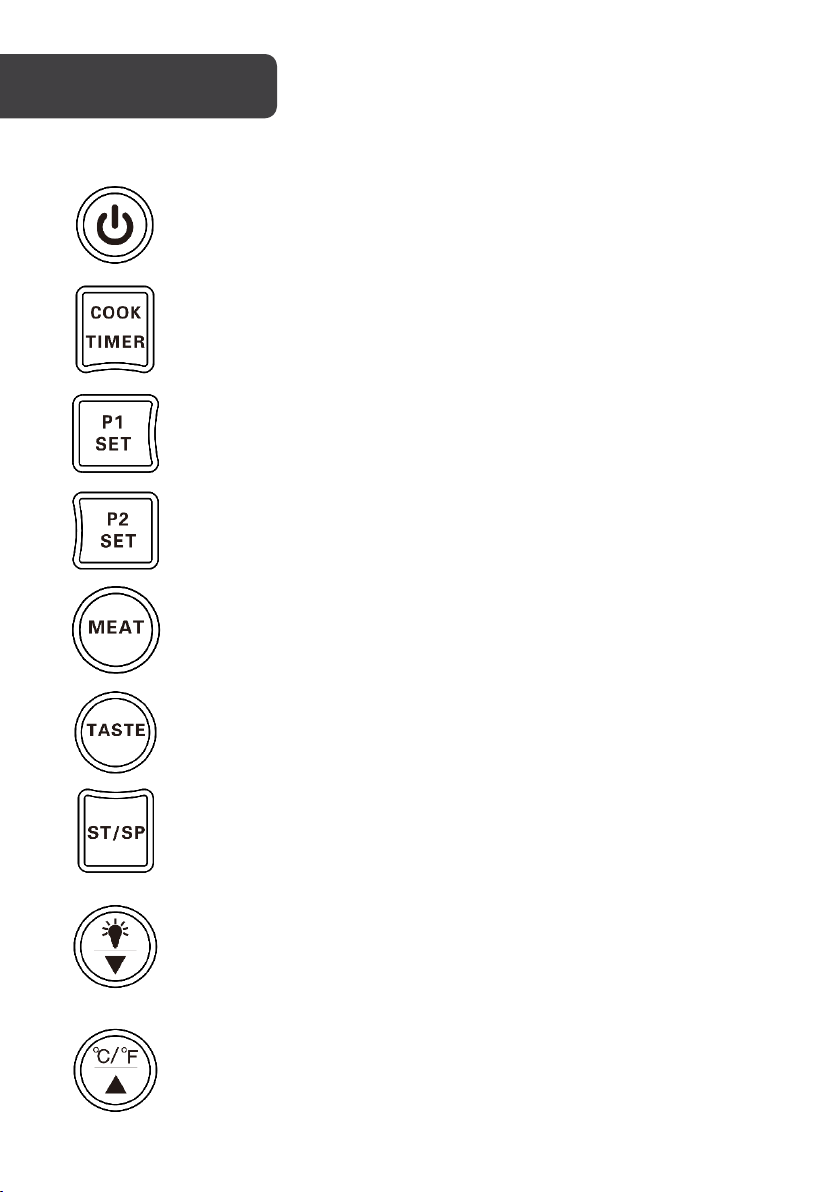
How To Use The Timer
1. Select the timer mode by pressing the Cook / Timer button.
2. The display will show two groups of “00:00” (Hours / Minutes). Press the Probe 1
Setting button to enter the setting mode of Probe 1 timer. As the Hour digits flash,
press the Increase button to increase or the Decrease button to decrease the value
to set hour value you need.
3. Press the Start/Stop button to enter the setting of minutes. As the Hour digits
flash, press the Increase button to increase or the Decrease button to decrease the
value to set hour value you need.
4. Press the Probe 2 Setting button to enter the setting mode of Probe 2 timer, with
the same input method as steps 2-3.
Note: Maximum timer value is 99 hours 59 minutes.
5. To start the timer, press the Start/Stop button. The “:” between hours and minutes
will flash to indicate that the timer is on.
6. When the preset time is up, the Alert will sound and the timer digit will flash. Press
the Start/Stop button to stop the alarm; if not manually stopped it will continue for
one minute (60 seconds). The alarm icon will keep flashing after the alarm has
stopped beeping, until the temperature falls below the preset temperature.
7. To reset the timer, enter the timer setting mode and press the Increase and the
Decrease buttons simultaneously.
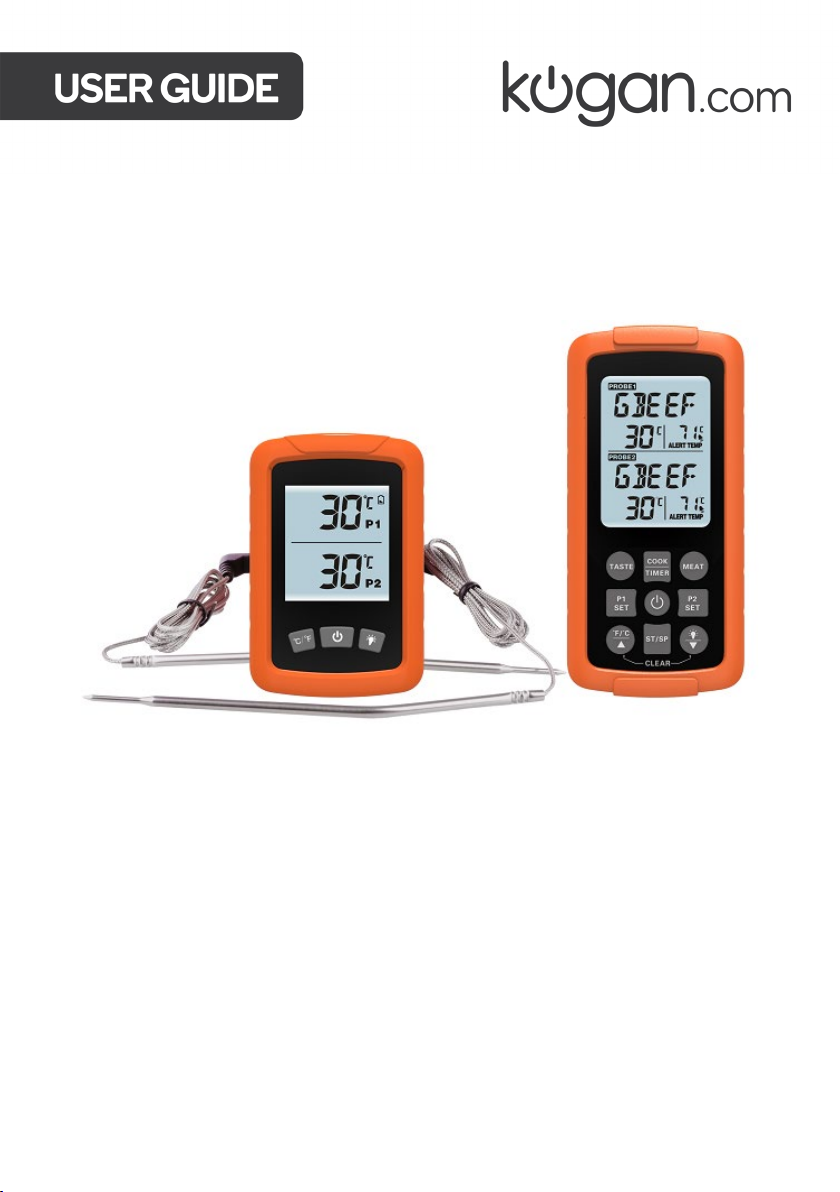
How to Cook
Ensure the wire is connected to the Transmitter, and then insert the stainless-steel probe into
the food to be cooked.
Note:For an accurate reading of the internal temperature, insert the probe at least 3cm
(1.25 inches) into middle of the thickest part of the meat. Ensure the probe is away from any
bones and is enclosed inside the meat. Do not let the probe pass through the meat to the
outside.
Once the probe is inserted, the actual meat temperature will be displayed on the left of LCD
and will increase gradually during cooking.
The alarm will automatically beep when the probe temperature reaches the preset
temperature (ALERT TEMP), indicating the meat is cooked to the desired “Done” setting.
When the preset time is up, the Alert will sound and the timer digit will flash. Press the
Start/Stop button to stop the alarm; if not manually stopped it will continue for one minute
(60 seconds). The alarm icon will keep flashing after the alarm has stopped beeping, until
the temperature falls below the preset temperature.

Preset temperatures:
Meat Type “Done” Setting
Preset temperatures
°C
°F
Ground Beef
Well done
71 °C
160 °F
Ground Poultry
Well done
74 °C
165 °F
Beef
Well done
Medium Well
Medium
Medium rare
Rare
77 °C
71 °C
66 °C
60 °C
52 °C
171 °F
160 °F
151 °F
140 °F
126 °F
Veal
Well done
Medium Well
Medium
Medium rare
Rare
74 °C
71 °C
66 °C
60 °C
52 °C
165 °F
160 °F
151 °F
140 °F
126 °F
Chicken
Well Done
74 °C
165 °F
Pork
Well Done
Medium Well
Medium
77 °C
74 °C
71 °C
170 °F
165 °F
160 °F
Poultry
Well Done
74 °C
165 °F
Lamb
Well done
Medium Well
Medium
Medium rare
Rare
77 °C
74 °C
71 °C
63 °C
60 °C
165 °F
160 °F
145 °F
140 °F
Fish
Well Done
63 °C
145 °F
Program
N/A
63 °C
145 °F

•Do not disassemble the product, as product damage may result.
•Do not immerse the product into water.
•Clean the product by wiping with a soft cloth.
•Do not drop the product or subject it to sudden shock or impact.
•The probe is only waterproof for the part of steel tube, do not immerse the wire or
the plug into water.
•The probe is not dishwasher safe.
Error code “LLL” The probes are not installed correctly, or measured temperature is
lower than its measuring range (-50°C / -58°F).
Error code “HHH” The probes are not installed correctly, or measured temperature is
higher than its measuring range (300°C / 572°F).
Display screen
not working
Make sure the batteries are installed correctly, paying attention to
polarity (+/-) markings. Batteries may need to be replaced.
Battery Low “ ”
indication Batteries may need to be replaced.
CLEANING & CARE
TROUBLESHOOTING

•Resolution: 1°
•Measurement range: -50°C to 300°C (-58°F to 572°F).
•Measurement accuracy: ± 1°C at -20°C~150°C.
•IP65 waterproof (receiver only – see Cleaning and Care section)
•Max wireless transmission distance is 100m (open filed)
•Auto Shut-off for both transmitter and receiver after 10 minutes of inactivity if the
measured temperature is stable within 2°C below 50°C.
•Countdown timer up to 99 hours and 59 minutes
•Timer and temperature settings are saved when unit is powered off
•Probe and wire can withstand temperature up to 380°C.
SPECIFICATIONS

NOTES


Need more information?
We hope that this user guide has given you
the assistance needed for a simple set-up.
For the most up-to-date guide for your product,
as well as any additional assistance you may require,
head online to help.kogan.com
Table of contents
Other Kogan Measuring Instrument manuals