Kogan KA3AGIMBALA User manual

3-AXIS HANDHELD
GIMBAL STABILISER
KA3AGIMBALA


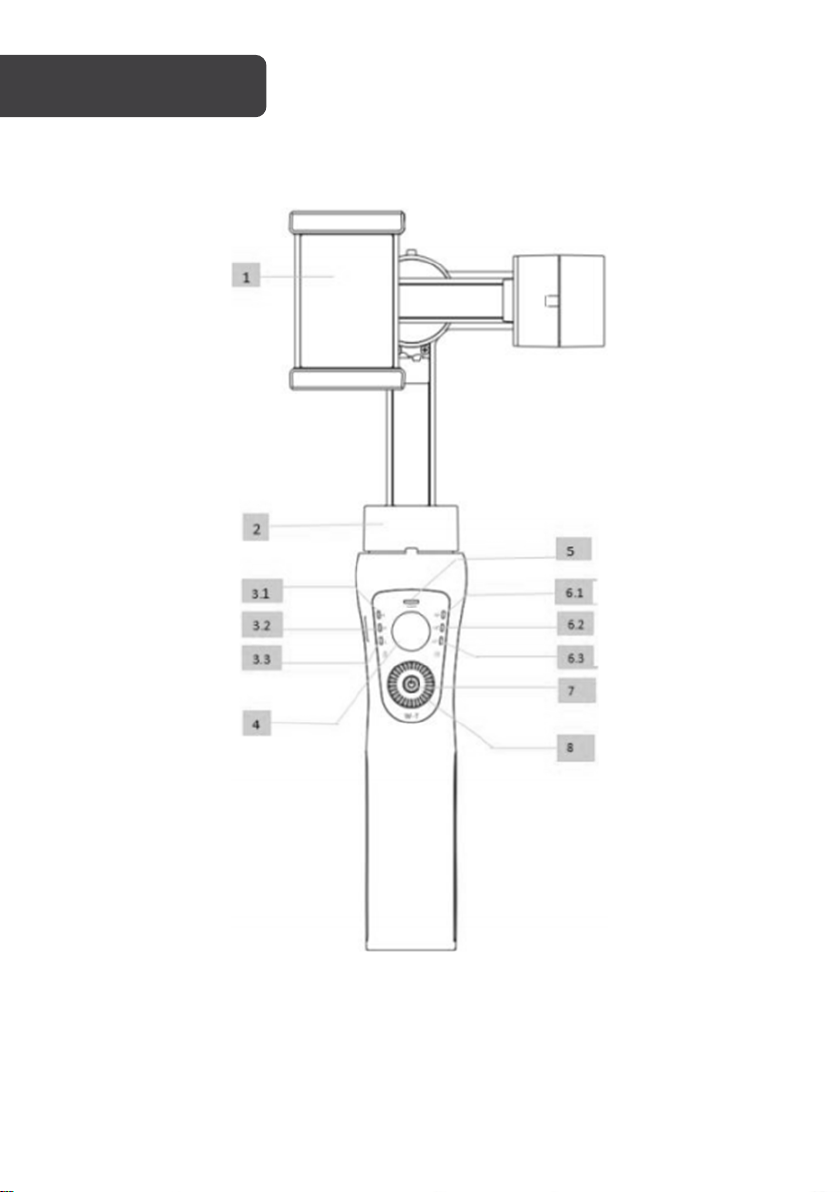
Before use, read this manual and become familiar with gimbals' components and operating
modes to ensure proper operation. Failure to read and follow the instructions and warnings
may result in serious injury to you or damage to your device or property.
•Do not use any third-party or unknown accessories or batteries.
•Do not disassemble the battery.
•Do not short-circuit the battery. Short-circuiting may occur when the battery
touches other metal objects.
•Do not charge the battery in direct sunlight.
•Always charge the battery in a designated space, away from people and animals.
•Do not leave a battery on prolonged charge when not in use.
•If the battery has a high surface temperature, leave it to cool before you try to re-
charge it.
•Do not charge the battery if the ambient temperature is below 10°C or above 45°C.
SAFETY & WARNINGS
WARNING:
•Read the entire user guide to become familiar with the features of
the product before operating.
•Failure to operate the product correctly can result in damage to the
product or personal property and cause serious injury.
•This is a sophisticated product. It must be operated with caution
and common sense and requires some basic mechanical ability.
•Incorrect use of product safely and responsibly could result in injury
or damage to the product or other property.
•This product is not intended for use by children without direct adult
supervision.
•Do not use with incompatible components or in any way otherwise
as mentioned or instructed in the product documents provided by
Kogan.com.
•The stabiliser should be used in temperatures from 0°C to 40°C. Use
of the battery in environments above 40°C can lead to a fire or
explosion. Use of battery below 0°C can lead to serious damage.

•Always use the supplied charger and observe manufacturer charging
requirements.
•Battery performance is best when within normal room temperature (5°C-20°C).
•Batteries need to be charged before use.
•Do not leave the gimbal near heat sources such as a furnace, heater, or the inside
of a vehicle on hot days.
•Store the stabiliser in a dry environment and never store the stabiliser in any
environment with a temperature of over 60°C.
•Do not leave the stabiliser unused for too long after it has been completely
discharged to prevent over-discharge of battery. This may result in battery
damage and permanent damage to the product.
Note:
•Hold the stabiliser’s handle still when it is powering up to ensure it starts up
successfully.
•Make sure the batteries are fully charged before each time of use.
•Discharge the battery to 40%~65% if it will not be used for over 10 days. This can
greatly extend the overall battery life.
•Charge and discharge the battery completely once every 3 months to keep it
active.
CAUTION:
•The stabiliser is a high -precision control device; damage may be
caused to stabiliser if it is dropped or subject to external force, which
may result in malfunction.
•Make sure the rotation of stabiliser axes is not blocked by external
force when the stabiliser is powered on.
•The stabiliser is not waterproof or water-resistant. Prevent contact
with liquid of any kind
•It is recommended to use a dry cloth for cleaning.
•Protect the stabiliser from dust and sand during use.

OVERVIEW
Smartphone holder
Bluetooth indicator
Pan and Tilt mode
Pan Follow
Lock mode
Power/mode
Zoom control
Pan motor
>66% Battery
>33% Battery
<33% Battery
Joystick

1/4" thread screw
Holder adjustment
Roll motor
Balance screw
Adjustable arm
Pitch motor
USB power out
Micro USB port
Shutter

Mounting a smartphone
Adjust balance
If the smartphone does not stay levelled when mounted:
1. Loosen the roll balance knob.
2. Make small adjustments by sliding the horizontal arm until the phone balances.
3. Tighten the thumbscrew after the phone is well balanced and level to ensure
normal operation.
INSTRUCTION
Place the
smartphone into
mounting clip as
shown. Slide the
smartphone to the
right until it touches
the tilt motor.
Note:
Proper adjustment of balance ensures better power saving during operation. The
stabiliser may still function well when the gravity centre is not properly configured,
however, it may lead to more power consumption on the motors and can greatly
affect the torque output.

Change orientation
1. Switching from horizontal to vertical:
•Keep the phone facing yourself and rotate the stabiliser handle over 70
degrees in a clockwise or counter-clockwise direction; stabiliser will enter
vertical shooting mode.
2. Switching the mount direction:
a. Loosen the smartphone clamp thumbscrew and rotate the clamp to the
vertical position.
b. Place your smartphone on the clamp
c. Tighten the clamp thumbscrew to ensure normal operation.
Note:
Only convert the phone holder when the gimbal stabiliser is turned off.

Charging during use
Connect the Micro USB Port on the side of stabiliser’s handle to a power source, such as a
power pack (not included), to extend run-times.
Mobile charging
The USB port at the bottom of the stabiliser handle can be used for the charging of your
smartphone while use.
•An L-shape charging connector is required when the smartphone is mounted
horizontally on the mobile clamp.
CONNECTIVITY

Downloading the app
A. Scan the QR Code below (Android & iOS) to download the “Gimbal Pro” app.
B. Find the "Gimbal Pro" app on the Google Play or Apple App Store.
Bluetooth Connection
1. Using the smartphone's camera
a. Power on the stabiliser
b. Turn on Bluetooth in your smartphone setting.
c. Find the Bluetooth name 'Stabilizer_xxxxxx' and select it to pair.
2. Using the app
a. Power on the stabiliser
b. Turn on Bluetooth
c. Enter the app’s device searching function, find the device name
"Stabilizer_xxxxxx", then click the device name to enter the camera
interface.
Gimbal Pro

App overview
1
Photo & video switch
9
Gimbal battery
2
Panorama & time-lapse
10
Phone battery
3
Shutter & shooting
11
Flash
4
Toggle camera
12
Home
5
Gallery
13
Camera modes
6
Bluetooth
14
Mode select
7
Face/object tracking
15
Settings
8
Mode status

Power On
Press and hold the power/mode button for 3-4 seconds until the Mode Indicator light
flashes blue and all indicators then illuminate in blue.
Power Off
Press and hold the power/mode button for 3-4 seconds until the Mode Indicator light dims.
Shutter button
Press once to take a picture.
Joystick
Controls the movement of the tilt, pitch, and roll motors (up/down and left/right),
depending on the selected mode.
OPERATION
Power/mode

Switching stabiliser modes
1. The stabiliser enters Pan & Tilt Following Mode by default when powered on.
2. Press the power button once when the unit is on to enter Pan Following Mode.
3. Press the power button again while in Pan Following Mode to enter Locking Mode.
Note:
The Joystick Function can be used in all 3 modes.
Pan & Tilt
Following Mode
Single press
Locking Mode
Pan Following
Mode
Single
Single press

Pan & Tilt Following Mode (default):
The Roll axis is locked.
The camera pan and tilt will rotate smoothly
following the movement of the camera.
Pan Following Mode:
The Tilt and Roll axes are locked.
The pan axis rotates smoothly with a turn of the
wrist.
Locking Mode:
All 3 axes are locked.
The camera stays still and stable and will not follow
the movement of the handle.
1/4" thread screw
Allows the gimbal to mounted on other devices with a compatible 1/4” thread, such as a
tripod or mount.

Min.
Standard
Max.
Input voltage
3.4V
3.7V
4.2V
Operating current
150mAh
1500mAh
3000mAh
Operating temperature
0˚C
40˚C
Operation time
10-12 hours
Weight
455g
Pitch angle range
330˚
Roll angle range
160˚
Pan angle range
330˚
Compatible devices
Smartphones under 6.0” and GoPro 3/4/5/6
Controllable pitch angle
-155˚
+155˚
Controllable roll angle
-30˚
+30˚
Controllable Pan angle
-150˚
+150˚
Maximum load
250g
Charging time
3-4 hours
Charging voltage
5V
Charging current
1A
Power output voltage
5V
Power output current
1A
SPECIFICATIONS

The product should be packed with the following items (including this user guide); if you are
missing any items or components, contact Kogan.com immediately.
1 x Gimbal stabiliser
1 x Micro USB cable
1 x User Guide
1 x lanyard
IN THE BOX

NOTES


Need more information?
We hope that this user guide has given you
the assistance needed for a simple set-up.
For the most up-to-date guide for your product,
as well as any additional assistance you may require,
head online to help.kogan.com
Other manuals for KA3AGIMBALA
1
Table of contents
Popular Telephone Accessories manuals by other brands

ZyXEL Communications
ZyXEL Communications P-2002L quick start guide

Acuity Brands Lighting
Acuity Brands Lighting HOLOPHANE Esplanade ESL3 manual

Depaepe Telecom
Depaepe Telecom Premium 20 user manual

Eela Audio
Eela Audio EA815/2 user guide

NEC
NEC ElectraElite IPK Installation and maintenance manual

Wheelock
Wheelock PS-15A installation instructions

Beam
Beam Man Down RST410 Installation and user guide

Pitney Bowes
Pitney Bowes 3400 PRINTER OPTION Operator's guide

Grandstream Networks
Grandstream Networks HT802 Quick installation guide

Siemens
Siemens Gigaset AL110A manual

PORT
PORT CMD0450 Quick setup guide

Sony Ericsson
Sony Ericsson HBH-DS205 user manual