Kogan KALED55UHDZD User manual

11
USER MANUAL

Table of Contents
Safety Instructions.............................................................................................................................3
General Safety Instructions.......................................................................................................3
Installation........................................................................................................................................4
Cleaning............................................................................................................................................5
General Description..........................................................................................................................6
Specifications & Accessories........................................................................................................6
Specifications.................................................................................................................................6
Accessories......................................................................................................................................6
Input terminals...............................................................................................................................6
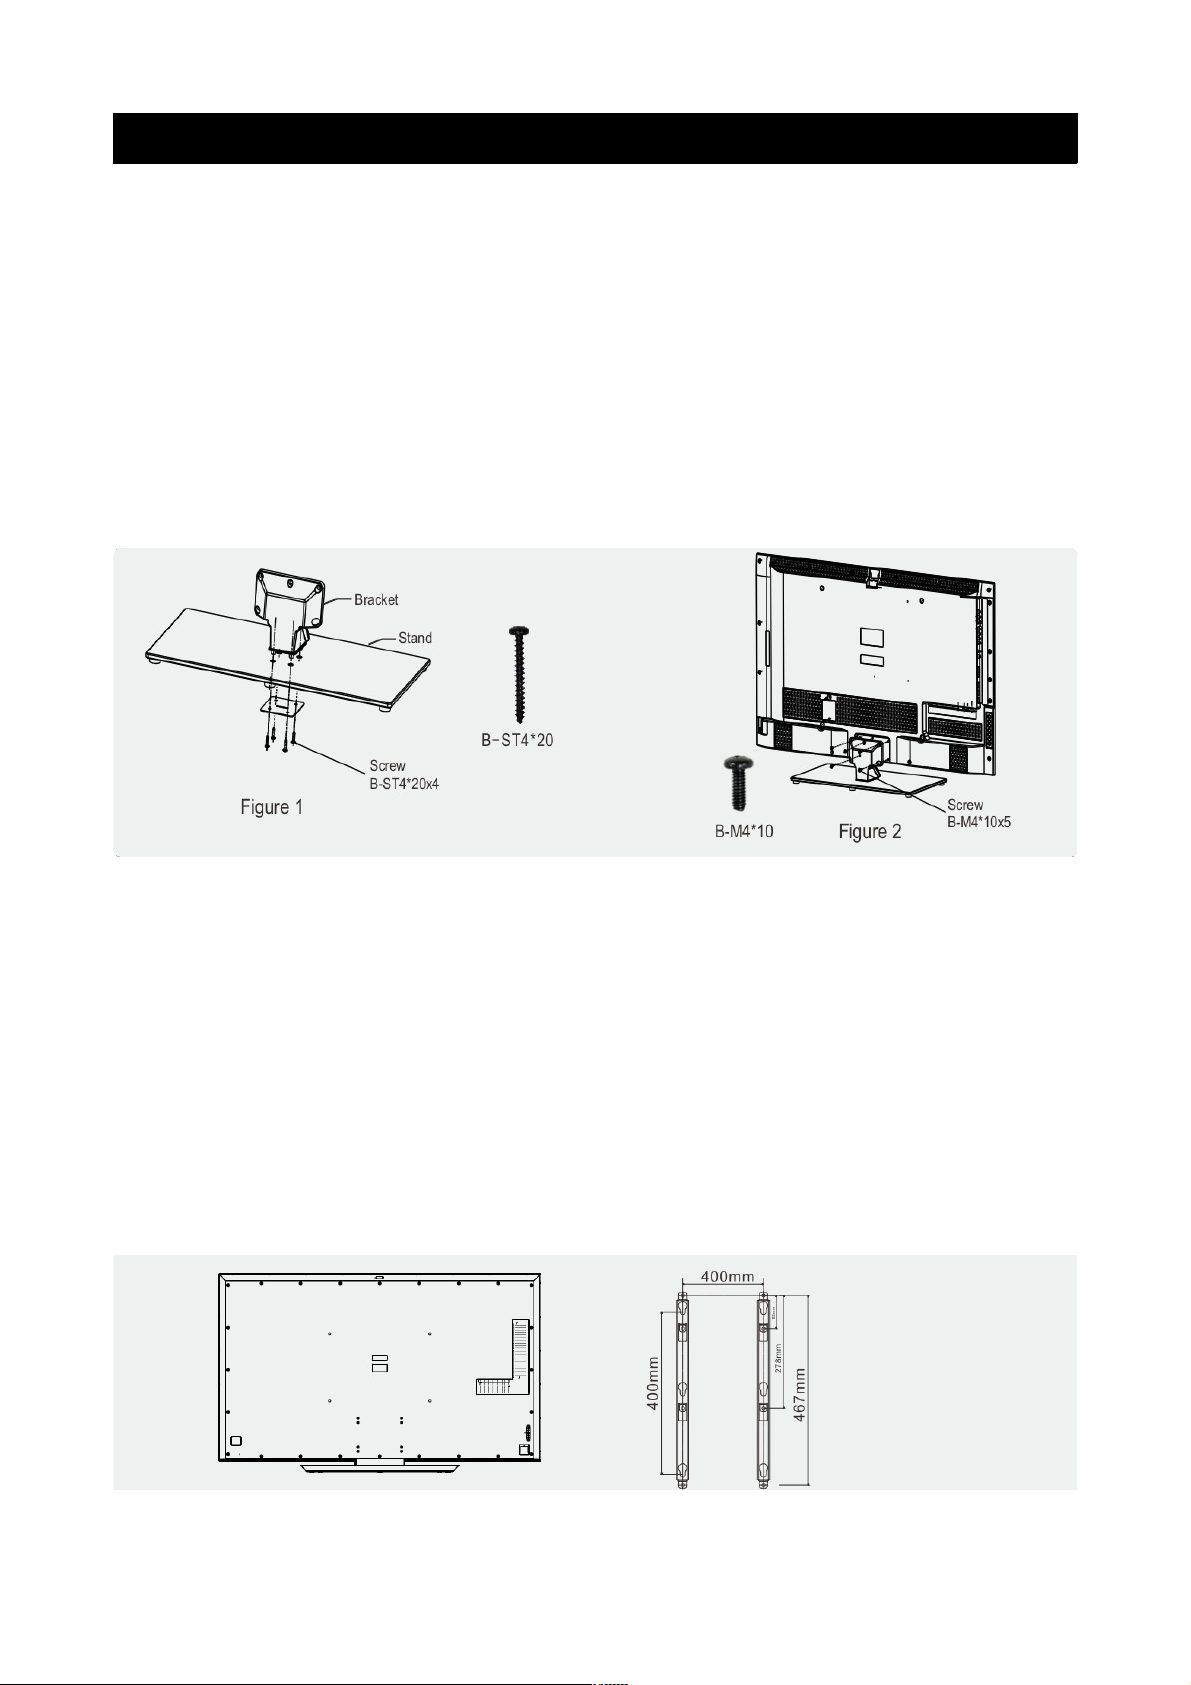
Assembling the Stan ......................................................................................................................7
Wall Mounting Instructions.......................................................................................................7
Overview...............................................................................................................................................9
Back Panel........................................................................................................................................9
Front Panel......................................................................................................................................9
Remote Control............................................................................................................................10
Installing Batteries in the Remote Control........................................................................12
External Connections......................................................................................................................12
Antenna Connection .................................................................................................................12
Basic Operation.................................................................................................................................13
Turning the TV on an off........................................................................................................13
Main Interface................................................................................................................................13
TV Applications............................................................................................................................14
Menu System......................................................................................................................................15
TV Menu...........................................................................................................................................15
Soun ...................................................................................................................................................15
Soun Mo e...................................................................................................................................15
Equalizer..........................................................................................................................................16
Balance............................................................................................................................................16
Auto Volume ................................................................................................................................16
Surroun Soun ...........................................................................................................................16
SPDIF Mo e...................................................................................................................................16
HDMI Soun ...................................................................................................................................16
Image.....................................................................................................................................................17
Picture Mo e..................................................................................................................................17
Aspect Ratio .................................................................................................................................17
Color Temp ...................................................................................................................................17
A justing the Backlight.............................................................................................................17
Win ow A just.............................................................................................................................17
Program................................................................................................................................................18
Auto Search...................................................................................................................................18
EPG(Use only in DTV).............................................................................................................18
ATV Manual Search.....................................................................................................................18
DTV Manual Search.....................................................................................................................18
Program E it ................................................................................................................................19
Signal Information (Use only in DTV)...............................................................................19
Input Source.................................................................................................................................20
1

Function................................................................................................................................................21
Time.......................................................................................................................................................23
PVR (Personal Vi eo Recor er)................................................................................................24
PVR File System..........................................................................................................................24
PVR Gui e......................................................................................................................................25
Time shift........................................................................................................................................25
Instant recor ing........................................................................................................................25
Recor ing in stan by mo e...................................................................................................26
DTV EPG (Electronic Program Gui e) .............................................................................26
Digital Me ia Player........................................................................................................................27
Device an File Management.....................................................................................................27
Initialization Interface...............................................................................................................27
USB Support......................................................................................................................................28
Photos.............................................................................................................................................28
Music................................................................................................................................................28
Movie...............................................................................................................................................29
Sync View......................................................................................................................................29
External Connection......................................................................................................................30
Connecting a VCR.....................................................................................................................30
Connecting a Camcor er........................................................................................................31
Connecting a DVD Player/Blu-Ray Player/Set-Top Box via DVI...........................32
Connecting a DVD Player/Blu-Ray Player/Set-Top Box via HDMI........................33
Connecting a Digital Au io System...................................................................................34
Connecting to PC......................................................................................................................35
Supporte Signals....................................................................................................................36
Troubleshooting..............................................................................................................................37
2

Safety Instructions
General Safety Instructions
Risk of electric shock. DO NOT OPEN!
Do not attempt to service the television yourself, as
opening or removing the covers may expose you to
angerous voltage or other hazar s. Refer all servicing to
the Kogan customer support team.
To re uce the risk of fire or electric shock, o not expose this
pro uct to rain or moisture. The television shoul not be
expose to ripping or or splashing, an no liqui fille objects
such as vases shoul be place on the case.
In the event of smoke, strange noises or a strange smell from
the unit, you shoul follow these steps:
•Turn off the unit imme iately.
•Disconnect the power plug from the power outlet.
•Contact the Kogan customer support team. Never
attempt to make repairs yourself.
Never push objects of any kin into the set through the
cabinet slots as they may touch angerous voltage
points or short-circuit parts that coul result in a fire or
electric shock. Never spill any liqui s onto the set. Use
special caution in househol s where chil ren are
present. The television is not suitable for chil ren un er
4 years ol to operate.
Power supply cor s shoul be route safely to prevent
angers ue to amage cor s.
The mains plug is the main isconnect metho , so it shoul
be easily accessible an not be obstructe uring use.
To avoi fires, no nake flame sources such as lit can les or
burning incense shoul be place onto the casing of the
television.
Do not pull the plug out of a power outlet by pulling on the
power cable. Always grasp the plug an pull.
Never touch the plug with wet han s.
3

An outsi e antenna system shoul not be locate in the
vicinity of overhea power lines or other electric light or
power circuits.
When installing an outsi e antenna system, extreme
care shoul be taken to keep from touching such power
lines or circuits, as contact with them may be fatal.
Always turn the set off when it is not being use .
Unplug the television from the power outlet when it will
not be use for a long time or when there is an
electrical storm.
Never touch the antenna cable uring a lightning storm.
Excessive volume from earphones an hea phones can
cause permanent hearing loss. Always monitor the volume of
noise from these evices, especially when chil ren are using
them.
Installation
Ventilation shoul not be impe e or limite by
covering the ventilation slots with items such as
newspapers, tablecloths, curtains etc..
At least 10cm of space shoul be left aroun the
apparatus for sufficient ventilation.
The television shoul be situate away from heat
sources such as ra iators, heaters, stoves or other
pro ucts that pro uct heat.
Place the television in a position where the screen is
not expose to irect sunlight. It is best to have soft
in irect lighting while watching, an you shoul avoi
a completely ark viewing environment an
reflections to avoi eye fatigue.
Keep the pro uct away from high magnetic fiel s
(such as near an amplifier speaker) to avoi affecting
the tint.
Do not place the television on an unstable table, stan
or shelf. The set may fall, causing serious injury as well
as amage to the television itself.
If moving the television on a cart, move the unit with
care as su en stops an starts may cause the
television to overturn.
4

Do not place this television near water, for example
near a bathtub, wash bowl, kitchen sink, laun ry tub,
swimming pool or in a amp basement etc..
When moving the television to a warm location from
a col location, allow some time for any ew or
con ensation insi e the television to evaporate fully
before you turn the unit on.
To prevent injury, the television must be securely
attache to the floor/wall in accor ance to the
supplie installation instructions.
Cleaning
Unplug the television from the power supply before
cleaning. Do not use any liqui cleaners or harsh
chemicals. Use a soft, amp cloth.
5

General Description
•Zero X ra iation complies to green environment protection requirements
•Connect to computer irectly to create a TV/Monitor combo
•MHL2.0
•An roi 4.2
•USB 3.0
•16:9 wi escreen
•Auto tuning an fine tuning.
•PC VGA input
•Component compatible (480i, 480P, 576i, 576P, 720P, 1080i, 1080P)
•HDMI input
•Programmable sleep timer
•No signal automatic power off
Specifications & Accessories
Specifications
Mo el
KALED55UHDZD
Display Screen Size 55” Diagonal
Maximum Resolution 3840 x 2160
Power Supply ~110-240V, 50/60Hz
TV Receive System PAL/SECAM: BG, DK, I DVB-T
Frequency Range DTV: 5-12, 21-69
Vi eo In PAL/NTSC/SECAM
Antenna Input Impe ance 75ohm unbalance
Speaker Output Power 2 x 5W
Remote Power Input DC 3V (Two AAA batteries)
Power Consumption 120W
Stan by Consumption <1W
Dimensions
(LxWxH)
With stan 1231.2 x 315 x 764.5mm
Without stan 1231.2 x 53.7 x 711mm
Weight
(Net)
With stan 26.54kg
Without stan 22.91kg
Operating Temperatures 0°C ~ 40°C
Accesories
Remote Control
Input Terminals
1 x Antenna jack 4 x HDMI inputs
1 x PC-RGB input 3 x USB inputs
1 x COMPONENT input 1 x CVBS output
1 x AV input 1 x SPDIF output
1 x Hea phone output
6

Assembling the Stand
If you nee to remove or assemble the stan , please rea the following:
•Before attaching/ etaching the stan , be sure to turn the TV off.
•Before performing any work, sprea cushioning out over the base area to
lay the TV on. This will prevent it from being amage .
Assembly Instructions
1. Fix the bracket at the stan with the four screws. (Fig. 1)
2. Put the television on the table, fix the stan an the unit with the screws
supplie in the carton. (Fig. 2)
3. To etach the stan from the TV, please reverse these steps.
Wall Mounting Instructions
Your LED TV is able to accommo ate wall mounting with the use of a wall
mount bracket (bracket an screws not supplie with the LED TV) an the
mounting holes on the back of the unit. We recommen removing the TV stan
prior to wall mounting the TV.
•After etaching the stan , fasten 4 mounting screws into the 4 screw
holes on the rear cover, as shown below.
•Fasten wall mounting bracket with screws on the wall.
•Carefully check for mounting strength before releasing the LED TV.
7

1. Please ensure the istance of the wall-mounting holes are 200mm or
400mm on the back cabinet before mounting your TV on the wall.
2. Mark the horizontal istance screw holes A an B with a pencil on the wall
by using the long wall-mounting bracket as a ruler.
3. Align the upper holes on the short wall-mounting bracket to A an B, then
mark the vertical istance screw holes C an D with a pencil on the wall.
4. Drill the holes at A, B, C an D positions on the wall.
5. Drive Nylon sleeves into the screw holes on the wall.
6. Fasten short wall-mounting bracket on the Nylon sleeves with self-tapping
screws on the wall.
7. Fasten long wall-mounting bracket with screws into the two screw holes
on the rear of the cabinet.
8. Lift the TV with another person an hang it on the wall.
N TES
•Please confirm that your wall has the strength to withstan the weight of
the TV.
•Be careful not to scratch the panel an TV cabinet when you fasten the
screws to the TV.
8

verview
Back Panel
You can connect the TV to vi eo evices such as DVD/Blu-Ray players, VCR an vi eo cameras
as well as gaming consoles.
Front Panel
The buttons on the lower left panel control your TVs basic functions. For a vance features you
must use your remote control.
1 Power Switch Press to turn the TV on or off.
2 Remote control Sensor
Power In icator
Aim the remote at this spot on the TV.
No Light: In power on mo e.
White: In stan by mo e.
3 INPUT Toggles between all of the available input sources.
4 MENU Press to isplay an on-screen menu of your TVs features.
5 PROG Press to change programs.
6 VOL Press to increase or ecrease the volume.
7 Stan by Button Press to toggle between normal an stan by mo es.
9

Remote Control
10

11
Note:
Before turning off the main power, or turning off the power supply, you must
switch the television into stan by mo e by pressing the POWER button on
the remote control or on the television set itself.
Once the television is in stan by mo e, you may turn off the mains power
supply.

Installing Batteries in the Remote Control
Notes
•One loa of batteries shoul last a year un er normal use.
•If you o not inten on using the remote control for an exten e perio of
time, remove the batteries to avoi leakage.
•Do not mix ol an new batteries together.
•The batteries shoul not be expose to excessive heat such as irect
sunlight, fires or similar situations.
External Connections
Antenna Connection
Antenna input impe ance of this unit is 75ohm. VHF/UHF 75ohm coaxial cable
can be connecte to the antenna jack irectly. If the antenna cable is 300ohm
parallel flat fee er cable, you will nee to use the 300ohm/75ohm converter to
connect the antenna cable to the antenna jack. For etails, see below.
Antenna with 300ohm flat twin lea s Antenna with 75ohm roun lea s
12

Basic peration
Turning the TV on and off
1. Insert the power cor into a power outlet.
2. If the TV is in stan by mo e, press the POWER
button on the remote control or the “ ” button
on the bottom panel of the LED TV.
3. Normal picture will be isplaye on the screen
after approximately 15 secon s. If no signal input is
etecte , “NO SIGNAL” will be isplaye on the screen.
4. If temporary power off is require , press the POWER button on the
remote control or the “ ” button on the bottom panel of the LED TV.
5. If you want to completely switch off the power to the unit, unplug the
power cor from the wall completely.
6. After switching the unit off, you shoul wait at least 5 secon s before
switching it back on.
Status In ication Lamp
Re : stan by mo e
Green: power on
Auto Power-off
1. If there is no signal, the TV will automatically enter stan by mo e after 10
minutes.
2. In VGA mo e, if there are no operations after 15 secon s, TV will enter
stan by mo e.
Memory before turning TV off
The picture an soun settings an preset channels will be memorise at the
point when the TV is turne off. When the TV is starting up again, it will come
on with these settings again.
Main Interface
You will enter the main menu once the TV is turne on.
13

Arrow buttons: the selecte menu item will be outline in orange.
OK button: enter the menu option that you have selecte .
INPUT button: You will enter the relevant option irectly.
The state icons at the top right corner are as follows:
1. A to home screen 2. All caps 3. Change Wallpaper 4. Search
5. Setting 6. Mass Storage 7. Wire
Note:
1. The first area as shown in the image will isplay the current vi eo image.
When there is no signal, it will isplay a snowflake.
2. The secon area shows some small esktop plug-ins. Select one an press
OK to enter the relevant application.
3. The thir area is the short-cut menu. Select one an press OK to enter the
relevant short-cut options.
TV Applications
The application menu isplays the applications that come pre-installe on the
television, along with any applications you have ownloa e .
Menu Button: Open or Close the app menu
Exit Button: Return to the main menu
Arrow Button: Select the application which you want
OK Button: Enter the application you've selecte .
Note: When the applications take up more than one page, an the focus is on
the left or right si e of each line, the left/right buttons will switch pages.
14

Menu System
TV Menu
Menu button: Open the TV menu.
Exit button: Close the TV menu.
Arrow buttons: Select the setting which you want to change.
OK button: Enter the selecte settings menu.
Note: Enter the function option by click the status bar.
Sound
Sound Mode
You can select the type of special soun to be use when watching a given
settings broa cast. Your TV has five soun settings (“Stan ar ”,“Music”,
“Movie”,“Sports”, “User”) that are preset at the factory.
1. Press / key to select "Soun Mo e" option.▲ ▼
2. Press / key to select one soun mo e.◀ ▶
•Stan ar : Selects the normal soun mo e.
•Music: Select the soun mo e for music.
•Movie: Provi es live an full soun for movies.
•Sports: Emphasises bass over other soun s.
•User: Selects your custom soun settings (See "User settings for Soun ”).
15

Equalizer
1. Press / key to select an equalizer item. ▲ ▼
2. Press OK key to enter the equalizer submenu.
The soun settings can be a juste to suit your user
preferences.
1. Press / key to select a particular item.▲ ▼
2. Press / key to ecrease or increase the value of a◀ ▶
particular item.
Note: The a juste values are store accor ing to the selecte particular item.
Balance
If the volumes of the left speaker an the right speaker are not the same, you
can a just the "Balance" to suit your personal preference.
1. Press / key to select "Balance" option.▲ ▼
2. Press / key to ecrease or increase the value of the item.◀ ▶
Auto Volume
Each station will have its own signal con itions which inclu e varying volume
levels. As it is inconvenient to a just the volume every time the channel is
change , “Auto Volume” automatically a justs the volume of the esire
channel by lowering the soun output when the mo ulation signal is high, or by
raising the soun output when the mo ulation signal is low.
1. Press / key to select “Auto Volume" option.▲ ▼
2. Press / key to select “On” or “Off”.◀ ▶
Surround Sound
This is use to turn on surroun soun to gain better soun effect.
Press / key to select "Surroun soun " option.▲ ▼
Press / key to select “On” or “Off”.◀ ▶
SPDIF Mode
This is use to select "SPDIF Mo e" .This option is only use in HDMI\DTV
mo e.
Press / key to select "SPDIF Mo e" option.▲ ▼
Press / key to select "RAW" or "PCM".◀ ▶
HDMI Sound
This option is only use in HDMI mo e.
Press / key to select “HDMI Soun " option.▲ ▼
Press / key to select HDMI Soun mo e, HDMI or VGA.◀ ▶
16

Image
Picture Mode
Your TV has five picture settings (Stan ar , Soft, Vivi , User, Dynamic) that are
preset at the factory. Only "User" mo e can be set to your preference by
a justing particular items such as Contrast, Brightness, Colour, Sharpness, Tint.
Press / key to select "Picture Mo e" option.▲ ▼
Press / key to select one picture mo e.◀ ▶
Aspect Ratio
You can select the picture size which best correspon s to your viewing
requirement.
Press / key to select “" option. Aspect Ratio▲ ▼
Press / key to set the scale mo e.◀ ▶
You can also press the “Aspect” key on the remote control to select one of the
scale mo es. Each source has ifferent scale mo es. (16:9, 4:3, Panorama, Movie,
Subtitle, Dot by ot)
Color Temp
You can change the color of the entire screen
accor ing to your preference.
1. Press / key to select "Color Temp" option.▲ ▼
2. Press / key to select one color temp.◀ ▶
Adjusting the Backlight
You can change the brightness of the entire screen accor ing to your
preference.
1. Press / key to select "Backlight" option.▲ ▼
2. Press / key to select one backlight mo e.◀ ▶
Window Adjust
This option is only use when VGA mo e has signal.
1. Press / key to select “Win ow A just” option.◀ ▶
2. Press OK key to isplay the “Win ow A just” menu.
17
Stan ar : Keeps whites white.
Warm: Makes whites re ish.
Cool: Makes whites bluish.

Program
Auto Search
Press / key to select "Auto Search" option. Then▲ ▼
press OK key to start a notice win ow. In this notice
win ow, you can select country in the “Country
Selection” option an set “Tune Type” option.
The number of searche channels will be shown on the
screen. If you set “Tune Type” to “DTV+ATV”, once
searching for DTV channels is over, the TV will start to
search for analog channels. (Please note, Australia no longer
has analog TV signals). When the whole searching is finishe ,
all the channels will be store in memory, an a message will
appear on the screen as per the iagram on the right:
NOTE:If you want to exit the search, you can press the EXIT
button.
EPG(Used only in DTV)
Press / key to select “EPG" option.▲ ▼
Press “OK” key to enter EPG submenu.
ATV Manual Search
This function is to search manually for analogue television signals. It will not
successfully tune into any stations in Australia.
DTV Manual Search
In the ATV/DTV source, you can choose “DTV Manual
Search” to enter “DTV Manual Search” menu. You can use
/ button to choose the channel an press OK button to◀ ▶
search, an then the TV will store the DTV channel if there
is a DTV signal present.
18

Program Edit
You can use / button to choose “Program E it” an enter▲ ▼
the menu, press the Blue/Re /Yellow colour button on the
remote control to skip, elete an move programs, also
you can press FAV button to a to your favourite list.
•Delete: You can press RED button to enter "DEL"
menu, then choose the channel you want to elete
an press RED button again to elete.
•Move: You can press the / button to choose the▲ ▼
channel in ATV mo e you want to move an press
YELLOW button to move it.
•Skip: You can press the / button to choose the▲ ▼
channel you want to skip an press BLUE button
to skip it when you change channels.
•FAV: If you like a channel, you can choose “FAV”
button in the menu to a it to your favourite list.
Then you can press “FAV” button on the remote
control to choose your favourite channel instantly.
Signal Information (Used only in DTV)
Press / key to select “Signal Information" option.▲ ▼
Press “Ok”or key so you can see the signal information of▶
the DTV channel.
NOTE: Signal Quality/Signal Strength (DTV Only): Unlike
analogue channels, which can vary in reception quality,
igital channels must have perfect reception quality or you
will not receive them at all. Unlike analogue channels, you
are not able fine tune a igital channel. If the signal
strength in icates that the signal is weak, a possible
solution is to a just your antenna to increase the signal
strength. Continue to a just the antenna until you fin the
best position with the strongest signal.
19
Other Kogan TV manuals

Kogan
Kogan KALED19XXXYA User manual

Kogan
Kogan KALCD42FHDWA User manual

Kogan
Kogan KALED503DSA User manual

Kogan
Kogan KALED503DSA User manual

Kogan
Kogan LET40T3 User manual

Kogan
Kogan KALED503DZA User manual

Kogan
Kogan KALED46SMTWA User manual

Kogan
Kogan KALED16XXXA User manual

Kogan
Kogan KAWLM42EXTA User manual

Kogan
Kogan KHSTVQCDONB Agora Smart+ User manual

Kogan
Kogan KALED32XXXYB User manual

Kogan
Kogan KGNFHDLEDH40VA User manual

Kogan
Kogan KALCD39FHDXA User manual

Kogan
Kogan KALED24DVDA User manual

Kogan
Kogan KALED55SMTZA User manual

Kogan
Kogan KALED16XXXYA User manual

Kogan
Kogan KALED55XX1ZA User manual

Kogan
Kogan KALED46BLSWB User manual

Kogan
Kogan KALED32BRPA User manual

Kogan
Kogan KALED24XXXA User manual