Kogan KALED55XXXTA User manual


Table of Contents
Safety Instructions..................................................................................................................................................................................2
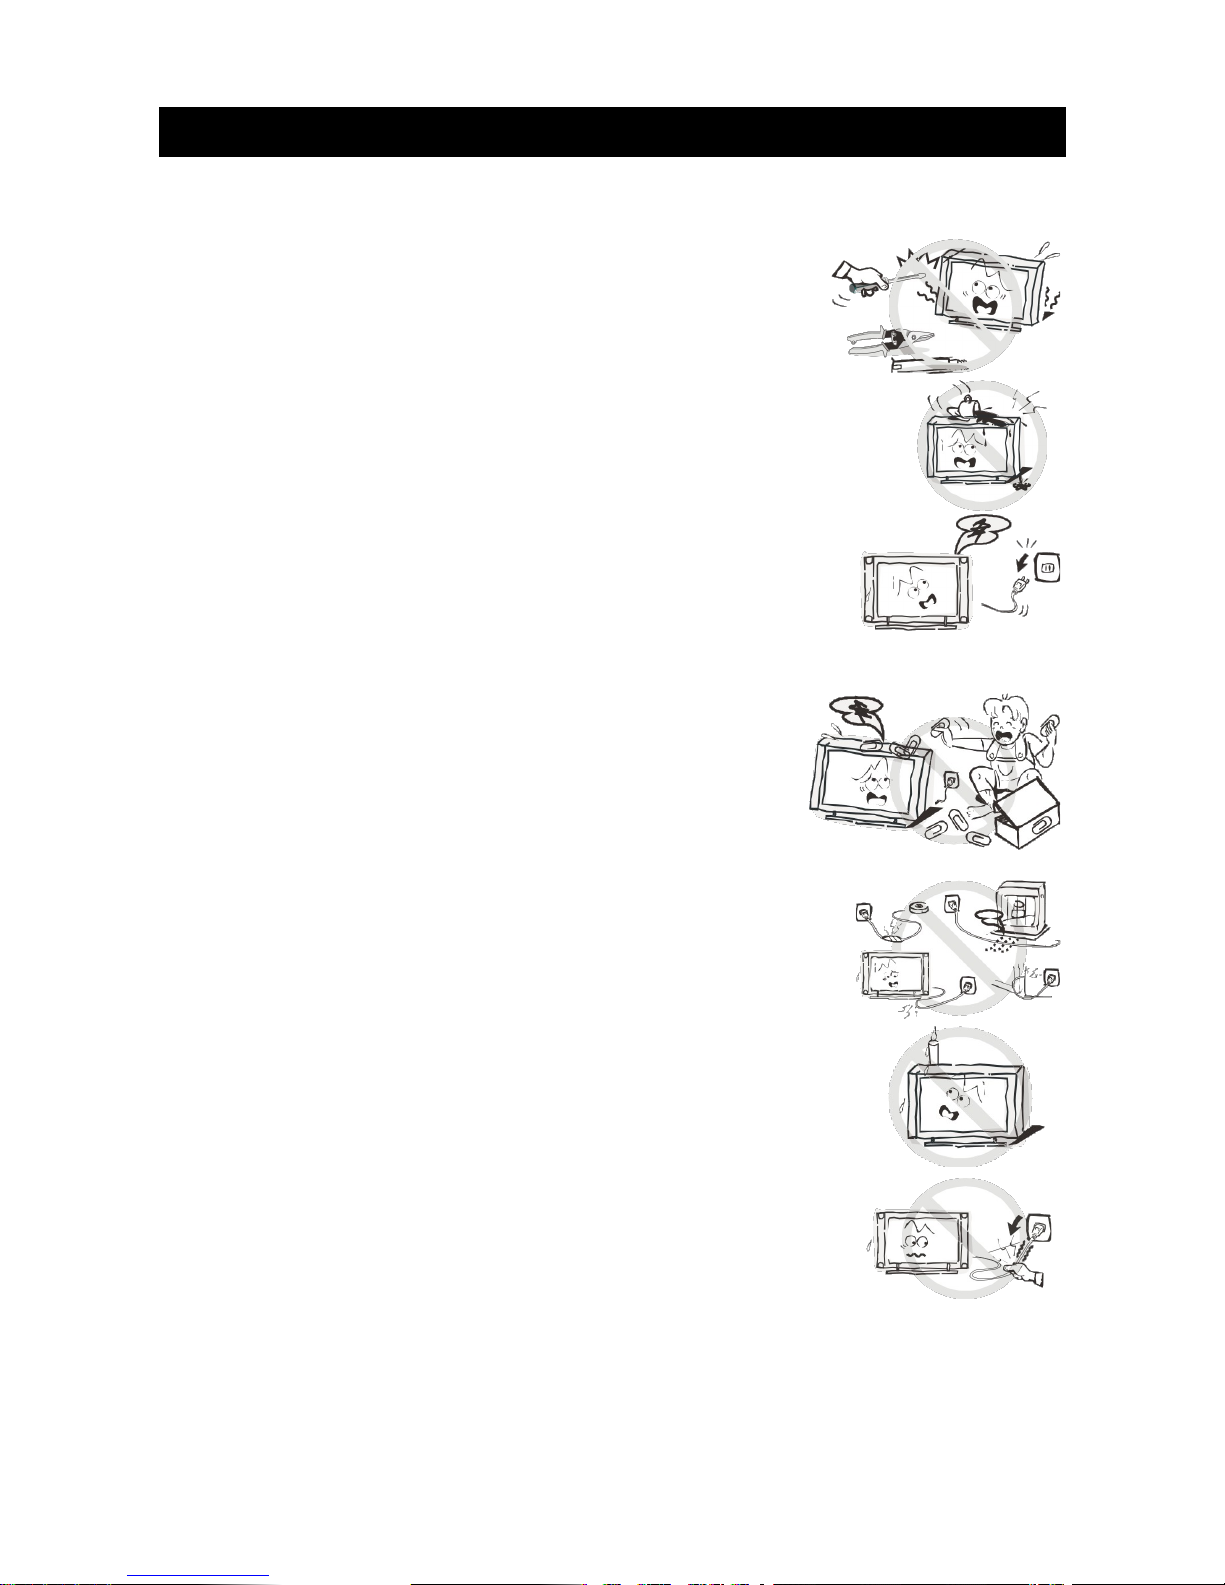
General Safety Instructions...........................................................................................................................................................2
Installation............................................................................................................................................................................................3
Cleaning................................................................................................................................................................................................4
Specifications & Accessories..............................................................................................................................................................5
Specifications.....................................................................................................................................................................................5
Accessories..........................................................................................................................................................................................5
Buttons and Terminal Interface..........................................................................................................................................................
TV Buttons...........................................................................................................................................................................................
Back View............................................................................................................................................................................................
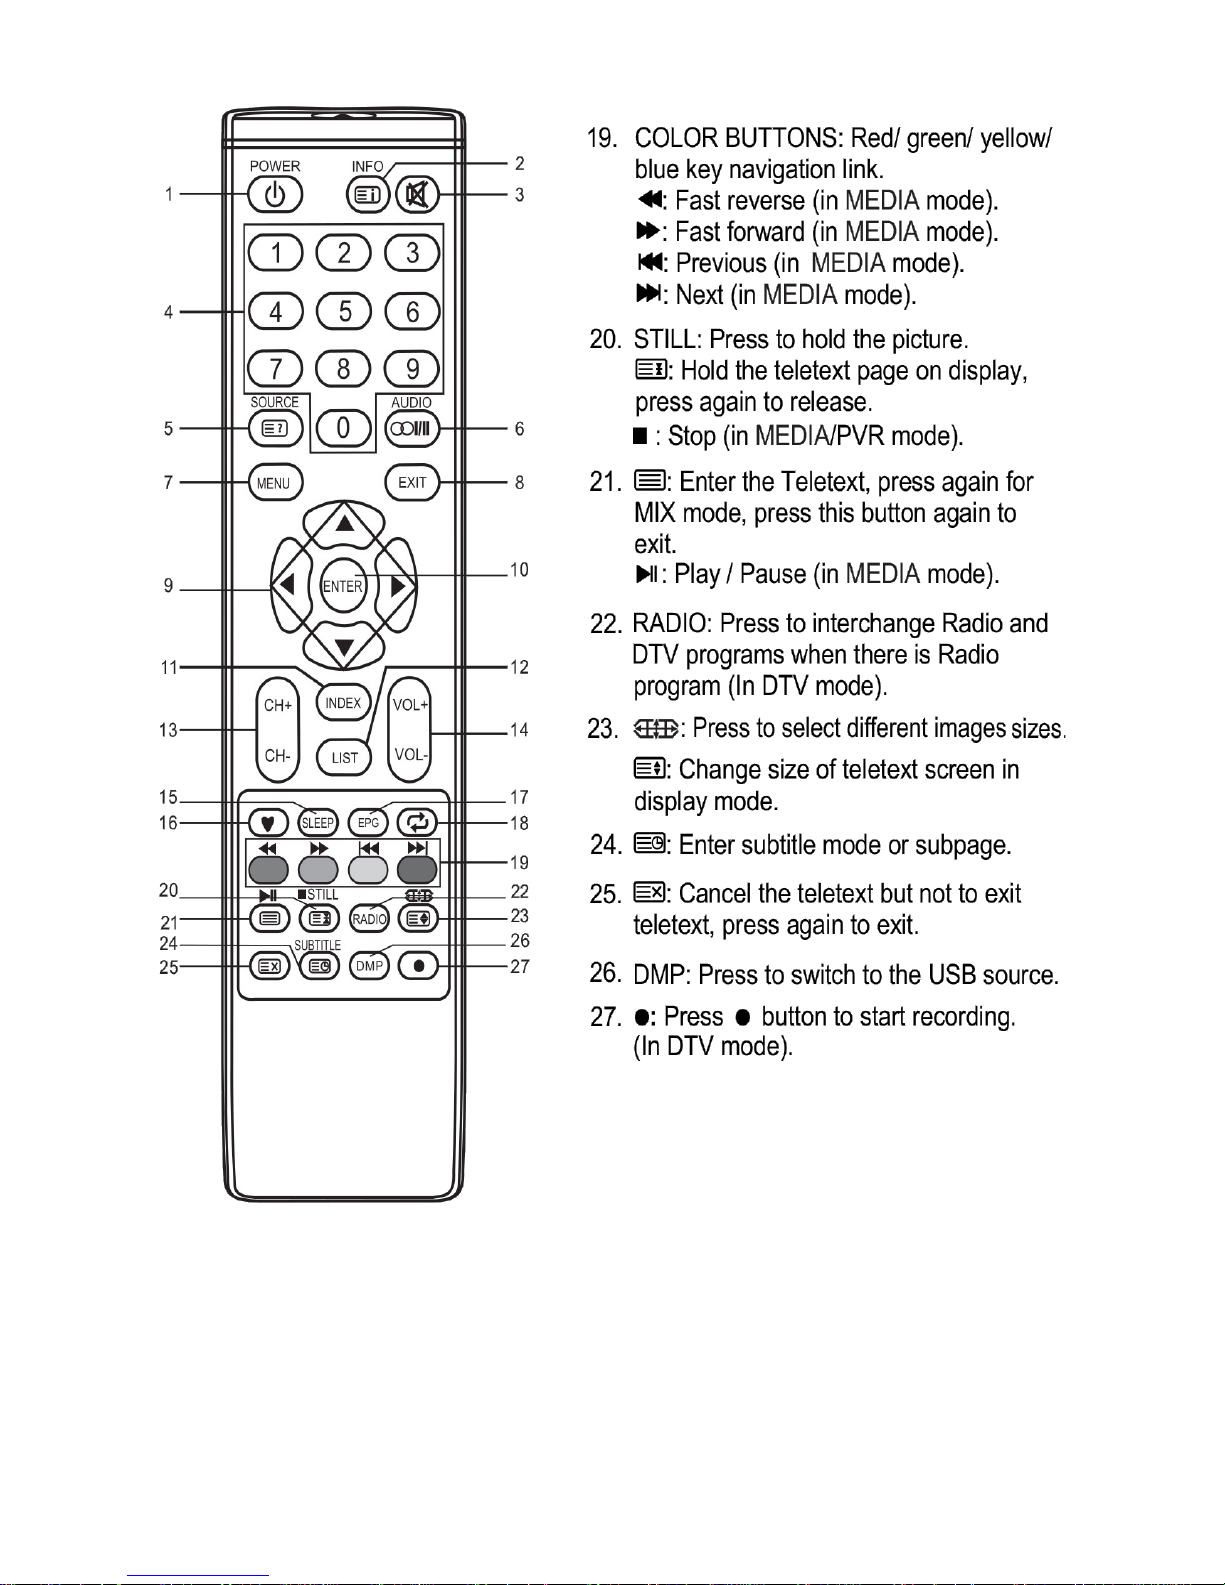
Remote Control........................................................................................................................................................................................7
Quick Start Guide....................................................................................................................................................................................9
Connection..........................................................................................................................................................................................9
First Time Setup................................................................................................................................................................................9
Turning TV On and Off...................................................................................................................................................................9
Programme Selection......................................................................................................................................................................9
Using 0-9 digital buttons...............................................................................................................................................................9
Volume Adjustment.........................................................................................................................................................................9
Changing the Input Source...........................................................................................................................................................9
Navigating Menus..................................................................................................................................................................................10
Picture Menu............................................................................................................................................................................................10
Sound Menu.............................................................................................................................................................................................. 11
Channel Menu...........................................................................................................................................................................................11
Lock Menu.................................................................................................................................................................................................12
Settings Menu..........................................................................................................................................................................................12
Multimedia Operation...........................................................................................................................................................................13
Accessing/Quitting Media Mode...............................................................................................................................................13
Supported Media Formats...........................................................................................................................................................13
Media Operating Interface...........................................................................................................................................................14
Multimedia Operation...........................................................................................................................................................................15
Photo....................................................................................................................................................................................................15
Music.....................................................................................................................................................................................................15
Movie....................................................................................................................................................................................................15
Text........................................................................................................................................................................................................15
Additional Usage....................................................................................................................................................................................15
Programme Guide (in DTV mode)............................................................................................................................................15
Channel List.......................................................................................................................................................................................1
Favourite List....................................................................................................................................................................................1
Troubleshooting.....................................................................................................................................................................................1
Cleaning and Maintenance ................................................................................................................................................................17
Cleaning the Screen........................................................................................................................................................................17
Cleaning the Cabinet......................................................................................................................................................................17
Extended Absence..........................................................................................................................................................................17
1

Safety Instructions
General Safety Instructions
Risk of electric shock. DO NOT OPEN!
Do not attempt to service the television yourself, as opening or removing the
covers may expose you to dangerous voltage or other hazards. Refer all
servicing to the Kogan customer support team.
To reduce the risk of fire or electric shock, do not expose this product to rain or
moisture. The television should not be exposed to dripping or or splashing, and no
liquid filled objects such as vases should be placed on the case.
In the event of smoke, strange noises or a strange smell from the unit, you should
follow these steps:
•Turn off the unit immediately.
•Disconnect the power plug from the power outlet.
•Contact the Kogan customer support team. Never attempt to make
repairs yourself.
Never push objects of any kind into the set through the cabinet slots as
they may touch dangerous voltage points or short-circuit parts that could
result in a fire or electric shock. Never spill any liquids onto the set. Use
special caution in households where children are present. The television is
not suitable for children under 4 years old to operate.
Power supply cords should be routed safely to prevent dangers due to damaged
cords.
The mains plug is the main disconnect method, so it should be easily accessible
and not be obstructed during use.
To avoid fires, no naked flame sources such as lit candles or burning incense should
be placed onto the casing of the television.
Do not pull the plug out of a power outlet by pulling on the power cable. Always
grasp the plug and pull.
Never touch the plug with wet hands.
2

An outside antenna system should not be located in the vicinity of overhead
power lines or other electric light or power circuits.
When installing an outside antenna system, extreme care should be taken to
keep from touching such power lines or circuits, as contact with them may
be fatal.
Always turn the set off when it is not being used. Unplug the television
from the power outlet when it will not be used for a long time or when
there is an electrical storm.
Never touch the antenna cable during a lightning storm.
Excessive volume from earphones and headphones can cause permanent hearing
loss. Always monitor the volume of noise from these devices, especially when
children are using them.
Installation
Ventilation should not be impeded or limited by covering the
ventilation slots with items such as newspapers, tablecloths,
curtains etc..
At least 10cm of space should be left around the apparatus for
sufficient ventilation.
The television should be situated away from heat sources such as
radiators, heaters, stoves or other products that product heat.
Place the television in a position where the screen is not exposed to
direct sunlight. It is best to have soft indirect lighting while watching,
and you should avoid a completely dark viewing environment and
reflections to avoid eye fatigue.
Keep the product away from high magnetic fields (such as near an
amplifier speaker) to avoid affecting the tint.
Do not place the television on an unstable table, stand or shelf. The set
may fall, causing serious injury as well as damage to the television itself.
If moving the television on a cart, move the unit with care as sudden
stops and starts may cause the television to overturn.
3

Do not place this television near water, for example near a bathtub, wash
bowl, kitchen sink, laundry tub, swimming pool or in a damp basement
etc..
When moving the television to a warm location from a cold location,
allow some time for any dew or condensation inside the television to
evaporate fully before you turn the unit on.
To prevent injury, the television must be securely attached to the floor/wall
in accordance to the supplied installation instructions.
Cleaning
Unplug the television from the power supply before cleaning. Do not
use any liquid cleaners or harsh chemicals. Use a soft, damp cloth.
4

Specifications & Accessories
Specifications
Model KALED55XXXTA
Display Screen Size 55” Diagonal
Power Supply 220-240V ~ 50/ 0Hz
Video In PAL/NTSC
Sound Output 2 x 10W
Remote Power Input DC 3V (Two AAA batteries)
Power Consumption 120W
Operating Temperatures 0°C ~ 40°C
Accessories
Remote Control
5

Buttons and Terminal Interface
TV Buttons
Turn power ON/OFF
Switch the signal source
MENU Display main MENU and confirm MENU item selection
VOL +/- Adjust volume
CH +/- Change channels
Back View
1 – Headphone 4 – PC 7 – HDMI 1/2/3
2 – YpbPr 5 – (Optical) Digital Audio Out 8 – USB
3 – PC/DVI Audio – ANT 9 – AV in

Remote Control
7

NOTE:
•All images in this manual are examples to be used only for reference. Actual product may
differ slightly.
•Any buttons not mentioned here are not used in TV operation.
8

Quick Start Guide
Connection
1. Connect the mains power and the antenna cable.
2. If the TV has a power switch, turn it on. Then press the POWER button on the remote to turn the
TV on.
irst Time Setup
When the TV is initially powered on, a sequence of on-screen prompts will assist in configuring basic
settings.
•OSD Language
Press to select the desired OSD (On Screen Display) language.◀▶
•Country
Press to select the country you are in.◀▶
•Auto Scan
Press to select the the mode (DTV+ATV, DTV, ATV)◀▶
•Auto Channel Update
Press to select ON or OFF.◀▶
Turning TV On and Off
•Turn TV on
Connect the power cable. If the TV has a power switch, turn it on. Press the Power button on the
remote control to turn the TV on from standby mode.
•Turn TV off
Press the Power button on the remote control to put the TV into standby mode.
Do not leave your TV in standby mode for long periods of time. It is best to unplug the power cable
and antenna cable if the TV will not be used for an extended period of time.
•No Signal
There will be a No Signal menu on the screen if there is no valid input signal. In DTV mode, if there
is no signal for 15 minutes the TV will turn off automatically. In PC mode, the TV will turn off
automatically after 1 minute of receiving no signal. When a VGA cable is connected, the TV will turn
on automatically.
Programme Selection
•Using CH+/CH- on panel of TV or on the remote
•Press CH+ to increase the channel number.
•Press CH- to decrease the channel number.
Using 0-9 digital buttons
•You can select the channel by pressing 0 to 9 (in DTV mode).
Example: To select channel 9, press 9. To select channel 22, press 22 in succession.
Volume Adjustment
•Press VOL+/- to adjust the volume.
•To completely turn the sound off, press the button.
•To cancel mute, increase the volume or press the button again.
Changing the Input Source
•You can select the input source by pressing the SOURCE button on the remote control. Press ▲▼
to cycle through the input sources, then press ENTER to confirm your choice.
9

Navigating Menus
Before using the TV, follow the steps below to learn how to navigate the menu in order to select and adjust
different functions. The access steps may differ depending on the selected menu.
1. Press MENU to display the main menu.
2. Press to cycle through the main menu.◀▶
3. Press to select the desired sub-item.▲▼
4. Press ENTER to access the submenu.
5. Press to select the desired values. The adjustment in the OSD may differ depending on the ◀▶▲▼
selected menu.
. Press MENU to return to the previous menu.
7. Press EXIT to exit from the menu.
NOTE:
•When an item in the MENU is displayed in gray, it means the item is not available or cannot be
adjusted.
•Buttons on the TV have the same functions as the corresponding buttons on the remote control. If
your remote control is lost or doesn't work, you can use the buttons on the TV to select menus. This
manual will focus on remote control menu operation.
•Some items in the menus may be hidden depending on modes or signal sources used.
Picture Menu
•Picture Mode
You can select the type of picture that best corresponds to
your viewing requirements.
We recommend the "Home" mode for most use.
•Brightness
Adjusts the base level of the signal in the picture.
•Contrast
Adjusts the signal level between black and white
in the picture.
•Sharpness
Adjusts the level of crispness in the edges between the light
and dark areas of the picture.
•Saturation
Adjusts colour intensity.
•Hue
Adjusts the balance between red and green levels. (Only available in NTSC mode)
•Color Temp
Select the colour temperature of the image.
•Aspect Ratio
You can select the picture size that best corresponds to your viewing requirements.
•PC Setup
Auto adjust: adjusts the image automatically
H Position: center the image by moving it left or right
V Position: center the iamge by moving it up or down
Phase: Minimize horizontal distortion
Clock: Minimize the vertical stripes in the image
•Screen Mode
Press to select the screen mode, then press to select Auto, Video or PC. (HDMI mode only)▲▼ ◀▶
•Advanced Settings
NR: Set options to reduce video noise.
Dynamic Contrast: Automatically adjust picture detail and brightness.
10

Sound Menu
•Sound Mode
You can select a sound mode to suit your personal
preferences.
•Treble
Adjust the treble effect. Increases or decreases high-pitched
sounds.
•Bass
Adjust the bass effect. Increases or decreases lower-pitched
sounds.
•Balance
You can adjust the sound balance of the speakers to your
preferred level.
•Surround Sound
You can select a desired Surround Sound mode.
•EQ Setting
Adjust the curve of 7 band equalizer.
EQ Mode: Only in User mode, the following can be manually adjusted.
120Hz/300Hz/500Hz/1.2KHz/3.0KHz/7.5KHz/10KHz. Adjusts the level of specific bandwidth
frequencies.
Based on your preferences and experience, you may work out which frequency bands need to be
adjusted for your desired effect. We suggest that you DON'T make large changes.
•AVL
AVL automatically remains on the same level of volume when you change channels. Often different
broadcasting stations will have their own signal conditions and volume settings, resulting on the
volume dropping or suddenly increasing when you change the channel. This feature allows you to
enjoy a stable volume level by making automatic adjustments for each program.
•SPDIF
You can adjust a desired SPDIF output mode.
•Audio Description (in DTV mode)
Press the buttons to select the Audio description, then press to enter the sub-menu.▲▼ ▶
Press the buttons to select the Mode, then press to select between On, Off. When the mode ▲▼ ◀▶
is ON, the volume can be adjusted by the user.
•Sound Type (in DTV mode)
Press the buttons to select the sound type, then press buttons to select.▲▼ ◀▶
Channel Menu
•Auto Scan
Press the ENTER button to enter the sub-menu.
County: press the buttons to select your country.◀▶
Mode: press the buttons to select your mode from◀▶
DTV+ATV, DTV, ATV.
Start: press the ENTER button to start the auto-search.
•Manual Scan
Press the ENTER button to enter the sub-menu.
Digital Manual Scan: Press the buttons to select the Digital▲▼
Manual scan, then press the ENTER button to enter the sub-
menu.
Digital scan: press the buttons to select the channel number.◀▶
Start: press the ENTER button to start the channel search.
Frequency: Display the frequency of the current TV signal.
Strength: Display the strength of the current TV signal.
Analog Manual Scan: Australia no longer uses analogue television signals.
Auto Channel Update
Press the buttons to select auto channel update ON or OFF.◀▶
11

•Channel Edit
Press the buttons to highlight the channel that you wish to delete, skip, move or rename. Then ▲▼
press the RED button to delete the channel, the GREEN button to skip the channel (the TV will skip
the channel automatically when navigating through the channels), YELLOW to rename the channel
(works in ATV mode only), or the BLUE button to set the channel to the moving state. You can then
press the buttons to move the channel to the position you want.▲▼
•Favourites Manager
Press the buttons to select your favourites.▲▼
Press the buttons to page up/page down the favourites list.◀▶
Press RED, GREEN, YELLOW or BLUE to select your favourite group.
•Signal Information (in DTV mode only)
Displays the current Signal Information.
Lock Menu
•Enter Password
The following items are only available if you input the correct
password. The default password is 0000, however if you
manually set a password and then forget it, please contact
the Kogan.com customer support team.
•Enable
Channel Locks, Parental Rating and Lock Keypad are all
available when this mode is enabled.
•Channel Locks
Press to select a channel you want to lock, then press ▲▼
ENTER to lock it.
•Parental Rating (in DTV mode)
Press the buttons to select a parental rating, then press to select.▲▼ ◀▶
•Lock Keypad
Enable to prevent anything being changed by young children or other unexpected usage.
•New Password
Press to select the new password, then enter a 4-digital number you want to set, twice.▲▼
•Clear Lock
Restore the Lock System settings to their original factory settings.
Settings Menu
•OSD Language
•Select your preferred On Screen Display language.
•Audio Languages (in DTV mode)
•Select your preferred audio language. (Available for digital
channels if multiple audio languages are broadcast). Press the
buttons to select the audio languages, then press ▲▼ ENTER
to enter the sub-menu.
Press the arrow button to select the audio primary language
and the secondary language.
•Subtitle (in DTV mode)
Press to select Subtitle, then press ▲▼ ENTER to enter the sub-menu.
Press to select Mode, then press to select On or Off.▲▼ ◀▶
Press the arrow button to select the subtitle primary language and the secondary language.
Press to select Hearing Impaired, then press to select On or Off.▲▼ ◀▶
•Teletext
The teletext service is not available in Australia.
•Blue Screen
Press to select Blue Screen On or Off.◀▶
•Time Settings
Press to select Time Settings, then press ▲▼ ENTER to enter the submenu.
OSD Timer: select the on-screen display time.
Sleep Timer: Select the time until the TV should go into standby mode automatically.
Auto Sleep: Select the auto sleep time you want.
12

Time Zone: Select your Time Zone.
Time: Press to select Time, then press ▲▼ ENTER to enter the sub-menu. Set Auto Sync Off, then
you can set the time manually.
Note: in the event of power loss, clock settings will be lost.
•PVR Settings (in DTV mode)
Press to select PVR settings, then press ENTER to enter the sub-menu.
It will then check the USB.
•File Manager: to display the record list.
Replay: press the RED button to replay the video.
Delete One: press the GREEN button to delete a video.
Delete All: press the YELLOW button to delete all videos.
Full: press the BLUE button to zoom in on the video.
Device List: when multiple recording devices are connected, the recording devices are listed. Select
one recording device in the Device List.
Format: press the RED button to format the USB disk.
Scheduled Recording: to set the parameters for a scheduled recording.
Press the ENTER button to set the parameters for recording.
Delete One: press the GREEN button to delete a video.
Delete All: press the YELLOW button to delete all videos.
•Digital Program Recording
1. Insert a USB disk. Press the RECORD button to record the current program. During the
recording, press the RECORD button again to bring up the record menu.
2. Press the STOP button to stop recording. The TV will return to normal broadcast television.
NOTE:
•The USB disk must have a minimum capacity of 512MB.
•Please format the USB disk with the television prior to attempting to record media.
•During the device formatting, do not remove the USB disk. When you format the disk, all files will
be deleted. Before formatting the disk, be sure to back up any files to prevent damage or loss to
them.
•The USB disk must support at least USB 2.0 data transfer speeds.
•Some non-standard USB devices may not be compatible.
Multimedia Operation
Accessing/Quitting Media Mode
1. Connect a USB device.
2. Press the SOURCE button to display the main menu. Use to highlight MEDIA, then press ▲▼ ENTER
to enter the MEDIA mode.
3. You may also use the signal source selection menu to exit from MEDIA mode.
Note
•Special USB devices may not be supported.
•USB max load: DC5V 500mA
Supported Media ormats
Multimedia
Categories File Extension Decoder Notes
Video Decode Audio Decode
Movie *.avi MPEG-1
MPEG-2 MP
MPEG-4 SP
MPEG-4 ASP
MPEG-4 XVID
DivX
H.2 4(AVC)
MP@Level 4
HP@Level 4
MPEG-1 Layer 2
MPEG-1 Layer 3
MPEG-2 Layer 3
AC3
AAC-LC
HE-AAC V1
HE-AAC V2
MPEG1/MPEG2/MPEG4 up
to 1080p @ 30F
H.2 4 up to 1080p @25F
13

MPEG (*.mpeg,
*.mpg, *.dat, *.vob)
MPEG-1 MP
MPEG-2MP
MPEG-4 (*.mp4)
MPEG-4 SP
MPEG-4 ASP
MPEG-4 XVID
H.2 4(AVC)
MP@Level 4
HP@Level 4
TS (*.ts, *.trp, *.tp)
MPEG-1
MPEG-2 MP
H.2 4(AVC)
MP@Level 4
HP@Level 4
MKV (*.mkv)
MPEG-1
MPEG-2 MP
MPEG-4 SP
MPEG-4 ASP
MPEG-4 XVID
DivX
H.2 4(AVC)
MP@Level 4
HP@Level 4
*.flv
H.2 4(AVC)
MP@Level 4
HP@Level 4
Music
*.mp3
MPEG-1 Layer 3 Bit Rate: up to 320Kbps
Sample Rate: 32KHz,
44.1KHz, 48KHz
MPEG-2 Layer 3
AAC (*.aac, *.m4a)
AAC
HE-AAC V1
HE-AAC V2
*.wav LPCM
ADPCM
Photo *.jpg
*.jpeg
Baseline Mode 72x72 < Baseline resolution
< 7 80x4320
Progressive
Mode
Progressive Mode Size
<=1280x1024
File Size <=10MB
Text *.txt
UTF-8
UNICODE
ASCII
File Size <=1MB
Note: There is a maximum of 500 files per directory.
Media Operating Interface
Use the buttons to select Photo, Music, Movie or Text, ◀▶
then press ENTER to enter into the sub-menu.
14

Multimedia Operation
Photo
Press to select Photo in the menu, then press ◀▶ ENTER.
Press to select the source disk, then press ◀▶ ENTER.
Press CH+/- to change pages.
Press INDEX to access the quick menu.
Use the arrow buttons to highlight a folder then press ENTER to select it.
Use the arrow buttons to highlight a file, then press the PLAY button to view it.
Press the STOP button to stop playing files.
Press EXIT to go back to the previous menu.
Music
Press to select Music in the menu, then press ◀▶ ENTER.
Press to select the source disk, then press ▲▼ ENTER.
Press to change pages.◀▶
Press INDEX to access the quick menu.
Use the arrow buttons to highlight a folder then press ENTER to select it.
Use the arrow buttons to highlight a file, then press the PLAY button to play it.
Press the STOP button to stop playing files.
Press EXIT to go back to the previous menu.
Movie
Press to select Movie in the menu, then press ◀▶ ENTER.
Press to select the source disk, then press ▲▼ ENTER.
Press to change pages.◀▶
Press INDEX to access the quick menu.
Use the arrow buttons to highlight a folder then press ENTER to select it.
Use the arrow buttons to highlight a file, then press the PLAY button to view it.
Press the STOP button to stop playing files.
Press EXIT to go back to the previous menu.
Text
Press to select Text in the menu, then press ◀▶ ENTER.
Press to select the source disk, then press ▲▼ ENTER.
Press to change pages.◀▶
Press INDEX to access the quick menu.
Use the arrow buttons to highlight a folder then press ENTER to select it.
Use the arrow buttons to highlight a file, then press the PLAY button to view it.
Press the STOP button to stop playing files.
Press EXIT to go back to the previous menu.
Additional Usage
Programme Guide (in DTV mode)
Press the RECORD button to set the parameters for recording. You can
choose the time of the recording to be made. The unit
is able to do schedule recording when the TV is turned on or in standby
mode. When recording starts in standby mode, there will be no picture
or sound from the unit.
Press the RED button to view the previous day's guide.
15

Press the GREEN button to view the next day's guide.
Press the YELLOW button to display the EPG schedule list.
Press the BLUE button to book a program.
Press the EXIT button to exit.
Channel List
Press LIST to display the Channel List.
Press to select the items. Press ENTER to select the channel.
Press to page up or down the channel list.
Press EXIT to exit.
avourite List
Press to display the Favourite List.♥
Press to select the items. Press ENTER to select the channel.
Press to select the Favourite 1, 2, 3 or 4.
Press CH+/CH- to page up or down the favourite list.
Press EXIT to exit.
Troubleshooting
If you have any problems with your television, please check the suggested solutions below, as these issues may be
caused by improper adjustment/setup rather than a malfunction with the unit. If the problem persists, please contact the
Kogan customer support team.
Problem Possible Solution
Poor picture and sound quality •Try a different channel
•Adjust the antenna
•Check all connections
No picture or sound in TV status •Try another channel
•Press the TV/AV button
•Make sure TV is plugged in
•Check the antenna connection
No sound, or sound is too low at maximum volume •Check the volume settings on any external
speakers connected to your television
•Adjust the TV volume accordingly
•Check that MUTE hasn't been turned on
No colour, wrong colour or tints •Make sure the program itself is broadcast in
colour
•Select the picture menu, then adjust the colour
and tint submenus
Picture rolls vertically •Check all connections
Blurred or snowy picture, distorted sound •Check direction, location and connections to your
antenna
•Issues may be caused by use of an indoor antenna
Remote control malfunctions •Replace remote control batteries
•Check battery terminals
•Remote is out of range, move closer to TV
•Confirm there is no obstructions between remote
and TV
•Make sure power cord is plugged in
Image is not centered on the screen •Adjust the horizontal and vertical position
1

Cleaning and Maintenance
Malfunctions can be prevented. Careful and regular cleaning can extend the amount of time that you will
have your new TV. Be sure to turn the television off and unplug it before you begin any
cleaning.Maintenance
Cleaning the Screen
Wet a soft cloth in a mixture of lukewarm water and a little fabric softener or dishwashing detergent. Wring
the cloth out until it is almost dry, then wipe down the screen.
Make sure all excess water is off the screen, and let it air dry before turning it on.
Cleaning the Cabinet
To remove dirt or dust, wipe the cabinet with a soft, dry, lint-free cloth. Do not use a wet cloth.
Extended Absence
If you are expecting to leave your TV dormant for a long time (such as while going away on vacation), it is a
good idea to unplug the power cord and antenna cable to protect the unit against damage from lightning
or power surges.
If you have any questions or problems with your television, please contact the Kogan.com customer
support team.
17
Table of contents
Other Kogan TV manuals

Kogan
Kogan KALED50XXXZB User manual

Kogan
Kogan KALED26DVDYA User manual

Kogan
Kogan KALED42XXXZA User manual

Kogan
Kogan KALED22DVDA User manual

Kogan
Kogan KALED24DVDA User manual

Kogan
Kogan KALED32SMTWA User manual

Kogan
Kogan KGNFHDLED46VA User manual

Kogan
Kogan KALED22XXXYB User manual

Kogan
Kogan KALED26XXXA User manual

Kogan
Kogan KALED55XX1B User manual

Kogan
Kogan KALCD32FHDXA User manual

Kogan
Kogan KGNUKFHDLED40VA User manual

Kogan
Kogan KALED55UHDZA User manual

Kogan
Kogan KALED32DVDWA User manual

Kogan
Kogan KGNFHDLEDH32VA User manual

Kogan
Kogan KALED503DZA User manual

Kogan
Kogan ZA Smart TV Series User manual

Kogan
Kogan KALCD39FHDXA User manual

Kogan
Kogan KAWLM42EXTA User manual

Kogan
Kogan KULED32SMTWA User manual