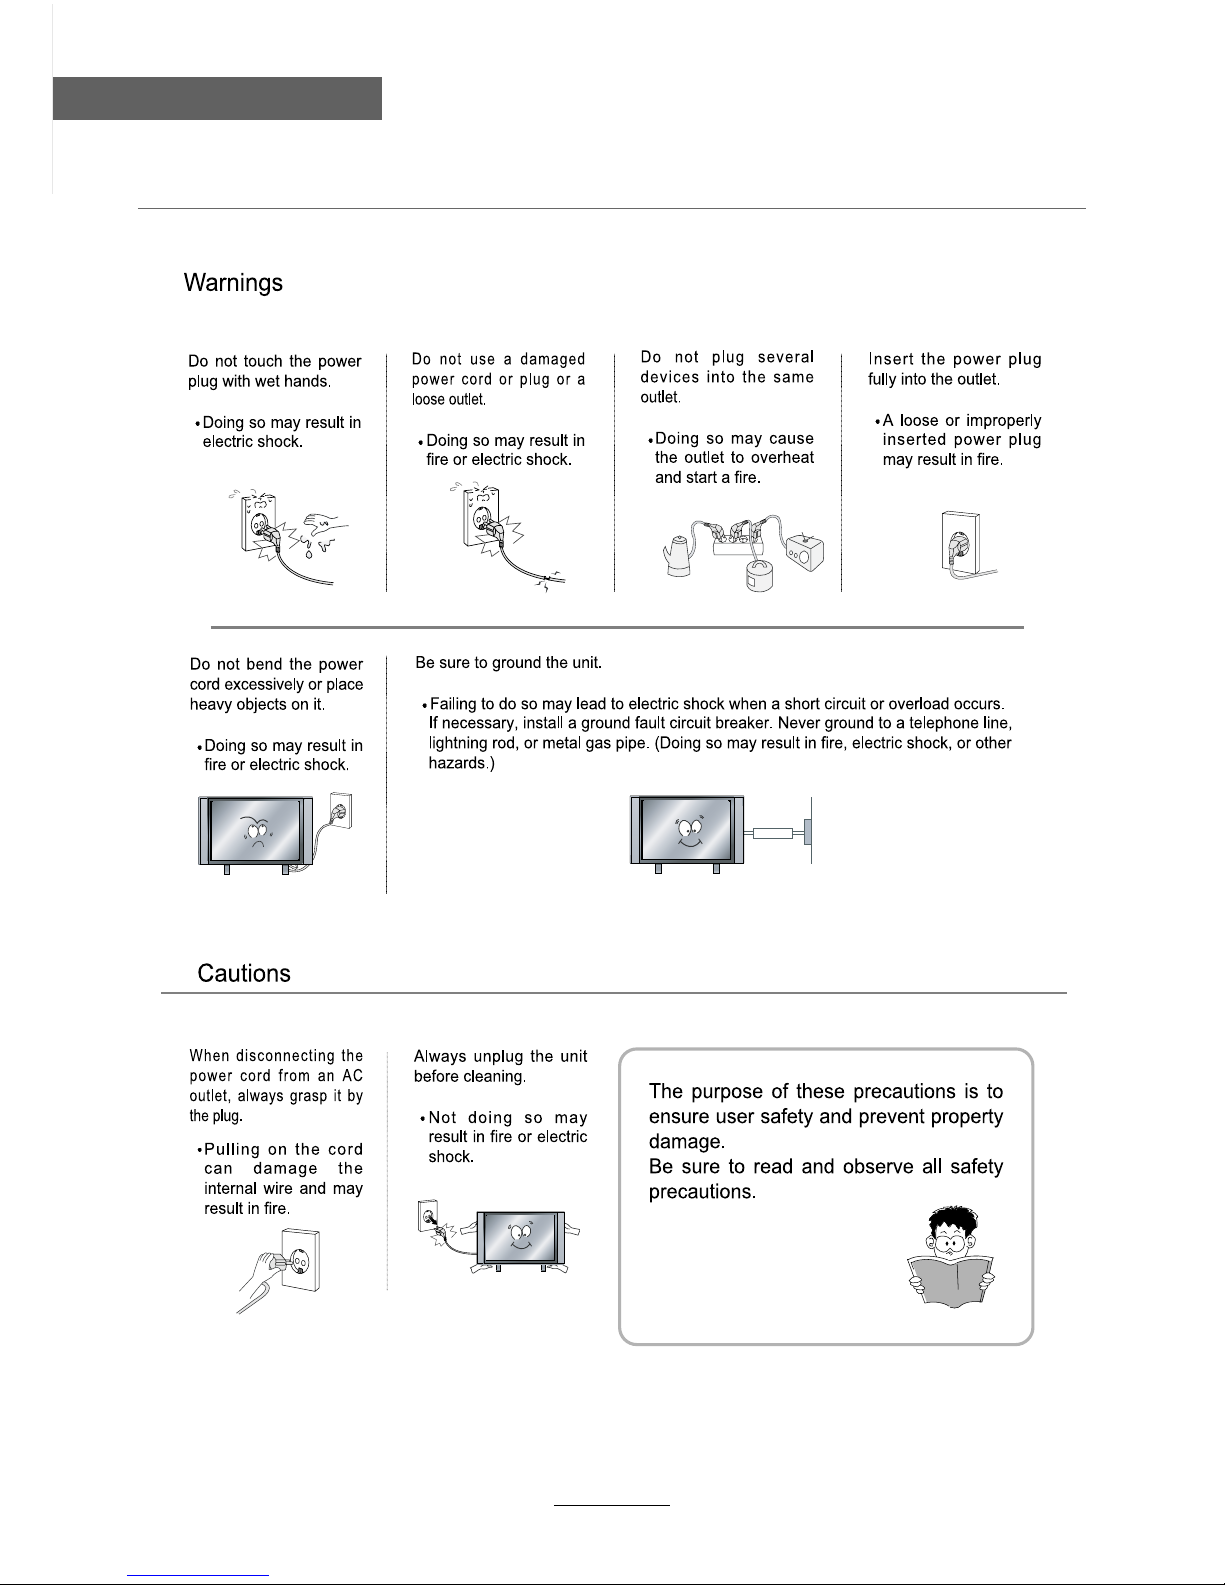
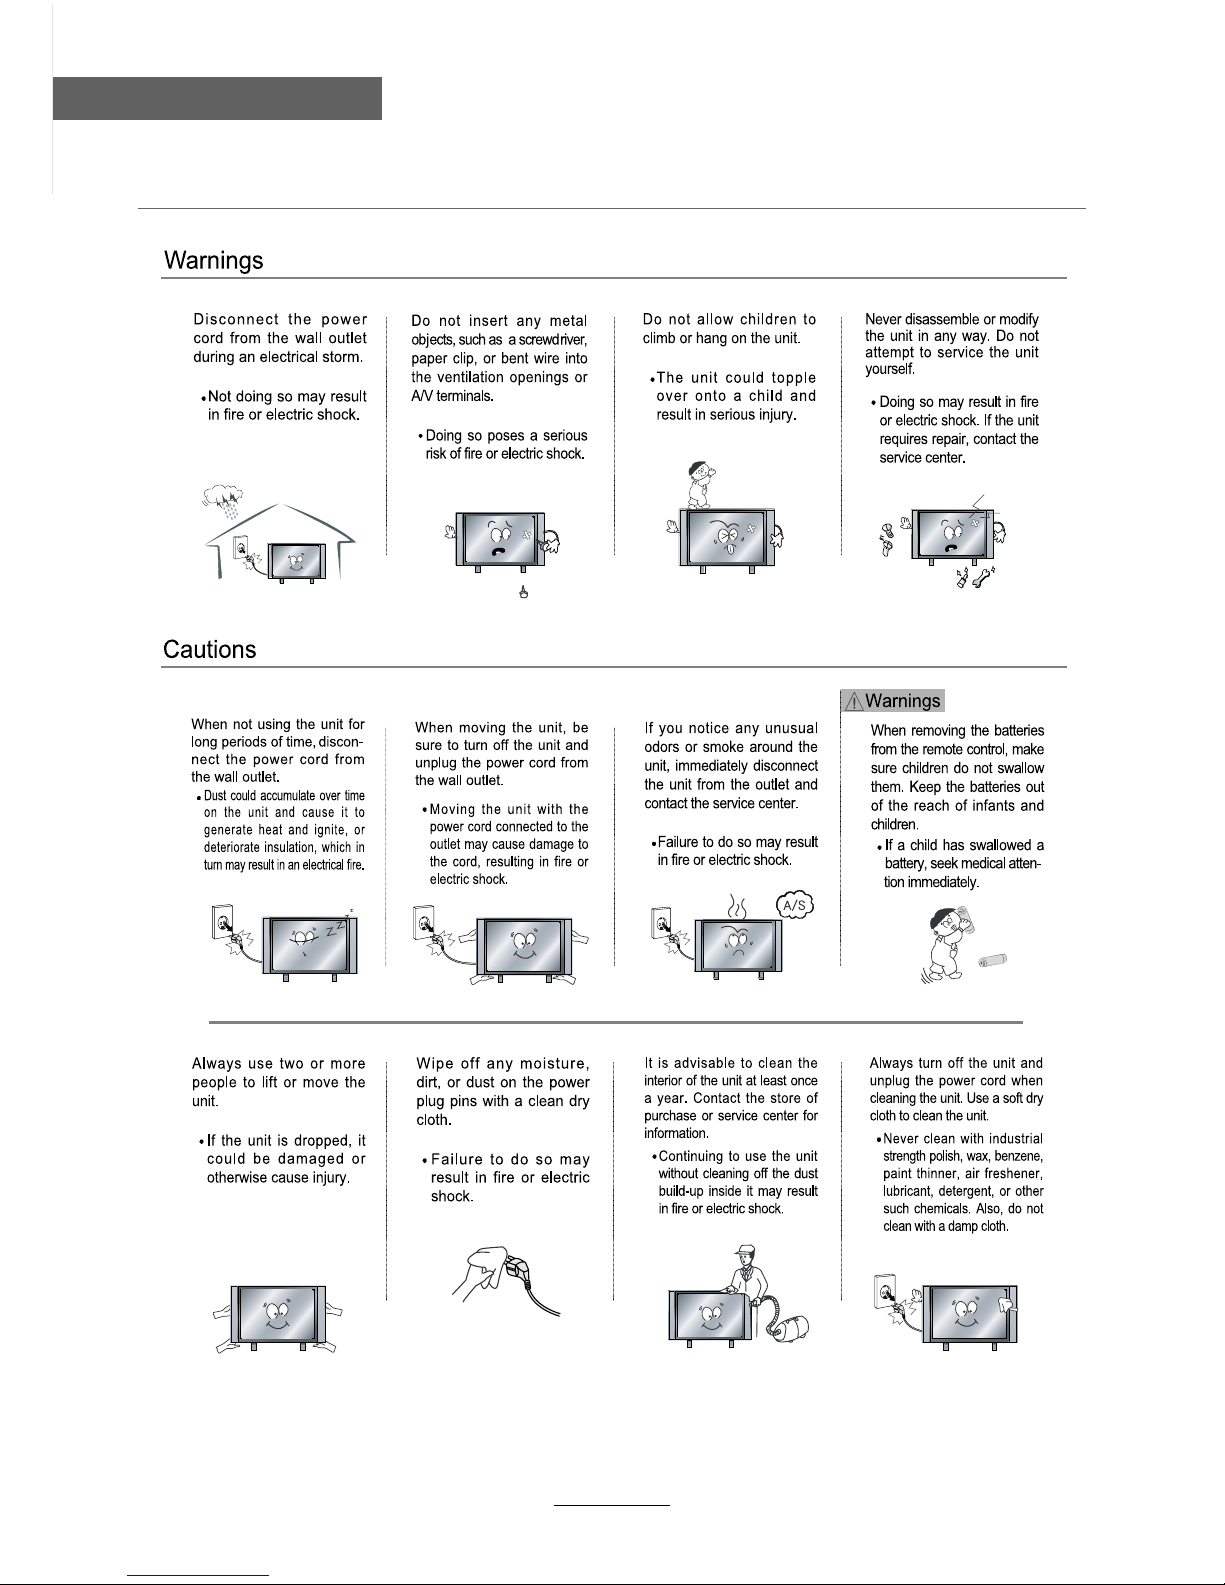
Kogan KGNHDLEDPRO19VB User manual

KGNHDLEDPRO19VB
USER MANUAL

Safety Precautions
Power Supply..................................................................................................................................................... 1
Installation......................................................................................................................................................... 2
Use and Maintenance....................................................................................................................................... 3
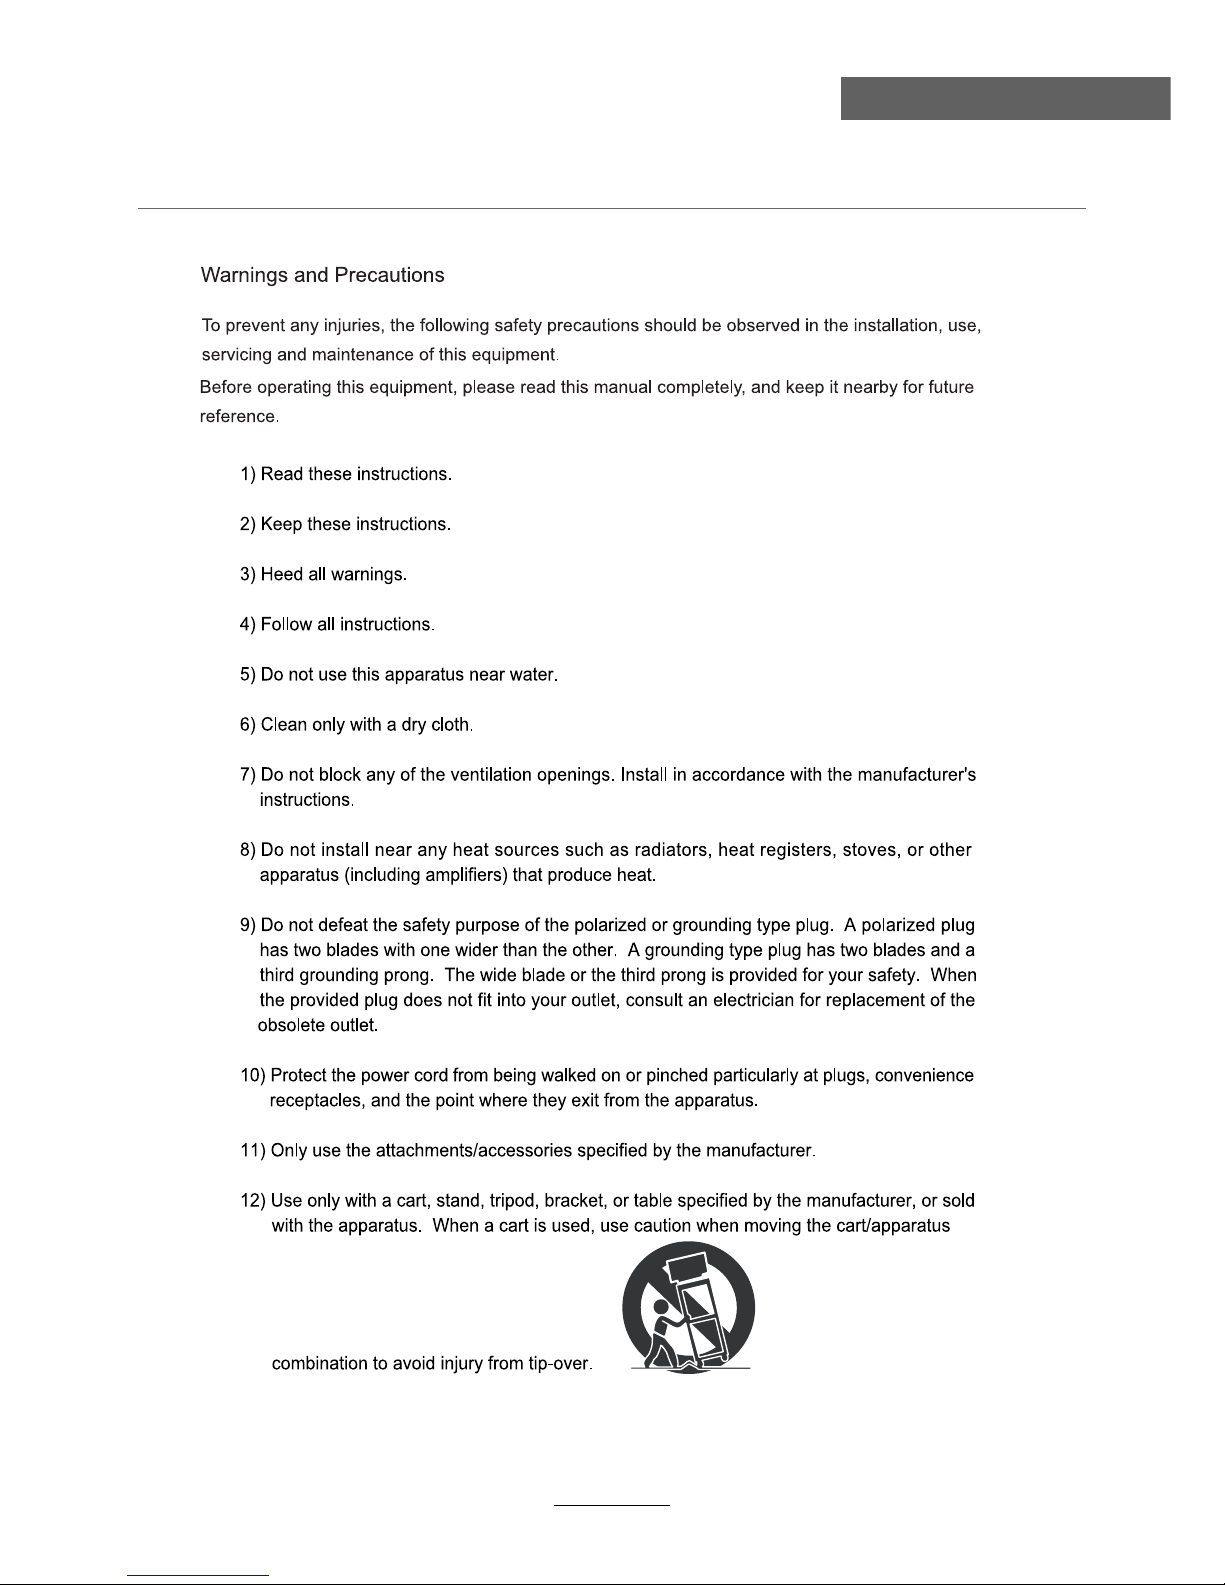
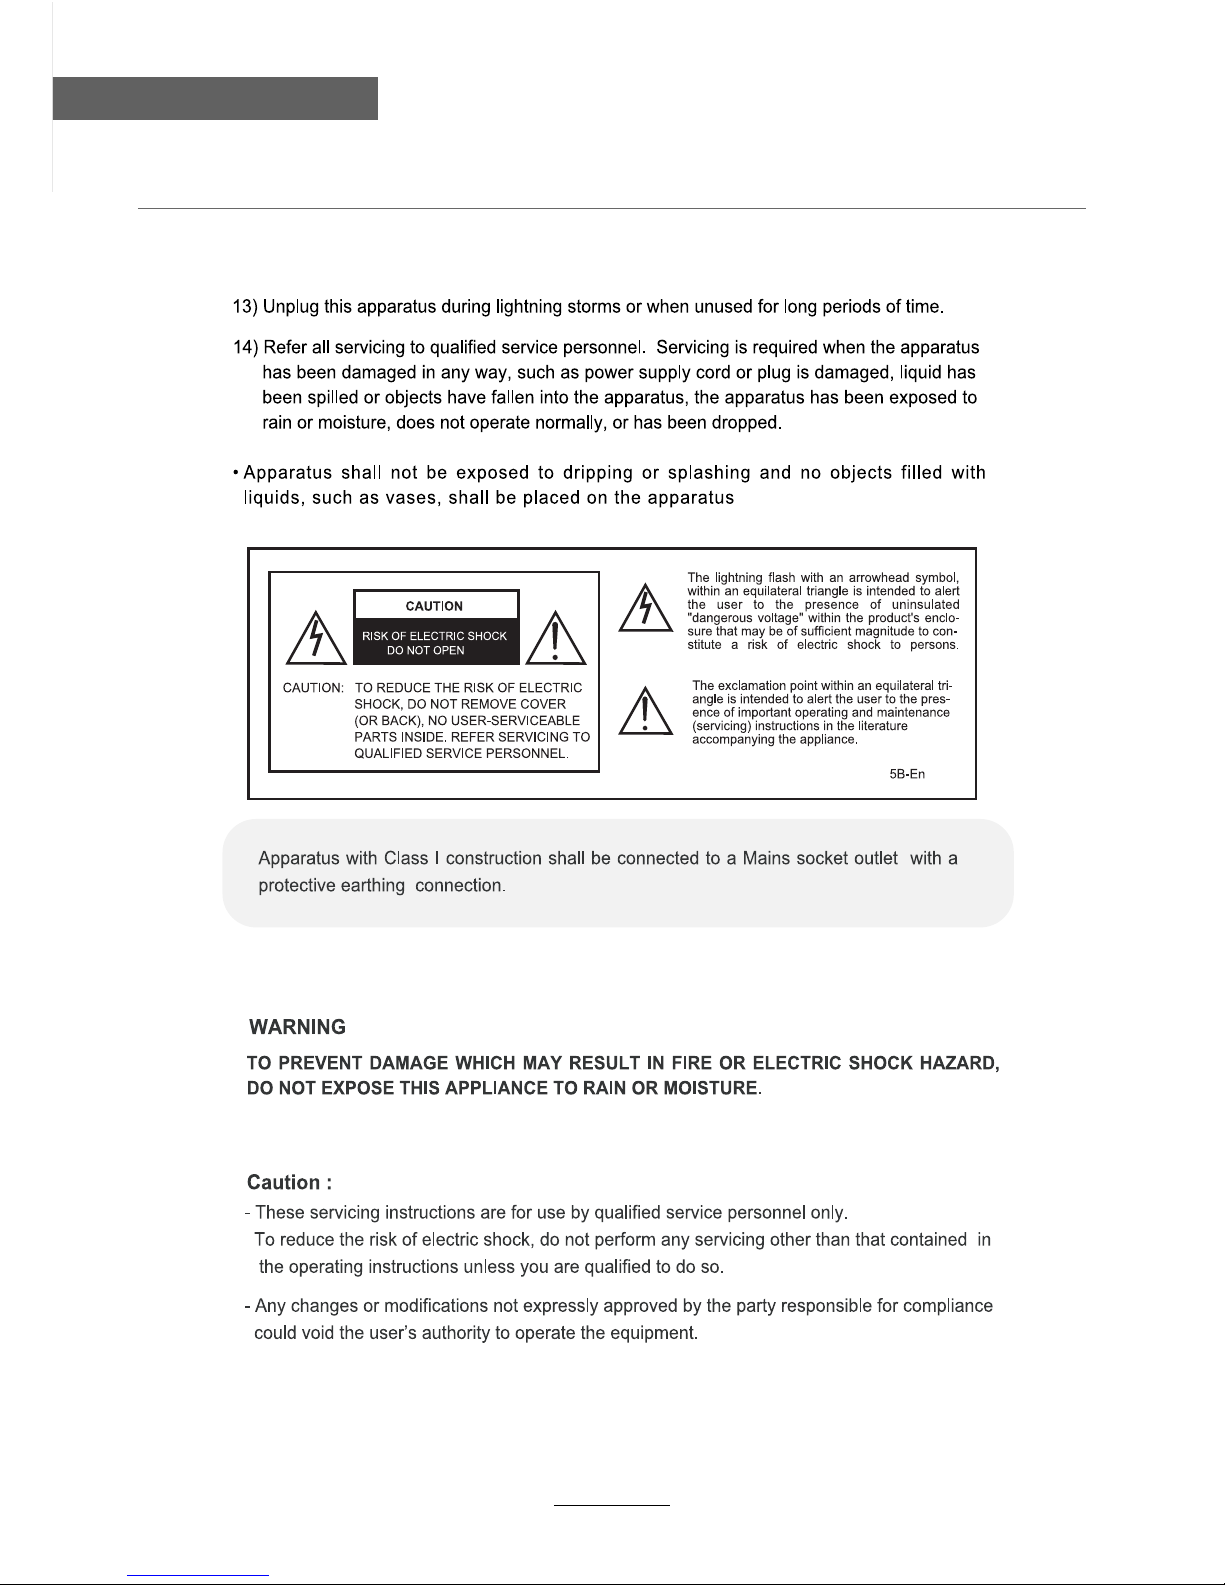
Important Safety Instructions ............................................................................................................................ 4-5
User Guidance Information
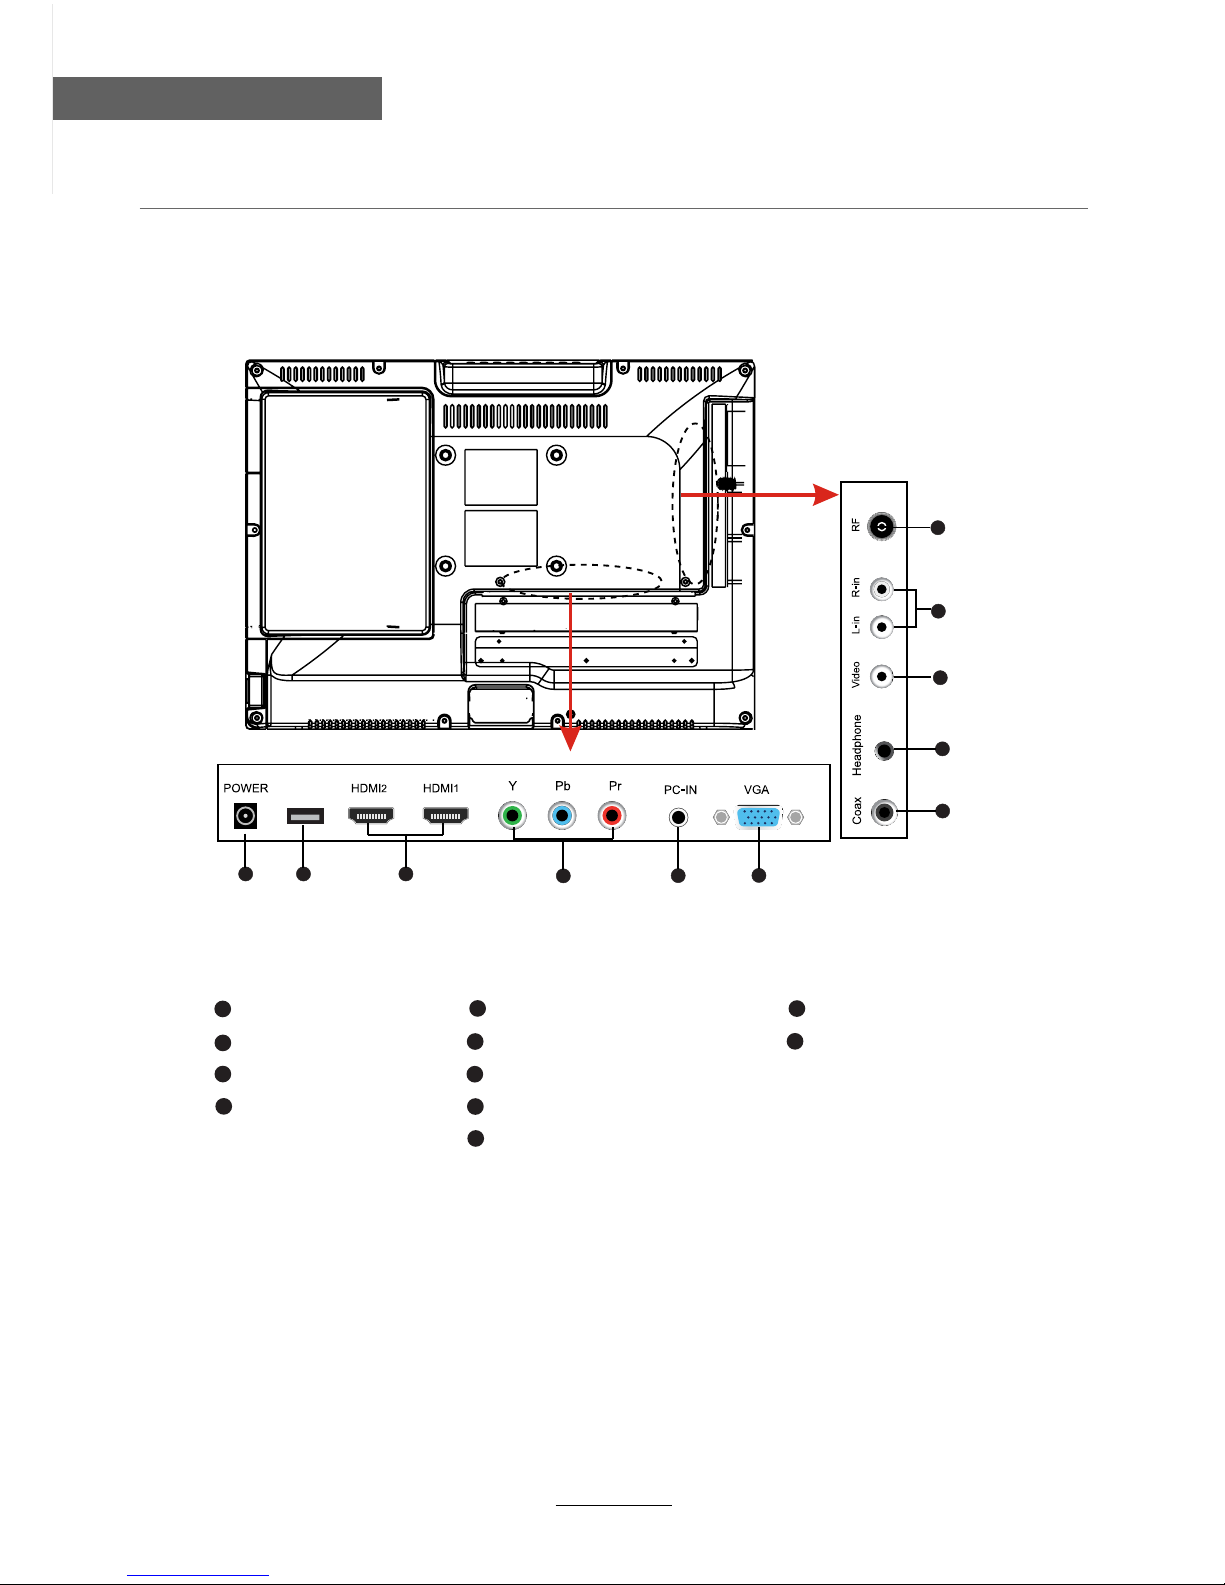
Names of each part(Back View) ........................................................................................................................ 7
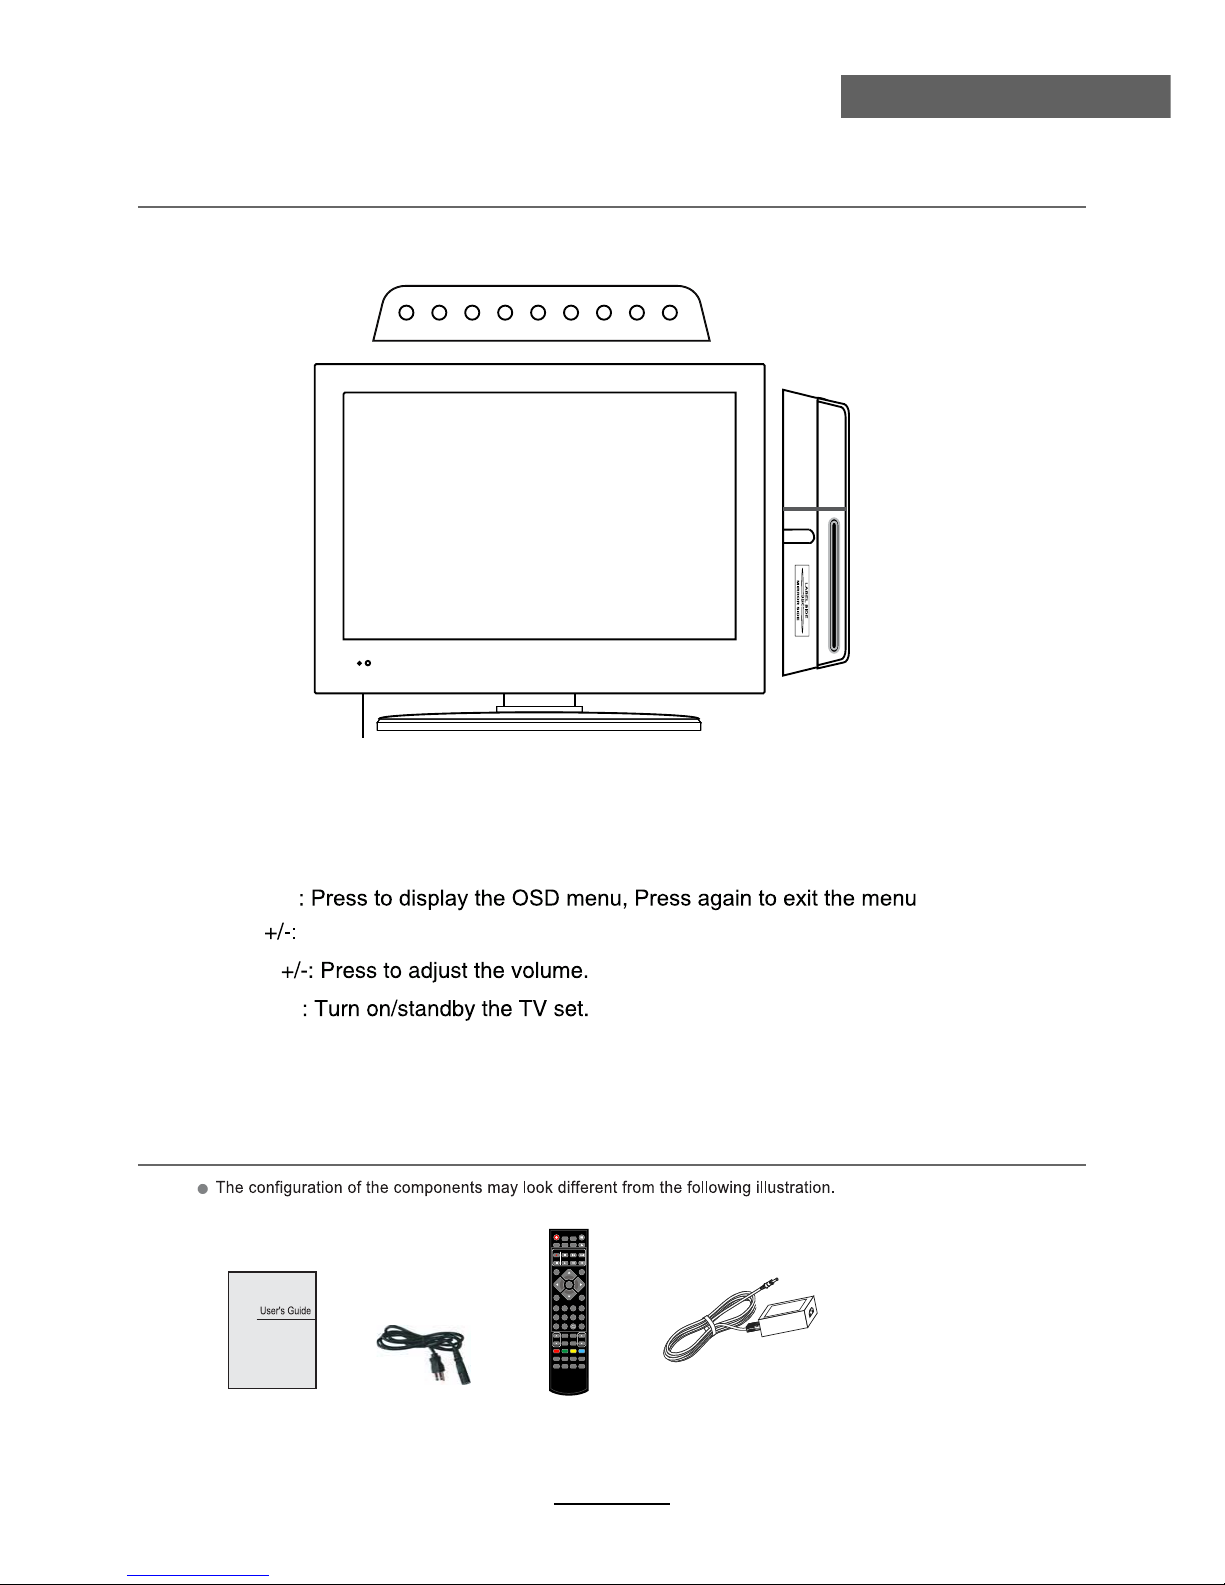
Names of each part(Front View) / Accessories ................................................................................................. 6
Remote control .................................................................................................................................................. 8-9
Basic Operation
Basic Operation .................................................................................................................................................10
OSD Menu
1. CHANNEL Menu ...........................................................................................................................................11-12
2. PICTURE Menu ............................................................................................................................................ 13
4. TIMER Menu ................................................................................................................................................. 15
5. OPTION Menu ...............................................................................................................................................16
6. LOCK Menu ...................................................................................................................................................17
Recording Operation
Recording Operation ......................................................................................................................................... 21-23
Multimedia Operation
Multimedia Operation ........................................................................................................................................ 18-20
3. SOUND Menu ............................................................................................................................................... 14
Trouble shooting ............................................................................................................................................... 32
Specifications ................................................................................................................................................... 33
Maintenance and Service
Contents
Contents
DVD Operation
DVD Operation ............................................................................................................................................... 24-25

1
Safety Precautions
Power Supply

2
Safety Precautions
Installation

3
Safety Precautions
Use and Maintenance

4
Safety Precautions
Important Safety Instructions

5
Safety Precautions
Important Safety Instructions

6
User Guidance Information
Names of each part
Front View
User’s Guide Power Cable Remote Control
Led Indicator
Remote Control window
(Keep clear) Please insert a 12cm disc
according to the Label.
Power
INPUT: Press to display the input source menu(see page 11).
EJECT: Eject the disc.
PLAY: Play / Pause the disc playing.
MENU
VOL
CH Press to skip through the channels.
MENUCHCHVOLVOL+ INPUT PLAYEJECTPOWER
Mains adapter
POWER MUTE
REC
EPG
INPUT
MENU EXIT
VOL CH
PICTURE
SETUP
A-B GOTO
D-MENU
TITLE
HOLD SIZE SUBPAGE INDEX
NICAM/A2
TV/TXT CANCEL REVEAL
SOUND SLEEP
FAV
1234
5678
90
DISPLAY
REP
PVR/DVD
SUBTITLE
OK
RECLIST CH/LIST
PRO
SLOW
SCREEN
LAN

7
Names of each part
User Guidance Information
Back View
YPbPr
9
USB
2VGA
6
L/R audio in
11
PC AUDIO IN
5
Video
10
1DC POWER
HDMI1/2
3Coax out
7
RF
Headphone out
8
4
1 2 3 5
4
8
7
9
10
11
USB
6

8
User Guidance Information
Remote Control
The remote control is using Infra-Red(IR). Point it towards the front of the LCD TV. The remote
control may not work correctly if it is operated out of range or out of angle.
POWER MUTE
REC
EPG
SOURCE
MENU EXIT
VOL CH
PICTURE
SETUP
A-B GOTO
D-MENU
TITLE
HOLD SIZE SUBPAGE INDEX
NICAM/A2
TV/TXT CANCEL REVEAL
SOUND SLEEP
FAV
1234
5678
90
DISPLAY
REP
PVR/DVD
SUBTITLE
OK
REC LIST CH/LIST
PRO
SLOW
SCREEN
LAN
POWER: Turn the TV on/standby.
MUTE: Press to mute the sound, press again or press
VOL+ to unmute.
REC LIST: Record List.
CH/LIST: Display the programs list.
SUBTITLE: Turn on/off the subtitle display in DTV mode.
EPG: To show the Electronic Program Guide during no-menu
state only in DTV mode.
REP: Repeat playing the title or chapter.
: Load/eject DVD disc.
CURSOR KEYS OK
Allows you to navigate the on-screen menus and adjust the
system settings to your preference.
NUMBER BUTTONS
Press0-9 to select a TV channel directly when you
are watching TV.
Return to the previous channel viewed.
SOURCE: Press to display the input source menu.
DISPLAY: Press to display the current mode’s information.
MENU: System setup menu.
EXIT: Exit the OSD menu.
FAV: Display the favorite program list.
PVR/DVD function
REC : Press to start record the program in DVB mode.
: DVD previous chapter.
: DVD next chapter.
: DVD fast reverse.
: DVD fast forward.
: Stop DVD program.
: Pause DVD program.
: Play DVD program.

9
User Guidance Information
Remote Control
POWER MUTE
REC
EPG
SOURCE
MENU EXIT
VOL CH
PICTURE
SETUP
A-B GOTO
D-MENU
TITLE
HOLD SIZE SUBPAGE INDEX
NICAM/A2
TV/TXT CANCEL REVEAL
SOUND SLEEP
FAV
1234
5678
90
DISPLAY
REP
PVR/DVD
SUBTITLE
OK
REC LIST CH/LIST
PRO
SLOW
SCREEN
LAN
SETUP: DVD system setup.
D-MENU: DVD play list/Disc menu.
TITLE: DVD title.
PRO: Edit the program and play.
LAN: Select DVD disc language.
A-B: Select and play the preferable paragraph of DVD program
by pressing this key twice at the beginning and end of it.
GOTO: Play your favorite title/chapter/track.
SLOW: Play DVD programs at slow speed.
CH / : Scan through channels.
VOL / : Adjust the volume.
PICTURE: Select the picture mode.
NICAM/A2: TV Nicam/A2 select.
SOUND: Select the sound mode.
SLEEP: Standby timer.
SCREEN: Turn on/off the screen.
TV/TXT: Turn off/on the Teletext display.
CANCEL: Cancel the Teletext display.
REVEAL: Reveal any hidden text.
HOLD: Hold or carry on the current subpage.
SIZE: Press to see top half of page double size,
Press again to see the bottom
half of page double size. Press again for normal size.
SUBPAGE: Press to enter subpages, pressagain to cancel.
INDEX: Go to index.

button to select the function item, press button to adjust/setup,
Basic Operation
10
Basic Operation
Power on/off
1. Connect to the power supply with the power cord.
2. -To turn on the TV
Press POWER/ button on the TV or remote control.
-To turn off the TV
Press POWER/ button on the TV or remote control.
Input Source select
Press INPUT button on the TV set or remote control to display input
source menu, and use CH+/- button on the TV set or Ĥ0ĥ!button
on remote control to select the input source, press OK button on the
remote control to enter.
Note: Before you select the input source, make sure the
connections are prepared.
Basic OSD Menu operation
Press MENU button to display the OSD menu as below:
Use /
Ĥ
/
ĥ
Ĥ
ĥ
button to select the main menu, and press button to enter the submenu.
In the submenu, use /
Ĥĥ
ĥ
or press OK button to enter the submenu.
* (Press MENU button to return to the upper menu.)
* (Press EXIT button to exit the menu display.)
Note1: Only when you input the suitable signal, the relevant items can be activated
Note2: Please operating the OSD menu according to hint on the bottom of the banner.
Main menu
CHANNEL
PICTURE
SOUND
TIME
OPTION
LOCK
Submenu
(Chanel menu
for example)
Hint---you should operate the OSD menu according to the hint.
Input Source
Move Select Quit
OK
DTV
ATV
YPBPR
PC
HDMI1
HDMI2
AV
USB
EXIT
DVD

OSD Menu
OSD Menu
1. CHANNEL menu
Description
Auto Scan
Press OK button to enter the hint menu, and select
the Country and Tune Type mode for the TV, then
press OK button to start auto tuning.
DTV Manual Tuning
Press OK button to enter the DTV Manual Tuning menu,
select a DTV channel, and press OK button to start searching.
ATV Manual Tuning
Press OK button to enter the ATV Manual Tuning menu.
Storage To: Select a position for storing the program.
System: Select a TV system for searching.
Current CH: Select the channel you want to manual tuning.
Search: Press < / > button to manual search.
Fin-Tune: Press < / > button to fine-tune.
Frequency: Display the current frequency.
Note: Press RED button to save all the setups you have
changed.
11
Australia

OSD Menu
12
OSD Menu
Programme Edit
Press OK button to enter the Program Edit menu as the following picture.
Delete: Select a channel and press RED button, “Delete” will appear on the right of the
program edit menu next to the channel you have chosen, then press RED button
again, the program will be deleted. However if you decide not to continue to delete
press the menu button to quit.
Move: Select an channel, and press YELLOW button, then you can use and
buttons to change the position of the program, press YELLOW again to confirm the
change. Press menu to exit and it will automatically save the current set.
Skip: Select a channel and press the BLUE button to label the channel, as long as the
channel has a skip label it will be skipped when searching through the channels with
the CH+/- buttons.
Rename: Select an ATV channel and press the GREEN button to change the name of the
channel by buttons
FAV: Select a program, press FAV button to set or delete the program as the favorite
channel.
Rename
Signal Information
Display the signal information in DTV mode.
Software Update(USB)
Press OK button to enter the menu, and update the software by the USB device.
CI Information
Please contact your “pay perview” provider who can supply a viewing card and cam unit with
instructions for their use.

OSD Menu
13
OSD Menu
2. PICTURE menu
Description
Picture Mode: Choose from Standard, Dynamic, User and Mild.
Note: Contrast, Brightness, Color and sharpness are only available and can be adjusted in
the User mode option in the Picture Mode Settings.
Contrast: Controls the difference between the brightest and darkest regions of the picture.
Brightness: Controls the overall brightness of the picture.
Color: Control the color.
Sharpness: Increase this setting to see crisp edges in the picture; decrease it for soft edges.
Tint: Controls the tint ( NTSC mode only).
Color Temperature: Choose from Medium, Cool, User and Warm.
Red: Controls the red colour of the picture.
Green: Controls the green colour of the picture.
Blue: Con trols the blue colour of the picture.
Aspect Ratio: Choose from 4:3, 16:9, Zoom1, Zoom2, Just Scan and Panorama.
Note: The aspect ratio modes you can select according to the input source.
Noise Reduction: Choose interference noise modes form Off, Low, Middle, High and Default.
Screen(PC mode only): Press OK button to enter the submenu to adjust Horizontal / Vertical
position, Size or Phase of the picture.
Over Scan(HDMI Mode Only): Press / to select dispaly mode: PC or video

OSD Menu
14
OSD Menu
3. SOUND menu
Description
Sound Mode: Allows you to select among: Standard, Music, Movie, Sports and User.
Treble(Could be adjusted when the sound mode is User):Controls the relative intensity of
higher pitched sounds.
Bass (Can be adjusted when the sound mode is set to User): Controls the relative intensity of
lower pitched sounds.
Balance: To adjust the balance of the left and right sound track, or turn off the volume of the
left and right sound track.
Auto Volume: Control the volume of the program automatically when you turn on the function
by selecting “On”.
Surround Sound: Turn on/off the surround sound function by selecting “off”/“surround”.
SPDIF MODE: Allows you to select among: Off, PCM and Auto.
SPDIF MODE PCM

OSD Menu
15
OSD Menu
Clock: Use the and buttons to select the position, and use the and buttons to set the
time.
Note: User can not change time manually during DTV mode, for time is from signal source
directly.
Off Time: Press OK button to enter the submenu, you could set the time when the TV set will
be turned off automatically, you could also set the frequency.
On Time: Press OK button to enter the submenu, you could set the time when the TV set will
be turned on automatically, you could also set the frequency, volume and program.
Sleep Timer: Allows you to setup the sleep timer among: 10min, 20min, 30min, 60min, 90min,
120min,180min, 240min and off.
Auto Sleep: Turn on/off the auto standby function.
Time Zone: Allows you to select the time zone.
4. TIME menu
Description

OSD Menu
16
OSD Menu
5. OPTION menu
OSD Language: Allows you to select menu language.
Audio Language 1st/2nd (can be selected in DTV mode): Allows you to select first and
second audio language.
Subtitle Language 1st/2nd (can be selected in DTV mode):Allows you to select first and
second subtitle language.
OSD Duration : Allows you to setup the time of the menu display on the screen among:
5s, 10s, 15s, 20s, 25s, 30s, 35s, 40s.
Country: Display the current Country, and you should select the Country when you want to
auto tuning.
Restore Factory Default: Press OK button to restore factory default.
Description
Country UK
OSD Duration 10s

OSD Menu
17
OSD Menu
Description
Lock System: Turn on/off the Lock System function.
Note: You should enter the code to operate the menu.(original code is 0000)
Set Password: Set pin code. If the Pin code has been changed you must enter the present
code.
New : Enter the new password.
Confirm: Enter the new password.
Block Program: Lock the channel, you have to enter the code to view the channel. Use
and buttons to select the channel, and press the GREEN button on the remote control to
lock the channel or canel.
Parental Guidance: Allows you to select the Parental Guidance mode.
6. LOCK menu
No lock

Press ˘/˚/ Ī/ībuttons to move , and press OK button to select the file or unfold the folder,
Then press button to play the files (be signed) you select or the files in the fold you select,
You can display the option table on the bottom of the screen by OK button, press button to hide.
Press button to stop and exit the full screen program.
Select
Basic Operation
2). Insert USB device, you will find the name of the device display on the screen.
3). Press ˘/˚button to select the kind of the files in the device you want to program from PHOTO,
MUSIC, MOVIE and TEXT. Press Ī/ībutton to select the device and press OK button to enter.
1). Press the SOURCE button on the remote control to display the input source menu, select USB
source by the / buttons, and press OK button to enter the Multimedia menu seen below.
MAINS MENU
PHOTO MUSIC MOVIE TEXT
MAINS MENU
PHOTO MUSIC MOVIE TEXT
Hints for operation
Hints and informations of USB device
USB device list
Select
Disk C:
Multimedia Operation
18
Multimedia Operation
Preview
Return to
device list
Up Folder Informations
Input Source
Move Select Quit
OK
DTV
ATV
YPBPR
PC
HDMI1
HDMI2
AV
USB
DVD
EXIT
Table of contents
Other Kogan TV manuals

Kogan
Kogan KALED16XXXYA User manual

Kogan
Kogan KGNFHDLEDH32VA User manual

Kogan
Kogan KALED50XXXZB User manual

Kogan
Kogan KGNFHDLEDPRO24VB User manual

Kogan
Kogan TU9210 User manual

Kogan
Kogan KALED32DVDWA User manual

Kogan
Kogan KALED19XXXYA User manual

Kogan
Kogan KALED55XX1ZA User manual

Kogan
Kogan KALED40XXXZB User manual

Kogan
Kogan 9 TU9220 Series User manual

Kogan
Kogan KALED19DVDA User manual

Kogan
Kogan AGORA KALED39SMTWA User manual

Kogan
Kogan KALED55XXXTA User manual

Kogan
Kogan KALED32XXXZA User manual

Kogan
Kogan KALED26DVDA User manual

Kogan
Kogan KALED32DVDYA User manual

Kogan
Kogan KALED42XXXA User manual

Kogan
Kogan KALED55SMTZA User manual

Kogan
Kogan KGNFHDLED46VA User manual

Kogan
Kogan KALCD39FHDXA User manual