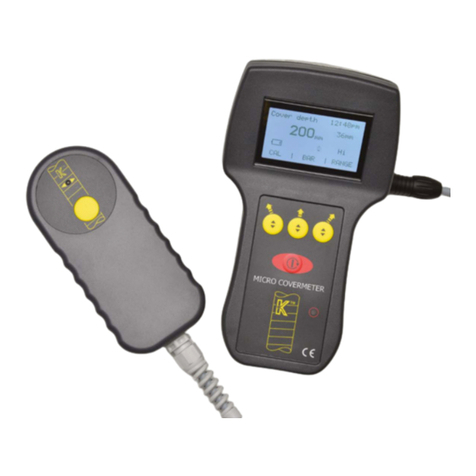
Kolectric MC8022 User manual

MC8022
Covermeter
Kolectric Research
Document number IM0166-003-20 Iss 1
Copyright 2014 Tallix Ltd

Getting Started 3
Maintenance 4
Measuring Cover 4
Automatic Bar Sizing 6
Low Cover Scanning 6
Custom Cover Tables 6
Data Logging and Download 7
Installing Download Software 7
Specification 8
Repair and Disposal 8
CONTENTS
Battery
charger
connection
Function
button labels
Probe &
Download
connection
Function
buttons
Power /
Mode button
Sole plate
replace when worn
Probe cable
Data log button
Bar indicator light
Kolectric Research
New Forest Enterprise Centre
Southampton, SO40 9LA, UK
Phone +44 (0)23 8066 0127
Email [email protected]
www.kolectric.com

3
Controls and Display
Switch the MC8022 on by pressing and holding the red button
until the display shows the instrument name and serial number.
The display quickly changes to show the normal controls and cover
reading.
Press the red button briefly to change the displayed control page.
These pages are shown in turn:
Cover depth Normal display for measuring cover depth
Bar size Automatic bar size measurement
Data log Review logged data
Settings Configure measurement, logging, audio and
time & date
Page labels and menu items are shown in this manual like this
Cover depth
The three yellow buttons have different functions depending on
which control page is being used. The active function is shown on
the display just above each button. In this manual button labels are
shown like this (SELECT).
When changing Settings, the left ( ) and right ( ) yellow
buttons move up and down through the list of settings, the middle
yellow button is pressed to select a menu item (SELECT) or
change a setting ( ) and the red button is used to move back to
the previous menu.
Switch the instrument off by pressing the red button for about two
seconds until the screen shows the Settings display. The first
option in the list, Switch off, is highlighted. Press (SELECT) to
turn the instrument off. The instrument can be switched off in any
mode and will switch off automatically after 10 minutes if there
have been no key presses.
Backlight
The display is designed to be visible in normal daylight conditions.
For use in darker environments, turn on the backlight.
Press the red button to display Settings, then select
Measurement.
Now select Backlight and use the middle yellow button ( ) to
turn it on or off.
Charging the battery
MC8022 contains a rechargeable battery that provides about 20
hours of typical operation. When operating, the battery indicator at
the left hand side of the Cover depth display shows approximately
how much charge is in the battery.
The instrument should be fully
charged before first use in the field.
If you know the MC8022 will not
be used for a few months, connect
the charger for 1-2 hours before
storing the instrument, and then
fully recharge the battery before it
is used again.
To recharge the battery, switch the instrument off and connect
the supplied charger to the left hand connector on the instrument.
Charging the battery to 95% of capacity takes about 2.5 hours.
Leave the charger connected for 3-4 hours for a full recharge.
Only use the supplied battery charger. Using any other type of
charger may result in reduced battery performance or damage to
the equipment. Damage caused by using an unsuitable charger
is not covered by warranty. If the charger is damaged, obtain a
genuine spare part from Kolectric Research or your local agent.
Always replace the connector sealing cap after charging to prevent
ingress of dust and moisture.
GETTING STARTED
Setting the date and time
MC8022 has an internal clock which is used to timestamp logged
data. The time, date and display format (12 hr or 24:00 hr, d/m/y or
m/d/y) can be set from Date and Time.
Display the Settings by pressing the
red button three times.
Press the right-hand yellow button
( ) to move down the menu until
Date and Time is highlighted. Press
the middle yellow button (SELECT) to adjust the Date and Time.
Use the yellow buttons ( ) and
( ) to move up and down the menu
and ( ) to change the selected
setting.
When finished, press the red button
to return to Settings.
Setting the measurement units
Cover depth and bar size can be displayed in millimeters or inches
to suit local requirements.
A third option is provided to display cover depth in arbitrary units
(0-1000). This scale is used with custom depth tables.
To change measurement units,
go to Settings and then select
Measurement. Scroll to Cover units
and press the middle yellow button to
change the setting.

Maintenance
MC8022 should be kept clean using a damp cloth. Do not immerse
in water. Do not use solvent or abrasive cleaners.
The bottom of the probe is protected by a replaceable yellow plastic
plate. This will wear as the probe is run over concrete. It should
be peeled off and replaced periodically to protect the main probe
housing. Self adhesive replacements are included in each MC8022
kit and spares are available direct from Kolectric Research.
Certification
The MC8022 Covermeter should be tested for compliant
performance periodically; the recommended interval is 12 months.
Complete units should be packed appropriately and returned to
Kolectric Research for testing and certification.
There are no user serviceable components inside the equipment
and opening the equipment voids any warranty.
4
MEASURING COVER
Use the following process to measure cover:
1. Connect and Calibrate the probe
2. Set the measurement range
3. Set the bar size
4. Locate the bar
5. Read the cover depth
Connect and Calibrate the probe
Calibration must be performed every time you switch the
instrument on.
To remind you, the Cover depth display will show 0mm (0.00in)
until calibration is performed.
Connect the probe cable to the connector on the right hand side of
the MC8022. Align the white index marks on the connectors, push
the plug onto the instrument connector, then turn the locking ring in
the direction of the green arrow. Press the red button to switch on
the MC8022.
Calibrate the instrument by holding
the probe in the air at least 1m away
from metal objects and magnetic
fields, such as keys, rings or coins,
fluorescent lights, mobile phones or
computer screens.
Press and release the left hand yellow button (CAL). The
instrument will beep when the button is pressed and beep again
when calibration is complete. The display changes to show 120mm
(Lo) or 200mm (Hi) depending on the range selected.
Move the probe towards a metallic
object and note that the cover display
changes from 120 mm or 200 mm to a
smaller reading.
These simple checks confirm that the
instrument is functioning and ready for use.
To get the best possible results, calibration should also be
performed periodically if you are making large numbers of
measurements and especially before making measurements of
deep cover.
MAINTENANCE

Set the measurement range
The MC8022 has two measurement ranges – High and Low.
Change range by pressing the right hand yellow button (Range).
An indicator on the right-hand side of the screen shows Hi or Lo.
The High range is more
sensitive so it can measure
greater cover depths. When
locating a bar or measuring
cover, you should normally
use the High range to avoid
missing deep bars. However,
when trying to find the orientation of bars that are closely spaced,
try the Low range because it is less affected by nearby bars.
Set the bar size
Cover measurement is only accurate if the bar size is known
reasonably precisely.
If you know the bar size, press the
middle yellow button (BAR) to set
the value shown on the Cover depth
page. Pressing (BAR) selects the next
available bar size. In the picture, the
bar size has been set to 16mm.
To locate a bar and estimate its size automatically, see “Automatic
bar sizing” below; this will set the current bar size to the measured
value.
Quick bar location
To quickly find the approximate position of a bar, look at the top of
the probe whilst slowly sweeping the probe over the search area.
The red bar indicator light flashes
briefly when the signal detected from
a bar is near its peak and this can be
used as a quick guide to bar location.
For more precise location follow the
procedure below.
Bar size Hi range Lo range
6mm 110mm 70mm
40mm 185mm 90mm
Maximum cover
5
Precise bar location and cover measurement
Once you have found a bar and aligned the probe to it, you can read
the cover depth from the display.
Hold the yellow face of
the probe flat against the
concrete surface. Move
the probe over the surface
whilst watching the cover
depth display. The probe is
positioned roughly over a bar
when the cover depth reading
is at its lowest.
Keeping the probe over the
same spot, rotate it around
its centre. When the lowest
cover reading is seen, the
probe body has been aligned
with the direction of the bar.
Now the bar orientation is
known, slowly sweep the
probe, keeping it parallel to
the bar. The lowest cover
reading will now correspond
to the center line.
TM
TM
TM
TM
TM
TM
TM
TM
TM
TM
TM
TM
TM
TM
TM
TM
TM
TM
TM
TM
TM
TM
TM
TM
TM
TM
TM
If you want to log this cover reading, press the yellow button on
the probe. This will record the cover depth, bar size, time and date
and can be viewed on the MC8022 or downloaded to a PC later if
required. (See Data logging, below)
For maximum precision follow the same procedure but instead of
watching for minimum cover, look for maximum signal strength
reading.
Signal strength is shown below the
main cover depth readout, in smaller
numbers – 1854 in the picture.
The signal strength reading is at its
greatest when the probe is aligned
with the centre line of a bar. When this position and alignment is
found, read the cover as before.
In some situations an alternate method is useful to map out the
orientation of bars. First sweep the probe in a straight line until
you find a bar (bar indicator light / lowest cover / maximum signal).
Mark this position. Now perform a second sweep in the same
direction but some distance from the first and again mark the bar
position. A line drawn between these marks gives the orientation of
the bars. Keeping the probe parallel to the bar orientation, perform
a third sweep to find the centre of the bar. The location of parallel
bars can now be marked by extending the sweep either side of the
first bar.
Audio cover mode
MC8022 has an audible indication
of detection strength which helps
to locate bars without having to
watch the display. To use Audio cover
indication, go to Settings, select
Audio and set Mode to “Cover”. You
can also adjust the volume from this menu.
Now when you sweep the probe over the search area, you will hear
a tone that increases in pitch as you get closer to a bar and reaches
its highest pitch when the probe is aligned with the bar.
Set the audio Mode to “Off” to stop the tone.

The MC8022 can be used to automatically calculate the size of
covered rebar.
First, align the probe with the centre line of the bar to be measured
using the bar search process above.
Keeping the probe in the same position, press the red button to
select the Bar size page. Initially this will show the detected
signal level. You can adjust the position of the probe so that the
reading is at its highest indicating the best alignment of the probe
with the bar.
Now press the left yellow button (SIZE) to calculate the bar size.
When the process is complete, the
display shows the bar size. The
instrument will indicate if the target
bar is too near or too far to complete
the calculation. If the bar is too near,
a plastic spacer can be used to hold
the probe away from the bar.
Press the right yellow button
(SIGNAL) to show the detected level
again to repeat the process.
Press the mode button to change back
to cover depth mode and note that
the bar size shown in the top right of the display has been updated
automatically, ready for cover depth measurements.
AUTOMATIC BAR RESIZING
TM
TM
TM
TM
TM
TM
TM
TM
TM
The MC8022 can be used to quickly check a large area for proper
cover.
To use Low Cover Scanning, configure the MC8022 as follows:
Press the red mode button to show the Settings page, then select
Audio. Press the middle yellow button ( ) to change the audio
Mode to “Low cover”.
Adjust the volume according to the
environment.
Move to the Low Cover setting
and use the middle yellow button
( ) to select the required cover
depth, pressing and holding the button to rapidly step through the
available cover range.
Press the red button twice to return to the Cover depth display.
Sweep the probe over the area to be checked. An alarm is heard if
a bar is detected with low cover.
Turn off Low Cover mode from the Audio menu when the search is
complete.
The MC8022 can be used to assess cover over non-standard bar,
pipes or other inclusions in pre-fabricated structures. This process
requires preparation of a custom depth table and setting the
measurement units to an arbitrary scale of 0-1000. Contact your
Kolectric reseller for advice on using custom cover tables.
LOW COVER SCANNING CUSTOM COVER TABLES
6

Reviewing Cover readings
To review logged data on the
MC8022, press the red button to
display the Data log page.
The display shows the latest recorded
reading. To see older readings press
the right-hand yellow button ( ) ; to see newer readings use the
left-hand yellow button ( ).
Downloading
The optional MC8022 download kit includes a USB cable and
software to transfer logged data to a PC. Follow the instructions in
the next section to install it on your PC.
To copy logged cover readings to a PC, first unplug the probe cable
and connect the download cable to the right-hand connector on the
MC8022. Plug the other end of the download cable into your PC’s
USB port.
Run the download software using the shortcut “Kolectric MC802x
download”.
Click the Download button. The logged data appears in the
download software window.
To save the data to your PC, click “Save File” and choose a suitable
filename. By default, this will save all the downloaded data. To
save a specific range of data, enter the first and last required record
numbers before clicking Save File.
When all the data required has been downloaded and saved, clear
the Covermeter’s memory by clicking “Clear Log”. This removes all
logged data from the MC8022.
You can also set the MC8022 time and date from the download
software.
MC8022 can log cover readings as you make them so that you can
review them later or download them to a PC.
Prepare for Data logging
Before starting a new set of measurements, prepare as follows.
Turn the MC8022 on. Check the time displayed on the Cover depth
page and make adjustments if necessary using the Data and Time
menu in Settings.
The MC8022 can store 2000 readings. It is good practice to
regularly review or download the data you need and then clear the
memory on the MC8022.
First, check that you have reviewed or downloaded any previous
logged data that might be needed.
Go to the Settings and select Data
log.
Select Clear log – the display will
show “Sure?”. Select Clear log a
second time and all stored readings
will be deleted. Press the red button to exit without clearing the
log.
The Overwrite option can be used so that the MC8022 always
stores the latest readings and automatically deletes older readings
as new ones are logged. Switch this option on to overwrite old
data. When Overwrite is switched off, the MC8022 will stop
logging when the memory is full, protecting previous readings.
Logging Cover readings
When measuring cover, press the
yellow button on the probe to log the
current cover depth. The instrument
beeps to confirm that the data has
been recorded and the display briefly
shows “Log” below the bar size.
DATA LOGGING AND DOWNLOAD
The MC8022 Download Kit includes software to copy logged cover
readings onto a PC using a USB cable. If your MC8022 kit was
not purchased with the download cable and software, it can be
purchased directly from Kolectric Research.
Kolectric download software is designed for Windows XP or
Windows 7. You may need administrator rights to successfully
install the software. Ask your IT advisor if in doubt.
You must install the software BEFORE connecting the download
cable.
Insert the USB memory stick into your PC. Open the root folder for
the USB disk and run ‘setup.exe’.
Follow the on-screen instructions.
When the installation is complete, plug the download cable into the
right-hand connector on the MC8022 (disconnect the probe cable
first). Connect the other end of the cable to a USB port on your PC.
Switch the MC8022 on.
The software creates a new program shortcut:
“Kolectric Research | Kolectric MC802x download”
Run this to start the software.
INSTALLING DOWNLOAD SOFTWARE
7

Repair
There are no user-serviceable components inside the equipment.
Opening the equipment voids any warranty.
If you damage your MC8022 or it malfunctions during the warranty
period, please contact your reseller or Kolectric Research directly to
arrange for assessment and repair.
Recycling
MC8022 contains sophisticated electronics which include valuable
materials which can be recovered by an appropriate waste
electrical and electronic equipment (WEEE) recycling process. The
equipment is marked with the crossed-out wheeled bin symbol to
remind you to recycle the equipment separately from household
waste.
Battery
MC8022 contains a lithium-ion battery pack. This is designed to
last the lifetime of the instrument and should only be replaced, or
removed for disposal, by Kolectric Research, a qualified service
agent or an authorized WEEE recycling centre.
Further details are available directly from Kolectric Research.
Cover Measurement
Cover depth indicated is from the bar surface. Performance meets
or exceeds the requirements of BS1881 part 204:1988 when
instrument has been tested and certified compliant by Kolectric
Research and is operated according to this user manual.
REPAIR AND DISPOSALSPECIFICATION
Operating Weight 800g (instrument+probe+cable)
Operating Temp -10°C – +50°C
Battery Operation 20 hrs
Battery Charger 110 – 240V AC
Ingress Protection IP65
Operating Parameters
Bar Size Cover Minimum Spacing
16mm 60mm 70mm
16mm 100mm 110mm
25mm 130mm 150mm
Bar Resolution
Bar resolution is dependent on bar size and cover. Typical examples of
resolution performance are shown:
Bar Size Cover Range
6 mm bar 5 mm – 108 mm
40 mm bar 22 mm – 185 mm
Cover depth Accuracy
up to 60 mm cover ±1 mm
up to 120 mm ±2 mm
up to 160 mm ±3 mm
over 160 mm ±4 mm
Accuracy ± 0.5mm – ± 1.5 mm
Resolution 0.1mm
Minimum Cover 8 mm – 22 mm minimum cover depending
on bar size
Maximum Cover 6 mm bar up to 60 mm cover; 40 mm bar
up to 80 mm cover
Automatic Bar Sizing
Kolectric Research
New Forest Enterprise Centre
Southampton, SO40 9LA, UK
Phone +44 (0)23 8066 0127
Email [email protected]
www.kolectric.com
8

Table of contents
Other Kolectric Measuring Instrument manuals