komodo KDSLR160PNLA User manual

12V 160W Folding Portable Solar Panel Kit
KDSLR160PNLA
User Manual
able of Contents
Product Features....................................................................................................................................................... 1
Product Components.............................................................................................................................................. 2
Product Specifications........................................................................................................................................... 2
LED Indicators........................................................................................................................................................... 3
Safety Precautions................................................................................................................................................... 3
Programming Mode................................................................................................................................................. 4
attery Voltage......................................................................................................................................................... 4
Operation Mode for running lamps, regular Day/Night mode.................................................................4
Programming Method............................................................................................................................................. 5
Wiring Diagram......................................................................................................................................................... 6
Troubleshooting Guide and FAQ........................................................................................................................ 6
To get the most out of the solar panels, please read this user manual fully before use.
Please keep a copy of this manual handy for future reference, as failure to follow instructions may result in personal injury
or damage to the equipment.
Product Features
Convenient Carry ag
The water-resistant polyester bag is fully padded with reinforced corners and
protectors to ensure safe transportation and staging.
Carry Handle and Safety Fasteners
The panels are fitted with a heavy duty handle, allowing for the easy handling and
removal from the protective carry bag. Two clip-type safety fasteners lock the panel
securely shut during transportation.
uilt-in Smart Solar Controller with LED Indicators
Mounted behind the panels, the controller ensures the safety of the panels and
batteries. The SMART controller will automatically cut out once the batteries are fully
charged, during solar panel discharge or in situations where reversed polarities may
exist. The controller features a switch that allows use with lead-acid or gel type
batteries.
Fold Away Support Legs
Features a unique system which allows for easy opening and closing, keeping the
panels at your desired angle without slipping. The angle can be easily adjusted
throughout the day to ensure maximum sun exposure and maximum power output.
Connecting Cables
The unit comes complete with a 4.5m cable extending from the controller.
1

Product Components
1. Two folding Mono-Crystalline silicon solar panels with heavy duty anodised aluminium frames.
2. Heavy duty A S handle.
3. Heavy duty steel safety fasteners.
4. Heavy duty aluminium fold support legs.
5. Automatic SMART solar charge controller with Green/Yellow LED indicators.
6. 4.5m cable extending from the controller.
7. Hinges.
8. Solar panel junction box.
9. Connection cable from left solar panel to controller.
10. Connection cable from right solar panel to controller.
Product Specifications
Solar Panel
Type Mono-Crystalline
MAX Power 2 x 80W
Open Circuit Voltage 21.96V
Short Circuit Current 9.38A
MAX Power Voltage 18.25V
MAX Power Current 8.76A
Operating Temperature -40°C ~ 85°C
Solar Panel Controller
Type SMART Automatic
Rated Voltage 12VDC / 24VDC
Rated Current 7A – 20A
MAX Input Voltage 25A
Operating Voltage 8V
Operating Temperature -20°C ~ 60°C
Recommended atteries (not included)
12V (60Ah – 200Ah) Lead-Acid or GEL type
2
(will not charge a 24V battery)

LED Indicators
Function
SOLID
Flashing
LED 3 SOLAR PANEL indicator Solar Panel Connected Charging attery
LED 2 attery indicator attery Connected
Voltage indicator. Will
flash quickly when
voltage is high. Will
flash slowly when
voltage is low.
LED 1 Load indicator Load ON Shorted Load
The 3-digit LED display can display battery voltage, load current and other information my
pressing K1. You can also check the currently set operational parameters by pressing K2 to cycle
through the relevant options.
Press K1 to cycle through the various information.
1. Display battery voltage
2. Display load current
3. Display load power
4. Display Temperature
5. Display Core PWM Voltage (Factory use)
Press K2 to cycle through the various current operation parameters
1. U__ Voltage mode
2. P20 No Function, Diagnostic only
3. 1H_ Not applicable
4. 2H_ Not applicable
5. 3H_ Not applicable
6. 4H_ Not applicable
7. 1F_ Runtime after dusk or Always on mode
8. 2F_ Fixed at 0 and cannot be changed
9. 8F_ Factory test mode..
10. 9F Save changed user settings and reboot controller
Safety Precautions
1. Read and understand this instruction manual before use. Always keep a copy of this
manual handy in a convenient location. A pocket is provided on the padded protective
bag for storage of this manual.
2. To reduce the risk of injury, charge only 12V lead-acid batteries or GEL batteries. Other
battery types may be subject to explosion, which can lead to personal injury and
property damage.
3. Always operate the solar panels in a well-ventilated location. atteries emit explosive
gases, which can be ignited by a spark, cigarette or naked flame such as a cigarette
lighter or matches.
4. Make sure the voltage of the battery being connected is the same as the output voltage
of the solar controller.
5. Make sure the batteries are connected with the correct polarities (positive pole to the
positive pole, negative pole to the negative pole).
6. The battery must be removed from any vehicles when being connected to the solar
controller.
3

7. Always adhere to the battery manufacturer's recommendations when charging the
battery.
8. Given sufficient light, solar panels will always generate energy, even when they are
disconnected. Accidental shortage of the terminals or wiring can result in sparks, causing
personal injury or fire.
9. This unit is not intended for use by children or by people suffering any disabilities that
may restrict them from taking actions to avert dangers in a timely manner.
10. Always avoid charging an old, damaged, overly discharged or defective battery.
11. When testing or working around batteries, it is advisable to wear protective eyewear.
12. Have plenty of fresh water and soap available in the event that battery acid comes into
contact with skin, eyes or clothing.
13. If battery acid does come into contact with skin or clothing, flush immediately with large
amounts of water. If battery acid comes into contact with eyes, then flush the eyes with
clean water for at least 15 minutes. The eye should be completely submerged and kept
open. See a doctor immediately. Do not use eye drops or any other medications unless
instructed to do so by a doctor.
14. When working with lead-acid batteries, be careful not to short-out the battery with a
metal tool or object. Remove all personal items such as watches, rings, bracelets and
necklaces. The possibility of short circuits exist, which can damage such items and result
in severe burns.
15. Keep the solar panel away from water, acids or alkalis.
16. Keep the surface of the solar panels clean from dust by cleaning it with a soft, dry cloth.
Do not walk on the panels.
17. Do not scratch or bend solar panels.
18. Do not disassemble or open the solar panels or the controller. There are no user-
serviceable parts in this unit.
19. When mounting the solar panels, adhere to all relevant safety regulations.
20. Do not pack heavy items on top of the solar panels when storing or transporting.
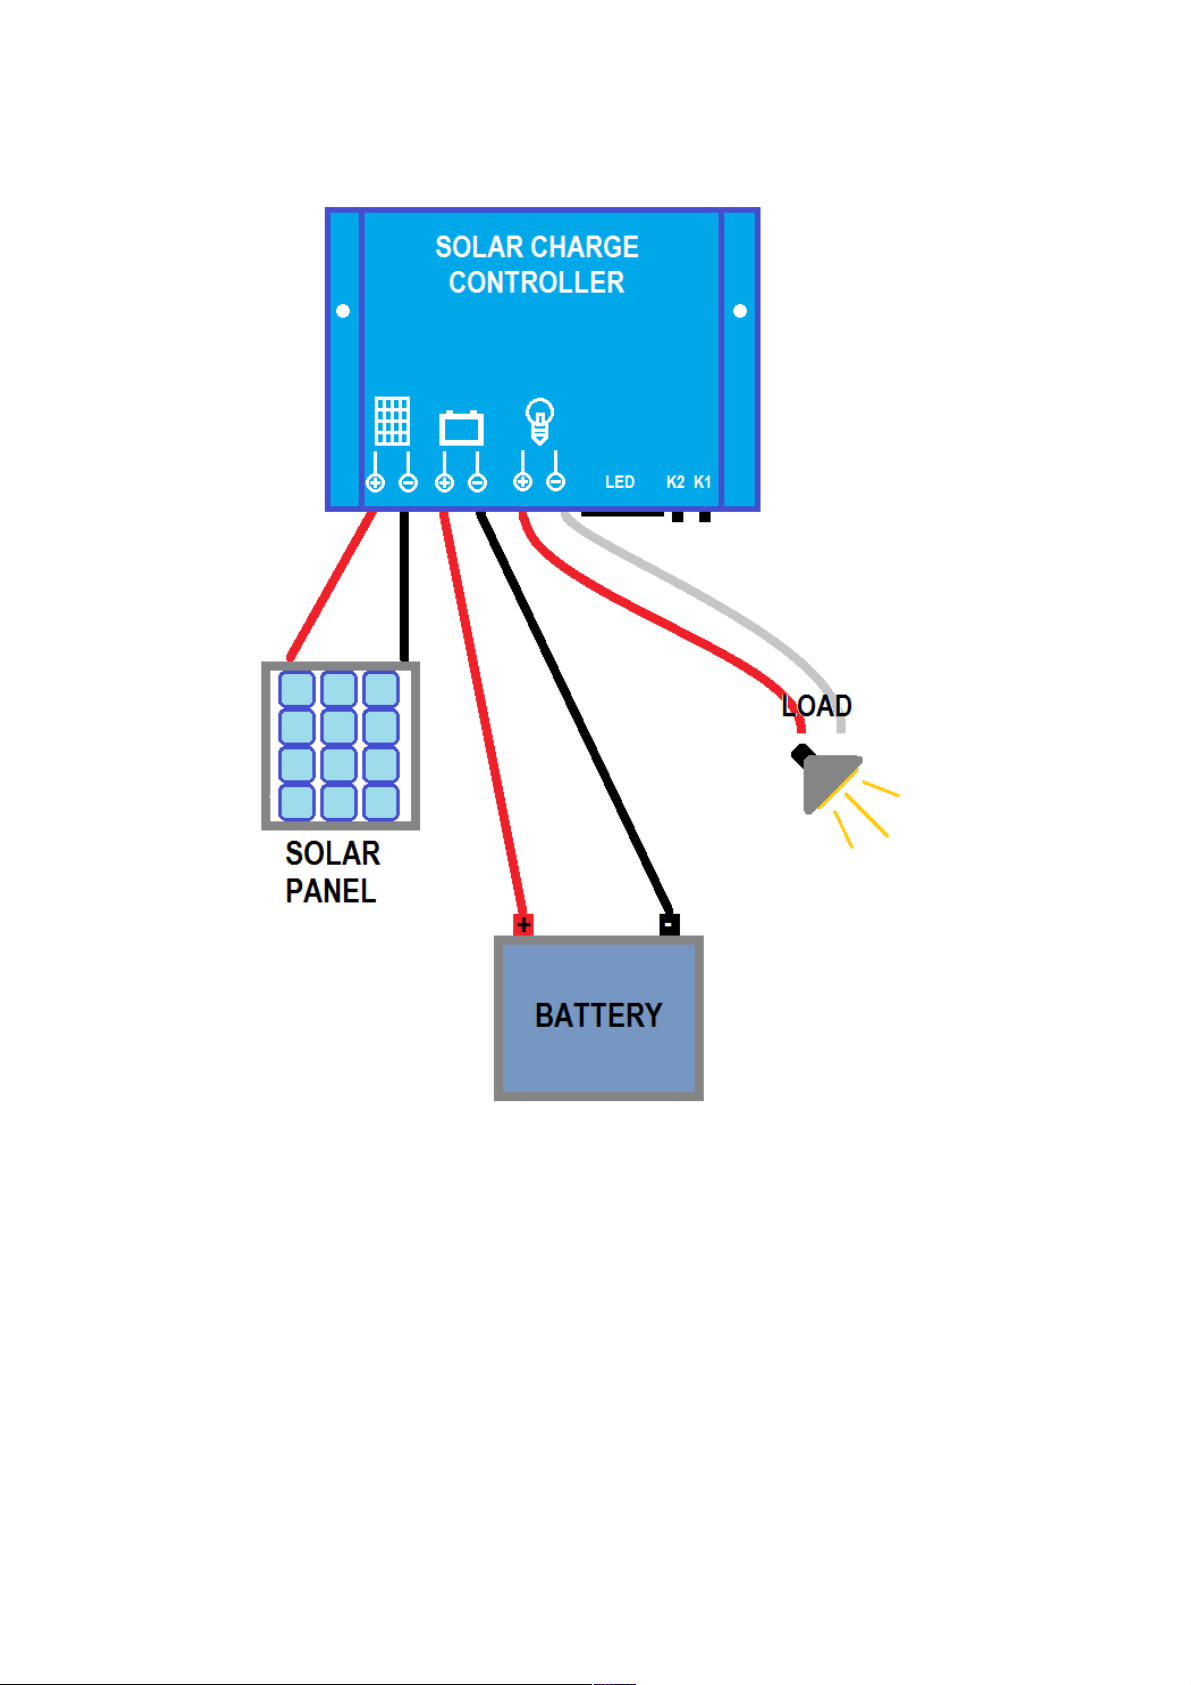
Programming Mode
This controller uses an intelligent automatic system to charge the battery, then turn lights on at
dusk and then off after 3 hours by default.
The unit is preset for a standard wet-cell 12-24V lead acid battery, however if a Gel-cell battery is
connected it will automatically detect it.
You can manually set the battery voltage, or change the load to stay on for a longer time from
3-9 hours, or always output the load.
Battery Voltage
U00, U12, U24
Options
•U00 : (Default) Autodetect the battery voltage
•U12 : For use with a 12V battery and load system
•U24 : For use with a 24V load and battery system
Operation Mode for running lamps, regular Day/Night mode
1F0, 1F3, 1F4, 1F5, 1F6, 1F7, 1F8, 1F9
Options
•1F0 - This is the “always on” power mode.
•1F3 - 3F9 - Time for load to be active after sunset (in hours)
If you select the always-on power mode, the output will always be supplied with power,
regardless of the timed brightness settings, unless the battery level reaches the low voltage cut-
out level.
4
(panel supports 12V only)

This option allows you to use the standard default mode where the controller runs lights at
night in a “Street lamp” mode, based on light falling on the panel or to power auxiliary
items at all times, regardless of it being day or night.
1F0 Will disable the timers and always power the load
1F3-1F9 will run the lamps for the time specified, with a range of 3 to 9 hours.
Press and hold K2 until the voltage is able to be set.
Press K2 multiple times until [1F3] appears in the display and press K1 to change this to a
longer duration, or set to “1F0” to have the load always output power during the day unless
overloaded, or the battery voltage drops below the cut-off.
IMPORTANT:
Remember to select 9F using K2 and then press K1 to save the setting and reboot the
controller. The following will appear in th
Modes Factory Defaults
U00 Voltage auto detect
U12 12V attery
U24 24V attery
P NOT FUNCTIONAL
1H NOT FUNCTIONAL
2H NOT FUNCTIONAL
3H NOT FUNCTIONAL
4H NOT FUNCTIONAL
1F0 Load always on
1F3 Load comes on for 3 hours
1F4 Load comes on for 4 hours
1F5 Load comes on for 5 hours
1F6 Load comes on for 6 hours
1F7 Load comes on for 7 hours
1F8 Load comes on for 8 hours
1F9 Load comes on for 9 hours
2F NOT FUNCTIONAL
7F Reset controller to factory settings
9F SAVE changed settings and reset controller
U00 Voltage auto detect
1F3 Load comes on for 3 hours
5
Programming Method

Wiring Diagram
roubleshooting Guide and FAQ
How does the solar panel work?
The solar panel converts sunlight energy into DC electric power, which can be used to charge a
rechargeable battery.
How many solar panels will it take to run my appliances?
As a general rule, the user should establish the amps required to run the appliances, then
multiply them by the expected module voltage.
Power Calculations
Amp Hours (Ah) = Current (amps) x Working Time (hours)
Module Power (W) = Current (amps) x Expected Module oltage ( )
After completing these calculations the capacity of the solar panel can be established.
For example, the follow table (overleaf) represents a typical portable appliance configuration.
6

Appliance Watts Voltage Amps Hours Amp Hours
12V Fluorescent Light 8 12 0.65 4 2.6
12V Television 20 12 1.67 1 1.67
12V Radio 5 12 0.42 1 0.45
12V Fan 4 12 0.33 5 1.65
12V Travel Iron 120 12 10 10 minutes 1.67
12V Fridge 45 12 3.75 6 22.5
Estimated Consumption 30.51
•Amp Hours: 30.21 AMP Hours per day
•Assumption: Solar Panel is exposed to 6 hours of suitable sunlight per day.
•Required current from the system would be 30.51 Amp Hours/6 Hours = 5.09A
•The required watts of the system would be 5.09A x 12.2V/0.8 = 110W
(17.2-module Vmp. 0.8 power consumption factor).
In this example, a 110W panel would be required by run the appliances for the desired time.
How much battery capacity is required?
Solar panel systems are generally sized to give plenty of reserve in the batteries.
attery Capacity Calculation: Current (Amp) x Hours = Amp Hours (Ah)
In the example above, we determined that we require 30.51Ah current per day.
It is never good to run a battery all the way down to zero during the charge cycle.
For the example given, at least 30% should be left in the battery.
We will need at least 30.51Ah/0.7-43.6Ah battery for each days use.
If the battery is going to be left used for 3 days without charging, the minimum battery capacity
recommended would be 43.6x3-131Ah at the related discharge rate.
There are no user-serviceable parts in this unit. If you have any problems, contact the Kogan.com
customer support team.
If the LED doesn't glow green:
•Ensure the panels are exposed to direct sunlight.
•Ensure the panel cables are free from damage and are connected securely.
•Ensure the cables from the controller to the battery are free from damage and are
connected securely.
•Check the battery voltage. If the battery voltage is less than 8V, the controller will not
work.
Check the fuse. The fuse may be blown for either of the following reasons:
•attery poles +/- were accidentally reversed or a short-circuit occurred.
•Solar controller output current was over 10A.
7
User manual is subject to change without notice. For the latest version of your user manual,
please visit https://www.kogan.com/usermanuals/
Table of contents
Other komodo Solar Panel manuals
Popular Solar Panel manuals by other brands

Wagner & Co
Wagner & Co EURO C22 installation instructions

Aleo
Aleo S_18 Quick reference manual

Sunna Design
Sunna Design Sol EVERGEN M Series installation guide

Consolar
Consolar EURO L20 installation instructions

Furrion
Furrion FURRIONNET-ZERO FSFP16MW-BL user manual

NEO TOOLS
NEO TOOLS 90-140 Original manual

Beretta
Beretta SCV-25 installation manual

Hunter
Hunter SOLAR PANEL quick start guide

Enerconcept
Enerconcept LUBA GL Technical manual

STIEBEL ELTRON
STIEBEL ELTRON SOL 29 Premium S Operation and installation instructions

Vaillant
Vaillant auroTHERM VFK 900 installation manual

Floe
Floe 511-01354-00 Assembly instructions