Komos Torpedo Keg User manual

KIT INCLUDES
• Ball Lock Keg
• 5lb Empty CO2Tank
• Dual Gauge Regulator
• Beer Line assembly
• Gas Line assembly
INSTRUCTIONS FOR USE:
First, secure a tall glass of beer as this can be a thirsty job. This will be the last time you have to pour from a can or a
bottle. Beer on tap is moments away.
1. Connect your dual gauge regulator to the 5 lb CO2tank with a crescent wrench. Do not overtighten the regulator
as you may split the built-in gasket if too much force is applied. The gauge that goes to 3000 psi is your tank gauge
and tells you how much gas is left in your tank. A normal 5 lb CO2tank will hold from 600–1000 lbs psi of pressure
when filled, depending on the temperature the tank is stored in. The gauge that goes to 100 psi (max working 60 psi)
is your outgoing gauge and tells you what amount of pressure is being released into the keg.
2. You are now ready to adjust the pressure on the tank. Open the valve on top of the CO2tank by turning the valve
counter clockwise. Now take the regulator adjustment knob and slowly thread it into the middle of the regulator body.
Turn the adjustment knob clockwise until the needle on the low pressure gauge (0–100 psi) begins to rise. This adjust-
ment is good for now, we will fine tune the pressure later.
3. On the top of your keg, near the valves (also called posts or body connects), the words “In” and “Out” are stamped.
Attach the gray quick connect to the “In” valve for the CO2. Attach the black quick connect to the “Out” valve for
the beverage.
4. After everything is connected, you will need to fine tune your CO2pressure. Usually 8–12 psi is considered the
norm, but dierent beers might have dierent requirements and ultimately your preference will rule. You increase the
outgoing pressure by screwing in the adjustment knob. In reverse, by loosening the knob, you decrease the pressure.
HOMEBREWING
DRAFT SYSTEMS
INSTRUCTION MANUAL
CO2
TANK
KEG
BEER
LINE
GAS
LINE
REGULATOR

5. To fill your keg with your homebrew you will need to clean and sanitize it first. A general pre-sanitizing cleaning of
the keg can be performed by scrubbing the inside with a scotch brite pad or carboy brush (if you can’t reach into the
keg). Remember that you must always clean before you sanitize. Do not use chlorine to sanitize stainless steel as the
bleach can pit the stainless steel. Star San, IO Star, or Sani Clean are the recommended sanitizers. We also recom-
mend that you remove the valves and lid and sanitize those as well.
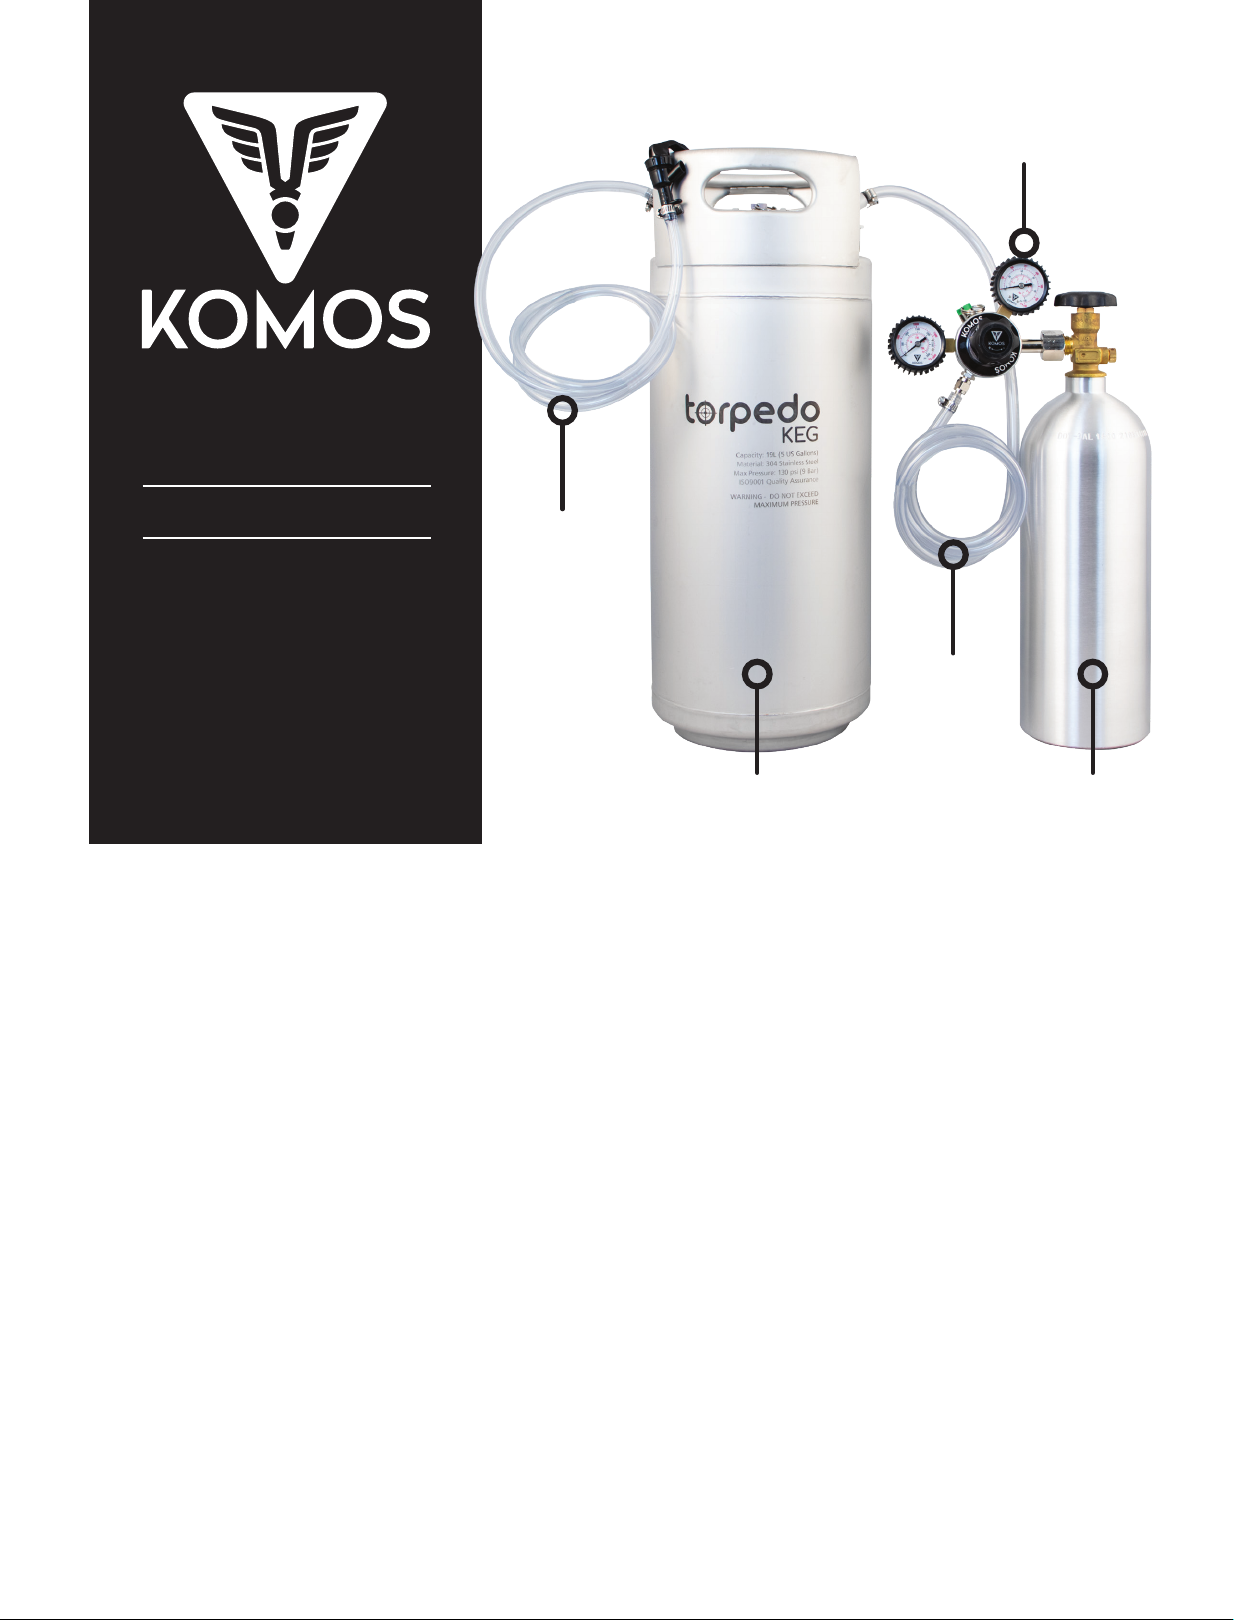
6. After filling your keg and reattaching the lid, flush the headspace with CO2by filling with CO2and releasing the
valve on top of the keg lid. Do this 3–5 times to eectively remove the oxygen from the keg.
CARBONATION
Carbonation is influenced by both temperature and pressure. The lower the temperature of the liquid, the higher the
CO2pressure, and the more surface area for contact between the liquid and CO2, the easier CO2goes into solution.
Thus the fastest way to carbonate your beer is to chill it down as much as possible, turn the CO2to about 30 lbs psi,
and shake it for around 3 minutes. A better quick method is to use the chart below. Select your temperature and de-
sired volume of CO2(2.2–2.7 is a good range to start with) and shake the keg until no more CO2goes into solution.
For those who want to carbonate like the pros (quickly, with precision, and without shaking), we do sell a carbonation
stone. It hooks to the inside of the CO2“In” valve and hangs to the bottom of the keg. The stainless steel stone re-
leases thousands of .5–2 micron bubbles of CO2, creating so much surface area that the CO2is instantly absorbed
into solution until saturation is reached at whatever level of carbonation you choose.
The paragraph above explains how to carbonate fast when you need it quick, but just like bottling, your beer is going
to benefit from a week or two of aging. What most people do is hook the keg up at whatever pressure CO2they are
going to dispense at, on average around 8–12 psi. Leave it on, in the refrigerator, for 1–2 weeks after which time the
beer will be carbonated. Our personal method of carbonation is to keep our refrigerator at around 38°F. We hook up
the gas line assembly to the keg, adjust pressure to 10 psi, and leave it for one week.
A keg of beer can be thought of as having two parts: the beer (liquid) and the headspace (gas). These two parts want to
equalize the pressure — your beer will keep accepting CO2until the pressures are equal. If you leave your flat beer with
30 psi of CO2in the headspace, you will eventually end up with fizz as the beer keeps accepting CO2into solution in
an attempt to equalize the pressures. If you have a carbonated beverage of any sort (beer, soda, seltzer) and you have
no pressure in the headspace, the CO2comes out of solution to try and equalize the pressure between the liquid and
the gas (headspace). You witness this every time you buy a 2 liter soda bottle and it goes flat in a few days. So the idea
is to equalize them at the carbonation level you prefer. The easiest way to do this is to carbonate at the pressure you
dispense. It may take a couple of days longer, but your beer ages and clears and dispenses very nicely without foaming
problems.
SERVING YOUR BEER:
After drawing o the first few pints, all the sediment around the dip tube in the bottom will be drawn o and you will
start to get clear beer. A nice benefit of the keg is since it is constantly aging at a very cold temperature, the chill haze
you see when you chill a bottle of homebrew will settle out within a few weeks.
HOW TO READ THE CARBONATION CHART
First choose the average temperature of the beer on the left side of the chart and then find the level of carbonation
you want in the center of the chart. Once you have determined the carbonation level, follow the column up to the top
of the chart to find your psi setting.

CARBONATION CHART
67 8 9 10 11 12 13 14 15 16 17 18 19 20
33 2.23 2.33 2.43 2.53 2.63 2.74 2.84 2.96 3.06 3.15 3.25
34 2.18 2.28 2.38 2.48 2.58 2.69 2.79 2.9 3.0 3.09 3.19
35 2.14 2.24 2.34 2.43 2.52 2.63 2.73 2.83 2.93 3.02 3.12 3.22
36 2.09 2.19 2.29 2.38 2.47 2.57 2.67 2.77 2.86 2.96 3.05 3.15 3.24
37 2.04 2.14 2.24 2.33 2.42 2.52 2.62 2.71 2.8 2.9 3.0 3.09 3.18 3.27
38 2.0 2.1 2.2 2.29 2.38 2.48 2.57 2.66 2.75 2.85 2.94 3.03 3.12 3.21
39 1.96 2.06 2.15 2.25 2.34 2.43 2.52 2.61 2.7 2.8 2.89 2.98 3.07 3.16 3.25
40 1.92 2.01 2.1 2.2 2.3 2.39 2.47 2.56 2.65 2.75 2.84 2.93 3.01 3.1 3.19
41 1.88 1.97 2.06 2.16 2.25 2.34 2.43 2.52 2.6 2.7 2.79 2.88 2.96 3.05 3.14
42 1.85 1.94 2.02 2.12 2.21 2.3 2.39 2.48 2.56 2.65 2.74 2.83 2.91 3.0 3.09
43 1.81 1.9 1.99 2.08 2.17 2.26 2.34 2.43 2.52 2.61 2.69 2.78 2.86 2.95 3.04
44 1.78 1.87 1.95 2.04 2.13 2.22 2.3 2.39 2.47 2.56 2.64 2.73 2.81 2.9 2.99
45 1.75 1.84 1.91 2.0 2.08 2.17 2.26 2.34 2.42 2.51 2.6 2.69 2.77 2.86 2.94
46 1.71 1.8 1.88 1.96 2.04 2.13 2.22 2.3 2.38 2.47 2.55 2.64 2.72 2.81 2.89
47 1.68 1.76 1.84 1.92 2.0 2.09 2.18 2.26 2.34 2.42 2.5 2.59 2.67 2.76 2.84
48 1.65 1.73 1.81 1.89 1.96 2.05 2.14 2.22 2.3 2.38 2.46 2.54 2.62 2.71 2.79
49 1.62 1.7 1.79 1.86 1.93 2.01 2.1 2.18 2.25 2.34 2.42 2.5 2.58 2.67 2.75
50 1.59 1.66 1.74 1.82 1.9 1.98 2.06 2.14 2.21 2.3 2.38 2.46 2.54 2.62 2.7
51 1.57 1.64 1.71 1.79 1.87 1.95 2.02 2.1 2.18 2.26 2.34 2.42 2.49 2.57 2.65
52 1.54 1.61 1.68 1.76 1.84 1.92 1.99 2.06 2.14 2.22 2.3 2.38 2.45 2.53 2.61
53 1.51 1.59 1.66 1.74 1.81 1.89 1.96 2.03 2.1 2.18 2.26 2.34 2.41 2.49 2.57
54 1.56 1.63 1.71 1.78 1.86 1.93 2.0 2.07 2.15 2.22 2.3 2.37 2.45 2.52
55 1.53 1.6 1.68 1.75 1.82 1.89 1.97 2.04 2.12 2.19 2.26 2.33 2.4 2.47
56 1.5 1.57 1.65 1.72 1.79 1.86 1.93 2.0 2.08 2.15 2.22 2.29 2.36 2.43
57 1.54 1.62 1.7 1.77 1.83 1.9 1.97 2.04 2.11 2.18 2.25 2.32 2.39
58 1.51 1.59 1.67 1.74 1.8 1.87 1.94 2.01 2.08 2.15 2.21 2.28 2.35
59 1.56 1.64 1.71 1.77 1.84 1.91 1.98 2.04 2.11 2.17 2.24 2.31
60 1.54 1.62 1.69 1.75 1.82 1.88 1.95 2.01 2.08 2.14 2.21 2.27
Pounds per Square Inch (PSI)
Volumes Of CO2
Degrees in Fahrenheit
Table of contents