Konifera SR-A43 User manual

- 1 -
Dokument Nr.
ANBAU TERRASSENDACH
DMontageanleitung
GB Assembly instructions
Wall shed
Instruction manual
SNSR-A43
size:400Lx300
IMPORTANT
You must read these instructions carefully before you start to assemble this greenhouse.Please ensurethat you nd all parts
in the carton box in the correct type and quantity as mentioned in the list illustrated in every page accordingly.
Please carry out the steps in the order set out in these instructions.
Do not tighten the steps in the greenhouse until completing on the assembly of the polycarbonate panels.
Keep these instructions in a safe place for future reference.
1029 Terrassendach.indd 1 15.11.17 09:40
D
SR-A43
Dokument Nr. AS5050
Greenhouse 16'x8'ft
Assembly Instructions
AS510
size: 510Lx245Wx230Hcm 12.5m²
IMPORTANT
You must read these instructions carefully before you start to assemble this greenhouse.Please
ensure that you find all parts in the carton box in the correct type and quantity as mentioned in
the list illustrated in every page accordingly.
Please carry out the steps in the order set out in these instructions.
Do not tighten the steps in the greenhouse until completing on the assembly of the poly carbon
ate panels.Keep these instructions in a safe place for future reference.
22/08/2018
IT Istruzioni di montaggio
GB Assembly instructions
DMontageanleitung
NL Montagehandleiding
FNotice de montage
GEWÄCHSHAUS
AS5050 SET

- 2 -
D
Wall shed
Instruction manual
SNSR-A43
size:400Lx300
IMPORTANT
You must read these instructions carefully before you start to assemble this greenhouse.Please ensurethat you nd all parts
in the carton box in the correct type and quantity as mentioned in the list illustrated in every page accordingly.
Please carry out the steps in the order set out in these instructions.
Do not tighten the steps in the greenhouse until completing on the assembly of the polycarbonate panels.
Keep these instructions in a safe place for future reference.
- 2 -
Anbau Terrassendach
Gebrauchsanweisung
Größe: 400 cm l x 300 cm b x 200/254 cm h
WICHTIG
Lesen Sie diese Anleitung sorgfältig durch, bevor Sie mit dem Aufbau dieses Terrassendaches beginnen. Vergewissern Sie sich
bitte, dass die richtigen Teile, gemäß der bebilderten Liste auf jeder Seite, in der richtigenAnzahl vorliegen.
Halten Sie sich bitte an die in dieser Anleitung angegebene Reihenfolge der Arbeitsschritte.
Ziehen Sie die Stützen des Terrassendaches erst fest, nachdem die Polycarbonat-Platten eingebaut wurden.
Bewahren Sie diese Anleitung für eine spätere Verwendung gut auf.
1029 Terrassendach.indd 2 15.11.17 09:40
SR-A43

- 3 -
D
- 3 -
ALLGEMEINE HINWEISE
Der Zusammenbau erfordert diverse Arbeitsschritte, planen Sie hierfür mindestens
260 Minuten ein.
Wahl des Standortes: Wählen Sie einen sonnigen, ebenen Standort ohne überhän-
gende Bäume aus. Verwenden Sie die vorgebohrten Löcher im Metallsockel, wenn Sie
das Terrassendach direkt auf einem massiven Beton-Fundament befestigen möchten.
Die Bauteile sollten geprüft und griffbereit ausgelegt werden.
Bewahren Sie kleine Teile (Schrauben usw.) in einer Schale auf, damit sie nicht verlo-
ren gehen. Das Dach muss von Schnee und Laub freigehalten werden.
PFLEGE & WARTUNG
Ihr Terrassendach sollte bei Bedarf mit einer milden Reinigungs-Lösung gereinigt und
mit kaltem, sauberem Wasser abgespült werden.
Verwenden Sie KEIN Aceton, keine Scheuermittel oder sonstige Spezialreiniger, um
die durchsichtigen Platten zu reinigen.
SICHERHEITSHINWEISE
Wir empfehlen, beim Aufbau Arbeitshandschuhe zu tragen.
Versuchen Sie nicht, das Terrassendach bei Wind oder Nässe aufzubauen.
+DOWHQ6LHGLH$OXPLQLXP3UR¿OHYRQ2EHUOHLWXQJHQIHUQ
Tragen Sie bei der Arbeit mit stranggepresstem Aluminium stets Schuhe und eine
Schutzbrille. Entsorgen Sie sämtliche Plastiktüten sorgfältig – von kleinen Kindern
fernhalten.
Das Terrassendach muss auf einer stabilen, ebenen Fläche aufgebaut werden.
Lehnen Sie sich während des Aufbaus nicht an das Terrassendach und verschieben
Sie ihn nicht.
Halten Sie Kinder aus der Baustelle fern.
%DXHQ6LHGDV7HUUDVVHQGDFKQLFKWDQHLQHP2UWDXIGHUVWDUNHP:LQGDXVJHVHW]W
ist. Versuchen Sie nicht das Terrassendach aufzubauen, wenn Sie müde sind, Drogen
oder Alkohol konsumiert haben oder zu Schwindelanfällen neigen.
Beachten Sie bei der Verwendung von Trittleitern und Elektrowerkzeugen die Sicher-
heitshinweise des Herstellers.
Heiße Gegenstände wie z.B. kürzlich verwendete Grills, Schweißbrenner, usw. dürfen
nicht unter dem Terrassendach aufbewahrt werden.
Bevor Sie die Haken anbringen, sollten Sie sich vergewissern, dass sich im Boden
NHLQHYHUERUJHQHQ5RKUHRGHU.DEHOEH¿QGHQ
BENÖTIGTE WERKZEUGE UND AUSRÜSTUNG
Schutzausrüstung:
Messwerkzeuge (metrisch):
Werkzeuge für den Aufbau:
1. Trittleiter, ca. 1,5 m hoch
2. 10 mm Schraubenschlüssel (am besten ein Ratschen-
schlüssel)
3. 14 mm Schraubenschlüssel (zum Einbau der
Dehnschraube)
4. 5 mm Sechskantschlüssel
5. Akku-Schrauber + 5 mm Sechskantschlüssel (empfohlen)
6. Holzhammer
7. Markierstift
8. Schlagbohreraufsätze
(8 mm und 10 mm)
9. Cutter
10. Kreuzschrau-
bendreher
Silikon
1. Helm
2. Handschuhe
%DXPZROO2YHUDOOPLWODQJHQ
Ärmeln
4. Erste-Hilfe-Set
5. Schutzbrille
1. Maßband (5 m)
2. Anschlagwinkel (90 Grad)
3. Wasserwaage
1029 Terrassendach.indd 3 15.11.17 09:40

- 4 -
D
OTHER CAUTIONS
1. 3 people required, one is for measuring & taking marks to
ensure the installation dimension ,the second person is
responsible for the installation and the last one do as assistant
and assure the safety.
2. Firstly, make sure the wall is strong enough for installation. A
brick concrete structures is the best choice.
3. High-power electric tools are required, ensure the normal work
of them and highly pay attention to electric safety.
4. Be careful when using the kind of blunt tools, like hammer.
5. Wearing long sleeve cotton overalls,gloves and helmet during
installation and wear safety glasses when using power tools .
6.No up watching when working height, or the drop screws may
hurt your eyes and suffocation causing accidentally when fall into
your mouth.
7. No climbing, No standing on the tent to avoid falling down.
8. If injuries immediately, using the first-aid kit to stop bleeding,
bind up, In case of emergency
ˈ
taken immediately to a nearby
medical institutions.
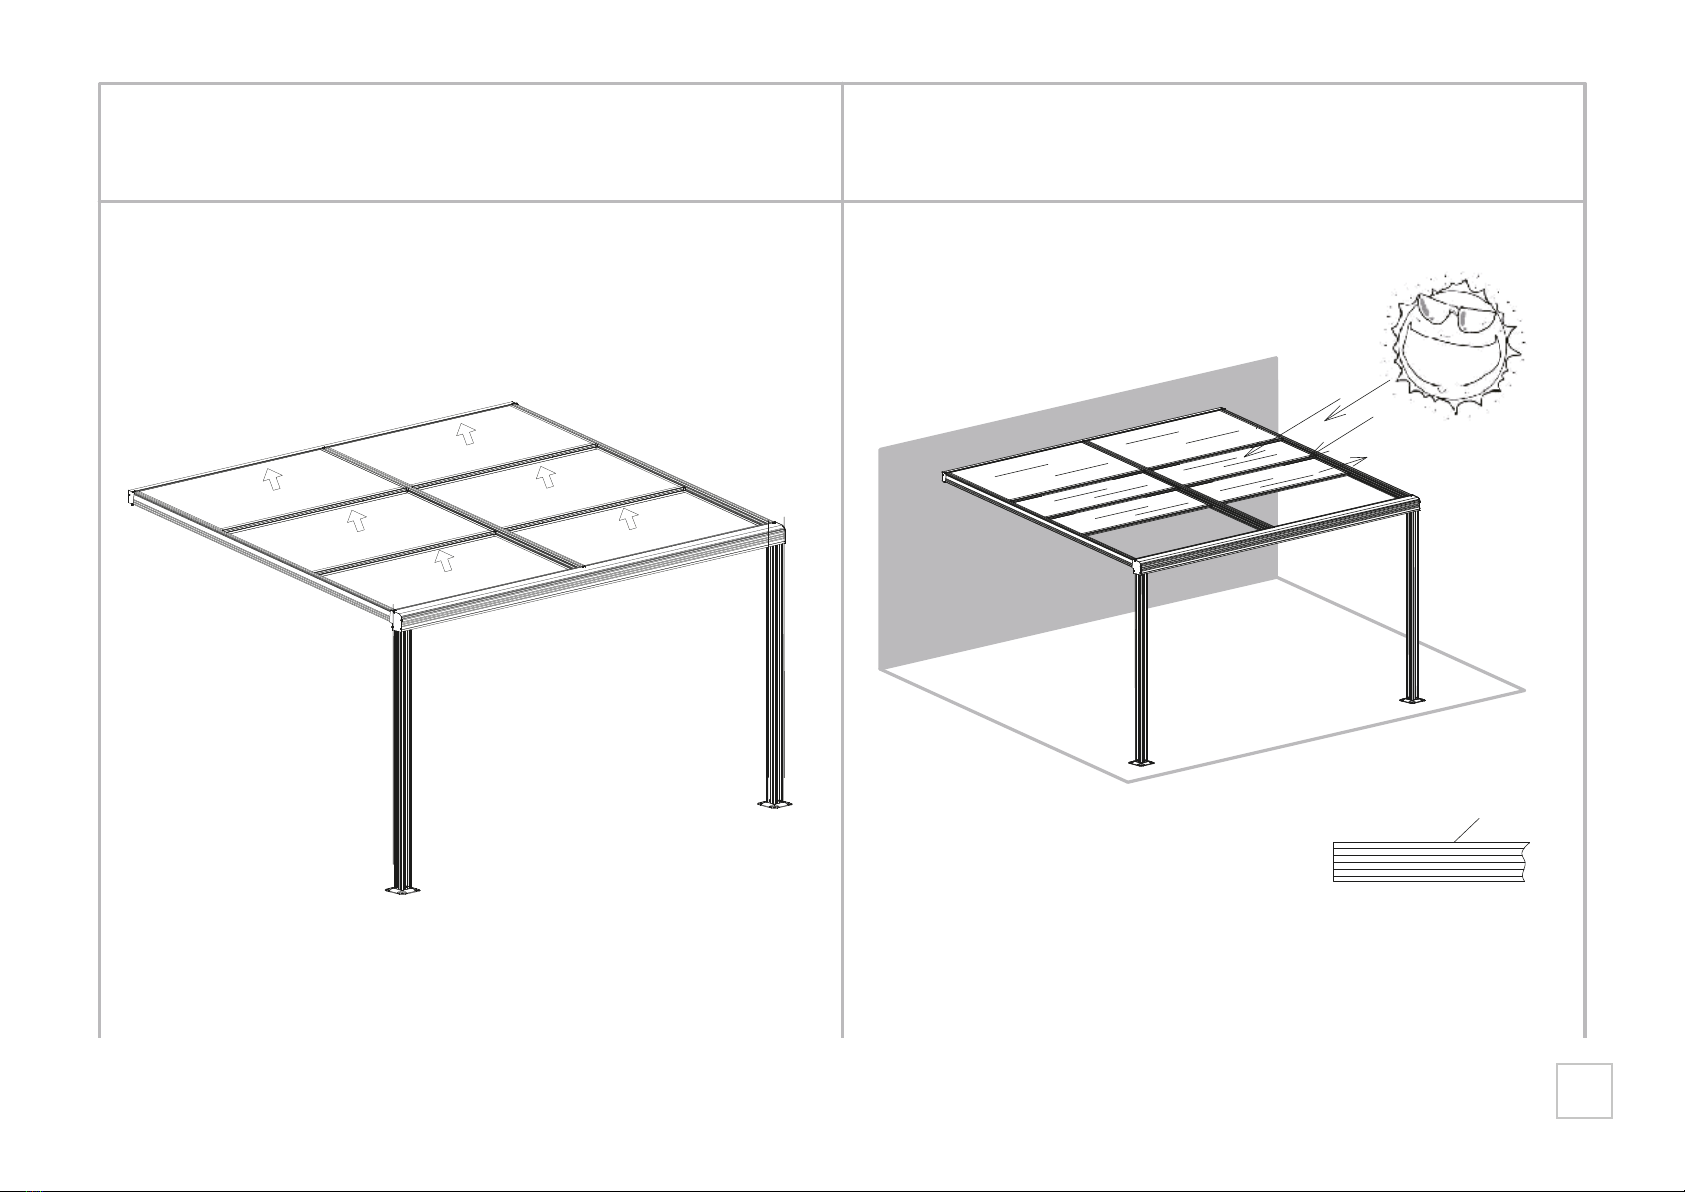
PRODUCT SIZE
Make sure a good installation location
400cm
300cm
200cm 215cm
254cm
300cm
PRODUKTGRÖßE
Wählen Sie für den Aufbau einen geeigneten Ort
SONSTIGE VORSICHTSMAßNAHMEN
1. Es werden 3 Personen benötigt. Eine Person sollte für das
Ausmessen und Markieren zuständig sein und dafür, dass
die Maße eingehalten werden. Eine Person sollte für den
Aufbau verantwortlich sein und eine Person sollte assistie-
ren und die Sicherheit gewährleisten.
2. Vergewissern Sie sich zunächst, dass die Wand für den
Anbau stabil genug ist. Am besten eignet sich eine Struktur
aus Ziegelsteinen und Beton.
3. Es werden elektrische Werkzeuge benötigt. Vergewissern
Sie sich, dass diese richtig funktionieren und achten Sie
besonders auf elektrische Sicherheit.
4. Seinen Sie im Umgang mit stumpfen Werkzeugen wie z.B.
Hämmern vorsichtig.
7UDJHQ6LHEHLP$XIEDX2YHUDOOVPLWODQJHQbUPHOQ
Handschuhe und einen Helm sowie bei der Arbeit mit elek-
trischen Werkzeugen eine Schutzbrille.
6. Schauen Sie beim Arbeiten über Kopf nicht nach oben.
Herunterfallende Schrauben können zu Augenverletzun-
gen führen oder bei versehentlichem Verschlucken eine
Erstickungsgefahr darstellen.
7. Klettern Sie nicht auf den Rahmen und stehen Sie nicht
darauf, um Stürze zu vermeiden.
8. Verwenden Sie bei Verletzungen sofort das Erste-Hilfe-Set
um Blutungen zu stillen und Verbände anzulegen. Wen-
den Sie sich im Notfall unverzüglich an eine medizinische
Einrichtung in Ihrer Nähe.
- 4 -
1029 Terrassendach.indd 4 15.11.17 09:40

- 5 -
PARTS LIST
NO. Qty.
STÜCKLISTE
RAHMEN
SCHEIBE A X2
SCHEIBE B X2
SCHEIBE C X2
SCHEIBE
Nr.
VERBINDUNG SCHRAUBE
Anzahl
- 5 -
1029 Terrassendach.indd 5 15.11.17 09:40
1 1 2870mm
2870mm
2 2
3 1
5 1
6 1
7 2
2870mm
8 8
B1 2
B2 2
B3 2
B5 2 S2 2
B7 1 1000mm
3914mm
3914mm
3914mm
2000mm
F3 44
F5 6
F2 36
S5 6
Scheibe A Scheibe A
Scheibe B
Scheibe
B
Scheibe C
Scheibe
C
S3 5
S4 4
B11 4
F4 1
F6 8
S8 8
NO. Qty.
Nr.
Anzahl
NO. Qty.
Nr.
Anzahl

- 6 -
D
Towards the white film side to the sun as it is UV-protected.
SUMMARY STATEMENT FOR POLYCARBONATE PANEL
UV
P1x6
Install schematic diagram of Alu.frames
- 6 -
INSTALLATIONSSCHEMA DES ALUMINIUM-
RAHMENS ALLGEMEINE INFORMATIONEN ZU DEN
POLYCARBONAT-PLATTEN
Sonne
Die mit weißer Folie beschichtete Seite sollte
in Richtung der Sonne zeigen, da sie mit einem
UV-Schutz ausgestattet ist.
1029 Terrassendach.indd 6 15.11.17 09:40
Window A
Window A
Window B
Window B
Window C
Window C
1
2
2
3
5
6
7
7
B1
B1
B2
B2
88
8
8
B3
B3
B5
B5
S2
S2
B7
S8
S8
B11
B11
S4
S4
S4 S4

- 7 -
D
[ )[
%[
%
ĉ
[
Ċ
[
)
) )
)
- 7 -
1029 Terrassendach.indd 7 15.11.17 09:40

- 8 -
D
%[ )[
%
%
) )
)
)
)
)
) )
Ċ
ĉ
%
%
) )
) )
) )
)
)
1029 Terrassendach.indd 8 15.11.17 09:40
- 8 -

- 9 -
D
8 x8
2 x2
1
8
8
88
8
8
2
1
x2
- 9 -
1029 Terrassendach.indd 9 15.11.17 09:40
Ⅰ
Ⅱ

- 10 -
D
- 10 -
Wasserwaage
1029 Terrassendach.indd 10 15.11.17 09:40
)[
FPFP
Ⅰ
Ⅰ
Ⅱx6
Ⅲ
PP
PP[
Ⅳ
x6
)
Ⅴ
PP
Wasserwaage

- 11 -
D
)[
)
)
)
- 11 -
Nr. 1 und 2 werden an der Wand befestigt.
1029 Terrassendach.indd 11 15.11.17 09:40

- 12 -
D
1
2
2
6
Scheibe A
Scheibe A
Scheibe B
Scheibe B
Scheibe C
Scheibe C
x2
x2
Scheibe B Scheibe B
Scheibe A Scheibe A
Scheibe C Scheibe C
21 2
Scheibe A
Scheibe B
Scheibe C x2
2
- 1-
Nr. 1 und 2 werden am Boden befestigt
1029 Terrassendach.indd 12 15.11.17 09:40
Ⅱ
ⅠⅢ

- 13 -
D
F3 x6
Scheibe
A
Scheibe
A
Scheibe
B
Scheibe
B
Scheibe
C
Scheibe
C
F3
F3
F3
F3
F3
F3
F3 F3
F3 F3
F3 F3
Scheibe A
ĉx2
Ċ
ĉ
ĉ
Ċ
ĊĊ
6
6
6
6
6
2
2
1
1
2
2
Ċ
1029 Terrassendach.indd 13 15.11.17 09:40
- 1-

- 14 -
D
1029 Terrassendach.indd 14 15.11.17 09:40
)[
) )
) )
) )
)
)
)
) )
) )
6[
6
Ⅰ
ⅡⅡ
Ⅰ
Ⅰ
Ⅰ
Ⅱ
Ⅱ
Ⅱ
x5
- 1-

- 15 -
D
)[
)
) )
) )
)
)
) )
) )
) )
ĉ
ĉ
Ċ
- 1-
1029 Terrassendach.indd 15 15.11.17 09:40
6

- 16 -
D
1 Person
1029 Terrassendach.indd 16 15.11.17 09:40
Ⅰx6
)
PP
ⅡⅡ
Ⅱ
Ⅲx6
:$1'
)
)
!
Ⅳx2
%
- 1-
1 Person
1 Person WAND

- 17 -
D
1029 Terrassendach.indd 14 15.11.17 09:40
)[
Ⅰx6
!
)
)[
)[
Ⅱx4
) )
6[ )
)[
6
6
6 6
Ⅲ
Ⅲ
Ⅳ
Ⅲx2
6
&
%
)
6
%
&
)
Ⅳ
)
%%
&&
$$
6 6
Schrauben festziehen
Wand
- 1-

- 18 -
D
-1-
3
F3 x12
B11 x4
UP
F3x3
F3x3
F3x3
F3x3
B11 B11
WINDOW C
WINDOW C
B11 B11 2
21
F3 B11 Window C
x2
130mm
130mm
130mm
130mm
Window C
Ø3 90
90
Window C
B11
B11
F3 F3 F3
F3 F3 F3
x2
Wenn das (Fenster C) 6 Löcher hat, können Sie diesen Schritt ignorieren

- 19 -
D
Sliding roof canopy
Instruction manual
SR-A43BD
SIZE:400Lx300Wx200/254Hcm
IMPORTANT
<RXPXVWUHDGWKHVHLQVWUXFWLRQVFDUHIXOO\EHIRUH\RXVWDUWWRDVVHPEOHWKLV6OLGLQJURRIFDQRS\3OHDVHHQVXUHWKDW\RXILQGDOOSDUWV
LQWKHFDUWRQER[LQWKHFRUUHFWW\SHDQGTXDQWLW\DVPHQWLRQHGLQWKHOLVWLOOXVWUDWHGLQHYHU\SDJHDFFRUGLQJO\
3OHDVHFDUU\RXWWKHVWHSVLQWKHRUGHUVHWRXWLQWKHVHLQVWUXFWLRQV
'RQRWWLJKWHQWKHVWHSVLQWKH6OLGLQJURRIFDQRS\XQWLOFRPSOHWLQJRQWKHDVVHPEO\
.HHSWKHVHLQVWUXFWLRQVLQDVDIHSODFHIRUIXWXUHUHIHUHQFH
14/09/2020
SR-A43DB PARTS LIST
-1-
NO. Qty.
Install schematic diagram of Alu.frames
S5-1 2
S5L 1
S5R 1
S6 2
S10 2
S5-1
S5-1
S5L
S5R
S6
S6
S10
S10
(External inlet)
SR-A43 TEILLISTE
Nr. Anz.
Schematische Darstellung des Aluminiumgerüsts

- 20 -
D
6[
6
6
6/
65 6[ 6[
6/ 6/
65
65
6
6
6
6
6 6
6
6
6[
6
6
6/
65 6[ 6[
6/ 6/
65
65
6
6
6
6
6 6
6
6
Table of contents
Other Konifera Lawn And Garden Equipment manuals
Popular Lawn And Garden Equipment manuals by other brands

Tiger
Tiger NH TS100-135A Mounting and operating instructions

AeroGarden
AeroGarden Wall Farm Deluxe Single Assembly/installation instructions

Tiger
Tiger FLX10 Operator's manual

Dunster House
Dunster House H4-GS3X3MK2PRG installation manual

Gepaval
Gepaval GUARDIAN-2 Instructions on the maintenance

Veradek Outdoor
Veradek Outdoor Corten Series instructions