Konig & Meyer 14760 User manual

SICHERHEITSHINWEISE
AUFSTELLANLEITUNG
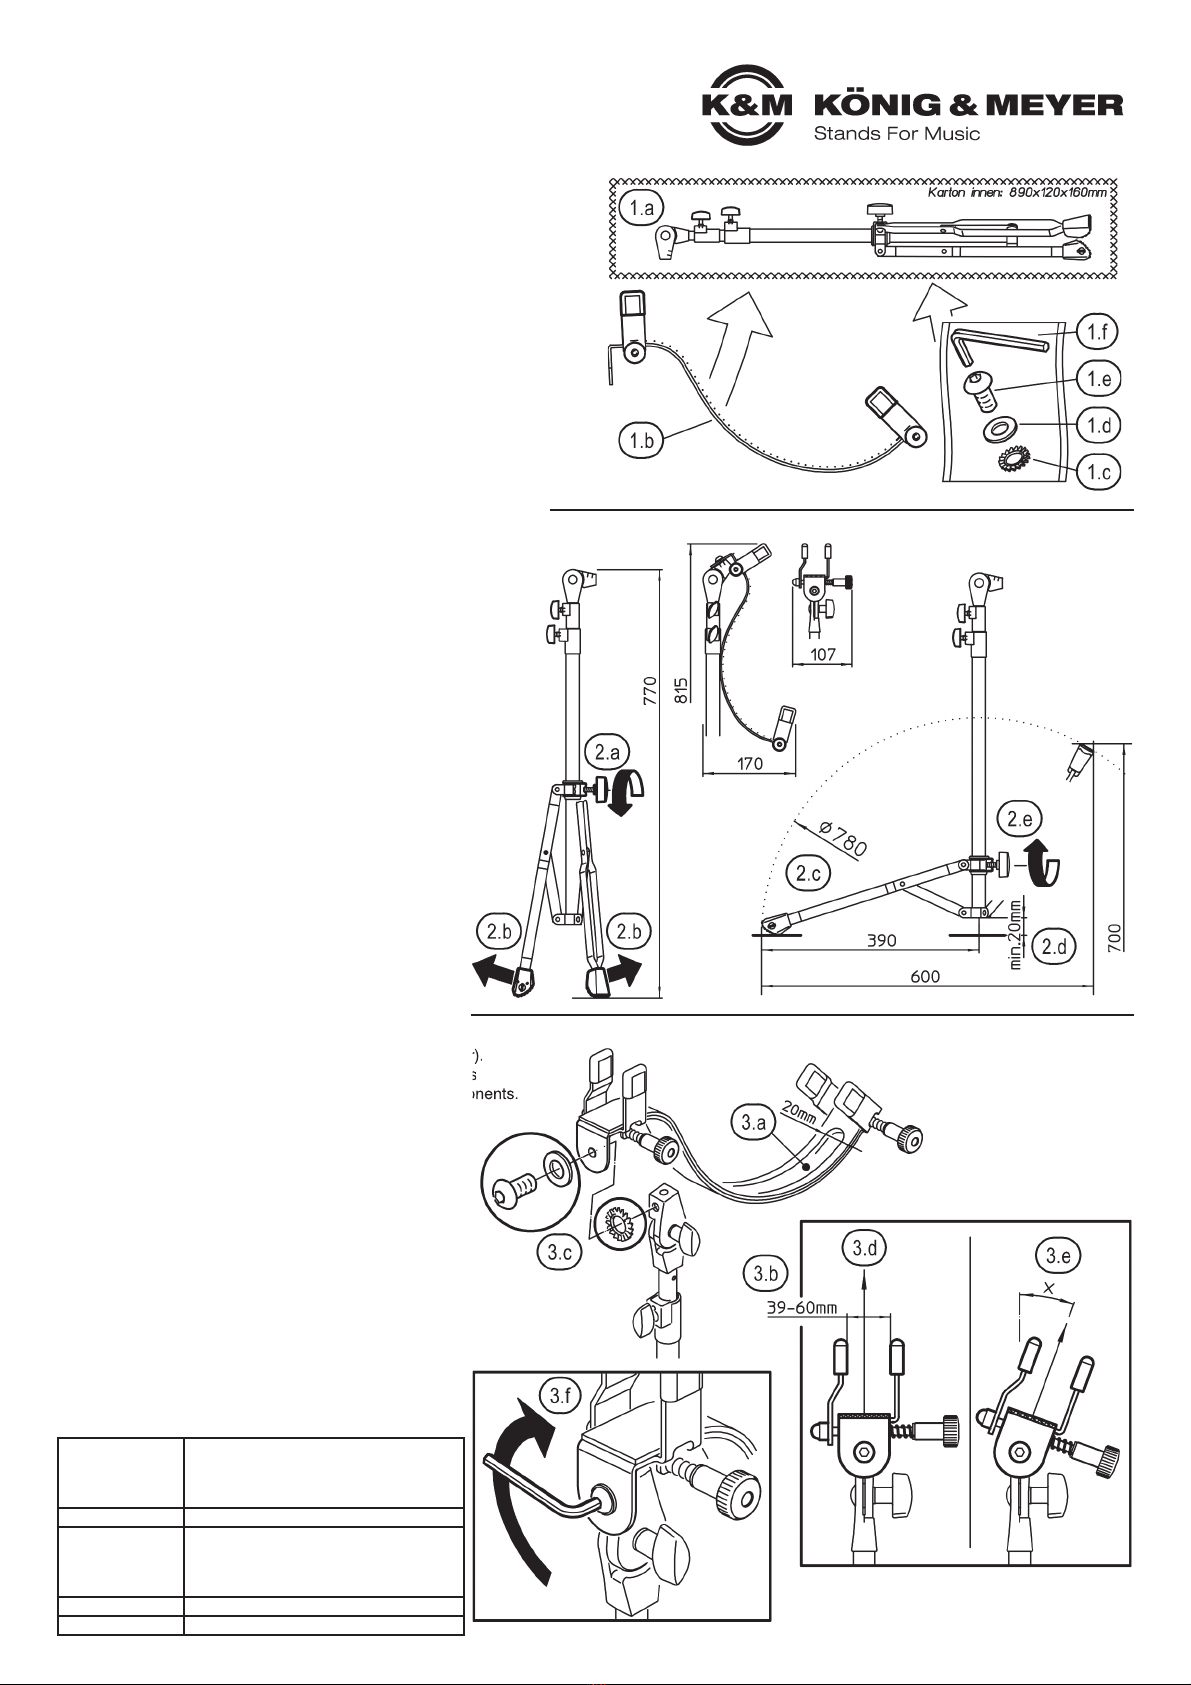
1. BESTANDTEILE
1.a Stativ
1.b E-Gitarrenhalterung
1.b Zubehörbeutel:
1.c Halbrundkopfschraube M8 x 16 mm
1.d U-Scheibe ø8,4/16 mm
1.e Fächerscheibe A8,4
1.f Inbusschlüssel SW5
2. STATIV-Packstück-Aufbau
2.a Feststellschraube etwas lösen
2.b Beine auseinanderziehen
2.c HINWEIS 1:
2.c Wir empfehlen aus Gründen der Standsicherheit,
2.c die Beine sehr weit auseinander zu ziehen, jedoch...
2.d HINWEIS 2:
2.d ...damit das Stativ nicht taumelt oder gar kippt, darf das
2.d Grundrohr den Boden nicht berühren (>20 mm Luft).
2.e Feststellschraube wieder anziehen. BEACHTE: Handkraft
2.e genügt völlig, überfestes Anziehen belastet die Bauteile.
3. E-GITARRENHALTERUNG
3.a Auflage mit 20 mm-Freimachung für Buchsen, Knöpfe etc.
3.b Geeignet für Korpusdicken von 39-60 mm
3.c Halbrundkopfschraube 1.e zunächst durch
3.c - U-Scheibe 1.d,
3.c - Lasche des Haltebügels 1.b sowie die
3.c - Fächerscheibe 1.c führen und an der
3.c - seitlichen Gewindebohrung des oberen
3.c -Zahngelenks ansetzen und leicht eindrehen
3.d Lasche des Haltebügels möglichst senkrecht ausrichten
3.e HINWEIS 3:
3.e Ein zu schräg montierter Haltebügel könnte aufgrund der
3.e Kippneigung den sicheren Halt der Gitarre gefährden.
3.f Mit dem Inbusschlüssel 1.f nun die Halbrundkopf-
3.f schraube 1.e fest mit dem Zahngelenk verschrauben
TECHNISCHE DATEN
Vielen Dank, dass Sie sich für dieses Produkt entschieden haben. Bitte lesen und be-
achten Sie sorgfältig diese Anleitung. Sie informiert Sie über alle wichtigen Schritte bei
Aufbau und Handhabung. Wie empfehlen, sie für den späteren Gebrauch aufzuheben.
KÖNIG & MEYER GmbH & Co. KG
Kiesweg 2, 97877 Wertheim, www.k-m.de
14760-000-55 Rev.18 03-80-740-00 8/19
- Vor und nach der Benutzung Stativ auf Schäden überprüfen.
-Beschädigt Teile dürfen nicht weiter eingesetzt werden.
-Sie müssen erst ausgetauscht oder repariert werden.
- Der Stativ-Untergrund muss eben und tragfähig sein
- Beim aufgestellten Stativ darf das mittige Grundrohr NICHT den Boden
-berühren. Sollte dieser Fall eintreten würde das Stativ auf eben diesem
-Grundrohr taumeln.
- Der sichere Sitz der Gitarre in der Halterung hängt ab von:
-a. der Eignung der Gitarre, d.h.:
-a. Größe, Form und Robustheit des Instruments müssen passen
-b. angemessener Einstellung der Halterung (v.a. der Neigung)
-c. ordnungsgemäßer Klemmung des Instruments (Festsitz)
-Erfahrungsgemäß funktioniert die Halterung bei einer Vielzahl von Fabri-
-katen; eine Garantie können wir jedoch nicht geben. Wichtig ist die
-weitgehende Parallelität der Vorder- und Rückwand des Instruments.
-Untauglich sind z.B. Gitarren mit Rundrücken.
- Schrauben fest anziehen und den Festsitz regelmäßig prüfen
- Die Möglichkeit das Produkt zusammenzuklappen birgt naturgemäß
-Einklemmgefahren: umsichtige Handhabung bei Aufbau, Betrieb und
-Abbau sind daher unverzichtbar
14760 Gitarren-Spielständer
- Stativ: standfest, solide und höhenverstellbar
- Gitarrenhalterung für Korpusdicke von 39 - 60 mm
- Passend für Heim, Studio, Bühne und Tour
- Höhe: 690-1550 mm, Packmaß: 815 mm, 3,3 kg
Material
Rohre, Streben, Haltebügel: Stahl
Schrauben, Scheiben: Stahl verzinkt
Schellen, Gelenk: Zink-Druckguß
Parkettschoner, Klemmkappen (TPE)
Traglast E-Gitarren, Korpus: 39-60 mm
Abmessungen
max. Fußkreis ø780 mm
Höhe: 760-1660 mm
Haltebügel: B x H x T - 380 x 120 x 110 mm
Gewicht: 3,3 kg
Karton 890 x 120 x 160 mm, 0,5 kg
Zubehör (optional) Tragetasche 18846
1. BESTANDTEILE
2. STATIV-Packstück-Aufbau
3. E-GITARRENHALTERUNG
BENUTZERHINWEISE / FUNKTIONEN
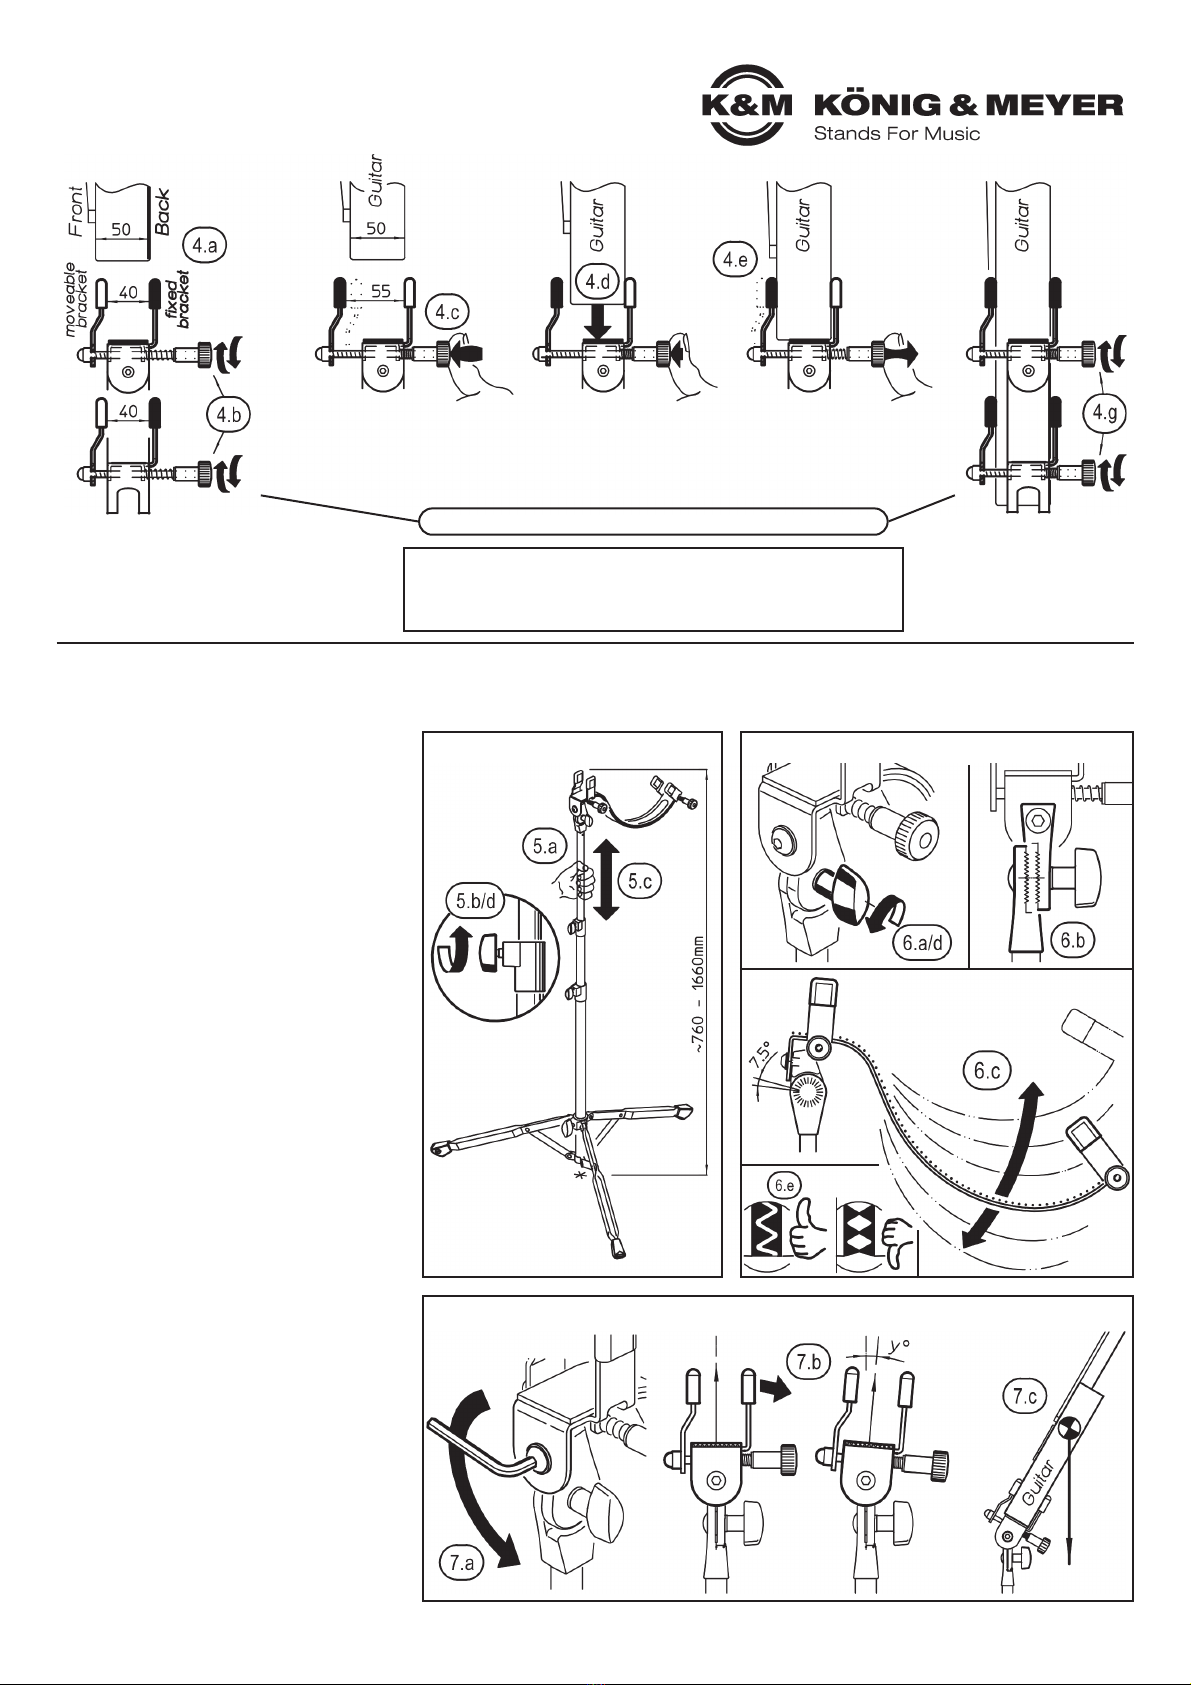
4. INSTRUMENT PLATZIEREN-voreinstellen-platzieren-nachjustieren
4.a Beachte: der Rücken des Korpus hat an den beiden festen Haltebügeln anzuliegen
WARTUNG, PFLEGE
4.b FEDERSPANNUNG VOREINSTELLEN
4.b An beiden Stellmuttern drehen bis
4.b - bei ungespannter Feder - der Abstand
4.b der Gummikappen um ca.10 mm kleiner
4.b ausfällt als die Stärke des Gitarrenkorpus
4.b BEISPIEL: Gitarre 50 mm, Abstand 40 mm
5./ 6./ 7. EINSTELLVARIANTEN
HINWEIS 5:
VERSTELLUNGEN am Stativ oder Halterung können den sicheren Halt des eingespannten Instruments gefährden.
Wir raten, die Gitarre zuvor der Halterung zu entnehmen oder alternativ, sie währenddessen festzuhalten.
5. STATIV - HÖHE
5.a Das jeweilige Auszugrohr festhalten
5.b Klemmschraube der Spannschelle lösen
5.c Auszugrohr in gewünschte Höhe bringen
5.d Klemmschraube wieder festdrehen
6. GITARRENHALTERUNG - ROTATION
6.a Flügelmutter lösen...
6.b ...bis die Zähne nicht mehr ineinandergreifen
6.c Gitarrenhalterung in gewünschte Richtung dre-
6.c hen - durch die Verzahnung in Stufen zu 7,5°
6.d Flügelmutter wieder festziehen
6.e HINWEIS 6:
6.e Die Zahnspitzen dürfen nicht aufeinander
6.e gepresst werden.
7. GITARRENHALTERUNG - NEIGUNG
7.a Halbrundkopfschraube 1.e nur lösen, d.h. nicht
7.a vollständig herausschrauben.
7.b Lasche der Gitarrenhalterung neigen.
7.c HINWEIS 7:
7.c Am sichersten sitzt die Gitarre bei annähernd
7.c senkrecht ausgerichteter Lasche, weil dann
7.c der Schwerpunkt des Instruments auf dem
7.c Haltebügel ruht. Eine Neigung des Instruments
7.c mag spieltechnisch sinnvoll sein, geht aber
7.c zunehmend mit größerer Kippgefahr einher.
4.f Auf gleiche Weise mit dem zweiten Haltebügelpaar verfahren.
4.h HINWEIS 4:
4.h Ein zu lockerer Sitz des Instruments erhöht die Kippgefahr. Ein
4.h zu fester Sitz gefährdet evtl. Oberfläche oder Material, was je-
4.h doch auch auf eine ungeeignete Gitarre hinweisen könnte.
4.g NACHJUSTIEREN
4.g Festsitz der Gitarre prüfen
4.g und diesen durch Drehen
4.g der Stelllmuttern ggf.
4.g nachjustieren.
4.c Eine der beiden Stellmuttern bis
4.c zum Anschlag (ca.15 mm) gegen
4.c die Feder drücken. Die Öffnung
4.c sollte nun ~5 mm größer sein als
4.c die Dicke des Gitarrenkorpus.
4.d Stellmutter gedrückt
4.d halten und Gitarre
4.d nun mit Bedacht auf
4.d dem Filz ablegen und...
4.e ...beweglichen Haltebügel
4.e anschließend kontrolliert
4.e gegen die Vorderseite der
4.e Gitarre gleiten lassen.
Bei Wartungsarbeiten besteht durch -Kanten, -lose
Verbindungen oder bewegliche Teile die Gefahr
des Quetschens und Stoßens. Um dies zu
vermeiden ist mit gebotener Vorsicht zu arbeiten.
- Prüfen Sie regelmäßig den:
-a. Festsitz der Schraubverbindungen
-b. ordnungsgemäßen Zustand der Bauteile sowie
-b. den der kompletten Installation
- Zur Reinigung ein leicht feuchtes Tuch und ein
-nicht scheuerndes Reinigungsmittel benutzen
FEHLERSUCHE (F) und BESEITIGUNG (B)
F: Stativ steht wackelig oder neigt zum Kippen
F: B: unebenen oder nachgiebigen Untergrund meiden
F: B: Korrekte Stellung der Beine herbeiführen (Kap.2)
F: B: Gitarrenhalterung senkrecht ausrichten (Kap.3)
F: B: Lockere Schraubverbindungen nachziehen
F: Unsicherer Sitz der Gitarre in der Halterung
F: B: Eignung der Gitarre prüfen (Größe, Form)
F: B: Sitz und Spannung der Haltebügel prüfen (Kap.4)
F: B: Neigung der Halterung prüfen (Kap.7)
5. STATIV - HÖHE
7. GITARRENHALTERUNG - NEIGUNG
6. GITARRENHALTERUNG - ROTATION
SAFETY INSTRUCTIONS
INSTALLATION INSTRUCTIONS
1. COMPONENTS
1.a Stand
1.b Electric guitar holder
1.b Accessories bag:
1.c Button head screw M8 x 16 mm
1.d Washer ø8,4/16 mm
1.e Serrated lock washer A8,4
1.f Allen key SW5
2. STATIV-package-setting
2.a Loosen the locking screw slightly
2.b Pull legs apart
2.c NOTE 1:
2.c We recommend for reasons of stability, to draw
2.c the legs very far apart, however...
2.d NOTE 2:
2.d ...to ensure that the stand does not stagger or even tip
2.d over, the support must not touch the ground (>20 mm air).
2.e Tighten the locking screw again. NOTE: Manual force is
2.e completely sufficient, overtightening impacts the components.
3. ELECTRIC GUITAR HOLDER
3.a Support with 20 mm clearance for sockets, buttons, etc.
3.b Suitable for body thickness of 39-60 mm
3.c Button head screw 1.e first through
3.c - Washer 1.d,
3.c - guide the strap of the retaining bracket 1.b plus
3.c - serrated lock washer 1.c
3.c - locate to the gear tooth hinge and screw in lightly
3.d Align the strap of the retaining bracket as vertically
3.d as possible
3.e NOTE 3:
3.e A bracket with too much inclination could endanger the
3.e secure hold of the guitar due to the tilting tendency.
3.f Use the Allen key 1.f to tighten the button head
3.f screw 1.e firmly to the gear tooth hinge
TECHNICAL DATA
Thank you very much for choosing this product. Please read the instructions carefully,
they inform you about all the important steps during assembly and handling. Keep
instructions for future reference.
KÖNIG & MEYER GmbH & Co. KG
Kiesweg 2, 97877 Wertheim, www.k-m.de
14760-000-55 Rev.18 03-80-740-00 8/19
- Check stand for damage before and after use.
-Damaged parts must not be used.
-Damaged parts should be replaced or repaired.
- The base of the stand must be level and stable.
- The central support must NOT touch the ground once the stand is assembled.
-If the central support touches the ground the stand wobbles.
- The secure fit of the guitar in the holder depends on:
-a. the suitability of the guitar, i.e: size, shape and robustness of the
-a. instrument must be appropriate.
-b. proper adjustment of the bracket (especially inclination).
-c. correct clamping of the instrument (tight fit).
-Experience has shown that the holder is adaptive to many brands,
-unfortunately we cannot give you any guarantees.
-It is important that front and back of the instrument are almost parallel.
-Guitars with rounded backs or similar are unsuitable.
- Tighten the screws firmly (not too tight) and check the tight fit
-regularly.
- The possibility to fold the product involves by nature entrapment
-hazards, therefore careful handling during assembly, operation
-and dismantling is essential.
14760 Guitar performer stand
- Stand: stable, steady and height adjustable
- Guitar holder for instruments with a body width of 39 - 60 mm
- Suitable for home, studio, stage and tour
- Height: 690-1550 mm, packing size: 815 mm, 3.3 kg
Material
Tubes, struts, retaining brackets: steel
screws, washers: steel galvanized
clamps, joint: zinc die- cast
parquet protectors, clamping caps (TPE)
Load E-Guitars, body: 39-60 mm
Dimensions
max. base circle-ø780 mm
Height: 760-1660 mm
Holding bracket: W x H x D - 380 x 120 x
110 mm; Weight: 3.3 kg
Box 890 x 120 x 160 mm, 0.5 kg
Accessories Carrying case 18846
1. COMPONENTS
2. STATIV-package-setting
3. ELECTRIC GUITAR HOLDER

USER INSTRUCTIONS / FUNCTIONS
4. INSTRUMENT-placing-preset-readjusting
4.a Note: the back of the corpus has to be attached to the two fixed retaining brackets
MAINTENANCE, CARE
4.b PRESET SPRING TENSION
4.b Turn both lock nuts until - with unloaded
4.b spring - the distance of the rubber caps
4.b becomes approx. 10 mm smaller as the
4.b strength of the guitar body.
4.b EXAMPLE: Guitar 50 mm, distance 40 mm
5./ 6./ 7. SETTING VARIANTS
NOTE 5:
ADJUSTMENTS on the stand or mount may compromise the secure hold of the clamped instrument.
We recommend that you remove the guitar from the holder or alternatively hold it in place.
5. STATIVE - HEIGHT
5.a Keep hold of the respective extension tube
5.b Loosen the clamp screw of the clip
5.c Move the extension tube to the desired height
5.d Retighten the clamp screw
6. GUITAR MOUNT - ROTATION
6.a Loosen wing nut...
6.b ...until teeth no longer engage
6.c Turn the guitar holder in the desired direction
6.c - tighten it again in steps of 7.5°
6.d Tighten the wing nut
6.e NOTE 6: The tooth tips must not be
6.e pressed against each other.
7. INCLINATION OF THE GUITAR HOLDER
7.a Loosen panhead screw 1.e
7.a do not unscrew completely.
7.b Tilt the strap of the guitar holder.
7.c NOTE 7:
7.c The safest position for the guitar is when the
7.c strap is almost vertically aligned, because the
7.c centre of gravity of the instrument then rests
7.c on the retaining bracket. An inclination of the
7.c instrument may make sense from a technical
7.c point of view, but is increasingly associated
7.c with a greater risk of tipping over.
4.f Apply same procedure for the second pair of mounting brackets.
4.h NOTE 4:
4.h A loose fitting of the instrument increases the risk of tipping.
4.h A too tight fit may jeopardize the surface or material, but this
4.h could also indicate an unsuitable guitar.
4.g READJUSTMENT
4.g Check the tight fit of the
4.g guitar and readjust if
4.g necessary, by turning the
4.g lock nuts.
4.c Press one of the two lock nuts
4.c against the spring up to the stop
4.c (approx. 15 mm). The opening
4.c should now be ~5 mm larger
4.c than the thickness of the body.
4.d Keep lock nut pressed
4.d and lay guitar with care
4.d on the felt and...
4.e ...subsequently slide the
4.e movable mounting bracket
4.e carefully towards the
4.e frontside of the guitar.
When carrying out maintenance work, there are
hazards of crushing or knocking due to edges,
loose connections or moving parts. To avoid this,
work with due caution.
- Regularly check:
-a. Tight fit of the screw connections
-b. Proper condition of the components as well
-b. as of the complete installation
- For cleaning use a slightly damp cloth and a
-non-abrasive cleaning agent
FAULT-FINDING (F) and REPAIR (R)
F: Stand is wobbly or tends to tip
F: R: Avoid uneven or yielding surfaces
F: R: Ensure correct position of the legs (Chap.2)
F: R: Align the guitar holder vertically (Chap.3)
F: R: Tighten loose screws
F: Unsafe fit of the guitar in the holder
F: R: Check the suitability of the guitar (size, shape)
F: R: Check the fit and tension of the brackets (Chap.4)
F: R: Check the inclination of the brackets (Chap.7)
5. STATIVE - HEIGHT
7. INCLINATION OF THE GUITAR HOLDER
6. GUITAR MOUNT - ROTATION
Table of contents
Languages:
Other Konig & Meyer Other manuals


Popular Other manuals by other brands


PCP
PCP Mendip Shower Tray installation instructions

Parkside
Parkside 291643 Translation of the original instructions

Hafele
Hafele Wandleser WRU 220 Installation and maintenance instructions

Airaid
Airaid 450-331 installation instructions

Chauvet
Chauvet Q-Mix supplementary guide

DAHON
DAHON SPEED DIAL ULTIMATE installation instructions


