manuals.online logo
Brands
  1. Home
  2. •
  3. Brands
  4. •
  5. Koolatron
  6. •
  7. Refrigerator
  8. •
  9. Koolatron KBC-190SS User manual

Koolatron KBC-190SS User manual

H1S302
Please Read These Instructions Carefully Before Use!
S.V.P., lire attentivement les instructions avant l’utilisation !
User Manual
Guide d'utilisation
6.2 cu.ft.
Refrigerator
Réfrigérateur
KBC-190SS
www.koolatron.com
©2020 Koolatron, Inc. All rights reserved. Tous droits réservés.
All specification are subject to change without notice.
Toutes spécifications sont sujettes à changement sans préavis. 09/2020 - v2
Warranty / Garantie
This product is warranted to the retail
customer for 90 days from date of retail
purchase, against defects in material and
workmanship.
WHAT IS COVERED
• Replacement parts and labour.
• Transportation charges to customer for
the repaired product.
WHAT IS NOT COVERED
• Damage caused by abuse, accident, misuse,
or neglect.
• Transportation of the unit or component
from the customer to Koolatron.
IMPLIED WARRANTIES
Any implied warranties, including the implied
warranty of merchantability are also limited
to the duration of 90 days from the date of
retail purchase.
WARRANTY AND SERVICE PROCEDURE
Keep the original, dated, sales receipt with
this manual.If you have a problem with your
unit, or require replacement parts, please
telephone the following number for assistance:
North America 1-800-265-8456
Koolatron has Master Service Centres at these
locations:
U.S.A.
4330 Commerce Dr., Batavia, NY 14020-4102
Canada
139 Copernicus Blvd., Brantford, ON N3P1N4
A Koolatron Master Service Centre must
perform all warranty work.
Cet appareil est garanti à l’acheteur au détail
pendant 90 jours à compter de sa date d’achat
contre tous défauts de pièces et de fabrication.
CE QUE COUVRE LA GARANTIE
• Pièces de rechange et main d’oeuvre.
• Frais d’expédition du produit réparé de
Koolatron à l’adresse du client.
CE QUE LA GARANTIE NE COUVRE PAS
• Tous dégâts causés par un abus, un accident,
une mauvaise utilisation ou une négligence.
• Frais d’expédition de l’appareil ou de la pièce
du client à Koolatron.
GARANTIES IMPLICITES
Toutes garanties implicites, y compris celle
de qualité marchande, se limitent également
à 90 jours à compter de la date d’achat.
PRISE EN CHARGE DE LA GARANTIE ET
PROCÉDURES DE RÉPARATION
Conservez le reçu de caisse daté d’origine
avec ce manuel. Si vous avez un problème
avec votre appareil ou si vous avez besoin
de pièces de rechange, veuillez téléphoner
au numéro suivant pour assistance :
Amérique du Nord 1-800-265-8456
Koolatron dispose de centres principaux de
réparations à ces adresses :
U.S.A.
4330 Commerce Dr., Batavia, NY 14020-4102
Canada
139 Copernicus Blvd., Brantford, ON N3P1N4
Les réparations sous garantie doivent être
effectuées par un centre principal de
réparations Koolatron.
1
2
4
5
9
6
7
3
8
2
Important Safeguards /Mises en garde importantes
3
Before you use the fridge, please read this owner’s
manual carefully.
• This appliance is for household / 110V AC use. It is
not designed for commercial or rental purposes.
• This device must be properly installed in
accordance with the installation instructions before
it is used.
• Never unplug the fridge by pulling on the power
cord. Always grasp the plug firmly and pull straight
out from the outlet.
• Repair or replace immediately, all electric service
cords that have become frayed or otherwise
damaged. Do not use a cord that shows cracks or
abrasion damage.
• Unplug the fridge before cleaning or before making
any repairs.
• Do not operate the fridge in the presence of
explosive fumes.
• The wall outlet must be properly grounded.
• Do not use the unit in the immediate surroundings
of a bath, shower, pool or standing water.
• Before discarding or storing, we recommend that
you remove the door and leave the shelves in place.
This will reduce the possibility of danger to children.
NOTE: If for any reason this product requires
service, we strongly recommend that a certified
technician perform the service.
Use of extension cords
Because of potential safety hazards under certain
conditions, we strongly recommend against the use
of an extension cord. However, if you must use an
extension cord, it is absolutely necessary that it be a
UL-listed (in the U.S.) or a CSA-listed (in Canada),
3-wire grounding type appliance extension cord
having a grounding type plug and outlet and that the
electrical rating of the cord be 15A (minimum) and
120V.
Avant d’utiliser ce réfrigérateur, veuillez lire
attentivement ce mode d’emploi.
• Cet appareil est pour un usage domestique de 110V
CA. Il n’est pas conçu pour être utilisé à des fins
commerciales ni de location.
• Cet appareil doit être correctement installé selon
son mode d’installation avant d’être utilisé.
• Ne débranchez jamais le réfrigérateur en tirant sur le
cordon électrique. Saisissez fermement la fiche et
tirez-la de la prise.
• Réparez ou remplacez immédiatement tout cordon
électrique effiloché ou endommagé de quelque
manière. N’utilisez pas un cordon qui présente des
craquelures ou des traces d’abrasion.
• Débranchez le réfrigérateur avant de le nettoyer ou
avant d’y effectuer une réparation.
• Ne faites pas fonctionner le réfrigérateur en
présence d’émanations explosives.
• La prise murale doit être correctement reliée à la
terre.
• N’utilisez pas l’appareil à proximité d’une baignoire,
d’une douche, d’une piscine ou d’un plan d’eau.
• Avant de vous débarrasser du réfrigérateur ou de
l’entreposer, il est recommandé de retirer la porte et
de laisser en place les clayettes. Ceci réduira les
risques de danger en présence d’enfants.
REMARQUE : Si pour quelque raison cet appareil
nécessite une réparation, nous vous recommandons
vivement de la faire effectuer par un réparateur
qualifié.
Utilisation de rallonges électriques
En raison des risques de danger en présence
d’enfants, nous déconseillons vivement l’emploi de
rallonges électriques. Si cela est absolument
nécessaire, la rallonge doit être homologuée UL (aux
États-Unis) et CSA (au Canada). Elle doit comporter 3
fils, posséder une fiche de masse (à brancher dans
une prise reliée à la terre) et avoir une intensité d’au
moins 15 ampères et une tension d’au moins 120
volts.
Parts/Pièces
1. freezer
2. drip tray
3. shelves
4. crisper box
5. leveling legs
6. handle
7. temperature control knob
8. defrost button
9. bottle racks
1. compartiment du congélateur
2. plateau d’égouttement
3. tablettes
4. bac à légumes
5. pieds de nivellement
6. poignée
7. sélecteur de température
8. bouton de dégivrage
9. balconnets porte-bouteilles
4
DANGER! RISK OF CHILD ENTRAPMENT
PROPER DISPOSAL OF THIS REFRIGERATOR
5
Installation / Installation Operating Instructions / Instructions d’utilisation
Before you use the fridge
• Remove the exterior and interior packaging,
including protective foam on door panels.
• Clean the interior surface with lukewarm water
using a soft cloth.
Installation of your fridge
• This appliance is designed to be free standing only,
and should not be recessed or built-in.
• Place your appliance on a floor that is strong
enough to support the appliance when fully loaded.
To level your appliance, adjust the legs at the front of
the appliance.
• Best performance is achieved by allowing some
space around the back and / or sides of the
appliance. This will allow air circulation
• Locate the appliance away from direct sunlight and
sources of heat (stove, heater, radiator, etc.). Direct
sunlight may affect the acrylic coating and heat
sources may increase electrical consumption.
Extreme cold ambient temperatures may also cause
the appliance not to perform properly.
• Avoid locating the appliance in moist areas.
• Plug the appliance into a properly installed grounded
110V wall outlet. Do not under any circumstances cut
or remove the third (ground) prong from the power
cord. Any questions concerning power and/or
grounding should be directed toward a certified
electrician or an authorized products service center.
Warning! Improper use of the grounded plug can
result in the risk of electrical shock. If the power
cord is damaged, have it replaced by an authorized
products service center.
• After plugging the appliance into a wall outlet,
allow the unit to cool down for 2-3 hours before
placing food in the refrigerator.
Avant d’utiliser le réfrigérateur
• Retirez l’emballage extérieur et intérieur, y compris
la mousse de protection sur le panneau de porte.
• Nettoyez la surface intérieure à l’eau tiède et au
chiffon doux.
Installation du réfrigérateur
• Cet appareil est conçu pour être position libre
seulement, et ne devrait pas être enfoncé ou
fonction intégrée.
• Placez l’appareil sur une surface suffisamment
solide pour soutenir un appareil entièrement chargé.
Pour mettre l’appareil de niveau, réglez les pieds
placés sur le devant de l’appareil.
• La meilleure performance est atteinte en assurant
de l’espace à l’arrière et aux côtés de l’appareil. Ceci
permettra une circulation d’air.
• Placez l’appareil à l’écart des rayons du soleil et
des sources de chaleur (poêle, chaufferette,
radiateur...). Les rayons du soleil peuvent abîmer le
revêtement acrylique et les sources de chaleur
peuvent augmenter la consommation de courant.
Des températures ambiantes très froides peuvent
également perturber le bon fonctionnement de
l’appareil.
• Évitez de placer l’appareil dans un endroit humide.
• Branchez l’appareil dans une prise murale à contact
de mise à la terre de courant 110V. Ne coupez ni
n’éliminez en aucun cas la troisième broche de mise
à la terre du cordon. Toute question concernant le
courant électrique ou la mise à la terre doit être
adressée à un électricien qualifié ou un centre de
réparations autorisé.
Danger! Une mauvaise utilisation de la fiche de mise
à la terre peut entraîner des risques de décharge
électrique. En cas de dégâts du cordon, faites-le
remplacer par un centre de réparations autorisé.
• Après avoir branché l'appareil à une prise murale,
permettez à l'unité de refroidir pendant 2 ou 3 heures
avant de placer la nourriture dans le réfrigérateur.
Interior Light
This refrigerator is provided with a LED light located
on the upper right hand corner of the compartment.
The light will be on when the door is opened and be
off when the door is closed.
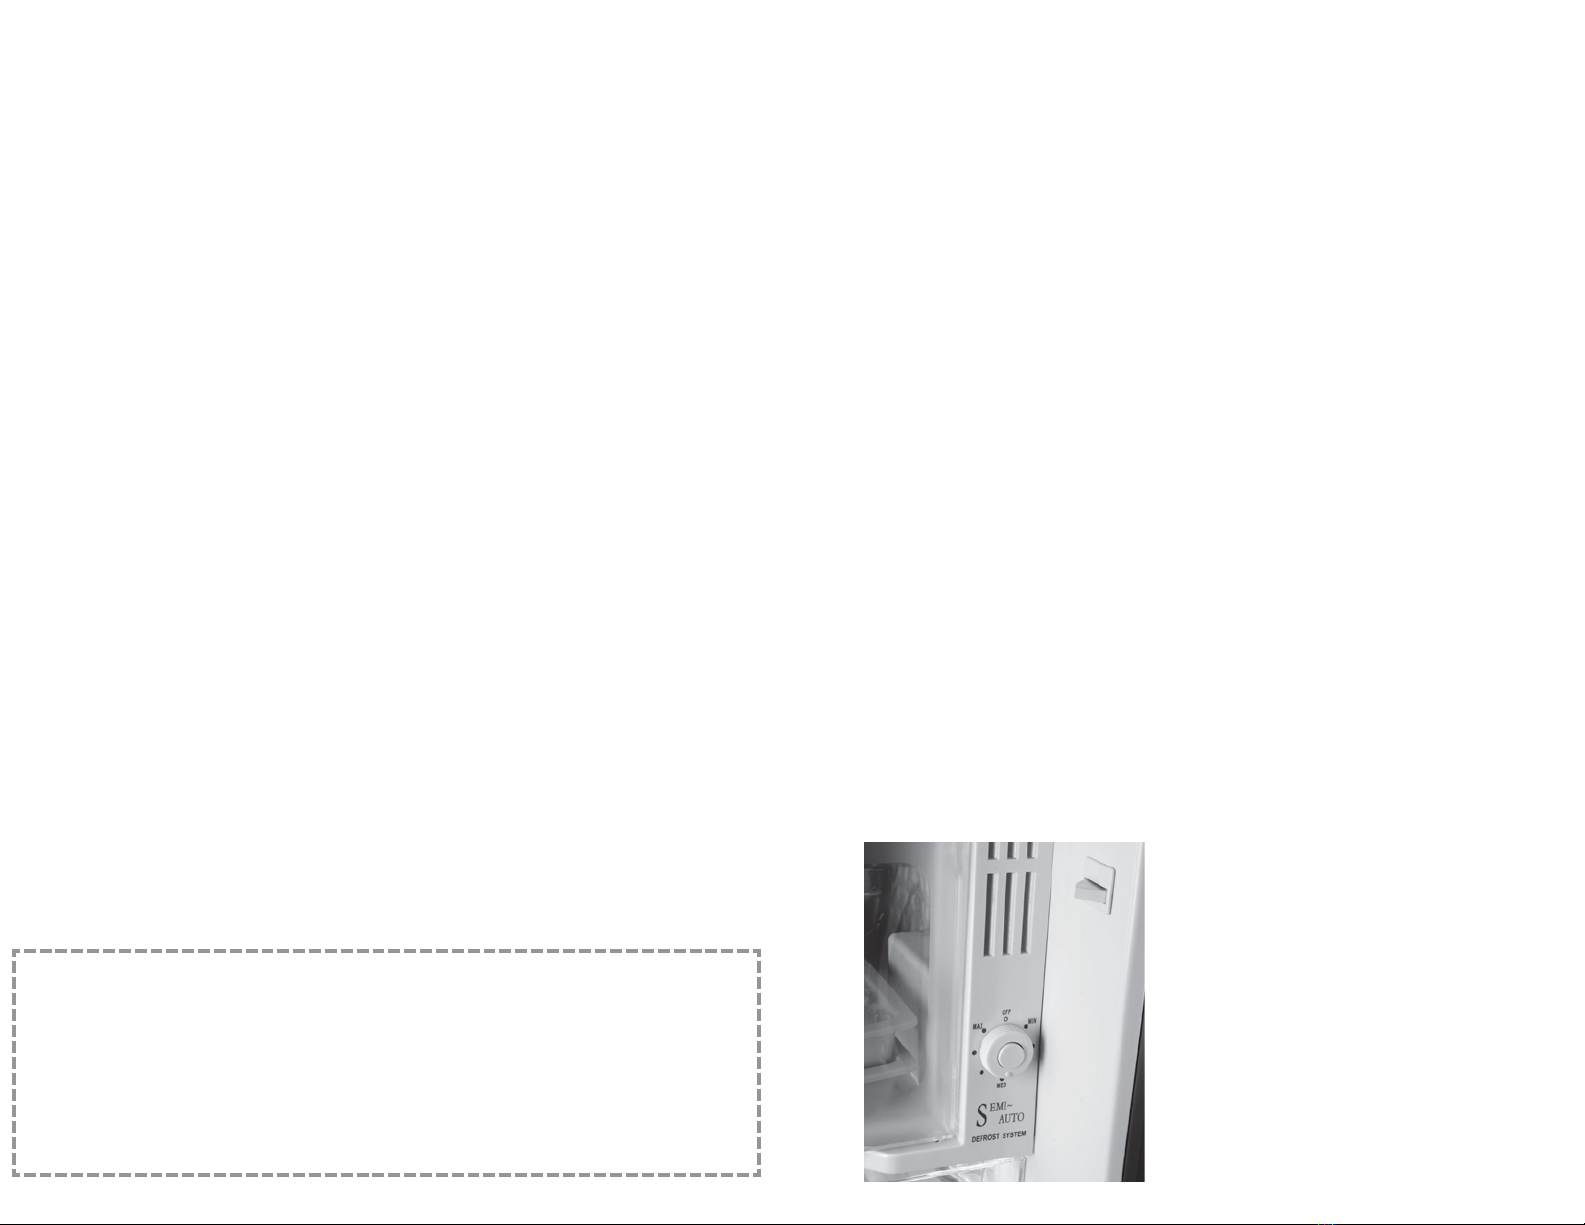
Temperature Control
• Your refrigerator has only one control for regulat-
ing the temperature. The temperature control is
located on the upper right hand of the compartment.
• To control the internal temperature, adjust the
control knob according to the ambient temperature
or purpose of use.
• The first time you turn the unit on, set the tempera-
ture control to “ Max ”.
• The range of the temperature control is from
position " Min ” to “ Max ”. After 2 hours, adjust the
temperature control to the setting that best suites
your needs. The middle setting should be appropri-
ate for home or office refrigerator use.
Semi-Auto Defrost
• Press the defrost button, located in the centre of
the temperature control knob, to activate the
semi-auto defrost mode.
• In this mode the compressor will shut off and the
evaporator ice will melt and gather in the water tray.
Once all the ice is melted, the compressor will
automatically turn back on.
• Pull out the water tray to empty it and return it to
its original position.
• For best results, place towels around the unit when
defrosting in case of overflow.
Lumière intérieure
Ce réfrigérateur est équipé d'une lampe DEL située
sur le coin droit supérieur du compartiment. La
lampe s'allume lorsque la porte est ouverte et
s'éteint lorsque la porte est fermée.
Commande de température
• Votre réfrigérateur a seulement une commande
pour régler la température. La commande de
température est située sur la main droite supérieure
du compartiment.
• Pour commander la température interne, ajustez le
bouton de commande selon la température
ambiante ou le but de l'utilisation.
• La première fois que vous allumez l'appareil,,
placez la commande de température sur « Max ».
• La plage de la commande de température est de la
position la « Min » à « Max ». Après 2 heures, réglez
la commande de température au réglage selon vos
besoins. Le réglage de milieu devrait être approprié
pour l'usage de réfrigérateur de maison ou de
bureau.
Dégivrage semi-automatique
• Appuyez sur le bouton de dégivrage, situé au
centre de la molette de commande de température,
pour activer le mode de dégivrage semi-automa-
tique.
• Dans ce mode, le compresseur s’arrête et la glace
de l’évaporateur fond et s’accumule dans le bac à
eau. Une fois que toute la glace a fondu, le
compresseur se remet en marche automatique-
ment.
• Sortez le bac à eau pour le vider et remettez-le
dans sa position d’origine.
• Pour éviter les dégâts, placez des serviettes autour
de l’appareil lors du dégivrage en cas de déborde-
ment.
Child entrapment and suffocation are a problem
with junked or abandoned refrigerators. If you are
getting rid of your old refrigerator, please follow
these instructions to help prevent accidents. Take
off the door, but leave the shelves in place so that
children may not easily climb inside.
DANGER! UN ENFANT PEUT RESTER ENFERMÉ
COMMENT SE DÉBARRASSER D'UN RÉFRIGÉRATEUR
Les enfants risquent de rester enfermés ou de
s’étouffer dans un réfrigérateur abandonné. Si vous
vous débarrassez de votre ancien réfrigérateur,
veuillez respecter ces directives afin de prévenir les
accidents. Enlevez la porte et laissez en place les
clayettes de sorte qu’un enfant ne puisse pas
facilement grimper à l’intérieur.
6 7
Maintenance / Entretien
Cleaning
• Unplug the unit, and remove all items.
• Wash the inside and shelf with a warm water and
baking soda solution. The solution should be about
2 tablespoons of baking soda to a quart of water.
• Wash the shelf with a mild detergent solution.
• The outside of the fridge should be cleaned with
mild detergent and warm water.
• It may also be necessary to periodically wipe the
bottom part of the storage area, as the unit is
designed to retain humidity, and condensation may
collect there.
Maintenance
• Power Failure
Most power failures are corrected within a few
hours and should not affect the temperature of your
unit if you minimize the number of times the door is
opened. If the power is going to be off for a longer
period of time, you need to take the proper steps to
protect your contents.
Vacation Time
During long absences, remove all items; unplug,
clean, and leave the door open slightly to avoid
possible formation of condensation, mold, or odors.
Moving
• Remove all items.
• Securely tape down shelf.
• Turn the levelling screws up to the base to avoid
damage.
• Tape the doors shut.
• Be sure the unit stays in the upright position during
transportation.
Nettoyage
• Débranchez l’appareil et retirez tous les articles.
• Lavez l’intérieur avec une solution d’eau tiède et de
bicarbonate de sodium (2 cuillerées de produit par
litre d’eau).
• Lavez la clayette et les plateaux à l’aide d’une
solution de détergent doux.
• L’extérieur de l’appareil doit être nettoyé à l’aide de
détergent doux et d’eau tiède.
• Cet appareil est conçu pour maintenir l’humidité; il
peut s’accumuler de la condensation dans le fond de
l’appareil, que l’on doit donc essuyer de temps en
temps pour l’éliminer.
Entretien
• Panne de courant
La plupart des pannes ne durent que quelques
heures et n’affectent en rien la température
intérieure de l’appareil si vous minimisez le nombre
de fois que la porte est ouverte. Si le courant doit
être coupé pendant plus longtemps, il faut prendre
quelques précautions pour en protéger le contenu.
Pendant les vacances
Pendant une longue absence, retirez tous les
articles; débranchez, nettoyez-le et laissez la porte
légèrement ouverte pour éviter toute formation de
condensation, de moisissure et d’odeurs.
Déplacement
• Retirez tous les articles.
• Fixez à l’aide de ruban adhésif étagère.
• Vissez à fond les pieds dans le socle pour éviter de
les endommager.
• Fixez bien la porte avec du ruban adhésif.
• Assurez-vous que l’appareil reste bien en position
verticale pendant le transport.
Troubleshooting /Dépannage
PROBLEM
Unit does not operate.
Not plugged in.
The circuit breaker tripped or blown fuse.
The temperature control is set at “OFF” position.
Unit is cooling excessively.
The temperature control dial may be set too high.
If you place food containing a lot of moisture
directly under the cool air outlets, they will freeze
easily, This does not indicate a malfunction.
Unit is not cold enough.
Check the temperature control setting.
The room temperature is hotter than normal.
The door is opened too often.
The door is not closed completely.
The door gasket does not seal properly.
The unit does not have the correct clearances.
Abnormal voltage.
The light does not work.
Not plugged in.
The circuit breaker tripped or a blown fuse.
The LED light has burned out.
Vibrations.
Check to assure that the unit is level.
The door will not close properly.
The unit is not level.
The gasket is dirty.
The shelves are out of position.
TECHNICAL SPECIFICATIONS
For detailed specifications, please refer to the
nameplate at the back of the unit.
The specifications are subject to change without
prior notice due to products improvement.
PROBLEME
L’appareil ne fonctionne pas.
Il n’est pas branché.
Disjoncteur ou fusible sauté.
La commande de température est placée à la
position « OFF » (arrêt).
L’appareil refroidit excessivement.
Le sélecteur de température est peut-être réglé au
niveau trop élevé.
Si vous placez des aliments contenant beaucoup
d’humidité directement sous les sorties d’air froid,
ils gèleront facilement. Cela n’indique pas un échec
de fonctionnement de l’appareil.
L’appareil n’est pas assez froid.
Vérifiez la commande de température.
La température ambiante est plus chaude que la
normale.
La porte est ouverte trop souvent.
La porte n’est pas bien fermée.
Le joint de la porte n’est pas bien étanche.
Les dégagements ne sont pas suffisants autour
Tension anormale.
La lampe ne s'allume pas.
Le réfrigérateur n'est pas branché.
Disjoncteur déclenché ou fusible sauté.
L'ampoule DEL est grillée.
Vibrations.
Assurez-vous que l’appareil est bien de niveau.
La porte ne se ferme pas bien.
L’appareil n’est pas bien de niveau.
Le joint est sale.
Les tablettes sont mal positionnées.
CARACTÉRISTIQUES TECHNIQUES
Pour plus de détails, consultez la plaque
signalétique à l’arrière de l’appareil.
Les caractéristiques peuvent être modifiées sans
préavis, du fait d’améliorations éventuelles de
l’appareil.

Other Koolatron Refrigerator manuals

Koolatron SUPER-KOOL 45 KCR-45 User manual

Koolatron

Koolatron SUPER-KOOL 45 KCR-45 User manual

Koolatron Coca-Cola KWC-25 User manual

Koolatron

Koolatron Coca-Cola KWC-25 User manual

Koolatron KBC-46SS User manual

Koolatron

Koolatron KBC-46SS User manual

Koolatron Miller Lite ML90 User manual

Koolatron

Koolatron Miller Lite ML90 User manual

Koolatron Coca-Cola KWC-25 User manual

Koolatron

Koolatron Coca-Cola KWC-25 User manual

Koolatron CCRF01 User manual

Koolatron

Koolatron CCRF01 User manual

Koolatron Coca Cola CC06 User manual

Koolatron

Koolatron Coca Cola CC06 User manual

Koolatron BC10-G User manual

Koolatron

Koolatron BC10-G User manual

Koolatron KBC-88 User manual

Koolatron

Koolatron KBC-88 User manual

Koolatron KBC-130 User manual

Koolatron

Koolatron KBC-130 User manual

Koolatron Coca-Cola KWC-25 User manual

Koolatron

Koolatron Coca-Cola KWC-25 User manual

Koolatron KWC4 User manual

Koolatron

Koolatron KWC4 User manual

Koolatron KCR-48B User manual

Koolatron

Koolatron KCR-48B User manual

Koolatron KCR-48B User manual

Koolatron

Koolatron KCR-48B User manual

Koolatron KBC-46SS User manual

Koolatron

Koolatron KBC-46SS User manual

Koolatron KBC-70 User manual

Koolatron

Koolatron KBC-70 User manual

Koolatron SUPER-KOOL KCR-40 User manual

Koolatron

Koolatron SUPER-KOOL KCR-40 User manual

Koolatron BC-128 User manual

Koolatron

Koolatron BC-128 User manual

Koolatron Coors LIGHT CL90 User manual

Koolatron

Koolatron Coors LIGHT CL90 User manual

Koolatron Coca-Cola KWC-25 User manual

Koolatron

Koolatron Coca-Cola KWC-25 User manual

Koolatron KBC-46SS User manual

Koolatron

Koolatron KBC-46SS User manual

Koolatron Coca-Cola CCRF01 User manual

Koolatron

Koolatron Coca-Cola CCRF01 User manual

Koolatron SUPER-KOOL KCR-40B User manual

Koolatron

Koolatron SUPER-KOOL KCR-40B User manual

Koolatron KBC-88W User manual

Koolatron

Koolatron KBC-88W User manual

Popular Refrigerator manuals by other brands

Bauknecht KGTNF 20CME IN quick guide

Bauknecht

Bauknecht KGTNF 20CME IN quick guide

Frigidaire FRS6R3E Factory parts catalog

Frigidaire

Frigidaire FRS6R3E Factory parts catalog

NABO KGR 2122 Rot Instructions for use

NABO

NABO KGR 2122 Rot Instructions for use

Norcold MRFT630C parts list

Norcold

Norcold MRFT630C parts list

Cylinda KF3285NHE user manual

Cylinda

Cylinda KF3285NHE user manual

CombiSteel 7013.2560 user manual

CombiSteel

CombiSteel 7013.2560 user manual

GE Appliances Profile 29 Owners and installation manual

GE

GE Appliances Profile 29 Owners and installation manual

Crown GN 2303 Instruction booklet

Crown

Crown GN 2303 Instruction booklet

Indesit PBAA34NF operating instructions

Indesit

Indesit PBAA34NF operating instructions

GE PFSF2MJX - Profile: 22.2 cu. Ft.... Dimensions and installation information

GE

GE PFSF2MJX - Profile: 22.2 cu. Ft.... Dimensions and installation information

GE Appliances 19 Use and care guide

GE

GE Appliances 19 Use and care guide

Delfield Shelleybasic SE-ICE1 Specifications

Delfield

Delfield Shelleybasic SE-ICE1 Specifications

Hotpoint HUL162I operating instructions

Hotpoint

Hotpoint HUL162I operating instructions

Frigidaire FGHB2844LE uso y cuidado

Frigidaire

Frigidaire FGHB2844LE uso y cuidado

Hitachi R-H350P4M instruction manual

Hitachi

Hitachi R-H350P4M instruction manual

Jenn-Air JF36NXFXDE installation guide

Jenn-Air

Jenn-Air JF36NXFXDE installation guide

KitchenAid KSSS36DWX01 parts list

KitchenAid

KitchenAid KSSS36DWX01 parts list

Siemens KG..F series user manual

Siemens

Siemens KG..F series user manual

manuals.online logo
manuals.online logoBrands
  • About & Mission
  • Contact us
  • Privacy Policy
  • Terms and Conditions

Copyright 2025 Manuals.Online. All Rights Reserved.