Kooper 2165306 User manual

Natura VAPORIERA ELETTRICA ART. 2165306
POTENZA MAX. ASSORBITA 700 W •230V • 50HZ
UNICAMENTE AD USO DOMESTICO
ATTENZIONE! LEGGERE ATTENTAMENTE LE ISTRUZIONI E LE AVVERTENZE CONTENUTE NEL PRESENTE LIBRETTO E CONSERVARLE PER ULTERIORI CONSULTAZIONI PER
TUTTA LA VITA DEL PRODOTTO. ESSE INFATTI FORNISCONO INDICAZIONI IMPORTANTI PER QUANTO RIGUARDA LA FUNZIONALITÀ E LA SICUREZZA NELL’INSTALLAZIONE,
NELL’USO E NELLA MANUTENZIONE DEL PRODOTTO.
PRODOTTO IMPORTATO DA GALILEO SPA - STRADA GALLI N. 27 - 00019 VILLA ADRIANA (RM) - MADE IN EXTRA UE
MANUALE DI ISTRUZIONI
PER UN USO CORRETTO E SICURO DELL’APPARECCHIO
IT

IMPORTANTI MISURE DI SICUREZZA
Quando si ulizzano degli apparecchi elerici, le misure di sicurezza di base devono essere rispeate, incluse le seguen:
• Leggere tue le istruzioni.
• Non toccare le superci calde. Usare delle presine per rimuovere il coperchio o i cestelli quando sono caldi al ne di evitare
scoature da vapore.
• Per evitare il rischio di scosse eleriche, non immergere il cavo, la spina o la base in acqua o altri liquidi.
• Una strea sorveglianza è necessaria quando l’apparecchio è ulizzato da o vicino a bambini.
• Rimuovere la spina dalla presa quando l’apparecchio non è in uso e prima di installare o smontare le par. Lasciare rareddare
l’apparecchio prima di procedere con la pulizia.
• Non meere in funzione nessun apparecchio con cavo o spina danneggia, dopo un malfunzionamento o se l’apparecchio è stato
danneggiato in alcun modo. Portare l’apparecchio presso un centro di assistenza autorizzato per farlo controllare o riparare.
• Non ulizzare in ambien esterni.
• Non lasciare il cavo pendere dal tavolo o dal bancone, ed evitare che entri in contao con superci calde.
• Non meere l’apparecchio in funzione quando è vuoto o senza l’acqua nel serbatoio.
• Non meere la vaporiera su o vicino i fornelli o in un forno acceso.
• Prestare la massima aenzione quando si sposta un apparecchio contenente cibo o acqua bollen o altri liquidi bollen.
• Non impiegare la vaporiera per scopi diversi da quello a cui è desnata.
• Sollevare il coperchio con aenzione per evitare scoature e far cadere le gocce di acqua nella vaporiera.
• L’ulizzo di accessori non raccomanda dal produore può essere pericoloso.
• Solo per uso domesco.
ISTRUZIONI SPECIFICHE
• Al ne di evitare un sovraccarico elerico, non collegare un altro apparecchio a elevata potenza allo stesso circuito.
• Se è necessario l’ulizzo di una prolunga elerica, assicurarsi che il voltaggio sia adeguato. Sistemare la prolunga in modo che
non res sospesa sopra il bancone o il tavolo dove i bambini potrebbero rarla o inciampare accidentalmente.
• Non immergere la base della vaporiera in acqua o altri liquidi.
CONSERVARE QUESTE ISTRUZIONI
Speciche tecniche
Voltaggio: AC220V-240V
Frequenza: 50 Hz
Potenza: 700 W
DESCRIZIONE DELLE PARTI
LEGGERE ATTENTAMENTE PRIMA DI UTILIZZARE LA VAPORIERA
PRIMA DEL PRIMO UTILIZZO
• Assicurarsi che il valore del voltaggio riportato sulla base corrisponda a quello della rete elerica della vostra casa.
• Rimuovere qualsiasi echea o adesivo presen sull’apparecchio.
• Prima del primo ulizzo, lavare il coperchio, il recipiente per il riso, i tre cestelli, l’adaatore per i cestelli, la vaschea di raccolta
e l’anello rimovibile ulizzando acqua calda e sapone, poi risciacquare e asciugare con cura.
• Pulire l’interno della base con un panno umido.
VAPORE INSTANTANEO
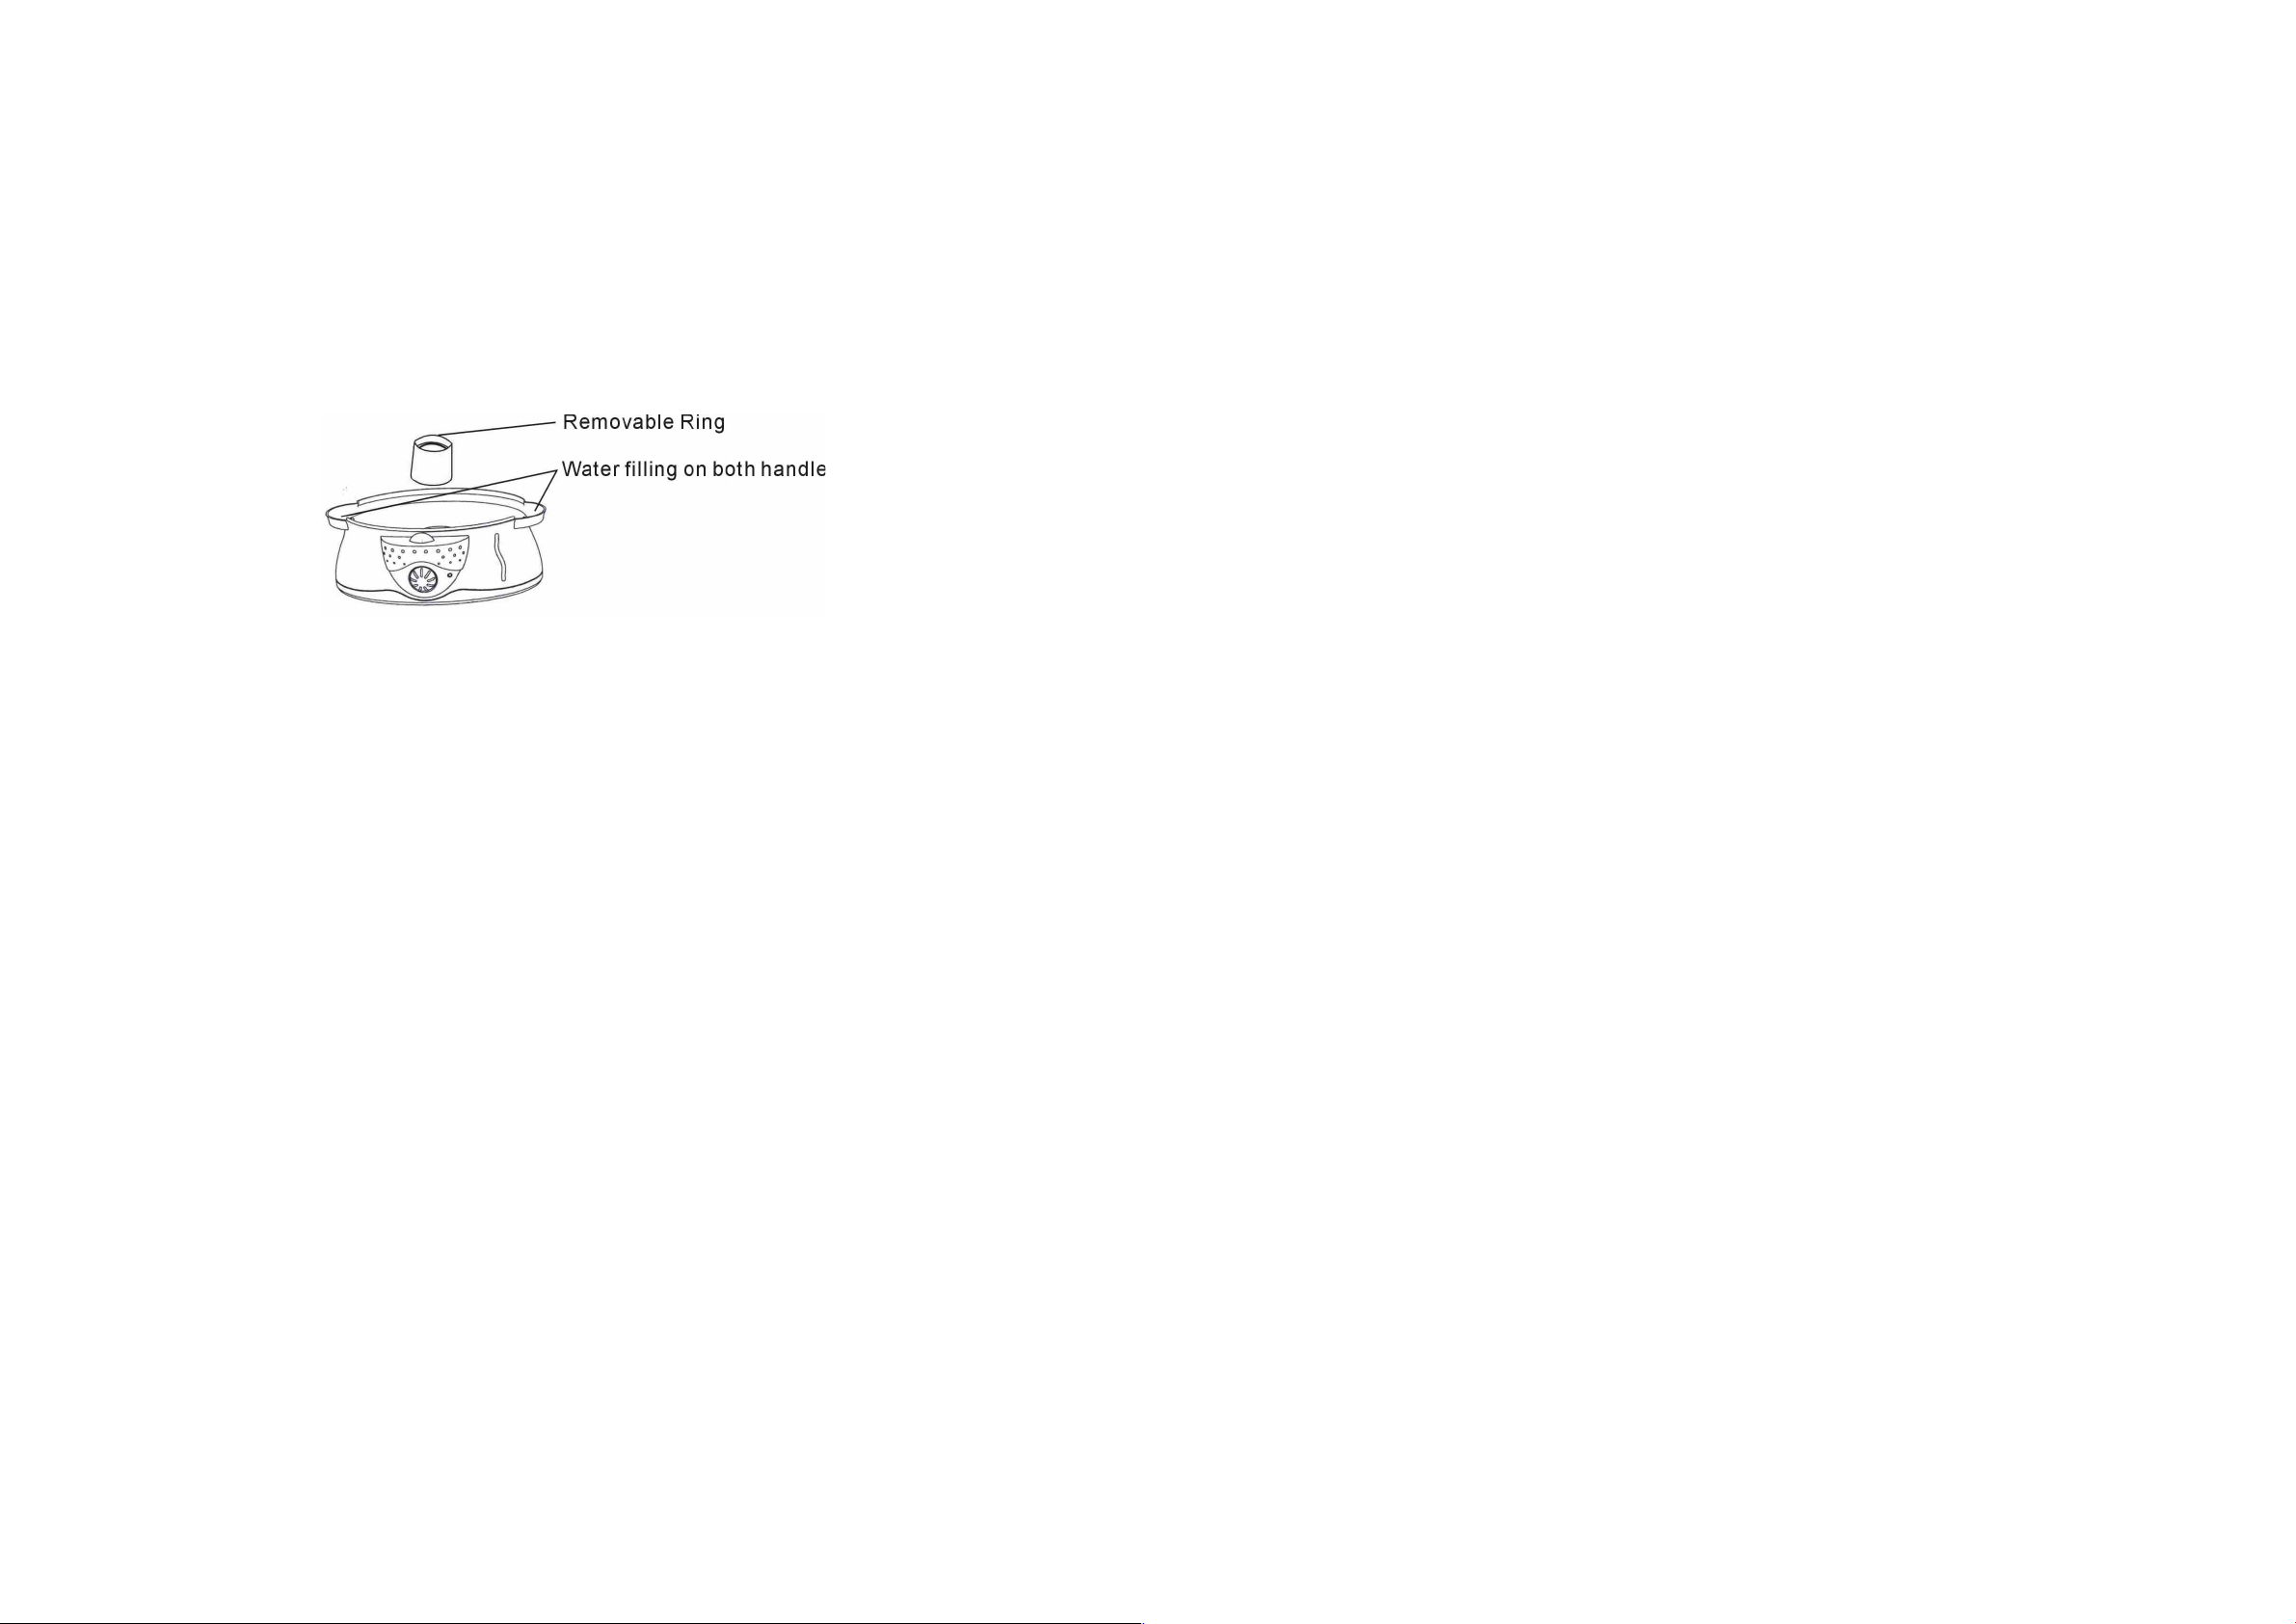
Questo prodoo include un anello riscaldante rimovibile. Posizionando l’anello sull’elemento riscaldante prima di cominciare la
coura, la vaporiera produrrà vapore dopo 35 secondi.
È da notare che l’anello riscaldante presenta un piccolo taglio che deve trovarsi posizionato verso il basso quando si installa l’anello.
ANELLO RISCALDANTE RIMOVIBILE
UTILIZZO
• Posizionare l’apparecchio su una supercie piana e stabile con suciente spazio intorno (ad esempio non soo elemen pensili).
La vaporiera e le sue par non sono adae per essere ulizza in forni (micro-onde, a convezione o tradizionale) o su fornelli.
• Meere l’anello rimovibile intorno all’elemento riscaldante.
• Riempire il serbatoio esclusivamente con acqua pulita. Non aggiungere nessun altro liquido né sale, pepe, ecc. nel serbatoio.
• Assicurarsi di non superare il segno MAX dell’indicatore del livello dell’acqua.
• Ci sono due modi per riempire il serbatoio.
1)Versare acqua fredda nel serbatoio per mezzo del disposivo di riempimento.
2)Versare acqua fredda direamente nel serbatoio tramite l’anello rimovibile..
• Posizionare la vaschea di raccolta sulla base.
• Posizionare l’adaatore per i cestelli tra il cestello grande e quello medio.
UTILIZZARE UNO DEI CESTELLI (Cestello grande o piccolo)
È possibile posizionare un cestello (grande o piccolo) sopra la vaschea di raccolta e la base. Inserire verdure, pesce o altri cibi privi
di salse o liquidi nel cestello assicurandosi di non ostruire le valvole di uscita del vapore.
UTILIZZARE IL CESTELLO GRANDE E IL CESTELLO MEDIO
Inserire l’alimento più grande con il tempo di coura più lungo nel cestello medio e posizionare il cestello sopra la vaschea di
raccolta e la base. Posizionare l’adaatore per i cestelli tra il cestello grande e quello medio, inne posizionare il cestello grande
con il coperchio sull’adaatore.
UTILIZZARE IL CESTELLO GRANDE E IL CESTELLO PICCOLO
Inserire l’alimento più grande con il tempo di coura più lungo nel cestello piccolo e posizionare il cestello sopra la vaschea di
raccolta e la base.
Posizionare il cestello grande con il coperchio sul cestello piccolo.
UTILIZZARE I TRE CESTELLI CONTEMPORANEAMENTE
Inserire l’alimento più grande con il tempo di coura più lungo nel cestello piccolo e posizionare il cestello sopra la vaschea di
raccolta e la base. Posizionare il cestello medio su quello piccolo, inserire l’adaatore tra il cestello medio e quello grande, inne
posizionare il cestello grande con il coperchio sull’adaatore.
UTILIZZARE LE GRIGLIE RIMOVIBILI
I cestelli sono forni di griglie rimovibili che aumentano lo spazio di coura e che possono essere usa per cucinare alimen di
grandi dimensioni.
UTILIZZARE IL RECIPIENTE PER IL RISO
Inserire il riso o altri cibi con salsa o liquidi nel recipiente. Chiudere con il coperchio. Collegare l’apparecchio alla corrente e
impostare il mer. Terminata la coura, rimuovere la spina dalla presa.
CUOCERE UOVA
Inserire le uova direamente nella vaschea di raccolta o in una griglia rimovibile ulizzando l’apposito porta-uovo fornito.
Chiudere con il coperchio.
1. Coperchio
2. Recipiente per riso
3. Cestello grande
4. Cestello medio
5. Cestello piccolo
6. Adaatore cestelli
7. Vaschea di raccolta
8. Anello rimovibile
9. Elemento riscaldante
10. Base
11. Copertura base
12. Manopola
13. Spia
14. Timer
15. Griglia rimovibile
16. Indicatore livello dell’acqua
17. Anello decoravo
18. Disposivo di riempimento
19. Serbatoio dell’acqua
Anellorimovibile
Sistemadiriempimentosuentrambi
imanici
Anello rimovibile
Sistema di riempimento su entrambi i manici

USER INSTRUCTIONS
FOR A CORRECT AND SAFE USE OF THE APPLIANCE
EN
QUANDO SI MANEGGIANO O RIMUOVONO PARTI CALDE, UTILIZZARE DELLE PRESINE AL FINE DI EVITARE SCOTTATURE CAUSATE
DAL VAPORE BOLLENTE.
IMPOSTARE IL TIMER
Tipo meccanico
Impostare il tempo di coura raccomandato (è possibile impostare il tempo di produzione del vapore). La spia si accenderà e il
vapore comincerà ad essere emesso dopo 35 secondi se si ulizza l’anello dell’elemento riscaldante.
Quando il mer tornerà in posizione “0”, la spia si spegnerà e un suono acusco verrà emesso per indicare che il cibo è pronto per
essere servito.
PULIZIA E MANUTENZIONE
• Rimuovere la spina dalla presa e lasciare che l’apparecchio si rareddi prima di procedere con qualunque operazione di di pulizia
o manutenzione. Non immergere mai la base, il cavo o la spina in acqua.
• Svuotare la vaschea di raccolta e il serbatoio.
• Lavare il coperchio, i cestelli, l’adaatore per i cestelli, il recipiente per il riso e la vaschea di raccolta con acqua calda e sapone,
poi risciacquare e asciugare accuratamente tue le par. Altrimen lavare tuo nel cestello superiore della lavastoviglie.
• Pulire il serbatoio con un panno umido.
• Non usare detergen abrasivi.
• Per riporre la vaporiera, è possibile inserire il recipiente per il riso e il cestello piccolo all’interno del cestello medio e il cestello
medio all’interno di quello grande con il coperchio a chiudere il tuo.
• In zone in cui l’acqua è parcolarmente dura, del calcare potrebbe formarsi sull’elemento riscaldante. Se il calcare si accumula, il
vapore potrebbe smeere di fuoriuscire prima che gli alimen siano cucina completamente. Dopo 7-10 ulizzi, versare 3 tazze di
aceto bianco nel serbatoio, poi riempirlo con acqua no al segno HI. Non installare il coperchio, i cestelli o la vaschea di raccolta
quando si eeua questa operazione.
• Inserire la spina nella presa e impostare il mer no a 20 minu. Quando il mer suona, rimuovere la spina dalla presa. Lasciare
rareddare completamente l’apparecchio. Inne sciacquare più volte il serbatoio con acqua fredda poi asciugarlo.
IMPORTANT SAFEGUARDS
When Using electrical appliance, basic safety Precauons should always be followed, Including the following:
·Read all instrucons.
·Do not touch hot surfaces. Use potholders when removing cover or handling hot containers to avoid steam burns.
·To protect against electrical shock, do not immerse cord, plug or base unit in water or other liquids.
·Close supervision is necessary when any appliance is used by or near children.
·Unplug from outlet when not in use. Unplug before pung on or taking o parts, and allow to cool before cleaning.
·Do not operate any appliance with a damaged cord or plug, or aer the appliance malfuncons or has been damaged in any
manner. Return appliance to an authorized service facility for examinaon, repair or adjustment.
·Do not use outdoors.
·Do not let cord hang over edge of table or counter, or touch hot surfaces.
·Do not operate appliance while empty or w/o water in the reservoir.
·Do not place on or near a hot gas or electric burner, or in a heated oven.
·Extreme cauon must be used when moving an appliance containing hot food or water or other hot liquids.
·Do not use appliance for other than intended use.
·Li and open cover carefully to avoid scalding and allow water to drip into steamer.
·The use of accessory aachments not recommended by this appliance manufacturer may cause hazards.
·For household use only.
SPECIAL INSTRUSTIONS
·To avoid a circuit overload, do not operate another high waage appliance on the same circuit.
·If a longer detachable power-supply cord or extension cord is used, the marked electrical rang of the appliance. The longer cord
should be arranged so that it will not drape over the counter top or table top where it can be pulled on by children or tripped over
unintenally.
·Do not immerse base unit in water or other liquids.
SAVE THESE INSTRUCTIONS
Technical characteriscs
Input Voltage:AC220V-240V
Frequency:50Hz
Waage:700W
PARTS DESCRIPTION
1. lid
2. Rice Bowl
3. Large size Steam Bowl
4. Middle size Steam Bowl
5. Small size Steam Bowl
6. Bowl Adapter
7. Juice Tray
8. Removal Ring
9. Heater Element
10. Base
11. Base cover
12. Knob
13. Lamp Cover
14. Timer Cover
15. Removable Grid
16. Water Level Indicator
17. Deco Ring
18. Water Filling Device
19. Water Reservoir

READ CAREFULY BEFORE USING YOUR NEW STEAMER
BEFORE THE FIRST USE
·Check the voltage rang on the base corresponds to the mains voltage in your home.
·Remove any labels or sckers from appliance.
·Thoroughly wash lid, rice bowl, large steam bowl, middle steamer, small steam bowl, bowl adapter, juice tray, and removable ring
in warm, soapy water before rst use the rinse and dry-carefully.
·Wipe the inside of the warm base with a damp cloth.
INSTANT STEAM FUNCTION
There is a removable heang element ring included, If you place this ring on top of heang element before.
Cooking. This instant steam funcon, will produce steam in 35 seconds, Please note there is a small cut on the heang element ring
which should be faced downward while you place it .
REMOVABLE HEATING ELEMENT RING
TO USE
·Place unit on a at sturdy surface with adequate clearance(i.e. do not place under wall cabinets),The steamer unit and components
are not for use in ovens(microwave, convecon or convenonal ) or on stove-top.
·Put the removable ring around the heater element.
·Fill water removable with clean water only, Do not put any other liquids or add any salt, pepper,. etc. In the water reservoir.
·Make sure the water should not exceed the MAX ll level as Indicated near the Water Level Indicator.
·There are two possible methods to ll the water reservoir.
1) Pour cold water into the water reservoir through the water lling device.
2) Pour cold water directly into the water reservoir and heang element housing.
·Place the juice tray on the base.
·Place the bowl adapter between large steam bowl and middle steam bowl.
TO USE ONE OF STEAM BOWL (Small or Large Steam Bowl)
You can place one steam bowl (Large or small) on top of juice tray and base. Place vegetable, seafood or other foods without sauce
or liquid in steam bowl, try not to block steam vents.
TO USE LARGE AND MIDDLE STEAM BOWLS
Place the large piece of food with the long cooking me in the middle steam bowl then place on top of juice tray and base. Place
the bowl adapter between large and middle steam bowl, Then place the large steam bowl with cover on the bowl adapter.
TO USE LARGE AND SMALL STEAM BOWLS
Place the larger piece of food with the longer cooking me in the small steam bowl the place on top of juice tray and base.
Place the large steam bowl with cover on the small steam bowl.
TO USE THREE STEAM BOWLS AT THE SAME TIME
Place the largest piece of food with the longest cooking me in the small steam bowl then place on top of juice tray and base.
Place the middle steam bowl on the small steam bowl, then place the bowl adapter between the middle and the large steam bowl,
Finally, place the large steam bowl with cover on the bowl adapter.
TO USE REMOVABLE GRIDS
The bowls are ed with removable grids which increase the volume of cooking area and can be used to cook large items of food.
TOUSE RICE BOWL
Place rice or other foods with sauce or liquid in rice bowl. Cover the lid. Plug into wall outlet, Set mer. When food is well cooked,
unplug unit.
COOKING EGGS
Place the eggs directly into the Juice Tray or the Removable Grid using the especially shaped holder provided for this purpose.
Cover the lid.
WHEN HANDLING AND REMOVINGHOT COMPONENTS,USEPOT-HOLDERSTO AVOID BURNS FROMHOT STEAMS.
TIMER SETTING
Mechanical Type
Set the mer to the recommended cooking me (steaming me can be adjust as per your experiment). The light turns on and
steam comes in 35 seconds if using heater element ring. The light will turn cooking is completed and the mer will give a signal bell.
The indicator lights up & steam comes in 35 seconds if using removable heang element ring. When mer reach<<0>>,the indicator
will go o & the bell will ring to indicate that food is ready to be served.
TO CARE AND CLEAN
Unplug cord from outlet before cleaning allow Steamer to cool, Never immerse the Base, Cord and Plug in water.
·Pour away excess liquid from the juice tray and the water reservoir.
·wash lid, steam bowls,-bowl adapter rice. Bowl and juice tray in hot, soapy water, rinse and dry all parts. Or wash on top rack of
dishwasher.
·Clean reservoir with soapy water then wipe with damp cloth.
·Do not use abrasive cleaners.
·The small steaming bowl and the rice bowl can be stored inside the middle steam bowl, and the middle steam bowl can be stored
inside the large steam bowl with the lid on top of all three.
·In bard water areas, the scale may build up on the heang element. If scale allowed to accumulate, the steam could go o before
the food is cooked. So, aer 7-10 uses. Pour 3 cups clear vineger into the water reservoir then ll water up to HI level. Do not place
lid, steaming bowl, rice bowl & drip tray in this procedure.
·Plug in and set mer up to 20 minutes, When the mer ring, unplug cord from outlet. Allow the unit to cool completely. Before
emptying the water reservoir, Use the cold water to rinse the water reservoir several mes.

TRATTAMENTO DEL DISPOSITIVO ELETTRICO ED ELETTRONICO A FINE VITA
Informazione agli uten per il correo smalmento del prodoo ai sensi della Direva Europea 2002/96/CE e del D.lgs N. 151/2005.
Caro consumatore,
è importante ricordarti che, come buon cittadino, avrai l’obbligo di smaltire questo prodotto non come riuto urbano, ma di eettuare una raccolta separata.
Il simbolo sopra indicato e riportato sull’apparecchiatura indica che il riuto deve essere oggetto di “raccolta separata”.
I dispositivi elettrici ed elettronici non devono essere considerati riuti domestici. Pertanto, il prodotto alla ne della sua vita utile, non deve essere smaltito insieme
ai riuti urbani. L’utente dovrà conferire (o far conferire) il riuto ai centri di raccolta dierenziata predisposti dalle amministrazioni locali, oppure consegnarlo al
rivenditore contro l’acquisto di una nuova apparecchiatura di tipo equivalente.
La raccolta dierenziata del riuto e le successive operazioni di trattamento, recupero e smaltimento favoriscono la produzione di apparecchiature con materiali
riciclati e limitano gli eetti negativi sull’ambiente e sulla salute eventualmente causati da una gestione impropria del riuto.
Grazie!
DISPOSAL OF THE ELECTRIC OR ELECTRONIC DEVICE AT THE END OF ITS LIFE
Informaon for users about the correct disposal of the product according to
the European Direcve 2002/96/CE and to the Legislave Decree N. 151/2005.
Dear Customer,
It is important to remind you that, as a good citizen, you cannot dispose of this product as municipal waste; you have to do a separate collection.
e symbol labelled on the appliance indicates that the rubbish is subject to “separate collection”.
Electrical and electronic appliance cannot be considered as domestic waste. erefore, at the end of its useful life, this product should not be disposed with municipal
wastes. e user must therefore assign or (have collected) the rubbish to a treatment facility under local administration, or hand it over to the reseller in exchange for
an equivalent new product.
e separate collection of the rubbish and the successive treatment, recycling and disposal operations promote production of appliances made with recycled materials
and reduce negative eects on health and the environment caused by improper treatment of rubbish.
Thank you!
2012/19/EU e del D.lgs N. 49/2014.
2012/19/EU N. 49/2014.
Other Kooper Electric Steamer manuals
Popular Electric Steamer manuals by other brands

Morphy Richards
Morphy Richards FOOD FUSION STEAMER - REV 1 instructions

Elba
Elba EFS-M2028 owner's manual

Omcan
Omcan FW-TW-0016 instruction manual

EmberGlo
EmberGlo AR30 troubleshooting guide

COMBITHERM ELECTRIC
COMBITHERM ELECTRIC ecosmart 20-120ES Technical & service manual

Hamilton Beach
Hamilton Beach Digital Simplicity manual