4. CARE AND MAINTENANCE
Cleaning our Air Filters
A dirty air filter will cause a reduction of airflow. Reduction of airflow causes overloading
and consumes more electricity. Therefore, regular cleaning is necessary for efficient and
trouble-free operation.
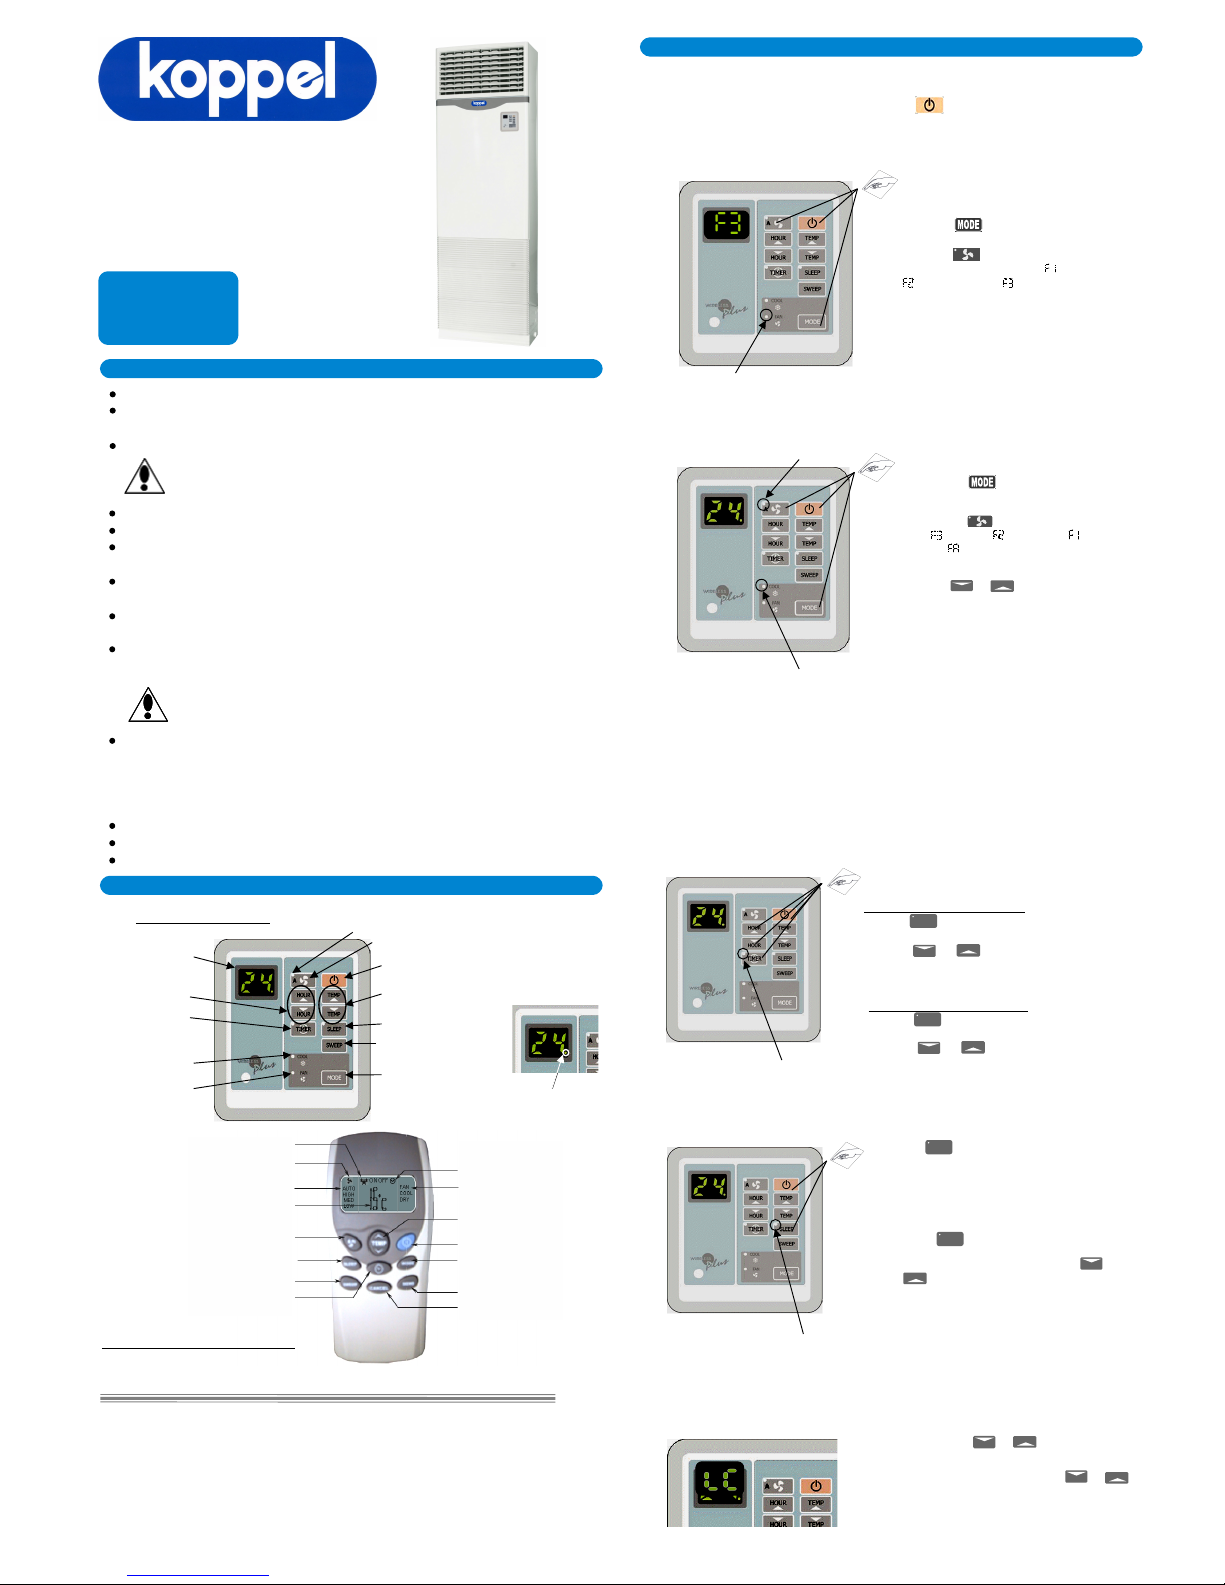
Remove the air filter from the return air
grille.
Remove dust from the air filter by using
vacuum cleaner or, if it is very dirty,
wash it with soap and wipe it dry
before reinstalling it.
Remove the return air grille.
For plastic return grilles, no screw
is used. Start removing the return grille
by pulling the bottommost part of the
grille.
WARNING: Ensure that the power supply is switched off
before commencing maintenance work.
1
2
3
Slide the air filter back into the return air
grille.
Re-mount the return air grilles.
For plastics grilles, re-install the return
air grille from top to bottom.
3
2
1
KFM-36CHW / KFM-60CHWA
KFM-36CHW / KFM-60CHWA
Cleaning The Unit
Clean the air conditioner with a
damp cloth and wipe it dry.
Do not use water above 40oC for
cleaning, as this will cause discolo-
ration and deformation.
Remove dust from the louver area
with your vacuum cleaner’s thin
nozzle.
Do not splash directly with water to
the body of the unit, as this may
cause a short circuit.
Do not use thinner, benzene,
abrasive powder, nor hot water to
clean the unit.
5. CLEANING THE UNIT
Not to be Operated for a Long Period of Time
When the air conditioner is not going to be used for a long period
of time, switch off the power from the circuit breaker.
Before Putting The System Back To Operation
Turn on the main power to the system at the outdoor unit.
Run the unit in fan mode for a while to clear the air flow before you operate
it in another mode.
Tips on Using the Air Conditioner
After a Power Failure
Auto-restart function and non-volatile memory will automatically turn O the unit
and return it to its previous setting.
Clean the filter every other week for higher efficiency.
Use curtains or blinds to prevent heat gain from the sunlight to the room.
Doing so will help reduce electric consumption.
Close all windows and doors when operating the unit so that there is no
leakage of conditioned air outside the room.
Do not locate a heater or any other heat source near the unit. The heat
may deform plastic parts.
THE FOLLOWING ARE JUST NORMAL CONDITIONS FOR THE UNIT:
The unit does not operate upon
restart.
If you restart the unit within 3 minutes after turning it
OFF, or change the mode during operation, a
protective device will work to shut OFF the
valve for 3 minutes. Cooling will resume
automatically after the 3-minute delay.
Low oise.
A soft, swishing noise can be heard during operation or
immediately after the unit is turned OFF. This is the
sound of the circulating refrigerant.
Condensate water or water droplets
present on the air outlet.
In COOL mode, condensate water can sometimes be
seen forming on the air outlet due to the
differences in temperature between the room air
and the outlet air.
KOPPEL, I C., warrants to the purchaser of this product that it will furnish labor and/or
replacement part or at its option, repair any part thereof which proves upon inspection by
KOPPEL, I C. or its authorized service company, to have been defective within one (1) year
from the date of original purchase, if it was used thereafter solely within the Republic of the
Philippines, in accordance with the terms of this warranty through the KOPPEL, I C.
Service Department or any of its authorized service company.
This warranty is non-transferable and does not apply to damage(s) arising from accident,
improper use or abuse, force majeure such as typhoons, floods, lightning, earthquakes
among others, from use with voltages beyond THE ALLOWABLE VOLTAGE RA GE OF
207 TO 253 VOLTS, or from failure to follow operating instructions provided. If the serial
number of the unit is removed, obliterated or defaced, or if the unit is faultily installed,
tampered with or altered by anyone other than a duly authorized service personnel, service
dealer or accredited installer of KOPPEL, I C., this warranty is considered null and void.
KOPPEL, I C. is not responsible and will not be held liable in contract or in tort (including
strict liability and negligence) for any special, indirect or consequential damages, including
but not limited to damage to structure or contents, or injury to persons by reason of the
installation, use or failure of any KOPPEL, I C. products.
UNIT MODEL : ______________________________
SERIAL NUMBER :____________________________
PRODUCT WARRANT CERTIFICATE
WARRANTY REGISTRATION FORM
IMPORTANT ! In order not to void this warranty please fill p and detach this
Warranty Registration Form and, within ten (10) days from date of receipt
of eq ipment, mail to Koppel, Inc. or send by fax to No. (02) 823-6999 .
Also yo can visit www.koppel.ph
UNIT MODEL : ___________________________________________________
SERIAL NUMBER :________________________________________________
OWNER’S NAME : ____________________ TEL NO.:___________________
ADDRESS : _____________________________________________________
DEALER’S NAME : _______________________________________________
DATE PURCHASED : _____________________________________________
INSTALLER’S NAME : ____________________________________________
(OWNER’S COP )
Manufacturer reserves the right to discontinue, or change at any time, specification or designs
without notice and without incurring any obligation.
P : F30052
Rev. 00
6. TROUBLESHOOTING
PROBLEM
CAUSES
o operation. Check to see if the power supply switch is off.
Check to see if you have a power failure.
Check to see if the timer is in operation.
Air conditioner runs but does not
cool.
Check whether the room temperature is correct.
Check whether the sunlight is directly shining into the
room. If yes, use curtains or blinds to prevent heat
gain to the room.
Check whether the door and the window are opened.
Ensure that no heating appliances have been placed
near the air conditioner.
Check for obstructions in the air inlet and outlet.
Check the air filter for dirt.
Call for service if the room does not cool after unit is
running for more than a reasonable cooling time.
Control pad is not working. Call for service.
The drain hose on the outdoor unit
is cracked or broken.
Call for service.
There’s a strange noise coming
from the unit.
Call for service.
Water leaking from the indoor unit. Call for service.
.