Korea Nakajo NID-1520T3 User manual

Ice Dispenser type Ice-maker (NID-1520T3)
Instruction Manual
lIn order to use this product properly, read this manual carefully
lBefore using the product, be sure to read and follow the "Warnings and Cautions for
Safety" in the manual.
lKeep this manual in a place where it can be easily seen by users.
lThe instruction manual contains a warranty card.
lThe performance and design of this ice-maker as described in the manual may be changed
without prior notice.
lKeep this manual in a safe place for future reference (A/S history record management)

2018. 09. 20 2nd edition
1. Preparation before use: things be sure to read
1-1. Safety precautions -------------------------------------------------------------------------
3~4
1-2. How to install the product and the ground connection -----------------------------------------
5
1-3. How to start the ice-making operation: proper use of ice-maker ----------------------
6
1-4. Name of parts --------------------------------------------------------------------
7
2.
Functions of ice-maker: Various useful functions
2-1. How to output Ice, Ice+Water, Water -----------------------------------------
8
2-2. How to check the temperature for Dispenser
and Accumulated time of operation ----------------------------------
9
2-3. How to set and check the function codes ---------------------------------------
10~13
3. Others: How to wash and clean the product and maintenance
3-1. How to wash and clean the product --------------------------------------------------
14~15
3-2. Maintenance for during the time of inactive -----------------------------------
16
3-3. Before requesting repair -------------------------------------------------------------------
17~18
3-4. Periodic change of parts --------------------------------------------------------------
19
3-5. Outside dimension ------------------------------------------------------------------------
20
3-6. Product performance and specification --------------------------------------------
21
4. Appendix
■Detail of product repair --------------------------------------------------------------
21
■Warranty card ------------------------------------------------------------------------------
22
■MEMO -------------------------------------------------------------------------------------
23
2
[ Contents ]

Do not use loose electrical outlet or damaged
power plug and a cord.
When unplugging the power cord, do not pull it
out of the electrical outlet.
lOtherwise, electric shock or fire may occur.
lUse a properly grounded electrical outlet
Warning
1-1. Safety precautions
Meaning of 【Warning】【Caution】signs
Warning
Warning sign indicate a dangerous situation that may lead to injuries including
serious ones if the signs are ignored and proper attention is `not paid.
Caution
Caution signs indicate a dangerous situation that is likely to lead to injuries
including serious ones and property damage if the signs are ignored and proper
attention is not paid.
Do not touch the power plug with wet hands.
lBe sure to unplug before cleaning the product.
lOtherwise, electric shock and/or fire may occur.
lUse a properly grounded electrical outlet
only. (Otherwise, electric shock may occur.)
lDo not connect several power cords to an
electrical outlet. Otherwise, a malfunction
may occur.
Do not move, disassemble or repair the
product or open its side cover while operating
the product.
lOtherwise, injury and/or
product damage may occur.
Be sure to unplug when not using the product.
lFalling or thunderbolt may cause
electric shock or fire.
If the product emits any strange sound or
smell or generates smoke, immediately turn
the power OFF and unplug and contact the
service center.
lIt may mean that
product breakdown
occur.
lFire may occur.
If the product needs to be repaired, be sure to
contact an authorized service center.
lThe product and only be disassembled by
a designated service technician. Otherwise,
malfunction, fire, or electric shock may
occur.
lIf the power plug or cord is abnormally hot,
contact the service center.
3

Caution (Caution for installment)
1-1. Safety precaution
Install the use the product at the place where
the ambient temperature is between 10℃~
35℃. Temperature for supply water should
be 5℃~30℃.
lIf the product is operated
outside of the temperature
range specified above, it may
cause troubles and degrade
the performance of the product.
lDo not place the product near
the heat generating device.
Place the product at well
ventilated and good sanitary
environment.
The product, when installed, must be level.
lAdjust the length of leg of the product to
stay level.
lDo not adjust it more than necessary.
lIt may fall and come of the legs.
lDo not put the angle of
over 45˚, when carrying
the product.
Caution(When using)
Leave the space over 10cm between the
product and the other things.
(Do not place too close )
lIt may cause the product breakdown,
overheat and malfunction of not being
able to make ice.
Never use gasoline, benzene as such when
washing and cleaning the product.
Do not sprinkle water directly on the inner
parts of the product.
lOtherwise, fire or electric shock
may occur.
lProduct breakdown
may also occur.
Do not cover the top and place things under
the product.
There are air inlets/outlets for cooling
upper and lower parts of the product.
lIf the air intake and
ventilation is not enough,
it may cause the perfor-
mance deterioration and
the product breakdown.
Take out all the remaining ice in the ice
stocker, when not operating the product for a
long period of time.
lPlease refer to the page 16 in this manual
for taking out the ice.
lIt may cause the product
breakdown if the ice became
massive and clustered together.
【ice stocker】
4
【ice stocker】

1-2. How to install the product and the ground connection
Warning
The rated voltage of this product is AC 220V
- When using the product, insert the power plug into AC 220V (±10% 198~242V) electrical
outlet.
- Use an electrical outlet with 15A.
- In order to prevent electric shock, and product damage, install proper ground wire as
specified in the electric safety rule.
Power connection
lInsert the power plug into
AC100V50/60Hz electrical outlet only.
lBe sure to use a properly grounded
electrical outlet only.
lUse an electrical outlet with electric
capacity of15A.
lNever connect multiple power plugs to
one electrical outlet or a extension cord.
Supply water connection
lInstall the on/off valve and connection
adaptor nipple on the water pipe, then
install G1/2 holeto feed-water inlet,
located at lower back side of the product.
lBe sure to install to drinking water only.
ex) waterworks. It may cause the product
breakdown by using underground water.
lDo not use old supply water hoses and
corroded pipes.
corroded pipes.
Supply water pressure:
Use booster pump when it is
lower than 98k㎰(1㎏/㎠)
~389 k㎰(4㎏/㎠),
use reducing valve when
it is higher than above range.
Ground connection
lConnect the ground wire(green/yellow
wire) to the ground contact part on the
lower back side of the product using a
proper ground connection method
specified in the electric safety rule.
lWater pipe or gas pipe is very danger-
ous and must not be connected forg-
rounding purposes.
Drain hoses
lWhen installing the drain hose, make
sure it is neither bent, smashed, nor
clogged at the tip.
lWhen the drain hose is folded, it may
cause clogging and reverse flow water
goes into the drain.
Drain hose
5

3. Insert the power plug into properly grounded 220V electric
outlet.
● Before installing the power plug, install the water supply hose and
2. Open the stop valve for water supply pipe connected to the
product.
● Start water supply to the product.
● Check the water leak at the joint part of the supply water hose.
About the proper use of the ice-maker
1. Holding lower part of the front panel and lift up.
● Loosen the decorative screws then open. Normally, the front panel
is fixed with decorative screws on the left side at the bottom.
* This Safety instruction contains a lot of important information.
Please read Safety instruction thoroughly in order to use without troubles for a long period of time.
1-3. How to start the ice making operation:Proper use of ice-maker
Fixed part
6. When Ice-making is in operation, display of accumulated Ice-
making motor will be changed.
● Cooling fan will be on/off repeatedly, its noise is not a product
breakdown. It is a normal operation.
● Ice-making will stop automatically when the full ice condition in the
ice stocker, and start automatically when the ice amount is less than
standard level in the ice stocker.
4. Lift up the power switch of leakage breaker and turn 【ON】
● Starting power supply to the product.
● Leakage breaker is installed to prevent an accident such as electrical
shock by power leakage.
● Check the normal operation by pressing the test button every month.
5. Starting automatic cleaning system(time = about 2 minutes)
● Turn the power beaker 【on】, and start ice-making operation after
cleaning 3 times.
● Make sure to check the leakage of the drain hose.
● It takes about 10 minutes until the first ice comes out.
● Automatic cleaning will be done every 10 hours, after finishing ice-
making operation.
(Time interval of automatic cleaning can be changed by setting.)
● Before installing the power plug, install the water supply hose and
drain hose first and make sure power switch is not (ON).
Test button
Cooling fan will be on/off repeatedly, its noise is not a product
breakdown. It is a normal operation.
Ice-making will stop automatically when the full ice condition in the
ice stocker, and start automatically when the ice amount is less than
standard level in the ice stocker.
6

1-4. Name of parts
Top cover
Front panel
Outlet
Drain body
Side panel
(Right)
Outlet lever
Power lamp
Leg
Front cover
Drip tray
(Cup tray)
Power code
Drainage
outlet
Inlet
Air outlet
Side panel
(Left)
Feed-water inlet
Accessories
Ice button
Ice + Water button
Water button
Lift up and open the
"Front panel" to see
"Setting panel".
Selection button
Setting panel Leakage breaker
Setting
Monitor
Mode Setting
Setting button
Drain hose
Drain hose band
Instruction Manual/Warranty
아이스 디스펜서 제빙기 (N ID-0520T3)
사 용 설 명 서
l본제품의 올바른 사용을 위하여 사용설명서를 자세히 읽어 주세요.
l사용전 사용설명서의 "안전을 위한 주의 사항"을 반드시 읽고 지켜 주세요.
l본사용설명서는 사용자가 언제나 볼 수 있는 곳에 보관해 주세요.
l사용설명서에품질보증서가 포함되어 있습니다.
l본제빙기의 성능 및 디자인은 임의로 변경될 수 있습니다.
l본사용설명서는 반드시 보관하여 주세요. ( A /S 이력기록 관리)
7
Drain hose band

Output type: select the output type (Ice, Ice+Water, Water)
Select mainly use type, and change the setting depending on frequency and purpose of use.
● Factory default of outputting type is Ice.
● LED above the basic setting button or selected setting button will be turned 【ON】
● Refer to Page 10 of F0, when changing the setting.
Change the length of outputting time. (0.1~9.9 seconds, 0.1second unit of length)
● Product outputting time (Factory default)
Output only ice
Output ice+water
Output only water
Ice button
F1
ice
1second
About 30g
Selection button
Function code
type
Setting time (ex)
Output amount (App.)
Ice+Water button
F2
ice
1second
About 30g
F3
water
1second
About 65g
Water button
F4
water
1second
About 70g
2-1. How to output Ice, Ice + Water, Water
● Refer to P10-11, F1-F4, when changing the length of outputting time by pressing each selection button.
● Outputting will be stop when stopping to press the lever within the set output time.
● When receiving Ice, Ice+Water,Water, place the cup to the outlet and press the outputting lever.
How to output Ice, Ice+Water, Water.
● The ice or water fall out of the cup if leaving the cup from the outputting outlet.
● Take the cup after finishing the output completely.
● Use with the following methods
1. Outputting basic setting (ex: basic setting is Ice)
● Holding the cup and pressing the lever with the cup and start
outputting for the designated time, then stop automatically.
● LED above the basic setting button will be turned 【ON】
2. Outputting differ from basic setting (ex: basic setting is Ice)
● Press the selected type of output button. -
LED above the selected type of output button will be turned 【ON】
● Holding the cup and pressing the lever with the cup and start
outputting for the designated time, then stop automatically.
(After one output, output setting will be returned to basic setting.)
● Use wide-mouthed cup
: Using small -mouthed cup may cause the ice falling out of the cup and wet the floor.
8

The function codes below to check if the Dispenser is in normal operation.
● Refer to P12 of F5-F7 to check the temperature of each location.
To check the accumulated ice-making time, and accumulated time of operation.
● By checking accumulated operating time of Dispenser, accumulated operating time of
necessary periodical change of major service parts can be checked. (Refer to P13 of F8)
- In order to make good quality of ice, periodical change of service parts is recommended.
- Refer to P19 for 『Periodical change of service parts』
●Accumulated operating time of ice-maker means total time of power-up. (Refer to P13 of F9)
Function code
Location to check the temperature
Condition of use
F5
Inner part of the product
5℃~50℃
F6
Condenser
below 65℃
F7
Evaporator
above -18℃
Function code
Type of accumulated time
F8
Accumulated operating time of Geared Motor
F9
Accumulated time of Power-up
2-2. How to check the temperature for Dispenser and
Accumulated time of operation.
●Accumulated operating time of ice-maker means total time of power-up. (Refer to P13 of F9)
Ice-maker has automatic drainage system for sanitary control purpose.
● Drainage frequency is every 10 hours in order to use sanitarily, automatic cleaning system
will wash reserver tank and inner part of hose.
● By setting automatic drainage system 【OFF】, no drainage can be done so that it can save the water.
It is useful function where the place drainage is difficult. (Refer to P14 of Fb)
Caution when restarting the product
●After stopping the dispenser, it needs to rest the product more than 5 minutes before restarting.
: It may cause excess load on over-load protector and cause product break down, if restart the operation right after.
Ice stocking characteristics
● Ice stocking amount is about 1.9kg.
● When the ice in the ice stocker become full condition, the product will detect it and
automatically stop the ice-making operation.
● When taking the ice out of ice stocker, or melting the ice, the product will detect it and
automatically start the ice-making operation.
9

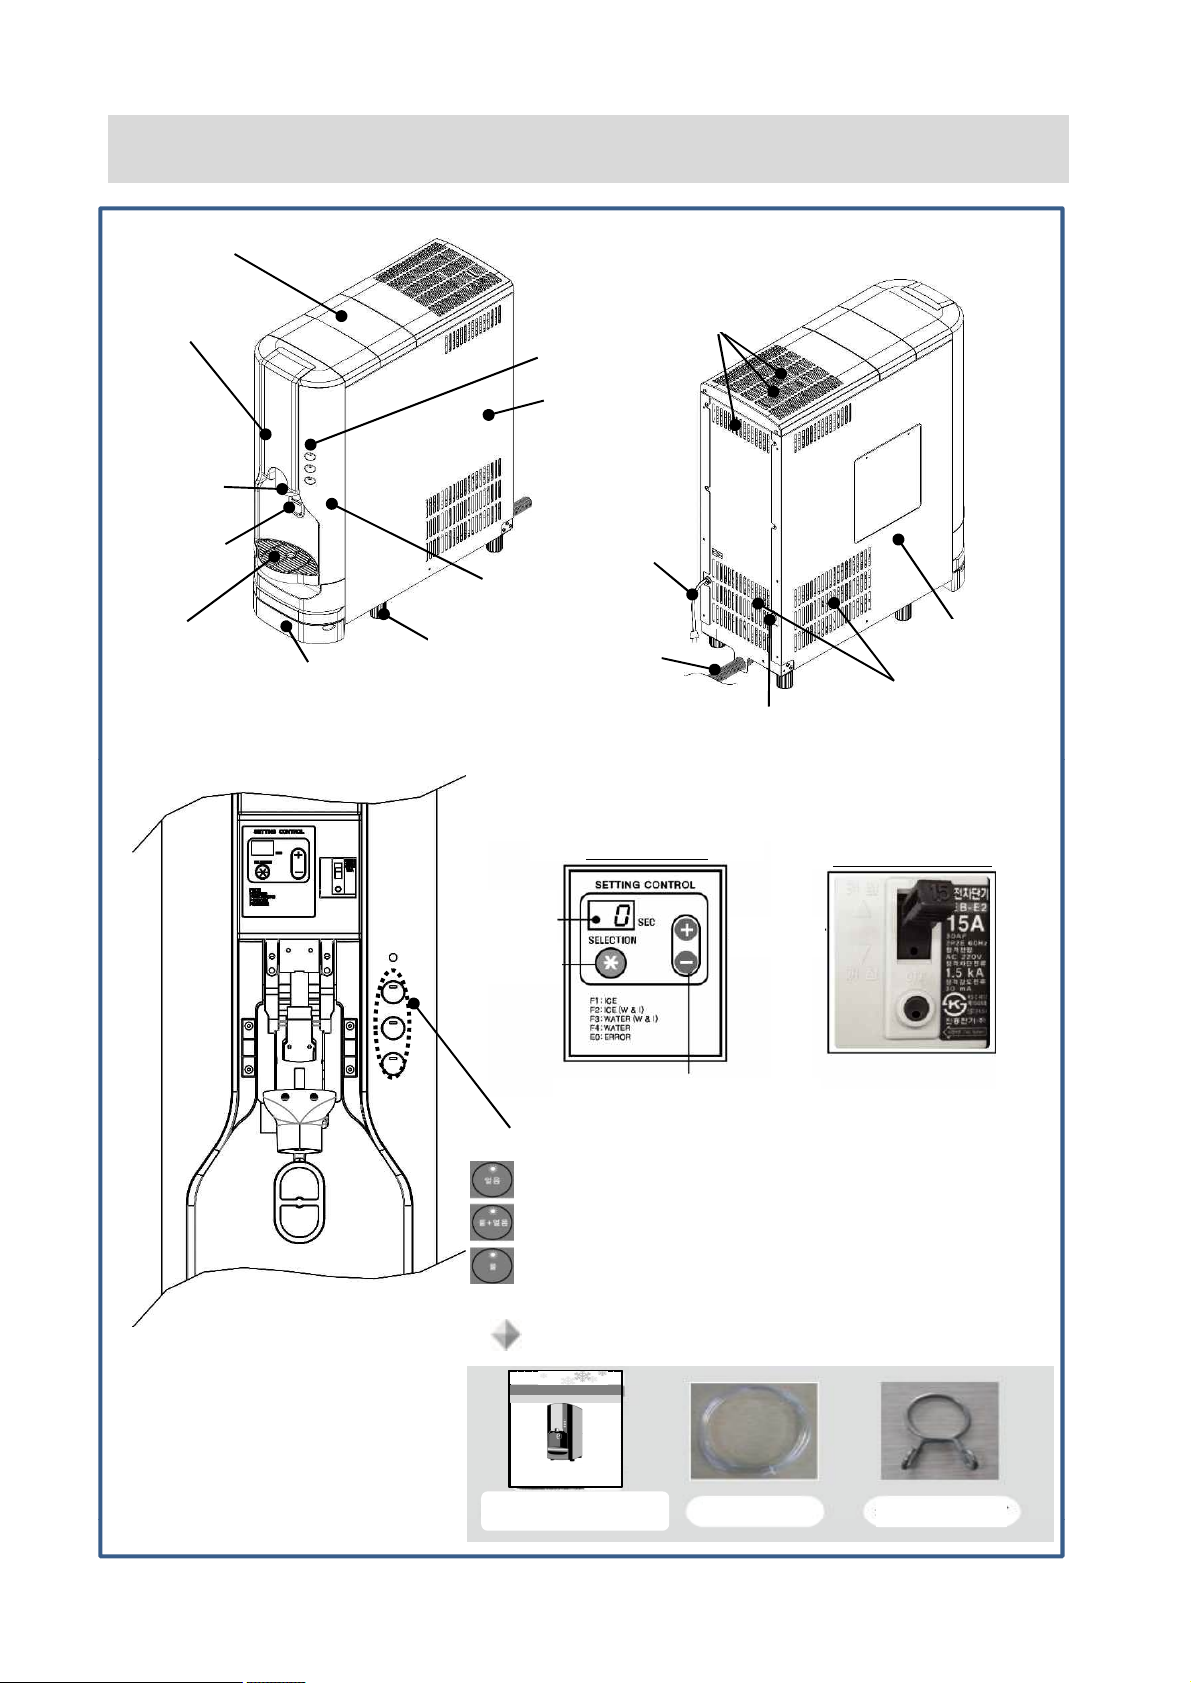
※Setting at the front setting panel in front panel :Refer to P7 『Name of parts』, 『Setting panel』
2-3 투출 종류 및 투출 시간 변경방법
How to set, change and check the function code:
Function code listing and content display
2-3. How to set and check the function code [Setting functions]
F0 F6
F1 F7
F2 F8
F3 F9
F4 Fb
F5
Geared Motor Accumulated use time
Ice outputting time (ice button)
Evaporator outlet temperature (℃)
Inner temperature of the product (℃)
Dispensing Standard type
Condenser temperature (℃)
Water outputting time (ice+water button)
Accumulated time of power-up
Water outputting time (iwater button)
Mode of automatic drainage
Ice outputting time (ice+water button)
Function to select
Select button
Press “SELECTION” button until the F0 appears.
F0 F6
F1 F7
F2 F8
F3 F9
F4 Fb
F5
Geared Motor Accumulated use time
Ice outputting time (ice button)
Evaporator outlet temperature (℃)
Inner temperature of the product (℃)
Dispensing Standard type
Condenser temperature (℃)
Water outputting time (ice+water button)
Accumulated time of power-up
Water outputting time (iwater button)
Mode of automatic drainage
Ice outputting time (ice+water button)
Press “SELECTION” button for 3 seconds to complete
the setting.
F1
Function for changing
the outputting time
(second ) of ice
*Default:1.0
(Factory default)
*Range of outputting
time: 0.1~9.9 seconds
Press “SELECTION” button until the F0 appears.
Press '+,- button to select F1.
Function to select
Select button
F0
Dispensing setting basic
type:select mainly use
function
00: Ice
01: Ice+Water
02: Water
Press “SELECTION” button until the F0 appears.
Press '+,- button and select F0.
Press “SELECTION” button for 1 second, the number
will be displayed.
Press “SELECTION” button for 1 second, the number
1.0 will be displayed.
Press '+,- button and select desired outputting type. (By
each press of the button, the number will be displayed
sequentially.)
Press “SELECTION” button for 3 seconds to complete
the setting.
Press '+,- button to select desired outputting type. (By
pressing the button 00,01,02 will be displayed
sequentially)
10
F0 F6
F1 F7
F2 F8
F3 F9
F4 Fb
F5
Geared Motor Accumulated use time
Ice outputting time (ice button)
Evaporator outlet temperature (℃)
Inner temperature of the product (℃)
Dispensing Standard type
Condenser temperature (℃)
Water outputting time (ice+water button)
Accumulated time of power-up
Water outputting time (iwater button)
Mode of automatic drainage
Ice outputting time (ice+water button)
Press “SELECTION” button for 3 seconds to complete
the setting.
F1
Function for changing
the outputting time
(second ) of ice
*Default:1.0
(Factory default)
*Range of outputting
time: 0.1~9.9 seconds
Press “SELECTION” button until the F0 appears.
Press '+,- button to select F1.
Function to select
Select button
F0
Dispensing setting basic
type:select mainly use
function
00: Ice
01: Ice+Water
02: Water
Press “SELECTION” button until the F0 appears.
Press '+,- button and select F0.
Press “SELECTION” button for 1 second, the number
will be displayed.
Press “SELECTION” button for 1 second, the number
1.0 will be displayed.
Press '+,- button and select desired outputting type. (By
each press of the button, the number will be displayed
sequentially.)
Press “SELECTION” button for 3 seconds to complete
the setting.
Press '+,- button to select desired outputting type. (By
pressing the button 00,01,02 will be displayed
sequentially)

2-3 투출 종류 및 투출 시간 변경방법2-3 투출 종류 및 투출 시간 변경방법
2-3. How to set and check the function code [Setting function]
Press '+,- button and select desired outputting type. (By
each press of the button, the number will be displayed
sequentially.)
Press “SELECTION” button for 3 seconds to complete
the setting.
Press “SELECTION” button until the F0 appears.
Function to select
Select button
F2
Function for changing
the outputting time
(second) of ice+water
*Default:1.0
(Factory default)
*Range of outputting
time: 0.1~9.9 seconds
Press “SELECTION” button until the F0 appears.
Press '+,- button to select F2.
Press “SELECTION” button for 1 second, the number
1.0 will be displayed.
Press “SELECTION” button for 3 seconds to complete
the setting.
Press '+,- button and select desired outputting type. (By
each press of the button, the number will be displayed
sequentially.)
Press “SELECTION” button for 3 seconds to complete
the setting.
F4
Function for changing
outputting time (second)
of water
*Default:1.0
(Factory default)
*Range of outputting
time: 0.1~9.9 seconds
Press “SELECTION” button until the F0 appears.
Press '+,- button to select F4.
Press “SELECTION” button for 1 second, the number
1.0 will be displayed.
Press '+,- button and select desired outputting type. (By
each press of the button, the number will be displayed
sequentially.)
F3
Function for changing
the outputting time
(second) of ice+water
*Default:1.0
(Factory default)
*Range of outputting
time: 0.1~9.9 seconds
Press “SELECTION” button until the F0 appears.
Press '+,- button to select F3.
Function to select
Select button
F2
Function for changing
the outputting time
(second) of ice+water
*Default:1.0
(Factory default)
*Range of outputting
time: 0.1~9.9 seconds
Press “SELECTION” button until the F0 appears.
Press '+,- button to select F2.
Press “SELECTION” button for 1 second, the number
1.0 will be displayed.
Press “SELECTION” button for 1 second, the number
1.0 will be displayed.
Press '+,- button and select desired outputting type. (By
each press of the button, the number will be displayed
sequentially.)
Press “SELECTION” button for 3 seconds to complete
the setting.
11
Press “SELECTION” button for 3 seconds to complete
the setting.
Press '+,- button and select desired outputting type. (By
each press of the button, the number will be displayed
sequentially.)
Press “SELECTION” button for 3 seconds to complete
the setting.
F4
Function for changing
outputting time (second)
of water
*Default:1.0
(Factory default)
*Range of outputting
time: 0.1~9.9 seconds
Press “SELECTION” button until the F0 appears.
Press '+,- button to select F4.
Press “SELECTION” button for 1 second, the number
1.0 will be displayed.
Press '+,- button and select desired outputting type. (By
each press of the button, the number will be displayed
sequentially.)
F3
Function for changing
the outputting time
(second) of ice+water
*Default:1.0
(Factory default)
*Range of outputting
time: 0.1~9.9 seconds
Press “SELECTION” button until the F0 appears.
Press '+,- button to select F3.
Function to select
Select button
F2
Function for changing
the outputting time
(second) of ice+water
*Default:1.0
(Factory default)
*Range of outputting
time: 0.1~9.9 seconds
Press “SELECTION” button until the F0 appears.
Press '+,- button to select F2.
Press “SELECTION” button for 1 second, the number
1.0 will be displayed.
Press “SELECTION” button for 1 second, the number
1.0 will be displayed.
Press '+,- button and select desired outputting type. (By
each press of the button, the number will be displayed
sequentially.)
Press “SELECTION” button for 3 seconds to complete
the setting.

2-3. How to set and check the function code [Safety check]
Condenser
Press “SELECTION” button until the F0 appears.
Press '+,- button to select F6.
Press “SELECTION” button for 1 second, the number
1.0 will be displayed.
Press “SELECTION” for 1 second, inner temperature
of the product will be displayed.
Press “SELECTION” button for 3 seconds to complete
the checking.
Function to select
Select button
F5
Function for displaying
inner temperature of
the product (℃):
*Normal use condition
is:
5℃~50℃
Press “SELECTION” button until the F0 appears.
Press '+,- button to select F5.
Press “SELECTION” button for 1 second, temperature
of Evaporator will be displayed.
Press “SELECTION” button for 3 seconds to complete
the checking.
Press “SELECTION” button for 3 seconds to complete
the checking.
F7
Function for displaying
outlet temperature of
Evaporator (℃) :
*Normal use condition
is:
below-18℃
Press “SELECTION” button until the F0 appears.
Press '+,- button to select F7.
Press “SELECTION” button for 1 second, the number
1.0 will be displayed.
F6
Condenser
Function for displaying
temperature (℃):
*Normal use condition
is:
below 65℃
Press “SELECTION” button until the F0 appears.
Press '+,- button to select F6.
Press “SELECTION” button for 1 second, the number
1.0 will be displayed.
Press “SELECTION” button for 1 second, temperature
of Condenser will be displayed.
Press “SELECTION” button for 1 second, the number
1.0 will be displayed.
Press “SELECTION” for 1 second, inner temperature
of the product will be displayed.
Press “SELECTION” button for 3 seconds to complete
the checking.
Function to select
Select button
F5
Function for displaying
inner temperature of
the product (℃):
*Normal use condition
is:
5℃~50℃
Press “SELECTION” button until the F0 appears.
Press '+,- button to select F5.
12
Press “SELECTION” button for 1 second, temperature
of Evaporator will be displayed.
Press “SELECTION” button for 3 seconds to complete
the checking.
Press “SELECTION” button for 3 seconds to complete
the checking.
F7
Function for displaying
outlet temperature of
Evaporator (℃) :
*Normal use condition
is:
below-18℃
Press “SELECTION” button until the F0 appears.
Press '+,- button to select F7.
Press “SELECTION” button for 1 second, the number
1.0 will be displayed.
F6
Condenser
Function for displaying
temperature (℃):
*Normal use condition
is:
below 65℃
Press “SELECTION” button until the F0 appears.
Press '+,- button to select F6.
Press “SELECTION” button for 1 second, the number
1.0 will be displayed.
Press “SELECTION” button for 1 second, temperature
of Condenser will be displayed.
Press “SELECTION” button for 1 second, the number
1.0 will be displayed.
Press “SELECTION” for 1 second, inner temperature
of the product will be displayed.
Press “SELECTION” button for 3 seconds to complete
the checking.
Function to select
Select button
F5
Function for displaying
inner temperature of
the product (℃):
*Normal use condition
is:
5℃~50℃
Press “SELECTION” button until the F0 appears.
Press '+,- button to select F5.

2-3 투출 종류 및 투출 시간 변경방법2-3 투출 종류 및 투출 시간 변경방법2-3 투출 종류 및 투출 시간 변경방법
2-3. How to set and check the function code [Safety check and Sanitary control ]
F9
F8
Function for checking
accumulated use time
(hr) of Geared Motor:
*Checking Total ice-
making time
Press “SELECTION” button until the F0 appears.
Press '+,- button to select F8.
Press “SELECTION” button for 1 second, time will be
displayed.
Press “SELECTION” button for 3 seconds to complete
the checking.
Function for checking
accumulated time of
power-up(hr):
*Checking total time of
Press “SELECTION” button until the F0 appears.
Press '+,- button to select F9.
Press “SELECTION” button for 1 second, time will be
displayed.
Function to select
Select button
Press '+,- button to set ON/OFF of automatic drainage.
Press “SELECTION” button for 3 seconds to complete
the checking.
Function to select
Select button
Fb
Function for automatic
drainage mode:
Setting of automatic
drainage ON/OFF
(Sanitary control)
*Default: ON
00: Automatic drainage
ON
01: Automatic drainage
OFF
Press “SELECTION” button until the F0 appears.
Press '+,- button to select Fb.
Press “SELECTION” button for 1 second, the number
will be displayed.
F9
* Chart for displaying accumulated use time 「F8 and F9」
F8
Function for checking
accumulated use time
(hr) of Geared Motor:
*Checking Total ice-
making time
Press “SELECTION” button until the F0 appears.
Press '+,- button to select F8.
Press “SELECTION” button for 1 second, time will be
displayed.
Press “SELECTION” button for 3 seconds to complete
the checking.
Function for checking
accumulated time of
power-up(hr):
*Checking total time of
use.
Press “SELECTION” button until the F0 appears.
Press '+,- button to select F9.
Press “SELECTION” button for 1 second, time will be
displayed.
Press “SELECTION” button for 3 seconds to complete
the checking.
Function to select
Select button
D i s pl a y Hour(hr) D i s pl a y Hour(hr) D i s pl a y Hour(hr) D i s pl a y Hour(hr)
0 0 - 0 0. 10,000 0.0 20,000 0.0. 30,000
0 1 100 0 1. 10,100 0.1 20,100 0.1. 30,100
1 0 1,000 1 0. 11,000 1.0 21,000 1.0. 31,000
9 9 9,900 9 9. 19,900 9.9 29,900 9.9. 39,900
13
Press '+,- button to set ON/OFF of automatic drainage.
Press “SELECTION” button for 3 seconds to complete
the checking.
Function to select
Select button
Fb
Function for automatic
drainage mode:
Setting of automatic
drainage ON/OFF
(Sanitary control)
*Default: ON
00: Automatic drainage
ON
01: Automatic drainage
OFF
Press “SELECTION” button until the F0 appears.
Press '+,- button to select Fb.
Press “SELECTION” button for 1 second, the number
will be displayed.
F9
* Chart for displaying accumulated use time 「F8 and F9」
F8
Function for checking
accumulated use time
(hr) of Geared Motor:
*Checking Total ice-
making time
Press “SELECTION” button until the F0 appears.
Press '+,- button to select F8.
Press “SELECTION” button for 1 second, time will be
displayed.
Press “SELECTION” button for 3 seconds to complete
the checking.
Function for checking
accumulated time of
power-up(hr):
*Checking total time of
use.
Press “SELECTION” button until the F0 appears.
Press '+,- button to select F9.
Press “SELECTION” button for 1 second, time will be
displayed.
Press “SELECTION” button for 3 seconds to complete
the checking.
Function to select
Select button
D i s pl a y Hour(hr) D i s pl a y Hour(hr) D i s pl a y Hour(hr) D i s pl a y Hour(hr)
0 0 - 0 0. 10,000 0.0 20,000 0.0. 30,000
0 1 100 0 1. 10,100 0.1 20,100 0.1. 30,100
1 0 1,000 1 0. 11,000 1.0 21,000 1.0. 31,000
9 9 9,900 9 9. 19,900 9.9 29,900 9.9. 39,900

3-1. How to wash and clean the product
Warning
Caution
lBefore performing the cleaning operation, be sure to unplug the power plug from the electrical outlet.
- It may cause fire and electric shock.
lWhen washing, do not sprinkle water directly onto the product.
- It may cause fire and electric shock by short-circuit.
lBe sure to clean the product regularly, and maintain a good sanitary condition.
- Do not fail to clean regularly, otherwise it may cause adverse effect on health by water scale, mold and various
bacteria. Especially, be sure to maintain a good sanitary condition to prevent water scale, contaminated various
bacteria from getting into the cup with water.
lWash your hands before cleaning, and use clean cotton cloth for cleaning.
lNever use abrasive powder, powder detergent, oil hot water (40℃or above), rough wire brush, acids,
thinner, benzene, alkaline detergent, etc. Otherwise, the plastic surface may be damaged.
lBefore using cleaning agent or sterilizing agent, refer to the precaution on the container label of such product.
lResidual cleaning agent or sterilizing agent may cause adverse effect on health or rusty surface. Completely
remove any residuals of such products.
lBe sure to wash the product every day.
lIt is very dangerous to wash inner part of the product. Do not wash the inner part except the specialists.
Things to be prepared
1
2
3
4
5
uContainer designed to receive ice.
uCleaning liquid: Dilute any commercially available neutral detergent with water at the ratio of 1:500
(add 1ℓ of water to about 2.0㎖of cleaning liquid)
uSterilizing agent: Rubbing alcohol in spray container (concentration 50~80%)
uSterilizing agent: sodium hypochlorite solution (concentration of 6%) diluted with water at the ratio of 1:300
(water:1ℓ; solution about 3.3㎖)
uBrush: Brush with stiff hair is preferred
uWater at the room temperature or warm water with temperature of 40℃or below.
uClean cotton cloth
①Open the front panel
②Take out the drip tray (cup tray). ③Disassemble the drip tray and wash.
④Disassemble the drip tray with the
(+) the screw driver wash thoroughly.
(Be careful not to loose the hose. )
⑤Wash assembled part of
outlet and drip tray
with clean cotton cloth.
14
(Be careful not to loose the hose. )
※Cleaning has to be done once a month.

Frequency of cleaning
3-1. How to wash and clean the product
Cleaning part Method of cleaning
Cleaning frequency
Spray with the anti-bacterial liquid, then brush
with the brush cleanly.
Everyday
Clean with the brush and water.
Everyday
Insulated sponge
Ice shooter
Tray
Drip tray
Silicon rubber
Cleaning part Method of cleaning
Cleaning frequency
Outside appearance of the ice-maker Wipe with the clean cloth 1 week
Spray with the anti-bacterial liquid, then brush
with the brush cleanly.
Everyday
Clean with the brush and water.
Everyday
Clean around the tray with clean cloth
Everyday
Power plug
Pull the power plug out of the power outlet,
then remove the dust. (Check the unusual
heating and burn. )
1 month
Insulated sponge
Ice shooter
Tray
Drip tray
Silicon rubber
15
Cleaning part Method of cleaning
Cleaning frequency
Outside appearance of the ice-maker Wipe with the clean cloth 1 week
Spray with the anti-bacterial liquid, then brush
with the brush cleanly.
Everyday
Clean with the brush and water.
Everyday
Clean around the tray with clean cloth
Everyday
Power plug
Pull the power plug out of the power outlet,
then remove the dust. (Check the unusual
heating and burn. )
1 month
Insulated sponge
Ice shooter
Tray
Drip tray
Silicon rubber

When not using the product over a long period of time.
When not using and keep the product with the power OFF.
*Be sure to keep the product where no water, no wind, no direct light and no dust.
*It should be within a week.
*Take out 3 cups of ice once a day regularly.
1. Tighten the water supply valve to the product.
2. Open the front panel in order to take out all the
remaining ice in the ice stocker and place a bigger
container under the ice outputting outlet.
3-2. Maintenance for during the time of inactive
16
3. Press outputting lever in order to discharge all the
remaining ice in the ice stocker.
4. Turn the switch [OFF] to [ON] while close the water
stop valve to discharge water from inner part reserver
tank of the product. Water will be discharged from inner
part.
Turn off the power switch 30 seconds later.
5. Turn the power switch off and then pull out the
power plug from the power outlet.
2. Open the front panel in order to take out all the
remaining ice in the ice stocker and place a bigger
container under the ice outputting outlet.
16

* Never disassemble, repair, and remodel the product without instruction.
* Contact the service center if there is an abnormality of the product.
Is ice sticking together?
Symptom
Identification
Action-taking
Power lamp is off. 3 selection buttons
Open the front panel and check the digits
Refer to the table below for Information function.
are blinking at the same time.
of the setting monitor.
※ If it continues, contact the service center.
The product fails to make ice.
① Is ice being produced now?
① Wait for a while to start outputting.
② Is ice clogged in the output?
② Remove the ice in the output.
③ Is ice remained in the stocker due to the no use
③ Turn off the power and wait until the ice melted
of the product for a long time?
Water flows at the bottom of the product.
① Is drip tray out of place?
① Set the drip tray in the proper place.
② Is there a clogging in drain hose?
② Remove clogged part in the hose.
The product fails to make ice.
① Is the valve of water supply pipe closed?
① Open the valve of water supply pipe.
② Is water supply cut off?
② Use the product after water supply started.
③ Is separately installed water purifying filter clogged?
③ Change the water purifying filter.
completely.
② Is the switch ON?
Error indication
Errors
Measures
Can not turn the power on.
① Is the power plug disconnected from an
① Insert the power plug to an electrical outlet.
electrical outlet?
② Turn the power switch lever ON.
E1
Failure of water supply
① Check the connection of water supply pipe, water stop valve,
and suspension of water supply.
3-3. Before requesting repair: Trouble shooting
Check the following items before requesting repair.
Information function for safe use
(ambient: temperature within 10-35℃)
supply. (within0.1-0.3MPa)
③ Check if the inner part of strainer is clogged, and change the filter.
④ Contact the service center if it happens repeatedly.
* After processing, the situation will be reset when starting the product.
E2
Failure of water drainage
① Re-start the power switch.
② Contact the service center if it happens repeatedly.
E1
Failure of water supply
① Check the connection of water supply pipe, water stop valve,
and suspension of water supply.
② Check if water pressure of water supply pipe is low, and lack of water
E3
Temperature of Inner part of the product below
5℃
When the room temperature is above 5℃, the product will recover
automatically.
Improve the surrounding environment of the product.
(ambient: temperature within 10-35℃)
E4
Temperature of inner part of the product over
50℃
When the room temperature is below 50℃, the product will recover
automatically.
Improve the surrounding environment of the product.
the power switch to restart.
E6
Over Cooling Condenser (Evaporator)
① Turn OFF the power switch, and wait for 30 minutes. Then turn ON
the power switch to restart.
② Contact the service center if it happens repeatedly.
E5
Over heating Condenser (Condenser)
① Be sure to place the product away from the heating-source.
② Check the inlet/outlet is not covered by the product or others.
③ Turn OFF the power switch, and wait for 30 minutes. Then turn ON
E9
Information function
Contact the service center or the seller for the periodical inspection.
E7
Abnormality of Geared Motor
① Turn OFF the power switch, and wait for 30 minutes. Then turn ON
the power switch to restart.
(Ice-making motor)
② Contact the service center if it happens repeatedly.
E8
Failure of ice-making function
① Turn OFF the power switch, and wait for 30 minutes. Then turn ON
the power switch to restart.
② Contact the service center if it happens repeatedly.
E9
Information function
Contact the service center or the seller for the periodical inspection.
E8
Failure of ice-making function
② Contact the service center if it happens repeatedly.
EF
Abnormality of FAN MOTOR
Contact the service center.
■ It is a full-ice detection error, when all the setting of the monitors are correct but, unable to make ice with no sign of error.
17

■ Check the contents of P17 and compare with the condition of the product.
■ Go through the measures of P17, but it still has problems, abnormal sound, smell, or smoke,
pull the power plug out of the power outlet immediately, then contact the service center.
Let the service center know the error indication in the setting panel as well.
Repair within a warranty period
Set the warranty period and repair the product for free within that period.
However, a repair fee of damage after installation due to out of our responsibility will be charged.
Contact the service center or the seller for repair.
Repair after warranty period
Warning
Be sure to request repair to an authorized repairer.
It may cause fire, electric shock and injury with imperfect repair.
3-3. Before requesting repair
Repair after warranty period
Contact the service center or the seller for repair.
Upon customer's request, we will repair with charges, if the product still functions and maintain its condition
by repair.
Others
Contact the seller for after service
When requesting repair
Check the contents of P17 and compare with the condition of the product.
It still has problems, pull the power plug out of the power outlet the contact the seller or an authorized repairer.
< Let us know the followings>
① Condition of malfunction
(Let us know specifically.)
② Model (Written right side of the product)
③ Serial number (Written right side of the product)
④ Customer's name, address, phone number
⑤ Preferred date of visit
18

Cutter and mechanical seal need to change within 3 years or total use time of 5000 hours.
Ice stocker and agitator need to change within 5 years.
3-4. Periodic change of parts
Agitator
Ice stocker
※ About periodic change of parts
Be sure to change Cutter, Mechanical seal periodically.
Timing of change above parts depends on the quality of water, installed environment, and
operation factor. Periodic inspection and maintenance are recommended.
It may cause serious accident and breakdown of major parts if using the product with
"Warning lamp" blinking. Be sure to change the parts immediately when it is necessary.
Ice stocker
Cutter
Mechanical seal
19

3-5. Outside dimension
20
Table of contents
Popular Ice Maker manuals by other brands

Hoshizaki
Hoshizaki IM-21CLE instruction manual

Hoshizaki
Hoshizaki DCM-240BAF Service manual

Manitowoc
Manitowoc B150 Owner / operator use and care guide

Sears
Sears Kenmore Ice Maker Use & care guide

Wessamat
Wessamat Micro Cube M 400 operating instructions

SIGURO
SIGURO SGR-IM210-B12SS Translation of the operating instructions