Korg KAOSS PAD User manual

2012 KORG INC.
4015-2 Yanokuchi, Inagi-city, Tokyo 206-0812 Japan
IMPORTANT NOTICE TO CONSUMERS
This product has been manufactured according to strict specifications and voltage
requirements that are applicable in the country in which it is intended that this product should
be used. If you have purchased this product via the internet, through mail order, and/or via
a telephone sale, you must verify that this product is intended to be used in the country in
which you reside.
WARNING: Use of this product in any country other than that for which it is intended could
be dangerous and could invalidate the manufacturer’s or distributor’s warranty.
Please also retain your receipt as proof of purchase otherwise your product may be
disqualified from the manufacturer’s or distributor’s warranty.
REMARQUE IMPORTANTE POUR LES CLIENTS
Ce produit a été fabriqué suivant des spécifications sévères et des besoins en tension
applicables dans le pays où ce produit doit être utilisé. Si vous avez acheté ce produit via
l’internet, par vente par correspondance ou/et vente par téléphone, vous devez vérifier que
ce produit est bien utilisable dans le pays où vous résidez.
ATTENTION: L’utilisation de ce produit dans un pays autre que celui pour lequel il a été
conçu peut être dangereuse et annulera la garantie du fabricant ou du distributeur.
Conservez bien votre récépissé qui est la preuve de votre achat, faute de quoi votre produit
ne risque de ne plus être couvert par la garantie du fabricant ou du distributeur.
WICHTIGER HINWEIS FÜR KUNDEN
Dieses Produkt wurde unter strenger Beachtung von Spezifikationen und
Spannungsanforderungen hergestellt, die im Bestimmungsland gelten. Wenn Sie dieses
Produkt über das Internet, per Postversand und/oder mit telefonischer Bestellung gekauft
haben, müssen Sie bestätigen, dass dieses Produkt für Ihr Wohngebiet ausgelegt ist.
WARNUNG: Verwendung dieses Produkts in einem anderen Land als dem, für das es
bestimmt ist, verwendet wird, kann gefährlich sein und die Garantie des Herstellers oder
Importeurs hinfällig lassen werden. Bitte bewahren Sie diese Quittung als Kaufbeleg auf, da
andernfalls das Produkt von der Garantie des Herstellers oder Importeurs ausgeschlossen
werden kann.
NOTA IMPORTANTE PARA EL CONSUMIDOR
Este producto ha sido fabricado de acuerdo a estrictas especificaciones y requerimientos de
voltaje aplicables en el país para el cual está destinado. Si ha comprado este producto por
internet, a través de correo, y/o venta telefónica, debe usted verificar que el uso de este
producto está destinado al país en el cual reside.
AVISO: El uso de este producto en un país distinto al cual está destinado podría resultar
peligroso y podría invalidar la garantía del fabricante o distribuidor. Por favor guarde su
recibo como prueba de compra ya que de otro modo el producto puede verse privado de la
garantía del fabricante o distribuidor.

2

3
Precautions
Location
Using the unit in the following locations can result in
a malfunction.
• In direct sunlight
• Locations of extreme temperature or humidity
• Excessively dusty or dirty locations
• Locations of excessive vibration
• Close to magnetic elds
Power supply
Please connect the designated AC adapter to an AC
outlet of the correct voltage. Do not connect it to an
AC outlet of voltage other than that for which your
unit is intended.
Interference with other electrical devices
Radios and televisions placed nearby may experi-
ence reception interference. Operate this unit at a
suitable distance from radios and televisions.
Handling
To avoid breakage, do not apply excessive force to
the switches or controls.
Care
If the exterior becomes dirty, wipe it with a clean, dry
cloth. Do not use liquid cleaners such as benzene
or thinner, or cleaning compounds or ammable pol-
ishes.
Keep this manual
After reading this manual, please keep it for later
reference.
Keeping foreign matter out of your equip-
ment
Never set any container with liquid in it near this
equipment. If liquid gets into the equipment, it could
cause a breakdown, re, or electrical shock.
Be careful not to let metal objects get into the equip-
ment. If something does slip into the equipment, un-
plug the AC adapter from the wall outlet. Then con-
tact your nearest Korg dealer or the store where the
equipment was purchased.
DECLARATION OF CONFORMITY (for USA)
Responsible Party : KORG USA INC.
Address :
316 SOUTH SERVICE ROAD, MELVILLE, NY
Telephone : 1-631-390-6500
Equipment Type :
DYNAMIC EFFECT/SAMPLER
Model : KP3+
This device complies with Part 15 of FCC Rules. Operation is sub-
ject to the following two conditions:
(1) This device may not cause harmful interference,and (2) this de-
vice must accept any interference received, including interference
that may cause undesired operation.
THE FCC REGULATION WARNING (for USA)
NOTE: This equipment has been tested and found
to comply with the limits for a Class B digital de-
vice, pursuant to Part 15 of the FCC Rules. These
limits are designed to provide reasonable protec-
tion against harmful interference in a residential
installation. This equipment generates, uses, and
can radiate radio frequency energy and, if not in-
stalled and used in accordance with the instruc-
tions, may cause harmful interference to radio
communications. However, there is no guarantee
that interference will not occur in a particular instal-
lation. If this equipment does cause harmful inter-
ference to radio or television reception, which can
be determined by turning the equipment off and on,
the user is encouraged to try to correct the interfer-
ence by one or more of the following measures:
• Reorient or relocate the receiving antenna.
• Increase the separation between the equip-
ment and receiver.
• Connect the equipment into an outlet on a cir-
cuit different from that to which the receiver is
connected.
• Consult the dealer or an experienced radio/TV
technician for help.
If items such as cables are included with this
equipment, you must use those included items.
Unauthorized changes or modication to this sys-
tem can void the user’s authority to operate this
equipment.
Notice regarding disposal (EU only)
When this “crossed-out wheeled bin” sym-
bol is displayed on the product, owner’s
manual, battery, or battery package, it sig-
nies that when you wish to dispose of this
product, manual, package or battery you
must do so in an approved manner. Do not
discard this product, manual, package or
battery along with ordinary household waste. Dis-
posing in the correct manner will prevent harm to
human health and potential damage to the environ-
ment. Since the correct method of disposal will
depend on the applicable laws and regulations in
your locality, please contact your local administra-
tive body for details. If the battery contains heavy
metals in excess of the regulated amount, a chem-
ical symbol is displayed below the “crossed-out
wheeled bin” symbol on the battery or battery
package.
* All product names and company names are the
trademarks or registered trademarks of their respec-
tive owners.

4
Table of Contents
Main features .......................................... 5
Connections ............................................ 6
DJ mixer connections ............................. 7
Using the power switch ........................... 8
Selecting the audio input ........................ 8
Adjusting the volume .............................. 8
Selecting a program ............................... 8
Using the touch pad ................................ 9
Mute function .......................................... 9
FX RELEASE .......................................... 9
Pad Motion ............................................ 10
Specifying the BPM .............................. 10
Storing settings to a PROGRAM MEMO-
RY ......................................................... 12
Sampling ............................................... 12
Procedure for Function settings ........... 15
About each function .............................. 15
Inserting or removing SD cards ............ 17
Checking the total capacity of the card 17
Checking the remaining capacity of the
card ....................................................... 17
Formatting the SD card ........................ 17
Saving to SD card ................................. 18
Loading from an SD card ...................... 18
Accessing the SD card from your com-
puter ...................................................... 18
MIDI connections .................................. 20
MIDI settings ......................................... 20
Using the KP3+ as a MIDI controller .... 22
Parts of the KP3+ ................................114
PROGRAM LIST..................................119

5
Introduction
Thank you for purchasing the Korg KP3+ KA-
OSS PAD dynamic effect/sampler. To enjoy
YOUR KP3+ to the fullest potential, please
read this manual carefully and use the KP3+
only as directed.
Main features
150 built-in programs for DJ mixes and sound
design
In addition to the effect programs that were so
popular on the KP3, such as a lter that's de-
signed with an analog feel in mind, standard
spatial-type effects such as a highly usable
delay, a grain shifter that lets you freeze an in-
stant of sound, and a decimator, we've added
an enhanced looper as well as new effects.
You can connect a mic to the mic input jack
and generate full-edged vocoder sounds in
real time. An "FX RELEASE" feature has been
provided which lets you control the reverberant
tail of the effect to obtain a more natural decay,
ensuring that these powerful effects will blend
naturally into your song or performance.
Use the touch pad to control eects in real
time
Since you can assign different types of effect
parameters to the X-axis and Y-axis of the
touch pad and control them simultaneously,
you can easily and intuitively perform complex
effect operations such as varying the delay
time and feedback at the same time, or simul-
taneously the lter's cutoff and resonance. By
rubbing, tapping, or stroking the pad with your
ngertip, you can easily apply complex effects.
Sampling capability with sophisticated func-
tionality
It's easy to capture either one-shot or loop
samples into the four sample banks. For loop
sampling, the BPM Detection function will de-
tect the tempo down to the rst decimal place,
and capture up to four measures along with
the BPM data. You can also adjust the start
point, instantly create completely new phras-
es by using the new Slice function to edit the
way that a loop sample is actually played, and
take advantage of the Resampling function to
recapture a sample as it's processed by an ef-
fect.
Use the slider to adjust the volume of the sam-
ple data
A volume slider that adjusts the volume of the
sample data makes usage dramatically more
efcient, and gives you even more expressive
possibilities. The Pad Motion function lets you
capture and play back the movements of your
nger on the pad, and even allows reverse
playback. There's a Hold function that locks
the effect depth at the position of your nger
on the touch pad, and a Mute function that lets
you cut the audio input and leave just the ef-
fect sound of the reverb or delay. From simple
effects to complex transformations that com-
bine multiple effects simultaneously, it's easy
to control the sound the way that you want for
your DJ mixes or sound design work.
SD card slot and USB connector
The SD card slot lets you store sample data
and user data such as the sample save-desti-
nation bank, one-shot/loop playback settings,
and program memories. There's also a USB
connector that lets you back up this data to
your computer, allowing you to manage large
amounts of sample data with ease.
Dedicated software available for download
We've provided dedicated KP3+ Editor soft-
ware that lets you use your computer to edit
sample data, program memories, and other
user settings. The software also includes a
MIDI Assignment Editor function which lets
you use the KP3+ as a powerfully customiz-
able MIDI controller. You can download this
software free of charge from the Korg website
(http://www.korg.com/).
6
Getting ready
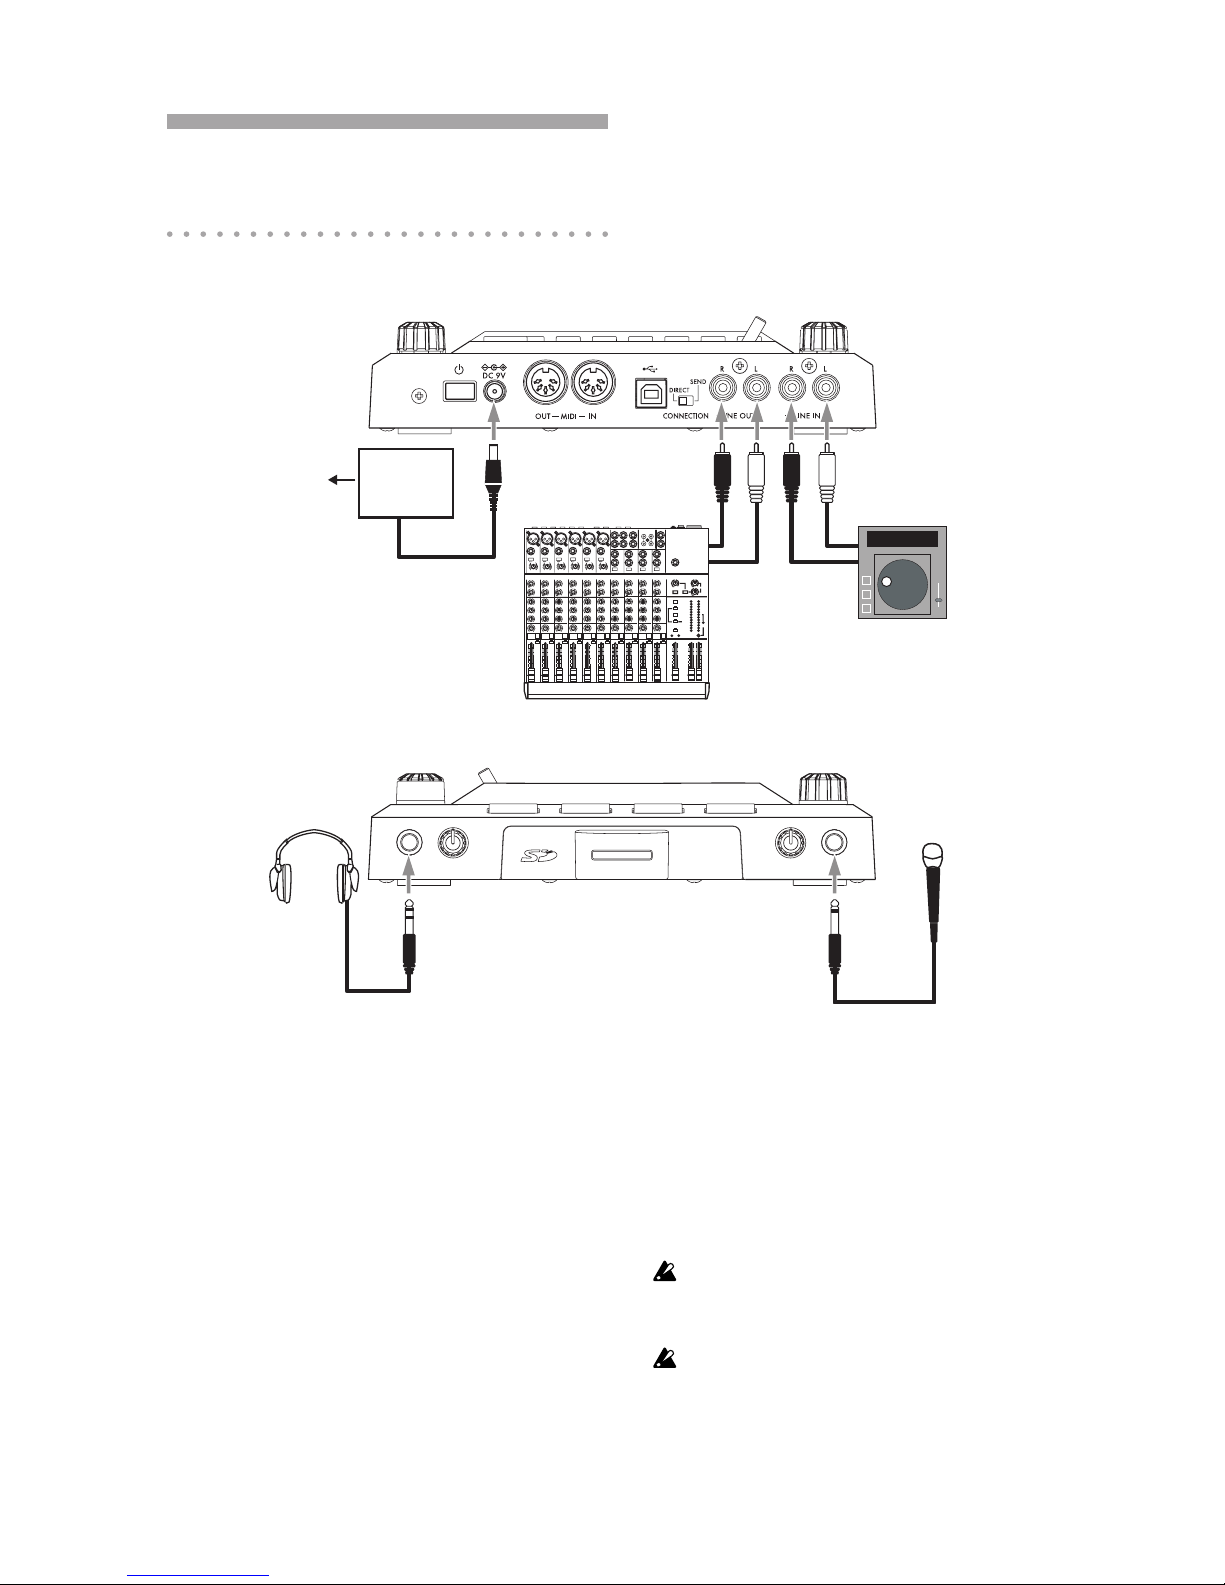
Connections
MIXER, DJ MIXER
AC
CD PLAYER
AC ADAPTER
Connecting your monitor amp or mixer to the
output jacks
Connect the KP3+’s LINE OUT jacks to your
mixer or powered monitors (amplied speak-
ers).
If you’re using headphones, connect them to
the PHONES jack.
TIP: The KP3+’s sound will still be output from the
LINE OUT jacks even if headphones are connected.
Connecting your mic or audio source to the
input jacks
If you’re using a mic, connect it to the MIC
jack.
If you want to connect a sampler or other audio
source device, connect its output jacks to the
KP3+’s LINE IN jacks.
Always connect gear with the power turned off. Care-
less usage can damage your speaker system or cause
other malfunctions.
If you are not using a mic, turn the MIC TRIM knob all
the way down.
7
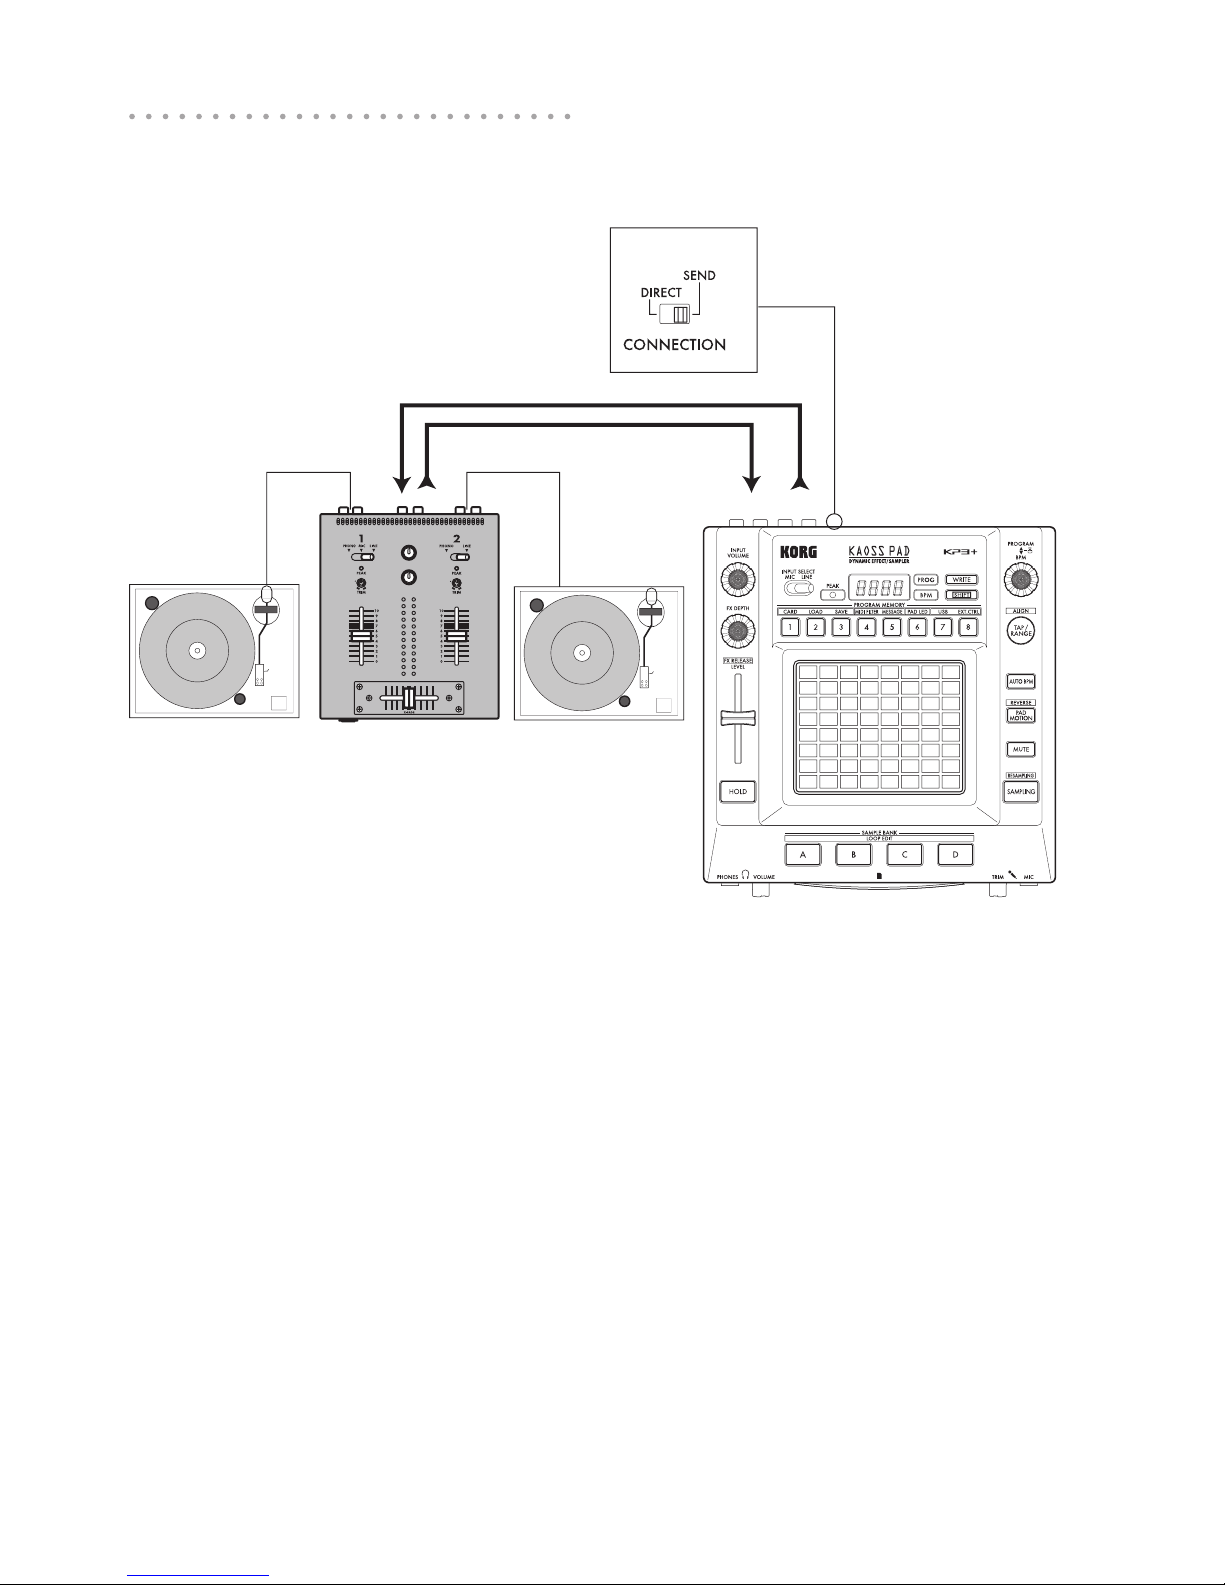
DJ mixer connections
Connecting the KP3+ to AUX send/return jacks
LINE IN
LINE OUT
TURNTABLE TURNTABLEDJ MIXER
SEND
RETURN
TIP When you are using the KP3+ as an external
effects unit, the return level may be lower than ex-
pected. In such cases, adjust the input level on the
KP3+. “Adjusting the volume (p.8)”
You can use the KP3+ as an external effect
unit by connecting it to the Aux send and return
jacks of a mixer. For this type of connection,
set the CONNECTION switch to SEND.
DIRECT: Both the input and effect sounds will
be output from the KP3+. When you are not
touching the touch pad, the input sound will
be output as is. “Controlling the effect depth
(p.9)”
SEND: Only the effect sound (not the input
sound) will be output from the KP3+.
TIP For more information on the send and return
jacks, please refer to the owner’s manual for the de-
vice that you are connecting.

8
Operation
Using the power switch
1. Connect the KP3+ to your other equipment
as shown in the diagrams on the preceding
pages, and connect the AC adapter to an elec-
trical outlet.
Never use any AC adapter other than the one that’s in-
cluded.
2. Press the Power button to turn the KP3+
on. The display will light up.
To turn the KP3+ off, press and hold down the
Power button until the display indicators turn
off.
The settings will not be retained after the power is
turned off.
Auto Power O
The KP3+ features an Auto Power Off func-
tion, which turns the unit off automatically if
the unit is left unused for approximately four
hours.
TIP If any sound is being input, this function will not
kick in.
Disabling the Auto Power O function
Follow the steps below to disable the Auto
Power Off function.
1. Turn the KP3+ on while pressing and hold-
ing down the SHIFT button.
The unit will indicate the current settings on
the display.
2. Rotate the PROGRAM/BPM knob to select
“diS” on the display.
3. Press the WRITE button to store this set-
ting. The unit will automatically restart.
TIP To enable the Auto Power Off function, turn the
KP3+ on while pressing and holding down the SHIFT
button. Rotate the PROGRAM/BPM knob to select
“EnA” on the display, then press the WRITE button.
TIP If you turn the unit off without pressing the WRITE
button in the steps above, the changes to the setting
will not be applied.
TIP The initial factory setting is “EnA” for the Auto
Power Off function.
Selecting the audio input
1. Use the INPUT SELECT switch to choose
which of the KP3+’s input jacks will be used.
MIC: The effect will be applied to the mic input.
LINE: The effect will be applied to the line in-
puts.
Adjusting the volume
1. Use the INPUT VOLUME knob to adjust
the input level. Adjust the Input Volume so that
the PEAK indicator does not light-up red.
If you are using the MIC jack, adjust the MIC
TRIM knob as appropriate for the sensitivity of
the mic, so that the sound is not distorted.
2. If you are listening through headphones,
use the PHONES VOLUME knob to adjust the
headphone volume level.
TIP: The PHONES VOLUME knob does not affect the
volume of the LINE OUT jacks.
Selecting a program
1. If the display is currently showing a pro-
gram number, you can select a program by
turning the PROGRAM/BPM knob.
TIP: If the display is showing the current BPM, press
the PROGRAM/BPM knob to switch to the program
display.
The BPM indicator will blink if you select a pro-
gram that synchronizes to the BPM.

9
2. If you hold down the SHIFT button as you
rotate the PROGRAM/BPM knob, you will ad-
vance to the rst program in each category,
rather than having to scroll through all 150
programs. Once you have selected the correct
category, release the SHIFT button and use
the PROGRAM/BPM knob to select the pro-
gram from within that category.
3. Finally, your eight favorite programs can be
selected by simply pressing one of the PRO-
GRAM MEMORY buttons. (Refer to page 12).
The PROGRAM/BPM knob is a continuous
knob. When you’ve reached the last program
number, you’ll wrap around to the beginning of
the list.
Controlling the eect depth
1. If the CONNECTION switch on the rear
panel is set to DIRECT, use the FX/DEPTH
knob to adjust the depth of the effect. Turning
the knob to the right will increase the effect
depth.
2. If the CONNECTION switch on the rear
panel is set to SEND, you will need to use the
effect send and return levels on your mixer to
control the effect depth.
Using the touch pad
You can control the sound by using your nger
to rub or tap the touch pad.
TIP: Afx the included protective sheet to the touch
pad before using it.
Touch pad care
Never press the touch pad with excessive
force, or place heavy objects on it. It may
crack or break if handled roughly. Press the
touch pad only with your nger, since rub-
bing or pressing the touch pad with a sharp
object will scratch it. To clean the touch pad,
wipe it lightly with a soft dry cloth. Do not
use solvents such as thinner, since this may
cause deformation.
Hold
IIf you press the HOLD button as your nger
is on the touch pad, you can take your nger
away and the effect will continue as if your n-
ger was still on the touch pad and at the same
location as when you pressed the HOLD but-
ton. The pad LEDs will remain lit at that posi-
tion.
TIP: The position of the pad LED that lights-up may
shift depending on how or where you press the touch
pad.
TIP: For some programs, the sound will continue
even after you take your nger off the touch pad.
Mute function
Holding down the MUTE button will momen-
tarily cut the input signal, but the effected sig-
nal will continue to play.
Transformer eect
By rapidly tapping the MUTE button, you can
create rhythmic effects from a continuous au-
dio input, as in the “transformer” technique
used by DJs.
FX RELEASE
What is FX RELEASE?
Making the transition from a very hard-edge
effect back to the original unaffected signal
can often times be very abrupt or sudden. With
FX RELEASE, the moment you take your hand
off the touch pad (i.e., the moment you turn
off the effect), a delay effect synchronized to
the current BPM will be applied, and will then
gradually diminish. This lets you smoothly and
musically transition from an aggressive effect
such as Distortion or the Decimator back to
the “thru” state.
TIP If you've selected an effect program that uses
delay (i.e., a program whose FX RELEASE is OFF
in the EFFECT PROGRAM LIST), the delay sound of
the effect program will remain the moment you take
your hand off the touch pad, and the FX RELEASE
function will not work.
Saving the FX RELEASE setting
You can save a different FX RELEASE setting
for each program.

10
1. To adjust the depth of the FX RELEASE ef-
fect for the program that’s currently selected,
hold down the SHIFT button and use the FX
RELEASE slider.
2. Press the WRITE button.
The WRITE button and PROGRAM MEMORY
button will blink. The SHIFT button will be lit,
and will function as an EXIT button.
3. Press the WRITE button once again.
The program will be written, and the KP3+ will
return to normal operation.
Pad Motion
Pad Motion allows you to record and playback
the motion of your nger on the touch pad.
This allows you to accurately reproduce the
same complicated movements repeatedly. In
addition, the pad LEDs will provide a visual in-
dication of the movement.
You can even save pad motion recording as
part of the Program Memory. (p.12)
Recording a pad motion
Hold down the PAD MOTION button. As soon
as your nger hits the touch pad, the PAD MO-
TION button will begin blinking, indicating that
the pad motion is being recorded. To stop re-
cording, release the PAD MOTION button, and
pad motion playback will begin. Pad motion is
only recorded for a few seconds, so if the Pad
Motion button stops blinking and is lit up red,
pad motion recording has stopped, and pad
motion playback will begin immediately.
To stop the pad motion playback, touch the
PAD MOTION button once again. the button
will go dark (unlit).
TIP When you begin recording, the previously-re-
corded motion will be overwritten.
Playing back a pad motion
Press the PAD MOTION button; the button will
light up, and the pad motion will begin playing
as a loop.
The pad LEDs will show the recorded move-
ment. When you press the PAD MOTION but-
ton once again, the button will go dark and
playback will stop.
Reverse playback
If you hold down the SHIFT button and press
the PAD MOTION (REVERSE) button, the
pad motion will play back in reverse. You can
repeat this operation to alternate between
“reverse playback” › “forward playback” › “re-
verse playback.”
Saving a pad motion
To save the pad motion you've just recorded,
write (or re-write) the current program into Pro-
gram Memory (p.12)
Specifying the BPM
What is BPM?
BPM (Beats Per Minute) is the tempo of the
song expressed as the number of beats (quar-
ter notes) that occur in one minute. A higher
BPM value means a faster tempo.
Viewing the BPM
When you turn on the KP3+, the BPM will be
set to 120.0.
If the display shows the current program,
press the PROGRAM/BPM knob to switch to
the BPM display.
TIP: If the clock is set to external synchronization,
“Ext” will be shown in the display, and you won’t be
able to specify the BPM value.
Manually setting the BPM
1. If the display shows the current program,
press the PROGRAM/BPM knob to switch to
the BPM display.
2. Use the PROGRAM/BPM knob to adjust
the BPM value in steps of 0.1. By turning the
PROGRAM/BPM knob while holding down the
SHIFT button, you can adjust the integer por-
tion of the value in steps of 1.
TIP The Auto BPM is automatically turned off.

11
Using Tap Tempo to set the BPM
If you’re not certain of the BPM value of a
song, you can set the BPM by pressing the
TAP/RANGE button in rhythm with the beat of
the song.
1. Press the TAP/RANGE button three or
more times in rhythm with the beat of the song.
The KP3+ will detect how fast you’re pressing
the button, the corresponding BPM value will
appear in the display, and that BPM value will
be set.
TIP: You can’t use Tap Tempo if the KP3+ is synchro-
nized to MIDI timing clock data that’s received from
an external MIDI device.
Auto BPM detection
The KP3+ can set the BPM value automati-
cally by detecting the beat of the song. If the
song's BPM changes, the KP3's BPM value
will change in sync.
1. Press the AUTO BPM button to turn on
Auto BPM detection.
2. The AUTO BPM button will light up, and the
BPM of the incoming audio source will be de-
tected automatically.
If the KP3+ is unable to detect the BPM
Press the TAP/RANGE button several times in
time with the beat of the song; the KP3+ will
automatically detect the BPM using the beat
you manually tapped as a guideline.
Because of the way that the Auto BPM func-
tion operates, it may erroneously detect a val-
ue that is 1/2 or 2/3 of the correct BPM value,
or small deviations may arise. In such cases,
you can use the TAP/RANGE button to make
compensations. If you press the TAP/RANGE
button while Auto BPM detection is active, the
value you specify by tapping will become the
center value of the BPM range.
TIP It’s not possible to detect the BPM value from
music that does not have a clear sense of beat. The
detectable BPM range is from 80 to 160.
Turning o Auto BPM
Press the AUTO BPM button to make the but-
ton go dark. The Auto BPM function will turn
off, and the current BPM value will be xed.
MIDI Sync function
The BPM of the KP3+ can be set to follow
MIDI Time Clock messages from an external
MIDI device. Connect the MIDI OUT connec-
tor of an external MIDI device (such as a se-
quencer set to transmit MIDI time clock mes-
sages) to the MIDI IN connector of the KP3+.
TIP: This function will not synchronize sequence
data with the KP3+’s rhythm pattern programs. If you
want to synchronize sequenced data and the KP3+’s
internal rhythm patterns, you will either have to insert
a Touch Pad On message into the beginning of each
measure of your sequence data, or touch the touch
pad at the beginning of each of the KP3+ phrases to
start the pattern.
TIP: If you want the KP3+ to receive Timing Clock
and Touch Pad On messages, go to MIDI Setting
(→p.20), and select “Applying the MIDI message lter”
(→p.21) so that these messages will be received.
TIP: You can not use the Tap Tempo or Auto BPM
functions while the KP3+ is receiving Timing Clock
from an external MIDI device.

12
Storing settings to a PROGRAM
MEMORY
The PROGRAM MEMORY buttons allow you
to save and instantly recall your eight favorite
KP3+ programs and settings.
Stored data
- Effect program
- FX DEPTH knob setting
- Pad motion
- The on/off status of the HOLD button and its
position (coordinates)
Storing
1. Set the KP3+ to the condition you want to
store.
2. Press the WRITE button.
The PROGRAM MEMORY button and the
WRITE button will blink.
3. Press the PROGRAM MEMORY button of
the number that you want to use to store the
settings; the settings will be stored, and then
the KP3+ will return to the program display.
Never turn off the power or perform any other opera-
tions while settings are being stored. Doing so may corrupt
the data.
Recalling
1. Press one of the PROGRAM MEMORY
buttons (1–8); the settings stored in that mem-
ory location will be recalled.
Sampling
The KP3+ can record both looped phrases and
one shot samples from an external source.
The KP3+ can also resample; allowing you to
sample external audio sources through the in-
ternal effects, or capture the entire output of
the KP3+ as a new sample.
Loop samples can be up to four measures (16
beats) long, at the current BPM when you be-
gin recording. (for example, at a tempo of 140,
16 beats would be approximately 7 seconds).
If the tempo value is 73 or lower, the maximum
of beats that can be sampled is 8. If the tempo
value is 39 or lower, the maximum of beats
that can be sampled is 4.
For a loop sample you can specify a beat
length of 16, 8, 4, 2, or 1.
When a loop sample is created, it will begin
playing as soon as it is done being recorded
(the corresponding SAMPLE BANK button will
be lit orange.)
Sampling
1. Press the SAMPLING button.
In this sample-ready mode, the SAMPLE
BANK buttons will blink red, and the display
will indicate “[4]” (the default value is 4 beats).
To exit without sampling, press the SHIFT but-
ton.
TIP The Auto BPM is automatically turned off.
2. Use the PROGRAM/BPM knob to specify
the length of sampling (in beats).
The display will switch between [16], [8], [4],
[2], or [1] accordingly.
3. When you are ready to record, press one of
the blinking SAMPLE BANK buttons—A, B, C,
or D. The selected SAMPLE BANK button will
blink red, the display will indicate “REC,” and
sampling will begin.
The PROGRAM MEMORY buttons will con-
secutively blink to indicate the beat you’re re-
cording.
TIP The data that had been in the selected SAMPLE
BANK button will be overwritten.
4. If you want to record a one-shot sample,
press the same SAMPLE BANK button before
reaching the specied BEAT. Sampling will
end, and a one-shot sample will be created.
The SAMPLE BANK button used for recording
will light up red. It will be easier to record a
one-shot sample if you specify a longer setting
such as “16.”
5. If the specied BEAT time elapses before
you press the SAMPLE BANK button, sam-
pling will end, and a loop sample will be cre-
ated. The KP3+ will automatically switch to
playback, and the SAMPLE BANK button will
light up green.
Resampling
By resampling, you can create a sample that
combines multiple existing samples, or create
a new sample from an existing sample that’s

13
been processed by an effect. You can resam-
ple to create both loop and one-shot samples.
Remember that with resampling, the output of
the KP3+ is being recorded, so all of the ef-
fects created using the touch pad will be re-
corded as part of the sample data.
1. Hold down the SHIFT button and press the
SAMPLING button.
2. The SAMPLE BANK buttons will blink or-
ange, and the KP3+ will be in the record-ready
mode.
3. From here, follow the same instructions for
loop and one shot sampling as described in
the previous section.
TIP When you press a SAMPLE BANK button, the
playback of the data assigned to that BANK button
will stop and will be overwritten.
Playing back samples
The SAMPLE BANK buttons will light up or-
ange if they contain a loop sample or in red if
they contain a one-shot sample. Buttons that
contain no sample data will be dark.
When you press a button that contains a loop
sample, loop playback will start. The button
will be lit up in green during playback. Press
the button once again to stop playback.
When you press a button that contains a one-
shot sample, the button will momentarily be
light up in green, and playback of the one-shot
sample will start.
TIP The way that the button illuminates will change
if you change the setting that’s described in "Setting
the Sample Playback Trigger" (page 14).
TIP If a sample effect is selected for the program,
playback will begin when you touch the touch pad
after selecting a SAMPLE BANK button.
Specifying the beginning of the measure
You can manually reset which beat will be con-
sidered the start of the measure. Hold down
the SHIFT button and press the TAP/RANGE
(ALIGN) button; that moment will be specied
as the beginning of a measure. The button will
blink red at the beginning of the beat. (This is
xed for 4/4; red→white→white→white)
Sample playback levels
If you want to adjust the sample playback vol-
ume for all banks, use the LEVEL slider.
Edit sample settings for each bank
Hold down the SHIFT button and press the
SAMPLE BANK button for the bank you want
to set; you'll enter the sample edit page.
In the sample edit page you can edit settings
for level and playback.
Adjusting the level of an individual sample
bank
1. Hold down the SHIFT button and press the
SAMPLE BANK button that contains the sam-
ple that you want to adjust the playback level
for. The Sample Editing Page will appear in the
display. The SAMPLE BANK buttons contain-
ing the sample to be edited will blink and the
pad LED will display a bar graph, indicating the
sample playback level. The LEDs above the
remaining banks will indicate their respective
levels.
2. When you touch the bar graph displayed in
the touch pad, the corresponding sample play-
back level can be adjusted.
3. When your nger touches the touch pad
above another SAMPLE BANK button,
the sample to be edited will change to the se-
lected bank. You can adjust its playback level
accordingly.
4. When you press the SAMPLE BANK but-
ton, the sample playback state will be changed.
When you press another SAMPLE BANK but-
ton, the sample to be edited will change.
5. When you press the SHIFT button, the set-
ting will be entered and the KP3+ will return to
its normal state.

14
Start Point setting
1. The SHIFT button will be lit, and the speci-
ed SAMPLE BANK button will change to
blinking.
The display will show the loop start point set-
ting.
2. Use the PROGRAM/BPM knob to adjust
the start point in steps of 1/32nd of a beat, over
a range of ± 1 beat.
TIP You can't select this setting for one-shot sam-
ples.
Slice setting
Loop samples can be sliced into equal parts.
You can select whether each sliced part will
play or not play. Sliced parts that do not play
are skipped, so the overall length of the loop
will be made shorter. This allows you to cre-
ate a variety of new rhythmic gures and loops
from the same original data. For example by
playing only the rst two beats and last two
beats of a four-measure sample to create a
one-measure loop.
1. The SHIFT button will be lit, and the speci-
ed SAMPLE BANK button will change to
blinking.
2. All eight PROGRAM MEMORY buttons will
light up (by default).
By pressing the corresponding button you can
turn on or off each sample slice.
TIP You can’t select this setting for one-shot sam-
ples.
Setting the Sample Playback Trigger
You can specify how a sample will be triggered
when the SAMPLE BANK button is pressed.
1. Enter the sample edit page.
If the display shows the start point setting,
press the PROGRAM/BPM knob to see the
trigger type specied for the selected sample.
2. Turn the PROGRAM/BPM knob to select
the trigger type.
When you press the SAMPLE BANK button,
the sample playback will start and you can
check the sample.
When you press another SAMPLE BANK but-
ton, the sample to be edited will be changed.
3. When you press the SHIFT button, the set-
ting will be entered and the KP3+ will return to
its normal state.
TIP: A one-shot sample cannot be set for TYPE 1
and 2.
TIP: The setting selected here is disabled when the
sample program (from the program SMP.1 to CRS.4)
mode is selected or when the trigger is set to turn on
or off by MIDI message.
TIP: The trigger can be set for each sample.
Trigger Type List
Type 1 “1.-.-”: When the sample is not heard,
the loop continues playing and each time the
SAMPLE BANK button is pressed, the volume
control is turned on or off.
Type 2 “2.-.g”: When the sample is not heard,
the loop continues playing. The sample vol-
ume is set to on (Gate) only when the SAMPLE
BANK button is held down.
Hold
Type3 “3.r.-”: In this setting, the sample al-
ways starts from the beginning (resetting).
Each time the SAMPLE BANK button is
pressed, the volume control is turned on or off.
Type 4 “4.r.g”: The sample always starts from
the beginning (resetting). The sample is set to
on (Gate) only when the SAMPLE BANK but-
ton is held down.
15
Function settings
These settings let you format an SD card, and
save or load your samples.
Procedure for Function settings
1. Hold down the SHIFT button and press one
of the PROGRAM MEMORY buttons 1–8.
2. Use the PROGRAM/BPM knob to select a
sub-parameter.
3. Press the PROGRAM/BPM knob to view
the value options for that parameter.
4. Use the PROGRAM/BPM knob to select a
value.
5. Press the TAP/RANGE button (lit) to return
to the parameter list. Repeat steps 2–5 to edit
additional parameters.
6. At this point, you can either press the
WRITE button (blinking) to save the changes
you have made, or you can press the SHIFT
button to exit without saving.
TIP: While the TAP/RANGE button is lit, you can
press the TAP/RANGE button to return to the pre-
ceding page.
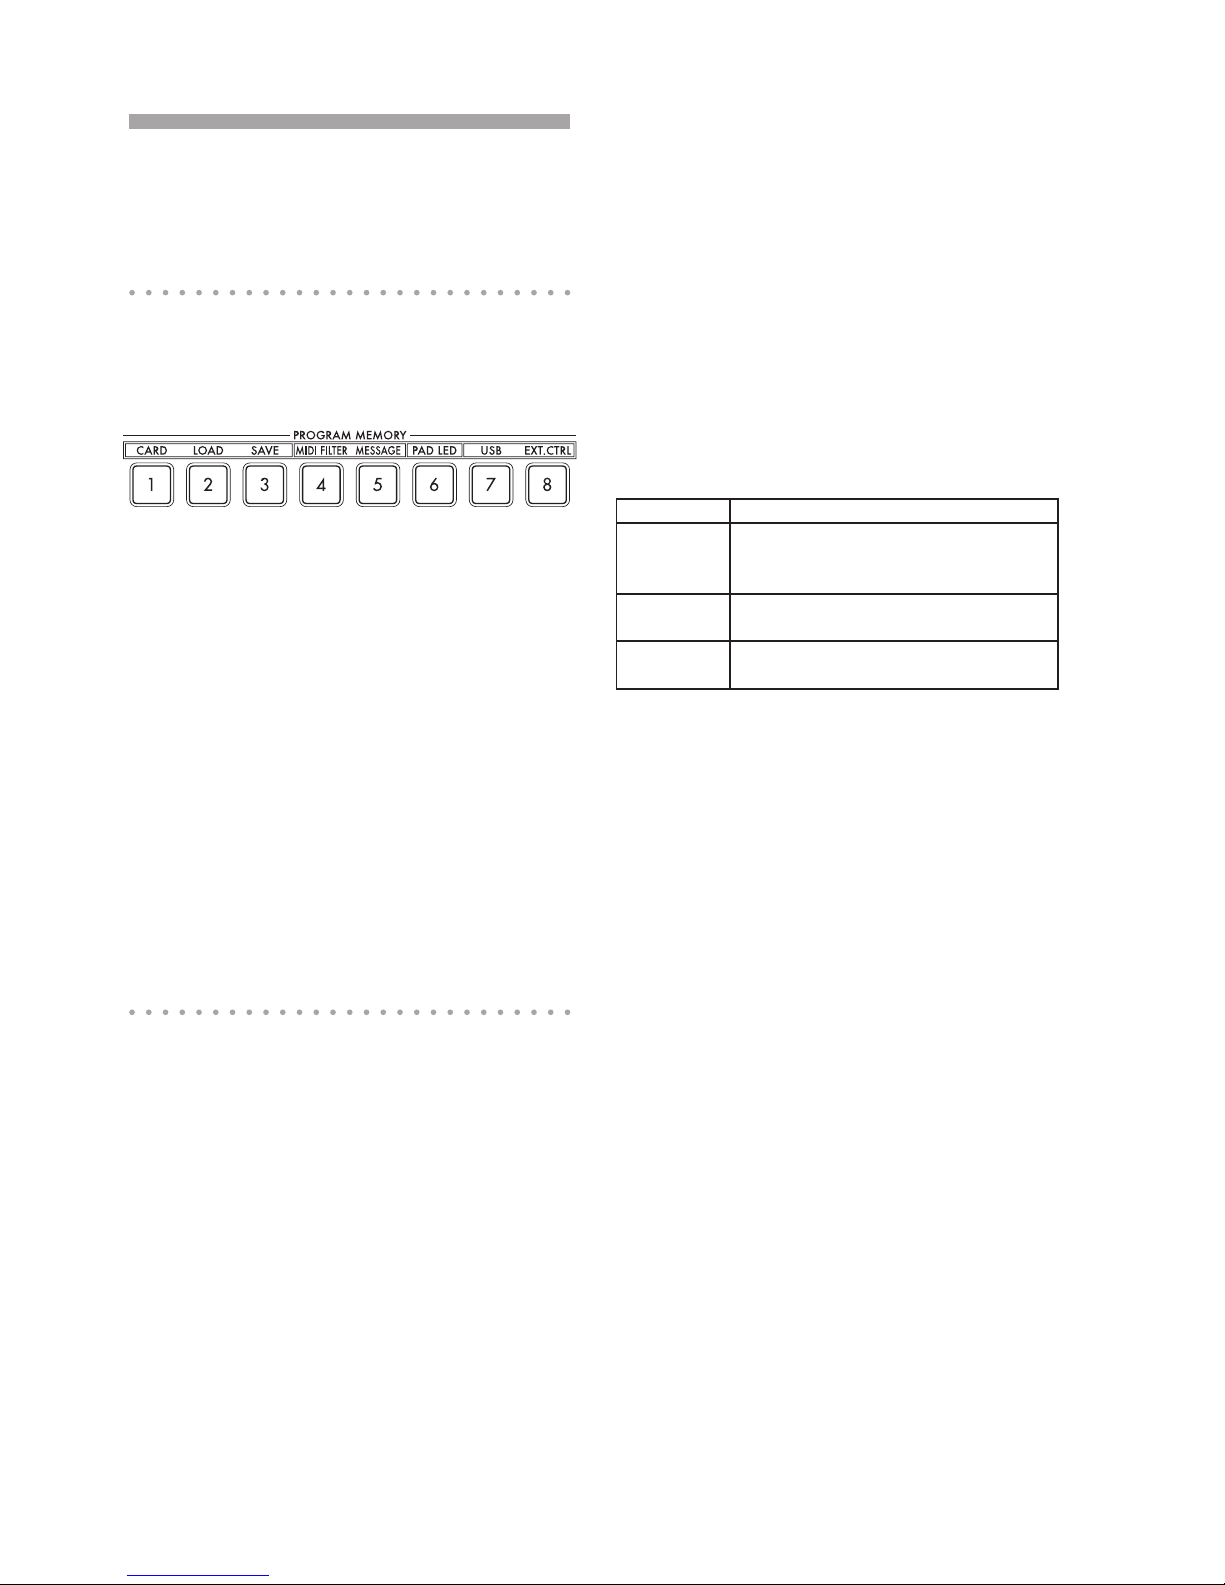
About each function
[1] CARD
Displays information about the SD card, or for-
mats the SD card (→p.16: Using an SD card).
[2] LOAD
Loads data from the SD card into the KP3+
(→p.18: Loading from an SD card).
[3] SAVE
Saves data from the KP3+ to the SD card
(→p.18: Saving to SD card).
[4] MIDI FILTER
Species the MIDI clock setting and MIDI
message ltering. (→p.21: Applying the MIDI
message lter).
[5] MESSAGE
Species the channel on which MIDI messag-
es will be transmitted/received, and assigns
a control change to each controller. You can
specify note numbers for the SAMPLE BANK
buttons. (→p.20: MIDI settings).
[6] PAD LED
Prog: This turns on/off the function that dis-
plays the program name in the touch pad LED
when a program change occurs.
ILLU: This species the illumination shown in
the pad LED when a certain time has elapsed
since you took your hand off the touch pad.
“oFF”: Illumination will be off.
“ChAr”: A text string will be scrolled. You can
use the editor software to edit this
text string.
“TYP.1–8”: Illumination in a variety of patterns
will be displayed.
“TYP.C”: Illumination patterns TYP.1 through
TYP.8 will be switched automatically.
TIP: Illumination will not occur if Hold is active, nor
when you’re adjusting function settings.
TIP: You can download the KP3+ Editor from the
Korg website. (http://www.korg.com)
Scrl: Species the speed setting used for
the text to scroll. This setting determines the
speed used for the pad LED to scroll. You can
choose Slow, Mid, or Fast speeds.
TIP: You can’t change the speed of the illumination
display.
[7] USB
You can connect the KP3+ to your computer
and read/write the contents of the inserted
card via USB (→p.18: Accessing the SD card
from your computer).
[8] EXT.CTRL
This lets you use the KP3+ as a MIDI control-
ler.
The MIDI message assigned to each control-
ler using the KP3+ Editor will be transmitted
(→p.22: Using the KP3+ as a MIDI controller).
TIP: You can download the KP3+ Editor from the
Korg website. (http://www.korg.com)
16
Using an SD card
You can use an SD card to save or load inter-
nal data.
Audio les (WAVE format or AIFF format) that
you’ve created on your computer can also be
loaded.
Never turn off the power or remove the SD card while
data is being saved or the card is being formatted. Doing so
may render the SD card unusable.
TIP The SD card is not included. It must be pur-
chased separately.
TIP The KP3+ supports SD cards of up to 2GB ca-
pacity and SDHC cards of up to 32GB capacity.
TIP The KP3+ can handle up to 256 les in total.
The unit will not recognize any les that exceed the
256 le limit.
TIP The KP3+ may take time to recognize or write
les on large capacity cards.
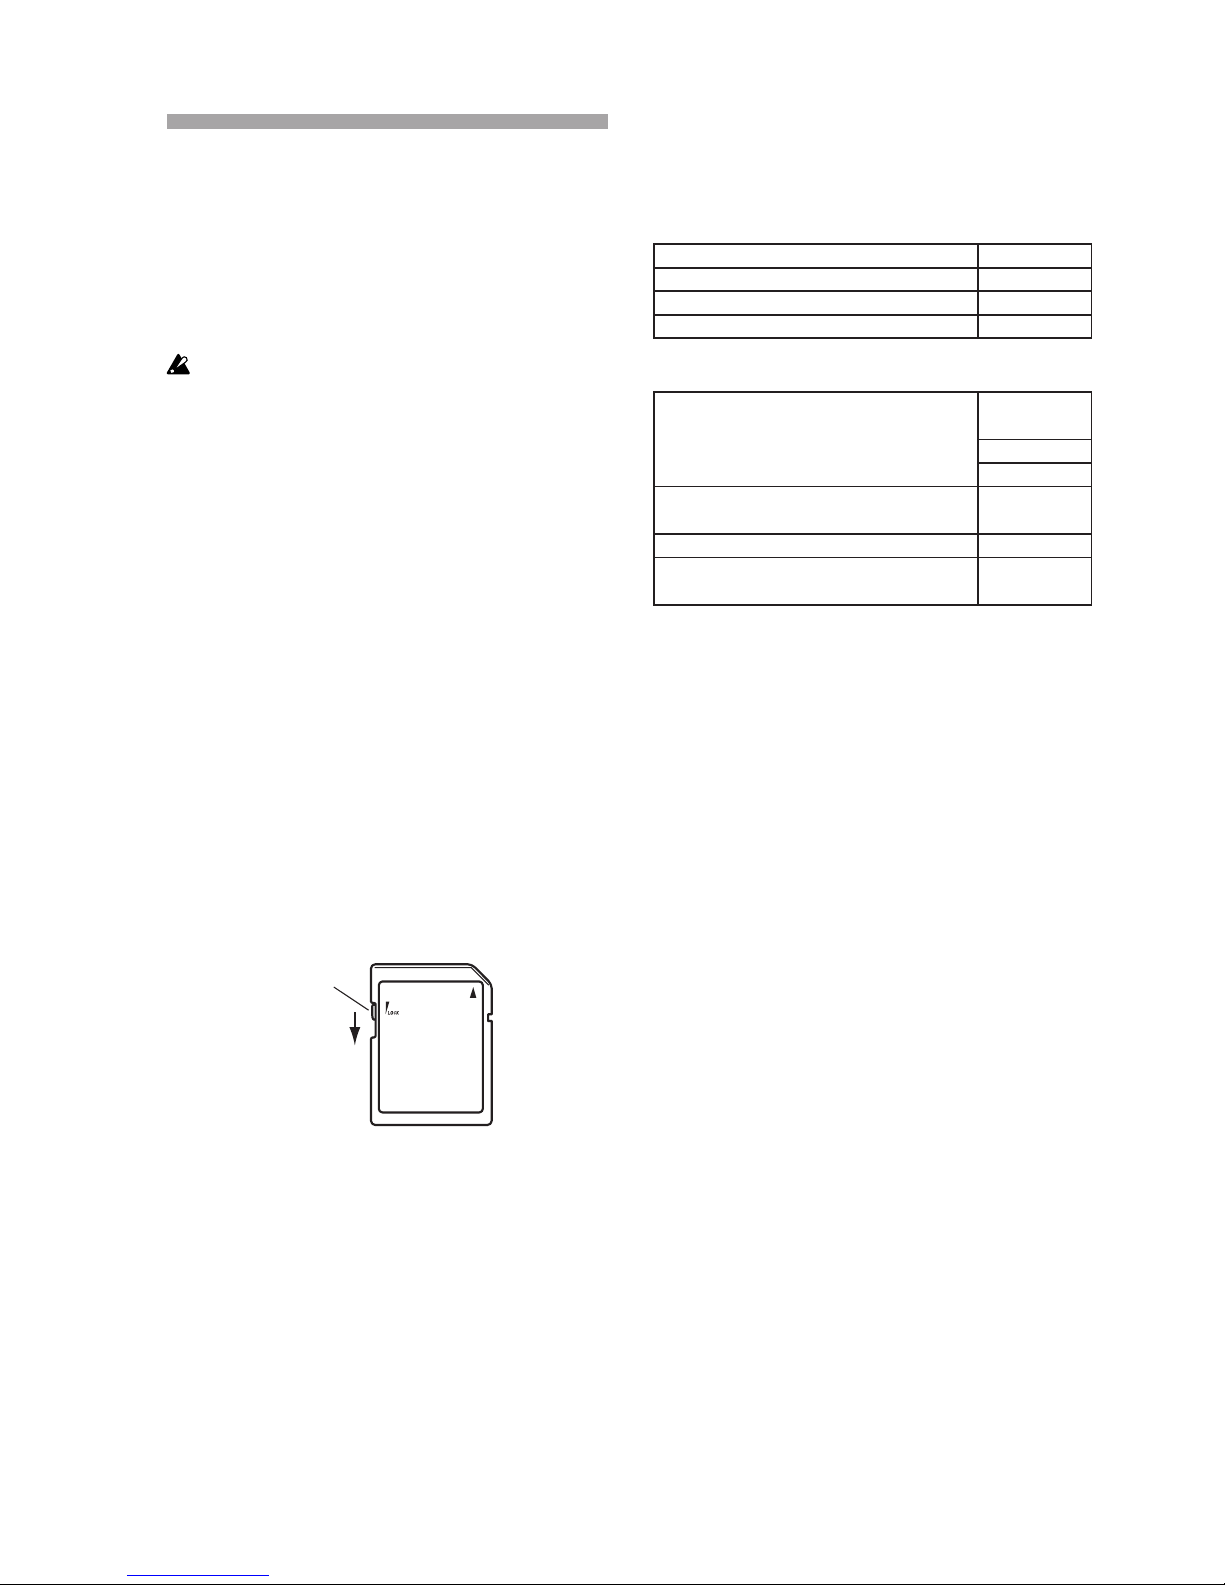
About the write protect setting of an SD card
SD cards have a write protect switch that pre-
vents the data from being overwritten acciden-
tally and lost. If you set the card’s switch to the
protected setting, it will be impossible to write
or erase data on the card, or to format it. If you
need to save edited data on the card, move the
switch back to its original unprotected setting.
Write protect
switch
Protected
Handling SD cards
Please carefully read and observe the instruc-
tions that came with your SD card.
About the contents of the SD card
The following les and folders will be created
in the root directory of the card.
Files you can save
SAMPLE Data 00–99.p3s
GLOBAL 0–9.p3g
PROGRAM MEMORY Set 0–9.p3p
All Data 0–9.p3a
Files you can load
SAMPLE Data 00–99.p3s
00–99.kps
00–99.wav
00–99.aif
GLOBAL 0–9.p3g
0–9.kpg
PROGRAM MEMORY Set 0–9.p3p
All Data 0–9.p3a
0–9.kpa
TIP: If an All data le named “0.p3a” exists on the
card, this le will automatically be loaded when you
start up the KP3+.
TIP The WAVE or AIFF les that can be loaded must
be 8/16-bit linear PCM mono or stereo les. 8-bit
data will be loaded by lling the lacking bits with
zeros. When loading les created on the computer,
the le name must be changed to a two-digit integer
(00–99), and the le must be placed in the root folder
of the SD card.
TIP When WAVE or AIFF les are loaded as sample
data, the le is loaded with the appropriate settings
for the loop. Therefore, it may be played back at a
different pitch than on your computer. To play back at
the same pitch, adjust the BPM setting on the KP3 +.
In addition, if the data is longer than can be recorded
in one bank, it will be truncated. If the data is shorter
than can be recorded in one bank, the remaining
length will be handled as silence.
TIP This device can use les saved with KP3. How-
ever, the PROGRAM MEMORY settings cannot be
loaded since they are incompatible with this device.

17
Inserting or removing SD cards
Inserting an SD card
Taking care that the SD card is oriented cor-
rectly, push into the slot until it locks into place
with a click. Insert the card, making sure that it
is oriented correctly. The gold contacts should
be facing down, and the angled corner to your
right.
SD Card Slot
SD Card
Removing an SD card
Press the SD card inward until it pops outward
with a click; then pull out the card to remove it.
Checking the total capacity of the
card
Here is how you can display the total capacity
of the SD card.
1. Hold down the SHIFT button and press the
PROGRAM MEMORY 1 (CARD) button.
2. Use the PROGRAM/BPM knob to select
“InFo” (card capacity).
3. Press the PROGRAM/BPM knob to view
the total capacity of the card.
Press the TAP/RANGE button (lit) to return se-
lect another parameter, press the SHIFT but-
ton to return to normal operation.
Checking the remaining capacity
of the card
Here is how you can display the remaining ca-
pacity of the SD card.
1. Hold down the SHIFT button and press the
PROGRAM MEMORY 1 (CARD) button.
2. Use the PROGRAM/BPM knob to select
“FrEE” (remaining card capacity).
3. Press the PROGRAM/BPM knob to view
the remaining capacity of the card.
Press the TAP/RANGE button (lit) to return
and select another parameter, press the
SHIFT button to return to the normal state.
Formatting the SD card
All data on the card will be lost when you format it.
Before you can use an SD card, you must format it on
the KP3+. The card may not work if it was formatted on an-
other device.
1. Hold down the SHIFT button and press the
PROGRAM MEMORY 1 button.
2. Use the PROGRAM/BPM knob to select
“ForM.”
3. Press the PROGRAM/BPM knob; the dis-
play will indicate (No.)
4. Use the PROGRAM/BPM knob to select
(Yes) and press the PROGRAM/BPM
knob to format the card. When formatting is
complete, the display will indicate (End.)
Press the TAP/RANGE button (lit in pink) to
return and select another parameter, press the
SHIFT button to return to the normal state.
Never turn off the power or remove the SD card while
data is being formated. Doing so may render the SD card
unusable.
If an SD card operation fails, the display will indicate
“Err” (Error).
18
Saving to SD card
Here’s how you can save the sample data, pro-
gram memories, and all settings onto an SD
card.
1. Hold down the SHIFT button and press the
PROGRAM MEMORY 3 (SAVE) button.
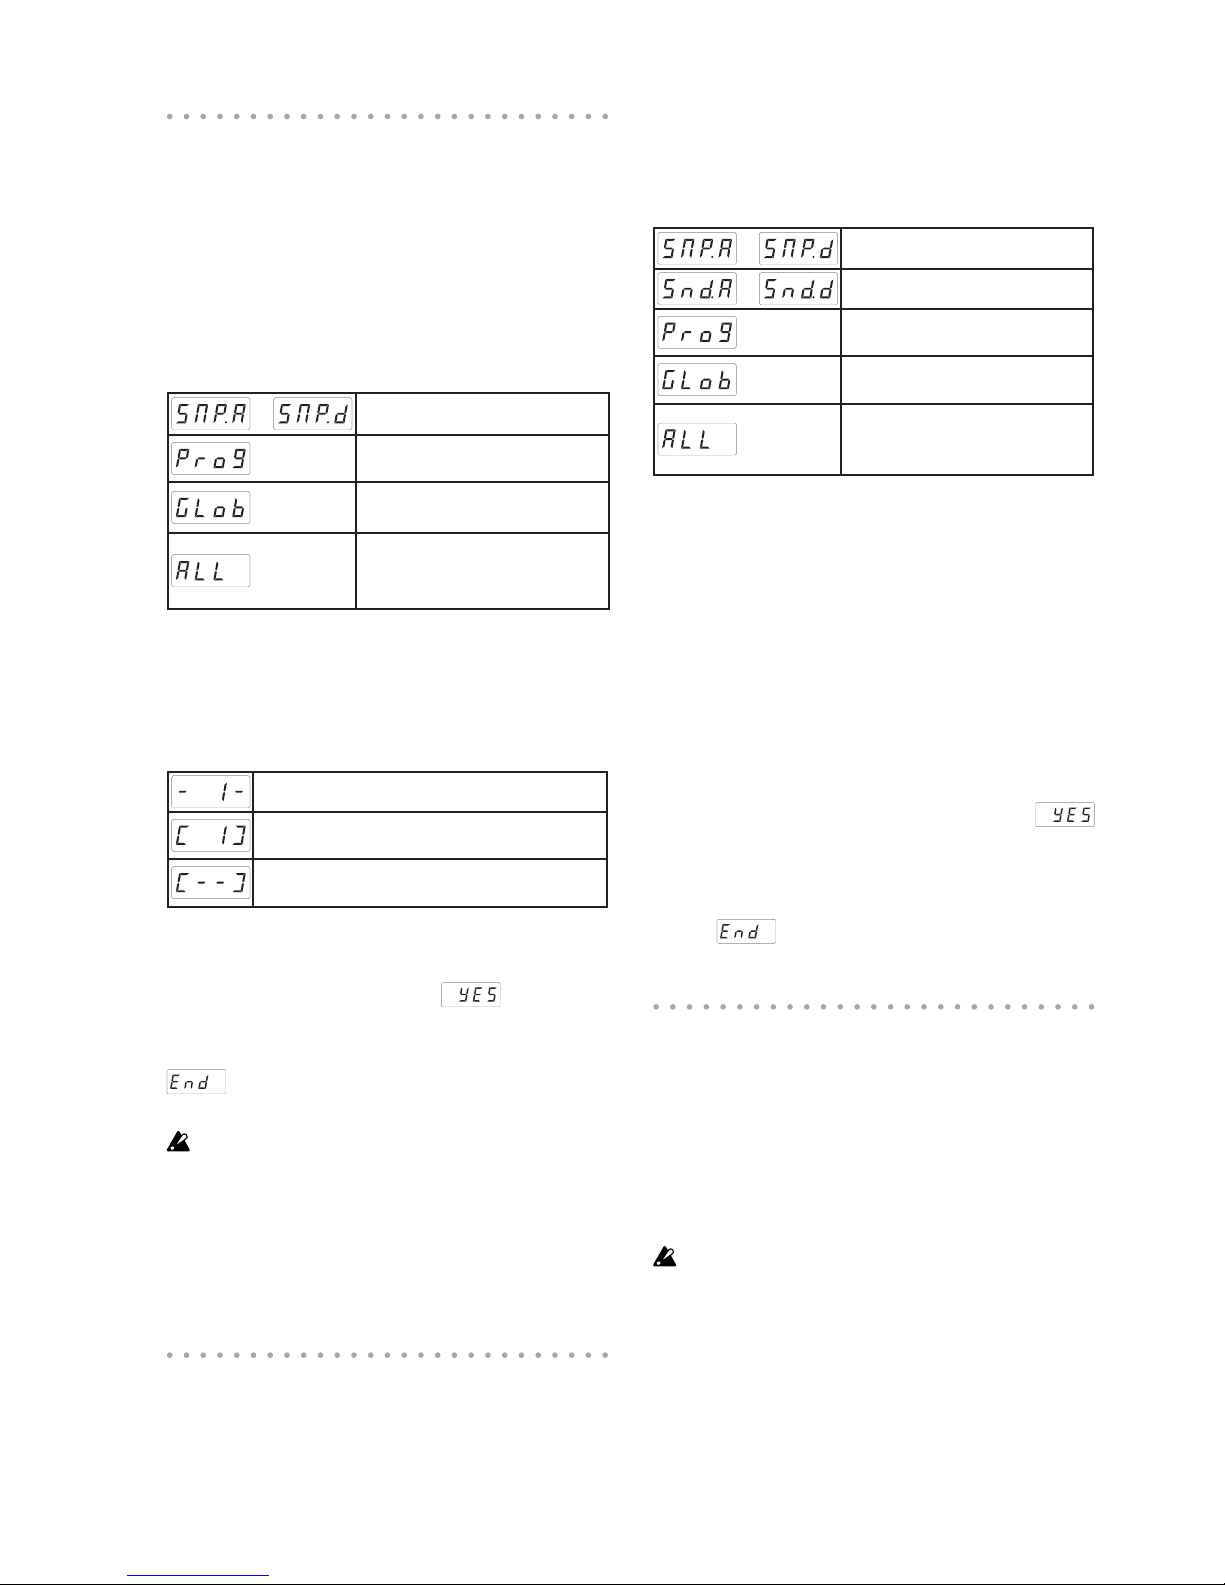
2. Use the PROGRAM/BPM knob to select
the type of data that you want to save.
– Sample data
Contents of program
memory
MIDI FILTER, MESSAGE and
PAD LED setting data le
The contents of “SMP.A”–
“SMP.D”, “Prog,” and “GLob”
combined in a single le
3. Press the PROGRAM/BPM knob; the dis-
play will show the le numbers (0–9, or 0–99
for sample data) that can be saved. Use the
PROGRAM/BPM knob to select the le num-
ber where you want to save the data.
A new le will be added.
The data will overwrite an existing le (in
this case, le 1).
There is an identically-named le or
folder that cannot be rewritten.
4. To execute the Save process, press the
PROGRAM/BPM knob, then use the PRO-
GRAM/BPM knob to select (Yes), and
nally press the PROGRAM/BPM knob. When
saving is completed, the display will indicate
(End.) Press the SHIFT button to return
to the program indication.
Never turn off the power or remove the SD card while
data is being saved. Doing so may render the SD card unus-
able.
TIP: If the SD card is protected, the display will in-
dicate “Prct” and it will not be possible to save. Re-
move the card, turn off write protect, and try the op-
eration again.
Loading from an SD card
Here’s how you can load data from an SD
card.
1. Hold down the SHIFT button and press the
PROGRAM MEMORY 2 (LOAD) button.
2. Use the PROGRAM/BPM knob to select
the type of data that you want to load.
– Sample data
– A WAVE or AIFF le
Contents of program
memory
MIDI FILTER, MESSAGE and
PAD LED setting data le
The contents of “SMP.A”–
“SMP.D”, “Prog,” and “GLob”
combined in a single le
3. Press the PROGRAM/BPM knob; the dis-
play will show the le numbers (0–9 or 0–99)
that can be loaded. Use the PROGRAM/BPM
knob to select the number that you want to
load.
TIP: For WAVE les and AIFF les, the KP3+ will rec-
ognize only les whose name consists of a two-digit
number with a le extension, such as “00.wav” or
“99.aif.” If .wav and .aif les with the same two-digit
number exist, the WAVE le will take priority.
4. Press the PROGRAM/BPM knob, then use
the PROGRAM/BPM knob to select
(Yes), and nally press the PROGRAM/BPM
knob again to execute the Load operation.
When loading is complete, the display will in-
dicate (End.) Press the SHIFT button to
return to the program indication.
Accessing the SD card from your
computer
The KP3+ has a USB connector that can be
connected to your computer, allowing you to
copy settings or sample data from the SD card
to your computer for saving (backup).
If you press the SHIFT button while in USB mode, you'll
return to the program display. Never press the SHIFT but-
ton while communication is occurring. Doing so may ren-
der the SD card unusable.

19
Connecting the USB connector
If you connect the KP3+’s USB connector di-
rectly to your computer, you’ll be able to use
your computer to manage the data on the card
that’s in the KP3+’s card slot.
Follow the procedure for the operating system
on your computer.
Windows users
TIP Before you continue, power-on your computer
and start up the operating system.
1. Use a USB cable to connect the KP3+ to
your computer.
Plug in the connector of the USB cable that
is connected to your computer into the KP3+’s
USB connector.
Make sure that the connector is oriented cor-
rectly, and insert it as far as it will go.
TIP: When you connect the KP3+ for the rst time,
the standard Windows device driver will be installed
automatically.
2. The drive name of the card in the card slot
will appear on your computer.
3. Hold down the SHIFT button and press the
PROGRAM MEMORY 7 (USB) button. The
display will indicate “rdy.”
TIP The contents of the KP3+’s card won’t be vis-
ible from your computer until you enter “USB Storage
Mode.”
From this point until you’ve completed step 5, you
must not disconnect the USB cable, remove the card from
the slot, or switch the power of your computer on or off.
Doing so may damage the data.
4. To view the contents of the KP3+’s card,
open the drive that was added to your com-
puter in step 2.
Copy the desired data onto your computer.
You can also copy data from your computer
onto the card.
5. Exit USB mode.
In Explorer or My Computer, right-click the
“Removable Disk” icon and choose “Remove.”
Then press the KP3+’s SHIFT button to exit
USB mode.
When you’re ready to disconnect the KP3+ from your
computer, you must rst exit USB mode and then discon-
nect the USB cable.
MacOSX users (OSX 10.5 or later)
1. Use a USB cable to connect the KP3+ to
your computer.
Plug the USB connector into the KP3+’s USB
connector. Make sure that the connector is ori-
ented correctly, and insert it as far as it will go.
2. Hold down the SHIFT button and press the
PROGRAM MEMORY 7 (USB) button.
The display will indicate “buSy.”
3. The drive name of the card in the card slot
will appear on your computer.
While this screen is shown, you must not disconnect
the USB cable, remove the card from the slot, or switch the
power of your computer on or off. Doing so may damage
the data.
4. To view the contents of the KP3+’s card,
open the drive that was added to your com-
puter in step 2.
Copy the desired data onto your computer.
You can also copy data from your computer
onto the card.
5. When you’re ready to disconnect the KP3+,
drag the drive from the desktop into the Trash.
Then press the KP3+’s SHIFT button to exit
USB mode.
When you’re ready to disconnect the KP3+ from your
computer, you must rst exit USB mode and then discon-
nect the USB cable.

20
MIDI functions
What is MIDI?
MIDI stands for Musical Instrument Digital
Interface, and is a world-wide standard for
exchanging a variety of performance-related
information between electronic musical instru-
ments and computers.
About the MIDI implementation chart
The MIDI implementation chart is designed
to let you compare the MIDI messages that
can be transmitted and received by a device.
When using two MIDI devices, you can com-
pare their MIDI implementation charts to see
which messages are compatible between
them.
TIP: You can download the KP3+’s MIDI implemen-
tation chart from the Korg website.(http://www.korg.
com)
* Details on the MIDI functionality are provided in the sepa-
rate MIDI implementation. To obtain the MIDI implementa-
tion, please contact your local Korg distributor.
MIDI connections
Commercially available MIDI cables are used
to transmit and receive MIDI messages. Con-
nect these cables between the MIDI connec-
tors of the KP3+ and the MIDI connectors of
the external MIDI device where you want to
transfer data.
MIDI IN connector: This connector receives
MIDI messages from another MIDI device.
Connect it to the MIDI OUT connector of the
external device.
MIDI OUT connector: This connector transmits
messages from the KP3+. Connect it to the
MIDI IN connector of the external device.
LINE IN MIDI INMIDI OUTOUTPUT
ELECTRIBE MX-SD
Connecting to your computer
You can use a USB cable to connect the KP3+
directly to a computer equipped with a USB
connector, and transmit or receive the same
MIDI messages as via the MIDI connectors.
In order to use the KP3+ Editor, you must con-
nect the KP3+ to your computer via USB.
Computer
USB
TIP: To use the USB connection, the Korg USB-MIDI
driver must be installed in your computer. Download
the Korg USB-MIDI driver from the Korg website
(http://www.korg.com), and install it as described in
the documentation included with the driver.
MIDI settings
In addition to using the KP3+ as a synthesizer,
you can also use it as a realtime controller for
an external MIDI device.
By connecting the KP3+ to your MIDI sequenc-
er and recording the MIDI messages that are
transmitted when you use the touch pad, you
can play back the touch pad operations.
If you turn off the power without storing your settings,
the settings will revert to their original state, and will not be
saved.
Setting the MIDI channel
Here’s how to set the KP3+’s MIDI channel.
Other manuals for KAOSS PAD
1
Table of contents
Languages:
Other Korg Music Pedal manuals

Korg
Korg KAOSS PAD KP2 User manual

Korg
Korg Nuvibe User manual

Korg
Korg G3 User manual

Korg
Korg Nu:Tekt HARMONIC DISTORTION User manual

Korg
Korg AX100G User manual

Korg
Korg Nu:Tekt OD-S User manual

Korg
Korg ToneWorks AX5B Product information sheet

Korg
Korg MIKU STOMP User manual

Korg
Korg pitchblack POLY User manual

Korg
Korg Nu:Tekt TR-S User manual


