Korg Nuvibe User manual
- 2 -
Precautions
Location
Using the unit in the following locations can result in a malfunction.
• In direct sunlight
• Locations of extreme temperature or humidity
• Excessively dusty or dirty locations
• Locations of excessive vibration
• Close to magnetic fields
Power supply
Please connect the designated AC adapter to an AC outlet of the correct voltage.
Do not connect it to an AC outlet of voltage other than that for which your unit
is intended.
Interference with other electrical devices
Radios and televisions placed nearby may experience reception interference. Oper-
ate this unit at a suitable distance from radios and televisions.
Handling
To avoid breakage, do not apply excessive force to the switches or controls.
Care
If the exterior becomes dirty, wipe it with a clean, dry cloth. Do not use liquid
cleaners such as benzene or thinner, or cleaning compounds or flammable polishes.
Keep this manual
After reading this manual, please keep it for later reference.
Keeping foreign matter out of your equipment
Never set any container with liquid in it near this equipment. If liquid gets into the
equipment, it could cause a breakdown, fire, or electrical shock.
Be careful not to let metal objects get into the equipment. If something does slip
into the equipment, unplug the AC adapter from the wall outlet. Then contact your
nearest VOX dealer or the store where the equipment was purchased.
THE FCC REGULATION WARNING (for USA)
NOTE: This equipment has been tested and found to comply with the limits
for a Class B digital device, pursuant to Part 15 of the FCC Rules. These limits
are designed to provide reasonable protection against harmful interference
in a residential installation. This equipment generates, uses, and can radiate
radio frequency energy and, if not installed and used in accordance with
the instructions, may cause harmful interference to radio communications.
However, there is no guarantee that interference will not occur in a particular
installation. If this equipment does cause harmful interference to radio or
television reception, which can be determined by turning the equipment off
and on, the user is encouraged to try to correct the interference by one or more
of the following measures:
● Reorient or relocate the receiving antenna.
● Increase the separation between the equipment and receiver.
● Connect the equipment into an outlet on a circuit different from that to
which the receiver is connected.
● Consult the dealer or an experienced radio/TV technician for help.
If items such as cables are included with this equipment, you must use those
included items.
Unauthorized changes or modification to this system can void the user’s
authority to operate this equipment.
Notice regarding disposal (EU only)
When this “crossed-out wheeled bin” symbol is displayed on the
product, owner’s manual, battery, or battery package, it signifies that
when you wish to dispose of this product, manual, package or battery
you must do so in an approved manner. Do not discard this product,
manual, package or battery along with ordinary household waste.
Disposing in the correct manner will prevent harm to human health
and potential damage to the environment. Since the correct method
of disposal will depend on the applicable laws and regulations in your
locality, please contact your local administrative body for details. If the battery
contains heavy metals in excess of the regulated amount, a chemical symbol
is displayed below the “crossed-out wheeled bin” symbol on the battery or
battery package.
All product names and company names are the trademarks or registered trade-
marks of their respective owners.

- 3 -
Nuvibe Owner’s manual
Owner’s manual
From the Uni-Vibe to the Nuvibe
From the Uni-Vibe developer
Overseeing the redevelopment of a product from half a century ago,
I was first hit with anxiety and embarrassment. This came from being
confronted with how young engineers nowadays have viewed basically
designed instruments while also being taken back to my own younger
days.
At the time, I was estranged from the popular music of the day, but I was
thinking we could skillfully cook up a new instrument by combining
countless familiar “sound” ingredients.
For example, the fading of short-wave broadcasts heard at night was
one of those “sounds”. To me, the radio waves of the slowly and
erratically changing Moscow broadcasts finally finding their way to
Japan from so far away felt like nostalgic music. In fact, that is how I
felt about the original Uni-Vibe. However, the challenge of designing
an oscillator that can be significantly adjusted from an extremely slow
cycle to vibrato is still a bitter memory.
This time, young engineers of the same age as me at the time are newly
developing it as the Nuvibe.
Unlike when making a new instrument, the association with an
electronic musical instrument of the past presents a difficulty, and it
is just not as easy as it’s generally imagined. Questions, such as how
close it should be to the original (for example, should it also emulate
the shortcomings of the original) and how the original was in the first
place, will emerge.
With original electronic musical instruments of the past, there are, as
with violins, individual differences other than the transformation of
parts with the passage of time. Since it was commonplace for electronic
Table of contents
From the Uni-Vibe to the Nuvibe. . . . . . . . . . . . . . . . 3
From the Uni-Vibe developer . . . . . . . . . . . . . . . . . . . . . . . . . . . . . . . 3
Main Features ..............................................4
Getting started ................................4
Installing the batteries (changing the batteries) . . . . . . . . . . . . . .4
Connections ................................................5
Top and rear panels ............................5
Top panel ..................................................5
Rear panel ..................................................6
Expression pedal ...........................................6
Troubleshooting ..............................7
Specifications .................................8
Thank you for purchasing the Korg Nuvibe vibrato chorus
effector. To help you get the most out of your new instrument,
please read this manual carefully.

- 4 -
components of the time to have a 10% or even 20% margin of error, they
could even be totally different from each other.
The greatest challenge was that CdS (cadmium sulfide) photoresistors
are no longer used in the heart of musical instruments due to regulation
of hazardous substances. There is still no substitute for this even
in a modern age flooded with diverse high-performance electronic
components. While questioning the need to apply regulations to
internal elements that are not in direct contact with the user, it took a
long time to somehow find another approach.
Even as I write these comments, some concerns still remain. However,
at the sight of the young engineers working so hard alongside one
another I believe these challenges will surely be overcome.
Actually, I have been wondering how other musical instruments
are affected, not just electronic ones. I feel deeply emotional that an
electronic musical instrument of my basic design has become the target
of these considerations after half a century.
We must appreciate the good fortune that happened to be present
at a time when, without yet knowing the word “effector”, we were
passionately immersed in creating and changing sound with electricity.
November 2013
Fumio Mieda
Main Features
• “21st century version of the Uni-Vibe”, designed under the
supervision of Fumio Mieda, developer of the visionary Uni-Vibe
• Recreates the expression pedal with CANCEL switch
• Recreates the original oscillation using a 10-stage sequencer
• True bypass
Getting started
Installing the batteries (changing the batteries)
Turn off the power before replacing the batteries.
Depleted batteries should be immediately removed from the
Nuvibe. Leaving depleted batteries in the battery compartment
may cause malfunctions (the batteries may leak). You should also
remove the batteries if you don’t expect to use the Nuvibe for an
extended period of time.
Don’t mix partially-used batteries with new batteries, and don’t
mix batteries of differing types.
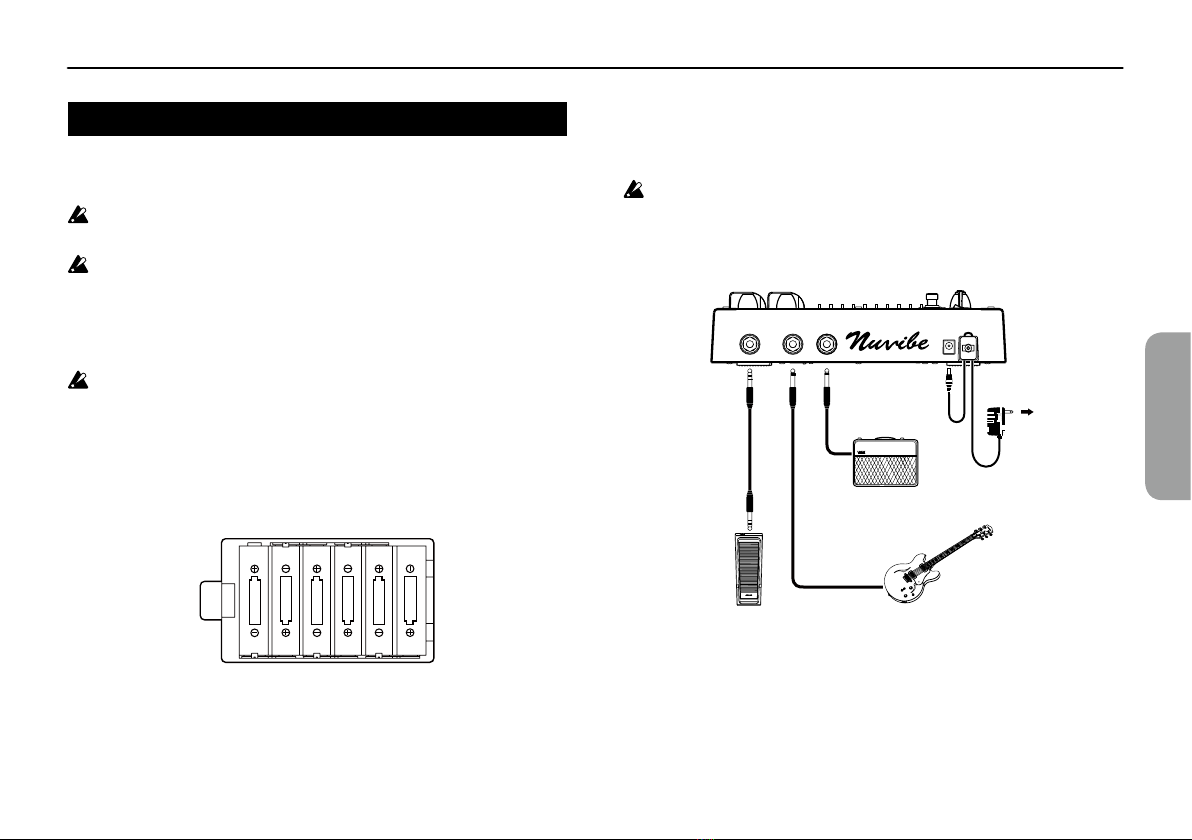
1. Detach the battery cover from the rear panel.
2. Insert six AA batteries, being sure to observe the correct polarity
(+/- orientation). Use alkaline batteries.
3. Reattach the battery cover.
- 5 -
Nuvibe Owner’s manual
Owner’s manual
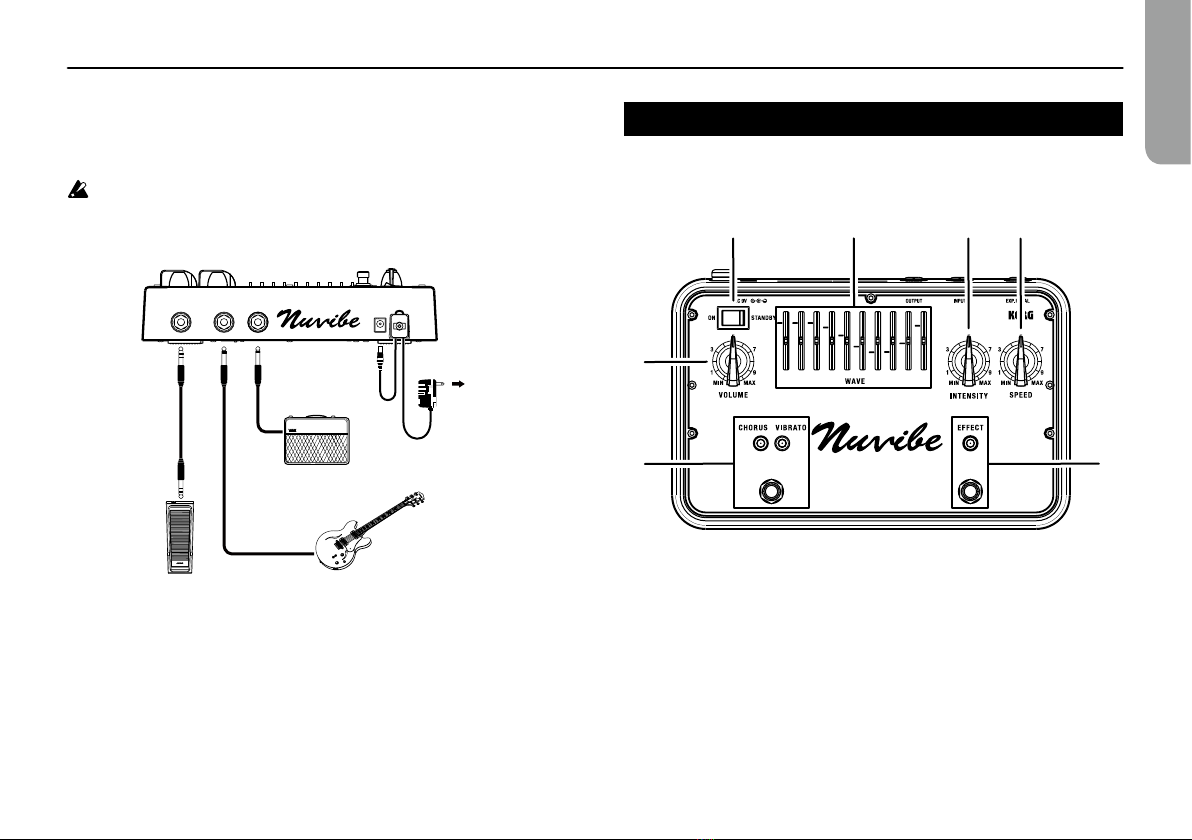
Connections
Let’s connect your guitar and amp to the Nuvibe, and turn on the
power.
You must turn off the power before connecting anything.
AC adapter
(sold separately)
To an elec
trical
outlet
Guitar
Guitar amp
Expression pedal
Nuvibe
Stereo cable
(included)
Tip: The Nuvibe will function even if the expression pedal is not
connected.
Top and rear panels
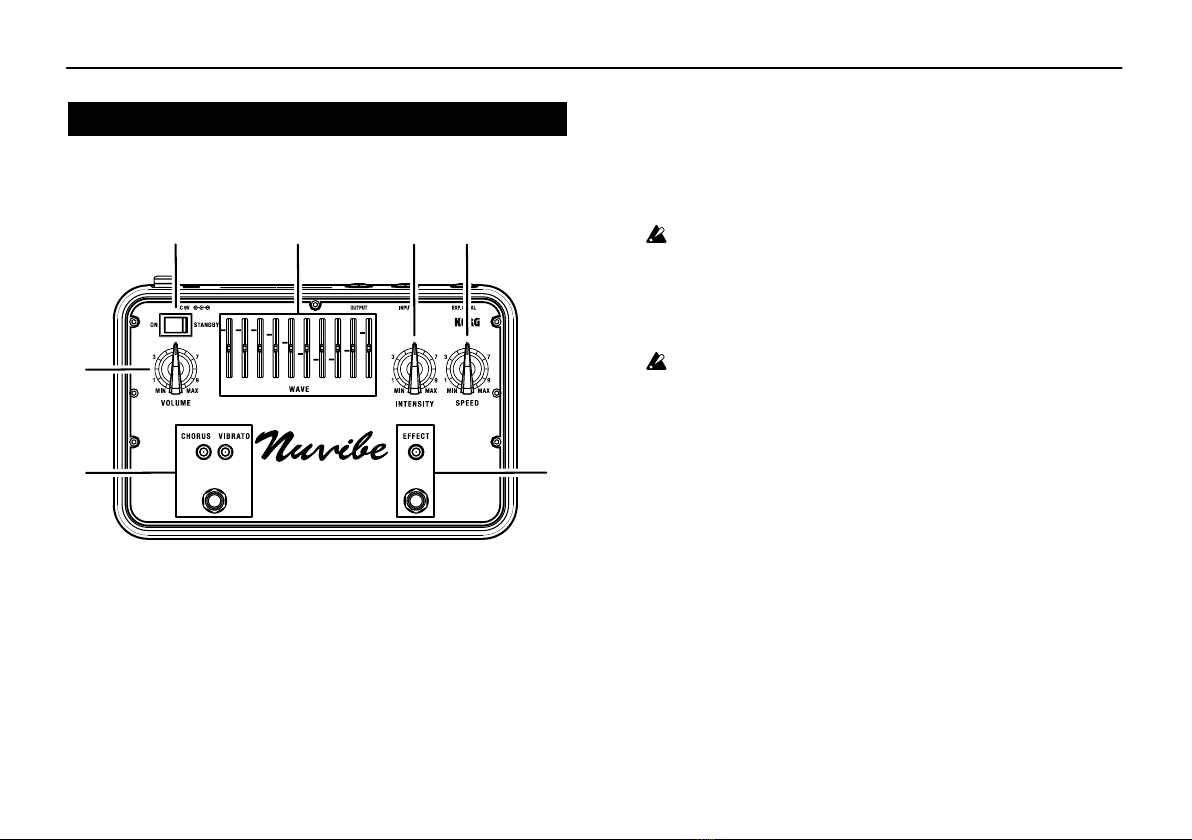
Top panel
a
b
c d e
fg
a. Powerswitch
This turns the power ON/STANDBY.
b. VOLUMEknob
Use this knob to adjust the volume of the sound from the OUTPUT jack.
c. WAVEsliders
Use these sliders to create the LFO waveform. Move the 10 sliders to
create the desired sound.
Tip: Setting all WAVE sliders to the white marks selects the original
Uni-Vibe settings (recommended).

- 6 -
d. INTENSITYknob
Use this knob to adjust the intensity of the effects.
When the expression pedal is connected, press the CANCEL
switch on the pedal to disable the INTENSITY knob.
e. SPEEDknob
Use this knob to adjust the modulation speed.
When the expression pedal is connected, the SPEED knob is
disabled.
f. CHORUS/VIBRATOswitch(LEDs)
Use this switch to set the effect to either CHORUS (red LED) or
VIBRATO (green LED).
g. EFFECTswitch(LED)
Use this switch to turn the effects on and off.
Rear panel
a b c d e
a. EXP.PEDALjack
Connect this jack to the EXP. OUTPUT jack on the expression pedal
by using the included stereo cable.
b. INPUTjack
Use this jack to connect musical instruments such as a guitar.
c. OUTPUTjack
Connect this jack to your guitar amp or mixer to this jack.
Do not connect headphones to the OUTPUT jack. The
headphones may be damaged.
d. DC9Vconnector
Use this jack to connect the optional AC adapter here.
e. Cablehook
Wrap the AC adapter cable around this hook to prevent the
AC adapter from being accidentally disconnected.
Expression pedal
c
ba
a. EXP.OUTPUTjack
Connect this jack to the EXP. PEDAL jack on the Nuvibe by using the
included stereo cable.

- 7 -
Nuvibe Owner’s manual
Owner’s manual
b. Pedal
Press down on the pedal to increase the modulation speed. Release
the pedal to reduce the modulation speed.
c. CANCELswitch
Press this switch to cancel modulation.
Troubleshooting
Power won’t turn on
• Could the power switch have been set to STANDBY?
• Is the AC adapter connected correctly?
• When using batteries, are the batteries installed?
• When using batteries, are the negative and positive orientation of the
batteries correct?
• When using batteries, could the batteries be depleted?
No sound
• Has the VOLUME knob been set so that sound is being output?
• Are the guitar amp, mixer and other devices connected correctly to
the jacks?
• Have the guitar amp, mixer and other devices been turned on and
have their volumes been raised?
Short battery lifespan
• Could the Nuvibe have been left turned on? Since the INPUT jack
does not function as a power switch, simply unplugging a cable does
not turn it off. When the Nuvibe is not being used, set the power
switch to STANDBY.
• Are new alkaline batteries being used?
No effect is applied
• Is the EFFECT LED lit up?
• Could the INTENSITY knob be set to MIN?
• Could all WAVE sliders be set to the same position? Move the sliders
to create the waveform.
• When the expression pedal is connected, could the CANCEL switch
in the heel area have been pressed? Press on the expression pedal.
Power turns off unexpectedly
• Could the batteries be depleted? If the EFFECT LED is not lit up,
replace the batteries with new ones.
Something is wrong with the sound
• Try changing the WAVE sliders to the recommended settings (page
5).
• Adjust the INTENSITY knob and SPEED knob again.
Using the knobs, sliders, switches or expression pedal
does not change the sound
• Are the batteries depleted?
• When the expression pedal is connected, the SPEED knob on the
Nuvibe is disabled.
• When the CANCEL switch on the expression pedal is pressed, the
INTENSITY knob on the Nuvibe is disabled.

- 8 -
Specifications
Input/output impedance:
47 KΩ/20 kΩ (maximum)
Jacks:
Nuvibe
INPUT 6.3 mm monaural phone jack
OUTPUT 6.3 mm monaural phone jack (unbalanced)
EXP. PEDAL 6.3 mm stereo phone jack
Expression pedal
EXP. OUTPUT
6.3 mm stereo phone jack
Power supply:
6 AA-size alkaline batteries
Optional AC adapter (DC 9V )
Battery lifespan:
Approximately 4 hours continuous use
Current consumption:
290 mA (Typ.)
Dimensions (W x D x H):
Nuvibe 260 × 170 × 67 mm / 10.24 x 6.69 x 2.64 inches
Expression pedal 94 × 246 × 81 mm / 3.70 x 9.69 x 3.19 inches
Weight:
Nuvibe 1.5 kg / 3.31 lbs
Expression pedal 1.1 kg / 2.43 lbs
Included items:
Stereo cable, 6 AA-size alkaline batteries, Owner’s manual
Options (sold separately):
DC 9V AC adapter
* Specifications and appearance are subject to change without notice
for improvement.

- 9 -
Nuvibe Manuel d’utilisation
Manuel d’utilisation
Précautions
Emplacement
L’utilisation de cet instrument dans les endroits sui vants peut en entraîner le
mauvais fonctionnement.
• En plein soleil
• Endroits très chauds ou très humides
• Endroits sales ou fort poussiéreux
• Endroits soumis à de fortes vibrations
• A proximité de champs magnétiques
Alimentation
Branchez l’adaptateur secteur mentionné à une prise secteur de tension appropriée.
Evitez de brancher l’adaptateur à une prise de courant dont la tension ne correspond
pas à celle pour laquelle l’appareil est conçu.
Interférences avec d’autres appareils élec triques
Les postes de radio et de télévision situés à proximi té peuvent par conséquent
souffrir d’interférences à la réception. Veuillez dès lors faire fonctionner cet appareil
à une distance raisonnable de postes de radio et de télévision.
Maniement
Pour éviter de les endommager, manipulez les com mandes et les boutons de cet
instrument avec soin.
Entretien
Lorsque l’instrument se salit, nettoyez-le avec un chiffon propre et sec. Ne vous
servez pas d’agents de nettoyage liquides tels que du benzène ou du diluant, voire
des produits inflammables.
Conservez ce manuel
Après avoir lu ce manuel, veuillez le conserver soigneusement pour toute référence
ultérieure.
Evitez toute intrusion d’objets ou de liquide
Ne placez jamais de récipient contenant du liquide près de l’instrument. Si le li-
quide se renverse ou coule, il risque de provoquer des dommages, un court-circuit
ou une électrocution. Veillez à ne pas laisser tomber des objets métalliques dans
le boîtier (trombones, par ex.). Si cela se produit, débranchez l’alimentation de la
prise de courant et contactez votre revendeur korg le plus proche ou la surface où
vous avez acheté l’instrument.
Note concernant les dispositions (Seulement EU)
Quand un symbole avec une poubelle barrée d’une croix apparait sur
le produit, le mode d’emploi, les piles ou le pack de piles, cela signifie
que ce produit, manuel ou piles doit être déposé chez un représentant
compétent, et non pas dans une poubelle ou toute autre déchetterie
conventionnelle. Disposer de cette manière, de prévenir les dommages
pour la santé humaine et les dommages potentiels pour l’environne-
ment. La bonne méthode d’élimination dépendra des lois et règlements
applicables dans votre localité, s’il vous plaît, contactez votre orga-
nisme administratif pour plus de détails.
Si la pile contient des métaux lourds au-delà du seuil réglementé, un symbole
chimique est affiché en dessous du symbole de la poubelle barrée d’une croix
sur la pile ou le pack de piles.
REMARQUE IMPORTANTE POUR LES CLIENTS
Ce produit a été fabriqué suivant des spécifications sévères et des besoins en
tension applicables dans le pays où ce produit doit être utilisé.
Si vous avez acheté ce produit via l’internet, par vente par correspondance ou/
et vente par téléphone, vous devez vérifier que ce produit est bien utilisable
dans le pays où vous résidez.
ATTENTION: L’utilisation de ce produit dans un pays autre que celui pour
lequel il a été conçu peut être dangereuse et annulera la garantie du fabricant
ou du distributeur. Conservez bien votre récépissé qui est la preuve de votre
achat, faute de quoi votre produit ne risque de ne plus être couvert par la
garantie du fabricant ou du distributeur.
Tous les noms de produits et de sociétés sont des marques commerciales ou dé-
posées de leur détenteur respectif.

- 10 -
De l’ Uni-Vibe au Nuvibe
Un mot du père de l’Uni-Vibe
Ce n’est pas sans une dose initiale d’embarras et d’anxiété que je me suis
vu confier la tâche de réinventer un produit vieux d’un demi siècle. Une
réaction provoquée d’une part par le regard que portent aujourd’hui les
jeunes ingénieurs sur ces instruments de conception rudimentaire, mais
que je dois aussi à un catapultage en arrière vers mes propres jeunes
années.
À l’époque, je ne connaissais pas grand-chose de la musique en vogue, mais
j’avais le sentiment que nous arriverions à concocter avec art un nouvel
instrument en combinant une foule “d’ingrédients sonores” familiers.
Pour prendre un exemple, le chuintement plaintif des émissions nocturnes
sur les ondes courtes était un de ces “ingrédients”. Pour moi, les ondes
radio des programmes de Moscou, aux fluctuations lentes et erratiques,
et portées de si loin jusqu’au Japon, avaient un parfum de musique
nostalgique. C’est ce que j’éprouvais en fait pour l’Uni-Vibe original. Cela
dit, le souvenir du défi constitué par la conception d’un oscillateur offrant
une large plage de réglage, d’un cycle extrêmement lent à un vibrato, a
toujours un goût amer.
Mais cette fois, des ingénieurs aussi jeunes que moi à l’époque réinventent
l’Uni-Vibe sous les traits du Nuvibe.
Contrairement à la conception d’un instrument totalement neuf, le travail
de design s’inspirant d’un instrument électronique du passé ne va pas sans
certaines difficultés, et n’est pas aussi facile que ce que les gens imaginent
généralement. Des questions se posent, comme par exemple le degré de
similitude avec l’original (le nouvel équipement doit-il aussi émuler les
défauts de l’original ?) et la définition exacte de l’équipement original.
Les instruments de musique “Vintage” originaux ont véritablement
Sommaire
De l’ Uni-Vibe au Nuvibe . . . . . . . . . . . . . . . . . . . . . .10
Un mot du père de l’Uni-Vibe . . . . . . . . . . . . . . . . . . . . . . . . . . . . . .10
Caractéristiques principales ................................11
Préparations .................................12
Installation des piles .......................................12
Connexions ...............................................12
Façade et face arrière . . . . . . . . . . . . . . . . . . . . . . . . .13
Panneau supérieur ........................................13
Panneau arrière ...........................................13
Pédale d’expression .......................................14
Dépannage ..................................14
Fiche technique ..............................15
Merci d’avoir choisi l’effet Vibrato Chorus Nuvibe de Korg.
Afin de pouvoir exploiter au mieux toutes les possibilités
offertes par l’instrument, veuillez lire attentivement ce manuel.

- 11 -
Nuvibe Manuel d’utilisation
Manuel d’utilisation
un caractère personnel et chaque exemplaire individuel d’un même
instrument présente souvent, comme les violons, des différences qui vont
au-delà des changements produits sur les composants par le passage du
temps.
Vu qu’il n’y avait rien d’exceptionnel à l’époque à ce que les composants
électroniques comportent une marge d’erreur de 10% et même de 20%, les
instruments de musique pouvaient parfois sonner de manière totalement
différente d’un exemplaire à l’autre.
Le principal obstacle a résidé dans le fait que les photorésistances en
sulfure de cadmium (CdS) ne sont plus utilisées dans les circuits des
instruments de musique en raison d’un durcissement des réglementations
sur les sustances dangereuses. Et malgré la variété des composants
électroniques de hautes performances innondant le marché de notre âge
moderne, on ne leur a pas encore trouvé de substitut. Non convaincus de
la nécessité de respecter des réglementations visant des éléments internes
qui ne sont pas en contact direct avec l’utilisateur, nous avons passé un
temps considérable à rechercher et finalement trouver une autre approche.
Et à l’heure où j’écris ces commentaires, certaines inquiétudes subsistent.
Il me suffit toutefois d’un regard sur cette équipe de jeunes ingénieurs
travaillant si dur côte à côte pour me dire que nous arriverons certainement
à surmonter ces défis.
En fait, je me suis interrogé sur la manière dont les autres instruments de
musique –non électroniques– sont affectés par les années. Je suis vraiment
ému que cet instrument de musique électronique réalisé sur base de ma
conception rudimentaire reçoive après cinquante ans toute cette attention.
Je pense que nous devons nous montrer extrêmement reconnaissants de
la chance qui nous a souri durant cette période où, alors que les mots
“processeur d’effets” n’existaient pas encore, nous nous consacrions avec
passion à créer et transformer des sons avec de l’électricité.
Novembre 2013
Fumio Mieda
Caractéristiques principales
• Mouture “21e siècle” de l’Uni-Vibe, redessinée sous la supervision
de Fumio Mieda, développeur du très visionnaire Uni-Vibe
• Comporte une pédale d’expression avec commutateur CANCEL
comme sur l’original
• Recrée l’oscillation de l’original via un séquenceur à 10 étages
• Véritable contournement (‘True Bypass’)

- 12 -
Préparations
Installation des piles
Avant de remplacer les piles, coupez l’alimentation.
Extrayez toujours immédiatement les piles usées du monotribe.
La présence de piles usées dans l’instrument peut provoquer des
dysfonctionnements (dus à une fuite du liquide des piles). Retirez
également les piles si vous n’avez pas l’intention d’utiliser le
monotribe pendant une période prolongée.
Ne mélangez pas des piles partiellement utilisées avec des piles
neuves et ne mélangez pas différents types de piles.
1. Ouvrez le couvercle du compartiment à piles situé sur le panneau
arrière.
2. Insérez six piles AA en veillant à respecter la polarité correcte
(l’orientation +/–). Utilisez des piles alcalines ou au nickel-hydrure
métallique.
3. Refermez le couvercle du compartiment à piles.
Connexions
Branchez votre guitare et ampli au Nuvibe et mettez les appareils sous
tension.
Mettez toujours les appareils hors tension avant d’effectuer la
moindre connexion.
R
accorder à une
prise de courant
Guitare
Ampli de guitare
Pédale d’expression
Nuvibe
Adaptateur secteur
(disponible en option)
Câble stéréo (fourni)
Astuce: Le Nuvibe fonctionne même si la pédale d’expression n’est pas
branchée.

- 13 -
Nuvibe Manuel d’utilisation
Manuel d’utilisation
Façade et face arrière
Panneau supérieur
a
b
c d e
fg
a. Interrupteurd’alimentation
Il met l’appareil sous (‘ON’)/veille (‘STANDBY’) tension.
b. CommandeVOLUME
Règle le niveau de sortie du signal transmis via la prise OUTPUT.
c. CurseursWAVE
Utilisez ces curseurs pour générer la forme d’onde du LFO.
Manipulez librement les 10 curseurs pour façonner le son voulu.
Astuce: Pour retrouver les réglages de l’Uni-Vibe original
(hautement recommandé), placez tous les curseurs WAVE
sur les repères blancs.
d. CommandeINTENSITY
Règle l’intensité des effets.
Quand la pédale d’expression est connectée, appuyez sur
le commutateur CANCEL de la pédale pour désactiver la
commande INTENSITY.
e. CommandeSPEED
Règle la vitesse de modulation.
Quand la pédale d’expression est connectée, la commande
SPEED est désactivée.
f. SélecteurCHORUS/VIBRATO(avecdiodes)
Ce sélecteur permet de choisir l’effet CHORUS (diode rouge) ou
VIBRATO (diode verte).
g. CommutateurEFFECT(avecdiode)
Ce commutateur permet d’activer/de couper les effets.
Panneau arrière
a b c d e
a. PriseEXP.PEDAL
Reliez cette prise à la prise EXP. OUTPUT de la pédale d’expression
avec le câble stéréo fourni.

- 14 -
b. PriseINPUT
Branchez un instrument tel qu’une guitare à cette prise.
c. PriseOUTPUT
Reliez cette prise à votre ampli de guitare ou console.
Ne branchez pas de casque à la prise OUTPUT. Cela risquerait
d’endommager le casque.
d. Connecteur9VDC
Branchez l’adaptateur secteur en option à cette prise.
e. Crochetpourcâble
Enroulez le câble de l’adaptateur secteur autour de ce crochet pour
éviter toute déconnexion accidentelle.
Pédale d’expression
c
ba
a. PriseEXP.OUTPUT
Reliez cette prise à la prise EXP. PEDAL du Nuvibe avec le câble
stéréo fourni.
b. Pédale
Enfoncez la pédale pour augmenter la vitesse de modulation.
Relevez la pédale pour diminuer la vitesse de modulation.
c. CommutateurCANCEL
Appuyez sur ce commutateur pour annuler l’effet de modulation.
Dépannage
L’instrument ne s’allume pas
• L’interrupteur d’alimentation ne se trouve-t-il pas sur la position
STANDBY?
• L’adaptateur secteur est-il correctement connecté ?
• Dans le cas de l’alimentation sur piles, l’appareil contient-il des piles?
• Dans le cas de l’alimentation sur piles, les piles sont-elles installées
correctement (polarité)?
• Dans le cas de l’alimentation sur piles, les piles dans l’instrument ne
sont-elles pas plates?
Pas de son
• La commande VOLUME n’est-elle pas sur un niveau trop bas?
• L’ampli de guitare, la console et les autres appareils sont-ils
correctement connectés aux prises du Nuvibe?
• L’ampli de guitare, la console et les autres appareils sont-ils sous
tension et leur volume est-il réglé sur un niveau suffisant ?
L’autonomie des piles semble courte
• N’auriez-vous pas oublié d’éteindre le Nuvibe? La prise INPUT ne
fait pas office d’interrupteur d’alimentation, aussi le simple fait de
débrancher un câble n’éteint pas l’appareil. Quand vous n’utilisez
pas le Nuvibe, placez son interrupteur d’alimentation sur STANDBY.
• Les piles alcalines dans l’appareil sont-elles neuves?
Aucun effet n’est appliqué
• Le témoin EFFECT est-il allumé?

- 15 -
Nuvibe Manuel d’utilisation
Manuel d’utilisation
• La commande INTENSITY n’est-elle pas sur la position MIN?
• Se pourrait-il que tous les curseurs WAVE se trouvent dans la même
position? Manipulez les curseurs pour générer la forme d’onde.
• Si vous avez branché une pédale d’expression, le commutateur
CANCEL de la portion talon (entièrement relevée) de la pédale n’a-t-
il pas été enfoncé? Enfoncez la pédale d’expression.
L’appareil s’éteint soudainement
• Les piles ne sont-elles pas plates? Si le témoin EFFECT est éteint,
installez des piles neuves.
Le son n’est pas normal
• Placez les curseurs WAVE sur la position recommandée (page 13)
• Manipulez à nouveau la commande INTENSITY et la commande
SPEED.
Le son ne change pas quand vous actionnez les commandes,
curseurs, sélecteurs ou la pédale d’expression
• Les piles ne sont-elles pas plates?
• Quand la pédale d’expression est connectée, la commande SPEED du
Nuvibe est désactivée.
• Quand vous enfoncez le commutateur CANCEL de la pédale
d’expression, la commande INTENSITY du Nuvibe est désactivée.
Fiche technique
Impédance d’entrée/de sortie:
47 KΩ/20 kΩ (maximum)
Prises:
Nuvibe
INPUT Prise jack mono de 6,3 mm
OUTPUT Prise jack mono de 6,3 mm (asymétrique)
EXP. PEDAL Prise jack stéréo de 6,3 mm
Pédale d’expression
EXP. OUTPUT
Prise jack stéréo de 6,3 mm
Alimentation:
6 piles alcalines AA
Adaptateur secteur en option (DC 9V )
Autonomie des piles:
Environ 4 heures en utilisation continue
Consommation électrique:
290 mA (Typ.)
Dimensions (L x P x H):
Nuvibe 260 × 170 × 67 mm
Pédale d’expression 94 × 246 × 81 mm
Poids:
Nuvibe 1,5 kg
Pédale d’expression 1,1 kg
Accessoires fournis:
Câble stéréo, 6 piles alcalines AA, Manuel d’utilisation
Options (disponibles séparément):
Adaptateur secteur DC 9V
* Les caractéristiques et l’aspect du produit sont susceptibles d’être
modifiés sans avis préalable en vue d’une amélioration.
- 16 -
Vorsichtsmaßnahmen
Aufstellungsort
Vermeiden Sie das Aufstellen des Geräts an Orten, an denen.
• es direkter Sonneneinstrahlung ausgesetzt ist;
• hohe Feuchtigkeit oder Extremtemperaturen auftreten können;
• Staub oder Schmutz in großen Mengen vorhan den sind;
• das Gerät Erschütterungen ausgesetzt sein kann.
• in der Nähe eines Magnetfeldes.
Stromversorgung
Schließen Sie das optionale Netzteil nur an eine geeignete Steckdose an. Verbinden
Sie es niemals mit einer Steckdose einer anderen Spannung.
Störeinflüsse auf andere Elektrogeräte
Dieser kann bei in der Nähe aufgestellten Rund-funkempfängern oder Fernsehge-
räten Empfangs störungen hervorrufen. Betreiben Sie solche Geräte nur in einem
geeigneten Abstand von diesem Erzeugnis.
Bedienung
Vermeiden Sie bei der Bedienung von Schaltern und Reglern unangemessenen
Kraftaufwand.
Reinigung
Bei auftretender Verschmutzung können Sie das Gehäuse mit einem trockenen,
sauberen Tuch ab wischen. Verwenden Sie keinerlei Flüssigreiniger wie beispiels-
weise Reinigungsbenzin, Verdün nungs- oder Spülmittel. Verwenden Sie niemals
brennbare Reiniger.
Bedienungsanleitung
Bewahren Sie diese Bedienungsanleitung gut auf, falls Sie sie später noch einmal
benötigen.
Flüssigkeiten und Fremdkörper
Stellen Sie niemals Behältnisse mit Flüssigkeiten in der Nähe des Geräts auf. Wenn
Flüssigkeit in das Gerät gelangt, können Beschädigung des Geräts, Feuer oder ein
elek-trischer Schlag die Folge sein.
Beachten Sie, daß keinerlei Fremdkörper in das Gerät gelangen. Sollte ein Fremd-
körper in das Gerät gelangt sein, so trennen Sie es sofort vom Netz. Wenden Sie
sich dann an Ihren KORG-Fachhändler.
Hinweis zur Entsorgung (Nur EU)
Wenn Sie das Symbol mit der „durchgekreuzten Mülltonne“ auf Ihrem
Produkt, der dazuge hörigen Bedienungsanleitung, der Batterie oder
dem Batteriefach sehen, müssen Sie das Produkt in der vorgeschrie-
benen Art und Weise entsorgen. Dies bedeutet, dass dieses Produkt
mit elektrischen und elektronischen Komponenten nicht mit dem
normalen Hausmüll entsorgt werden darf. Für Produkte dieser Art
existiert ein separates, gesetzlich festgelegtes Entsor gungssystem.
Gebrauchte elektrische und elektronische Geräte müssen separat
entsorgt werden, um ein umweltgerechtes Recycling sicherzustellen.
Diese Produkte müssen bei benannten Sammelstellen abgegeben werden. Die
Entsorgung ist für den Endverbraucher kostenfrei! Bitte er kundigen sie sich
bei ihrer zuständigen Behörde, wo sie diese Produkte zur fach gerechten
Entsorgung abgeben können. Falls ihr Produkt mit Batterien oder Ak-
kumulatoren ausgerüstet ist, müssen sie diese vor Abgabe des Produktes
entfernen und separat entsorgen (siehe oben). Die Abgabe dieses Produktes
bei einer zustän digen Stelle hilft ihnen, dass das Produkt umweltgerecht
entsorgt wird. Damit leisten sie persönlich einen nicht unerheb lichen Beitrag
zum Schutz der Umwelt und der menschlichen Gesundheit vor möglichen
negativen Effekten durch un sachgemäße Entsorgung von Müll. Batte rien oder
Akkus, die Schadstoffe enthal ten, sind auch mit dem Symbol einer durchge-
kreuzten Mülltonne gekennzeich net. In der Nähe zum Mülltonnensymbol
befindet sich die chemische Bezeichnung des Schadstoffes. Cd oder NiCd steht
für Cadmium, Pb für Blei und Hg für Queck silber.
WICHTIGER HINWEIS FÜR KUNDEN
Dieses Produkt wurde unter strenger Beachtung von Spezifikationen und
Spannungsanforderungen hergestellt, die im Bestimmungsland gelten. Wenn
Sie dieses Produkt über das Internet, per Postversand und/oder mit telefoni-
scher Bestellung gekauft haben, müssen Sie bestätigen, dass dieses Produkt
für Ihr Wohngebiet ausgelegt ist.
WARNUNG: Verwendung dieses Produkts in einem anderen Land als dem,
für das es bestimmt ist, verwendet wird, kann gefährlich sein und die Garantie
des Herstellers oder Importeurs hinfällig lassen werden. Bitte bewahren Sie
diese Quittung als Kaufbeleg auf, da andernfalls das Produkt von der Garantie
des Herstellers oder Importeurs ausgeschlossen werden kann.
Alle Produkt- und Firmennamen sind Warenzeichen oder eingetragene Waren-
zeichen der betreffenden Eigentümer.

- 17 -
Nuvibe Bedienungsanleitung
Bedienungsanleitung
Vom Uni-Vibe zum Nuvibe
Vorwort des Entwicklers des Uni-Vibe
Als ich mit der Betreuung der Neuentwicklung eines ein halbes
Jahrhundert alten Produkts betreut wurde, war ich sowohl verwundert
als auch verlegen: Ich durfte erleben, wie sehr junge Ingenieure
selbst heute noch die in den Pionierzeiten entworfenen Instrumente
wertschätzen und wurde gleichzeitig in meine Jugend zurückversetzt.
Damals hatte ich keinen Bezug zur zeitgenössischen populären Musik
mehr. Dennoch war ich der Ansicht, dass wir durch eine sorgsame
Kombination diverser bekannter „Soundingredienzen“ ein neues
Instrument erschaffen können.
Einer dieser Sounds war das Auf- und Abschwellen nächtlicher
Kurzwellen-Radiosendungen. Die langsam und unberechenbar
wechselnden Radiowellen der Sendungen von Radio Moskau, die
irgendwie ihren Weg ins entfernte Japan fanden, kamen mir vor wie
nostalgische Musik. Genau dieses Gefühl wollte ich mit dem originalen
Uni-Vibe vermitteln. Was leichter gedacht war als getan, denn die
Entwicklung eines Oszillators, dessen Einstellungsbereich von extrem
langsamen Schwingungszyklen bis hin zu einem Vibrato reicht, stellte
uns vor so manche schwere Herausforderung.
Die jungen Ingenieure, die nun dieses Gerät zum Nuvibe
weiterentwickelt haben, sind im selben Alter wie ich damals – und
haben sich nicht minder harten Herausforderungen gestellt.
Denn ähnlich wie die Entwicklung eines neuen Geräts ist auch die
Weiterentwicklung eines elektronischen Musikinstruments aus der
Vergangenheit – anders als generell angenommen – keine leichte
Aufgabe. So stellen sich beispielsweise Fragen zur Originalgetreue: Soll
das neue Gerät so originaltreu geraten, dass es auch die Nachteile des
Inhaltsubersicht
Vom Uni-Vibe zum Nuvibe . . . . . . . . . . . . . . . . . . . .17
Vorwort des Entwicklers des Uni-Vibe . . . . . . . . . . . . . . . . . . . . . .17
Wichtigste Eigenschafen ...................................18
Vorbereitung .................................19
Einlegen der Batterien .....................................19
Anschlüsse ................................................19
Ober- und Rückseite ..........................20
Oberseite .................................................20
Rückseite ..................................................21
Expression-Pedal ..........................................21
Fehlersuche ..................................22
Technische Daten .............................23
Vielen Dank für Ihre Entscheidung zu einem Korg Nuvibe
Vibrato-Chorus-Effektgerät. Bitte lesen Sie sich diese Anleitung
vollstädig durch, um bei der Bedienung alles richtig zu machen.

- 18 -
Originals emuliert? Und was war überhaupt das Original?
Denn ähnlich wie bei alten Geigen weisen auch alte elektronische
Musikinstrumente individuelle Unterschiede auf – und dazu gehören
nicht nur Änderungen an Bauteilen im Laufe der Zeit.
Damals waren bei elektronischen Bauteilen Fehlermargen von 10 %, ja
selbst 20 % üblich, was dazu führte, dass zwei Geräte desselben Typs
völlig unterschiedlich klingen konnten.
Die größte Hürde war, dass aufgrund der Richtlinien zur Beschränkung
der Verwendung gefährlicher Stoffe CdS-(Kadmiumsulfit)-
Fotowiderstände nicht mehr als Bauteile von Musikinstrumenten
verwendet werden dürfen. Selbst in unserer heutigen Zeit mit ihren
vielfältigen Hochleistungs-Elektronikbauteilen hat sich jedoch noch
kein adäquater Ersatz dazu gefunden. Es mag umstritten sein, diese
Richtlinien auf Bauteile anzuwenden, mit denen der Nutzer gar nicht
in direkten Kontakt kommt – doch es blieb uns nichts anderes übrig, als
lange nach einer alternativen Herangehensweise zu suchen.
Selbst nun, wo ich dieses Vorwort schreibe, sind noch nicht alle Belange
zu unserer vollsten Zufriedenheit geklärt. Doch wenn ich mir ansehe,
wie hart und engagiert diese jungen Ingenieure zusammenarbeiten,
bin ich mir sicher, sie werden auch diese Herausforderungen meistern.
Es lässt mich immer wieder Staunen, dass manche Musikinstrumente
– nicht nur elektronische – nachgeahmt werden. Und es erfüllt mich
mit Freude und Stolz, dass ein von mir entworfenes elektronisches
Musikgerät nach einem halben Jahrhundert nun ebenfalls ins Visier
genommen wird.
Wir sollten das Glück schätzen, dass wir damals hatten, als wir – noch
ohne den Begriff „Effektgerät“ zu kennen – voller Leidenschaft daran
arbeiteten, mithilfe elektrischer Schaltkreise neue, andere Sounds zu
erschaffen.
November 2013
Fumio Mieda
Wichtigste Eigenschafen
• „Der Uni-Vibe des 21. Jahrhunderts“, entworfen unter der
Aufsicht von Fumio Mieda, Entwickler des visionären Uni-Vibe
• Emulation des Expression-Pedals mit CANCEL-Schalter
• Emulation der originalen Oszillation mithilfe eines 10-Stufen-
Sequenzers
• Echter Bypass
- 19 -
Nuvibe Bedienungsanleitung
Bedienungsanleitung
Vorbereitung
Einlegen der Batterien
Vor dem Auswechseln der Batterien müssen Sie das Gerät
unbedingt ausschalten.
Erschöpfte Batterien müssen so schnell wie möglich aus dem
monotribe entfernt werden, weil es sonst zu Betriebsstörungen
(z.B. durch Auslaufen der Batterieflüssigkeit) kommen kann.
Entfernen Sie die Batterien außerdem, wenn Sie den monotribe
längere Zeit nicht verwenden möchten.
Wechseln Sie immer alle Batterien aus und verwenden Sie nur
jeweils Batterien desselben Typs.
1. Entfernen Sie den Batteriefachdeckel an der Unterseite.
2. Legen Sie sechs AA-Batterien unter Einhaltung der richtigen
Polarität (+/–-Pol) ein. Verwenden Sie nur Alkali-Batterien.
3. Schließen Sie das Batteriefach wieder.
Anschlüsse
Schließen Sie Ihre Gitarre und Ihren Verstärker an den Nuvibe an und
schalten Sie ihn ein.
Achten Sie darauf, dass das Gerät ausgeschaltet ist, bevor Sie
andere Geräte anschließen.
AC-Netzteil
(als Zubehör erhältlich)
Z
ur Steckdose
Gitarre
Gitarrenverstärker
Expression-Pedal
Nuvibe
Stereokabel
(im Lieferumfang
enthalten)
Tipp: Der Nuvibe funktioniert auch ohne angeschlossenes Expression-
Pedal.
- 20 -
Ober- und Rückseite
Oberseite
a
b
c d e
fg
a. Netzschalter
Hiermit schalten Sie das Gerät ein („ON”) und bereitschaft
(„STANDBY”).
b. VOLUME-Regler
Zur Einstellung des Ausgangspegels der OUTPUT-Buchse.
c. WAVE-Schieberegler
Schieberegler zur Auswahl der LFO-Wellenform. Bewegen Sie die
10 Schieberegler, um den gewünschten Sound zu generieren.
Tipp: Befinden sich alle WAVE-Schieberegler in der mit weißen
Markierungen gekennzeichneten Position, werden die
Originaleinstellungen des Uni-Vibe emuliert (empfohlen).
d. INTENSITY-Regler
Regler zur Einstellung der Intensität der Effekte.
Falls Sie ein Expression-Pedal angeschlossen haben, drücken
Sie den CANCEL-Schalter am Pedal, um den INTENSITY-
Regler zu deaktivieren.
e. SPEED-Regler
Regler zur Einstellung der Modulationsgeschwindigkeit.
Falls Sie ein Expression-Pedal angeschlossen haben, ist der
SPEED-Regler deaktiviert.
f. CHORUS/VIBRATO-Schalter(LEDs)
Zum Umschalten des Effekts zwischen CHORUS (rote LED) und
VIBRATO (grüne LED).
g. EFFECT-Schalter(LED)
Zum Ein- und Ausschalten der Effekte.
Table of contents
Languages:
Other Korg Music Pedal manuals

Korg
Korg KAOSS PAD KP2 User manual

Korg
Korg Nu:Tekt OD-S User manual

Korg
Korg G3 User manual

Korg
Korg Nu:Tekt TR-S User manual

Korg
Korg FK1 User manual

Korg
Korg Pitchblack Custom User manual

Korg
Korg AX100G User manual

Korg
Korg Toneworks AX1G User manual

Korg
Korg MIKU STOMP User manual

Korg
Korg FK1 User manual


