Korg ToneWorks AX10B User manual

2
AX10B Program Chart
Prog# PRE FX Value AMP MID FC/ BASS MIDDLE TREBLE
VOLUME MODULA-
DEPTH SPEED
AMBIENCE
DEPTH TIME PEDAL
VOL PEDAL
NR Comments
TYPE GAIN
TION
FX MIN
01 COMP 25 VALVE2 5 30 18 26 11 OFF - - OFF - - VOL. 0 5 Standard
02 COMP 15 LA STUDIO 1 27 26 23 11 CHORUS 20 - OFF - - MOD. - 5 LA Chorus
03 COMP 5 UKMAJOR 21 18 30 28 13 OFF - - ROOM 14 2.4 AMB. - 5 Pedal Reverb
04 OCTAVE 14 STUDIO 29 25 28 23 15 TALK 16 5 OFF - - MOD. - 10 Dirty Talk
11 COMP 10 AC100 30 21 19 20 14 PHASER 0 0 AIR 19 - VOL. 0 15 Standard 2
12 COMP 13 VALVE2 2 26 19 25 15 CHORUS 29 0 PLATE 20 4.3 AMB. - 5 Pedal Plate
13 DIST 9 STUDIO 30 20 27 16 12 FLANGE 15 5 AIR 20 - VOL. 0 15 Dist Flange
14 COMP 14 EQ 5 24 14 25 17 FILTER 26 21 OFF - - VOL. 0 5 Auto Wah
21 COMP 11 CLASSIC 5 16 16 19 20 OFF - - AIR 11 - VOL. 0 5 Standard 3
22 COMP 8 LA STUDIO 3 19 7 16 20 OFF - - PLATE 15 3.2 AMB. - 5 Clean Plate
23 DIST 30 CLASSIC 5 21 25 22 15 OFF - - PLATE 21 3.4 AMB. - 10 Dirty Plate
24 OFF - UKMAJOR 12 25 17 22 16 TALK 24 1 OFF - - MOD. - 10 Talker
31 COMP 14 LA STUDIO 2 28 25 23 15 OFF - - OFF - - VOL. 0 6 Standard 4
32 COMP 21 SCOOPED 2 25 26 26 17 PHASER 29 5 OFF - - VOL. 0 10 Phaser
33 COMP 30 VALVE2 4 23 24 23 17 OFF - - PP DLY 30 0.6 AMB. - 6 Ping Pong1
34 COMP 15 VALVE 2 25 14 21 15 TREM 26 - OFF - - MOD. - 5 Pedal Trem
41 COMP 25 LA STUDIO 5 25 28 24 15 OFF - - HALL 5 2.4 VOL. 0 14 Standard 5
42 COMP 13 CLASSIC 5 24 15 23 17 OFF - - HALL 17 2.4 AMB. - 5 Motown
43 DIST 27 STUDIO 25 30 23 21 13 FEEDBK 30 2 OFF - - VOL. 0 10 Feedback1
44 COMP 11 EQ 3 25 17 25 15 FILTER 25 - MULTI 16 0.6 MOD. - 10 Pedal Filter
51 COMP 13 JAZZ 1 19 24 6 18 OFF - - OFF - - VOL. 0 5 Standard 6
52 COMP 25 LA STUDIO 5 26 27 20 14 PHASER 10 - SLAP 9 0.15 MOD. - 10 Phaser Slap
53 COMP 19 AC100 26 27 28 15 12 PITCH1 4 - OFF - - MOD. - 5 Pitch Major 3rd
54 OCTAVE 22 CLASSIC 5 20 21 27 19 PHASER 22 13 HALL 7 2.4 OCT. - 10 PedalOctave1
61 COMP 13 VALVE2 1 21 22 11 14 OFF - - OFF - - VOL. 0 5 Standard 7
62 OCTAVE 18 GOLDPNL 3 26 28 22 16 OFF - - SLAP 18 0.075 OCT. - 5 PedalOctave2
63 COMP 19 VALVE 3 22 15 23 15 ROTARY 15 - SPRING 18 2.4 MOD. - 5 PedalRotary
64 DIST 25 LA STUDIO 3 22 23 18 10 OFF - - ECHO1 30 0.6 AMB. - 15 Dist Echo
71 COMP 21 SCOOPED 2 24 0 15 24 OFF - - AIR 16 - VOL. 0 5 Standard 8
72 COMP 15 VALVE 3 21 20 22 19 TREM 20 9 ROOM 11 0.5 VOL. 0 5 Tremolo
73 COMP 15 EQ 5 19 24 24 20 PITCH1 d 22 ECHO2 30 0.8 AMB. - 7 Pedal Echo2
74 COMP 11 UKMAJOR 15 14 21 30 13 FILTER 23 - SLAP 15 0.02 MOD. - 10 Filter wah
81 COMP 20 GOLDPNL 4 26 14 19 16 OFF - - OFF - - VOL. 0 5 Standard 9
82 COMP 8 LA STUDIO 4 22 7 30 17 OFF - - PP DLY 30 0.84 AMB. - 10 Ping Pong2
83 DIST 0 VALVE2 3 25 23 18 18 OFF - - OFF - - VOL. 0 10 OverDrive
84 OCTAVE 26 EQ 3 25 27 22 14 FILTER 14 20 SLAP 24 0.025 OCT. - 10 Synth1
91 COMP 8 STUDIO 10 18 21 29 17 OFF - - OFF - - VOL. 0 5 Standard10
92 COMP 20 AC100 20 20 21 25 15 FEEDBK 21 1 HALL 12 4.8 VOL. 0 5 Feedback2
93 OFF - VALVE 2 18 16 25 21 PITCH2 SP - SLAP 20 0.035 MOD. - 5 PedalPitch-SP
94 OCTAVE 25 LA STUDIO 5 27 18 20 17 FILTER 25 19 OFF - - OCT. - 5 Synth2

3
Bedirnungshandbuch Manuel d'utilisation Owner's Manual
Owner’s Manual
Introduction
Thank you for purchasing the AX10B — Tone Works
bass modeling signal processor. To ensure trouble-
free enjoyment, please read this manual carefully
and use the product as described. When you have
finished reading the manual, keep it for future
reference.
• Korg’s “REMS” modeling technology is used to
provide numerous sophisticated effects including:
3 types of pre-effects, 11 types of amp modeling,
11 types of modulation effects, and 11 types of
ambience effects. The panel controls for these
amps and effects are logically arranged according
to the signal flow, from the bass input to the output,
allowing you to easily and intuitively create a wide
range of sounds.
PRE FX
3 TYPES
INPUT OUTPUT
AMP TYPE
11 TYPES
MODULATION
11 TYPES
AMBIENCE
11 TYPES
AX10B signal routing
•The AX10B models a variety of famous bass amp
sounds, ranging from distinctive warm and fat tube
amp sounds to the sound of modern amps. Effects
such as chorus, delay, and tape echo are also
provided.
•40 factory presets that take full advantage of the
AX10B’s potential are provided for immediate use,
plus 40 of your own settings in the user area.
•The built-in expression pedal gives you an added
dimension of realtime control, letting you change
the volume, add a pitch one octave lower, or
control the modulation speed, delay time, filter, or
pitch bend. There’s even a unique Talk effect that
produces a talking modulator sound, opening up
new possibilities for bass performance.
•The built-in Auto Chromatic Tuner lets you tune
silently which is ideal for live situations.
Table of contents
Introduction .............................................................. 3
Precautions .............................................................. 4
Quick Start ............................................................... 5
Parts and what they do ............................................ 6
Front panel ........................................................ 6
Rear panel ......................................................... 7
Setup ........................................................................ 8
Turning the power on/off ................................... 8
Connections ....................................................... 8
Playing the AX10B ................................................... 9
Selecting programs ........................................... 9
Bypass and Mute ............................................... 9
Tuner .................................................................. 9
Using the expression pedal ............................. 10
Creating sounds .................................................... 10
Creating sounds on the AX10B ....................... 10
PRE FX ............................................................ 11
AMP TYPE ....................................................... 11
MODULATION ................................................. 11
AMBIENCE ...................................................... 12
Expression pedal ............................................. 12
NR (Noise Reduction) ..................................... 12
Storing a program .................................................. 12
Other functions ...................................................... 13
Calibrating (adjusting) the expression pedal .. 13
Restoring programs to the factory settings ..... 13
Troubleshooting ..................................................... 13
Main specifications ................................................ 14

4
Precautions
Location
Using the unit in the following locations can result in a malfunction.
•In direct sunlight
•Locations of extreme temperature or humidity
•Excessively dusty or dirty locations
•Locations of excessive vibration
•Close to magnetic fields
Power supply
Please connect the designated AC adapter to an AC outlet of the correct voltage. Do not connect it to an AC outlet
of voltage other than that for which your unit is intended.
Interference with other electrical devices
Radios and televisions placed nearby may experience reception interference. Operate this unit at a suitable
distance from radios and televisions.
Handling
To avoid breakage, do not apply excessive force to the switches or controls.
Care
If the exterior becomes dirty, wipe it with a clean, dry cloth. Do not use liquid cleaners such as benzene or thinner,
or cleaning compounds or flammable polishes.
Keep this manual
After reading this manual, please keep it for later reference.
Keeping foreign matter out of your equipment
Never set any container with liquid in it near this equipment. If liquid gets into the equipment, it could cause a
breakdown, fire, or electrical shock.
Be careful not to let metal objects get into the equipment. If something does slip into the equipment, unplug the AC
adapter from the wall outlet. Then contact your nearest Korg dealer or the store where the equipment was purchased.
THE FCC REGULATION WARNING (for U.S.A.)
This equipment has been tested and found to comply with the limits for a Class B digital device, pursuant to Part
15 of the FCC Rules. These limits are designed to provide reasonable protection against harmful interference in
a residential installation. This equipment generates, uses, and can radiate radio frequency energy and, if not
installed and used in accordance with the instructions, may cause harmful interference to radio communications.
However, there is no guarantee that interference will not occur in a particular installation. If this equipment does
cause harmful interference to radio or television reception, which can be determined by turning the equipment off
and on, the user is encouraged to try to correct the interference by one or more of the following measures:
•Reorient or relocate the receiving antenna.
•Increase the separation between the equipment and receiver.
•Connect the equipment into an outlet on a circuit different from that to which the receiver is connected.
•Consult the dealer or an experienced radio/TV technician for help.
Unauthorized changes or modification to this system can void the user’s authority to operate this equipment.
CE mark for European Harmonized Standards
CE mark which is attached to our company’s products of AC mains operated apparatus until December 31,
1996 means it conforms to EMC Directive (89/336/EEC) and CE mark Directive (93/68/EEC).
And, CE mark which is attached after January 1, 1997 means it conforms to EMC Directive (89/336/EEC), CE
mark Directive (93/68/EEC) and Low Voltage Directive (73/23/EEC).
Also, CE mark which is attached to our company’s products of Battery operated apparatus means it conforms
to EMC Directive (89/336/EEC) and CE mark Directive (93/68/EEC).
IMPORTANT NOTICE TO CONSUMERS
This product has been manufactured according to strict specifications and voltage requirements that are
applicable in the country in which it is intended that this product should be used. If you have purchased this
product via the internet, through mail order, and/or via a telephone sale, you must verify that this product is
intended to be used in the country in which you reside.
WARNING: Use of this product in any country other than that for which it is intended could be dangerous and
could invalidate the manufacturer’s or distributor’s warranty.
Please also retain your receipt as proof of purchase otherwise your product may be disqualified from the
manufacturer’s or distributor’s warranty.
What is ?
(Resonant structure and Electronic circuit Modeling System) is KORG’s proprietary sound modeling
technology which precisely reproduces the complex character and nature of both acoustic and electric
instruments as well as electronic circuits in real world environments. emulates a wide variety of sound
generation characteristics including instrument bodies, speakers & cabinets, acoustic fields, microphones,
vacuum tubes, transistors, etc.

5
Quick Start
Before you make connections with any external
devices, turn all volumes to the minimum position
and turn off the power.
1. If you will be powering the AX10B with batteries,
open the battery compartment located on the
bottom panel, and install four AA alkaline
batteries (sold separately). If you will be powering
the AX10B with the separately sold AC adaptor,
connect the AC adaptor to the rear panel DC9V
connector (the power will turn on).
2. Set the INPUT L/H switch to the appropriate
position for the output of your bass. Use the “H”
position if your bass has a high output, or the “L”
position if your bass has a low output.
3. Connect your bass to the AX10B’s INPUT jack. If
you are using batteries, the power of the AX10B
will turn on at this point.
4. If you are connecting the AX10B to a bass amp,
set the AMP/LINE switch to “AMP”. If you are
connecting the AX10B to headphones, a recorder,
or a mixer, set this switch to “LINE”.
5. Connect the AX10B’s OUTPUT jack to the INPUT
of your bass amp or recorder. If you want to use
headphones, connect them to the OUTPUT jack.
6. Turn on the power of the connected equipment,
and raise the volume to an appropriate level. You
can also use the AX10B’s MASTER buttons to
adjust the volume.
7. Press the program select switches to change
programs.
TIPS
The AX10B has 40 preset programs (01~94) and 40
user programs (0.1~9.4). With the factory settings,
the user programs contain the same
contents as the preset programs.
8. You can control the pedal effect by using the
expression pedal. The pedal is active when the
PEDAL LED at the upper left of the pedal is lit. If
this LED is dark, advance the pedal all the way
forward to make the LED light and the pedal will
be active.
9. Editing the sound
Use the AMP TYPE selector to select an amp
type, and use the various control knobs to adjust
the gain, tone, and volume etc.
10. Editing an effect
If you want to edit the modulation effect or
ambience effect (located after the amp), use the
MODULATION selector or AMBIENCE selector to
select the desired effect, and use the DEPTH
buttons located below the selector to adjust the
effect depth etc. You can also adjust the speed
etc. of a modulation effect by holding down the
FUNCTION button and pressing the DEPTH
buttons (which act as the SPEED buttons). For the
ambience effect, you can set the delay or reverb
time by pressing the TAP button at the desired
interval.
11. To edit the pre-effect located before the amp,
press the PRE FX button to select an effect, and
use the VALUE buttons to make adjustments.
This concludes our brief introduction to the
AX10B. This manual contains much more
information about the AX10B so please read it to
ensure that you are taking full advantage of all its
capabilities.
54 3
6
7
8
8
9
7
9
10 10
10
11
10
2 1

6
Parts and what they do
Front panel
○○○○○○○○○○○○○○○○○○○○○○○○○
1
Display
This shows the program number and when you
operate a knob or button, the value of that parameter
will briefly appear in the display.
•This will light when the power is on.
•The dot in the lower right of the display will light
when you edit a parameter value.
•If the AX10B is running on batteries, will blink
when the batteries run low.
○○○○○○○○○○○○○○○○○○○○○○○○○
2
AMP TYPE selector
This selects one of 11 types of amp models.
3
Control knobs
These knobs adjust the gain, tone, and volume of the
amp models.
You can adjust the depth of the noise reduction (NR)
by holding down the FUNCTION button and turning
the VOLUME/NR knob.
Some settings of these knobs may cause distortion
in your sound. If this occurs, lower the VOLUME
control knob (or MASTER buttons).
○○○○○○○○○○○○○○○○○○○○○○○○○
4
PRE FX (TUNER) LED
These indicate the selected pre-effect.
The LEDs will not light if the pre-effect is off.
When the tuner is operating, these LEDs indicate the
difference from the correct pitch. (p.9)
5
PRE FX button
Each time you press this button, the pre-effect type
will change in the order of COMP →DIST →OCTAVE
→COMP.
6
VALUE (CALIB) buttons –ON/OFF–
These buttons adjust the value of the pre-effect.
You can switch PRE FX on/off by pressing the
VALUE ▲and ▼buttons simultaneously.
When the tuner is operating, you can use these
buttons to adjust the calibration (CALIB).
○○○○○○○○○○○○○○○○○○○○○○○○○
7
MODULATION selector
This selects one of 11 types of modulation effects.
8
DEPTH/SPEED buttons –ON/OFF–
These buttons adjust the depth etc. of the modulation
effect (DEPTH).
You can adjust the modulation speed etc. by holding
down the FUNCTION button and pressing these
buttons (SPEED).
You can switch the MODULATION effect on/off by
pressing the DEPTH ▲and ▼buttons simulta-
neously (ON/OFF). When off, the MODULATION
selector LED will not be lit.
○○○○○○○○○○○○○○○○○○○○○○○○○
9
AMBIENCE selector
This selects one of 11 ambience effects.
10
DEPTH buttons –ON/OFF–
These buttons adjust the depth etc. of the selected
ambience effect.
You can switch AMBIENCE on/off by pressing the
DEPTH ▲and ▼buttons simultaneously (ON/OFF).
When off, the AMBIENCE selector LED will not be lit.
If the expression pedal is controlling volume, you can
set the minimum volume (i.e., when the pedal is fully
returned) by holding down the FUNCTION button
and pressing ▲or ▼.
11
TAP button
You can set the delay or reverb time of the ambience
effect by tapping this button at the desired interval.
The LED located at the left will blink to indicate the
tempo.
1 3
4
5
62
7
8
9
10
12
13
14
15
11
16
17
18
19

7
○○○○○○○○○○○○○○○○○○○○○○○○○
12
FUNCTION button
To edit one of the parameters printed on the front
panel in red, hold down this button and operate the
corresponding knob or button. For example, you can
edit the speed of the modulation effect by holding
down this button and using the MODULATION
DEPTH buttons.
○○○○○○○○○○○○○○○○○○○○○○○○○
13
MASTER (CANCEL) buttons
These buttons adjust the overall volume of the
AX10B (MASTER).
When the AX10B is ready to write (store), pressing
either of these buttons will cancel the Write operation
(CANCEL).
14
WRITE button
Use this button to write (store) a program.
When you press this button, the AX10B will enter
“write-ready”mode; if you press this button again,
the program will be written (stored). (p.12)
○○○○○○○○○○○○○○○○○○○○○○○○○
15
PEDAL FX/BANK HOLD button
This button selects the effect that will be controlled
by the expression pedal (Pedal Effect).
Each time you press the button, the LED will change
color to indicate the pedal effect that will be con-
trolled.
ORG: OCTAVE (orange): Octave
RED:MOD (red):
The effect selected by MODULATION
GRN:AMB (green):
The effect selected by AMBIENCE
OFF:VOLUME (dark): Volume pedal
If something other than OCTAVE is selected for the
pre-effect, you cannot use the PEDAL FX button to
select OCTAVE.
By holding down the FUNCTION button and pressing
this button, you can select “bank hold”mode as the
way in which programs will be selected (BANK
HOLD). Refer to “Selecting programs: b”(p.9).
○○○○○○○○○○○○○○○○○○○○○○○○○
16
Expression pedal
You can use the expression pedal to control effects
or volume. By advancing the pedal all the way
forward you can switch the selected pedal effect on/
off.
17
PEDAL LED
This LED will light if the expression pedal is active.
18
ORIGINAL VALUE LED
This LED will light if the edited value is identical to
the saved (original) value.
○○○○○○○○○○○○○○○○○○○○○○○○○
19
Program select switches DOWN/BANK DOWN,UP/
BANK UP –BYPASS,TUNE–
Use these switches to select programs. You can
select programs in one of three ways. Refer to
“Selecting programs”(p.9).
If you press the UP and DOWN switches simulta-
neously, the effects will be bypassed and the tuner
will operate (BYPASS) (p.9).
Rear panel
○○○○○○○○○○○○○○○○○○○○○○○○○
20
INPUT L/H select switch
Set this switch according to the pickup output of your
bass.
H: High-output basses with active circuitry
L: Low-output basses
21
INPUT jack
Connect your bass to this jack. Use a 1/4" mono
plug. If the AX10B is running on batteries, the power
will come on when you plug into this jack.
If the AX10B is running on batteries, the power will
not come on if a 1/4" stereo plug is inserted.
○○○○○○○○○○○○○○○○○○○○○○○○○
22
OUTPUT jack
Connect this jack to your bass amp, recorder, or
headphones.
23
AMP/LINE select switch
Set this to “AMP”if you are plugging into an amp, or
to “LINE”if you are plugging into a recorder or using
headphones.
If you are connecting the AX10B to a bass amp that
has a tweeter for extended high-frequency re-
sponse, select the “LINE”position.
○○○○○○○○○○○○○○○○○○○○○○○○○
24
DC9V
The separately sold AC adapter can be connected
here (p.8). When this is connected, the power will be
turned on automatically.
You must only use the specified AC adaptor (p.14).
25
Cable hook
If the separately sold AC adapter is used, connect
the cable of the AC adapter around this hook (p.8).
2425 20 21 22 23

8
Setup
Turning the power on/off
Before you turn the power on or off, you must turn
down the volume of any connected devices.
When using batteries:
1. To open the battery compartment, lightly press
the tab located by the arrow and lift the cover up.
Install four AA alkaline batteries (sold separately)
observing the correct polarity and close the
cover.
2. When using batteries, the power will turn on
when a mono cable is plugged into the INPUT
jack. The display will light while the power is on.
The power will turn off when you remove the
cable from the INPUT jack.
Be sure to remove the cable from the INPUT jack
when you are not using the AX10B to preserve
battery life.
If you connect a stereo cable, the power will not be
turned on.
When the batteries run down, an indication of
will blink in the display. Please replace the batteries
as soon as possible. If dead batteries are left in the
unit, they may leak or cause other malfunctions.
You should also remove the batteries if you will not
be using the AX10B for an extended period.
When using the AC adaptor:
1. Connect the separately sold AC adaptor to the
DC 9V jack, and plug the AC adaptor into an AC
outlet. The POWER LED will light, and the power
will turn on.
Use only the specified external AC adaptor. (p.14)
Be sure to disconnect the AC adaptor from the AC
outlet when you are not using the AX10B.
Do not apply excessive force to the cable.
Wrap the AC adaptor cable around the hook as
shown in the diagram.
Connections
1. Turn off the power of the equipment you want to
connect, and lower each volume control.
2. Set the INPUT L/H switch according to the output
of your pickups.
“H”is suitable for basses that have a high output
level. “L”is suitable for basses that have a low
output level.
3. Connect your bass to the INPUT jack.
4. Set the LINE/AMP select switch to the appropriate
position.
Use the “AMP”position if you are connecting the
AX10B to a bass amp. Use the “LINE”position if
you are connecting the AX10B to audio equip-
ment such as mixers, recorders or headphones.
If you are connecting the AX10B to a bass amp that
has a tweeter for extended high-frequency re-
sponse, select the “LINE”position.
5. Connect the OUTPUT jack to your amp or
recorder, etc.
The OUTPUT jack is stereo (TRS), so if you use
a mono cable to connect it to your bass amp etc.,
only the sound of the L (left) channel will be
heard.
If you are listening through headphones, connect
them to this jack.
If you are running into two channels of a mixer or
using two amplifiers in stereo, use a stereo to
dual mono cable.
6. When you have finished making connections,
turn on the power of your bass amp, recorder, or
other equipment, and adjust the volume.
Use the MASTER buttons to adjust the overall
volume (master level) of the AX10B. (p.7
13
)
TIPS
If the sound distorts when you play the AX10B in
“bypass”mode, use the MASTER buttons to lower
the level.
INPUTOUTPUT
AMP/LINE
LINE
L/H
INPUT
AMP/LINE
AMP
INPUT
Headphones
Recorder, mixer, etc.
1/4" mono
—1/4" mono
1/4" mono x 2
—1/4" stereo
1/4" mono
—1/4" mono
Bass amp
AC adaptor
to an AC outlet
Audio equipment
Stereo phono
—1/4" stereo
Bass
1/4" mono
—1/4" mono

9
Playing the AX10B
Selecting programs
When you’ve finished setting up, you can select
programs and try them out.
The AX10B has 40 preset programs and 40 user
programs. There are ten preset banks (0~9) and ten
user banks (0.~9.), with four programs in each bank.
User programs
Program: 1~4
Preset programs
Bank: 0.~9. Bank: 0~9 Program: 1~4
You can select programs in any of the following three
ways.
a: Step through the programs of all banks
1. Press the program select UP or DOWN switch.
...9.4÷01÷02÷03÷04÷11÷...÷93÷94÷0.1...
b: Step through the programs in a bank
1. Hold down the FUNCTION button and press the
PEDAL FX (BANK HOLD) button to select “bank
hold”mode. The bank will appear as “ ” in the
display.
2. Press the program select UP or DOWN switch.
Only the program will change; the bank will
remain the same.
...H4÷H1÷H2÷H3÷H4÷H1÷H2...
3. To defeat “bank hold”mode, hold down the
FUNCTION button and press the PEDAL FX
(BANK HOLD) button.
c: Step through the banks (leaving the program fixed)
1. Hold down the FUNCTION button and press the
program select UP (BANK UP) or DOWN (BANK
DOWN) switch. The bank will change. You can
also use this method while Bank Hold mode is
selected. (The following example is when
program 1 is selected)
...11÷21÷31÷41÷...÷91÷0.1÷...÷9.1...
a1 c1 b2
c1
b1
b1
Bypass and Mute
If you bypass the AX10B, your sound will be direct
(dry) without any effects (wet).
If you mute the AX10B, there will be no sound.
1. Simultaneously press the UP and DOWN
program select switches.
Bypass: Simultaneously press UP and DOWN
and release them immediately.
Mute: Simultaneously press UP and DOWN
and hold them for about one second;
then release them.
When you press UP and DOWN simultaneously,
the display will blink slowly, and after approxi-
mately one second will blink more rapidly. To
bypass, release the buttons while the display is
blinking slowly. To mute, release the buttons when
the display is blinking rapidly.
2. To cancel Bypass or Mute, press either the UP or
DOWN program select switch.
Tuner
You can use the AX10B’s built-in auto chromatic
tuner to tune your bass. To activate the tuner,
simultaneously press the UP and DOWN program
select switches.
TIPS
You can activate the tuner by selecting either
Bypass or Mute. If you select Mute, you will be able
to tune silently.
Tuning procedure
1. To activate the tuner, simultaneously press the
UP and DOWN program select switches to either
Bypass or Mute the AX10B. For the procedure,
refer to “Bypass and Mute”(above).
2. Pluck the string that you want to tune, and the
closest note name will appear in the display. A
decimal point “.”at the right of the note name
indicates a sharp (#).
Do not play two or more strings simultaneously
when tuning.
3. Tune the string approximately so that the correct
note name is shown in the display.
4. Fine-tune the string so that only the middle LED
of the PRE FX (TUNER) section is lit.
When the note name is A#
Too low Too high Correct tuning
5. When you have finished tuning, press the UP or
DOWN program select switch to return to
normal operation.
Adjusting the tuner calibration
When you turn on the power, middle A is set to a
reference frequency of 440 Hz. If desired, you can
adjust (calibrate) this reference pitch.
1. While the tuner is activated, use the VALUE
(CALIB) buttons to adjust the calibration.
The range is 438~445 Hz. When you adjust the
value, the display will show the lower two digits of
the calibration frequency (e.g., “41”for 441 Hz).
The AX10B does not remember the tuner calibra-
tion setting when powered-off.

10
Using the expression pedal
You can use the expression pedal to add a pitch one
octave lower, and control parameters such as
volume, modulation speed, filter, pitch bend, and
ambience level.
The expression pedal can control the PRE FX effect
OCTAVE, a parameter of the selected MODULATION
or AMBIENCE effect (11 types each), or volume. You
can choose one of these to be controlled by the
expression pedal.
Using the expression pedal
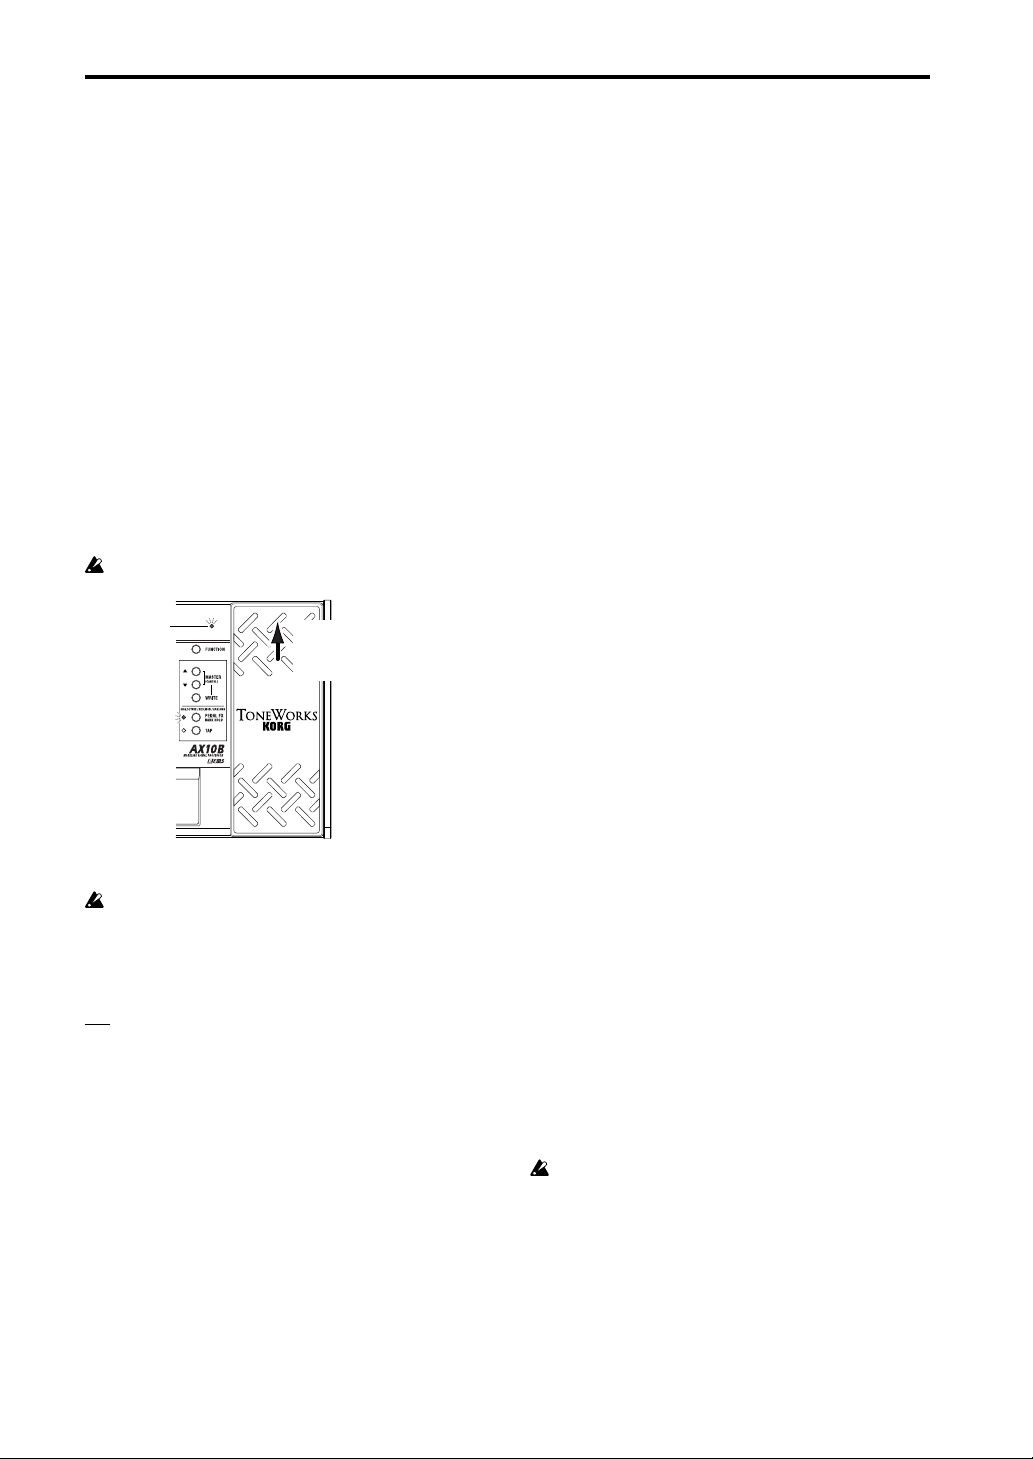
1. Select a program for which the PEDAL LED
(located at the upper left of the expression pedal)
is lit.
If you have selected a program for which the
PEDAL LED is lit, you can use the expression
pedal to control a pedal effect.
Even for programs for which the PEDAL LED is
not lit, you can advance the pedal all the way to
switch it on (the PEDAL LED will light).
If volume is selected as the pedal effect, you cannot
switch it on/off from the pedal; it will always be on.
PEDAL LED If the PEDAL
LED is not lit,
advance the
pedal
2. Operate the expression pedal while you play, and
you’ll notice how the sound changes accordingly.
Do not apply excessive force to the expression
pedal. Before you begin using the expression
pedal, you should determine the amount of force
that is needed to make the PEDAL LED light or to
control the effect, and use only the necessary
amount of force.
TIPS
You can use the PEDAL FX button to switch the
effect (or volume) that is controlled by the expres-
sion pedal. The current assignment is indicated by
the color of the LED located at the left of the button.
(p.12)
Creating sounds
Creating sounds on the AX10B
You can create sounds in one of two ways; you can
edit an existing preset program or user program, or
you can create a sound “from scratch”.
If you want to start from an existing program, select a
program that is close to the sound you want, and
modify it as necessary. Adjust the amp MID FC/
GAIN,BASS, MIDDLE and TREBLE knobs, and use
the VALUE, DEPTH, SPEED, and TAP buttons to
adjust the depth and speed etc. of the effects.
If you want to create a sound from scratch, you can
(for example) begin by selecting the AMP TYPE. If
you turn the PRE FX, MODULATION, and AMBI-
ENCE effects off at this time, you will be able to hear
the character of each amp type more clearly. You can
switch each effect off by simultaneously pressing its
VALUE or DEPTH ▲and ▼buttons.
When you have decided on an amp type, adjust the
MID FC/GAIN, BASS, MIDDLE, TREBLE and
VOLUME control knobs.
After you have made your amp settings, you can
start adding effects. First are MODULATION and
AMBIENCE, located after the amp. Simultaneously
press the DEPTH ▲and ▼buttons to switch the
effect on. Then turn the MODULATION selector or
AMBIENCE selector to choose the desired effect.
Use the DEPTH buttons to adjust the effect depth
etc. For the modulation effect, you can hold down the
FUNCTION button and use the DEPTH buttons to
adjust the delay/reverb time. To choose settings for
PRE FX, before the amp, turn the PRE FX on, and
then use the PRE FX button to select the effect. Use
the PRE FX VALUE buttons to adjust the amount of
effect. You may wish to temporarily turn off MODU-
LATION and AMBIENCE while adjusting the PRE FX.
Then use the PEDAL FX button to select what you
will control from the expression pedal. This button
selects the effect (or volume) that will be controlled
by the pedal.
If you hear unwanted noise, you can adjust the noise
reduction. Hold down the FUNCTION button and
turn the NR knob (the right-most knob) to adjust the
depth of the noise reduction.
Finally, when you have come up with a sound you
like, you should write (store) it into memory. If you
switch to a different program or turn off the power
without writing your new program, it will be lost.
Some effect settings may produce unwanted
distortion. If this happens, lower the VOLUME knob.

11
PRE FX
Use the PRE FX button to select a pre-effect, and use the VALUE buttons to adjust the amount of effect. If you have selected
WAH as the PEDAL FX, you can use the expression pedal to control WAH.
TYPE Explanation Normal PEDAL FX: WAH
VALUE PEDAL VALUE
COMP Compressor with an emphasized attack Adjusts sensitivity: 0~30 --- ---
DIST Distortion optimized for bass Amount of distortion: 0~30 --- ---
OCTAVE This generates a pitch one octave lower than the Adjusts tone: 0~30 Controls the Specifies the effect
original sound, and mixes it with the original sound effect depth depth at maximum
to add depth and low end. (*1) pedal position
(*1)
This effect may not operate correctly if two or more strings are played simultaneously, or when low-pitched strings are played.
AMP TYPE
Use the AMP TYPE selector to select an amp, and adjust the MID FC/GAIN, BASS, MIDDLE, TREBLE and VOLUME. A
cabinet effect appropriate for that amp is added to each AMP TYPE (with the exception of EQ). Changing the setting of the
AMP/LINE switch will change the depth of the cabinet effect.
TYPE Explanation
EQ 3-band EQ from direct line input.
VALVE A tube amp with the ULTRA LO switch turned ON.
(recommended CAB: 810CLS)
VALVE2 A tube amp suitable for rock. (recommended CAB: 810CLS)
CLASSIC A tube amp whose basic character changes according to the
setting of the value dial. (recommended CAB: 118+112)
SCOOPED
An amp that is typical of 80’s sounds. (recommended CAB: 410MTL)
LA STUDIO
An amp that is typical of the LA sound. (recommended CAB: 410 LA)
GOLDPNL An amp distinctive for its eye-catching gold panel and clean
sound. (recommended CAB: 410MDN)
JAZZ
A combo amp favored by jazz bassists. (recommended CAB: 115JAZ)
STUDIO
A tube combo ideal for the Motown sound. (recommended CAB: 115STU)
AC100 A 100W tube amp made by Vox. (recommended CAB: 215TALL)
UKMAJOR
A 200W tube amp made in the UK. (recommended CAB: 415 UK, 412 UK).
Control knobs
MID FC/ Mid-range peak frequency
adjustment (when AMP TYPE is set
to EQ ~ JAZZ) 1~5
GAIN(*2) Gain adjustment (when AMP TYPE
is set to STUDIO ~ UKMAJOR)
BASS Adjusts low-frequency range.
MIDDLE Adjusts mid-frequency range.
TREBLE Adjusts high-frequency range..
VOLUME Adjusts volume.
○○○○○○○○○○○○○○○○○○○○
NR (*3) Adjusts noise reduction depth.
(Hold down the TAP button and turn
EFF.DEPTH)
(*2) Functions as MID FC if AMP TYPE is set to EQ~
JAZZ. Functions as GAIN if AMP TYPE is set to
STUDIO ~ UKMAJOR.
(*3) To adjust the noise reduction, hold down the
FUNCTION button and turn the VOLUME (NR) knob.
MODULATION
Use the MODULATION selector to choose a modulation effect, and use the DEPTH buttons to adjust the DEPTH parameter.
To adjust the SPEED parameter, hold down the FUNCTION button and use the DEPTH (SPEED) buttons. If MOD is selected
as the PEDAL FX, you can use the expression pedal to control the effect.
TYPE Explanation Normal PEDAL FX:MOD
DEPTH SPEED PEDAL DEPTH SPEED
CHORUS Vintage stereo chorus.
FLANGE Vintage flanger.
PHASER Vintage phaser.
TREM Vintage tremolo.
ROTARY Rotary speaker simulation.
FEEDBK Mode 1 artificially generates
feedback, and operates when
a note is held for an extended
time.
Mode 2 generates feedback
one octave higher.
PITCH1 Pitch shifter mixed with the
direct sound.
FILTER Filter whose cutoff frequency
varies in response to picking
strength (for “Normal”) or pedal
movement (for “PEDAL FX”)
U-VIBE Vintage U-Vibe.
TALK “Talking”effect controlled by
pick attack (for “Normal”) or
pedal movement (for “PEDAL
FX”)
PITCH2 Pitch shifter with 100% effect
(wet).
Effect depth: 0~30
Feedback amount:
0~15
Vibrato depth:
16~30
Pitch shift amount
(*5): 12.~1., d., d,
1~12
Down sweep :
0~15,
UP sweep :
16~30
Effect depth: 0~30
Pitch shift amount
(*7): 12.~1., 1~12
Modulation
speed: 0~30
Mode setting:
1. Normal,
2. Overtone
Effect level: 0~30
Resonance: 0~30
Modulation
speed: 0~30
Mode setting: 1~5
(*6)
N/A (*4)
Modulation speed
First half of pedal
movement controls
feedback amount;
further movement
controls vibrato
depth
Effect level
Cutoff frequency
Modulation speed
Controls “talking”
effect
Controls the pitch
shift amount
Effect depth: 0~30
Mode setting:
1. Normal,
2. Overtone
Pitch shift amount
(*5): 12.~1., d., d,
1~12
Resonance: 0~30
Effect depth: 0~30
Effect depth: 0~30
Pitch shift amount when
pedal at maxi-mum
(*7): 12.~1., 1~12,
SP
N/A (*4)
Mode
setting:
1~5 (*6)
N/A (*4)
(*4) You cannot use the buttons to edit the value. (*5) “.”indicates negative (-), “d”indicates detune.
(*6) Mode setting: 1: YAH-YAH, 2: U-WAH, 3: YOI-YOI, 4: YEAH, 5: HI U-WAH
(*7) “.”indicates negative (-), “SP”indicates stair-step pitch change one octave upward.

12
AMBIENCE
Use the AMBIENCE selector to choose an ambience effect, and use the DEPTH buttons to adjust the DEPTH parameter. To
adjust the delay time or reverb time, press the TAP button twice at the desired interval. If AMB is selected as the PEDAL FX,
you can use the expression pedal to control the effect.
TYPE Explanation TAP Normal PEDAL FX: AMBIENCE
DEPTH PEDAL DEPTH
SLAP Slap-type delay whose delay time is a 1/4
of the interval at which you press TAP
ECHO1 Tape echo simulation with a warm tone (feedback low)
ECHO2 Tape echo simulation with a warm tone (feedback medium)
ECHO3 Tape echo simulation with a warm tone (feedback high)
PP DLY Ping-pong delay that bounces from to left to right
MULTI Multi-tap delay
AIR Reverb with an airy feel
ROOM Room reverb
HALL Hall reverb (*8)
PLATE Plate reverb (*8)
SPRING Spring reverb (*8)
Delay time:
up to 250 [ms]
Delay time:
up to 1.0 [s]
N/A (*4)
Reverb time:
up to 4.0 [s]
Reverb time:
up to 8.0 [s]
Effect level:
0~30
Controls the
effect depth
Specifies the
effect depth at
maximum
pedal position
(*8) Sets the reverb time to twice the interval at which you press TAP.
Expression pedal
Selecting the effect that will be controlled by the
pedal
Press the PEDAL FX button to select the effect that
will be controlled by the pedal. The LED located at
the left indicates the effect (or volume) that will be
controlled.
ORG: OCTAVE (orange): Octave
RED:MOD (red): The effect selected by MODULATION
GRN:AMB (green): The effect selected by AMBIENCE
OFF:VOLUME (unlit): Volume pedal
If an effect other than OCTAVE is selected for the
pre-effect, you cannot select OCTAVE from the
PEDAL FX button. If OCTAVE is selected as the
pedal effect, changing the pre-effect to something
other than OCTAVE will switch the pedal effect to
VOLUME.
Using the pedal to switch the effect on/off
By advancing the pedal all the way forward you can
switch the selected PEDAL FX effect on/off. When
the effect is on, the LED at the left of the pedal will
light. If VOLUME is selected as the PEDAL FX, the
LED cannot be turned off.
Setting the minimum value of the volume pedal
If PEDAL FX is set to VOLUME, you can hold down
the FUNCTION switch and use the AMBIENCE
DEPTH buttons to specify the minimum volume (VOL
PEDAL MIN) that will be controlled by the pedal.
Saving the sound of a specific pedal position
You cannot save the sound produced by a specific
pedal position. The pedal effect will always modify
the sound according to the actual current position of
the pedal.
NR (Noise Reduction)
You can adjust the amount of noise reduction by
holding down the FUNCTION button and turning the
VOLUME (NR) control knob.
Depending on the connected device, excessively
high NR settings may cause notes to be cut off. If
this happens, lower the level.
Storing a program
When you have created a sound you want to keep,
you can write (store) it into one of the 40 user
programs (0.1~9.4).
If you switch programs or turn off the power before
writing your edited program, the changes you made
will be lost.
The program that had been in the writing destina-
tion will be overwritten.
1. Press the WRITE button. The program number
will blink in the display, and the AX10B will be in
“write-ready”mode.
2. Use the program select switches to select where
you would like to store the program.
You cannot write to a preset program (01~94).
3. Press the WRITE button to write the program into
the selected program number.
If you decide not to write, press either of the
MASTER (CANCEL) buttons to exit write-ready
mode (display blinking). You will return to normal
operation.
2
3
1, 3

13
Other functions
Calibrating (adjusting) the
expression pedal
If the expression pedal is not working properly,
please perform the procedure described below.
When calibrating the pedal, use your hand because
accurate adjustments may not be possible if you
use your foot to operate the pedal.
1. While simultaneously holding down the FUNC-
TION button and the PEDAL FX button, turn on
the power.
The display will indicate for approximately
one second, and then indicate .
2. Slowly move the pedal back. When it stops, take
your hand off the pedal and press the PEDAL FX
button.
The display will change from to .
If you press the MASTER (CANCEL) during the
calibration operation, calibration will be halted
and the program number will appear.
2. press slowly
3. press slowly
3. Slowly move the pedal forward. When it stops,
take your hand off the pedal and press the
PEDAL FX button.
When the adjustment has been completed, the
display will blink , and then the program
number will appear. Check the pedal to make
sure the settings are correct.
TIPS
For example if you assign PEDAL FX to VOLUME
and set VOL PEDAL MIN to 0, it will be easy to
verify the MIN level when the pedal is fully returned.
If the calibration operation fails, the display will
indicate , and you will return to the display
before calibration ( ). If repeated attempts are
unsuccessful, it is possible that the AX10B has
malfunctioned. Contact your dealer.
Restoring programs to
the factory settings
1. While holding down the WRITE button, turn on
the power.
The display will indicate .
If you decide to start up normally without loading
the factory settings, press either of the MASTER
(CANCEL) buttons.
2. While the display indicates , press the WRITE
button. The factory programs will be loaded into
the user area (0.1~9.4). When loading is com-
pleted, the display will blink , and then the
program number will appear.
Never turn off the power while this operation is in
progress.
Be aware that if you reload the preset programs, all
previously written programs will be overwritten.
Troubleshooting
If the AX10B does not operate as you expect, please
check the following points first. If this does not
resolve the problem, contact your dealer.
Power does not turn on.
❑Are batteries installed? Alternatively, is the AC
adapter connected to an AC outlet? (p.8)
❑Is a mono phone plug cable connected to the
INPUT jack? (p.8)
No sound
❑Are your bass, amp and/or headphones connected
to the correct jacks? (p.8)
❑Is your amp turned on and set correctly?
❑Are any cables broken?
❑Is the master level of the AX10B set to “0”or to a
low level? (p.7)
❑Is the program volume of the AX10B set to “0”or
to a low level? (p.11)
❑Is the volume of your instrument turned down?
❑Is the AX10B muted?
No effect is heard
❑Is the AX10B bypassed? (p.9)
❑Are the effects used in the program turned on?
Pedal does not work
❑Have you selected a program which uses an
expression pedal effect? (p.10,12)
❑Is the pedal indicator lit?
Cannot write (Display indicates“Er”)
❑Did you turn the power off while the preset
programs were being loaded?
Reload the preset programs. (p.13)

14
Main specifications
Amp models: 11
Effects: Pre effect types: 3
Modulation types: 11
Ambience types: 11
Noise Reduction: 1
Number of programs: Preset Programs: 40 (10 banks x 4 programs)
User Programs: 40 (10 banks x 4 programs)
Input: Bass Input (mono 1/4" jack)
Output: Line/Headphone dual-purpose output (stereo 1/4" jack)
Tuner: Tuning Range: 27.5Hz–1,318.5Hz(A0–E6)
Tuner calibration: A = 438Hz–445Hz
Power supply: Four AA alkaline batteries (not included allows approximately 18 hours of continu-
ous use) or separately sold AC adaptor (DC9V )
Dimensions (W x D x H): 287 mm x 182 mm x 60 mm
Weight: 1.1 kg (not including batteries)
Included items: Owner’s manual
Options: AC adaptor
Appearance and specifications are subject to change without notice for improvement.

15
Bedirnungshandbuch Manuel d'utilisation Owner's Manual
Manuel d'utilisation
Introduction
Merci d'avoir choisi le
Processeur de signal à modélisa-
tion ToneWorks AX10B
. Pour garantir un fonctionnement
sans problèmes, veuillez lire attentivement ce manuel et
utiliser l'appareil comme expliqué. Quand vous aurez fini de
lire le manuel, conservez-le de façon à pouvoir vous y reporter
par la suite.
• La technologie de modélisation “REMS” de Korg est utilisée
pour délivrer de nombreux effets sophistiqués dont : 3 types
de pré-effets, 11 types de modélisation d'ampli, 11 types
d’effets de modulation et 11 types d’effets d'ambiance.
La disposition logique des boutons et touches d'ampli et
d’effet suivant le flux du signal, de l'entrée de basse à la
sortie, vous permet de créer facilement et intuitivement un
large éventail de sons.
PRE FX
3 TYPES
INPUT OUTPU
T
AMP TYPE
11 TYPES
MODULATION
11 TYPES
AMBIENCE
11 TYPES
Schéma du signal de l'AX10B
• Le modèle AX10B offre une large gamme de sons d'amplis
de basse fameux, allant des sons chauds et gras distinctifs
des amplis à tube au son des amplis modernes. Des effets
comme le Chorus, le Delay et le Tape-Echo sont aussi
disponibles.
• 40 programmes présélectionnés tirant pleinement profit du
potentiel de l'AX10B sont immédiatement prêts à l'emploi et
vous pouvez enregistrer vos propres réglages dans 40
autres programmes utilisateurs.
• La pédale d’expression intégrée vous apporte une
dimension ajoutée de contrôle en temps réél, vous
permettant de changer le volume, d’ajouter un effet
d'octave pour un son ultra basse, ou de contrôler la vitesse
de modulation, le temps du Delay, le Filter, ou le Pitch
Bend. Un effet unique Talk produit même un son “talking
modulator”, qui étend dramatiquement vos possibilités de
jeu de basse.
• L'accordeur chromatique automatique intégré vous permet
d'accorder votre instrument silencieusement, un plus pour
les citadins.
Table des matières
Introduction ........................................................................... 15
Précautions ........................................................................... 16
Guide de démarrage rapide ................................................. 17
Nomenclature et fonctions ................................................... 18
Panneau avant .............................................................. 18
Panneau arrière ............................................................ 19
Configuration ........................................................................ 20
Mise sous/hors tension ................................................. 20
Raccordements ............................................................. 20
Utilisation de l'AX10B ........................................................... 21
Sélection des programmes ........................................... 21
Bypass et Mute ............................................................. 21
Accordeur ...................................................................... 21
Utilisation de la pédale d'expression ............................ 22
Création de sons .................................................................. 22
Création de sons sur l'AX10B ....................................... 22
PRE FX .......................................................................... 23
AMP TYPE .................................................................... 23
MODULATION ............................................................... 23
AMBIENCE .................................................................... 24
Pédale d'expression ...................................................... 24
NR (Réduction du bruit) ................................................ 24
Enregistrement d'un programme ......................................... 24
Autres fonctions .................................................................... 25
Calibrage de la pédale d'expression ............................ 25
Réinitialisation des programmes aux réglages d'usine .. 25
Guide de dépannage ............................................................ 25
Principales spécifications ..................................................... 26

16
Précautions
Emplacement
L'utilisation de cet instrument dans les endroits suivants peut en entraîner le mauvais fonctionnement.
• En plein soleil
• Endroits très chauds ou très humides
• Endroits sales ou fort poussiéreux
• Endroits soumis à de fortes vibrations
• A proximité de champs magnétiques
Alimentation
Veuillez brancher l'adaptateur secteur spécifié sur une prise secteur à la tension appropriée. Ne branchez pas l'adaptateur sur une prise de
courant dont la tension ne correspond pas à celle pour laquelle l'appareil a été conçu.
Interférences avec d'autres appareils électriques
Les postes de radio et de télévision situés à proximité peuvent souffrir d'interférences à la réception. Faites fonctionner cet appareil à une
distance raisonnable des postes de radio et de télévision.
Maniement
Pour éviter de les endommager, manipulez les commandes et les boutons de cet instrument sans appliquer de force excessive.
Entretien
Lorsque l'extérieur est sale, essuyez-le avec un chiffon propre et sec. Ne vous servez pas d'agents de nettoyage liquides comme du
benzène ou du diluant, des produits de nettoyage ou des vernis inflammables.
Conservez ce manuel
Après avoir lu ce manuel, veuillez le conserver soigneusement pour référence ultérieure.
Évitez toute intrusion d'objets ou de liquide
Ne placez jamais de récipient contenant du liquide près de l'instrument. Si le liquide pénètre dans l'appareil, il risque de provoquer des
dommages, un incendie ou une électrocution.
Veillez à ne pas laisser tomber d'objets métalliques dans le boîtier. Si cela se produisait, débranchez l'adaptateur secteur de la prise de
courant et contactez votre revendeur Korg le plus proche ou le magasin où vous avez acheté l'instrument.
Marque CE pour les normes européennes harmonisées
La marque CE apposée sur tous les produits de notre firme fonctionnant sur secteur jusqu'au 31 décembre 1996 signifie que ces
appareils répondent à la Directive EMC (89/336/CEE) et à la Directive concernant la marque CE (93/68/CEE).
La marque CE apposée après le 1 janvier 1997 signifie que ces appareils sont conformes à la Directive EMC (89/336/CEE), à la
Directive concernant la marque CE (93/68/CEE) ainsi qu'à la Directive Basse Tension (73/23/CEE).
La marque CE apposée sur tous les produits de notre firme fonctionnant sur piles signifie que ces appareils répondent à la Directive
EMC (89/336/CEE) et à la Directive concernant la marque CE (93/68/CEE).
REMARQUE IMPORTANTE POUR LES CLIENTS
Ce produit a été fabriqué suivant des spécifications sévères et des besoins en tension applicables dans le pays où ce produit doit être
utilisé. Si vous avez acheté ce produit sur internet, par correspondance ou/et au téléphone, vous devez vérifier que ce produit est bien
utilisable dans votre pays de résidence.
ATTENTION: L'utilisation de ce produit dans un pays autre que celui pour lequel il a été conçu peut être dangereuse et annulera la
garantie du fabricant ou du distributeur.
Veuillez aussi conserver votre récépissé qui est la preuve de votre achat, faute de quoi votre produit risque de ne plus être couvert par
la garantie du fabricant ou du distributeur.
Qu'est-ce que le ?
Le système (de l'anglais
R
esonant Structure and
E
lectronic circuit
M
odeling
S
ystem) est une technologie de modelage du son
propriétaire de Korg qui reproduit avec précision les caractéristiques et la nature complexes des instruments acoustiques et
électriques ainsi que des circuits électroniques dans leur environnement réel. Le système émule une vaste gamme de
caractéristiques de générateurs de sons comme des corps d'instruments, des haut-parleurs et des enceintes, des champs acousti-
ques, des microphones, des lampes, des transistors, etc.

17
Guide de démarrage rapide
Avant d'effectuer les raccordements avec un appareil extérieur
quelconque, mettez toutes les commandes de volume sur leur
position minimale et mettez l'AX10B hors tension.
1.
Si l'AX10B doit être alimenté sur piles, ouvrez le logement
des piles situé sous le panneau inférieur, et insérez quatre
piles alcalines AA (vendues séparément). Si vous souhaitez
alimenter l'AX10B avec l'adaptateur secteur vendu
séparément, branchez l'adaptateur sur la prise DC9V du
panneau arrière (l'appareil se mettra sous tension).
2.
Réglez le commutateur de sélection INPUT L/H sur la
position correspondant à la sortie de votre guitare. Si
votre guitare est munie de micros à niveau de sortie élevé
comme des micros double bobinage, choisissez la
position “H”. Si votre guitare est munie de micros à niveau
de sortie faible comme des micros simple bobinage,
choisissez la position “L”.
3.
Raccordez votre guitare à la prise INPUT de l'AX10B. Si
vous faites fonctionner l'appareil sur piles, l'AX10B se
mettra alors sous tension.
4.
Si vous raccordez l'AX10B à un ampli de basse, réglez le
commutateur de sélection AMP/LINE sur “AMP”. Si vous
raccordez l'AX10B à un casque, un enregistreur ou un
mélangeur, réglez ce commutateur sur “LINE”.
5.
Raccordez la prise OUTPUT de l'AX10B à la prise INPUT
de votre ampli de basse ou enregistreur. Si vous souhaitez
utiliser un casque, branchez-le sur la prise OUTPUT.
6.
Mettez l'appareil raccordé sous tension, and réglez le
volume au niveau souhaité. Vous pouvez aussi utiliser les
boutons MASTER de l'AX10B pour régler le volume.
7.
Appuyez sur les touches de sélection de programme pour
changer de programme.
CONSEILS
L'AX10B offre 40 programmes préréglés (01~94)
et 40 programmes utilisateur (0.1~9.4). Avec les
réglages d'usine, les programmes utilisateur ont le
même contenu que les programmes préréglés.
8.
Vous pouvez contrôler l'effet de la pédale en utilisant la
pédale d'expression. La pédale est activée lorsque la LED
PEDAL en haut et à gauche de la pédale est allumée. Si
cette LED est éteinte, enfoncez complètement la pédale
pour allumer la LED. La pédale sera alors activée.
9.
Édition du son
Utilisez le commutateur de sélection AMP TYPE pour
sélectionner un type d'amplificateur et les divers boutons
de commande pour régler le gain, la tonalité, le volume,
etc.
10.
Édition d'un effet
Si vous souhaitez éditer l'effet de modulation ou l'effet
d'ambiance (situé après l'amplificateur), utilisez le
commutateur de sélection MODULATION ou le commuta-
teur de sélection AMBIENCE pour sélectionner l'effet
souhaité, et les touches DEPTH situées sous le
commutateur de sélection pour régler la profondeur de
l'effet, etc. Vous pouvez aussi régler la vitesse, etc. d'un
effet de modulation en maintenant la touche FUNCTION
enfoncée et en appuyant sur les touches DEPTH (qui
prennent alors la fonction de touches SPEED). Vous
pouvez régler le temps du Delay ou du Reverb pour l'effet
d'ambiance en appuyant sur la touche TAP à l'intervalle
souhaité.
11.
Pour éditer le pré-effet situé avant l'amplificateur, appuyez
sur la touche PRE FX afin de sélectionner un effet et
utilisez les touches VALUE pour effectuer les réglages.
Ainsi s'achève cette brève introduction à l'AX10B. Ce
mode d'emploi contient bien d'autres informations sur les
capacités de l'AX10B, aussi veuillez le lire attentivement
de telle sorte que vous puissiez tirer pleinement parti de
votre AX10B.
54 3
6
7
8
8
9
7
9
10 10
10
11
10
2 1

18
Nomenclature et fonctions
Panneau avant
○○○○○○○○○○○○○○○○○○○○○○○○○
1
Écran
Le numéro de programme est affiché et lorsque vous utilisez
un bouton ou une touche, la valeur du paramètre correspon-
dant apparaîtra brièvement sur l'afficheur.
• S'allume lorsque l'appareil est sous tension.
• Le point situé dans le coin inférieur droit de l'afficheur
s'allumera quand vous éditerez une valeur de paramètre.
• Quand l'AX10B fonctionne sur piles, clignotera si les
piles sont presque épuisées.
○○○○○○○○○○○○○○○○○○○○○○○○○
2
Commutateur de sélection AMP TYPE
Utilisez ce commutateur pour sélectionner un des 11 types
d'amplificateurs.
3
Boutons de commande
Ces boutons permettent de régler le gain, la tonalité et le
volume des modèles d'amplificateur.
Vous pouvez régler la quantité de réduction du bruit en
tournant le bouton VOLUME/NR tout en maintenant la touche
FUNCTION enfoncée.
Certains réglages de ces boutons peuvent provoquer de la
distorsion. Dans ce cas, baissez le volume avec le bouton de
commande VOLUME (ou les touches MASTER).
○○○○○○○○○○○○○○○○○○○○○○○○○
4
LED PRE FX (TUNER)
Ces LED indiquent le pré-effet sélectionné.
Elles ne s'allumeront pas si le pré-effet est désactivé.
Lorsque l'accordeur est activé, ces LED indiquent la différence
par rapport à la hauteur de note correcte. (p.21)
5
Touche PRE FX button
Chaque fois que vous appuyez sur cette touche, le type de
pré-effet change dans l'ordre suivant : COMP
→
DIST
→
OCTAVE
→
COMP.
6
Touches VALUE (CALIB) –ON/OFF –
Ces touches servent à régler la valeur du pré-effet.
Vous pouvez activer/désactiver PRE FX en appuyant
simultanément sur les touches VALUE
▲
et
▼
.
Lorsque l'accordeur est activé, vous pouvez utiliser ces
touches pour effectuer son calibrage (CALIB).
○○○○○○○○○○○○○○○○○○○○○○○○○
7
Commutateur de sélection MODULATION
Permet de sélectionner un des 11 types d'effets de modulation.
8
Touches DEPTH/SPEED buttons –ON/OFF –
Ces touches permettent de régler la profondeur, etc., de l'effet
de modulation (DEPTH).
Vous pouvez régler la vitesse de modulation, etc. en appuyant
sur ces touches (SPEED) tout en maintenant la touche
FUNCTION enfoncée.
Vous pouvez activer/désactiver l'effet MODULATION en
appuyant simultanément sur les touches DEPTH
▲
et
▼
(ON/OFF). Si l'effet est désactivé, la LED du commutateur de
sélection MODULATION ne s'allumera pas.
○○○○○○○○○○○○○○○○○○○○○○○○○
9
Commutateur de sélection AMBIANCE
Permet de sélectionner un des 11 effets d'ambiance.
10
Touches DEPTH –ON/OFF –
Ces touches permettent de régler la profondeur, etc. de l'effet
d'ambiance sélectionné.
Vous pouvez activer/désactiver AMBIENCE en appuyant
simultanément sur les touches DEPTH
▲
et
▼
(ON/OFF). Si
l'effet est désactivé, la LED du commutateur de sélection
AMBIENCE ne s'allumera pas. Si la pédale d'expression
contrôle le volume, vous pouvez obtenir le niveau le plus bas
(i.e., lorsque la pédale est revenue complètement en position
haute) en appuyant sur
▲
et
▼
tout en maintenant la touche
FUNCTION enfoncée.
11
Touche TAP
Vous pouvez régler le temps du Delay ou du Reverb pour l'effet
d'ambiance en appuyant sur la touche TAP à l'intervalle souhaité.
La LED située à gauche clignotera pour indiquer le rythme.
1 3
4
5
62
7
8
9
10
12
13
14
15
11
16
17
18
19

19
○○○○○○○○○○○○○○○○○○○○○○○○○
12
Touche FUNCTION
Pour éditer un des paramètres imprimés en rouge sur le
panneau avant, maintenez cette touche enfoncée et utilisez la
touche ou le bouton correspondant. Vous pouvez par exemple
changer la vitesse de l'effet de modulation en maintenant
cette touche enfoncée et en utilisant les touches MODULA-
TION DEPTH.
○○○○○○○○○○○○○○○○○○○○○○○○○
13
Touches MASTER (CANCEL)
Ces touches permettent de régler le volume général de
l'AX10B (MASTER).
Lorsque l'AX10B est prêt à enregistrer, une pression sur l'une
de ces touches annulera l'opération Write (CANCEL).
14
Touche WRITE
Utilisez cette touche pour enregistrer un programme.
Lorsque vous appuyez sur cette touche, l'AX10B entre en
mode “write-ready” ; si vous appuyez de nouveau sur cette
touche, le programme sera enregistré. (p.24)
○○○○○○○○○○○○○○○○○○○○○○○○○
15
Touche PEDAL FX/BANK HOLD
Cette touche permet de sélectionner l'effet qui sera contrôlé
par la pédale d'expression (Pedal Effect).
A chaque pression sur cette touche, la LED change de couleur
pour indiquer l'effet de pédale qui sera contrôlé.
ORG : OCTAVE (orange) : Octave
RED : MOD (rouge) : L'effet sélectionné avec MODULATION
GRN : AMB (vert) : L'effet sélectionné avec AMBIENCE
OFF : VOLUME (éteinte) : Pédale de volume
Si un effet différent de OCTAVE est sélectionné comme pré-
effet, vous ne pourrez pas utiliser la touche PEDAL FX pour
sélectionner OCTAVE.
En appuyant sur cette touche tout en maintenant la touche
FUNCTION enfoncée, vous pouvez sélectionner le mode
“bank hold” comme moyen de sélection des programmes
(BANK HOLD). Reportez-vous à “Sélection des programmes :
b” (p.21).
○○○○○○○○○○○○○○○○○○○○○○○○○
16
Pédale d'expression
Vous pouvez utiliser cette pédale d'expression pour contrôler
les effets ou le volume. Enfoncez complètement la pédale
pour activer/désactiver l'effet de pédale sélectionné.
17
LED PEDAL
Cette LED s'allumera si la pédale d'expression est activée.
18
LED ORIGINAL VALUE
Cette LED s'allumera si la valeur éditée est identique à la
valeur enregistrée (d'origine).
○○○○○○○○○○○○○○○○○○○○○○○○○
19
Commutateurs de sélection de programme
DOWN/BANK DOWN,UP/BANK UP –BYPASS,
TUNE –
Utilisez ces commutateurs pour sélectionner les programmes.
Vous pouvez sélectionner les programmes de trois façons
différentes. Reportez-vous à “Sélection des programmes”
(p.21).
Si vous appuyez simultanément sur les commutateurs UP and
DOWN, les effets seront contournés et l'accordeur sera activé
(BYPASS) (p.21).
Panneau arrière
○○○○○○○○○○○○○○○○○○○○○○○○○
20
Commutateur de sélection INPUT L/H
Réglez ce commutateur en fonction du niveau de sortie du
micro de votre basse.
H:
Basses avec niveau de sortie élevé et circuit actif
L:
Basses avec niveau de sortie faible
21
Prise INPUT
Raccordez votre guitare à cette prise. Utilisez une fiche mono
1/4". Si l'AX10B fonctionne sur piles, il sera mis sous tension
quand vous brancherez la fiche.
Si l'AX10B fonctionne sur piles, il ne sera pas mis sous
tension si vous insérez une fiche stéréo 1/4".
○○○○○○○○○○○○○○○○○○○○○○○○○
22
Prise OUTPUT
Raccordez cette prise à votre amplificateur de basse, votre
enregistreur, ou votre casque.
23
Commutateur de sélection AMP/LINE
Réglez ce commutateur sur “AMP” si vous branchez un
amplificateur, ou sur “LINE” si vous branchez un enregistreur
ou utilisez un casque.
Si vous raccordez l'AX10B à un ampli de basse muni d'un
tweeter pour une réponse étendue dans les fréquences
élevées, sélectionnez la position “LINE”.
○○○○○○○○○○○○○○○○○○○○○○○○○
24
DC9V
L'adaptateur secteur vendu séparément peut être branché sur
cette prise (p.20). Lorsque vous branchez l'adaptateur,
l'appareil se met automatiquement sous tension.
Vous devez utiliser uniquement l'adaptateur spécifié (p.26).
25
Crochet de câble
Si vous utilisez l'adaptateur secteur vendu séparément,
enroulez le câble de l'adaptateur autour de ce crochet (p.20).
2425 20 21 22 23

20
Configuration
Mise sous/hors tension
Avant de mettre sous ou hors tension l'appareil, vous devez
baisser le volume de tous les appareils raccordés.
Lors d'une alimentation sur piles :
1.
Pour ouvrir le logement des piles, appuyez légèrement
sur l'onglet situé près de la flèche et soulevez le
couvercle.
Installez quatre piles alcalines (vendues séparément) en
respectant la polarité et refermez le couvercle.
2.
Si l'appareil est alimenté sur piles, il se mettra sous
tension lorsque vous brancherez un câble mono sur la
prise INPUT. L'écran s'allume quand l'appareil est sous
tension.
L'appareil se met hors tension lorsque vous débranchez
le câble de la prise INPUT.
Veillez à débrancher le câble de la prise INPUT lorsque vous
n'utilisez pas l'AX10B de façon à économiser l'énergie des
piles.
Si vous raccordez un câble stéréo, l'appareil ne se mettra pas
sous tension.
Si les piles sont usées, un indicateur clignotera sur
l'écran. Remplacez les piles le plus tôt possible. Les piles
usées devront être immédiatement retirées de l'appareil. Si
vous laissez des piles usées dans l'appareil, elles risquent de
fuir ou de provoquer un dysfonctionnement. Vous devez
également retirer les piles lorsque vous ne prévoyez pas
d'utiliser l'AX10B pendant un certain temps.
Lors d'une alimentation avec l'adaptateur secteur :
1.
Raccordez l'adaptateur secteur vendu séparément à la
prise DC 9V et branchez l'adaptateur secteur sur une
prise secteur. La LED POWER s'allumera, et l'appareil se
mettra sous tension.
Utilisez uniquement l'adaptateur secteur spécifié (p.26).
N'oubliez pas de débrancher l'adaptateur secteur de la prise
secteur lorsque vous n'utilisez pas l'AX10B.
N'appliquez pas de force excessive sur le câble.
Enroulez le câble de l'adaptateur secteur autour du crochet
comme indiqué sur le schéma.
Raccordements
1.
Mettez les appareils que vous souhaitez raccorder hors
tension et baissez toutes les commandes de volume.
2.
Réglez le commutateur de sélection INPUT L/H en
fonction du niveau de sortie de vos micros.
“H” est correct pour des basses avec niveau de sortie
élevé. “L” est correct pour des basses avec niveau de
sortie faible.
3.
Raccordez votre guitare à la prise INPUT.
4.
Réglez le commutateur de sélection LINE/AMP sur la
position appropriée.
Si vous raccordez l'AX10B à un ampli de basse, utilisez le
réglage “AMP”. Si vous raccordez l'AX10B à un
mélangeur, un enregistreur ou un casque, utilisez le
réglage “LINE”.
Si vous raccordez l'AX10B à un ampli de basse muni d'un
tweeter pour une réponse étendue dans les fréquences
élevées, sélectionnez la position “LINE”.
5.
Raccordez la prise OUTPUT à votre ampli ou enregis-
treur, etc.
La prise OUTPUT est stéréophonique (TRS). Par
conséquent, si vous utilisez un câble mono pour la
raccorder à votre ampli de basse, etc., seul le son du
canal L (gauche) sera émis.
Si vous souhaitez utiliser un casque, raccordez le casque
à cette prise.
Si vous utilisez les deux canaux d'un mélangeur ou deux
amplificateurs en stéréo, utilisez un câble stéréo à mono
double.
6.
Lorsque les raccordements sont terminés, mettez
l'appareil raccordé sous tension et réglez le volume.
Utilisez les touches MASTER pour régler le volume
général de l'AX10B. (p.19-
13
)
CONSEILS
Si le son présente de la distorsion lorsque vous utilisez
l'AX10B en mode “bypass”, utilisez les touches MASTER pour
abaisser le volume.
INPUTOUTPUT
AMP/LINE
LINE
L/H
INPUT
AMP/LINE
AMP
INPUT
Casque
Enregistreur, mélangeur, etc.
Jack mono 1/4"
– Jack mono 1/4"
Jack mono 1/4" x 2
– Jack stéréo 1/4"
Jack mono 1/4"
– Jack mono 1/4"
ampli de basse
Adaptateur secteur
à prise secteur
Équipement audio
Prise phono stéréo
– Jack stéréo 1/4"
basse
Jack mono 1/4"
– Jack mono 1/4"
Table of contents
Languages:
Other Korg Recording Equipment manuals

Korg
Korg ElecTribe ES-1 MkII User manual

Korg
Korg D3200 User manual

Korg
Korg EasyStart mini-KP User manual

Korg
Korg MR-1000 Technical manual

Korg
Korg D12 User manual

Korg
Korg Trinity series User manual

Korg
Korg volca-fm2 User manual

Korg
Korg KAOSS PAD KP3 User manual

Korg
Korg MR-1 Product information sheet

Korg
Korg Pandora PX5D User manual