manuals.online logo
Brands
  1. Home
  2. •
  3. Brands
  4. •
  5. K+W
  6. •
  7. Indoor Furnishing
  8. •
  9. K+W 4112 User manual

K+W 4112 User manual

Montageanleitung
assembly Instruction /
instructions de montage
Modell 4112
Eckbank
mitgeliefertes Material / Supplied material / matériel fourni Größe / size / taille Nr. / Number / nombre Stück / piece
Eckfuß
corner foot
Pied d‘angle GELA0309601
2
Montagezeit ca. 20 min.
Installation time /
temps d‘installation
DIV1000174
Doppelgewindestift
Double-threaded Setscrew
double filetage M8x60 mm je Wange/Fuß 4
side panel/ leg 4
par flanc/pied 4
U-Scheibe Innend. 8,4
washer 8,4
rondelle 8,4 25x1,25 mm 12
SCHRUSCH0825
1/3
GELA03009501
Holzwange li/re
wooden panel left/right
panneau en bois gauche/droit
benötigtes Werkzeug / required tool / outils nécessaires
Inbusschlüssel
allen key
Clé allen
13er Maulschlüssel
13-way wrench
13mm clé ouverte
1
Sechskantmutter
hexagonal nut
écrou hexagonal M8 SCHR934M08 12
Maschinenschraube mit
Sechkantkopf
machine screw with
hexagonal head
vis de la machine avec
tête hexagonale
M8x70 mm SCHR93308070 4
Um Beschädigungen der Bezüge zu vermeiden, verwenden Sie bitte zum
Öffnen der Verpackung keine scharfen Gegenstände. Die Klebebänder
bitte an der Kartonverpackung mit der Hand abziehen.
To avoid damages on the cover please don´tuse sharp objects to open the
package. Remove the tape by hand.
N‘utilisez aucun objet pointu ou coupant pour ouvrir l‘emballage.
l‘utilisation d‘un cutterest interdite –enlever les rubans a la main.
• Wir empfehlen die Montage nur durch fachkundiges Personal
• Bei nicht vorschriftsmäßiger und/oder fachgerechter Montage sowie unsachgemäßer Nutzung wird bei Personen- oder Sachschaden
keinerlei Haftung übernommen
• We recommend the montage only by expert staffs
• The manufacturer doesn´t liable for damages and injurys which arise to an incorrect use.
• Nous recommondons le montage par du personnel compétent
• Attention: Le fabricant ne répond pas des dommages ou blessures qui résultent d'une mauvaise utilisation
SCHR97608060
Linsenkopfschrauben
oval head screw
Vis à tête avec bride M8x40 SCHR7380840 4
Schritt 2: Wange mt Sitz verbinden
Wange mit eingedrehten Gewindestiften in die gegenüberliegenden
Löcher des Sitzes einführen.
Step 2: connect the side panel with the seat
Insert the side panel with the turned setscrews in the holes of the seat.
2. étape: Connectez le panneau avec le siège
Visez le panneau avec le siège.
Montageanleitung
assembly Instruction /
instructions de montage
Montagezeit ca. 20 min.
Installation time /
temps d‘installation
DIV1000174 2/3
Modell 4112
Eckbank
Schritt 1: Vormontage Wange
Je Wange 4 Gewindebolzen mit der kurzen Gewindeseite seitlich in die
Wange eindrehen.
Step 1: pre-assembly wooden panel
Screw in 4 setscrews with the short side inside the panel.
threaded bolts M8x60 4 pieces per side panel
1. étape: montage de panneau
Montez 4 boulons filétage
Schritt 3: Montage Wange
Reißverschluß an der Unterseite öffnen, je Gewindestange eine U-Scheibe
Aufstecken und die Muttern mit der Hand auf die Gewinde aufdrehen.
Mit einem 13-er Maulschlüssel die Muttern festziehen.
Step 3: montage of side panel
Open the zipper on the underside of the seat. Put on each setscrew a washer
and a hexagonal nut. Fix it with a 13-way wrench.
3. étape: montage du panneau
Ouvrez la férmeture éclair dessous, et vissez a la main les vis avec un clé
plat no. 13.
Schritt 4: Montage Stützfuß Eckteil
Fuß an der Unterseite des Eckteils anlegen und mit den beigelegten
Linsenkopfschrauben montieren.
Step 4: Montag of the corner foot
Put the corner foot on the bottom of the seat and screw in the oval head
screw
4. étape: Montage du pied de support d‘angle
Mettez le pied de support au dessous et montez les vis.
Linsenkopfschrauben M8x40 4 Stück
oval head screw M8x40 4 pieces
vis M8x40 4 - pièces
Gewindebolzen M8x60 4 Stück je Wange
threaded bolts M8x60 4 pieces per side panel
Boulons filetés M8x60 –4 pièces par panneau
Montageanleitung
assembly Instruction /
instructions de montage
Modell 4112
Eckbank
Montagezeit ca. 20 min.
Installation time /
temps d‘installation
DIV1000174 3/3
7
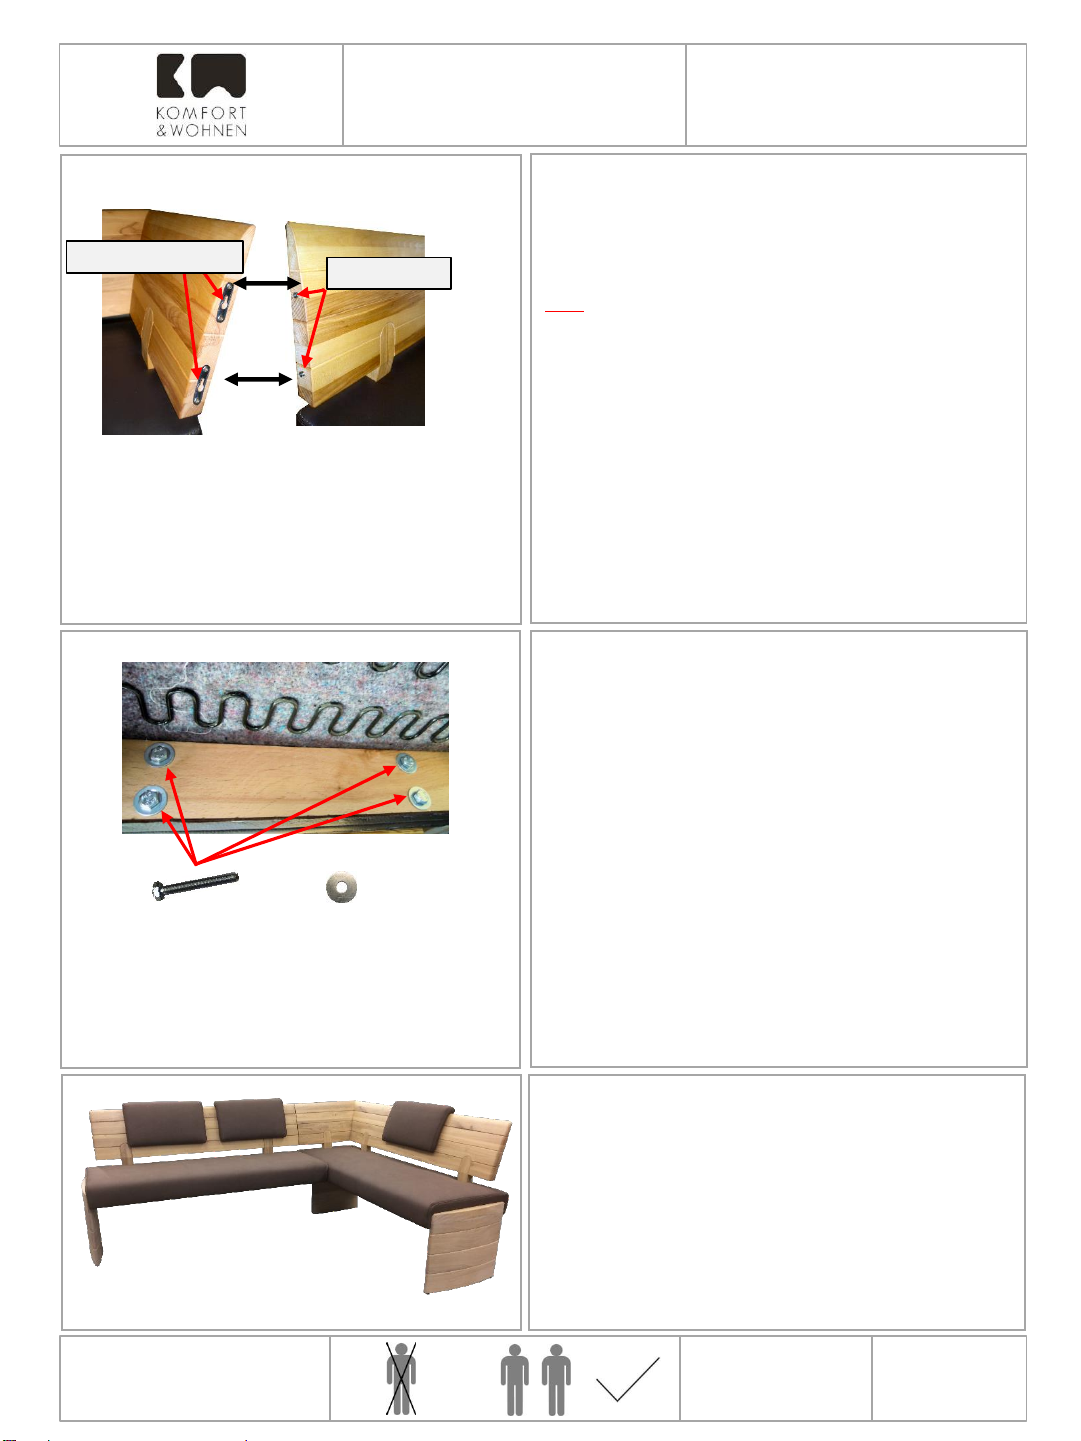
Schritt 5: Rücken verbinden
Die Rücken der Bankelemente mit den Stellschrauben in die Rücken mit
den Schlüssellochverbindern einhängen bzw. miteinander verbinden.
HINWEIS:
Hierzu die Teile etwas anheben, leicht hin und her bewegen und mit der
Hand nachdrücken!
Nicht mit dem Hammer oder anderen Gegenständen auf das Holz
klopfen um Beschädigungen an Beschlag und Holz zu vermeiden.
Step 5: connect the back
Connect the back of the bench element with the back of the corner
Please note:
Lift the parts and sway light.
To avoid damages please don´t hit on the wood parts.
5. étape: Connecter les dos
Assemblez es élements et montez au dos.
Attention: ne pas frappéz avec un marteau sur le bois afin d‘éviter tous
dommages
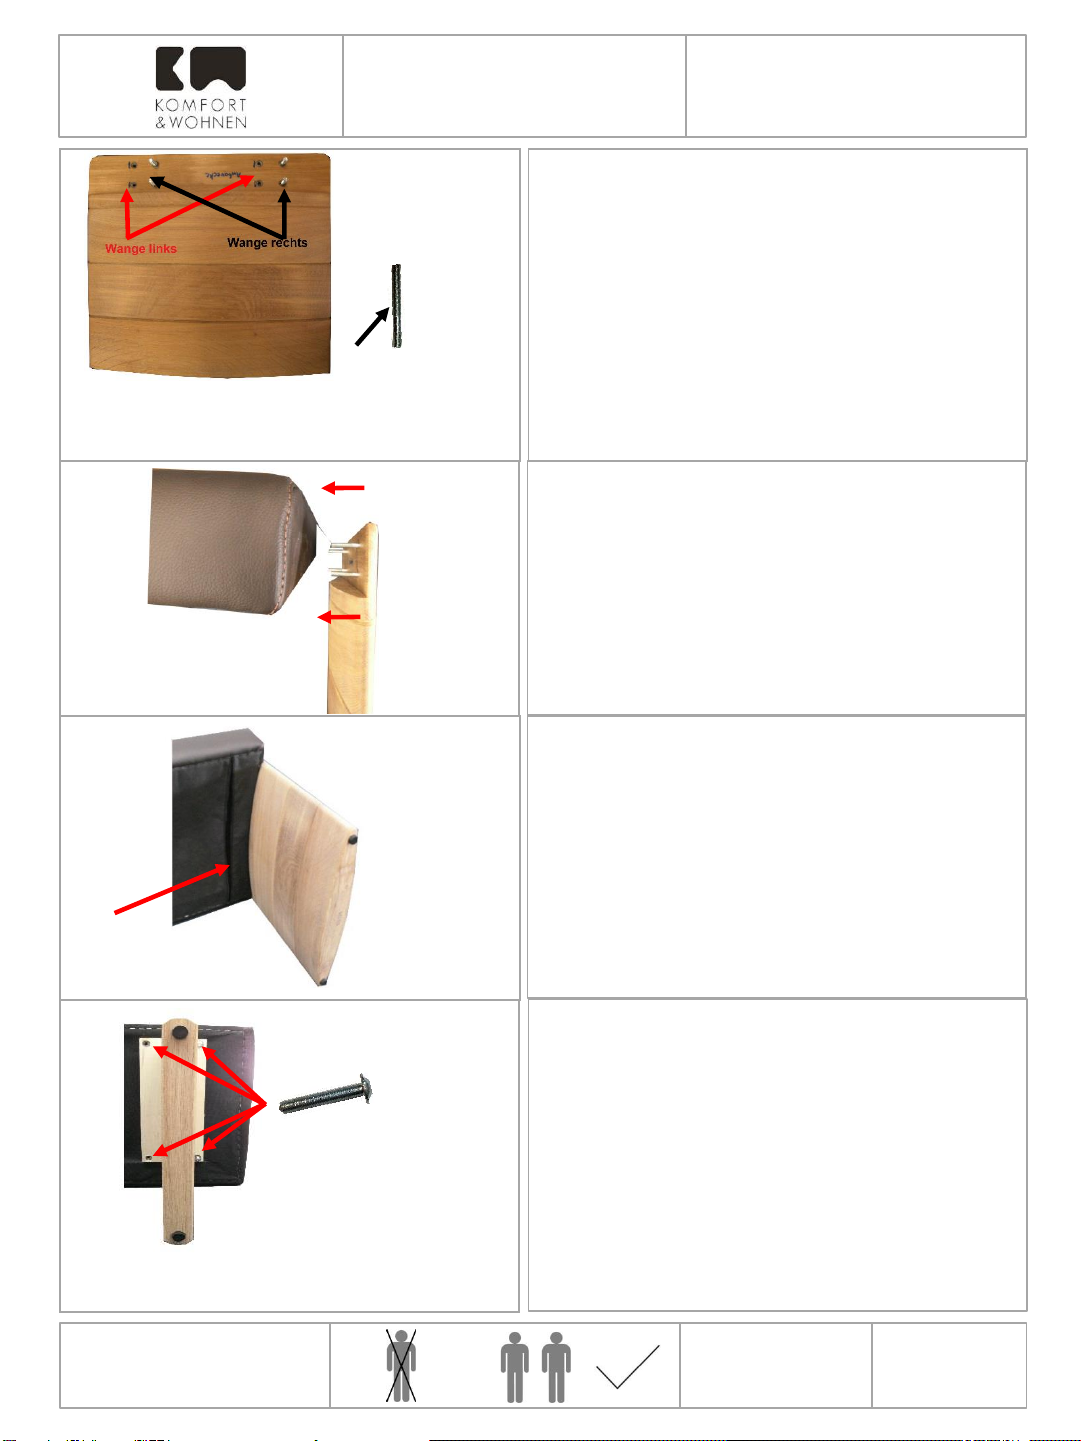
Schritt 6: Unterseite verbinden
An der Unterseite des Sitzes den Reißverschluss öffnen.
Bankelemente aneinander stellen!
Je eine Unterlegscheibe auf die Sechskantschraube aufstecken und die
Sechskantschraube in die vorgesehenen Löcher des Metallrahmen ein-
stecken. Gewinde per Hand eindrehen bis es im gegenüberliegenden Sitz
greift.
Dann die Sechskantschrauben mit einem 13er Ringschlüssel festziehen
und den Reißverschluss schließen.
Step 6: connect the bottom
Open the zipper on the bottom.
Put the both elements together.
Put a washer on each machine screw and put screws in the holes of the
metal frame.
Put on a hexagonal nut from the other side and fix with the 13-way wrench.
6. étape: Connecter le dessous
Veuillez ouvrier la fermeture éclair dessous le siège. Ensemblez les
elements banquettes. Visez a la main les dif. vises.
HINWEIS: Die Bank muß vor dem Festziehen der Schrauben ausgerichtet
werden. Nach dem Ausrichten die Schrauben festziehen.
Bei unsachgemäßer Handhabung wird keine Gewährleistung übernommen.
PLEASE NOTE : The bench need to stand on a flat surface before screw
together the parts. After adjust fix the screws. The manufacturer doesn´t liable
for damages and injurys which arise to an incorrect use.
Attention: Les meubles doivent être placés uniformement sur une
surface plane.Visez les vis ap`res l’installation
Attention: Le fabricant ne répond dommages ou blessures qui résultent
d'une mauvasise untilisation
Maschinenschraube mit Sechskant M8x70 mm 4 Stück
Unterlegscheibe 4 Stück
Machine screw M8x70 mm 4 pieces, Washer 4 pieces
Vis à tête M8x70 mm, 4 pièces, Laveuse 4 pièces
Stellschrauben
Schlüssellochverbinder

Popular Indoor Furnishing manuals by other brands

KRAFTWERK 3989 instruction manual

KRAFTWERK

KRAFTWERK 3989 instruction manual

Glacier bay KHWHT30D Use and care guide

Glacier bay

Glacier bay KHWHT30D Use and care guide

Blanco BLANCOTORINO 157-183 Specification sheet

Blanco

Blanco BLANCOTORINO 157-183 Specification sheet

Vivo DESK-V123EB instruction manual

Vivo

Vivo DESK-V123EB instruction manual

Wampat B-SCT1501W Assembly instructions

Wampat

Wampat B-SCT1501W Assembly instructions

Prepac RK-2525 Assembly instructions

Prepac

Prepac RK-2525 Assembly instructions

Whalen Marlee Twin over Full Bunk Bed instruction manual

Whalen

Whalen Marlee Twin over Full Bunk Bed instruction manual

Habitat SUKI-TB-SS15-A Assembly instructions

Habitat

Habitat SUKI-TB-SS15-A Assembly instructions

Barton 93553 Owner's manual and safety instructions

Barton

Barton 93553 Owner's manual and safety instructions

IRUS Kabine Z111 Assembly instructions

IRUS

IRUS Kabine Z111 Assembly instructions

RiverRidge 02-144 Assembly instructions

RiverRidge

RiverRidge 02-144 Assembly instructions

ROOMS TO GO KIDS CREEKSIDE 2.0 3964040P Assembly instructions

ROOMS TO GO

ROOMS TO GO KIDS CREEKSIDE 2.0 3964040P Assembly instructions

OSP Designs MET44 Assembly instructions

OSP Designs

OSP Designs MET44 Assembly instructions

Maro OP-Lite Assembly manual

Maro

Maro OP-Lite Assembly manual

Acme Furniture Malai 81705 Assembly instructions

Acme Furniture

Acme Furniture Malai 81705 Assembly instructions

mecanair RONA 20035067 Operator's manual

mecanair

mecanair RONA 20035067 Operator's manual

atmosphera SOLARO 166596 manual

atmosphera

atmosphera SOLARO 166596 manual

Next CORSICA 781603 Assembly instructions

Next

Next CORSICA 781603 Assembly instructions

manuals.online logo
manuals.online logoBrands
  • About & Mission
  • Contact us
  • Privacy Policy
  • Terms and Conditions

Copyright 2025 Manuals.Online. All Rights Reserved.