manuals.online logo
Brands
  1. Home
  2. •
  3. Brands
  4. •
  5. Krieg
  6. •
  7. Recording Equipment
  8. •
  9. Krieg IUT102 User manual

Krieg IUT102 User manual

Wireless Monitor Systems
User's Manual
POWER
PHONES
8
1 15
12
4
-20
-40dB 0dB
-10
-30
SET
INP UT LE VEL
2
-
+
-
+
POWER
PHONES
8
1 15
12
4
-20
-40dB 0dB
-10
-30
SET
INP UT LEVE L
R F
BATT
UHF Wireless Stereo BodyPack Receiver
Bodypack Receiver
2"AA" Batteries
Power
User's Manual
Earphone
Transmitter
System Parts:
Antenna
Wirele ss Monitor Sy stems
User 's Manual
POWER
PHONES
8
1 15
12
4
-20
-40dB0dB
-10
-30
SET
INPUT LEVEL
3
POWER
PHONES
8
1 15
12
4
-20
-40dB 0dB
-10
-30
SET
INPUT LEV EL
1
1
2
2
3
3
4
5
6
7
7
4
5
8
Transmitter Features:
Front Panel:
Rear Panel:
Earphones jack.
LCD screen
Please See “system setup ” on page 4.
Transmitter menu up button
Please See “system setup ” on page 4.
DC adapter jack
PAD switch
Use to adjust output gain.To cut gain,set to (-12dB)
To leave gain unaffected leave set the switch to (0dB).
Left track XLR input jack
Right track XLR input jack
Transmitter menu down button
Please See “system setup ” on page 5.
Transmitter setup button
ON/OFF Switch
Hold for two seconds to turn ON.
Hold to turn OFF.
Antenna jack A
50ohm
Phones Output Control
Input Level
Controls the earphone volume,turn left to
decrease the audio level,turn right to
increase.
Controls the monitor volume level.
45
8
9
10
6
7
1
2
3
4
5
10
Bodypack Receiver
Antenna.
RF signal LED
Lights when receives RF signal is received.
Earphone jack.
Audio output control and On/Off switch.
LCD screen
Esc button Exits menu setup.
Please See “system setup ” on page 6.
Receiver menu down button
Set button, .Use this to select menu parameters
Receiver menu up button
Features:
Low battery indicator
SLIKE UNDER CLIP
WHEN MOUNTING
TO A BELT
SLIKE THROUGH
CLIP WHEN MOUNTING
TO A GUITAR STRAP
Wearing the Bodypack Receiver
Clip the receiver to a belt.For the best results,clip the receiver
onto a belt by pushing the receiver down onto the belt as far as
it will go.
For guitarists,attach the guitar strap”through” the receiver clip.
Changing Batteries
Expected life for two Alkaline batteries is approximately 5 hours.
When the LCD panel battery sign is flashing(see below),
the (see below)batteries should be changed immediately, .
OPEN CLOSE
Select a Group and Channel:
Press “SET” button, “Group” will flash, press ▲ or ▼to select
suitable frequency group number, as shown in Diagram on
the left. Then press “ SET” again , “CHANNEL” flashes, press
▲or ▼ to select suitable channel, as shown in Diagram on
the left.
Note: When using multiple systems, for optimum results at all
of the systems to the same group number and select a different
channel number for each system in that group.
Working Mode Selection:
Hold and Press “SET” button, “Mode Select” will flash, press
▲ or ▼ to select Stereo or Mono, as shown in Diagram .
Locking Selection:
Hold and Press “SET” button,, “Lock Select” will flash, press ▲
or ▼ to select Lock or Unlock, as shown in Diagram .
Audio Input Level Indication
Displays left and right audio input level, as shown in Diagram
.
Note: Adjust audio input level to control system volume in a
suitable status.
System Setup
1
1
2
2
3
3
4
4
5
5
Transmitter Programming
Left and Right Audio track Adjusting:
Press ▲ or ▼ to adjust left and right audio track balancing, as
shown in Diagram .
Press “SET” button, “Group” will flash, press ▲ or ▼ to select
suitable frequency group number, as shown in Diagram on
the left. Then press “ SET” again , “CHANNEL” flashes,
press ▲or ▼ to select suitable channel, as shown in Diagram
on the left.
Four level battery status in bodypack receiver, as shown in
Diagram .
Hold and Press “SET” button, “EQ” will flash, press ▲ or ▼ to
select EQ working mode, Hight Boost (Offers more high-end
response: 6dB boost at 10KHz), Normal(Flat), as shown in
Diagram .
Hold and Press “SET” button, “Limiter” will flash, press ▲ or ▼
to select Limiter function, as shown in Diagram .
Hold and Press “SET” button, “ ” will flash, press ▲ or ▼ to
select Lock or Unlock, as shown in Diagram
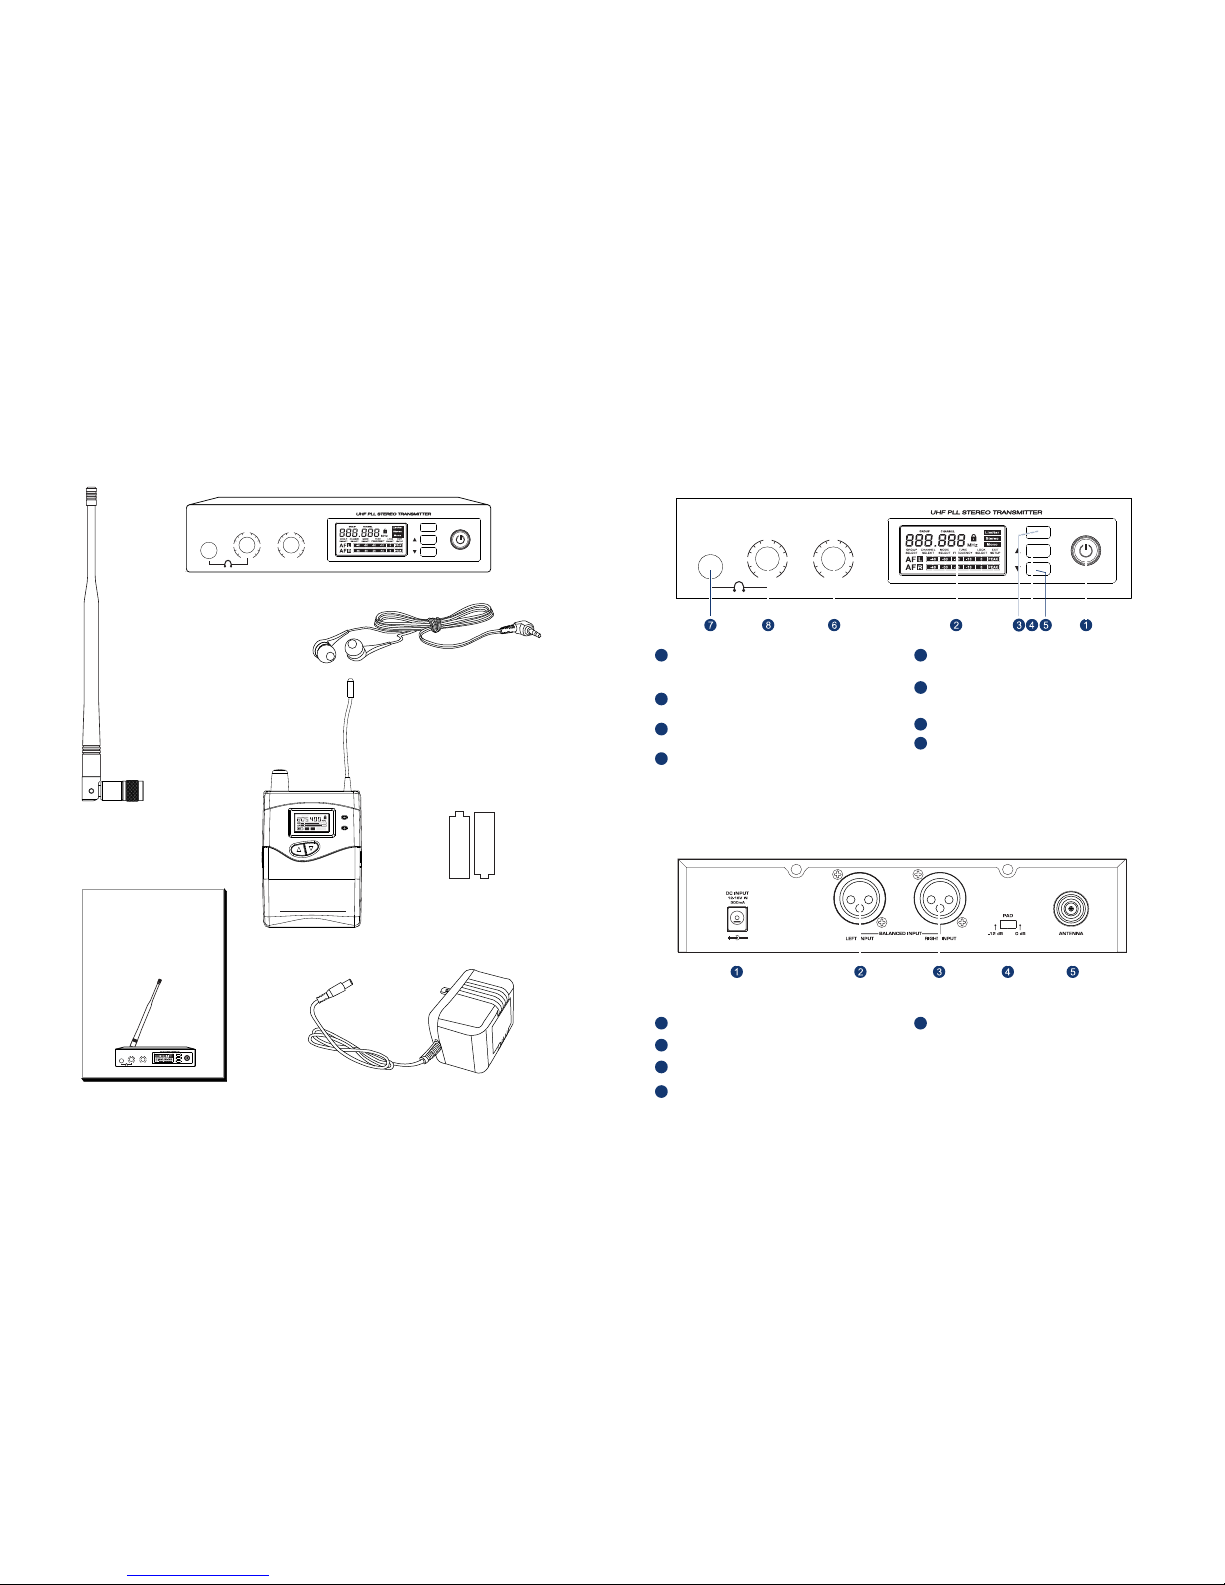
Display battery status, RF/audio level, stereo/mono working
mode, EQ mode,locking status, limiter function and working
frequency, as shown in Diagram .
2
8
5
6
7
1
Full Display
Locking Selection:
Limiter selection:
Equalization setup:
Battery Indication
Select a Group and Channel:
Bodypack Receiver Programming
4
3
6
2
5
6
7
8
System Setup
1
4
3
Specifications
System
Frequency Range and Transmitter Output Level
Operating Range Under Typical Conditions
Band: UC
Frequency Range :740~770MHz
Transmitter Output Level: 10dBm
50m
Note:actual range depends on RF signal
absorption, reflection, and interference
Audio Frequency Response(+/-3dB)
60Hz~16KHz
Total Harmonic Distortion(+/-30KHz deviation,
1KHz tone)
<1%
Dynamic Range
>90dB A-weighted
Operating Temperature Range
-10 C to +50 C
Note: battery characteristics may limit this range
Max Audio input level
+6dBV
Gain Adjustment Range
40dB
Input Impedance
100K
Dimensions
44mm H * 200mm W*96mm D
Weight
600 grams
Power Requirements
2 size alkaline or rechargeable
batteries
“AA”
Battery Life
>5 hours
Audio Output Level
XLR input
Impedance balanced
Pin1:Ground(cable shield)
Pin2:Audio
Pin3:No Audio
100mW
Sensitivity
-94dBm for 30dB SINAD,typical
Image Rejection
>65dB
Dimensions
90mm H*64mm W*23mm D
Weight
100 grams(without batteries)
Power Requirements
12-18 V dc at 300mA,supplied by external
power supply
Bodypack Receiver
Transmitter
7

Popular Recording Equipment manuals by other brands

Geberit 115.817.11.5 Maintenance manual

Geberit

Geberit 115.817.11.5 Maintenance manual

MOTU USB-MIDI user guide

MOTU

MOTU USB-MIDI user guide

RackVax RVX-100E product manual

RackVax

RackVax RVX-100E product manual

SPL Vitalizer stereo MK2-T manual&nbsp;

SPL

SPL Vitalizer stereo MK2-T manual&nbsp;

Yamaha RIVAGE PM10 Operation manual

Yamaha

Yamaha RIVAGE PM10 Operation manual

Firmtech FB900AS user manual

Firmtech

Firmtech FB900AS user manual

Nav TV GM IO3-PRG installation manual

Nav TV

Nav TV GM IO3-PRG installation manual

SOMFY CONTROL4 Programming guide

SOMFY

SOMFY CONTROL4 Programming guide

Yamaha PLG150-AN Tutorial

Yamaha

Yamaha PLG150-AN Tutorial

Rane DC 22 Operator's manual

Rane

Rane DC 22 Operator's manual

Elan Microelectronics EM60000 series user manual

Elan Microelectronics

Elan Microelectronics EM60000 series user manual

Allen-Bradley 1770-KFD Installation instructions manual

Allen-Bradley

Allen-Bradley 1770-KFD Installation instructions manual

Alesis Studio Interface MasterControl Reference manual

Alesis

Alesis Studio Interface MasterControl Reference manual

Advantech UNO-1019 user manual

Advantech

Advantech UNO-1019 user manual

Epson ELPIF01 user guide

Epson

Epson ELPIF01 user guide

Yamaha Mobile owner's manual

Yamaha

Yamaha Mobile owner's manual

Universal Audio 1178 operating instructions

Universal Audio

Universal Audio 1178 operating instructions

KYOWA PCD-300B Hardware instruction manual

KYOWA

KYOWA PCD-300B Hardware instruction manual

manuals.online logo
manuals.online logoBrands
  • About & Mission
  • Contact us
  • Privacy Policy
  • Terms and Conditions

Copyright 2025 Manuals.Online. All Rights Reserved.