Krown PortaView 20 Jr. User manual

PORTAVIEW 20 JR
TTY/TDD | K-PV20JR
Made in the U.S.A.
Innovation & Design for Accessibility, Diversity & Inclusion for All


FEATURES
•1-year Manufacturer’s Warranty
•4 – Row Keyboard
•32K Character Memory
•Rugged Injection-Molded Case
•Acoustic cups to fit round and square handset
•Pre-recorded greeting messages
•GA – SK combination keys for easy typing
•Heavy duty rechargeable battery
THINGS TO KNOW
•Krown Manufacturing Inc.’s reputation for providing
technologically advanced and quality
Telecommunication Devices for the Deaf (TDD) at
an affordable price is reflected in the Portaview 20
JR. It utilizes the same degree of engineering as
other TDD’s and will provide years of reliability and
performance. Feature for feature, the PV20JR is an
excellent value when compared with other TDD’s
available today.
•Portable, lightweight, and dependable…Krown’s
PV20JR delivers superior communications for all your
telephone calls.
•The Krown PV20JR has a built-in microphone and
speaker allowing the use of all phone types;
cordless, corded, flat, square, round. The Krown
PV20JR does not require a direct phone line
connection.

TABLE OF CONTENTS
I. GETTING STARTED 2...........................................
II. HOW TO MAKE A TDD CALL 3..........................
III. HOW TO ANSWER A TDD CALL 4......................
IV. USE AND CARE OF
RECHARGEABLE BATTERIES 5............................
V. SERVICE INFORMATION 7..................................
VI. REPAIRS 8............................................................
VII. WARRANTY 8......................................................
VIII.SPECIFICATIONS 8..............................................
IX. TDD TYPING ABBREVIATIONS 9.........................
X. SAFETY INSTRUCTIONS 11....................................
1

I. GETTING STARTED
Your new PortaView 20 Junior (PV20JR) is created by
industry pioneer, Krown Manufacturing. The unit is
compact, lightweight, and portable. Here are a few
quick and easy steps to setup your PV20JR for use:
FIG 1
Set your PV20JR near your
telephone and near an
electrical outlet.
FIG 2
Plug the adapter cord into
the jack in the back of the
PV20JR.
FIG 3
Plug the adaptor/charger
into an electrical outlet.
FIG 4
Turn on the PV20JR by
pushing the ON/OFF switch
at the right of the display.
2

Let the PV20 charge by leaving the AC adapter plugged in for
24 hours prior to use. After charging you may choose to use
either the AC adapter or battery to power the unit. A fully
charged battery will provide approximately 8 hours of use. If you
plan on taking the PV20 with you when traveling, be sure to
charge the battery the night before.!You may keep the
adapter plugged in when using the unit to ensure a fully
charged battery for use in case of a power outage.
To make a call during a power outage simply turn the unit on by
pushing the ON/OFF switch at the right of the display, (FIG. 4)
and follow the instructions in section II with a regular telephone.
CAUTION! The adapter/charger is NOT interchangeable. You
MUST use the adapter that comes with your unit.
II. HOW TO MAKE A TDD CALL
1. Turn on your PortaView (PV20JR). (See FIG.4)
2. Put the telephone handset into the rubber acoustic
cups. The telephone cord must be on the left. (See
FIG.1)
3. Watch the signal light to make sure it glows red
steadily. A steady red glow indicates a dial tone. If
the signal light blinks, press your phone receiver
button to hang up for a few seconds; then release
and watch for a steady red light.
4. Dial the number you want to call. The signal light
lets you know what is happening on the phone line.
If it blinks slowly, the phone is ringing. If it blinks fast,
the line is busy.
5. Wait for the other person to answer you and type
GA (Go Ahead) which is your signal to start typing.
If the signal light flickers, it may be a hearing person
answering by voice. Press the space bar to let the
person know it is a TDD call.
3

6. After you respond, type GA to show it is the other
persons turn to type a response.
7. Continue typing back and forth with the other
party remembering to use GA at the end of each
statement.
8. When the conversation is finished, type GA TO
9. SK (Go Ahead if you have more to say; I’m
finished).
10. When both parties type SK (Stop Keying, the
conversation is finished. You can hang up the
telephone and turn off your PV20JR.
III. HOW TO ANSWER A TDD CALL
1. When the telephone rings, turn on the PV20JR and
place the telephone handset onto the rubber
acoustic cups. (See FIG.1)
2. Type your greeting followed by GA to signal the
other person to begin typing.
3. Continue typing back and forth remembering to
use GA at the end of each statement.
4. When you are finished, type GA TO SK.
5. When both parties type SK, the conversation is
finished. You can hang up the telephone and turn
off your PV20JR.
NOTE TO HEARING PEOPLE
You can recognize an incoming TDD call in two ways:
The caller will press the space bar and
you will hear electronic beeps.
OR
There will be a silence on the other end assume this could be a
TDD call and follow the steps given above.
4

IV. USE AND CARE OF RECHARGEABLE
BATTERIES
The PortaView comes with a rechargeable battery pack as a
standard feature. The battery can supply up to 8 hours of power
when the PortaView is not plugged into an electrical outlet.
To USE the battery:
1. Disconnect the adapter/charger from the PV20JR.
2. Use the PV20JR as usual.
To RECHARGE the battery:
1. The POWER Light will blink when the battery is
weak.
2. Turn off the PV20JR.
3. Connect the adapter/charger to the PV20JR.
4. Plug the adapter/charger into an electric outlet.
5. Leave the PV20JR plugged in and turned off for 12
to 15 hours.
THE PV20JR battery begins recharging when the power adapter
is plugged in.
To REPLACE the battery:
1. Turn the PV20JR upside
down and place in
your lap.
2. Find the battery door.
3. Press the door latch
marked “PRESS” with
your thumb.
5

IMPORTANT NOTE:
It is important to “exercise” the battery regularly to prolong the
overall life of the battery. From time to time (once per month),
allow the battery to run down until the power light flashes.
Recharge using the procedure given in previous section.
4. Slide the door out.
5. With a firm grip on the white
connector, carefully
separate the two halves of
the connector, gently
wiggle and pull at the
connector unit it
disconnects.
6. Turn the white male plug
connected to the board with
the tab on top. Align the
white female plug with the
tab on top to the male
plug. Slide them in together.
7. Place the battery back in
the compartment.
8. Snap the door back in
place.
6

V. SERVICE INFORMATION
Helpful Hints:
•Be sure to turn off your PV20JR when not in use.
•Avoid exposing your unit to extreme hot or
cold temperatures.
•Avoid dropping the unit, as it is a delicate
electronic instrument.
•If you have trouble sending or receiving messages,
make sure your phone cord is to the left on the unit
(acoustic mode).
•When traveling by air, carry your PV20JR on as hand
luggage. At the security station, do not allow the
unit to be x-rayed. Ask for a hand inspection instead.
DO NOT check in the unit as baggage.
•Be careful not to spill liquids onto the PV20JR. Also
protect it from dust and dirt.
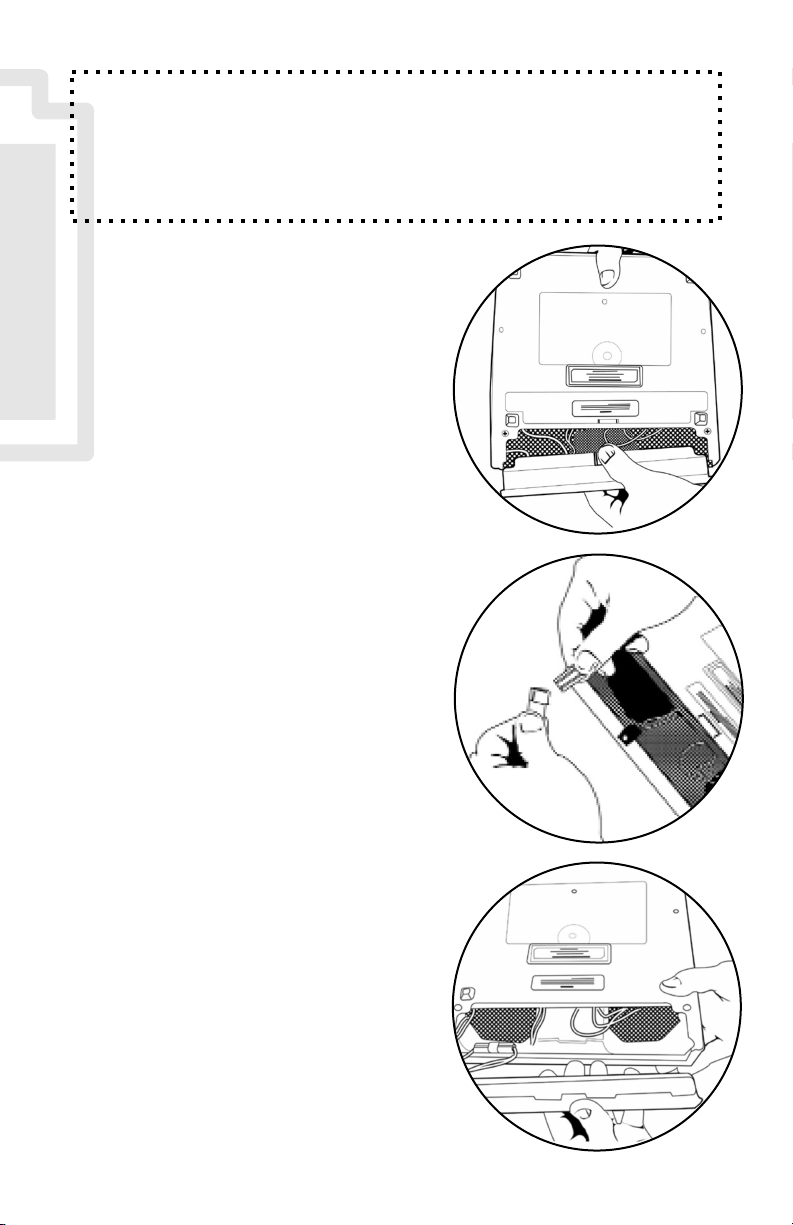
•Exercise the battery often to ensure years of service.
•If the telephone being used in conjunction with the
PV20JR has a volume control, ensure it is turned ¾of
the way up.
What to do if...
•The PV20JR will not send or receive:
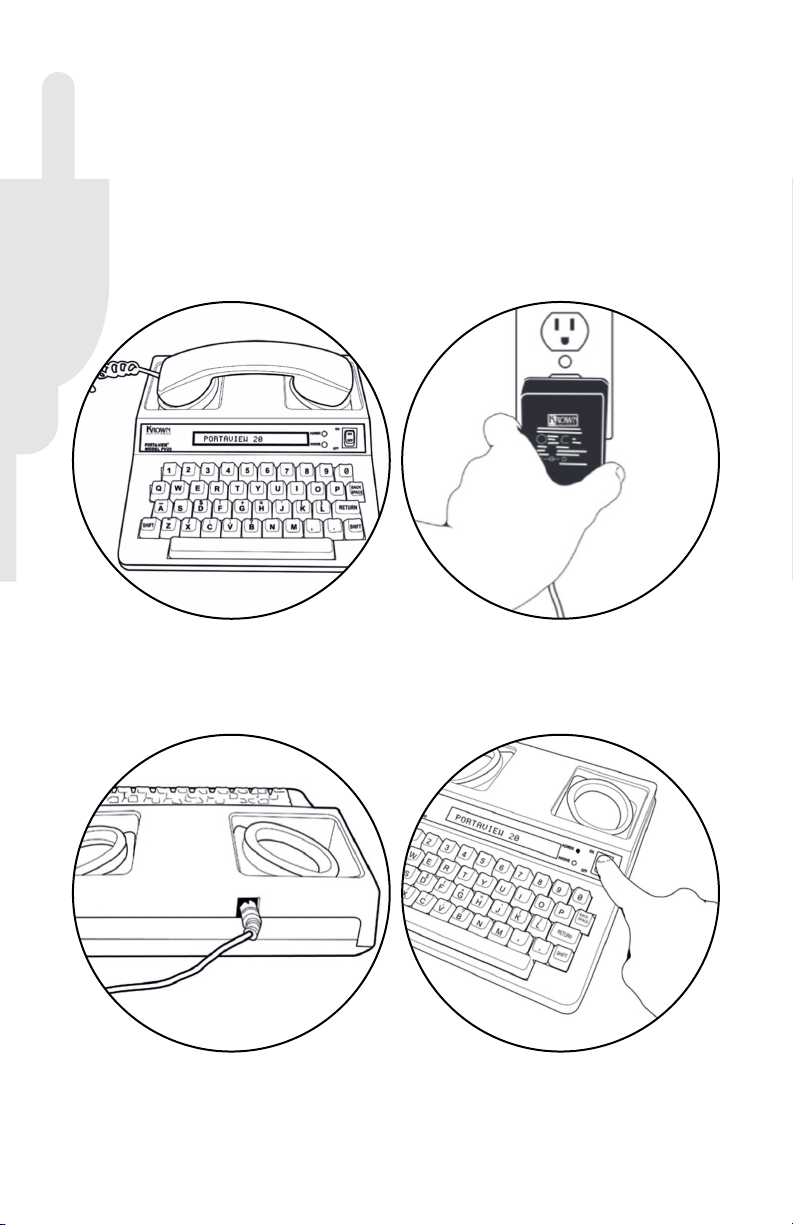
A. Check to make sure the phone cord is to the
left side of the unit (acoustic mode).
B. If the battery is weak, begin using your
adapter/charger
•The battery runs down very quickly:
A. Exercise the battery often by allowing it to run
down completely. Then recharge it overnight.
•The unit receives only numbers and figures:
A. Press your “X” key several times to change to
letters mode, then proceed
7

VI. REPAIRS
If your PV20JR needs repair, pack it in the original
shipping box along with the adapter and charger.
PLEASE enclose a note describing the problem you
are having.
You may send the unit to the authorized repair center at:
KROWN MANUFACTURING INC.
ATTN: Repair Dept
3408 INDALE ROAD
FORT WORTH, TX 76116
VII. WARRANTY
Your Portaview 20 Junior is covered for (1) full year
from the date of purchase against all defects in
materials and/or workmanship. Please fill out and
send in the warranty cards as soon as possible.
Extended warranty information is included with
your unit.
VIII. SPECIFICATIONS
Keyboard
•44 Keys, 4-row keyboard (PV20)
Display
•20 Character
•Vacuum florescent or LED
•5.5 mm character height
8

Communications
•Baudot code, 45.5 Baud
•1 start bit, 5 data bits, 1.5 stop bits
•Acoustically coupled to round and square handsets
Power
•AC charger: input 100 - 240VAC, output 9VDC at 1A, (neg.
centered)
•Heavy duty battery: 6VDC, 1800 mAH
•UL Listed
Physical Dimensions
•Weight: 2.7 lbs. (1.36 kg) with batteries
•Size: W 10” (25.4 cm), L 10” (25.4 cm), H 2.5” (6.5 cm)
IX. TDD TYPING ABBREVIATIONS
TDD users often abbreviate commonly used words or
expressions to save time Here are some common
abbreviations used in TDD communication.
GA
Go Ahead (your signal to begin typing)
SK
Stop Keying (sign off)
QQ
Question - take place of (?) key
PLS
Please
MIN
Minute
HD
Hold
UR
Your
THX
Thanks
XXXXX
Mistake
GA to SK
Go ahead if you have more to say; I’m finished
U
You
MSG
Message
9

CTRL + 1
Hello GA
CTRL + 2
(Smile)
CTRL + 3
PLS HOLD
CTRL + 4
HA HA HA
CTRL + 0
BYE BYE SK
CTRL +
RETURN
SK
CTRL + SPACE
GA
CTRL + Q
“THE BROWN…” (test message)
CTRL + V
Display model and version of the unit
For your convenience the unit has several pre-
recorded messages that will become handy in your
conversation. To use those messages: first press and
hold the down CRTL key and press the other key in
combination then release both keys.
10

¡ IMPORTANT ¡
X. SAFETY INSTRUCTIONS
1. Read/keep these instructions.
2. Read all warnings.
3. Follow all instructions.
4. Do not use this device near water.
5. Clean only with a dry cloth.
6. Install in accordance with the manufacturer’s
instructions.
7. Do not install near any heat sources such as
radiators, heat registers, stoves, or other.
8. Do not tamper with the polarized & grounding
plug. Each blade of the plug has a special
purpose for seamless communication & safety. A
grounding type plug has two blades and a third
grounding prong.
9. Liquid damage is not covered by warranty.
10. Unplug this product during lighting storms.
11. Caution marking is located at the bottom of
device.
Warning: To prevent fire or shock hazard.
Do not expose this unit to rain or moisture.
11

Notes:
.............................................................................................
.............................................................................................
.............................................................................................
.............................................................................................
.............................................................................................
.............................................................................................
.............................................................................................
.............................................................................................
.............................................................................................
.............................................................................................
.............................................................................................
.............................................................................................
.............................................................................................
.............................................................................................
.............................................................................................
.............................................................................................
.............................................................................................
.............................................................................................
.............................................................................................
.............................................................................................
.............................................................................................
.............................................................................................
.............................................................................................
.............................................................................................
.............................................................................................
.............................................................................................
.............................................................................................
.............................................................................................
.............................................................................................
.............................................................................................
.............................................................................................
................................

Our strategic intent is to help
people who are deaf or hard-of-
hearing by finding better ways to
live in an accessible world.
We use leading research and
development to manufacture
universally designed products.
We do business with purpose,
integrity, and honesty.
We aspire to deliver quality
and excellence in all we do.
Voice/TDD: 817-738-2485 | Fax: 817-738-1970
www.krownmfg.com
This manual suits for next models
3
Table of contents
Other Krown Telephone manuals

Krown
Krown Communication Keyboard for Deaf-Blind VTouch... User manual

Krown
Krown StarPlus-45 User manual

Krown
Krown StarPlus-45 User manual

Krown
Krown StarPlus Standard User manual

Krown
Krown The Equalizer K-EQ40 User manual

Krown
Krown StarPlus Standard User manual

Krown
Krown Starplus Standard Amplified Speaker... User manual

Krown
Krown PVCO-C User manual

Krown
Krown The Equalizer K-EQ40 User manual