Kruger HAP User manual

PAT America, Inc.
1665 Orchard Drive Chambersburg, PA 17201
Phone: 717/ Fax: 717/877-2117
KRUGER
HAP/HLAP SYSTEM
A-2-B With Angle and Angle Presets
. .
A-2-B with Length, Angle, and Angle Presets


H(L)AP - AA 103 - Install (RE699) Page 1
PAT America, Inc.
FOREWORD
The purpose of this manual is to provide the installer and technician with information on the
proper installation and set-up of the KRÜGER “H(L)AP” family of Indicator Systems.
The H(L)AP family of Indicating Systems is designed to provide an audible and visual warning of
an IMMINENT TWO-BLOCK condition with an analog display of MAIN BOOM LENGTH and
MAIN BOOM ANGLE. The H(L)AP family of Indicating Systems can actuate an optional crane
functionshutoffsystem.
WARNING
DO NOT CONSIDER THIS SYSTEM A SUBSTITUTE FOR GOOD
JUDGEMENT, EXPERIENCE AND ACCEPTED SAFE CRANE
OPERATIONAL PRACTICES.
THE CONTENTS OF THIS HANDBOOK AND THE CRANE
MANUFACTURERS HANDBOOKS SHOULD BE READ AND
UNDERSTOOD BEFORE ATTEMPTING TO OPERATE THE
CRANE.
NOTE
This system utilizes a series of electrical and mechanical components and
cannot be 100% fail safe.
Thissystem shouldonly beserviced byqualified individuals,either PAT-KRUEGERCorporation,
Inc. service technicians or those who have received special training from Krüger GmbH & Co.
KG. or their authorized representatives.
Toavoid damageand loss of warranty consideration,we recommend repair only be attempted
byindividuals witha strong electrical/electronic background.
Translated and reprinted by PAT-KRUEGER Corporation, Inc. with approval of Krüger GmbH &
Co. KG.

PAT America, Inc.
Page 2 H(L)AP - AA 103 - Install (RE699)
INTRODUCTION
The KRÜGER “H(L)AP” family of Indicating Systems are designed to provide an audible and
visualindication ofimminent TWO-BLOCK and analog display of BOOM LENGTH and/or BOOM
ANGLE with ANGLE PRE-SET capabilities.
When installed in conjunction with a crane function shut off system, this system prevents the
hookblockof a crane fromcomingintophysical contact with thesheavesin the boom head.
The complete system consists of:
*TheIndicatorPanel
*ACable Reel withLength and/or Angle sensors
*An Anti-Two-Block switch with counterweight
SPECIFICATIONS
PowerSupply: 12VDC +/- 20% (24VDC +/- 20% Optional)
CurrentDraw: Ca.60mA.
WorkingTemperature: -22°F to 160°F(-30°C to +70°C)
RelativeHumidity: 95%/40°Cnotcondensing
Enclosure: IP65(NEMA4)
Display: Analog meter with 105° illuminated scale
Accuracy of Display: Angle: -2° to 0° of actual angle, 1.0° increments
Length: +/-2%, 1.0 Ft. increments

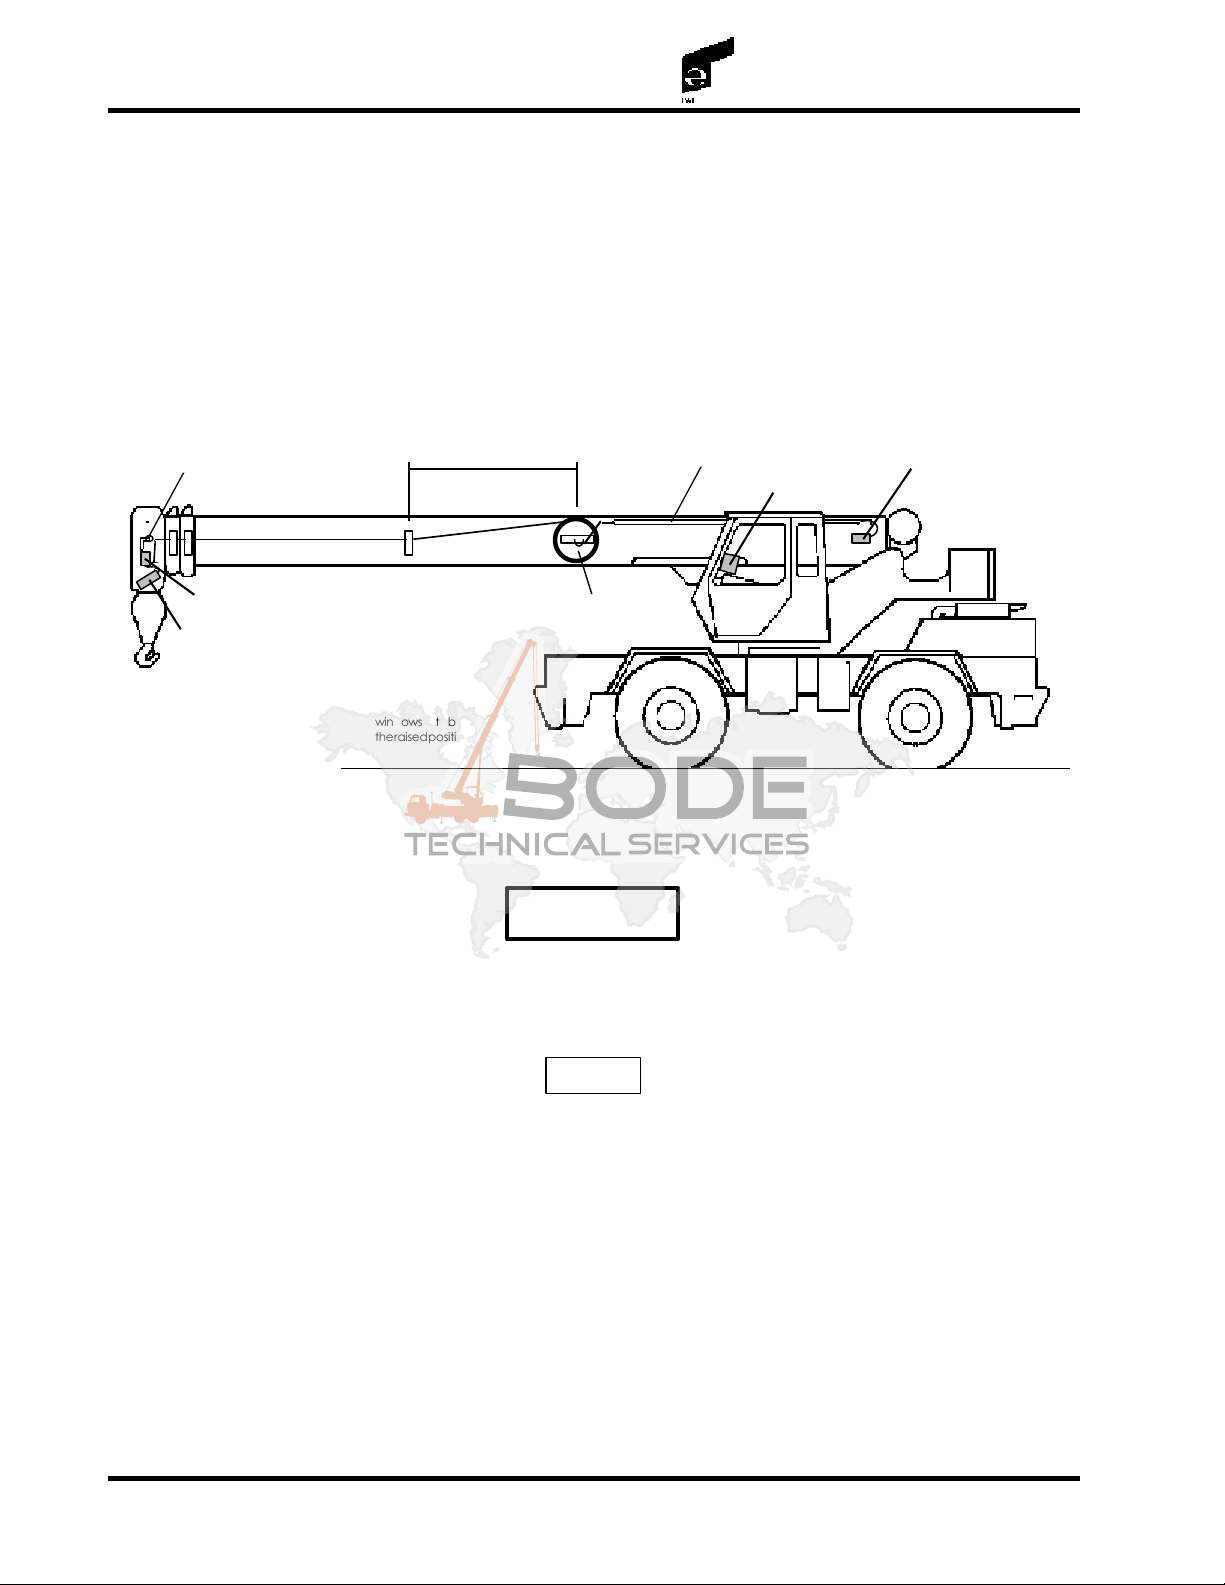
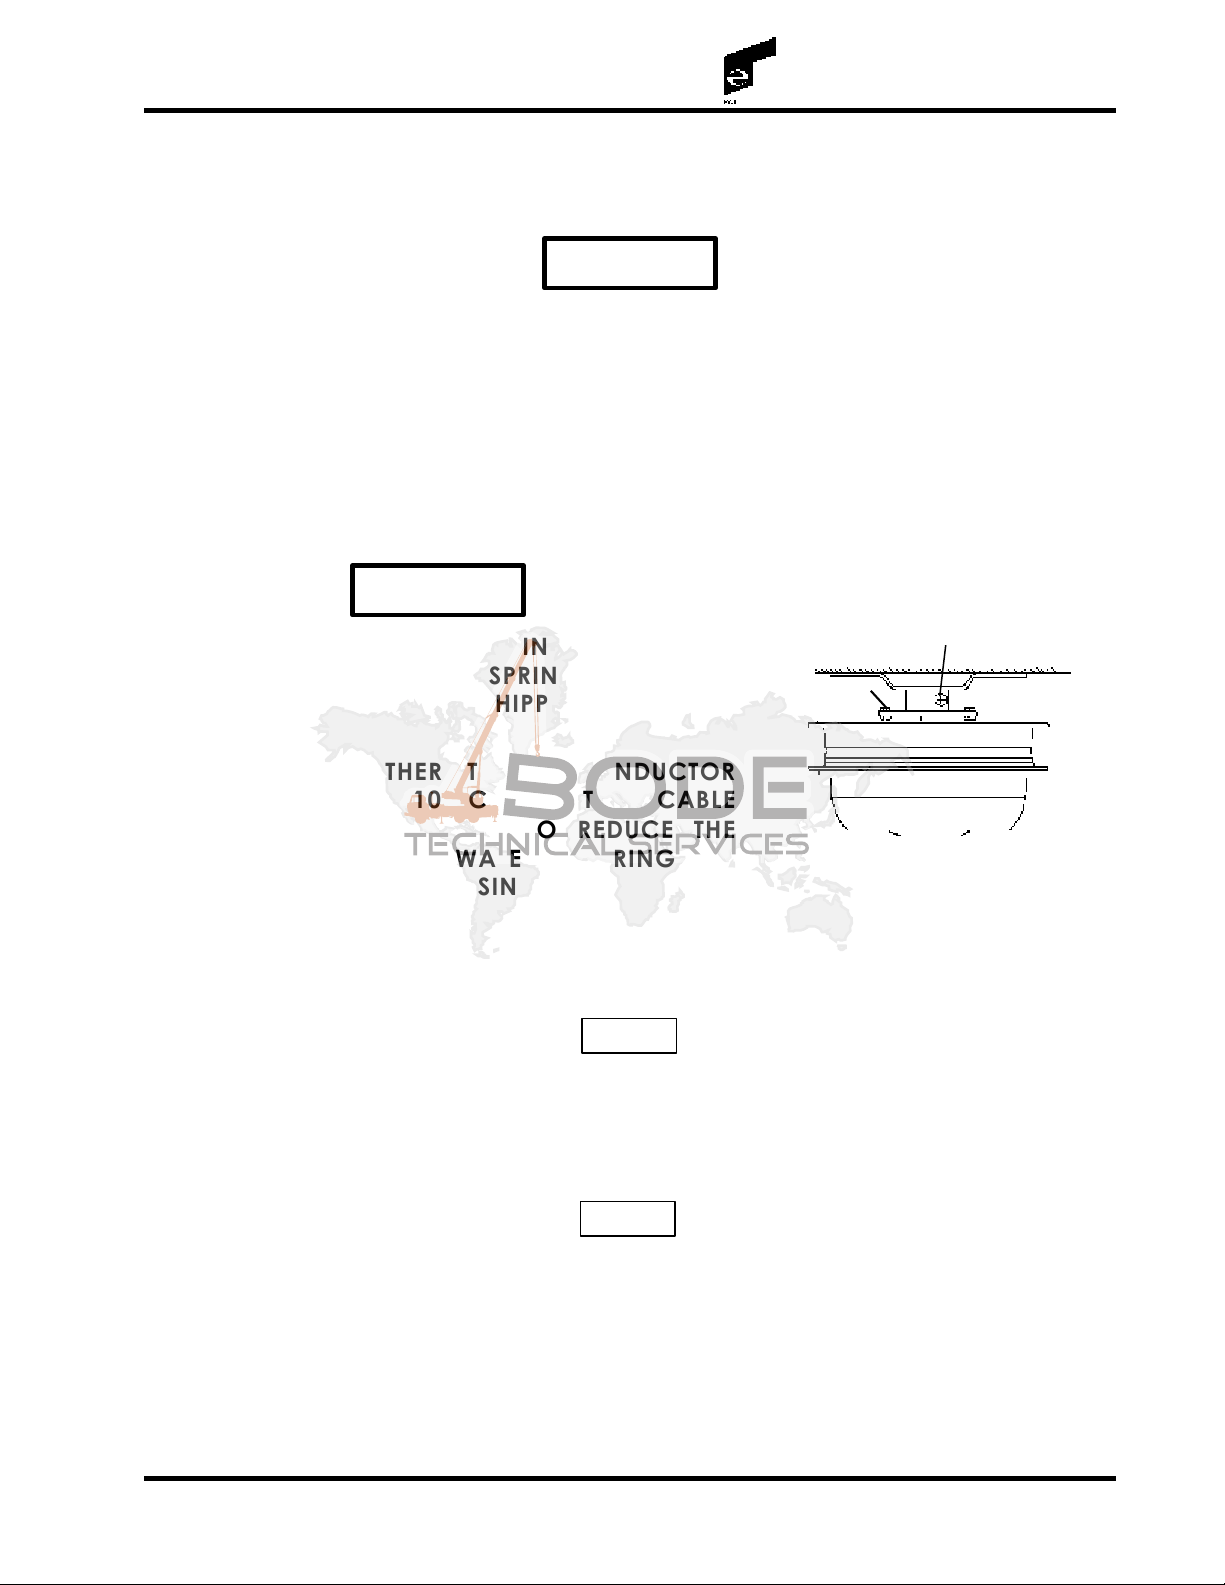
H(L)AP - AA 103 - Install (RE699) Page 3
PAT America, Inc.
WARRANTY
THERE ARE NO WARRANTIES EXPRESS OR IMPLIED, MADE BY EITHER THE
DISTRIBUTOR OR THE MANUFACTURER ON KRÜGER EQUIPMENT, EXCEPT
THE MANUFACTURER’S WARRANTY AGAINST DEFECTS IN MATERIAL AND
WORKMANSHIP SET OUT BELOW.
NEW EQUIPMENT WARRANTY
Themanufacturerwarrantseachnewproductmadeby themanufacturertobefreefrom defects
in material and workmanship. At its option, all obligation and liability under this warranty is
limited to free of charge replacement, repair or reconditioning, at its factory, of any part proven
defective under normal use and service within twelve (12) months from date of delivery. The
system or component must be on record with the manufacturer as being delivered by the
distributor. If the system or component is not on record as being delivered by the distributor,
the warranty period will commence on the date of shipment from the factory. This warranty
shall not include any transportation, customs or other charges or the cost of installation or any
liability for the cost of installation or any other liability for direct, indirect or consequential
damage or delay resulting from the defect. The manufacturer is not responsible for, and makes
no warranties in connection with, the installation or servicing, use or operation of the product.
Any repair, alteration or adjustment of the product or any substitution of parts without the
express written consent of the manufacturer shall void this warranty. This warranty covers only
the products of KRÜGER including products replaced, repaired or reconditioned by KRÜGER.
The products of other manufacturers are covered by such warranties as are made by their
manufacturers.
THIS WARRANTY IS EXPRESSLY IN LIEU OF ANY OTHER WARRANTIES,
EXPRESS OR IMPLIED, INCLUDING ANY IMPLIED WARRANTY OF
MERCHANTABILITY OR FITNESS FOR A PARTICULAR PURPOSE, AND OF THE
OBLIGATIONS OR LIABILITY ON THE PART OF THE MANUFACTURER, AND
KRÜGER NEITHER ASSUMES NOR AUTHORIZES ANY OTHER PERSON TO
ASSUME FOR IT ANY OTHER LIABILITY IN CONNECTION WITH SUCH
EQUIPMENT!

PAT America, Inc.
Page 4 H(L)AP - AA 103 - Install (RE699)
NOTE:
Locatecablereelonthe
approximatecenterlineof
theboom.
Allow for clearance
between the cable reel
andanyopencab
windows with boom in
theraisedposition.
Optional 6 Pin Receptcle
A-2-BSwitch
offset 18°
5Ft.Max.toFirst
Roller Guide
StrainReliefAnchor Boom Pivot
Plug / Receptacle
1/2" Conduit
CableReel
withDripLoop
Control Panel
INSTALLATION PROCEDURE - MAIN BOOM
COMPONENT LOCATION
Installallthesystemcomponentsaccordingtomanufacturerinstallationdrawings. Ifnotavailable,
use the following as a basic guide for component location.
CAUTION
USE ACCEPTED WELD PRACTICE WHEN WELDING
COMPONENT MOUNTING BRACKETS TO THE STRUCTURES.
NOTE
Donot install cable reelinto mounting bracketatthis time.
MAIN BOOM WIRING
1. Foran HLAP Systeminstall a pieceof 10 conductorcable between thecable reel mounting
bracketandthe10pinreceptaclemountedattheboompivot.
For an HAP System install a piece of 5 conductor cable between the cable reel mounting
bracketandthe6pinreceptaclemountedattheboompivot.
Leaveapproximately 2 feetofexcess cable ateach end.
Itis recommended, butnot essential, thata piece of1/2"conduit be mountedto the boom

H(L)AP - AA 103 - Install (RE699) Page 5
PAT America, Inc.
base section to protect the cable.
If conduit is not used, secure the cable to the boom structure using stand offs and tie
wraps.
CAUTION
INSTALL THE CABLE INTO THE RECEPTACLE WITH THE CABLE
ENTERING FROM THE LOWEST POINT OF THE RECEPTACLE
WITH THE BOOM IN ITS NORMAL OPERATING POSITION.
2. Removethecablereelcover. Removethenutandrubbergrommetfromthecentershaft.
Route cable through the mounting bracket and into hole in the cable reel center shaft.
Replacetherubber grommet and nut,tightennut. Install the cable reelintothe mounting
bracket and tighten the bolt in the mounting bracket to lock the cable reel in place.
CAUTION
DO NOT LOOSEN SPRING LOCK NUTS,
AS CABLE REEL SPRING IS UNDER
TENSION, WHEN SHIPPED.
INSTALL EITHER THE 5 CONDUCTOR
CABLE OR 10 CONDUCTOR CABLE
WITH A DRIP LOOP TO REDUCE THE
POSSIBILITY OF WATER ENTERING THE
CABLE REEL HOUSING.
3. Unwrap sufficient cable from the cable reel to reach the strain relief anchor on the boom
head.
NOTE
Take care to keep any twists out of the cable reel cable.
4. Route the cable through the roller guides and attach the strain relief assembly to the
anchorbracketontheboomhead.
NOTE
Do not put a twist in the cable reel cable between the reel and strain relief
anchor. Twisted cable will result in accelerated wear.
5. Ifa 6 PinReceptacle is installed atthe boom head,pull the cablereel cable throughthe
P clamps on the receptacle and into the bottom of the receptacle. Wire as shown on the
Wiringdiagramincludedwiththispublication.
Spring Lock Nut
Cable Reel Mounting Bolt

PAT America, Inc.
Page 6 H(L)AP - AA 103 - Install (RE699)
NOTE
Wire the cable reel cable directly to the A-2-B switch, if a 6 Pin Receptacle
is not used.
6. Using 2 conductor Olflex cable wire from the bottom of the receptacle to the A-2-B switch.
Refer to wiring diagram included with this publication. The wiring shown is for a Main
Boominstallationonly.
7. DO NOT loosen the cable reel lock nuts. Leave slack in the cable from the Boom head.
8. MovetothecablereelandcompletethewiringfortheA-2-B,Angletransducer and Length
transducer, if this is an HLAP installation. Refer to the Wiring diagrams included with this
publication.
9. Install either the 5 conductor or 10 conductor cable in
the Boom Pivot receptacle. Wire as described in the
wiringdiagramincludedwiththispublication.
10. Make up either a 6 Pin or 10 Pin Plug with either 5
conductoror10conductorcable. Thecableshouldbe
longenough to berouted along themachine structure
to the Control Panel mounted in the crane cab.
NOTE
Route cable to ensure that cable is not crimped
or can be stepped on in the normal course of
machineoperation.
11. Secure the cable in position with stand offs and tie wraps, as needed.
12. Install cable in panel and wire to terminal strips in the panel. Refer to the wiring diagram
includedwiththispublication.
13. Install a piece of 2 conductor Olflex cable from panel to the power source of the crane.
Connect the power side to the power source. The preferred connection is the run side of
theignition keyswitch. Connect theground wireto a cleaned ground lug on the machine
structure.
CAUTION
DO NOT APPLY POWER TO THE SYSTEM AT THIS TIME. POWER
WILL BE APPLIED AS PART OF THE CHECK OUT AND
CALIBRATION PROCEDURE. THIS WILL ENSURE THAT THE
PANEL VOLTAGE AND CRANE SYSTEM VOLTAGE ARE
IDENTICAL.
To Control Panel
FromCableReel
RemoveCableConnector
andinstallPlug.
RECEPTACLE
PLUG

H(L)AP - AA 103 - Install (RE699) Page 7
PAT America, Inc.
ADJUSTMENT PROCEDURES
Tools required:
MagneticbaseAngleprotractor Needle nose pliers
Small flat blade screwdriver Digital Volt-Ohm meter
Mediumflatbladescrewdriver 1/2" ratchet driver
1.5mmAllenwrench 8" extension
13mmOpenendwrench 17mmsocket
1. Bring the boom down to zero degrees (level). Measure with an angle finder to insure that
the boom is at zero degrees.
2. Loosen the cable reel mounting bolt and
gentlyturn thereel until the angle
transducerpendulumjustbeginstocome
offthestop(seediagram).
3. Apply power to the system and select
the angle indication (HLAP ONLY). The
meter should indicate zero degrees on
thepanelinthecab.
4. If the indication is not correct, gently
rotate the cable reel until the reading is
correctandtightenthecablereelmounting
bolt.
Theanglevoltageshouldbemeasuredat
this time. Using a volt meter place the
positive lead on terminal #5 on the 6 pin
terminal strip in the cable reel and the
negativeleadon terminal#4. Thevoltage
should be in a range of 0.995 to 1.005 volts DC.
If the voltage is not in this range, loosen but do not remove the three screws that hold the
Angle Pot in the mounting bracket. Rotate the angle pot to bring the voltage into the
allowablerangeandtightenthescrews.
If this is an HAP system continue at step 7.
5. With the boom fully retracted, carefully loosen the spring lock nuts on the back side of the
cablereel,applytensiontothecabletotheboomheadandtightenthemoutofthewayso
the reel can turn freely.
TERMINAL STRIP
LENGTH
TRANSDUCER
ANGLE
TRANSDUCER
PENDULUM
3 2 16 5 4

PAT America, Inc.
Page 8 H(L)AP - AA 103 - Install (RE699)
6. Pushthe Lbutton andcheck theminimum boomlength setting(HLAP ONLY). Usea volt
meter and put the positive lead on terminal #2 on the 6 pin terminal strip in the cable reel
and the negative lead on terminal #1. the voltage should be in a range of 0.995 to 1.005
voltsDC. Ifthevoltage needs adjustment, rotatethearmon the back of thelengthpotin
the cable reel until the panel indicates the proper boom length.
7. PushtheAbutton and check theangleindicationon the panel inthecab. Itshould be zero
degrees.Boomuptothemaximumboomangleandmeasuretheboomanglewithanangle
finder. Verify that the panel indicates the correct angle.
8. If the panel reading is not correct, the indication may be adjusted at this time using potR6
(A)Max rotate until the panel reading is correct.
9. Checkseveralboomanglesbetweenzeroandmaximumtoverifythesystem’soperation.
10. Tocheck the lowangle preset warning. With aboom angle greaterthan 10 degrees,set the
low angle preset to 10 degrees. Boom down until the light and horn come on. This must
occur between 10 and 12 degrees. If the light and horn come on too late or too early,
removethe black coveron the knob,loosen the screw inthe middle ofthe knob andadjust
the knob until it is correct. Tighten the screw and replace the cover.
11. To check the high angle preset warning. Turn the low angle knob to zero degrees and
boom down below 10 degrees. Turn the high angle preset knob to 10 degrees. Boom up
until the light and horn come on. This must occur between 8 and 10 degrees. In the light
and horn come on too late or too early, remove the black cover on the knob, loosen the
screw in the middle of the knob and adjust the knob until it is correct. Tighten the screw
andreplacethecover.
(A) MAX
(L) MAX
(L) OFFSET
R6
R12
R16
R21 3.4 V. REF

H(L)AP - AA 103 - Install (RE699) Page 9
PAT America, Inc.
12. Tochecktheanglepresetwarningatahighboomangle. Setthehighangle preset warning
to 70 degrees. Boom up until the light and horn come on. This must occur between 68 and
70 degrees. If the warning occurs too early or too late, adjust potR21 3.4 V. Ref in the
panel until it is correct.
Setthehighpresetknobtomaximum.
13. Tocheckthelowanglepresetwarningatahighboomangle. Boomupabove70degrees.
Setthe low anglepreset warning to70 degrees. Boom downuntil the lightand horn come
on. This must occur between 70 and 72 degrees. If the warning occurs too early or too
late, adjustR21 3.4 V. Ref in the panel until it is correct.
If this is an HAP system continue at step 17.
14. Check and adjust the length indication (HLAP ONLY). Push the L button to select length
indication. The length should read the fully retracted boom length. If it does not, adjust
pot R16 (L) Offset in the panel until it is correct.
15. Fullyextendtheboom(includinganymanualorpinnedsection). Checkthelengthindication
against the actual boom length. If it is incorrect, adjust potR12 (L) Maxin the panel until
the correct length is indicated.
16. Fully retract the boom and check the length indication. If necessary re-adjust potR16(L)
Offsetin the panel. Calibration of the retracted and extended boom lengths interact,
which may make it necessary to repeat these steps for proper length indication.
17. Complete installation of Crane function shut off system, if required.
18. Create a Two-Block condition by lifting the counterweight at the boom head. Check that
thelight and horncome on. If equipped witha Crane functionshut off systemthe following
functionsshouldbedis-abled.
Boom Hoist - Down
Boom Telescope - Out
Main Winch / Front or Right hand Drum - Up
Aux. Winch / Rear or Left hand Drum - UP
19. Lower the counterweight to verify that the light and horn go off and all crane functions
returntonormaloperation.
18. The machine is ready for operation.

PAT America, Inc.
H(L)AP - Operator (PK995)
INDEX
FOREWORD 1
INTRODUCTION 2
WARRANTY 3
OPERATION AND FUNCTION 4
Analog Meter 4
Upper Boom Angle Pre-set 5
Lower boom Angle Pre-set 5
Horn / Pre-set Limit Push Button 5
"L" Length Push Button 5
"A" Angle Push Button 6
A-2-B Warning Light 6
By-Pass Key Switch 6
Audible Alarm 6
SYSTEM OPERATION 7
Set-Up 7
PhysicalCheck 8
NormalOperatingConditions 8
Two-Block During Operation 8
Pre-set Limit Exceeded 9
PREVENTIVE MAINTENANCE 10
Daily Inspection 10
Semi-Annual Inspection 10
AnnualInspection 11

PAT America, Inc.
H(L)AP - AA 103 - Operator (RE699) Page1
FOREWORD
Thepurpose of this handbook isto provide the operator withinformation on the proper
operationoftheKRÜGER-"H(L)AP"familyofIndicatingSystems.
The"H(L)AP"familyofIndicatingSystemsisdesignedtoprovideanaudibleandvisualwarning
ofanIMMINENTTWO-BLOCKconditionwithananalogdisplayofMAINBOOMLENGTHor
MAINBOOMANGLE.The"H(L)AP"familyofIndicatingSystemscanactuateanoptionalcrane
functionshutoffsystem.
ThismanualcoverstheoperationofasystemthatincorporatesTWO-BLOCK,MAINBOOM
ANGLEwithANGLEPRESETandMAINBOOMLENGTH.
WARNING
DO NOT CONSIDER THIS SYSTEM A SUBSTITUTE FOR GOOD
JUDGEMENT, EXPERIENCE AND ACCEPTED SAFE CRANE
OPERATIONAL PRACTICES.
THE CONTENTS OF THIS HANDBOOK AND THE CRANE
MANUFACTURERS HANDBOOKS SHOULD BE READ AND
THOROUGHLY UNDERSTOOD BEFORE ATTEMPTING TO
OPERATE THE CRANE.
NOTE
Thissystemutilizesaseriesofelectricalandmechanicalcomponentsand
cannotbe100%failsafe.
Thissystemshouldonlybeservicedbyqualifiedindividuals,eitherPAT-KRUEGERCorporation,
Inc.servicetechniciansorthosewhohavereceivedspecialtrainingfromKrügerGmbH&Co.
KG.ortheirauthorizedrepresentatives.
Toavoiddamageandlossofwarrantyconsideration,werecommendrepaironlybeattempted
byindividualswithastrongelectrical/electronicbackground.
TranslatedandreprintedbyPAT-KRUEGERCorporation,Inc.withapprovalofKrügerGMBH
&Co.KG.

H(L)AP - AA 103 - Operator (RE699)
PAT America, Inc.
Page2
INTRODUCTION
TheKrüger"H(L)AP"familyofIndicatingSystemsincorporatestate-of-the-artdesigntoprovide
componentsforintegrationintooperatingsystemsformostcranespecificapplications.
Thecompactdisplaypanelprovideseasytoreadanalogdisplay,clearfunctionidentificationand
easytooperatecontrols.
TheelectricalcomponentsaremountedtoasinglePCBoardforeaseofservice.
The"HAP"- MODEL AA103indicator covered by thispublicationprovides indication of
imminent TWO-BLOCK, MAIN BOOM ANGLE with ANGLE PRESET.
The"HLAP"-MODELAA103indicatorcoveredbythispublicationprovidesindicationof
imminent TWO-BLOCK, MAIN BOOM ANGLE with ANGLE PRESET and MAIN BOOM
LENGTH.
SPECIFICATIONS
PowerSupply: 12VDC±20%(24VDC ±20%Optional)
CurrentDraw: Ca.60mA
WorkingTemperature: -22°Fto160°F ( -30°C to + 70°C)
RelativeHumidity: 95%/40°C
Enclosure: IP65(NEMA4)
Display: Analogmeterwith105°illuminatedscale
AccuracyofDisplay:
Angle: -2°to 0 °o f a c t u a l a n g l e , 1 . 0 ° i n c r e m e n t s
Length: ±2%,1.0Ft.increments
FEATURES
AnglePreset: Bothhighandlowboomangleadjustablefrom0-90°
Warnings: VisualwarningwithLEDinPushButton.
AudiblewarningisanElectronicBeeperWith
temporaryby-pass

PAT America, Inc.
H(L)AP - AA 103 - Operator (RE699) Page3
WARRANTY
THERE ARE NO WARRANTIES EXPRESS OR IMPLIED, MADE BY EITHER THE
DISTRIBUTOR OR THE MANUFACTURER ON NEW KRÜGER EQUIPMENT,
EXCEPT THE MANUFACTURER’S WARRANTY AGAINST DEFECTS IN MATERIAL
AND WORKMANSHIP SET OUT BELOW.
NEW EQUIPMENT WARRANTY
Themanufacturerwarrantseachnewproductmadebythemanufacturertobefreefromdefects
inmaterialandworkmanship.Atitsoption,allobligationandliabilityunderthiswarrantyis
limitedtofreeofchargereplacement,repairorreconditioning,atitsfactory,ofanypartproven
defectiveundernormaluseandservicewithintwelve(12)monthsfromthedateofdelivery.The
systemorcomponentmustbeonrecordwiththemanufacturerasbeingdeliveredbythe
distributor. Ifthesystemorcomponentisnotonrecordasbeingdeliveredbythedistributor,
thewarrantyperiodwillcommenceonthedateofshipmentfromthefactory.Thiswarrantyshall
notincludeanytransportation,customsorotherchargesorthecostofinstallationoranyliability
forthecostofinstallationoranyotherliabilityfordirect,indirectorconsequentialdamageor
delayresultingfrom the defect.Themanufacturer is not responsiblefor,and makes no
warrantiesinconnectionwith,theinstallationorservicing,useoroperationoftheproduct.Any
repair,alterationoradjustmentoftheproductoranysubstitutionofpartswithouttheexpress
writtenconsentofthemanufacturershallvoidthiswarranty. Thiswarrantycoversonlythe
productsofKRÜGERincludingproductsreplaced,repairedorreconditionedbyKRÜGER.The
productsofothermanufacturersarecoveredonlybysuchwarrantiesasaremadebytheir
manufacturers.
THIS WARRANTY IS EXPRESSLY IN LIEU OF ANY OTHER WARRANTIES,
EXPRESS OR IMPLIED, INCLUDING ANY IMPLIED WARRANTY OF
MERCHANTABILITY OR FITNESS FOR A PARTICULAR PURPOSE, AND OF THE
OBLIGATIONS OR LIABILITY ON THE PART OF THE MANUFACTURER, AND
KRÜGER NEITHER ASSUMES NOR AUTHORIZES ANY OTHER PERSON TO
ASSUME FOR IT ANY OTHER LIABILITY IN CONNECTION WITH SUCH
EQUIPMENT!

H(L)AP - AA 103 - Operator (RE699)
PAT America, Inc.
Page4
OPERATION AND FUNCTION
Thissectionofthemanualwillprovidetheoperatorwithinformationonthelocationand
operationofthedisplays,pushbuttons,lightsandselectorswitchesofthe"H(L)AP"familyof
IndicatingSystems.
The"H(L)AP"familyofIndicatingSystemsisdesignedtoprovideanaudibleandvisualwarning
ofanIMMINENTTWO-BLOCKconditionandanalogindicationof MAINBOOMANGLEwith
ANGLEPRESETandMAINBOOMLENGTH.The"H(L)AP"familyofIndicatingSystemscan
actuateanoptionalcranefunctionshutoffsystem.
ThismanualcoversboththeHAPandHLAPIndicatorsystems. Thepanelshownbelowisthe
HLAPIndicator. TheHAPpanelissimilarindesign. Buttons5,LENGTH,and6,ANGLE,are
notrequiredfortheHAPindicator.
1. ANALOG METER
The analog meter is used to display angle and length indication.
BOOM ANGLE
The actual boom angle, the angle between the longitudal centerline of the boom
base section and horizontal plane, is displayed in 2° increments.

PAT America, Inc.
H(L)AP - AA 103 - Operator (RE699) Page5
BOOM LENGTH
The Main Boom Length is displayed on this meter. Various scales are used
depending on the Boom Length.
2. UPPER BOOM ANGLE PRE-SET
The Upper boom angle limit is set by rotating the selector switch. This setting
determines the maximum boom angle for crane operation.
Iftheactualboomangleisequaltoorexceedsthepre-setvalue;theREDpilotlight(4)andthe
electronicbuzzer,locatedonthebackofthepanel,areactivated. Thewarningisclearedby
loweringtheboomtoananglelessthantheUpperPre-Setvalue.
The electronic buzzer can be temporarily silenced by pushing the horn/pilot light
button (4). The horn warning is automatically reset when the warning is cleared.
3. LOWER BOOM ANGLE PRE-SET
TheLowerboomanglelimitissetbyrotatingtheselectorswitch. Thissettingdeterminesthe
minimumboomangleforcraneoperation.
Iftheactualboomangleisequaltoorgoesbelowthepre-setvalue;theREDpilotlight(4)and
theelectronicbuzzer,locatedonthebackofthepanel,areactivated. Thewarningiscleared
byraisingtheboomtoananglegreaterthantheLowerPre-Setvalue.
Theelectronicbuzzercanbetemporarilysilencedbypushingthehorn/pilotlightbutton(4). The
hornwarningisautomaticallyresetwhenthewarningiscleared.
4. HORN / PRE-SET LIMIT PUSH BUTTON
TheREDpushbuttonisthevisualwarningthatoneofthepre-setangleshasbeenreachedor
exceeded. Thispushbuttonalsotemporarilysilencestheaudibleelectronicbuzzer. Temporarily
disablingtheelectronicbuzzerdoesnotturnofftheREDlight.
5. "L" LENGTH PUSH BUTTON
Pushthisbuttonwhenyouwanttheanalogmetertodisplaytheactualboomlength. Thebutton
willlighttoindicatethattheBoomLengthisbeingdisplayed. Thelengthisthedistancefromthe
boompivotpintothecenteroftheboomheadsheaves.
ThisbuttonisonlyusedontheHLAPIndicator.

H(L)AP - AA 103 - Operator (RE699)
PAT America, Inc.
Page6
6. "A" ANGLE PUSH BUTTON
Push this button when you want the analog meter to display the actual boom
angle. The button will light to indicate that the Boom Angle is being displayed. The
angle displayed is the angle between the longitudinal centerline of the boom
base section and the horizontal plane.
ThisbuttonisonlyusedontheHLAPIndicator.
7. A-2-B WARNING LIGHT
If the A-2-B circuit is "open" the warning light “A- 2-B” comes on and a shut off relay
is utilized to stop specific crane functions, if the crane is equipped with a crane
function shut-off system. The shut off function can be by-passed using the
momentary “By Pass” key switch in the panel. If the A-2-B switch is activated and
the “By Pass” key switch is used, the A-2-B warning light will remain on until the
pending 2-Block condition ceases.
8. BY-PASS KEY SWITCH
Theshutofffunctioncanbeby-passedusingthemomentary“ByPass”keyswitchinthepanel.
WARNING
THE BYPASS KEY SWITCH SHOULD BE USED WITH
DISCRETION, AS UNWARRANTED USE OF IT TO OVERRIDE
THE CRANE FUNCTION SHUT OFF SYSTEM COULD RESULT
IN LOSS OF LIFE, DESTRUCTION OF PROPERTY AND/OR
IRREPARABLE DAMAGE TO THE CRANE. SOUND JUDGEMENT
MUST BE USED WHEN USING THE BYPASS KEY.
9. AUDIBLE ALARM
Integratedintothebackofthepanelisanelectronicbeeperwhichisactivatedby:
1. OpenA-2-Bcircuit
2. Ifthepre-setUpperorLowerAnglelimitsarereachedorexceeded.
Theaudiblealarm can be silencedbypushingthe HORN button. Theaudiblealarm will
automaticallybereactivatedforbothfunctionsafterleavingthelimitedvaluesforanglepreset
orpendingtwo-blockcondition.

PAT America, Inc.
H(L)AP - AA 103 - Operator (RE699) Page7
SYSTEM OPERATION
SET UP
Thissectionwillprovidedastepbystepsequenceofstartupandoperationofthe"H(L)AP"
IndicatingSystem.
1 . Installjumpercableordummyplugintheappropriatereceptaclesattheboomtipand
attachment(s)forthemachineconfigurationbeingused.
NOTE
Thedummyplugisonlyusedifthemachineisequippedwithtwo(2)winches
andtwo(2)ormoreA-2-Bswitches.
InstallthedummyplugonlyifasingleA-2-Bswitchisbeingemployed,with
thistypemachineconfiguration.
2 . Installcounterweight(s)onA-2-Bswitchestobechecked.
CAUTION
THE LENGTH OF THE CHAIN IS IN ACCORDANCE WITH
HOOK SPEED AND SENSITIVITY OF THE OPTIONAL SHUT
OFF SYSTEM AND SHOULD NOT BE SHORTENED OR A
POSSIBLE TWO-BLOCK CONDITION COULD RESULT PRIOR
TO ACTUAL FUNCTION SHUT OFF.
NOTE
Withevenpartsofhoistline,thecounterweightshouldbeattachedtothe
deadendline.
Withoddpartsofhoistline,thecounterweightshouldbeattachedtothe
slowestspeedline.
3 . Startthecraneaccordingtothecranemanufacturerinstructions.
4 . Atstartupthe"H(L)AP"IndicatingSystemwilldisplayeithertheBoomLengthorBoomAngle
thatwasinuseatthetimeofsystemshutoff. Thepushbuttoncorrespondingtothedisplayed
valuewillbelighted.
5 . ChecktheUpperandLowerBoomAnglepre-setvalues. Followinstructionsintheprevious
sectiontochangethesevalues,ifachangeisrequired.

H(L)AP - AA 103 - Operator (RE699)
PAT America, Inc.
Page8
PHYSICAL CHECK
Thisportionofthecheckoutmustbeperformedwithextremecareandcanbebypassedifthe
craneoperatorissurethattheshutoffsystemisoperational.
6 . Withtheboomatalowangle,lifttheA-2-Bcounterweightbyhandtosimulateatwo-block
condition.Thefollowingshouldoccur:
*RED"A-2-B”lightisON.
*Audiblealarmsounds.Push“HORN”buttontosilencethehorn.
*Ifsoequipped,theoptionalshutoffsystemisdeactivatedandthefollowingcrane
functionsareinoperative:
*Hoistupbothmainandauxiliarywinches
*Boomlowering
*Telescopeout(HydraulicMachineOnly)
BeginSafeoperationofthe crane.PROCEEDWITHAPPROPRIATECARE.
NORMAL OPERATING CONDITIONS
DuringnormalcraneoperationtheOperatingPanelwill
*HavetheRED“Horn/Pre-SetLimit”lightOFF
*Have either the "L" or "A" light ON. For HLAP only.
*HavetheaudiblealarmSILENT
*Ifsoequipped,theCraneFunctionShutOffSystemisactivatedandallcranefunctionsare
operational.
TWO-BLOCK DURING OPERATION
Whenatwo-blockconditionoccursduringoperationthepanelwilldisplaythefollowing:
*The RED “A-2-B” light is ON
*TheaudiblealarmSOUNDS.ItcanbesilencedbypushingtheRED“Horn/Pre-SetLimit”
button.
*Ifsoequipped,theCraneFunctionShutOffSystemisdeactivatedandthefollowingcrane
functionsareinoperative:
*Hoistupbothmainandauxiliary
*Boomlowering
*Telescopeout(HydraulicMachineOnly)
TOCORRECT:Lowertheload,RaisetheboomorRetracttheboom.Usethecranefunction
whichbestsuitstheimmediatesituationandjobsiteconditions.
Whenthetwo-blockconditionhasbeencorrected:
*The RED “A-2-B” light is “OFF”
*Theaudiblealarmissilent
*Thehornisreset,ifithadbeensilencedpreviously.
Returntonormalcraneoperation.PROCEEDWITHAPPROPRIATECARE.
This manual suits for next models
1
Table of contents