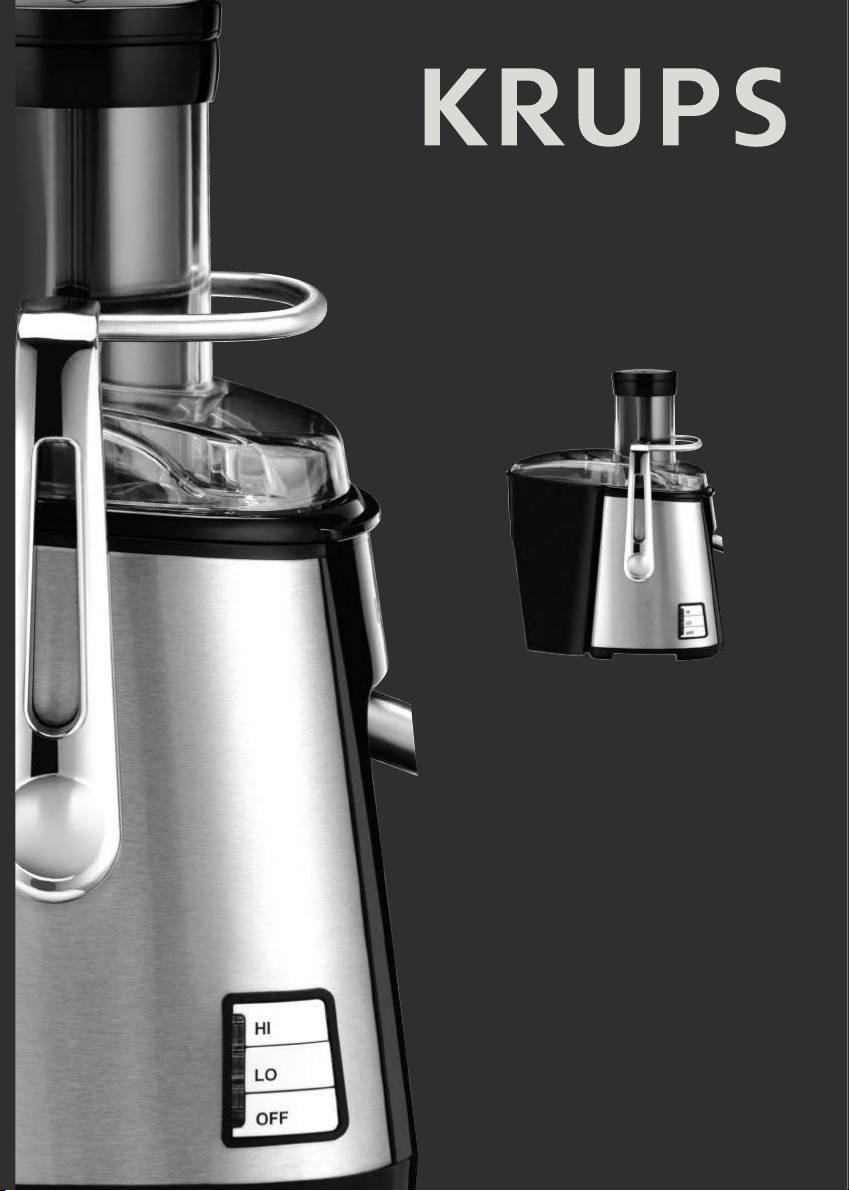
Krups ZY501 User manual

www.krups.com
NC00118428
English . . . . . . . . . . . . . . . . . . p. 1
Français . . . . . . . . . . . . . . . . . p. 7
Español . . . . . . . . . . . . . . . . . p. 13
Réalisation : Espace Graphique
EN
FR
ES
WWW.KRUPS.COM
A
L
M
K
F
N
B
C
D
E
G
H
I
O
P
J
ZY501
KR-CENTRIF-NC00118428 19/04/13 17:34 PageC1

KR-CENTRIF-NC00118428 19/04/13 17:34 PageC4

English
2
I PORTANT SAFEGUARDS
When using electrical appliances, basic safety precautions should always be
followed including the following:
1. Read all instructions.
2. To protect against risk of electrical shock do not put unit in water or other liquid.
3. Close supervision is necessary when unit is used by or near children.
4. Unplug from outlet when not in use, before putting on or taking off parts and before
cleaning.
5. Avoid contact with moving parts.
6. Never feed food by hand. Always use food pusher.
7. Do not operate appliance with a damaged cord or plug or after the appliance
malfunctions, or is dropped or damaged in any manner. Return appliance to the
nearest authorized service facility for examination, repair or electrical or mechanical
adjustment.
8. Always make sure juicer cover is clamped securely in place before motor is turned
on. Do not unfasten clamps while juicer is in operation.
9. The use of attachments not recommended or sold by the manufacturer may cause
fire, electric shock or injury.
10. Do not operate without the pulp container in place.
11. Make sure the motor stops completely and the power supply plug is removed from
the outlet before disassembling.
12. Do not put your fingers or other objects into the juicer opening during operation. If
food becomes lodged in opening, use food pusher or another piece of fruit or
vegetable to push it down. When this method is not possible turn the motor off and
disassemble juicer to remove the remaining food.
13. Ensure unit is completely assembled before use. Do not operate the unit without
Grater/Filter Basket, Pulp Container, and Juice Container.
14. Do not use outdoors. This appliance is for household use only. Do not use this
appliance for anything other than its intended use.
15. Do not let cord hang over edge of table, counter, bench or touch hot surfaces,
including the stove.
16. Switch off the appliance before changing accessories or touching parts which move
during use.
17. Do not use the appliance if the stainless steel filter basket is damaged.
18. Do not leave the juice extractor unattended when in use.
19. Always ensure the juice extractor is turned off by pressing the “OFF” switch on the
control panel. Then switch the appliance off at the power outlet and unplug the cord.
Make sure the stainless steel filter basket has stopped before releasing the safety
locking arm and/or attempting to move the appliance.
20. Do not operate the appliance continuously with heavy loads for more than 10
seconds. Allow the motor to rest for 5 minutes between each use.
KR-CENTRIF-NC00118428 19/04/13 17:36 Page2

21. Be careful when handling the stainless steel filter basket. The small cutting blades
are very sharp. Handle very carefully. Mishandling may cause injury.
22. Fully unwind the cord before use.
SAVE THESE INSTRUCTIONS
POLARIZATION PLUG
This appliance has a polarized plug (one blade is wider than the other). To reduce
the risk of electrical shock, this plug will fit in a polarized outlet only one way. If the
plug does not fit fully in the outlet, reverse the plug. If it still does not fit, contact a
qualified electrician. Do not modify the plug in any way.
DESCRIPTION
SAFETY SYSTEM
nThis appliance is fitted with a safety mechanism. To start the juice machine, the cover (C) must be
properly secured by the safety clamp (H). Opening the safety clamp (H) will stop the juice extractor.
At the end of a cycle, place the control switch (I) to OFF and wait until the stainless steel filter basket
(D) stops completely before removing the cover. The appliance will switch off automatically after 3
minutes of non-use as an added safety feature.
BEFORE FIRST USE
nUnpack the appliance and place it on a solid, stable work surface.
nEnsure that all packaging has been removed before starting the appliance.
nWe recommend that you wash all the removable parts (A, B,C, D, E, G, L, , N) in warm soapy water
(see paragraph ”Cleaning”). Before the first use rinse and dry them carefully.
USING THE APP IANCE
nFit the juice collector (E) onto the appliance, tipping it slightly forward to pass the pouring spout through
the hole provided (see Fig. 1).
nPlace the stainless steel filter basket (D) in the juice collector (E). Ensure that the filter basket is properly
clipped onto the drive shaft (J). You can hear an audible click when it is positioned correctly (see Fig. 2).
nFit the cover (C) on the appliance with the ejection spout to the back (see Fig. 3).
nPush the safety clamp (H) towards the back of the machine until it locks into place. The red light will
become blue.You will hear an audible “click” (see Fig. 4).
nFit the pulp collector (G) on the rear of the appliance (see Fig. 5).
APusher
BFeed tube
CCover
DStainless steel filter basket
EJuice collector
FPouring spout
GPulp collector
HSafety clamp
IControl switch (2 speeds)
JDrive shaft
KMotor unit
LJuice container cover
Foam separator
NJuice container
OBrush
PCord storage
English
3
KR-CENTRIF-NC00118428 19/04/13 17:36 Page3

English
4
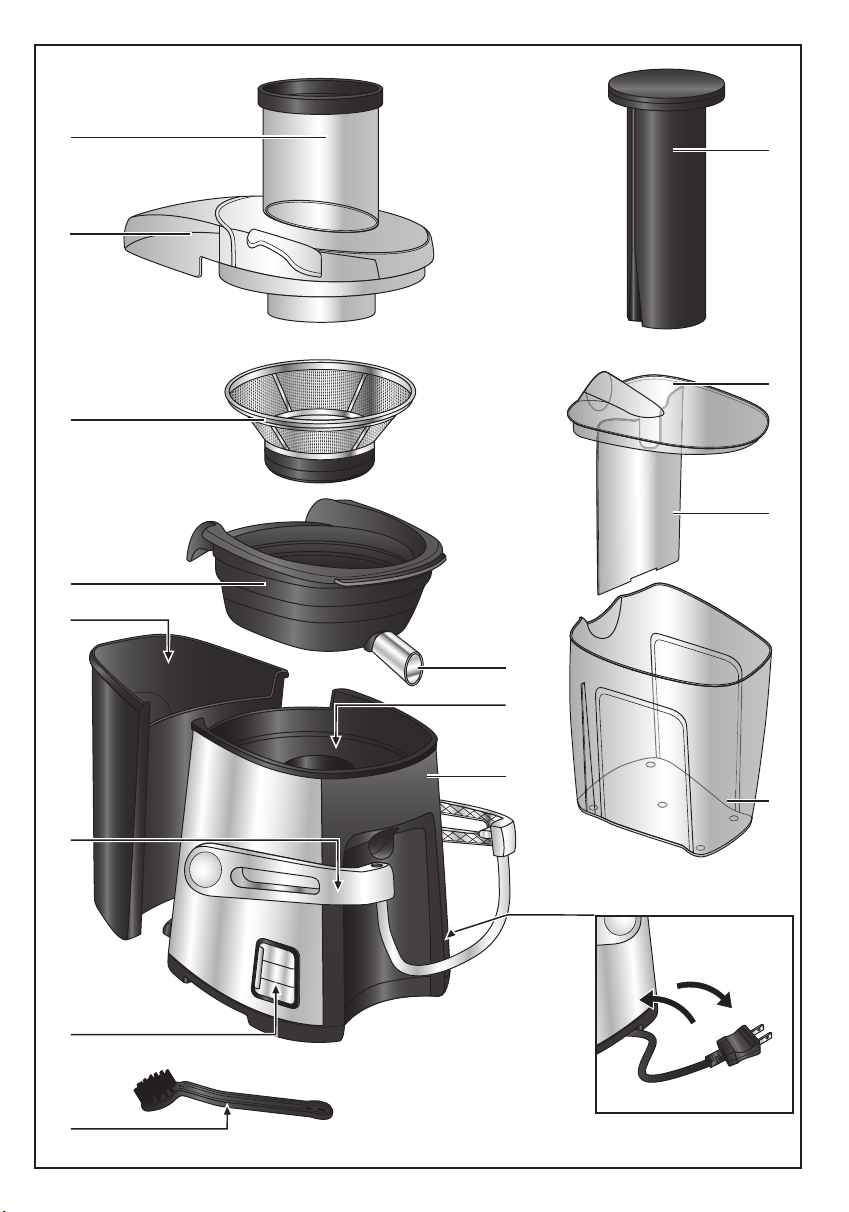
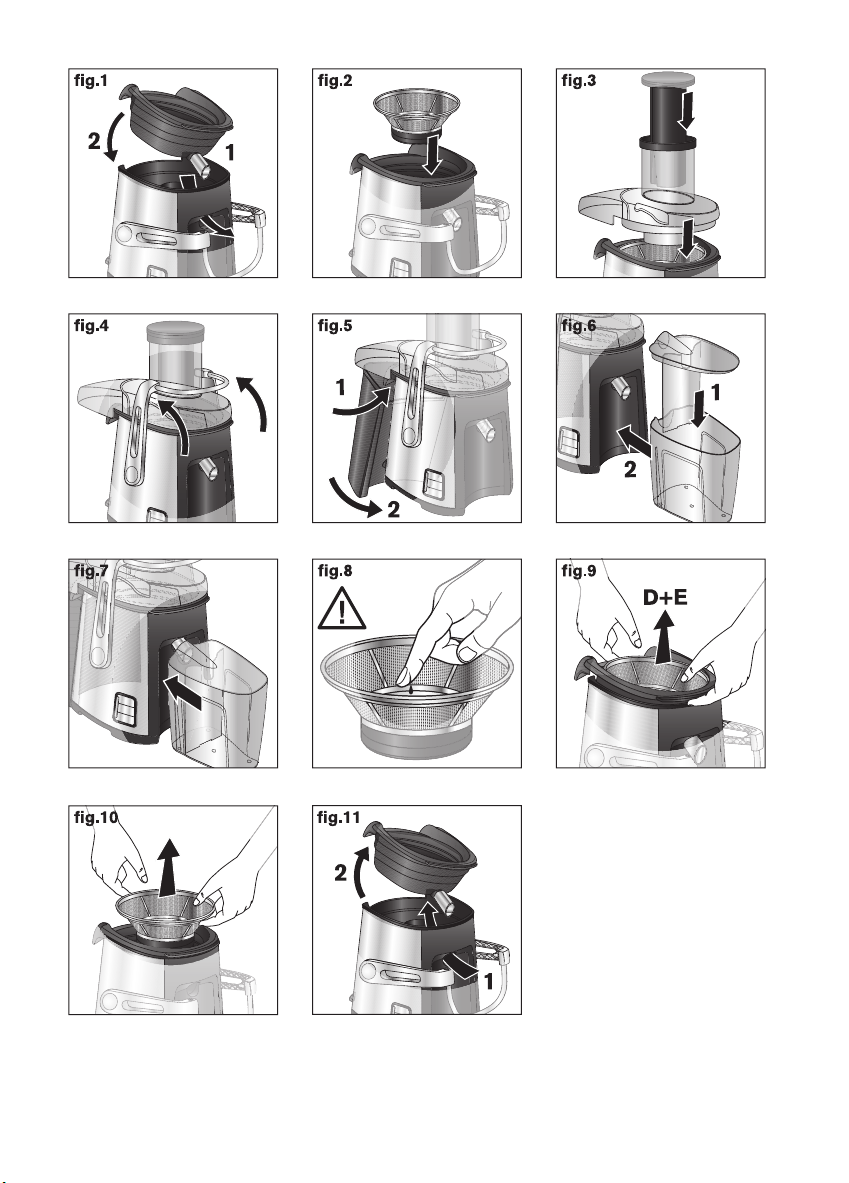
nSlide the pusher (A) into the feed tube (B) aligning the groove on the pusher with the small ridge in the
feed tube.
nIf you wish to separate the juice from the froth, slide the foam separator ( ) in the juice container (N)
(see Fig. 6). The foam separator allows you to keep the froth inside the jug when you pour the juice
into a glass.
nPlace the juice container (N) under the pouring spout in front of the appliance (see Fig. 7).
nPlug in the appliance.
nTo start the appliance, use the control switch (I) and choose either the “ o” or “Hi” setting based on
what you are juicing.
nInsert the fruits or vegetables through the feed tube (B).
nThe fruits and vegetables must be inserted only while the motor is running.
nDo not press too hard on the pusher (A). Do not use any other utensil. NEVER push with
your fingers.
nWhen you have finished, stop the appliance by pushing the OFF button on the control switch (I) and
wait until the filter basket (D) stops completely.
nWhen the pulp collector (G) is full, or the juice flow slows down, empty the pulp collector and clean the
filter basket and the cover.
nTo remove the filter, release it by pulling with both hands (see Fig. 9 and 10). Then remove the stainless
steel filter basket (D) followed by the juice collector (E) (see Fig. 10 and 11).
PRACTICAL TI PS
nWash the fruit carefully before juicing.
nIn general, you do not need to remove the skin or peel. You only need to peel fruit with thick and/or
bitter skin, like lemons, oranges, grapefruits or pineapple (remove the core).
nCertain types of fruit like apples, pears, tomatoes etc. (with a diameter less than 3 inches) will fit in the
feed tube whole, thanks to the “Direct Fruit System”. So choose the appropriate type of fruit or
vegetable. Fruits and vegetables should be inserted into the machine one piece at a time to avoid
overheating.
nIt is difficult to extract juice from bananas, avocados, blackberries, figs, aubergines and strawberries.
nThe juice machine should not be used for sugar cane and excessively hard or fibrous fruit.
nChoose fresh, ripe fruit and vegetables, they will yield more juice This appliance is suitable for such
fruits as apples, pears, oranges, grapes, pomegranates and pineapple and such vegetables as carrots,
cucumbers, tomatoes, beets and celery.
nIf you use over-ripe fruit, the filter basket will be blocked more quickly.
nImportant: All juice must be consumed immediately. On contact with air, it quickly becomes oxidized,
which can change its taste, color and nutritional value. Apple and pear juices quickly turn brown. Add
a few drops of lemon juice to slow this discoloration.
C EANING
nAll removable parts (A, B, C, D, G, L, and N) may be cleaned in the dishwasher, except for the juice
collector (E).
nThe juice collector (E) must be cleaned directly after use in soapy water.
nThis appliance is easier to clean immediately after use.
nDo not use scouring pads, acetone, alcohol, etc. to clean the appliance.
nThe filter basket must be handled with care. Avoid any mishandling that may affect the performance of
the appliance. The filter basket can be cleaned with the brush (O). Change your filter basket at the first
sign of wear or damage.
nClean the housing with a damp cloth. Dry carefully.
nNever immerse the motor under running water.
KR-CENTRIF-NC00118428 19/04/13 17:36 Page4

TROUB ESHOOTING
For any other problem or fault, please contact your approved Service center.
DISPOSING OF YOUR APP IANCE
Your appliance contains valuable materials which can be recovered or recycled.
eave it at a local civic waste collection point or at an approved service centre.
MANUFACTURER’S WARRANTY
: www.krups.com
With a strong commitment to the environment, most of Krups products are
repairable during and after the warranty period. Before returning any defective
products to the point of purchase, please call Krups consumer service directly
at the phone number below for repair options.
Your help to sustain the environment is appreciated!
The Warranty
This product is guaranteed by Krups for a period of 2 years against any manufacturing defect in materials or
workmanship, starting from the initial date of purchase.
The manufacturer's warranty by Krups is an extra benefit which does not affect consumer's Statutory Rights.
The Krups warranty covers all costs related to restoring the proven defective product so that it conforms to
its original specifications, through the repair or replacement of any defective part and the necessary labor. At
Krups’s choice, a replacement product may be provided instead of repairing a defective product. Krups’s
sole obligation and your exclusive resolution under this warranty are limited to such repair or replacement.
PROBLE S CAUSES SOLUTIONS
The appliance does
not work.
The plug is not inserted correctly; the
control switch (I) is neither on “ o”
nor on “Hi”.
Plug the appliance into an outlet with
the correct voltage. Turn the control
switch to speed “ o” or “Hi”.
The cover (C) is not properly
secured.
Check that the cover (C) is properly fit-
ted and secured by the safety clamp
(H).
The appliance is
giving off a smell or
is very hot to touch,
is making an
abnormal noise
or smoking.
The filter basket (D) is not properly
fitted.
Check that the filter basket (D) is fitted
properly onto the drive shaft (J).
The quantity of fruit or vegetables
being processed is too great.
Allow the appliance to cool and reduce
the quantity of fruit or vegetables being
processed.
The flow of juice
decreases.
The filter basket (D) is blocked. Switch off the appliance, clean the feed
tube (B) and the filter basket (D).
English
5
KR-CENTRIF-NC00118428 19/04/13 17:36 Page5
Other manuals for ZY501
1
Table of contents
Other Krups Kitchen Appliance manuals

Krups
Krups FDK 451 User manual

Krups
Krups CZ715815 User manual

Krups
Krups Slice/IT 213 A User manual

Krups
Krups Extra Crisp User manual

Krups
Krups ZY403 User manual

Krups
Krups ZX7000 User manual

Krups
Krups BeerTender User manual

Krups
Krups COOK4ME+ GRAMEEZ User manual

Krups
Krups BeerTender User manual

Krups
Krups Cook4Me User manual

Krups
Krups COOK 4 ME User manual

Krups
Krups JC100810 User manual

Krups
Krups ZY403 User manual

Krups
Krups F608 User manual

Krups
Krups CZ856815 User manual

Krups
Krups VB215850 User manual

Krups
Krups PANINI & GRILL PG70 Series User manual

Krups
Krups NC00131945 User manual

Krups
Krups ZX7000 User manual

Krups
Krups b95 Beertender User manual