KUMATSUGEN GM6000 User manual

WWW.NIKOLAOUTOOLS.GR
GM6000 GM6100
053583 053590
v2.2
:
IT EL
BG SL
RO
EN FR

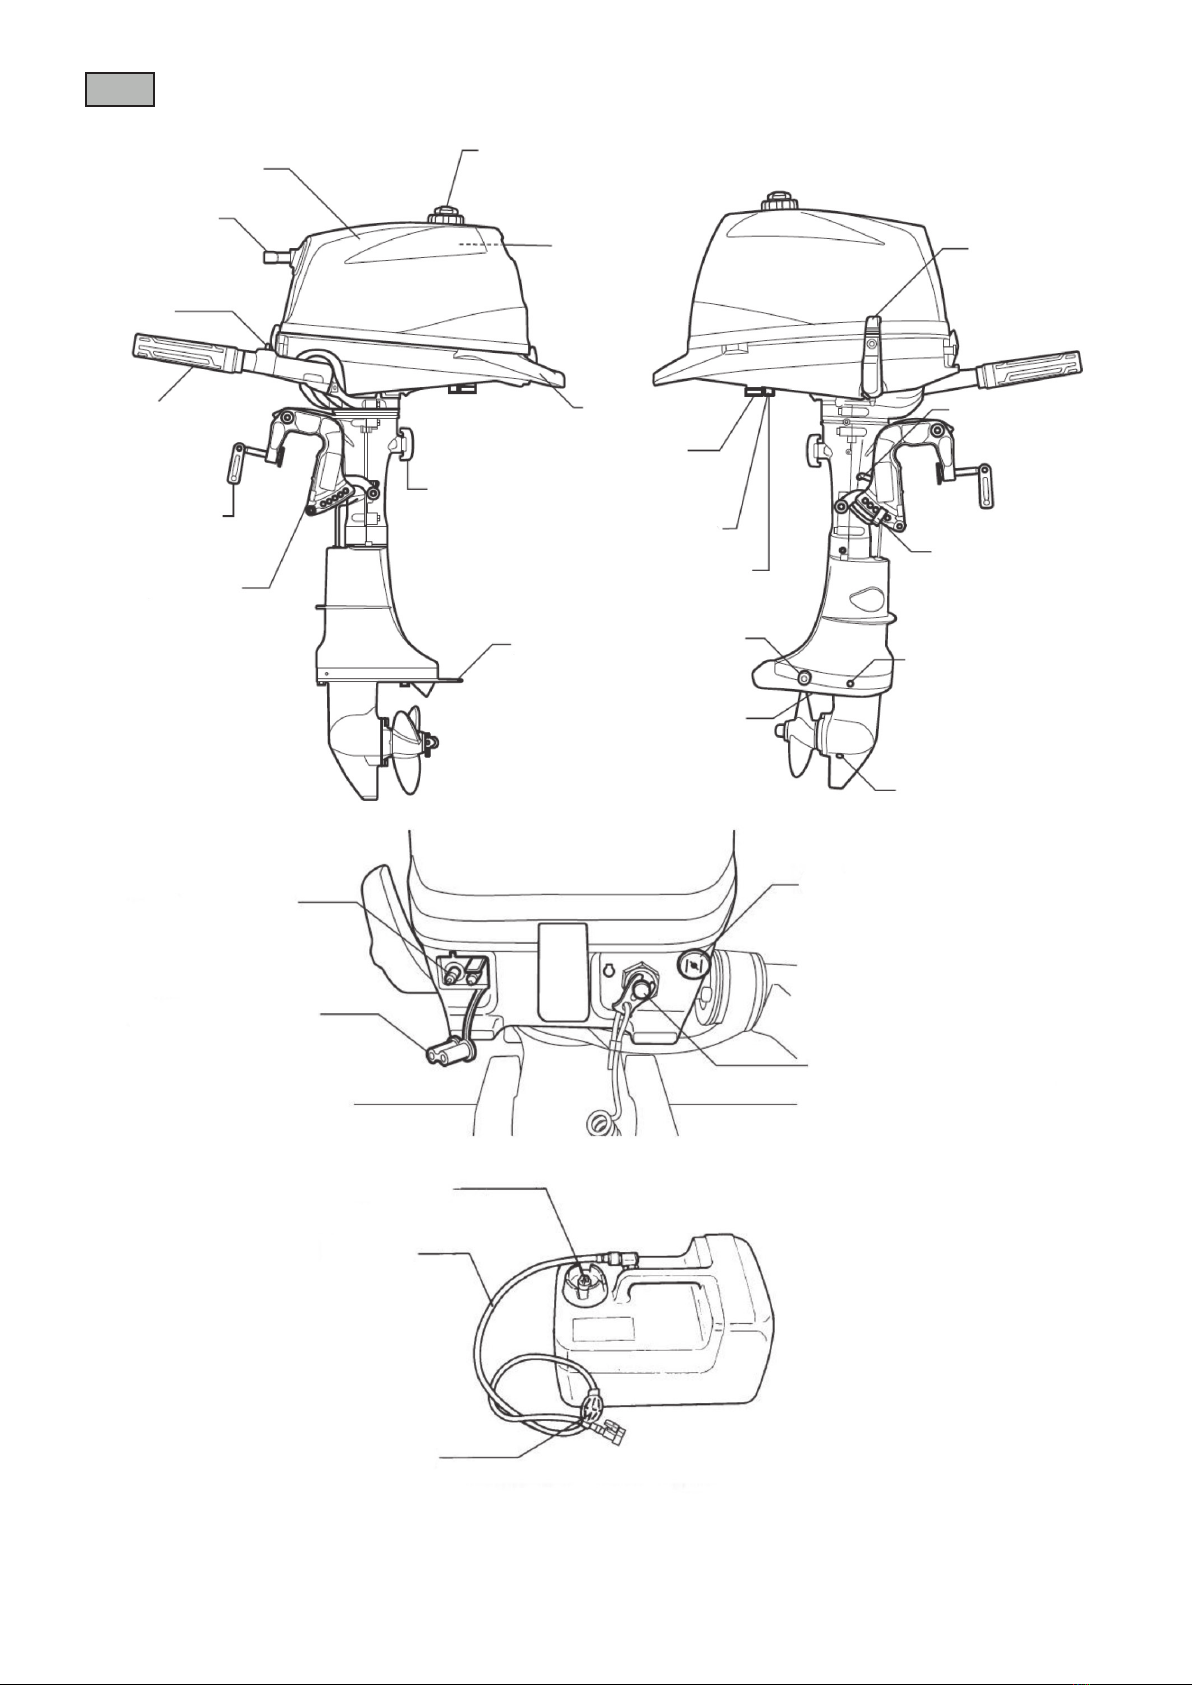
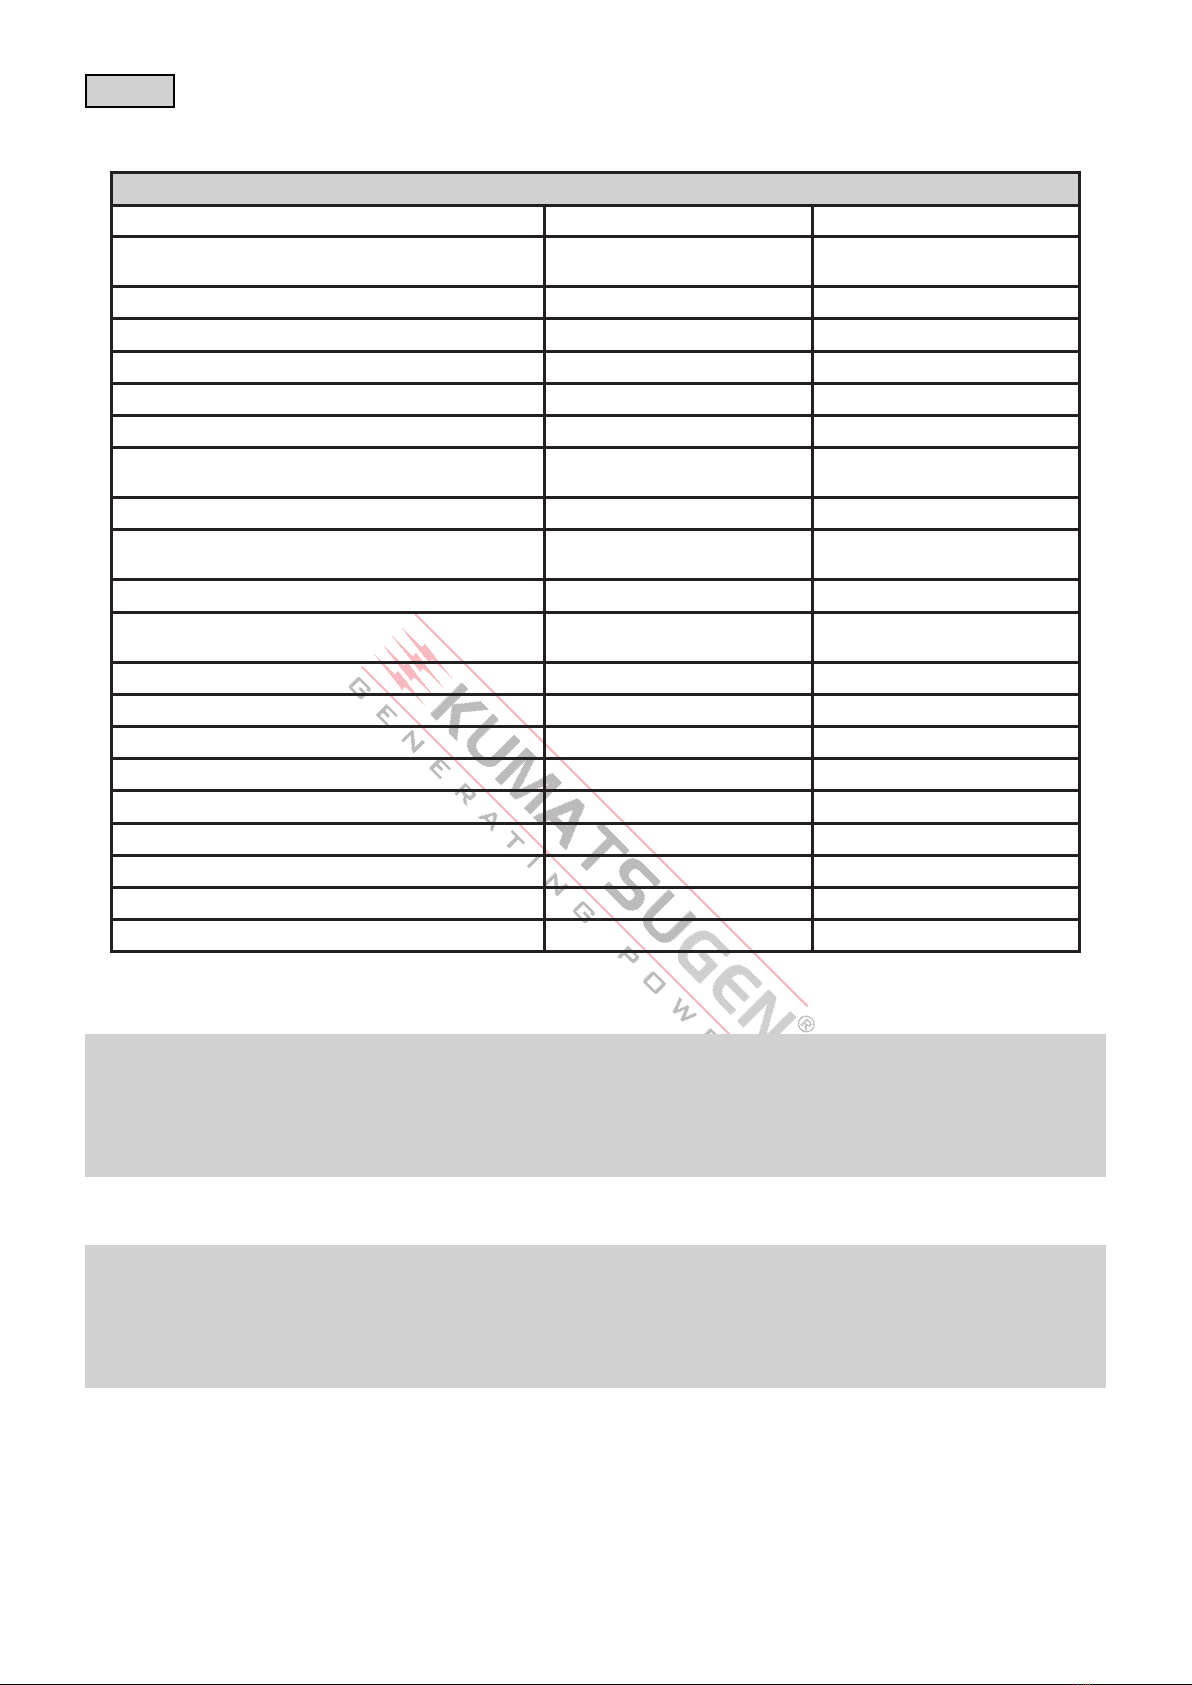
Technical data / Τεχνικές προδιαγραφές
Model / Μοντέλο GM6000 GM6100
Engine type / Τύπος κινητήρα Water cooled, 4-stroke
Υδρόψυκτος, τετράχρονος
Water cooled, 4-stroke
Υδρόψυκτος, τετράχρονος
Number of cylinders / Αριθμός κυλίνδρων 1 1
Displacement / Κυβισμός 112cc 112cc
Max. output / Μέγιστη ισχύς 4.4kW / 6.0hp 4.4kW / 6.0hp
Idling speed / Ταχύτητα ρελαντί 1450-1550rpm 1450-1550rpm
Full throle operang range / Μέγιστη ταχύτητα 4500-5500rpm 4500-5500rpm
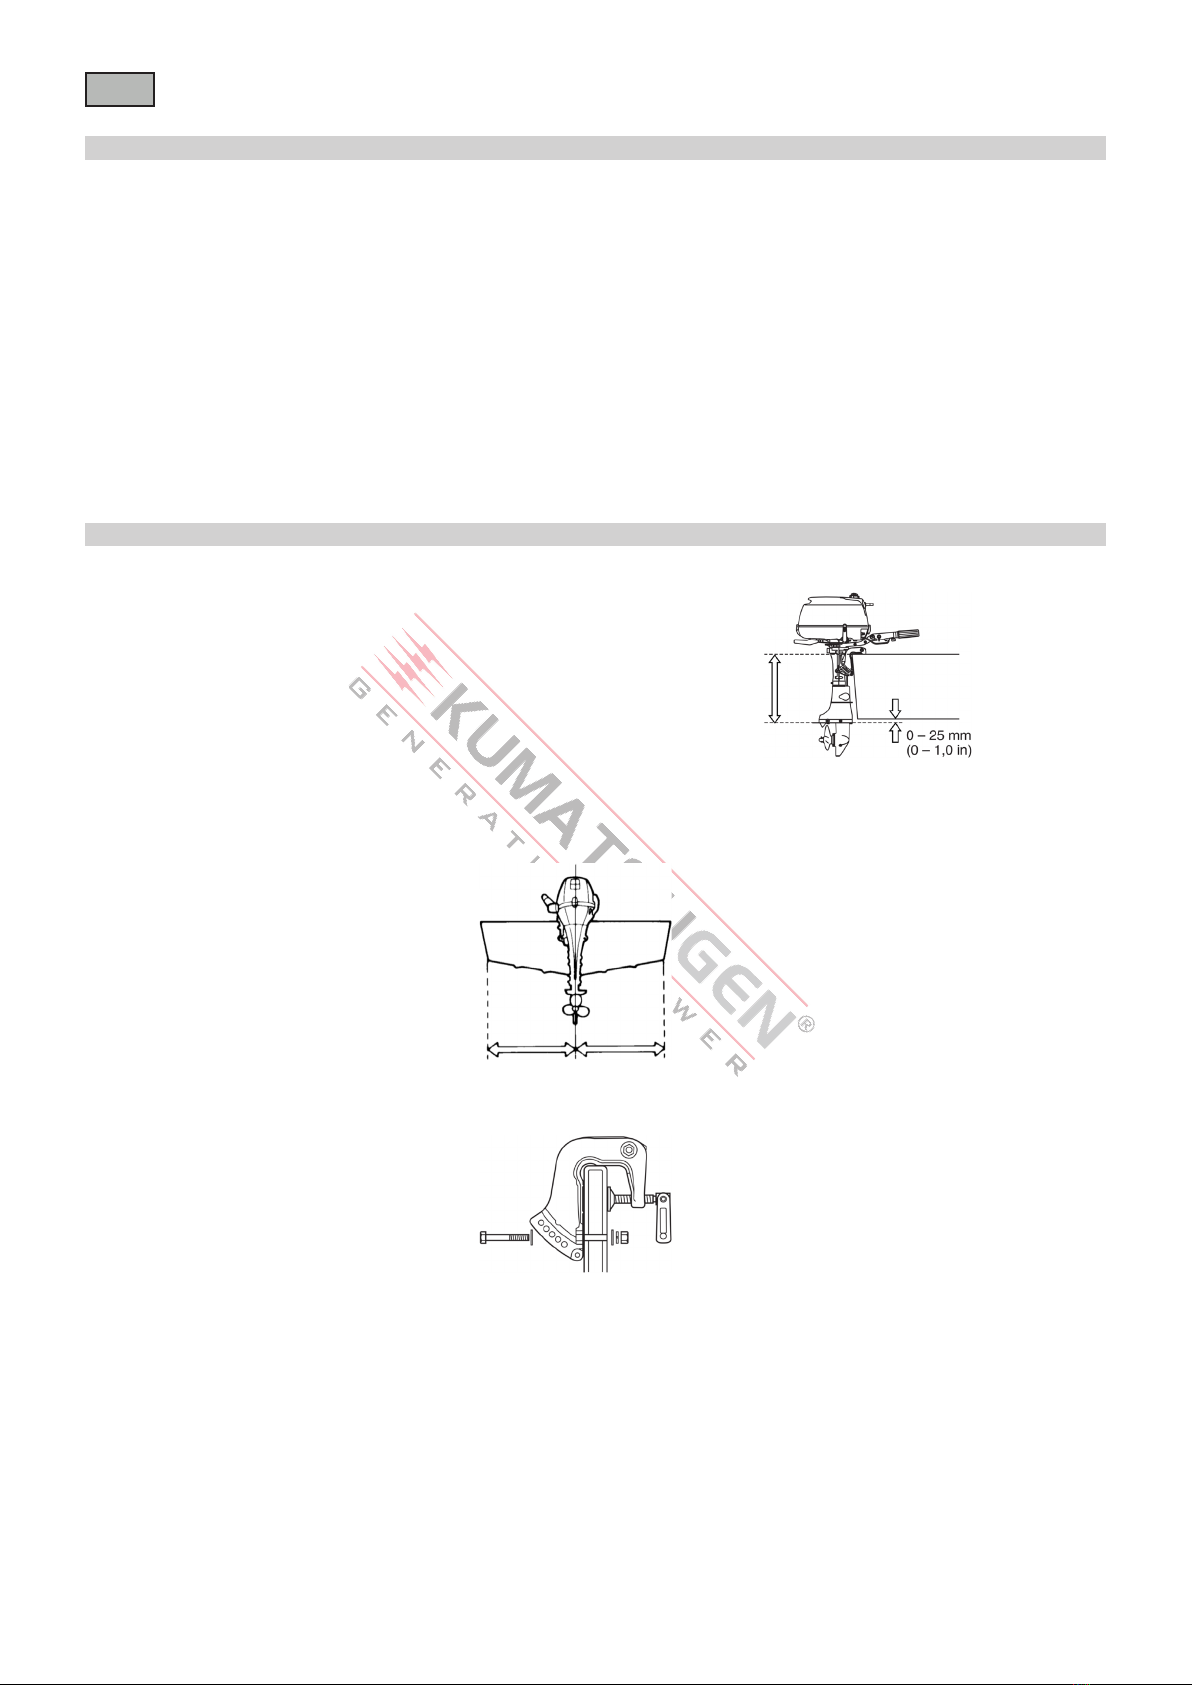
Transom height / Ύψος λαιμού 44cm (short sha)
44cm (κοντόλαιμη)
58cm (long sha)
58cm (μακρύλαιμη)
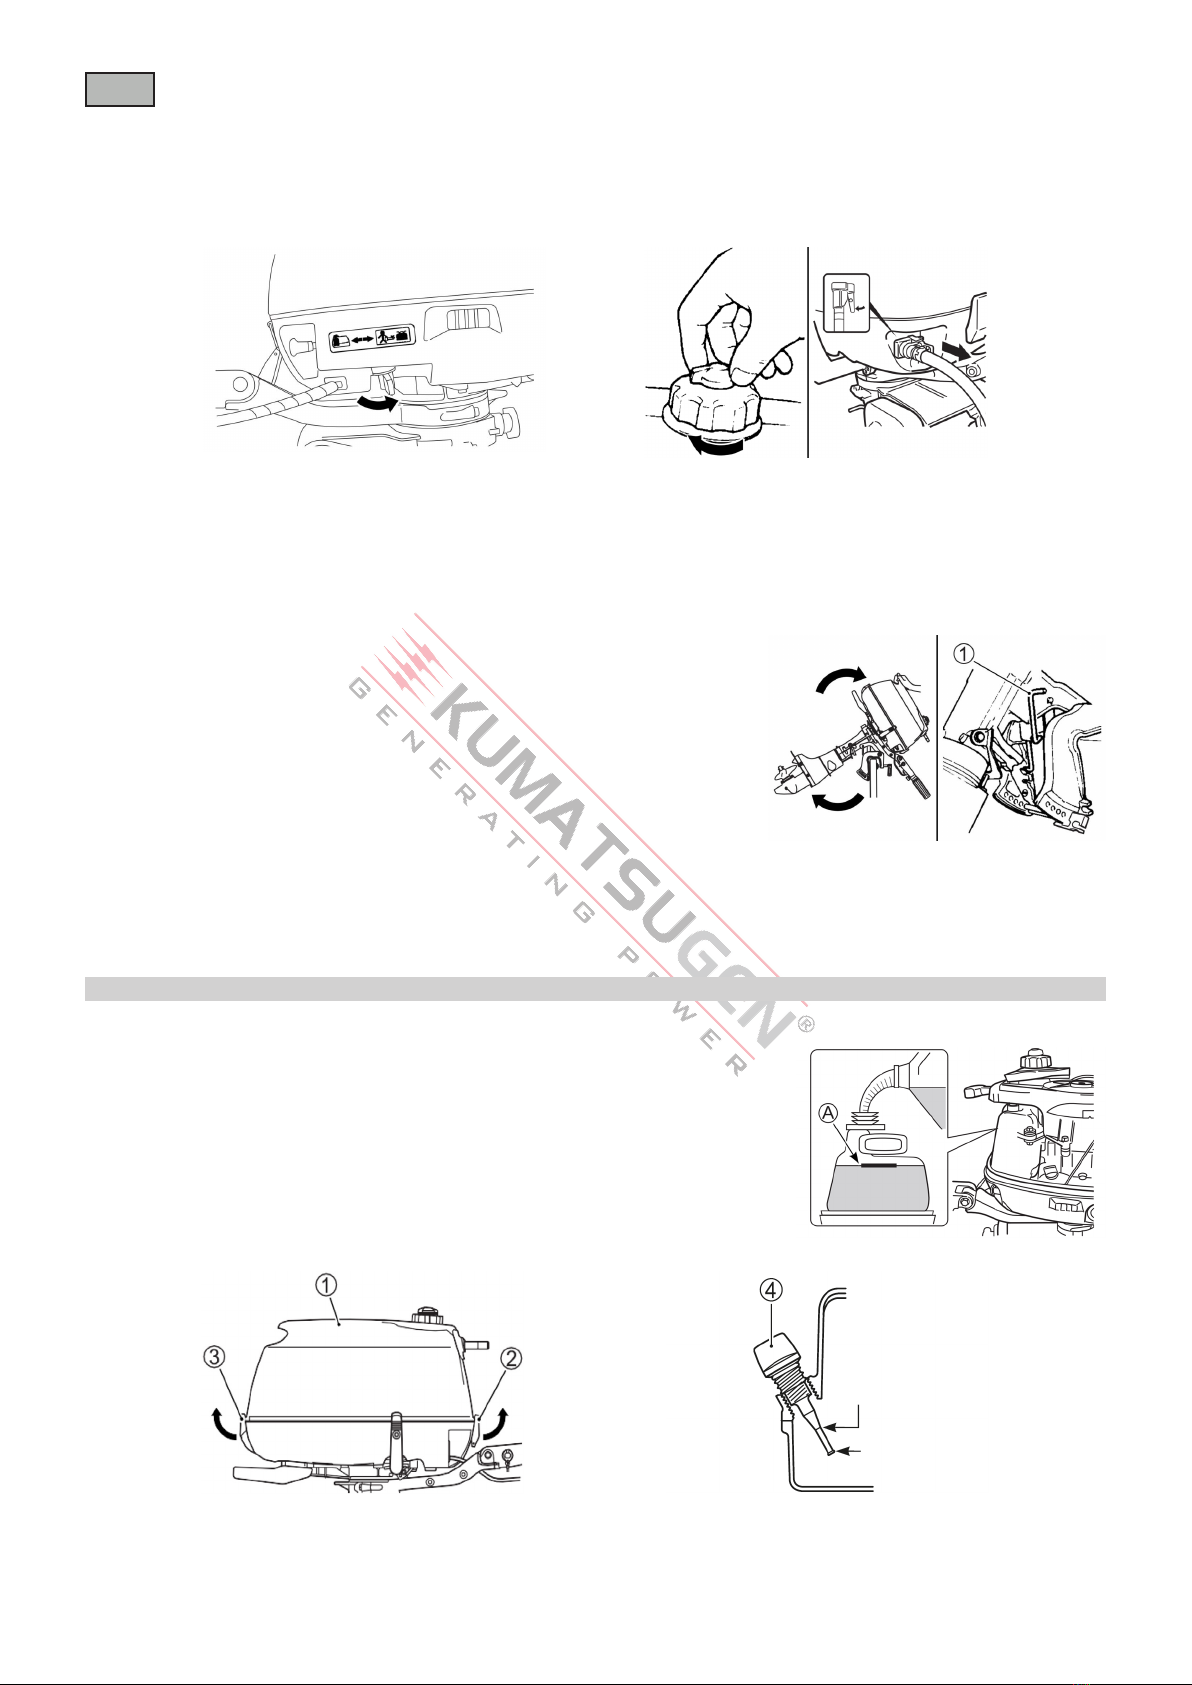
Fuel tank capacity / Χωρητικότητα δεξαμενής καυσίμου 1.3L 1.3L
Recommended fuel / Συνιστώμενο καύσιμο #93 Lead-free gasoline
#93 Αμόλυβδη βενζίνη
#93 Lead-free gasoline
#93 Αμόλυβδη βενζίνη
Oil tank capacity / Χωρητικότητα δεξαμενής λαδιού 0.5L 0.5L
Recommended gear oil / Συνιστώμενο λάδι κιβωτίου ταχυτήτων Hypoid gear oil SAE #90
Υποειδές λάδι ταχυτήτων
Hypoid gear oil SAE #90
Υποειδές λάδι ταχυτήτων
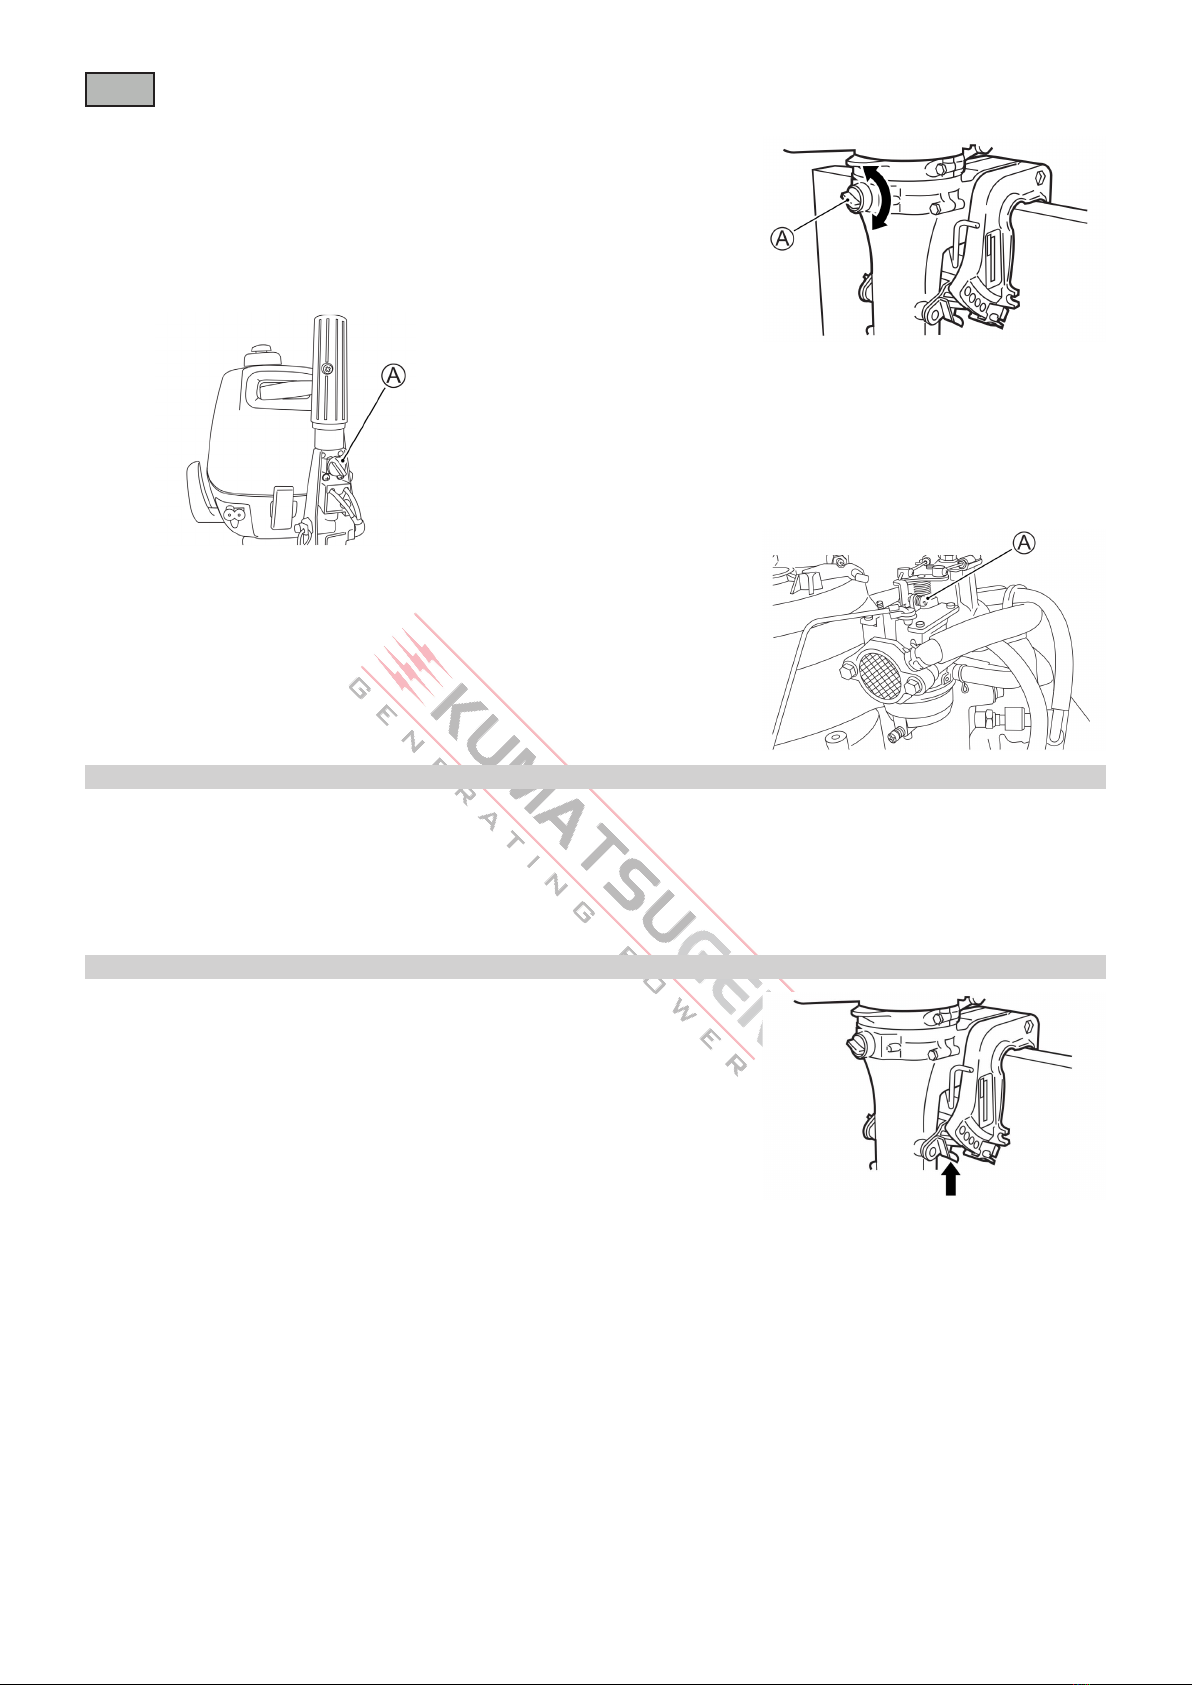
Starng system / Τύπος εκκίνησης Manual start / Χειρόμιζα Manual start / Χειρόμιζα
Ignion system / Σύστημα ανάφλεξης CDI / Ανάφλεξη εκκίνησης πυκνωτή CDI / Ανάφλεξη εκκίνησης πυκνωτή
Control system / Σύστημα ελέγχου Tiller control / Πηδάλιο Tiller control / Πηδάλιο
Gear rao / Σχέση μετάδοσης 2.08(27/13) 2.08(27/13)
Gear posions / Ταχύτητες F-N-R F-N-R
Propeller diameter / Διάμετρος προπέλας 180mm 180mm
Bore x stroke / Διάμετρος x διαδρομή 59x41mm 59x41mm
Dimensions LxWxH / Διαστάσεις ΜxΠxΥ 1060x490x320mm 1060x490x320mm
Net weight / Καθαρό βάρος 28kg 28kg
* The manufacturer reserves the right to make minor changes to product design and technical specicaons without prior noce unless these changes signicantly aect the performance and safety of the
products. The parts described / illustrated in the pages of the manual that you hold in your hands may also concern other models of the manufacturer's product line with similar features and may not be included
in the product you just acquired.
* To ensure the safety and reliability of the product and the warranty validity, all repair, inspecon, repair or replacement work, including maintenance and special adjustments, must only be carried out by
technicians of the authorized service department of the manufacturer.
* Always use the product with the supplied equipment. Operaon of the product with non-provided equipment may cause malfuncons or even serious injury or death. The manufacturer and the importer shall
not be liable for injuries and damages resulng from the use of non-conforming equipment.
* Ο κατασκευαστής διατηρεί το δικαίωμα να πραγματοποιήσει δευτερεύουσες αλλαγές στο σχεδιασμό του προϊόντος και στα τεχνικά χαρακτηριστικά χωρίς προηγούμενη ειδοποίηση, εκτός εάν οι αλλαγές
αυτές επηρεάζουν σημαντικά την απόδοση και λειτουργία ασφάλειας των προϊόντων. Τα εξαρτήματα που περιγράφονται / απεικονίζονται στις σελίδες του εγχειριδίου που κρατάτε στα χέρια σας ενδέχεται να
αφορούν και σε άλλα μοντέλα της σειράς προϊόντων του κατασκευαστή, με παρόμοια χαρακτηριστικά, και ενδέχεται να μην περιλαμβάνονται στο προϊόν που μόλις αποκτήσατε.
* Για να διασφαλιστεί η ασφάλεια και η αξιοπιστία του προϊόντος καθώς και η ισχύς της εγγύησης όλες οι εργασίες επιδιόρθωσης, ελέγχου, επισκευής ή αντικατάστασης συμπεριλαμβανομένης της συντήρησης
και των ειδικών ρυθμίσεων, πρέπει να εκτελούνται μόνο από τεχνικούς του εξουσιοδοτημένου τμήματος Service του κατασκευαστή.
* Χρησιμοποιείτε πάντα το προϊόν με τον παρεχόμενο εξοπλισμό. Η λειτουργία του προϊόντος με μη-προβλεπόμενο εξοπλισμό ενδέχεται να προκαλέσει βλάβη ή ακόμα και σοβαρό τραυματισμό ή θάνατο. Ο
κατασκευαστής και ο εισαγωγέας ουδεμία ευθύνη φέρει για τραυματισμούς και βλάβες που προκύπτουν από την χρήση μη προβλεπόμενου εξοπλισμού.
EN - EL
WWW.NIKOLAOUTOOLS.GR
2

Motor cover
Starter grip
Throle tension
adjuster
Throle control grip
Clamp screw
Clamp bracket
Fuel connector
Fuel connector cap
Combinaon emergency stop switch
and normal stop buon
Choke knob
Gear oil drain plug
Gear oil level plug
Water intake hole
Anode
Flush plug
An-cavitaon plate
Pilot water hole
Steering tension adjuster
Air vent screw
Tilt pin
Shi lever
Fuel cock lever
Rear handle
Built-in fuel tank
Tilt up lock arm
Air vent screw
Fuel line
Priming bulb
SEPARATE FUEL TANK
EN
WWW.NIKOLAOUTOOLS.GR
3

EN
SAFETY INSTRUCTIONS
Warning: Read the manual before operang the outboard motor. Failure to follow the warnings and instrucons may cause damage to the
machine or result in electric shock, re and/or serious injury. Aer reading the manual, store it in a safe place for future reference.
Exhaust gas
• Exhaust gases contain carbon monoxide, a colorless and odorless poisonous gas. Inhalaon of carbon monoxide may cause unconsciousness and may be
fatal.
• If you run the outboard motor in a closed or parally enclosed space, the concentraon of carbon monoxide in the air can build up rapidly, causing poisoning.
• The outboard motor must never be operated in a garage, in a house or in places with closed windows and doors.
Fire and explosion hazard
• The outboard motor must be stopped before refuelling.
• Gasoline is extremely ammable and explosive under certain condions.
• Refuelling must be done in a well-venlated room with the engine o.
• Make sure that fuel is not spilled when refuelling. Gasoline fumes or spilled fuel can ignite. If gasoline has been spilled, make sure to thoroughly clean the
area where the gasoline has been spilled before starng the engine.
MOTOR MOUNTING
Warning: Never install an outboard motor with horsepower exceeding the recommended maximum horsepower listed on the boat's
cercaon plate. Excessive horsepower can cause damage to the boat's hull.
• Proper transom height is important for good performance. A motor mounted on a transom
that is too high causes the propeller to slip resulng in wasted power or overheang. A motor
mounted on a transom that is too low will increase drag, causing reduced speed.
• Make sure that when the motor is lowered all the way down, the an-cavitaon plate is located
0 – 25 mm (0 – 1.0 in) below the boom of the boat.
Warning: Operang the outboard motor with the an-cavitaon plate above water can cause over-heang and severe damage to the
outboard motor. Do not operate the outboard motor with the an-cavitaon plate above water.
• Center the motor on the transom and secure it by alternately ghtening the clamp bracket screws by hand. Make sure you accurately center the motor, or
the boat will lean to one side during operaon.
• Install 8 mm bolts, washers, lock washers and nuts as illustrated and ghten the bolts sequenally.
• Be sure to seal the holes with sealant to prevent water leakage.
Noce: Over ghtening the transom bolts can damage the clamp bracket. Do not over ghten the transom bolts. Do not use an impact
tool to ghten or loosen the transom nuts. Aempng to mount the outboard to the transom without having mechanical experience or
without being certain where to drill holes can cause serious damage to the boat.
• Aer installing the motor, check to make sure that steering and lt movement is not obstructed by any part of the boat.
Warning: If the motor is not properly secured to the transom, it can come o. Be sure to bolt the motor to the transom. The motor may
come o if it is held only by the clamp screws. Occasionally check the clamp screws for ghtness.
WWW.NIKOLAOUTOOLS.GR
4

EN
PROPELLER SELECTION AND INSTALLATION
• It is essenal to use a propeller that is properly matched to the boat's operang characteriscs.
• The speed of the engine when you operate the boat at full throle depends on the propeller you use.
• Excessive engine speed can seriously damage the motor, while low engine speed at full throle will adversely aect performance.
• Your operang load will also aect propeller selecon. Smaller loads generally require larger pitch propellers; larger loads generally require smaller pitch
propellers.
Propeller selecon
Noce: Installing a propeller with either too much or too lile pitch will cause incorrect maximum engine speed, which may result in
severe damage to the motor.
• You can determine if a given propeller is appropriate for use with your boat by using a tachometer to measure engine speed when operang your boat at
full throle, under minimum load condions.
Propeller installaon
Warning: Failure to take proper precauons when installing or removing the propeller can result in severe personal injury.
When installing or removing the propeller:
• Always shi into “Neutral” and remove the emergency stop switch lock plate so that the motor cannot be started accidentally.
• Wear gloves to protect your hands, and “lock” the propeller by placing a block of wood between the blades and the an-cavitaon plate.
To install a propeller on the outboard motor, take the following steps:
1. Coat the propeller sha splines (1) liberally with water resistant grease to help prevent corrosion.
2. Place the stopper (2) on the sha.
3. Slide the propeller (3) onto the sha.
4. Screw on the propeller nut (4) and ghten it. Align the hole in the propeller nut with the hole in the sha,
then insert the coer pin (5) and bend it so that it can’t come o.
To remove the propeller, follow the above steps in reverse.
ADJUSTMENT
• To help maintain steering stability and good performance, always maintain the proper trim angle as shown in the illustraon.
• The appropriate trim angle varies depending on the combinaon of the boat, engine, and propeller, as well as operang condions.
Trim angle adjustment
Make a test run in the boat to determine if the trim angle needs to be adjusted.
To adjust the trim angle, take the following steps:
1. Hold the motor in the fully lted up posion. (Refer to the TILT UP LOCK ARM secon.)
2. Reposion the lt pin (A) in the desired holes.
3. Lower the motor back down.
To lower the bow, move the pin towards the boat. To raise the bow, move the pin away from the boat.
Trim angle is too small
Trim angle is too large
Proper trim angle
Warning: Always maintain proper trim angle based on the combinaon of your boat, engine,
and propeller, as well as operang condions. If you operate the motor with the lt pin
removed, you may not be able to control steering as expected. Do not operate the motor
with the lt pin removed.
WWW.NIKOLAOUTOOLS.GR
5

EN
• The steering tension should be adjusted so that there is only a slight resistance to steering
movement.
• To increase the steering tension, turn the steering tension adjuster (A) clockwise. To decrease the
steering tension, turn the steering tension adjuster counterclockwise.
Steering tension adjustment
• The tension of the throle control grip can be adjusted according to your preference.
• To increase the tension, turn the throle tension adjuster (A) clockwise. To decrease the tension,
turn the adjuster counterclockwise.
Throle tension adjustment
To adjust the idle speed, take the following steps:
1. Warm up the engine for about 5 minutes.
2. Make sure that the motor is in “NEUTRAL” and the throle control grip is fully closed.
3. Turn the idle adjustment screw (A) clockwise to increase idle speed or counterclockwise to decrease
idle speed.
Idle speed adjustment
• The motor is equipped with a revoluon liming system which acvates when engine speed exceeds 6000 rpm.
• Over-revoluon can result from cavitaon when turning hard, if a propeller bush is slipping, if the blades are worn down or if the trim seng is too high.
• If the over-revoluon liming system acvates, the motor will exhibit a rough running condion and you must immediately reduce engine speed to within
the recommended operang range.
Noce: If the over-revoluon liming system acvates at the recommended maximum throle and you are sure that the propeller pitch is
sucient and that there are no other factors that could be causing this, there may be a problem with the over-revoluon liming system.
• When the motor is shied into the “REVERSE” gear, the motor will automacally lock so that it will
not li out of the water due to forces such as propeller thrust.
OVER-REVOLUTION LIMITING SYSTEM
OPERATION OF TILTING SYSTEMS
Tilt lock
Warning: When the shallow water posion is used, the lt lock will not work. As a
result, forces such as from propeller thrust during operaon in «REVERSE” gear, rapid
deceleraon, and striking an underwater object can cause the motor to li out of the
water, resulng in personal injury. When using the shallow water posion, proceed with
cauon and only at very low speeds.
• The lt up lock arm is used to hold the motor in the fully lted up posion and shallow water posion.
Tilt up lock arm
Full lt up posion
Warning: If you place your hands near the mounng bracket or under the motor when lng it, your hands can be crushed if the motor
slips from your grasp. Never place your hands near the mounng bracket or under the motor when lng it.
WWW.NIKOLAOUTOOLS.GR
6

EN
To hold the motor in the fully raised posion:
1. Shi into “NEUTRAL”.
2. Turn the fuel cock lever to the right (o posion) and ghten the air vent screw on the fuel ller cap.
3. Grab the handle on the back of the motor cover and lt the motor all the way up unl it is automacally
locked in the fully lted posion by the lt up lock arm (1).
Warning: If you do not take proper precauons when lng up the motor, fuel may leak out.
• Do not ll the fuel tank above the upper limit.
• For motors with a built-in fuel tank, be sure to turn the fuel cock lever to the right (o posion) and ghten the air-vent screw on the
fuel ller cap before lng up the motor.
• Lower the motor back down to normal posion before opening the air vent screw on the fuel ller cap of the built-in fuel tank.
• For motors with a separate fuel tank, disconnect the fuel line whenever you leave the motor lted up for a long period of me.
Noce: If you use the throle grip handle to raise or lower the motor, the handle may
break. Never use the throle grip handle to raise or lower the motor.
To lower the motor back down, pull the motor slightly toward you, pull up on the lt up lock arm (1)
and slowly let the motor down.
Noce: If you use the lt up lock arm to hold the motor in the fully lted posion for
trailering, the lt up lock arm could release resulng in damage to the motor. When
trailering your boat, never use the lt up lock arm to hold the motor in the fully lted
posion.
There are two shallow water posions. Use whichever one is appropriate, depending on the depth of the water.
To set the motor in the shallow water posion:
1. Shi into “NEUTRAL”.
2. Slowly lt the motor up unl you hear it make a “click” sound.
3. Slowly lower the motor. It will stop in a posion that is slightly lted up from the normal trim angle.
Shallow water posion
Always perform the following checks before you begin boang:
• Make sure that there is enough fuel in the fuel tank.
- Fuel tank capacity: 1.3L
- Warning: Do not ll the tank above the upper limit (A).
• Make sure that there is enough engine oil in the oil tank.
- Oil tank capacity: 0.5L
- Warning: Running the engine with an insucient amount of oil can cause serious damage to the engine.
- Place the motor in a vercal posion and remove the motor cover (1) by unlocking the lever (2) and (3).
- The oil on the ller cap (dipsck) (4) should be between the upper and lower limits shown on the ller cap.
- Noce: If the engine oil is contaminated or discolored, replace with fresh engine oil.
- If the oil level indicaon is near the lower limit, add enough oil to raise the level to the upper limit.
INSPECTION BEFORE BOATING
1.3L
Lower limit
Upper
limit
WWW.NIKOLAOUTOOLS.GR
7

EN
To ll The engine oil:
1. Remove the oil ller cap (dipsck) (4) and wipe oil o with a clean cloth.
2. Fill the recommended engine oil to the upper level. To check the upper oil level, touch the ller cap threads
onto the ller cap edge as shown. Do not screw the ller cap.
3. Tighten the oil ller cap securely.
Noce: If the engine oil is contaminated or discolored, replace with fresh engine oil. do not overll the
engine with oil.
• Visually check the propeller to make sure it is not damaged.
• Make sure that the motor is securely mounted to the transom.
• Make sure that the lt pin is securely installed in the proper posion.
• Make sure that the starter rope does not show any signs of fraying or wear.
• Make sure you have the boang safety and emergency equipment on board.
Lower limit
Upper
limit
Notice: Failure to follow the break-in procedures described below can result in severe engine damage. Be sure to follow the engine
break-in procedures described below.
ENGINE BREAK-IN
Break-In period: 10 hours
Break-in procedure
• For the inial 2 hours:
- Allow sucient idling me (about 5 minutes) for the engine to warm up aer cold engine starng.
- Aer warming up, run the engine at idling speed or the lowest in-gear speed for about 15 minutes.
- During the remaining 1 hour and 45 minutes, operate the engine in gear at less than 1/2 (half) throle.
• For the next 1 hour:
- Operate the engine in gear at half throle or at three-quarter throle. Αvoid running the engine at full throle.
• Remaining 7 hours:
- Operate the engine in gear at desired engine speed. Υou may occasionally use full throle; however do not operate the engine connuously at full throle
for more than 5 minutes at any me.
OPERATION
Before starng the engine
Using the built-in fuel tank, rst lower the motor into the water and then:
1. Twist the air-vent screw on the fuel tank cap counterclockwise to open the vent. (1)
2. Turn the fuel cock lever to the le. Fuel will ow from the built-in tank. (2)
3. Ensure that the motor is in “NEUTRAL”. (3)
Noce: When the motor is in gear, the recoil starter cannot be operated and aempng to use it can damage the recoil starter.
4. Ensure that the lock plate is in place and that the end of the emergency stop switch cord is aached to a part of your body. (4)
Warning: Failure to properly aach the emergency stop switch cord or to take proper precauons to help ensure that the emergency
stop switch works as intended may result in serious injury or death to the operator or passengers.
Always take the following precauons:
• Make sure that the emergency stop switch cord is fastened securely to the operator’s wrist or to an appropriate clothing area (belt etc.).
• Be careful not to pull the stop switch cord and ensure that the lock plate stays in place during operaon.
1 2 3
4
NEUTRAL
WWW.NIKOLAOUTOOLS.GR
8

EN
Using a separate fuel tank, rst lower the motor into the water and then:
1. Connect the fuel hose securely to the fuel tank and the motor. (1)
2. Twist both air vent screws on the fuel tank caps counterclockwise to open the vent. (2)
3. Turn the fuel cock lever to the right. (3)
Noce: When using a separate tank, turn the fuel cock lever to the right to ow to the carburetor from the separate tank.
4. Make sure that the motor is in “NEUTRAL”.
5. Ensure that the lock plate is in place and that the end of the emergency stop switch cord is aached to a part of your body.
6. Squeeze the fuel line priming bulb several mes unl you feel resistance. (4)
Noce: Do not squeeze the priming bulb while the engine is running, as the carburetor may overow.
1 2 3
4
Noce: When starng the engine on gasoline from the built-in fuel tank aer the separate fuel tank has become empty:
1. Disconnect the fuel line of the separate fuel tank from the fuel connector on the engine side. Install the fuel connector cap to fuel
connector.
2. Pour fuel into the built-in fuel tank and wait about 1/3 minute before starng.
4. Turn the fuel cock lever to le.
Starng the engine
If the engine is cold:
• Pull the choke knob (1) fully out.
• Align the arrow mark on the throle control grip (2) with the posion (A).
If the engine is warm:
• Align the arrow mark on the throle control grip (2) with the posion (A).
• Do not use the choke.
You may need to use the choke when restarng a warm engine. If the engine does not start quickly when
warm, follow the procedure for cold starng:
• Firmly grasp the starter grip (3) and pull slowly unl resistance is felt and then pull the rope sharply to
start the engine. Do not release the rope when it is pulled out.
• Hold the rope and allow it to recoil slowly.
• Aer starng, use the throle control grip (2) to bring the engine to idle.
• Push the choke knob in.
• Warm up the engine for about 5 minutes.
Noce: Never pull the starter grip while the engine is running.
Noce: In cold weather, you may have to leave the choke knob out for a longer period of me for the
engine to warm up.
WWW.NIKOLAOUTOOLS.GR
9

EN
Cooling water check
• As soon as the engine starts, water should spray out of the pilot water hole, indicang that the water
pump and cooling system are working properly.
• If you noce that water does not spray out of the pilot water hole, stop the engine immediately and
have it repaired by an authorized service technician.
Emergency starng
If you must get the engine running, but are unable to do so because of starter system failure, you can follow the emergency starng procedure to start the
engine.
To start the engine when the starter system fails:
1. Shi the motor into “NEUTRAL”. (1)
2. Remove the motor cover. (2)
3. Loosen the lock nut (1), take o the NSI cable from the recoil starter. Separate the end of the cable from the (2) recoil starter. (3)
4. Remove the bolts securing the recoil starter in place.
5. Tie a knot in one end of the emergency starter rope located in the tool kit. Tie the other end around the screw-driver handle in the tool kit.
6. Hook the knoed end of the rope in the pulley notch and wind the rope around the pulley in a clockwise direcon.
7. Put the emergency stop switch lock plate in place.
8. Aer following steps of the normal starng procedure, pull the emergency starter rope sharply to start the engine. (4)
Warning: Ensure that the emergency stop switch works properly before following the emergency starng procedure.
If you touch electrical components when rope starng the engine, you can get a severe electrical shock.
When rope starng the engine, be careful not to touch electrical components such as ignion coils or spark plug leads.
1 2 3
4
NEUTRAL
Shiing gears
• To shi the motor into “FORWARD”, set the throle control grip to the idle posion and pull the shi
lever towards you rmly.
• To shi into “REVERSE”, set the throle to the idle posion, and push the shi lever away from you
rmly.
Noce: Severe engine damage may occur if engine speed is not returned to idle before shiing gears and if boat speed is not reduced when
shiing from “FORWARD” to “REVERSE” or from “REVERSE” to “FORWARD”.
Noce: Avoid shiing gears when the engine is not running.
REVERSE FORWARD
Speed control
• Aer shiing, control the engine speed by twisng the throle control grip.
• When it is necessary to stop the engine in an emergency, pull the emergency stop switch lock plate out
of the emergency stop switch by pulling the emergency stop switch cord.
FASTER
SLOWER
WWW.NIKOLAOUTOOLS.GR
10

EN
Stopping the engine
To stop the engine:
1. Turn the throle control grip to the idle posion.
2. Shi into “NEUTRAL”.
3. Aer operang at full throle, cool o the engine a few minutes by allowing it to idle.
4. Push and hold in the stop buon (A) unl the engine stops.
5. Aer stopping the engine, turn the fuel cock lever to right.
6. Aer stopping the engine, disconnect the fuel connector from the outboard motor (if using separate
fuel tank).
7. Turn the air vent screw on the fuel tank cap clockwise to shut the vent.
Mooring
• The motor should be lted up out of the water when you moor the boat in shallow water or if the motor will not be used for some me, to protect it from
damage by underwater obstacles at low de or corrosion from salt water. Refer to the ''Tilt up lock arm'' secon for details on how to lt up the motor.
• Improperly securing your boat may cause damage to your boat or motor, or other property damage.
Operaon in shallow water
• When operang the outboard motor in shallow water, use the shallow water posion to lt the motor slightly from the normal trim angle.
• When using the shallow water posion, you should only operate the motor at slow speeds. Refer to the ''Shallow water posion'' secon.
Noce: If you do not take proper precauons when operang your boat in shallow water, the outboard motor or boat could be
damaged.
• When you operate your motor in shallow water using the shallow water posion, make sure that the water intake holes remain in the
water at all mes and that water is always spraying out of the water discharge hole.
• Do not allow the motor to hit the boom, parcularly when operang in “REVERSE” gear or serious damage can result.
Operaon in salt water
• Aer operang the motor in salt water, you should ush the water passages with clean, fresh water.
• If you do not ush the water passages, salt can corrode the motor and shorten its life.
Operaon in freezing weather
• When operang the outboard motor in freezing temperatures, you should keep the lower part of the unit submerged in the water at all mes.
• When taking the motor out of the water, stand it up in a vercal posion unl the cooling system drains completely.
MOTOR REMOVAL AND TRANSPORTING
Motor removal
1. Make sure that the engine has stopped completely.
2. Turn the fuel cock lever to right.
3. Tighten the built-in fuel tank cap and its air vent screw.
4. Remove the fuel hose from the motor (if provided).
5. Drain the gasoline from the carburetor as follows:
- Remove the motor cover.
- Loosen the carburetor drain screw (A) and drain the gasoline into a suitable container.
- Aer draining, reghten the drain screw.
6. Remove the mounng bolts.
7. Loosen the clamp screws.
8. Li the motor o the transom.
9. Stand the motor vercally and drain the water from the lower unit.
10. To carry, hold the motor by gripping the hand grip and rear handle in the engine lower cover.
WWW.NIKOLAOUTOOLS.GR
11

EN
Motor transporng
• When transporng the motor, place the motor either vercally or horizontally.
Vercal transport: Incline the handle backward, and aach the motor to the carrier by securing the clamp
bracket with two clamp screws. Never use display stand for transportaon of the motor.
Horizontal transport: Incline the ller handle backward and rest the motor on a case protector with the port
side, starboard side or front side facing downwards as shown.
TRAILERING
• When trailering your boat with the motor aached, keep the motor in the normal operang posion unless there is not enough ground clearance.
• If you need more ground clearance, trailer the motor in a lted posion using a transom saver bar or similar device to support the weight of the motor.
MAINTENANCE
• It is important to inspect and maintain the outboard motor regularly. Follow the table below.
RECOMMENDED MAINTENANCE SCHEDULE
Each use First month or
each 20 hours
Every 12 months
or each 100 hours
Every 12 months
or each 200 hours
Every 36 months
or each 300 hours
Engine oil Check level X
Change X X
Gear oil Change X X
Tightness of bolts and nuts Check X X
Lubricaon Change X X
Anodes Check X X
Engine oil lter Change X
Ignion ming Check - adjust X
Carburetor Check - clean X X
Water pump Check - adjust X
Water pump impeller Check X
Change X
Propeller nut and pin Check - adjust X X
Air cleaner
Check X
Clean X
Replace X
Spark plug Check - adjust X
Replace X
Idle speed Check - adjust X X
Valve clearance Check - adjust X X
Fuel tank and lter Clean X
Fuel tube Check Every 2 years (replace if necessary)
WWW.NIKOLAOUTOOLS.GR
12

EN
Spark plug
• Remove carbon deposits from the spark plugs using a small wire brush or a spark plug cleaner
and adjust the gap so that it is 0-8-0-9 mm.
• If the spark plugs are found in the condions described below, have them replaced.
1. Excessive wear
2. Breakage
3. Melng
4. Erosion
5. Yellow deposits
6. Oxidaon
1 2 3
4 5
1
6
Breather and fuel line
• Inspect the breather and fuel line for leaks, cracks, swelling, or other damage.
• If they are damaged in any way, they must be replaced.
Engine oil
Noce: The oil should be changed when engine is warm so that the oil will drain thoroughly from the engine.
To change the engine oil:
1. Place the motor in a vercal posion and remove the motor cover. (1)
2. Remove the oil ller cap (4).
3. Fully steer the motor to the starboard side.
4. Place a drain pan under the engine oil drain plug.
Cauon: The engine oil temperature may be high enough to burn your ngers when the drain plug
is loosened. Wait unl the drain plug is cool enough to touch with bare hands before removing it.
5. Remove the engine oil drain plug and gasket, then let the engine oil drain. (2)
6. Aer draining, secure the engine oil drain plug with a new gasket.
7. Fill with recommended engine oil to the upper level.
- Oil tank capacity: 0.5 L
8. Check the engine oil level. (3)
9. Reinstall the oil ller cap.
Lower limit
Upper
limit
1 2
3
WWW.NIKOLAOUTOOLS.GR
13

EN
Gear oil
Noce: Before the rst operaon, it is not necessary to check the oil level of the gearbox because the
gearbox oil is already lled up at the factory.
• To check the gear oil level, remove the upper oil level plug and look into the hole. The oil level should
be at the boom edge of the hole.
• If the oil level is low, add the specied gear oil unl the level reaches the boom edge of the hole. Then,
reinstall and ghten the plug.
To change the gear oil:
1. Make sure the motor is in an upright posion. Place a drain pan under the lower casing.
2. Remove the gear oil drain plug (1), then remove the gear oil level plug (2).
3. Aer the oil has drained completely, inject the specied gear oil into the lower drain hole unl it just
starts to come out of the upper hole.
4. Reinstall and ghten the gear oil level plug (2), then quickly reinstall and ghten the gear oil drain plug
(1).
Lubricaon
• The following pictures show the points of the unit that can be lubricated.
Clamp screws Throle linkageThrole linkage Propeller sha
Water resistant grease
Water resistant grease (apply with grease gun)
Swivel bracket Shi lever Steering bracket
Anodes
• The motor is protected from exterior corrosion by anodes.
• You should periodically inspect each of the anodes and replace them when 2/3 of the metal has
corroded away.
FLUSHING THE WATER PASSAGES
If you do not ush the water passages, salt can corrode the motor and shorten its life.
Flush the water passages as follows:
Engine running, vercal posion
Noce: Never start the motor without supplying water to the cooling system.
1. Shi the motor into “NEUTRAL”.
2. Remove the propeller from the motor.
3. Install the motor on a large container such as an empty 200-liter drum.
4. Fill the container with clean, fresh water as illustrated.
5. Start the motor and let it idle for about ve minutes. This will clean the salt water out of the cooling system.
6. Shut o the motor. Remove the motor from the container and maintain motor in a vercal posion unl the
engine has drained completely.
7. Clean the motor surface and apply a coat of automove wax on the external nish of the motor.
WWW.NIKOLAOUTOOLS.GR
14

EN
SUBMERGED MOTOR
In case the motor is accidentally submerged, take the following steps:
1. Get the motor out of the water as soon as possible.
2. Wash it thoroughly with fresh water to completely remove all salt, mud, and seaweed.
3. Remove the spark plugs. Drain the water from the cylinders through the spark plug holes by manually turning the ywheel several mes.
4. Check if any water is evident in the engine oil. If water is seen, remove the oil drain plug and drain the oil. Aer draining, ghten the oil drain plug.
5. Drain the fuel line and the carburetors.
6. Pour engine oil into the engine through the spark plug holes and carburetors. Coat the engine inner parts with oil by turning the engine over with the
emergency starter rope or recoil starter.
STORAGE
Motor storage
When storing the motor, take the following steps:
1. Change the gear oil.
2. Change the engine oil.
3. Fill a fuel stabilizer to the fuel tank.
4. Flush the water passages in the motor thoroughly.
5. Readjust the water ow, run the engine at about 1500 rpm in neutral for ve minutes to
distribute the stabilized fuel through the engine.
6. Stop the engine and then turn o the water.
7. Turn the fuel cock lever to right. (1)
8. Disconnect the fuel line of the separate fuel tank from the fuel connector on the engine side
(if provided). Install the fuel connector cap to fuel connector.
9. Lubricate all other specied parts.
10. Apply a coat of automove wax on the external nish of the motor. If paint damage is
evident, apply touch up paint before waxing.
11. Store the motor in an upright posion in a dry, well-venlated area.
1
Aer storage
When taking the motor out of storage, take the following steps:
1. Thoroughly clean the spark plugs. Replace them if necessary.
2. Check the gear-case oil level and if necessary, add gear oil.
3. Lubricate all moving parts.
4. Check the engine oil level and if necessary, add motor oil.
5. Clean the motor and wax the painted surfaces.
Problem Possible cause
The engine will not start or has
diculty starng
The emergency stop switch lock plate is not in posion.
The fuel tank is empty.
The fuel hose is not properly connected to the engine.
The fuel hose is kinked or pinched.
Α spark plug is worn or broken.
The engine idles unstably or
stalls
The choke knob is not pushed in securely.
The fuel hose is kinked or pinched.
A spark plug is worn or broken.
Engine speed will not increase
The engine is overloaded.
The propeller is damaged.
The propeller is not properly matched to loads.
The engine vibrates excessively
Engine mounng bolts or clamp screws are loose.
Foreign object (seaweed etc.) is tangled on the propeller.
The propeller is damaged.
The engine overheats
Cooling water intake(s) are blocked.
The engine is overloaded.
The propeller is not properly matched to loads.
TROUBLESHOOTING
WWW.NIKOLAOUTOOLS.GR
15

EL
Κάλυμμα του μοτέρ
Λαβή μίζας
Ρυθμιστής αντίστασης
του χειρόγκαζου
Πηδάλιο
Βίδα σύσφιξης
Βραχίονας σύσφιξης
Σύνδεσμος καυσίμου
Καπάκι συνδέσμου καυσίμου
Συνδυαστικός διακόπτης
λειτουργίας έκτακτης ανάγκης και
κανονικής διακοπής
Τσοκ
Πώμα αποστράγγισης
λαδιού κιβωτίου ταχυτήτων
Πώμα ελέγχου στάθμης
λαδιού κιβωτίου
ταχυτήτων
Οπή εισαγωγής νερού
Ανόδιο
Πώμα έκπλυσης
Πλάκα προστασίας
σπηλαίωσης
Οπή εξόδου νερού
Ρυθμιστής αντίστασης
συστήματος πηδαλιουχίας
Βίδα εξαερισμού
Πείρος ρύθμισης κλίσης
Μοχλός ταχυτήτων
Βάνα καυσίμου
Οπίσθια λαβή
Ενσωματωμένη
δεξαμενή καυσίμου
Μπάρα στήριξης
εξωλέμβιας μηχανής στην
πλήρως ανυψωμένη θέση
Βίδα εξαερισμού
Σωλήνας καυσίμου
Πουάρ καυσίμου
ΞΕΧΩΡΙΣΤΗ ΔΕΞΑΜΕΝΗ ΚΑΥΣΙΜΟΥ
WWW.NIKOLAOUTOOLS.GR
16

EL
ΟΔΗΓΙΕΣ ΑΣΦΑΛΕΙΑΣ
Προσοχή: Διαβάστε το εγχειρίδιο πριν θέσετε σε λειτουργία την εξωλέμβια μηχανή. Η μη τήρηση των προειδοποιήσεων και των οδηγιών
μπορεί να προκαλέσει ζημιά στη μηχανή ή να οδηγήσει σε ηλεκτροπληξία, πυρκαγιά ή/και σοβαρό τραυματισμό. Αφού διαβάσετε το
εγχειρίδιο, φυλάξτε το σε ασφαλές μέρος για μελλοντική αναφορά.
Καυσαέρια
• Τα καυσαέρια περιέχουν μονοξείδιο του άνθρακα, ένα άχρωμο και άοσμο δηλητηριώδες αέριο. Η εισπνοή μονοξειδίου του άνθρακα μπορεί να προκαλέσει
απώλεια των αισθήσεων και μπορεί να αποβεί μοιραία.
• Εάν λειτουργήσετε την εξωλέμβια μηχανή σε κλειστό ή μερικώς κλειστό χώρο, η συγκέντρωση μονοξειδίου του άνθρακα στον αέρα μπορεί να αυξηθεί
γρήγορα, προκαλώντας δηλητηρίαση.
• Η εξωλέμβια μηχανή δεν πρέπει ποτέ να λειτουργεί σε γκαράζ, σε σπίτι ή σε χώρους με κλειστά παράθυρα και πόρτες.
Κίνδυνος πυρκαγιάς και έκρηξης
• Η εξωλέμβια μηχανή πρέπει να σταματήσει πριν από τον ανεφοδιασμό με καύσιμα.
• Η βενζίνη είναι εξαιρετικά εύφλεκτη και εκρήξιμη.
• Ο ανεφοδιασμός πρέπει να γίνεται σε καλά αεριζόμενο χώρο με τη μηχανή σβηστή.
• Βεβαιωθείτε ότι δεν θα χυθεί καύσιμο κατά τον ανεφοδιασμό. Εάν έχει χυθεί βενζίνη, φροντίστε να καθαρίσετε σχολαστικά την περιοχή όπου έχει χυθεί η
βενζίνη πριν ξεκινήσετε τον κινητήρα.
ΕΓΚΑΤΑΣΤΑΣΗ ΤΗΣ ΜΗΧΑΝΗΣ
Προσοχή: Ποτέ μην εγκαθιστάτε εξωλέμβια μηχανή με ιπποδύναμη που υπερβαίνει τη συνιστώμενη μέγιστη ιπποδύναμη που
αναγράφεται στην πινακίδα πιστοποίησης του σκάφους. Η υπερβολική ιπποδύναμη μπορεί να προκαλέσει ζημιά στο κύτος του
σκάφους.
• Το σωστό ύψος του λαιμού είναι σημαντικό για την διασφάλιση των βέλτιστων επιδόσεων.
Η τοποθέτηση του μοτέρ σε ένα πολύ ψηλό λαιμό προκαλεί την ολίσθηση της προπέλας
με αποτέλεσμα τη σπατάλη ισχύος ή την υπερθέρμανση. Η τοποθέτηση του μοτέρ σε πολύ
χαμηλό λαιμό θα αυξήσει την αντίσταση, προκαλώντας μείωση της ταχύτητας.
• Βεβαιωθείτε ότι όταν το μοτέρ είναι χαμηλωμένο εντελώς προς τα κάτω, η πλάκα προστασίας
σπηλαίωσης βρίσκεται 0-25 mm (0-1,0 in) κάτω από τον πυθμένα του σκάφους.
Προσοχή: Η λειτουργία της εξωλέμβιας μηχανής με την πλάκα προστασίας σπηλαίωσης πάνω από το νερό μπορεί να προκαλέσει
υπερθέρμανση και σοβαρή ζημιά στην εξωλέμβια μηχανή. Μην λειτουργείτε τον εξωλέμβια μηχανή με την πλάκα προστασίας
σπηλαίωσης πάνω από το νερό.
• Κεντράρετε το μοτέρ στον λαιμό και ασφαλίστε τον σφίγγοντας εναλλάξ τις βίδες του βραχίονα σύσφιξης με το χέρι. Βεβαιωθείτε ότι κεντράρετε με
ακρίβεια το μοτέρ, διαφορετικά το σκάφος θα γέρνει προς τη μία πλευρά κατά τη λειτουργία.
• Τοποθετήστε μπουλόνια 8 mm, ροδέλες, ροδέλες κλειδώματος και παξιμάδια όπως απεικονίζεται στο παρακάτω σχήμα και σφίξτε τα μπουλόνια.
• Φροντίστε να στεγανοποιήσετε τις οπές με στεγανωτικό υλικό για να αποτρέψετε τη διαρροή νερού.
Σημείωση: Η υπερβολική σύσφιξη των βιδών του του λαιμού μπορεί να προκαλέσει ζημιά στο βραχίονα σύσφιξης. Μην σφίγγετε
υπερβολικά τις βίδες του λαιμού. Μην χρησιμοποιείτε κρουστικό εργαλείο για να σφίξετε ή να χαλαρώσετε τα παξιμάδια του λαιμού.
Η τοποθέτησης του μοτέρ στον λαιμό χωρίς να έχετε μηχανική εμπειρία ή χωρίς να είστε σίγουροι για το πού πρέπει να ανοίξετε τις
οπές μπορεί να προκαλέσει σοβαρή ζημιά στο σκάφος.
WWW.NIKOLAOUTOOLS.GR
17

EL
• Αφού εγκαταστήσετε το μοτέρ, ελέγξτε για να βεβαιωθείτε ότι το σύστημα οδήγησης και της κλίσης δεν παρεμποδίζεται από οποιοδήποτε μέρος του
σκάφους.
Προσοχή: Εάν το μοτέρ δεν είναι σωστά στερεωμένο στον λαιμό, μπορεί να αποσυνδεθεί. Βεβαιωθείτε ότι έχετε βιδώσει τον μοτέρ στον
λαιμό. Ο κινητήρας μπορεί να αποσυνδεθεί από τη θέση του εάν συγκρατείται μόνο από τις βίδες σύσφιξης. Ελέγχετε περιστασιακά τις
βίδες σύσφιξης για να βεβαιώνεστε ότι είναι καλά σφιγμένες.
ΕΠΙΛΟΓΗ ΚΑΙ ΤΟΠΟΘΕΤΗΣΗ ΠΡΟΠΕΛΑΣ
• Είναι σημαντικό να χρησιμοποιείτε μια προπέλα που είναι κατάλληλα προσαρμοσμένη στα χαρακτηριστικά λειτουργίας του σκάφους.
• Η ταχύτητα του μοτέρ στη μέγιστη ισχύ εξαρτάται από την προπέλα που χρησιμοποιείτε.
• Η υπερβολική ταχύτητα του μοτέρ μπορεί να προκαλέσει σοβαρή ζημιά στο μοτέρ, ενώ η χαμηλή ταχύτητα του μοτέρ στη μέγιστη ισχύ επηρεάζει αρνητικά
την απόδοση.
• Το φορτίο λειτουργίας θα επηρεάσει επίσης την επιλογή της προπέλας. Τα μικρότερα φορτία απαιτούν γενικά προπέλες μεγαλύτερου βήματος- τα
μεγαλύτερα φορτία απαιτούν γενικά προπέλες μικρότερου βήματος.
Επιλογή προπέλας
Σημείωση: Η τοποθέτηση προπέλας με πολύ μεγάλο ή πολύ μικρό βήμα μπορεί να οδηγήσει σε σοβαρή βλάβη του κινητήρα.
• Μπορείτε να κρίνετε αν μια συγκεκριμένη προπέλα είναι κατάλληλη για χρήση με το σκάφος σας χρησιμοποιώντας ένα στροφόμετρο για να μετρήσετε την
ταχύτητα του μοτέρ όταν το σκάφος λειτουργεί στη μέγιστη ισχύ, υπό συνθήκες ελάχιστου φορτίου.
Τοποθέτηση προπέλας
Προσοχή: Η μη λήψη των κατάλληλων προφυλάξεων κατά την τοποθέτηση ή την αφαίρεση της προπέλας μπορεί να οδηγήσει σε σοβαρό
τραυματισμό.
Κατά την τοποθέτηση ή την αφαίρεση της προπέλας:
• Να αλλάζετε την ταχύτητα στη νεκρά θέση (neutral) και να αφαιρείτε την πλάκα ασφάλισης του διακόπτη έκτακτης ανάγκης, ώστε να
μην μπορεί να εκκινηθεί κατά λάθος ο κινητήρας.
• Φορέστε γάντια για να προστατέψετε τα χέρια σας και τοποθετήστε ένα ξύλο μεταξύ των πτερυγίων και της πλάκας προστασίας
σπηλαίωσης για να αποτρέψετε τη κίνηση της προπέλας.
Για να τοποθετήσετε μια προπέλα στην εξωλέμβια μηχανή, ακολουθήστε τα παρακάτω βήματα:
1. Επικαλύψτε τον άξονα της προπέλας (1) με γράσο ανθεκτικό στο νερό για να αποτρέψετε τη διάβρωση.
2. Τοποθετήστε το πώμα (2) στον άξονα.
3. Σύρετε την προπέλα (3) πάνω στον άξονα.
4. Βιδώστε το παξιμάδι της προπέλας (4) και σφίξτε το. Ευθυγραμμίστε την οπή στο παξιμάδι της προπέλας
με την οπή στον άξονα και στη συνέχεια τοποθετήστε το κοπίλι (5) και λυγίστε το έτσι ώστε να μην μπορεί να
βγεί από τη θέση του.
Για να αφαιρέσετε την προπέλα, ακολουθήστε τα παραπάνω βήματα αντίστροφα.
ΡΥΘΜΙΣΗ
• Για τη μέγιστη απόδοση και σταθερότητα κατά την οδήγηση, διατηρείτε πάντα τη σωστή γωνία διαγωγής, όπως απεικονίζεται στο διπλανό σχήμα.
• Η κατάλληλη γωνία διαγωγής που πρέπει να διατηρηθεί εξαρτάται από το συνδυασμό σκάφους, μοτέρ και προπέλας, καθώς και από τις συνθήκες
λειτουργίας.
Ρύθμιση γωνίας διαγωγής
Πραγματοποιήστε μια δοκιμαστική πλεύση για να διαπιστώσετε αν η γωνία ρύθμισης χρειάζεται
ρύθμιση.
Για να ρυθμίσετε τη γωνία διαγωγής, ακολουθήστε τα εξής βήματα:
1. Κρατήστε το μοτέρ στην πλήρως ανυψωμένη θέση. (Ανατρέξτε στην ενότητα ''Μπάρα στήριξης
εξωλέμβιας μηχανής στην πλήρως ανυψωμένη θέση'')
2. Επανατοποθετήστε τον πείρο ρύθμισης κλίσης (A) στις επιθυμητές οπές.
3. Κατεβάστε το μοτέρ ξανά προς τα κάτω.
Για να χαμηλώσετε την πλώρη, μετακινήστε τον πείρο ρύθμισης κλίσης προς το σκάφος. Για να σηκώσετε
την πλώρη, απομακρύνετε τον πείρο ρύθμισης κλίσης από το σκάφος.
Μικρή γωνία διαγωγής
Μεγάλη γωνία διαγωγής
Σωστή γωνία διαγωγής
Προσοχή: Πάντα να διατηρείτε την κατάλληλη γωνία διαγωγής με βάση το συνδυασμό
του σκάφους, του μοτέρ και της προπέλας, καθώς και τις συνθήκες λειτουργίας. Μην
λειτουργείτε το μοτέρ χωρίς τον πείρο ρύθμισης κλίσης (Α).
WWW.NIKOLAOUTOOLS.GR
18

EL
• Η αντίσταση του συστήματος πηδαλιουχίας πρέπει να ρυθμιστεί έτσι ώστε η αντίσταση κατά τη
πηδαλιουχία να είναι μικρή.
• Για να αυξήσετε την αντίσταση κατά τη πηδαλιουχία, περιστρέψτε τον ρυθμιστή αντίστασης
συστήματος πηδαλιουχίας (A) δεξιόστροφα. Για να μειώσετε την αντίσταση κατά τη πηδαλιουχία,
γυρίστε τον ρυθμιστή αντίστασης συστήματος πηδαλιουχίας αριστερόστροφα.
Ρυθμιστής αντίστασης συστήματος πηδαλιουχίας
• Η αντίσταση του χειρόγκαζου μπορεί να ρυθμιστεί ανάλογα με τη προτίμηση του χειριστή.
• Για να αυξήσετε την αντίσταση, γυρίστε τον ρυθμιστή αντίστασης του χειρόγκαζου (A)
δεξιόστροφα. Για να μειώσετε την αντίσταση, γυρίστε τον ρυθμιστή αριστερόστροφα.
Ρυθμιστής αντίστασης του χειρόγκαζου
Για να ρυθμίσετε τη ταχύτητα ρελαντί ακολουθήστε τα εξής βήματα:
1. Ζεστάνετε το μοτέρ για περίπου 5 λεπτά.
2. Βεβαιωθείτε ότι το μοτέρ βρίσκεται στη θέση "NEUTRAL" (νεκρά) και ότι το πηδάλιο είναι κλειστό.
3. Περιστρέψτε τη βίδα ρύθμισης του ρελαντί (A) δεξιόστροφα για να αυξήσετε την ταχύτητα ρελαντί
ή αριστερόστροφα για να μειώσετε την ταχύτητα ρελαντί.
Ρύθμιση ταχύτητας ρελαντί
• Το μοτέρ είναι εξοπλισμένο με σύστημα περιορισμού στροφών το οποίο ενεργοποιείται όταν η ταχύτητα του μοτέρ υπερβαίνει τις 6000 στροφές ανά
λεπτό.
• Η υπερστροφία μπορεί να προκύψει από σπηλαίωση κατά τις απότομες στροφές, αν γλιστράει το κουζινέτο της προπέλας, αν τα πτερύγια έχουν φθαρεί ή
αν η γωνίας διαγωγής (trim) είναι πολύ υψηλή.
• Εάν ενεργοποιηθεί το σύστημα περιορισμού στροφών, το μοτέρ θα λειτουργεί με δυσκολία και θα πρέπει να μειώσετε αμέσως την ταχύτητα του μοτέρ
εντός του συνιστώμενου εύρους λειτουργίας.
Σημείωση: Εάν το σύστημα περιορισμού στροφών ενεργοποιείται στις συνιστώμενες μέγιστες στροφές και είστε βέβαιοι ότι το βήμα της
προπέλας είναι επαρκές και ότι δεν υπάρχουν άλλοι παράγοντες που θα μπορούσαν να προκαλέσουν την ενεργοποίηση του συστήματος
περιορισμού στροφών, ενδέχεται να υπάρχει πρόβλημα με το εν λόγω σύστημα.
• Όταν αλλάζεται η ταχύτητα του μοτέρ στη θέση ''REVERSE'' (όπισθεν), το μοτέρ κλειδώνει αυτόματα,
ώστε να μην ανασηκώνεται από το νερό λόγω δυνάμεων όπως η ώθηση της προπέλας.
ΣΥΣΤΗΜΑ ΠΕΡΙΟΡΙΣΜΟΥ ΣΤΡΟΦΩΝ
ΡΥΘΜΙΣΗ ΚΛΙΣΗΣ
Κλείδωμα κλίσης
Προσοχή: Όταν χρησιμοποιείται η θέση για ρηχά νερά, το κλείδωμα κλίσης δεν θα
λειτουργεί. Ως αποτέλεσμα, η ώθηση της προπέλας κατά τη λειτουργία στη ταχύτητα
"REVERSE", η απότομη επιβράδυνση και η σύγκρουση με υποβρύχιο αντικείμενο
μπορεί να προκαλέσουν την ανύψωση του κινητήρα από το νερό, με αποτέλεσμα να
τραυματιστούν άτομα. Όταν χρησιμοποιείτε τη θέση για ρηχά νερά, προχωρήστε με
προσοχή και μόνο σε πολύ χαμηλές ταχύτητες.
• Η μπάρα στήριξης συγκρατεί την εξωλέμβια μηχανή στην πλήρως ανυψωμένη θέση και στη θέση για ρηχά νερά.
Μπάρα στήριξης εξωλέμβιας μηχανής στην πλήρως ανυψωμένη θέση
Θέση πλήρους ανύψωσης
Προσοχή: Εάν τοποθετήσετε τα χέρια σας κοντά στο βραχίονα στήριξης ή κάτω από το μοτέρ καθώς ρυθμίζετε τη κλίση του, τα χέρια σας
μπορεί να συνθλιβούν εάν το μοτέρ γλιστρήσει από τα χέρια σας. Μην τοποθετείτε ποτέ τα χέρια σας κοντά στο βραχίονα στήριξης ή
κάτω από το μοτέρ καθώς ρυθμίζετε τη κλίση του.
WWW.NIKOLAOUTOOLS.GR
19

EL
Για να στερεώσετε το μοτέρ στην πλήρως ανυψωμένη θέση:
1. Αλλάξτε τη ταχύτητα του μοτέρ στη θέση "NEUTRAL".
2. Γυρίστε τη βάνα καυσίμου προς τα δεξιά (θέση απενεργοποίησης) και σφίξτε τη βίδα εξαερισμού στο πώμα πλήρωσης καυσίμου.
3. Πιάστε τη λαβή στο πίσω μέρος του καλύμματος του μοτέρ και γείρετε το μοτέρ προς τα πάνω μέχρι να κλειδώσει αυτόματα στην πλήρως ανυψωμένη
θέση με τη μπάρα στήριξης (1).
• Προσοχή: Εάν δεν λάβετε τις κατάλληλες προφυλάξεις καθώς ανυψώνετε την εξωλέμβια μηχανή, ενδέχεται να διαρρεύσει καύσιμο.
• Μην γεμίζετε τη δεξαμενή καυσίμου πάνω από το ανώτερο όριο.
• Για εξωλέμβιες μηχανές με ενσωματωμένη δεξαμενή καυσίμου, φροντίστε να γυρίσετε τη βάνα καυσίμου προς τα δεξιά (θέση
απενεργοποίησης) και να σφίξετε τη βίδα εξαερισμού στο πώμα πλήρωσης καυσίμου πριν ανυψώσετε την εξωλέμβια μηχανή.
• Κατεβάστε την εξωλέμβια μηχανή ξανά στην κανονική θέση πριν ανοίξετε τη βίδα εξαερισμού αέρα στο πώμα πλήρωσης καυσίμου
της ενσωματωμένης δεξαμενής καυσίμου.
• Για εξωλέμβιες μηχανές με ξεχωριστή δεξαμενή καυσίμου, αποσυνδέστε το σωλήνα καυσίμου κάθε φορά που αφήνετε το μοτέρ στην
ανυψωμένη θέση για μεγάλο χρονικό διάστημα.
Σημείωση: Ποτέ μην χρησιμοποιείτε το πηδάλιο για να ανυψώσετε ή να χαμηλώσετε το
μοτέρ καθώς ενδέχεται να σπάσει το πηδάλιο.
Για να κατεβάσετε το μοτέρ προς τα κάτω, τραβήξτε το μοτέρ ελαφρώς προς το μέρος σας, τραβήξτε
προς τα πάνω τη μπάρα στήριξης (1) και αφήστε το μοτέρ να κατεβεί αργά προς τα κάτω.
Σημείωση: Εάν χρησιμοποιήσετε τη μπάρα στήριξης για να στερεώσετε το μοτέρ στην
πλήρως ανυψωμένη θέση για ρυμούλκηση, η μπάρα στήριξης μπορεί να απελευθερωθεί
με αποτέλεσμα να προκληθεί ζημιά στο μοτέρ. Όταν ρυμουλκείτε το σκάφος σας, μην
χρησιμοποιείτε ποτέ τη μπάρα στήριξης για να στερεώνετε το μοτέρ στην πλήρως
ανυψωμένη θέση.
Υπάρχουν δύο θέσεις για ρηχά νερά. Χρησιμοποιήστε όποια είναι κατάλληλη ανάλογα με το βάθος του νερού.
Για να ρυθμίσετε την εξωλέμβια μηχανή στη θέση ρηχού νερού:
1. Αλλάξτε τη ταχύτητα στη θέση "NEUTRAL".
2. Γείρετε αργά την εξωλέμβια μηχανή προς τα πάνω μέχρι να ακούσετε έναν χαρακτηριστικό ήχο τύπου ''κλικ''.
3. Χαμηλώστε αργά την εξωλέμβια μηχανή. Θα σταματήσει σε μια θέση που είναι ελαφρώς κεκλιμένη προς τα πάνω.
Θέση για ρηχά νερά
Εκτελείτε πάντοτε τους ακόλουθους ελέγχους πριν ξεκινήσετε τη πλεύση:
• Βεβαιωθείτε ότι υπάρχει αρκετό καύσιμο στη δεξαμενή καυσίμου.
- Χωρητικότητα δεξαμενής καυσίμου: 1.3L
- Προσοχή: Μην γεμίζετε τη δεξαμενή πάνω από το ανώτατο όριο (A).
• Βεβαιωθείτε ότι υπάρχει αρκετό λάδι κινητήρα στη δεξαμενή λαδιού.
- Χωρητικότητα δεξαμενής λαδιού: 0,5L
- Προσοχή: Η λειτουργία του κινητήρα με ανεπαρκή ποσότητα λαδιού μπορεί να προκαλέσει σοβαρή
ζημιά στο μοτέρ.
- Τοποθετήστε την εξωλέμβια μηχανή σε κατακόρυφη θέση και αφαιρέστε το κάλυμμα του μοτέρ (1)
ξεκλειδώνοντας τους μοχλούς (2) και (3).
- Το λάδι στο πώμα πλήρωσης (βυθομετρική ράβδο) (4) πρέπει να βρίσκεται μεταξύ του ανώτατου και
του κατώτατου ορίου.
- Σημείωση: Εάν το λάδι κινητήρα είναι μολυσμένο ή αποχρωματισμένο, αντικαταστήστε το με φρέσκο
λάδι κινητήρα.
- Εάν η στάθμη του λαδιού βρίσκεται κοντά στο κατώτατο όριο, προσθέστε όσο λάδι χρειάζεται για να
ανεβεί η στάθμη στο ανώτατο όριο.
ΕΠΙΘΕΩΣΗ ΠΡΟ ΠΛΕΥΣΗΣ
1.3L
Κατώτατο όριο
Ανώτατο
όριο
WWW.NIKOLAOUTOOLS.GR
20
This manual suits for next models
3
Table of contents
Languages:
Other KUMATSUGEN Outboard Motor manuals