Kushall R33 User manual

Gebrauchsanleitung
User manual
Mode d‘emploi
deutschenglish français

0R33 1
Table of contents
1General ................................................................................3
1.1 Introduction..................................................................................3
1.2 Warning and instruction signs...............................................3
1.3 Description of the wheelchair................................................3
1.4 Use as per specifications ..........................................................3
1.5 Before using the wheelchair...................................................3
2Using the wheelchair..........................................................4
2.1 Sitting down / getting up ........................................................4
2.2 Driving and steering the wheelchair...................................4
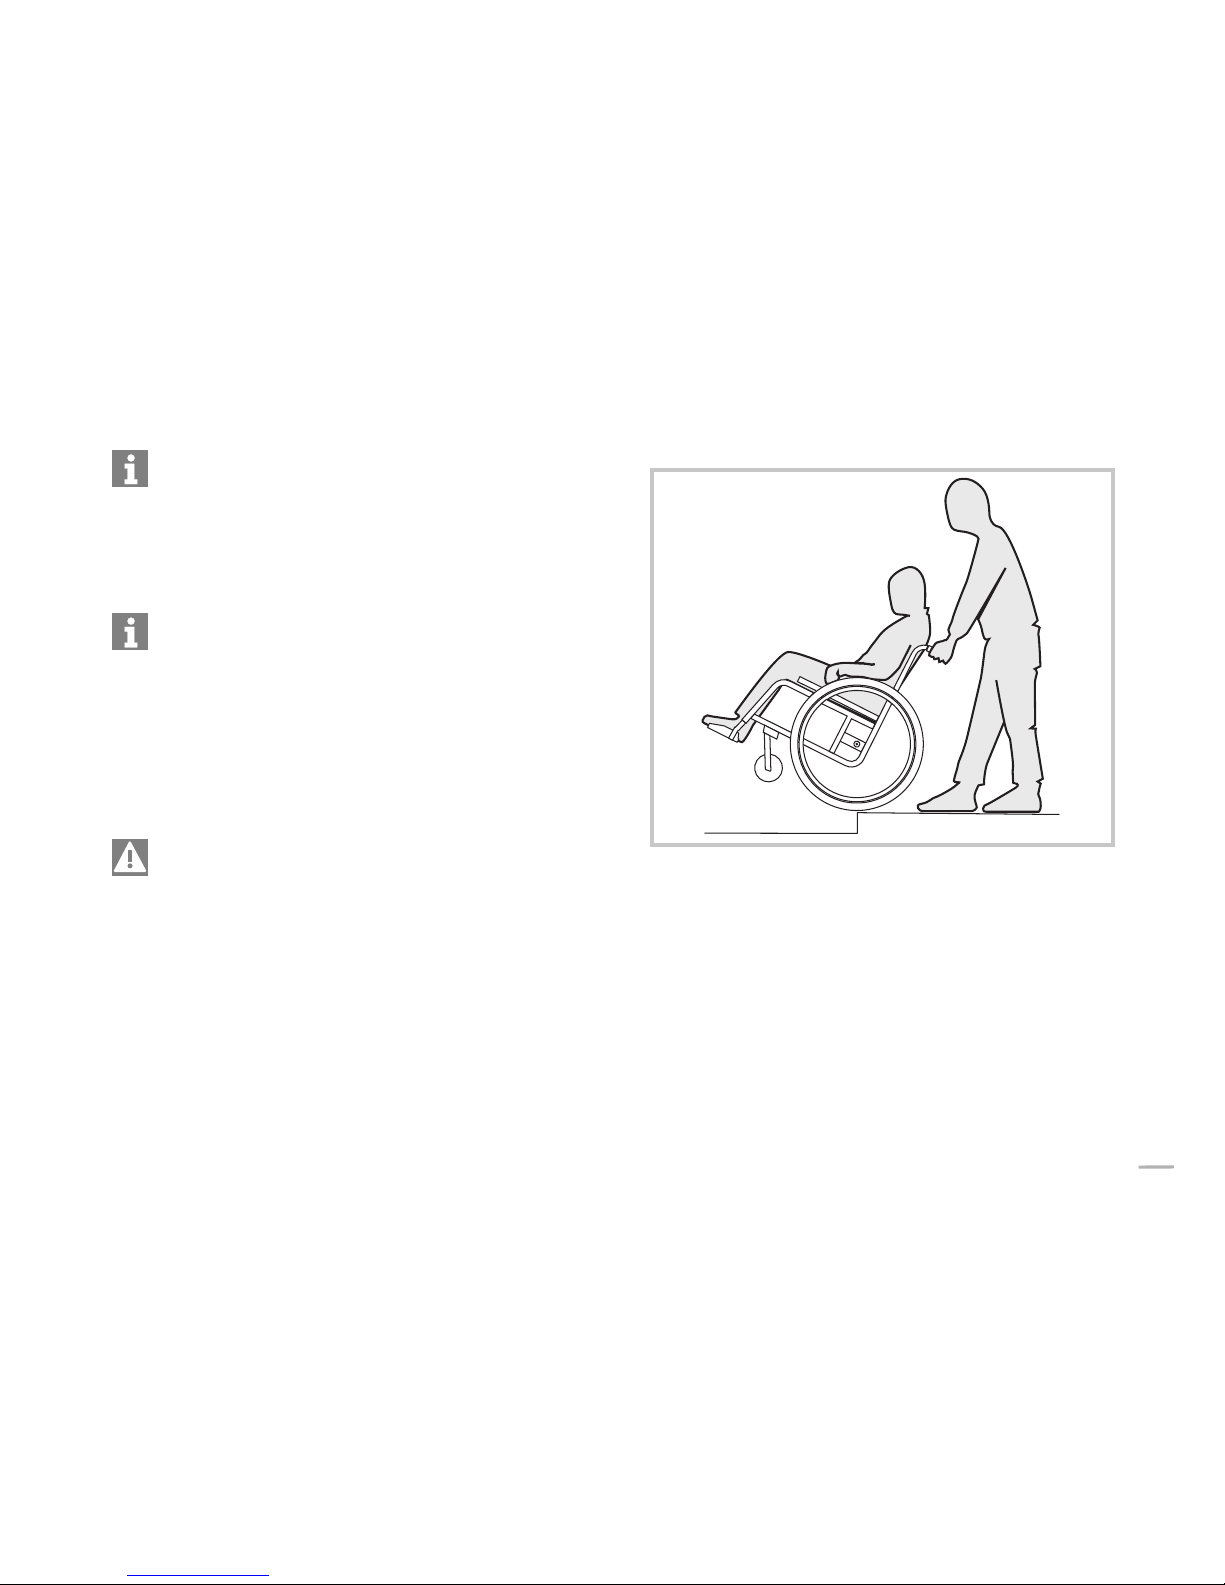
2.3 Driving over stairs and steps ..................................................5
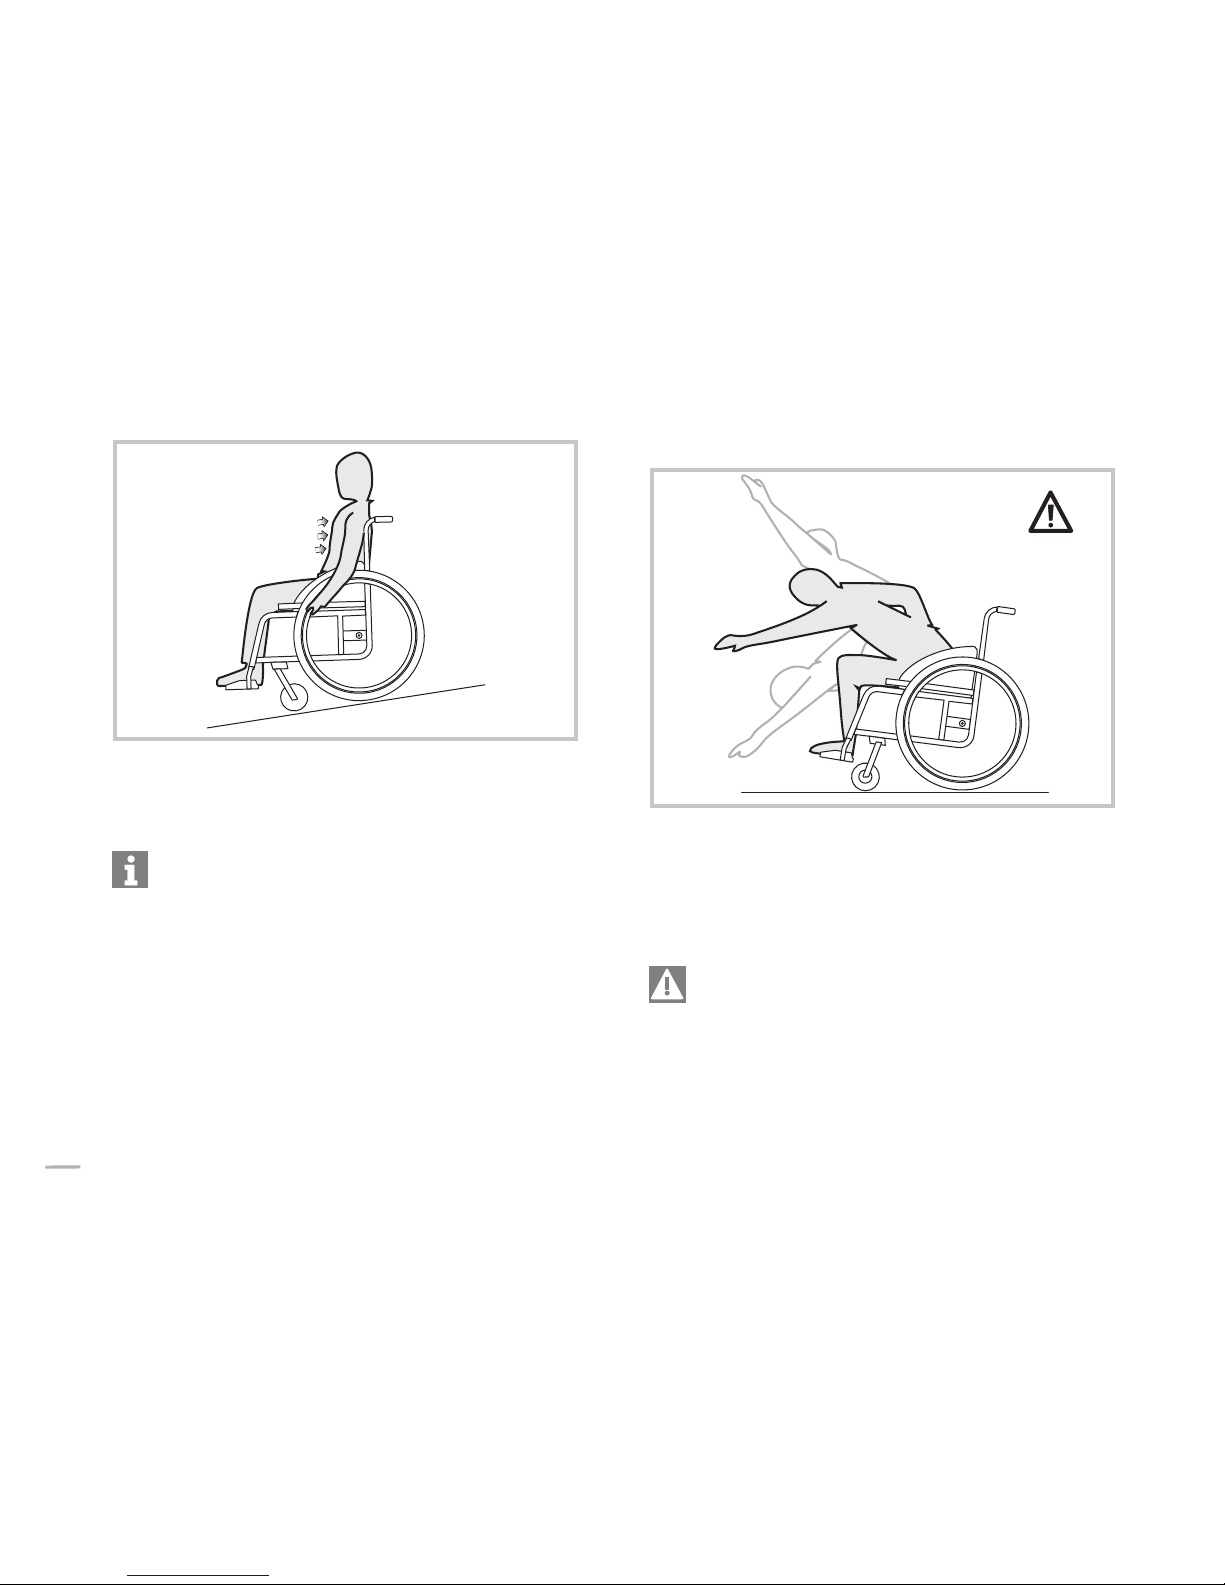
2.4 Driving on ramps and slopes..................................................7
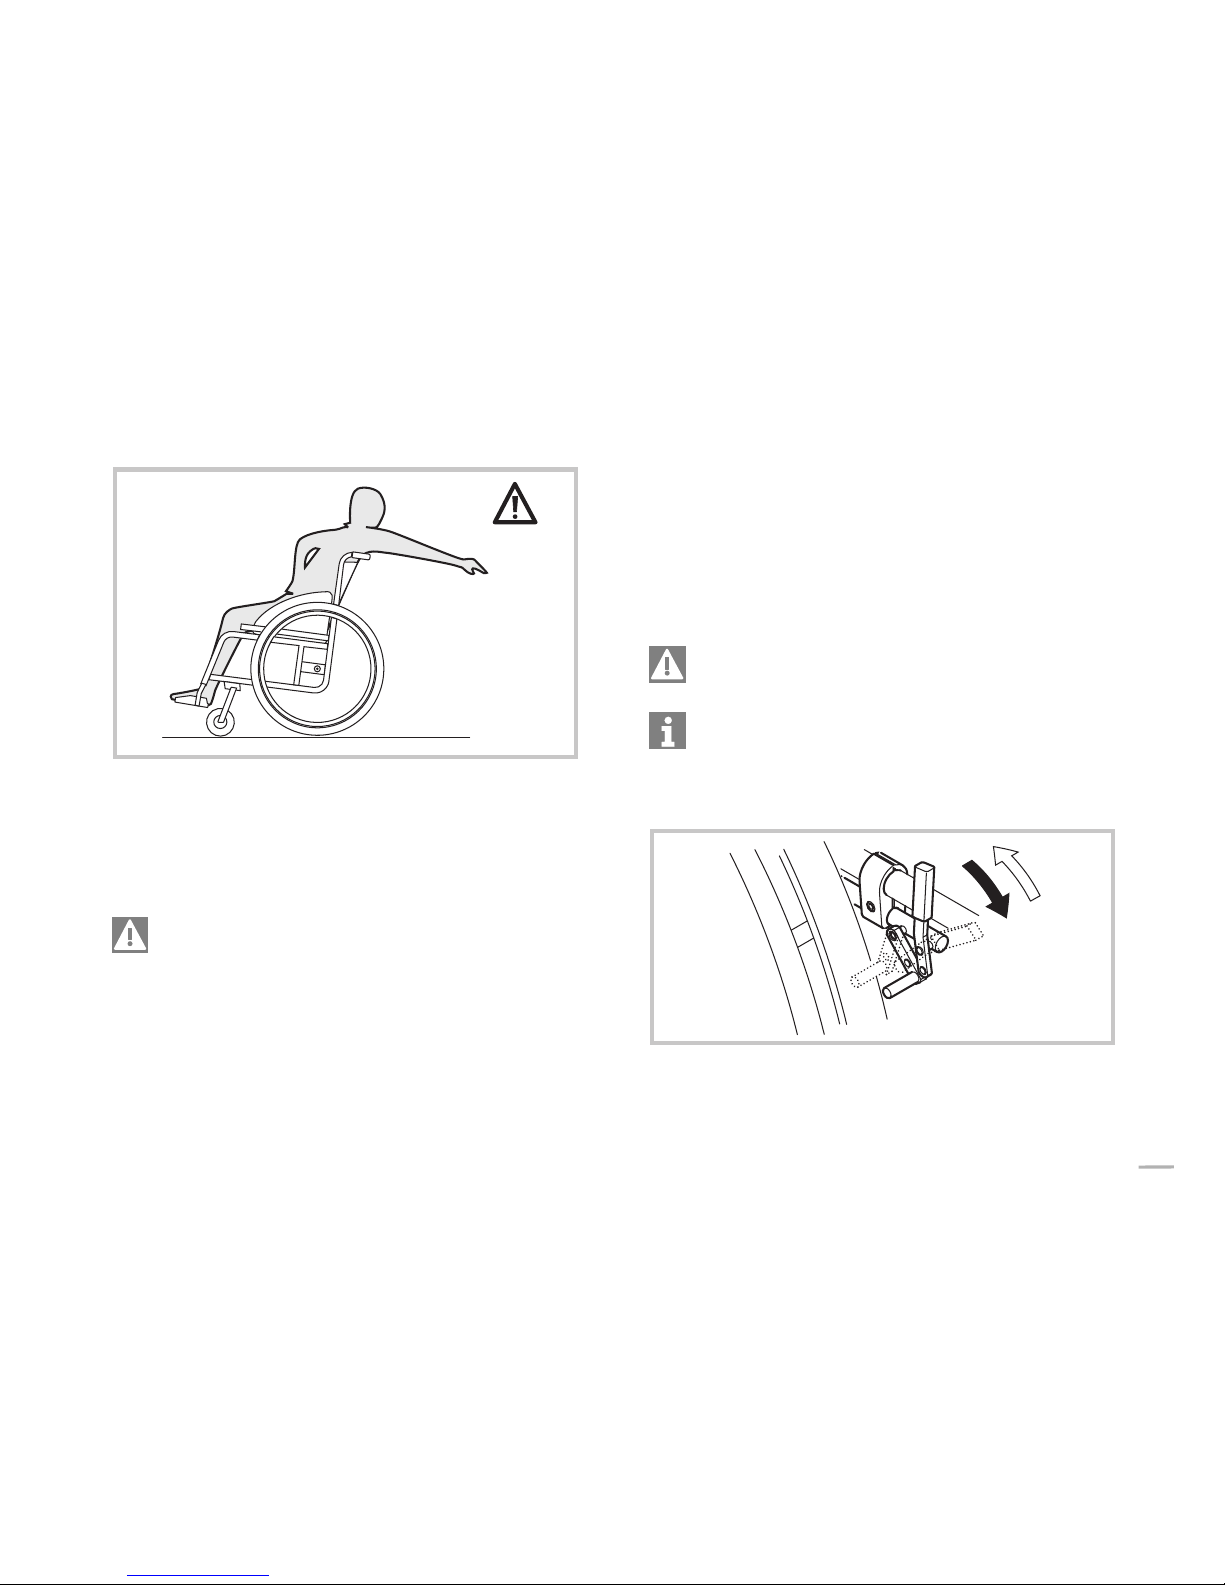
2.5 Stability and balance when sitting in the chair...............8
2.6 Parking brakes..............................................................................9
3Transporting the wheelchair .......................................... 11
3.1 Folding and unfolding the wheelchair .............................11
3.2 Removing and installing the rear wheels ........................12
4Adjustments and options................................................ 14
4.1 Adjusting the parking brakes...............................................14
4.2 Adjusting the tension of the backrest cover ..................14
4.3 Foldable Push handles............................................................15
4.4 Mudguards ..................................................................................15
4.5 Antitipper.....................................................................................15
4.6 Security belt................................................................................16
4.7 Passive lighting ..........................................................................16
4.8 Air pump.......................................................................................16
5Service...............................................................................17
5.1 Cleaning....................................................................................... 17
5.2 Maintenance .............................................................................. 17
5.3 Service life and disposal ........................................................ 19
5.4 Environmental Conditions.................................................... 19
5.5 Detecting and repairing defects ........................................ 20
5.6 Technical data............................................................................ 21
5.7 Warranty conditions................................................................ 22
6Adjustments carried out by the authorized dealer .......23
6.1 Back height adjustment......................................................... 23
6.2 Backrest angle adjustment................................................... 23
6.3 Seat height adjustment (SHh)............................................. 24

2 0R33
Figure 1
Front frame
Seatmodule
Axle tube
Rear wheel
Backrest
Footrest
Front wheel

0R33 3
1General
1.1 Introduction
Thank you for purchasing a 0wheelchair.
With the 0R33 you have purchased a top-quality
product. In order to make optimum use of its functionalities and
learn about its safety requirements, please read these operating
instructions carefully and follow the safety instructions.
1.2 Warning and instruction signs
The following signs and abbreviations are used in these
operating instructions:
Warning sign containing important information to
prevent injuries and material damage.
Useful information for user
Required tool:Hexagon socket wrench 3mm
Required tool:Wrench 8mm
Required tool:Screw driver
1.3 Description of the wheelchair
The wheelchair consists of a rigid frame onto which the seat
module and the foldable backrest are attached.Both the
left and the right side frame are attached to an axle tube . The
rear wheels are mounted to the frame with rear wheel fixture
elements.The front wheels as well as the footrest are fixed
to the front frame.(See figure 1)
1.4 Use as per specifications
The wheelchair is driven manually and is used for independent
or guided locomotion of gait-impaired persons (e.g.hemiplegia,
paraplegia, tetraplegia, multiple sclerosis, traumatic brain injury,
etc.).The wheelchair may only be used without a guide by
persons who are physically competent to handle the wheelchair
(eg.driving,steering and braking).The wheelchair is designed
for in- and outdoor use on level ground and pathed terrain.
1.5 Before using the wheelchair
Before using the wheelchair for the first time, please read
Chapter 2 - Using the wheelchair carefully and follow the
safety instructions.
It is essential that you check the functionality of your wheelchair
daily.Pay special attention on the following parts (provided they
are mounted):Wheels, backrest, antitipper, pushhandles, quick
release fork.
Normally, your authorized dealer will unpack and unfold the
wheelchair if necessary for you.If you receive your wheelchair
unfolded, please read Chapter 3.1 - Folding and unfolding the
wheelchair.

4 0R33
2Using the wheelchair
2.1 Sitting down / getting up
When getting in or out of the wheelchair, do not stand on
the footrests. Danger of tipping!
You should only get on/off the wheelchair if you are
physically competant. Please consult your physician or
therapist.
Do not sit on the clothing guard, the tire cover or the
armrest when getting on/off the wheelchair. They might
bend or break. Danger of injury!
The method you use to transfer in and out of your wheelchair
will depend on your own capabilities. Generally, the procedure is
as follows:
Pull the parking brake
Hold on to the wheelchair and, if necessary, to a stable object
nearby.
2.2 Driving and steering the wheelchair
Finding the tipping point
The tipping point of the wheelchair depends on the adjustment
of the seat position.The correct seat position is adjusted
depending on parameters such as the weight of the user, the
type of handicap and the driver's driving skills.The seat position
which is adjusted upon delivery corresponds to the information
indicated in your order.
Figure 2
To find the tipping point of your wheelchair, proceed as follows
(see Figure 2):
When determining the tipping point, an aide must always
stand directly behind the wheelchair in order to catch it in
case it tips.
To ensure that you are in control of your wheelchair at
any given point, you should not exceed a speed of 7km/h.
(4Mph)
Loosen the brakes
Sitting in the wheelchair, move forwards briefly, hold both
hand rims tightly and pull back with a slight swing.
By shifting your weight slightly and applying a counter-force
to the hand rims,the tipping point can be determined.

0R33 5
To avoid the wheelchair tipping backward, we recommend that
the wheelchair should be equipped with an antitipper (see
Chapter 4).
Please note that a heavy backpack fixed to the backrest can
affect the tipping behaviour of the wheelchair.
The position of the seat module influences the balance and the
tipping tendency of the wheelchair. The centre of gravity must be
re-defined after adjustments have been made.
2.3 Driving over stairs and steps
Always be very careful and move slowly when driving
over curbstones, stairs or other steps.
Do not try to drive over steps which have a height of more
than 25 cm.
Only drive on stairs with more than one step if an aide is
behind the wheelchair.
With an aide
Figure 3
Driving down a step
Drive to the edge of the step,make sure that the wheelchair
is in a straight position.
Hold on to the two push handles on the rear of the
wheelchair and tilt backward so that the front wheels leave
the ground.
Hold the wheelchair in this position and push it down the
step slowly.The wheelchair driver can support you by using
the hand rims.

6 0R33
Tilt the wheelchair forward until the front wheels have
ground contact again.
Driving up a step
Do not lift the wheelchair by the backrest bar.
Move the wheelchair backward until the rear wheels hit the
edge of the step.
Pull back both push handles, tilt the wheelchair until the
front wheels leave the ground and pull the rear wheels over
the edge.
Move the wheelchair until you can safely tilt the wheelchair
forward and the front wheels have ground contact again.
Without an aide
If you want to drive down a step without a guide, you
must have perfect control over your wheelchair and must
be able to balance it on the rear wheels. (see Finding the
Tipping Point in Chapter2.2).
Figure 4
Driving down a step
Drive to the edge of the step,make sure that the wheelchair
is in a straight position.
Lift up the front wheels from the floor by shifting your body
weight and keep your balance.
Now let the two rear wheels roll down over the edge.Make
sure to hold the hand rims tightly.
Tilt forward the wheelchair until the front wheels have
ground contact again.
Driving up a step
Drive the wheelchair backward until the rear wheels hit the
edge of the step.

0R33 7
Lift up the front wheels from the floor by shifting your body
weight and keep your balance.
Now let the two rear wheels roll up over the edge. Make sure
to hold the hand rims tight.
Move the wheelchair until you can tilt the wheelchair
forward safely.
Lower the front wheels again.
2.4 Driving on ramps and slopes
Only drive on long slopes if a guide is behind the
wheelchair.
Do not drive on steep or lateral slopes (max. assending
grade 7°). Danger of tipping!
Avoid abrupt changes of direction when driving on
slopes. Danger of tipping!
Never pull the parking brakes when the wheelchair is in
motion. Danger of tipping!
Driving uphill
To drive uphill you must set the wheelchair in motion and
maintain the motion in order to be able to control the direction.
Figure 5
Lean forward and drive the wheelchair by pushing the hand
rims quickly and powerfully.
Downhill
When driving downhill direction and, above all, speed must be
controlled.

8 0R33
Figure 6
Lean back and let the hand rims slip through your hands
carefully.You should be able to stop the wheelchair at any
time by holding the hand rims.
Please note that, the hand rims can heat if you brake for longer
periods of time by hand. This applies especially to MaxGrepp
and Supergripp handrims
2.5 Stability and balance when sitting in the
chair
For many every day life activities you will have to bend out of
the wheelchair, forwards,to the side or backwards.This has a
great influence on the stability of the wheelchair. In order to
keep your balance at any time,please observe the following:
Leaning forward
Figure 7
Align the front wheels to the front. (To do this, move the
wheelchair slightly forward and then back again.)
Apply both parking brakes.
When leaning forward, make sure that your abdomen
remains above the front wheels.
Do not lean forward too much. You might fall out of the
wheelchair!
Do not slide forward in your seat to reach out for remote
objects. You might fall out of the wheelchair!
Do not try to bend your abdomen forward between your
legs in order to pick up something from the floor.

0R33 9
Leaning backward
Figure 8
Align the front wheels to the front. (To do this, move the
wheelchair forward a bit and then back again.)
Do not apply the parking brakes.
Reach out backward only as much as possible without
leaving your sitting position.
Do not lean over the backrest. You might tip backward.
2.6 Parking brakes
If your wheelchair is not equipped with a drum brake,
deceleration is effected manually by applying force on the hand
rims of the rear wheels.The parking brakes are used only for
keeping the wheelchair in place when standing and to prevent
it from rolling away.The correct function of the parking brakes is
ensured only if sufficient air is in the tire.(see Chapter 5.2 -
Maintenance)
Never apply the parking brakes when the wheelchair is in
motion - Danger of tipping!
For adjusting the parking brakes please see chapter 4.
Standard brake
Figure 9
Applying the brake
Push the brake lever forward until it reaches the stopper.

10 0R33
Releasing the brake
Pull the braking lever back.
Performance brake
Figure 10
Applying the brake
Push the brake lever forward until it reaches the stopper.
Releasing the brake
Pull the braking lever back.
Active brake
Figure 11
Applying the brake
Pull the braking lever forward (beside or between your legs)
until it reaches the stopper.
Releasing the brake
Push the braking lever back (beside or between your legs).

0R33 11
3Transporting the wheelchair
Your wheelchair is not suitable for use in vehicles. Do not
sit on the wheelchair during a transport, use a properly
secured seat.
Be careful when you remove the wheels from the
wheelchair that you do not move the wheelchair on any
abrasive surfaces (e.g. pulling over concrete). Excessive
material abrasion could affect the strength of load-
bearing parts.
3.1 Folding and unfolding the wheelchair
The K-Series has a rigid frame.But the backrest can be folded
down and fixed (“click”) into position nonetheless.
Folding the wheelchair
Figure 12
Remove the seat cushion, if present.
Flip clothes-guard inward to rest against backrest.(Both
sides)
Pull the pull-strap on the back of the wheelchair. (1.)
Fold the backrest forward until it snaps into place.(2.)
The backrest bar of the wheelchair can now be used as a handle
during transport.

12 0R33
Unfolding the wheelchair
Figure 13
Pull the pull-strap on the back of the wheelchair.(1.)
Pull backrest by the backrest bar upwards until the backrest
tubes on both sides of the frame snap into position.(2.)
Reposition the clothes-guards.
Do not pull the backrest bar to open the backrest without
pulling the pull-strap first.
Check that the backrest has really snapped into position before
using the wheelchair.
3.2 Removing and installing the rear wheels
To reduce the size of your wheelchair, you can remove the rear
wheels.
Figure 14
Removing the rear wheels
Release the brakes.
With one hand,hold the wheelchair in an upright position.
With the other hand,hold the wheel at the spokes around
the wheel hub (see Figure 14).
Press the axle knob with your thumb and pull the wheel
out of the adapter sleeve .
Installing the rear wheels
Release the brakes.

0R33 13
With one hand,hold the wheelchair in an upright position.
With the other hand,hold the wheel at the spokes around
the wheel hub (see Figure 14).
Press the axle knob with your thumb, keep it pressed.
Now insert the axle in the adapter sleeve of the axle tube
until it comes to a rest.
Release the axle knob. Now, the wheel fits tightly.
After fitting the wheels, always make sure that the
removable axles are engaged completely. The head must
be extended completely. Check by pulling the wheels
outwards.

14 0R33
4Adjustments and options
4.1 Adjusting the parking brakes
The parking brakes must be readjusted after adjusting the
position of the rear wheels.
Figure 15
Make sure that sufficient air is in the tyres.(see Chapter 5.2 -
Maintenance).
Loosen the hexagon socket bolt at the brake holder (hex.
socket wrench 5mm), and move the brake to the required
position.
With the brake applied, the brake shoe should not sink into the
tyre more than 4 mm.
Tighten the hexagon socket bolt at the brake holder again.
The function of the parking brakes is only ensured if
sufficient air is in the tyre. (see Chapter 5.2 - Maintenance)
4.2 Adjusting the tension of the backrest cover
If your wheelchair is equipped with a backrest cover with
adjustable tension,you can adjust the tension of the backrest
cover to your individual requirements.
Figure 16
Remove the backrest cushion.
Loosen the Velcro® straps on the rear side of the seat cover,
by simply by pulling them off.
Tighten or loosen the straps,as required, and fix them again.
Adjusting the backrest, see Chapter 6

0R33 15
4.3 Foldable Push handles
1. 2.
3.
Figure 17
Folding Push handles
Hold wheelchair with one hand.
Grasp push handle with the other hand and press the trigger,
which is hidden under the plastic,with thumb
Pull the push handle back and fold down.
Unfolding push handle
Pull the push handle upwards into the horizontal,until it has
snapped into place.
Certify that the push handles have actually been snapped
into position, so that they cannot accidentally fold down
again when pushing the wheelchair.
4.4 Mudguards
Removable mudguards can be mounted to the wheelchair to
prevent dirt and mud from spraying from the rear wheels onto
clothes when driving outdoors.
4.5 Antitipper
The Antitipper device prevents the wheelchair from tipping
backward.
Figure 18
Installing the Antitipper
Slide the Antitipper onto the bracket and fix it with the
qickpin .
In any case deactivate the Antitipper device before
driving over a curbstone or a step. Danger of tipping!

16 0R33
Deactivating the Antitipper
Unplug the quickpin and remove the Antitipper .
4.6 Security belt
Your wheelchair can be equipped with a security belt which
prevents falling out of the wheelchair.
Figure 19
Belt assembly
The assembly of the belt should be carried out by your
dealer!
Pull the belt through the backrest and position it so that the
buckle is placed at the front.
Opening the belt
Press on the PRESS button and pull the locker out of its
socket .The buckle will open up.
Closing the belt
Insert the locker completely into the buckle socket .
Pull the belt until you are secured in the wheelchair.
4.7 Passive lighting
You can install two reflectors on the rear wheels.
4.8 Air pump
The air pump is delivered with a valve adapter. Depending on
the size of the valve of your model, it may be necessary to turn
the adapter at the air outlet of the pump.
Remove the locknut
Take out the valve adapter
Turn it around and reinstall it
Tighten the locknut again.

0R33 17
5Service
5.1 Cleaning
The service life of your wheelchair increases if you maintain and
clean it regularly.
Clean cushions and metal parts with a moist, soft cloth.
Carefully dry your wheelchair after using it in rainy weather
or after taking a shower.
The removable axles require particularly thorough cleaning (see
Chapter 5.2 Maintenance)
Sand and sea water may damage the ball bearings.
After using your wheelchair in a dirty environment, clean and
dry it thoroughly as soon as possible.
Do not use rough scouring agents,aggressive cleaning agents
or high-pressure cleaning machines.
5.2 Maintenance
We strongly advise that you should have your wheelchair
thoroughly checked by the authorized dealer once a year, as a
minimum.This is in addition to to the general maintenance
procedures detailed below.
In order to make sure that your wheelchair will give you the
necessary safety and reliability over its whole service life, you
should carry out the following work regularly, or have it carried
out by your authorized dealer.
Maintenance plan
Weekly Check air pressure in tyres
Check the proper fitting of the rear wheel
axle in the sleeve
Monthly Check bolted connections
Oil removable axles
Check tension of spokes
Yearly General check by an authorized dealer
Measuring the air pressure
To ensure that the driving and braking function is maintained, it
is important that the air pressure in the tires is correct.
Check weekly, if there is sufficient air in the tires.
The optimum pressure values are indicated in the following
table:
Type of tire Air pressure
Smooth-running tires 7 bars 700 kPa 100 psi
Treaded tires 7.5 bars 750 kPa 110 psi
Mountain bike tire 5 bars 500 kPa 70 psi
If you are not sure about the tires of your wheelchair, contact
your authorized dealer.

18 0R33
Oiling the removable axles
To ensure the proper function of the removable axles,they must
be oiled at regular intervals.
Pour some resin-free bicycle oil on a cloth and slightly oil the
balls at the end of the removable axles,the axle and the
push-button.
Checking the bolted connections
Bolted connections may loosen if the wheelchair is used
frequently.
Check the bolts monthly for tight fit,re-tighten,if necessary.
Locknuts and locking bolts should be replaced if they
become loose.
For replacement please contact an authorized dealer.
Repairing or replacing tires
Take off the wheel (see Chapter 3.2).
Deflate the tire by pressing on the valve.
Lift one flank of the tire off the wheel rim.
Use a bicycle tire lever for this. Do not use sharp or pointed
objects such as screw drivers in order to prevent the inner tube
from being damaged.
Pull the tube out of the tire.
Repair the tube using a bicycle tire repair kit. If repairing is
not possible,replace the tube.
Fitting tires
Inflate the tube slightly until it has its round shape.
Insert the valve in the valve hole of the wheel rim and insert
the tube in the tire (the tube should be inside the tire
completely without folds).
Starting at the valve push the tire flanks over the edge of the
wheel rim with both hands.Make sure that the tube is not
jammed between the tire and the wheel rim.
Use a bicycle tire lever for this. Do not use sharp or pointed
objects such as screw drivers in order to prevent the inner tube
from being damaged.
Pump the tire up to the maximum operating pressure.Make
sure that the tire does not loose air anymore.
Spare parts
All spare parts are available at your authorized dealer.
To determine the size of a front wheel compare its outer
diameter to the scale on the back of this manual.

0R33 19
5.3 Service life and disposal
We assume that our wheelchairs will be in use daily. For this
reason the whole equipment is subjected to an almost
continuous stress and, consequently, a natural wear and tear.
Taking this into consideration and provided that the wheelchair
is maintained properly, the lifetime of the Küschall® wheelchairs
is approximately 5 years. If the wheelchair is used less frequently,
e.g. if you use it inside your apartment only, and if it is
maintained perfectly, the service life will increase accordingly.
For proper disposal of your wheelchair, please contact your
authorized dealer.
5.4 Environmental Conditions
The wheelchair should not be exposed to temperatures lower
than -20°C or higher than 40°C.
Table of contents
Other Kushall Wheelchair manuals