KUULAIRE PACKA44 User manual

CAUTION
SAVE AND READ THESE IMPORTANT INSTRUCTIONS
Read all instructions carefully before setting up and operating this unit. This manual
was designed to provide you with important information needed to setup, operate,
maintain, and trouble-shoot your cooler. Failure to follow these instructions may dam-
age and/or impair its operation and void the warranty.
Owner’s Manual
Port-A-Cool, LLC • 709 Southview Circle • Center, TX 75935
www.kuulaire.com • 1-888-999-6511
Made in China
115V 220V
Model PACKA34
PACKA34-22050
PACKA34-22060
Model PACKA44
and PACKA44-22050
PACKA44-22060
WARRANTY
For one year from date of installation, Port-A-Cool, LLC, warrants any original
component part or parts of the KuulAire®evaporative unit found, upon examination
by factory authorized personnel, to be defective in material or workmanship. Due to
warranty limits placed on our component parts by the original manufacturers, our
warranty is limited on manufactured units and their original component parts, as well
as replacement parts to a total of one (1) year after the date of installation.
If said equipment develops such defects within this period, it will be repaired or
replaced at our option. For breach of any implied or written warranty on this product,
Port-A-Cool, LLC, shall not be liable for any incidental or consequential damages.
This warranty is declared void if the equipment is found to have been misused, abused
or tampered with by unauthorized personnel. Do not use cooler cleaners, cooler treat-
ments, or other additives in this portable evaporative cooler. The use of any of these
products will void your warranty and may impair the life of your evaporative cooler.
All transportation charges on parts submitted for replacement or repair under this
warranty must be borne by the purchaser.
To obtain service under this warranty, contact the dealer where you purchased your
evaporative cooler. As a nal step, if you cannot locate your dealer, please contact
customer service at Port-A-Cool, LLC. Please include your name, address and ZIP code,
the model number and serial number of your evaporative cooler, date of installation,
and a description of your problem. Port-A-Cool, LLC, 709 Southview Circle, Center, TX
75935, Tel: 1-800-695-2942, 936-598-5651. For more information or to register online,
visit www.kuulaire.com.

Introduction
The PACKA34 and PACKA44 feature a 3-speed fan and
automatic timer that can be programmed for 0.5 hour
to 7.5 hours. The automatic louver swing function
provides directional control and the remote control
(batteries not included), provides convenience. The
PACKA34, PACKA34-22050, PACKA34-22060, PACKA44,
PACKA44-22050, and PACKA34-22060 portable evaporative
coolers are the latest in evaporative cooling technology
from Port-A-Cool, LLC, manufacturer of world-class
portable cooling units , for residential, industrial and
commercial applications.
WARNINGS AND SAFETY RULES
▲
!
LOCATION
PARTS DESCRIPTION
ELECTRICAL
ASSEMBLY INSTRUCTIONS
WARRANTY
CLEANING AND MAINTENANCE
TECHNICAL SPECIFICATIONS
TROUBLESHOOTING
REMOTE CONTROL
USE AND OPERATION
▲
!
1. This unit is intended for indoor use. Any other use is
not recommended and may cause re, electric hazard,
or injury to persons or property, and may void the
warranty.
2. Unplug the unit from power outlet when lling and
relling water reservoir.
3. Unplug the unit from power outlet when moving the
unit.
4. Unplug the unit from power outlet when cleaning or
servicing.
5. Do not use the unit in areas where gasoline, paint or
any other ammable chemicals are stored.
6. Extreme caution should be taken when used near
children and the elderly. The unit should not be left
unattended for any extended period of time while in
operation.
7. Do not let children play with any packaging material.
8. Do not operate the unit with a damaged power cord.
9. Do not attempt to repair or adjust any electrical or
mechanical functions of the unit.
10. The PACKA34 and the PACKA44 unit should run on 110-
120V 60Hz AC only. The PACKA34-22050, PACKA44-22050
on 220-240V 50Hz AC only, and PACKA34-22060,
PACKA44-22060 on 220-240V 60Hz AC only.
11. Do not cover unit air inlet or air outlet openings.
12. This product is not intended for use in wet or damp
locations.
13. When not in use, drain the water from the reservoir and
store the unit in a dry location.
14. Do not run power cord under carpeting or cover with rugs
or runners. Arrange the cord away from areas where it
may be tripped over.
15. Do not use the unit with an extension cable.
16. Do not insert or allow objects to enter the air outlet
opening, as this may cause damage to the blower and
may void the warranty.
17. Use only fresh water to ll the water reservoir. The use
of air fresheners or cleaners is not recommended as it
may damage the unit and void the warranty.
18. Drain the reservoir once every week to reduce calcium
saturation.
19. The unit is built with a water pump which has a feature
to stop when water in reservoir is at low water. The
pump will restart when the reservoir is relled with
water.
20. Do not use this appliance with any solid-state speed
control device.
21. If the unit is damaged or malfunctioning, discontinue
operation and refer to the trouble-shooting section and/
or contact a service technician via 1-888-999-6511.
Basic safety precautions should always be followed when using any electrical appliance.
WARNINGS AND SAFETY RULES
▲
!
LOCATION
PARTS DESCRIPTION
ELECTRICAL
ASSEMBLY INSTRUCTIONS
WARRANTY
CLEANING AND MAINTENANCE
TECHNICAL SPECIFICATIONS
TROUBLESHOOTING
REMOTE CONTROL
USE AND OPERATION
▲
!
WARNING: Unplug the unit from power outlet prior
to moving or servicing, or lling or draining the water
reservoir. After unplugging, drain the tank until it is
half full before moving the unit.
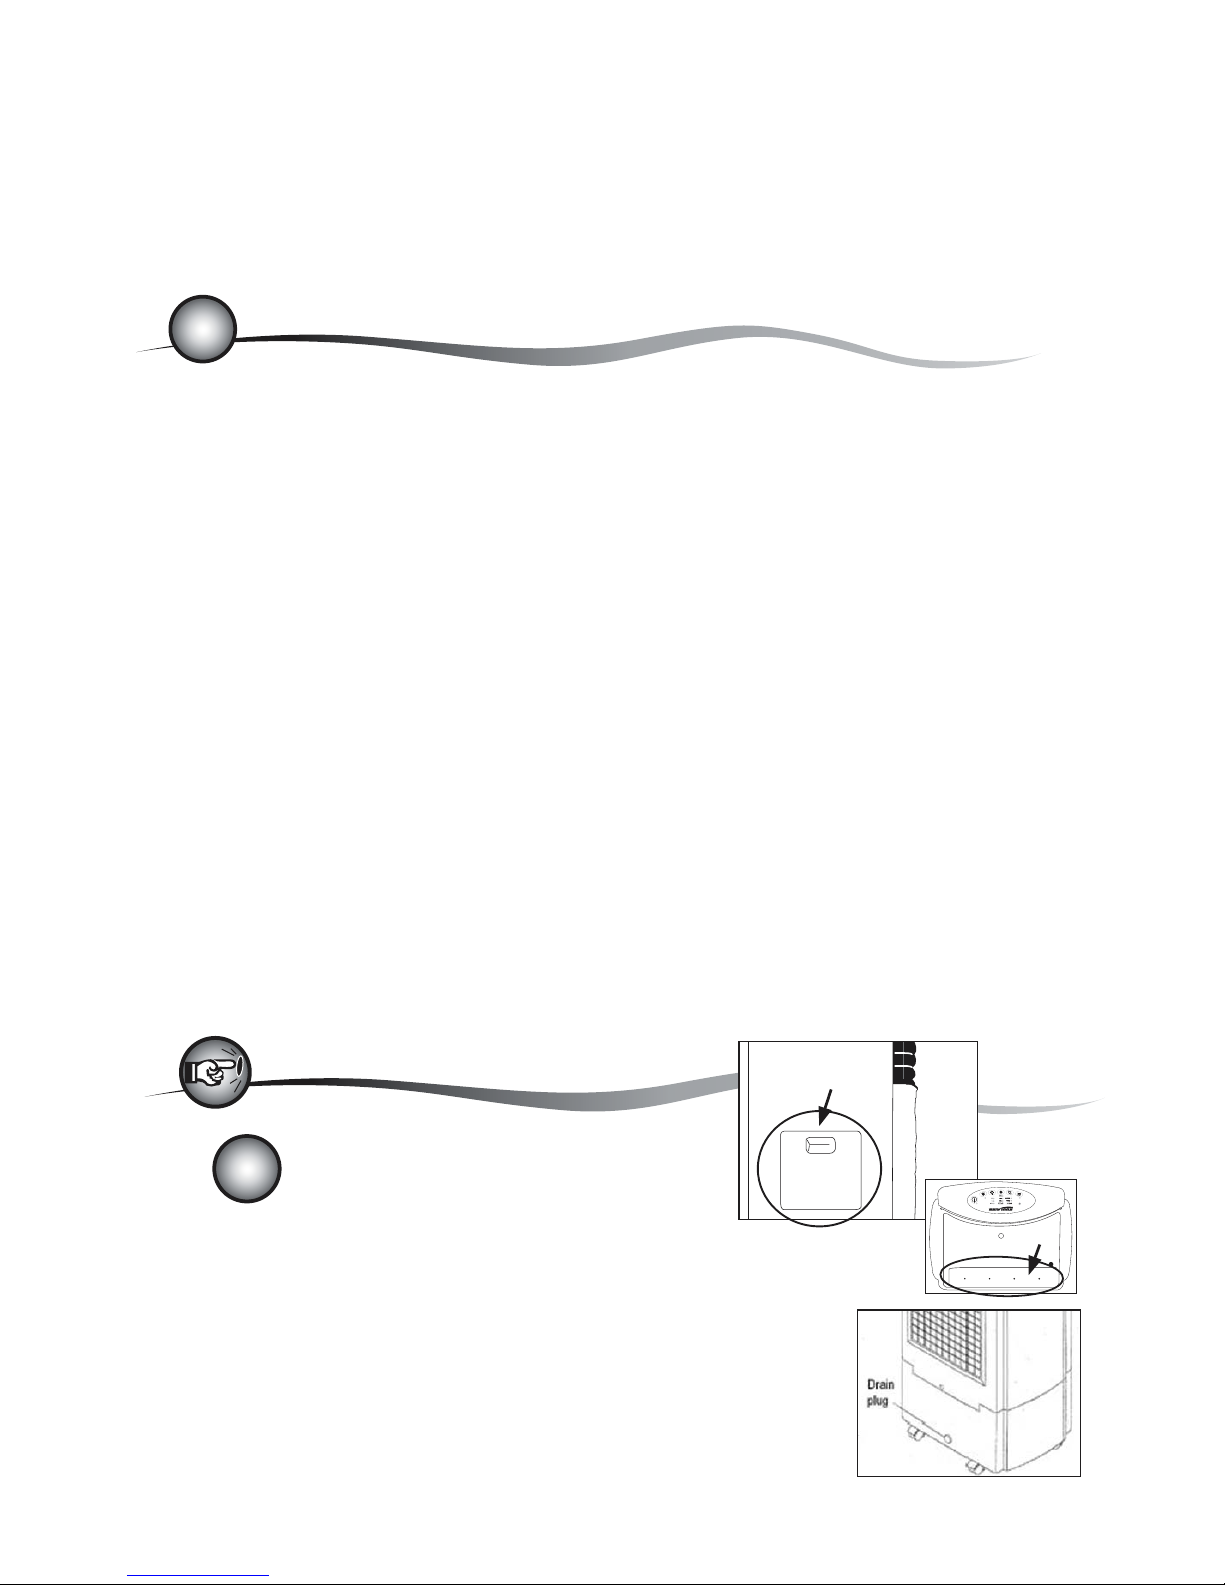
Filling the Reservoir with Water
The water ll door is located on the side of the unit. Open the water ll door and pour water
carefully into the reservoir. Pay attention to the water level indicator to avoid overlling
the unit. The PACKA34 water reservoir capacity is 3 gallons (11 liters). The capacity of the
PACKA44 reservoir is 4 gallons (15 liters) You can also ll water from the top compartment.
Draining the Reservoir
Move the unit to a location where water can be disposed of safely. Remove the drain plug
which is located at the back of the unit to release water from the reservoir. Once it is
completely drained, replace the drain plug. The unit is ready to be lled with fresh water.
WARNINGS AND SAFETY RULES
▲
!
LOCATION
PARTS DESCRIPTION
ELECTRICAL
ASSEMBLY INSTRUCTIONS
WARRANTY
CLEANING AND MAINTENANCE
TECHNICAL SPECIFICATIONS
TROUBLESHOOTING
REMOTE CONTROL
USE AND OPERATION
▲
!
Water
Fill Door
COOL
Water only
Top Water Fill

COOL
Dampen a clean cloth with water and use it on the exterior
of the unit to remove any dust or dirt. Never use harsh
detergents, solvents, and corrosive cleaners to clean the unit.
When not in use, drain the water reservoir and store the unit
in an area where it is dry and out of sunlight.
MAINTENANCE:
Regular draining, at least once each week, will decrease the
water mineral build up and extend the life of the honey-comb
media pad. A damp cloth can be used to remove calcium build-
up inside and outside of the unit. The dust lter/cover can be
removed easily and can be cleaned weekly. The inside of the
water reservoir can be cleaned once or twice in a season to
maintain air quality.
DEEP CLEAN:
Remove screws holding the rear panel and remove the rear
panel by unhooking the tab located in the top of the rear panel.
Wash cooling pad with water and soft bristled brush to remove
debris and mineral build-up. Fill up the reservoir with fresh
water and drain. Repeat the procedure to remove debris and
mineral build-up in the reservoir.
WARNINGS AND SAFETY RULES
▲
!
LOCATION
PARTS DESCRIPTION
ELECTRICAL
ASSEMBLY INSTRUCTIONS
WARRANTY
CLEANING AND MAINTENANCE
TECHNICAL SPECIFICATIONS
TROUBLESHOOTING
REMOTE CONTROL
USE AND OPERATION
▲
!
WARNING: Unplug the unit from power
outlet prior to moving or servicing, or
lling or draining the water reservoir.
WARNINGS AND SAFETY RULES
▲
!
LOCATION
PARTS DESCRIPTION
ELECTRICAL
ASSEMBLY INSTRUCTIONS
WARRANTY
CLEANING AND MAINTENANCE
TECHNICAL SPECIFICATIONS
TROUBLESHOOTING
REMOTE CONTROL
USE AND OPERATION
▲
!
WARNINGS AND SAFETY RULES
▲
!
LOCATION
PARTS DESCRIPTION
ELECTRICAL
ASSEMBLY INSTRUCTIONS
WARRANTY
CLEANING AND MAINTENANCE
TECHNICAL SPECIFICATIONS
TROUBLESHOOTING
REMOTE CONTROL
USE AND OPERATION
▲
!
ON/OFF
1. Connect the cord to a power outlet.
2. Press the ON/OFF button to turn on the unit. Indicator
light will illuminate. To turn off, press the ON/OFF button
again.
SPEED
Press the SPEED button to select the desired fan speed.
The selected fan speed indicator LED light will light up.
Fan speed settings are LOW – MID – HIGH.
MODE
Press the MODE button to select the desired fan mode.
The selected fan mode indicator LED light will light up.
When SLEEP or NATURAL is selected, air speed will change
randomly.
COOL
To use the unit as an evaporative cooler, press the COOL
button. The pump will start and distribute water to wet
out the cellulose media located in the rear of the unit.
After approximately three minutes, as the pad becomes
saturated, the air from the outlet should be cool.
LOW WATER ALARM FUNCTION
The PACKA34, PACKA34-22050, PACKA34-22060, PACKA44,
PACKA44-22050, PACKA44-22060 are equipped with a low
water sensor alarm. When water in the reservoir is below
minimum level, you will hear audible beeps and COOL LED
indicator will ash continuously. At the same time the
power to the pump will be cut off to protect the life of
the pump. In order to disengage the alarm function, turn
off and unplug the unit from the power outlet, and ll the
reservoir with water above the minimum level. In order to
turn off the alarm function and continue to use it in FAN
mode, press COOL button again. If COOL button is pressed
again without lling the reservoir with water, low water
alarm will go off again.
SWING
Press the SWING button to direct the air stream. The
vertical louvers will begin to move automatically from
side to side. The indicator LED will come on. To adjust the
vertical direction of air ow, adjust the horizontal louvers
manually.
TIMER
The unit comes with an 0.5 hour to 7.5 hour. To set, press
the TIMER button to the desired operation time. When the
pre-selected time has elapsed, the unit will automatically
shut off. In order to cancel the TIMER program, press and
hold TIMER button until time indicator lights are turned off.
WARNINGS AND SAFETY RULES
▲
!
LOCATION
PARTS DESCRIPTION
ELECTRICAL
ASSEMBLY INSTRUCTIONS
WARRANTY
CLEANING AND MAINTENANCE
TECHNICAL SPECIFICATIONS
TROUBLESHOOTING
REMOTE CONTROL
USE AND OPERATION
▲
!
Water Reservoir Capacity 11 Liters/3 gallons
Dimensions (cm) 65 H x 39.7 W x 30 D
Dimensions (inches) 25 H x 16 W x 12 D
Net Weight 6.0 kg/14 lbs.
WARNINGS AND SAFETY RULES
▲
!
LOCATION
PARTS DESCRIPTION
ELECTRICAL
ASSEMBLY INSTRUCTIONS
WARRANTY
CLEANING AND MAINTENANCE
TECHNICAL SPECIFICATIONS
TROUBLESHOOTING
REMOTE CONTROL
USE AND OPERATION
▲
!
Model No. PACKA34
(110-120V 60Hz, 70W)
Model No. PACKA34-22050
(220-240V 50Hz, 70W)
Model No. PACKA34-22060
(220-240V 60Hz, 70W)
ON/OFF – start or turn off the unit
Timer – timer from 0.5 hour to 7.5 hours
Cool – start water pump
Speed – Low/Medium/High
Swing – automatic swing of louvers
Mode – Sleep/Natural/Normal
COOL
PACKA34 and PACKA44
CONTROL PANEL
9/26/2011
COOL
Model No. PACKA44 (110-120V 60Hz, 115W)
Model No. PACKA44-22050 (220-240V 50Hz, 115W)
Model No. PACKA44-22060 (220-240V 60Hz, 115W)
Water Reservoir Capacity 15 Liters/4 gallons
Dimensions (cm) 72 H x 39.7 W x 30 D
Dimensions (inches) 28.3 H x 16 W x 12 D
Net Weight 6.7 kg/14.8 lbs.

WARNINGS AND SAFETY RULES
▲
!
LOCATION
PARTS DESCRIPTION
ELECTRICAL
ASSEMBLY INSTRUCTIONS
WARRANTY
CLEANING AND MAINTENANCE
TECHNICAL SPECIFICATIONS
TROUBLESHOOTING
REMOTE CONTROL
USE AND OPERATION
▲
!
WARNINGS AND SAFETY RULES
▲
!
LOCATION
PARTS DESCRIPTION
ELECTRICAL
ASSEMBLY INSTRUCTIONS
WARRANTY
CLEANING AND MAINTENANCE
TECHNICAL SPECIFICATIONS
TROUBLESHOOTING
REMOTE CONTROL
USE AND OPERATION
▲
!
Symptom Possible Cause Possible Solution
No discharge of air
Cord is not plugged in
Power is not on
Make sure cord is plugged in and try to turn the unit on by pressing ON/
OFF button on control panel and remote control. Check the circuit breaker or
check GFCI reset button.
The unit will not
turn off
Damaged PCB
Remote control batteries
Damaged PCB - contact service technician.
Check batteries.
Unit is making noise
No water and water level sensor is
stuck - pump is dry running when COOL
button is pressed.
Clean the reservoir with fresh water and loosen the water level sensor oat
inside the reservoir.
Not cooling Low/No Water
Pump doesn’t turn on and low water
alarm turns on with full tank of water
in the reservoir.
Check water level
Water level sensor is stuck. Drain/rell with fresh water and loosen the
water level sensor oat inside the reservoir.
Odor Emission
Brand new unit
Old unit with algae
Brand new cooling pad will initially emit an odor which will dissipate within
a week of initial use.
If the unit is not new, there may be an algae issue. Replace the cooling pad
and clean the pad regularly.
Water droplets coming
out of air outlet
Calcium saturated water
Clogged cooling pad
Drain water, deep clean and clean the cooling pad.
Cooling pad may need to be replaced.
1. Control Panel
2. Horizontal Louvers
3. Water Level Gauge
4. Caster
7. Cooling Pad / Cover
8. Drain Plug
5. Top Water Fill 6. Side Water Fill
Other manuals for PACKA44
1
This manual suits for next models
5
Table of contents
Other KUULAIRE Air Cleaner manuals