KYK 777 User manual

User Manual

2
Thank you for purchasing one of the KYK products.
Please read this Manual before use of the Product, since it contains useful
information for you to enjoy the Product for a longer period of time.
The Manual will help you use the Product in correct and effective ways so that
you could make the best of the Product.
KYK shall continue to strive for the best of your benefit, health and happiness.
Please do not hesitate to contact us should you experience any inconvenience or
have any suggestion during use of the Product.
We wish you health and happiness.
Staff of
This product is a medical device. Please familiarize yourself with
the 'Caution in Use' and 'How to Use' before using the Product.

3
Front Panel of the Main Body
Control Panel
LED Display and Status
How to Operate
Design or specification of the Product may be changed without
prior notice for further improvement in performance and quality.
3
5
6
7
12
13
18
22
23
24
25
28
30
31
32
33
34

4
❶
❷
❸
❹
❺
❻
❼
❽
❾
❿

4.5cm
1.5cm
5
Components
Pre-treatment Filter
Special Booster Pump
Dust Filter
Dust Filters must be installed in areas where the tap water contains rust, fine dust or
other impurities, in order to ensure long service life and proper operation of the
solenoid valve (automatic raw water feed on/off valve) fitted to the Product.
The Pressure Valve must be installed in areas where the tap water pressure is higher
than 3.5L per minute, in order to ensure safety and normal operation of the Product.
The Booster Pump must be installed in areas where the tap water pressure is 1.0L ±
10%) per minute, in order to ensure normal operation of the Product.
This Product has been designed for normal tap water. In areas where underground
water is used or water quality is poor, the Pre-treatment Filter should be installed.
These Filters should be replaced at 6-month intervals.
※If the raw water contains a significant amount of heavy metal, nitric nitrogen, harmful
germs or lime scale the Product may require additional device to be fitted on.
Compressed
rubber
6x8
Elbow Fitting
User Manual
Hose
Feed Water
Corporation Cock
Power Cord
Reagent (for pH
measurement)
Dust
Filter
Pressure
(Reducing)
Valve
Special
Booster
Pump
Pre-
treatment
Filter
※
Fitting Stopper
Water Tray
Pressure (Reducing)
Valve

6
465mm
487mm
300mm

7
Front Panel of the Main Body
❸Water Dispensing Cock
❶Display
❷Function Selection Buttons
❹Water Dispensing Button
❺Water Tray
❶
: The case forming the exterior of the Product with all parts fitted
❷
: to select various functions
❸
: When the Water Dispending Button is
pressed, the Cock protrudes forward to
dispense water, and withdraws after
dispensing.
❹
: to dispense water
❺
: to collect spilled water

8
❶Display
❷Cold water
❹Filter 1 Status
❸Hot water
❺Filter 2 Status
❻Filter 3 Status
❼Filter 4 Status
❽Button to select cold alkaline water
❿Button to select hot water
Button to Clean/Set
Button to select
continuous operation
❾Button to select
alkaline water
Button to select
purified water
Button to select Mode
Front Panel of the Main Body
Central Cock Display

9
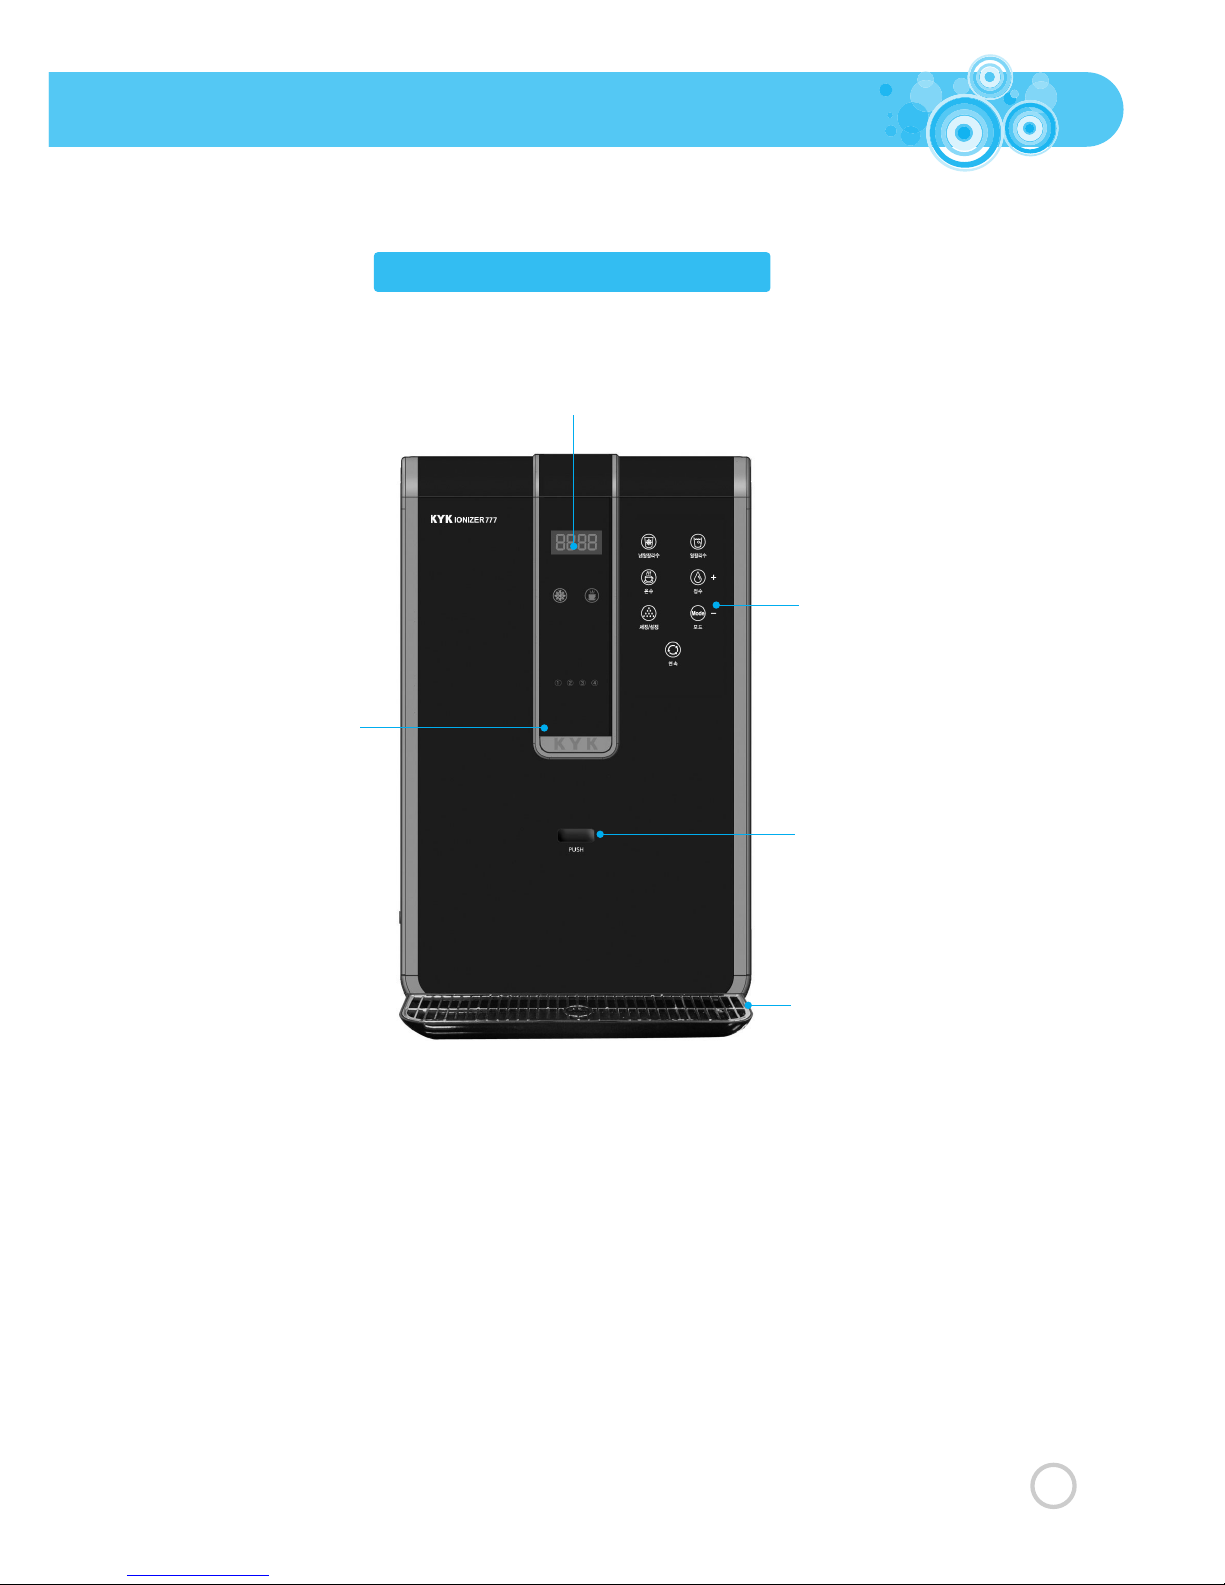
It displays the current use and setting of each application.
Select 'Cold Water' to dispense cold water. The button illuminates during
dispensing to indicate that the Product dispenses cold water.
Select 'Hot Water' to dispense hot water. The button illuminates while
dispensing to indicate that the Product dispenses hot water.
The button is lit in red when it is time to replace Filter 1.
The button is lit in red when it is time to replace Filter 2.
The button is lit in red when it is time to replace Filter 3.
The button is lit in red when it is time to replace Filter 4.
Cold alkaline water available in 2 levels
(pH8.5 and pH9.0)
Alkaline water available in 4 levels (pH8.5, pH9.0,
pH9.5, pH10.0)
Press and hold the button for 2 seconds for your
safety.
The purified water is dispensed.
Press this button for forced setup. Once you are in the
Setup Mode, use this button to change or save the settings
you have made.
Press this button to change the setup mode.
Press this button to continuously dispense
alkaline water. (Applicable to alkaline water
only) Use this button to fill the cooling tank.

10
❶
Cooling Tank Air-out Connection : To discharge air during replenishment of the cooling module (white)
❷
Cold water drain connection : To be connected for drainage of cold water from the cooling module (blue)
❸
Hot water drain connection : To be connected for drainage of hot water from the hot water tank (red)
❹
Power cord connection : To be connected by the AC power supply cord
❺
Hot water tank switch : To supply AC power to the hot water tank heater
❻
Leak drainage connection : To drain water when there is a leak
❼
Power switch : To switch the product ON/OFF (green)
❽
Drainage outlet : To drain water collected after electro deionization and cleaning (orange)
❾
Raw water inlet : To feed raw water into the Product
❿
Intermediary valve : To fill cold water into the cooling module at initial installation
Back view
Cooling tank air exhaustion
valve: use only during first
installation, lock after
installation
Turn left - open / Turn right -
lock
Over
10cm
Power
cord
(if faucet is used)
Cooling tank
drain connection
(must be used
with a fitting)
Raw water
inlet
Drain (acidic
water) outlet
FFaucet aucet conconnenectionction
Leak drain outlet

11
Filter Door : To open and close after filter replacement
Manual valve cap : To fit a manual valve if required
Water tray rubber foot : To support the water tray
Rubber foot : To support the main body
Filter Door
Water tray rubber foot
Manual valve cap
Rubber foot
Left
Bottom

12
Install the Product on solid and level
ground.
Please observe the following before installation.
Keep away from moisture, water
and direct sunlight.
The raw water hose must be connected
to the cold water pipe. The Product may
be damaged if it is connected to the hot
water pipe.
Keep a gap of 10cm or more from
the walls.
The drain hose must remain below the
Product. It shall not be bent or pressed
down by the Main Body.
The distance between the drain
hose and the drain hole should be
less than 1 meter. [More than 1M]
Cold water pipe

13
Open
Closed
Cold water pipe
1
Back view after installation
Cooling tank air exhaustion
valve: use only during first
installation, lock after
installation
Turn left - open / Turn right -
lock
Over
10cm
Power
cord
(if faucet is used)
Cooling tank
drain connection
(must be used
with a fitting)
Raw water
inlet
Drain (acidic
water) outlet
FFaucet aucet conconnenectionction
Leak drain outlet

14
2
3
4
5

15
6
7
8
9

16
10
11
12
13
◆
To set for hot water
14

17
15
16
※ 0800 indicates the volume of water (800ml). When more
than 800ml of hot water is dispensed, the water heater starts
to heat water to facilitate continuous dispensing of hot water.
When you turn power off and turn on again of the Product, only the cold
water will be dispensed. Dispense more than 800ml of hot water and the
Product will be ready to dispense hot water in a short while.
Check water level: While dispensing water upon pressing and holding
the PUSH button with a cup, touch the Mode button to display the
water level
.
Touch once again to release the display.
If hot water is not in use for a long period of time, turn off the Hot Water Switch
at the back of the Product.
l If the Product is short of cold water after initial installation, the central
Dispending Cock Display window will display .
Please repeat the above Steps from 1 to 12 to fill cold water.

18

19
Touch the Cold Alkaline Water Button and the Button will be lit on with the
display of pH level in the Display Window. Also the blue lamp is lit on the
Cold Water Display. Press the PUSH (Dispensing Button) button with a cup
and the Dispensing Cock will protrude to dispense cold alkaline water
with an audible message.
●
Select either pH8.5 or pH9.0 for cold alkaline water.
●
The Product will memorize the previous pH level of cold alkaline water
you had selected and dispense cold alkaline water of the previous pH
level when you dispense water next time.
●
When you release the PUSH button, dispensing of water stops, and the
Dispensing Cock will be withdrawn in 5 seconds.

20
Touch the Alkaline Water Button and the pH level is shown on the Display
Window. Press the PUSH (Dispensing Button) button with a cup and the
Dispensing Cock will protrude to dispense alkaline water with an audible
message.
●Select a pH level from 4 levels (from 8.5 - 10.0).
●The Product will memorize the previous pH level of cold alkaline water
you had selected and dispense cold alkaline water of the previous pH
level when you dispense water next time.
●When you release the PUSH button, dispensing of water stops, and the
Dispensing Cock will be withdrawn in 5 seconds.
Table of contents