Kyocera TJEP 9/20 HP User manual

www.tjep.eu
TJEP 9/20 HP


3
English........................................................... 5
Deutsch ....................................................... 23
Dansk .......................................................... 41
Svenska....................................................... 59
Norsk........................................................... 77
Français ...................................................... 95
Nederlands................................................ 113

4

UK
5
TJEP 9/20 HP compressor
Thank you for your recent purchase of a TJEP 9/20 HP compressor. Please read this instruc-
tion manual carefully for guidelines to installation, inspection and maintenance. Keep this
instruction manual for future references. In addition, after reading this manual, please keep it
to hand so it can be consulted at any time.
Denitions:
WARNING: Indicates a potentially hazardous situation which, if not avoided, could result in death or serious injury.
CAUTION: Indicates a potentially hazardous situation which, if not avoided, may result in minor or moderate injury.
Prohibited: Action is prohibited. Strict compliance is a must.
NOTE: Emphasizes essential information.
Table of contents
1. Specications ...........................................................................................................................6
2. Using the TJEP 9/20 HP safely and correctly .........................................................................7
2.1. Important notes...............................................................................................................8
3. Safety precautions ...................................................................................................................9
3.1. Preparations before operation......................................................................................10
3.2. Maintenance and inspection........................................................................................12
4. Main components and functions ............................................................................................13
4.1. Switch sheet ..................................................................................................................14
5. Instruction of use....................................................................................................................14
5.1. Before pressing the stop/start switch...........................................................................15
5.2. During use ....................................................................................................................16
5.3. After use........................................................................................................................18
6. Trouble shooting.....................................................................................................................18
6.1. Start-up Current and Abnormal Voltage (low voltage) ................................................18
6.2. Trouble shooting if Low Voltage Warning occur..........................................................19
6.3. Warning display and errors ..........................................................................................20
7. Maintenance, service and inspection ....................................................................................20
7.1. Daily Check and Maintenance......................................................................................20
7.2. Maintenance (Overhaul / Parts Replacement / Inspection and Maintenance)...........21
8. In Case of Malfunction ...........................................................................................................21
9. Declaration of conformity...................................................................................................... 22

UK
6
1. Specications
Model
Items and units
TJEP 9/20 HP
Normal mode Power mode Silent mode
Output HP 2
Current A6.3
Power supply V
Single-phase 230 – 240 VAC
50 Hz ±1 %
Φ = 1
Maximum pressure MPa 4.2
Working temperature °C 0 – 40
Working humidity % 30-80%
Height above sea level meter < 1,000
Operation
control
pressure
OFF pressure
MPa
4.2
ON pressure 3.2 3.8 3.2
Ejectable
pressure
General pressure MPa 0 - 1.1 or less
High pressure Approximately 0.5-2.5
Revolution min-1 Variable (up to 2,800) 1,500
Free air
delivery
Low pressure (0.7MPa) L/min 110
High pressure (2.5MPa) 102
Air receiver capacity L 9
Noise level dB(A) 62 59
Protective structure -IP20
External dimension (W×D×H) mm 450×317×363
Net weight kg 13.8
Air outlet Regular pressure -Coupler joints × 2
High pressure High pressure coupler joints × 2
Conversion of pressure
Please refer to the table below for the conversion of bar unit to MPa, kgf/cm2and psi.
Units of pressure
bar 2 8 25 32 38 42
MPa 0.2 0.8 2.5 3.2 3.8 4.2
kgf/cm228.2 25.5 32.6 38.7 42.8
lbs - psi 29 116 363 464 551 609
(Conversion ratio: 1MPa = 10.197 kgf/cm2 = 145 psi)

UK
7
2. Using the TJEP 9/20 HP safely and correctly
Please always keep this instruction manual at hand for users or those responsible for
maintenance and inspections.
1. Always observe and operate within the product limitations described in this instruction
manual.
2. Prevent device failure and problem occurrence by executing proper maintenance and
inspection.
3. Do not operate or handle in ways not described in this instruction manual. Do not use
replacement parts other than genuine TJEP parts, and do not disassemble, repair or
modify the product or parts. Kyocera Unimerco Fastening shall assume no responsibility
for any accidents and/or failures to the air compressor attributed to the above.
4. For any question or clarication regarding the instruction manual, contact your TJEP
distributor.
5. If the equipment becomes inoperable, breaks down, is deformed or is damaged, stop
usage immediately, and call the service number shown on the label afxed on the com-
pressor. Please advise the following information as detailed as possible
a. Model number
b. Number of years used.
c. Notication of the maintenance period and whether the display LEDs are ashing
or not.
d. Detailed description of problem or current condition (nature of error, status of
product before and after problem occurrence, etc.).
6. Due to device modications or upgrades, the contents of this instruction manual may
change without prior notice.
7. Disposal of this product must be carried out in accordance to the laws and regulations
related to the product disposal. Hire qualied contractors who specialize in disposal of
such products to dispose the product for you.
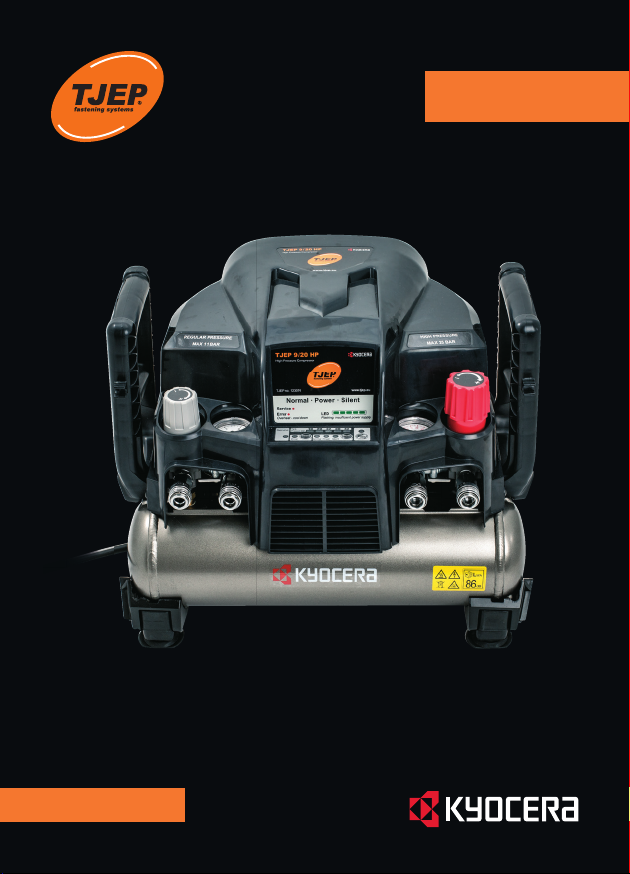
8. This product is equipped with two regular pressure outlets and two high-pressure outlets
• Be sure not to attach hoses or tools for use at regular pressures to a high-pressure
outlet. It may cause an accident.
9. Read instruction manuals of connected pneumatic tools to ensure correct handling.
10. Warning: This product uses an inverter motor as the driving source. High voltages may
occur in internal parts. Do not disassemble or modify.
CUT-IN PRESSURE: While the motor is off, air tank pressure drops as you continue to use
your accessory or air tool. When the tank pressure drops to certain level the motor will restart
automatically. This is called “cut-in pressure”.
CUT-OUT PRESSURE: When you turn on your air compressor, it begins to run, air pressure
in the tank begins to build. It builds to a certain pressure before the motor automatically shuts
off - protecting your air tank from pressure higher than its design rating. The pressure at which
the motor shuts off is called “cut-out pressure”.

UK
8
2.1. Important notes
Before installation, operation, maintenance or inspection, be sure to read
the contents of this instruction manual and the warning labels in full. Use the
product correctly in accordance with the instructions on safety information,
warnings, installation, operation, maintenance, inspection, controlling, and
handling.
Risk of electric shock.
WARNING: Before doing any work on the compressor it must be
disconnected from the power supply.
Risk of high temperatures
Caution: The compressor contains some parts which might reach high
temperatures.
Risk of accidental start-up
Caution: The compressor could start automatically in case of a black-out
and subsequent reset.
The product is an air compressor specically for light work.
Do not use in life support applications such as air source for air breathing
equipment or other medical devices.
Wear personal safety equipment
WARNING: Wear ear safety goggles, a safety helmet, safety shoes and ear
protectors in accordance with the work environment.
Only for EU countries…
Do not dispose electric equipment together with household waste material.
In observance of European Directive 2002/96/EC on waste electrical and
electronic equipment and its implementation in accordance with national
law, electric equipment that have reached the end of their life must be col-
lected separately and returned to an environmentally compatible recycling
facility. The product is manufactured to meet RoHS directives.
Do not operate continuously for more than 30 minutes. Operation cycle
should be max 50% operation and min 50% pause. The compressor body
and electric motor will become hot and failure to comply with the above may
cause reduction in the lifespan and performance degradation, which will not
be covered by the product warranty.
Drain tank daily or after 4 hours of use.
Water in the system will result in break down of the compressor and the
attached tools.
Keep and store this instruction manual in a safe and accessible place after using

UK
9
3. Safety precautions
In order to prevent accidents such as re, electric shock or injury, be sure to observe the
following safety precautions and “Instructions of use” in clause 5 (including sub-clauses).
WARNING
Prohibited
Check the work place surroundings. Be
sure not to use the equipment in places
near to explosive or ammable gas (such as
acetylene gas or propane gas), petroleum
products (such as gasoline or kerosene),
organic solvents (such as thinner),
or explosive dust.
(It may cause a re or accident.)
Do not use in places exposed to high temper-
atures or direct sunlight, nor in a small box.
Also, do not use with the
intake or exhaust vents
blocked.
(It may cause burn out and will reduce
the lifespan of the product.)
Children and those not involved in the work
should not get close to the equipment. Do not
allow anyone other than the operator to touch
the product or the power cord.
Do not allow anyone other than
the operator close to the
workplace.
Do not install/use in places where moisture
such as rain and steam collects or in pud-
dles. Do not install/use in a location where
there is a lot of dirt and
dust such as wood
chips or oil. Also, do not
install/use in a location
where foreign matter,
such as iron powder,
sand and dust collects.
Do not expose the
compressor to rain/drizzle or high humidity
(IP20).
Failure to comply may cause overheating, short-circuiting,
re accidents or abnormal wear on the equipment.
Install the compressor on a hard, at surface.
Do not operate the compressor in vertical
position. Be sure that all four rubber covered
chassis feet have proper contact to the
surface/oor. If installed in an unstable
location, the product may move, fall or
overturn and cause an accident. If used in
high places, x the handle rmly with a rope
or band to prevent falling.
Prohibited
Prohibited
Prohibited
Prohibited
Prohibited

UK
10
3.1. Preparations before operation
WARNING
1. Do not put thin and long objects such as ngers or nails into openings. (Entanglement
may cause a breakdown or accident.)
2. If the product is accidentally dropped or banged, check carefully that there is no damage,
crack or deformation to the product or air tank. If there is any damage, crack or deforma-
tion, it may cause an accident.
3. If there is any deformation or damage to the handle, air tank or control box, immediately
halt use and contact the dealer where it was purchased or call the number written on the
service label.
Important notes
• The equipment is not suitable for stationary
use.
• When not in use or carrying out mainte-
nance/inspection, be sure to press the
stop/ start switch to stop the unit, and after
conrming that the operation display LED is
ashing, disconnect the plug from the power
outlet.
• If the plug is removed from the power
source while the operation display LED is
on, the power failure automatic recovery
function kicks in. Consequently, when
the power is re-connected, the compres-
sor automatically begins operation which
may lead to unexpected accidents.
Always unplug
when not in use.
Prohibited
CAUTION
Prohibited
Prohibited
When operating the product, the ambient
temperature should be 5 - 40°C
Failure to comply may reduce product-lifespan, or may
cause the electric motor to burn out or operation of the
product to fail.
Do not use in an atmosphere containing
corrosive gases such as ammonia, acids,
salts, ozone gas or
sulphuric acid gas.
Failure to comply may cause the whole product to rust or
reduce the product-lifespan.

UK
11
4. Do not apply excessive force to the power cord.
• Do not pull the cord to move the product or to unplug from the power outlet. Also,
keep the power cord away from heat, oil and sharp corners. (It may cause discon-
nection, short-circuiting, or burn out accidents.)
5. Fully insert the plug into the power outlet.
• If not plugged in properly, the plug may come loose and there is a risk that the
power outlet and the plug may heat up and catch re.
6. To prevent electric shock, do not touch any metal parts while inserting the plug and be
sure not to touch the plug with wet hands.
• There is a risk of electric shock if pulling out the plug or operating the switch with
wet hands.
7. When using an extension cord or extension cord reel, be sure to use a 3-core exible
cable:
• Up to 10m → 3 × 1.5 mm2.
• Up to 20m → 3 × 2.5 mm2.
8. Regularly inspect the power cord of the compressor and any extension cord used.
• If the plug, the power cord or the extension cord is damaged, immediately halt use
and replace the damaged part.
• To replace the power cord, contact the dealer where the product was purchased or
call the service number written on the service label.
9. Do not place objects on top of the power cord.
• If products are placed on top of the power cord, there is a risk of damage, heat
building up and risk of re.
10. Do not leave the air tank pressurized for a long time in direct sunlight or in a hot place.
• The pressure of the compressed air in the air tank will further rise, and there is a
risk of the tank rupturing.
11. During operation or immediately after halting operation, do not touch metal parts such as
the air tank.
• Metal parts become very hot. This is due to the heat of the compressed air and is
not a fault, but beware of burn injuries.
12. For regular pressure outlets, use TJEP approved hoses.
13. For high pressure outlets, only use TJEP approved high-pressure air hoses.
• Failure to comply may cause an accident rupturing the air hose.
14. Before connecting the air hose, check that the connectors are clean and be sure that the
air hose plugs are rmly xed.
• If used without being rmly xed, it may come off and cause injury.
15. The connected air tools used should be used within the air pressure operating range. Do
not set the pressure reducing valve for pressures greater than this.
• If the pressure is too high, the lifespan of the air tool will be reduced and it may
cause breakdown or an accident.
16. During thunder storms, be sure to remove the plug from the power outlet. Failure to
comply may cause damage or breakdown.
17. If problems occur, immediately press the stop/start switch to halt the unit and disconnect
the power plug from the power source.
• Additionally, loosen the drain valve to release all the compressed air.
• Contact the dealer where the product was purchased or call the number written on
the service label.

UK
12
• If use is continued as is, it may cause an accident.
18. Before moving the product make sure that:
• the operation is stopped.
• all the compressed air has been released from the air tank.
• all the parts have sufciently cooled down. Failure to comply may cause burn
injuries or accidents.
• the power plug is disconnected from the power source.
CAUTION
1. Do not sit or stand on this product or place objects on it. (It may cause damage, cracks or
deformation)
2. The compressor is for AIR application only. Do not use the product to compress or
separate gas other than air. (Doing so may cause re or damage the device.)
3. After deactivating the product with the start/stop switch, wait at least 5 seconds before
restarting. (Otherwise it may fail to start up.)
3.2. Maintenance and inspection
WARNING
1. When performing maintenance or inspection, be sure to press the stop/start switch to stop
the unit, and after conrming that the operation display LED is ashing, remove the power
plug from the power source.
2. Latest 3 years after purchase or if the maintenance period notication display LED is
ashing, contact the dealer where the product was purchased or call the service number
shown on the sticker which is placed on the compressor to have maintenance (an over-
haul) carried out.
3. Unauthorized disassembly or repair of the product and parts is extremely dangerous.
Never do this.
• If someone other than a professional repair technician carries out disassembly
or repairs, not only will the product not display sufcient performance, it may also
cause breakdown or an accident.
4. Check thoroughly that the product and air tank have no damage, cracks or deformation. If
there is any deformation or damage to the handle, air tank or control box, immediately halt
use and contact the dealer or call the service number.
5. Never carry out repairs or alterations to leaks in the air tank.
• If there is damage, crack or deformation, it may cause personal injury.
6. Be careful that dirt and dust do not build up in the power outlet or plug, and clean
regularly.
• Regularly check the power outlet and plug, and remove dust with a dry cloth. If you
nd deformation or discoloration, consult the nearest electrician.

UK
13
4. Main components and functions
Regular pressure reducing valve
(refer to clause 5.2.1.)
• Set the pressure to match the
equipment being used.
• The maximum pressure of the air
tank will rise to approximately 42
bar, but to prevent damaging the
equipment the maximum outlet
pressure is 11 bar or less.
Pressure gauge for pressure
reducing valve
• Shows the pressure adjusted by
the pressure reducing valve.
Drain valve
(refer to clause 2.1.)
• Discharge the water from
the air tank daily or after
4 hours of use.
Drain discharge tube
(refer to clause 7.1.)
• If the drain valve is opened,
the water is discharged from
the tip of the tube.
Labels
• Check the afxed labels,
and read the manual to
conrm the meaning.
Read the name plate
and verify if the correct
model was delivered.
High pressure reducing
valve
(refer to clause 5.2.1.)
• Set the pressure to match
the equipment being used.
• The maximum outlet
pressure is approximately
25 bar.
Regular pressure coupler
(refer to clause 2.)
• This is the regular pressure
air outlet. Connect it to the
air hose of the equipment
being used.
Plug
(refer to clause 3.1.)
• Connect the plug to the power
source and be sure it is grounded
properly.
High pressure coupler
(refer to clause 2.)
• This is the high pres-
sure air outlet. Connect
a high-pressure-only air
hose.
Control box
(refer to clause 3.1.)
• Built-in inverter control
circuit.
Rubber base feet
(refer to clause 3.)
• Be sure to install in at at surface.
Power cord
(refer to clause 5.1.)
Air tanks
(refer to clause 3.1.)
Handle
Model nameplate

UK
14
4.1. Switch sheet
5. Instruction of use
Method of transportation
1. Transport the product carefully.
2. If transporting by car, make sure it is properly xed.
CAUTION
Conrm that the handle is not deformed or damaged, and that the screws are not loose, as
this may lead to dropping during transportation causing damage or personal injury.
WARNING
When carrying by the handle, do so calmly and carefully. If treated roughly, the product may
be damaged or it may lead to injury due to the corners or protruding parts of the product.
The work environment and installation environment
Keeping the workplace clean and sufciently bright will lead to safe work. Also, wear safety
goggles, a safety helmet, safety shoes and ear protectors in accordance with the work
environment.
Service indicator LED
(refer to clause 7.1.)
• Noties service period
(overhaul period).
Air tank pressure display LED
(refer to clause 5.2.1. and 6.2.)
• Displays the pressure in the air tank.
• This is a low voltage alarm (all 5 LEDs
ash). (The operation display LED also
ashes simultaneously.)
Normal operation mode LED
(refer to clause 5.2.3.)
• Lights up when operating in
normal operation mode.
Operation display LED
(refer to clause 5.2.1.)
• Flashes when power is
applied (waiting).
• Lights up when operating.
• This is a low voltage alarm
(ashing).
Power operation mode LED
(refer to clause 5.2.3.)
• Lights up when operating in
power operation mode.
Stop/start switch
(refer to clause 5.2.1.)
• Operate this when
operating or halting
the equipment.
Operation selector
switch
(refer to clause 5.2.3.)
• This is a switch to
change between
the 3 operation
modes (normal,
power, silent).
Silent operation mode LED
(refer to clause 5.2.3.)
• Lights up when operating in
silent operation mode.
Error LED
(refer to clause 6.3.)
• Noties halt to operation
due to overheating,
errors, etc.
Operation recovery
switch
(refer to clause 6.3.)
• Operate when the halt
function is active.

UK
15
5.1. Before pressing the stop/start switch
1. Check that none of the bolts or screws are loose.
2. Check that the plug is properly connected to the power outlet,
if it is loose or will slip out easily, then it needs to be repaired.
Consult the nearest electrician.
3. Take all the power cord out from the handle part, and connect
to the power source. When doing this, do not apply excessive
force to the power cord. Also, do not touch the metal parts of
the plug.
4. Only connect the compressor to a single-phase 230V power
supply. Do not use a generator or direct current power supply.
5. Make sure that the power supply is equipped with
• A RCD (Residual-current device), 30 mA, to prevent
electric shocks. This prevents accidents with short
circuits or electric shocks. Mounting a RCD requires an
electrician’s qualication, so contact the nearest electri-
cian.
• A fuse with a minimum current rating of 10 A.
6. Make sure to ground (earth) the compressor. The product comes with a standard Schuko
plug, which is suitable for most European countries. If the plug does not t you standard
power source, please consult your local electrician.
7. If an extension cord is used, a voltage drop may cause problems. Avoid using an
extension cord as much as possible and connect directly to the power source. If forced
to use an extension cord, do so in compliance with clause 3.1.
Connecting to the power supply with an extension cord
WARNING
Avoid using the extension cord together with other equipment. (It may cause a break down
due to a lack of electric power or drop in voltage.)
Single-phase 230V AC
Electrical
grounding
RCD protected
If using in a location away from the
power source, it is recommended
that you avoid using an extension
cord and use an extension
air hose instead.
In order to prevent the extension cord over-
heating, pull out the whole cord when using.

UK
16
Fully open the drain valve
and press the start/stop
switch.
Check air is
coming out of
the tube
The operation
display LED
lights up
The air tank pressure display
LEDs are all lit up and it halts
The air tank
pressure display
LEDs light up from
the left in order.
Pressure:
High
Pressure:
Low
Pressure
reducing
valve
5.2. During use
5.2.1. Flow from starting up to compressed air available state
1. This product is manufactured as an air compressor for
air tools such as nailing machines. Use for light work
only.
2. Do not operate continuously for more than 30 minutes.
The compressor body and electric motor will become
hot and this will cause reduction in the lifespan of the
product and performance degradation.
3. Do not operate at ambient temperatures above 40°C or
below 5°C (0 – 40 °C short term).
4. When connected to the power source and power is
being supplied, conrm that the operation display LED is
ashing.
5. After fully opening the drain valve, press the start/stop
switch and start up the equipment. The operation display
LED lights up.
6. Conrm that air is coming out of the drain valve dis-
charge tube.
7. Fully close the drain valve, and as the pressure in the
air tank rises, the air tank pressure display LEDs light
up from the left in order as the displayed pressure is
reached.
8. When the air tank pressure reaches approximately 42
bar, all 5 LEDs light up and the compressor halts.
9. Use the pressure reducing valve to adjust the pressure
according to the connected air tool. Turn the knob fully to
the right to increase the pressure, and next turn it fully to
the left to lower the pressure, then adjust to the required
pressure.
10. The maximum ejection pressure possible by setting the
pressure reducing valve is approximately 11 bar for
regular pressure usage and approx. 25 bar for high
pressure usage.
11. If the knob is turned fully to the left for high pressure
pressure reducing valve, the ejection pressure is approx.
5 bar (Pressure below approx. 5 bar cannot be ejected.)
5.2.2. Using compressed air and points during operation
1. Connect the air hose to the coupler and begin the work.
a. Regular pressure air outlet will not t a high pres-
sure coupler and vice versa.
Do not directly connect heavy objects such as an
air lter, pressure reducing valve or socket pair.
Turn the knob to the right:
the pressure increases
Turn the knob to the left:
the pressure decreases

UK
17
b. When lowering the pressure reducing the outlet pressure, the air inside the
connected air hose will escape into the atmosphere from the pressure reducing
valve. When this happens, a hissing sound will occur. Do not mistake this for an air
leakage.
2. Inverter Control
a. The product’s rotation speed is altered using the inverter control. As the rotation
speed alters the sound will also change. Do not mistake this as an error.
b. Inveter control may affect/be affected by radio waves, so keep the product minimum
1 m away from other electronic equipment.
3. Function to halt operation
a. This product is equipped with a function to halt operation in response to the
following faults
i. If supply voltage is abnormally high/low.
ii. To protect against overheating of the electric motor or the control box.
5.2.3. Switching the operation mode
This product’s operation can be switched depending on
user requirements. If the operation changeover switch is
pressed, the operation mode switches and the LED lights
up to show the current operation mode.
Normal operation mode
This operation mode is suitable for normal operation.
Cut-out pressure is set to approx. 42 bar.
Cut-in pressure is set to approx. 32 bar.
Power operation mode
This operation mode is suitable if a large amount of air is
needed in a short period, (e.g. a large number of nails must
be driven in at high pace).
Cut-out pressure is set to approx. 42 bar.
Cut-in pressure is set to approx. 38 bar.
Silent operation mode
This operation mode is suitable for work, where noise levels
are more important than high compressed air delivery.
The pressure settings for cut-in and cut-out are the same as
for the normal operation mode, but the electric motor
rotation speed is reduced to a maximum of 1,500 RPM which
reduces the noise level.
Note: Silent mode requires more time to ll the tank.
The operation mode is
switched if pressed.
The “Normal” LED is lit.
The “Power” LED is lit.
The “Silent” LED is lit.

UK
18
5.3. After use
1. When nishing operation, be sure to halt the equipment by pushing the start/stop button.
Conrm the operation display LED is ashing and remove the plug from the power source.
2. Open the drain valve to release all the water and
compressed air from the air tank.
Do not put body parts near the drain opening. The
discharge air contains water, abrasion powder and
rust.
Gently open the drain valve. If the drain valve is
opened to quickly, the water and compressed air may
rebound off the ground or oor and hit body parts.
Note! Drain water and air can stain and discolor the
surrounding area.
3. Detach the air hose. If the air hose is detached while
compressed air remains in the air tank, the coupler
will spring out, which may cause an injury or accident.
Caution! Keep your face away, when detaching the
air hose. Failure to comply may cause blindness or
injury.
5.3.1. Storage
1. If the compressor is to be stored for a longer period (1 month or more), before storing,
fully open the drain valve, operate it for 5 minutes or more to prevent rusting.
2. Store in a dry place out of reach of children.
3. Store at a temperatures (5°C or higher) at which there is no risk of freezing.
4. Store on horizontal surface and do not store in upright position.
6. Trouble shooting
6.1. Start-up Current and Abnormal Voltage (low voltage)
Start-up current
In order to prevent halting as much as possible due to the original power supply breaker trip-
ping or the air compressor overheating, this unit is equipped with a control to keep the rated
current value to the 6.3A level.
Low voltage
If the supply voltage becomes insufcient during compressor operation, all mode settings are
overruled. Cut-in is set to 25 bar and cut-out at 32 bar.
If the unit is in a low voltage state or halted operation state due to insufcient supply voltage,
the 5 air tank pressure display LEDs ash to notify of the “low voltage”.
Gently open the drain
valve and adjust the
discharge condition.

UK
19
6.2. Trouble shooting if Low Voltage Warning occur
Display (LED) and
operation State Cause Solution
All (11) LEDs ash
simultaneously and a
buzzer sounds for 3
seconds
Halted
Insufcient
supply
voltage
• Connect to alternative power source
• Use shorter extension cord or
alternative cord with bigger core
gauge.
• Refer to clause 5.1.
The air tank pressure
display LEDs (5) and the
operation display LED
ash simultaneously
Low
voltage
operation

UK
20
6.3. Warning display and errors
The product is equipped with a function to halt operation
automatically when there is a fault with the compressor. A
warning function will notify about these faults by ashing
the LEDs and sounding the buzzer. If the compressor
halts and the LEDs are ashing, respond according to the
table below.
Display (LED) and
operation State Cause Solution
The abnormal function
display
LEDs ash and the buzzer
sounds for 3 seconds.
Halted Overheating
Improve the connection
between the power supply
and extension cord.
Re-install the product in a well-
ventilated place to ensure
sufcient cooling.
Conrm that the 50/50 work/
pause cycle is complied.
Press reset button.
• If the problem re-occur, it is conceivable that the air compressor has a fault.
• Immediately press the stop/start button to halt the unit and remove the plug from the
power source.
• Loosen the drain valve to release all the compressed air and call the service number
shown on the service label.
• Failure to comply may cause an accident.
7. Maintenance, service and inspection
In order maintain the TJEP 9/20 HP in good condition for a long period, you need to carry out
the following day-to-day inspections, care and maintenance (overhaul).
Safety measures
When performing maintenance or inspection, be sure to
press the stop/start button to stop the unit, and after
conrming that the operation display LED is ashing,
disconnect the plug from the power outlet.
7.1. Daily Check and Maintenance
● Noise and vibration
Push the start/stop button and check that there is
no abnormal noise or abnormal vibration during
operation.
● Pressure reduction
Check that the pressure reducing valves are working normally.
Release the drainage
every day.
Table of contents
Languages:
Other Kyocera Air Compressor manuals