-24-
◎The magnetic field produced during charging may prevent the magnetic
sensor from working properly.
Charging with a Wireless Charging Pad (Sold
Separately)
How to use the Wireless Charging Pad 01 (sold separately) for charging is
explained here.
For usage precautions and details, also see the instructions included with the
Wireless Charging Pad 01 (sold separately).
qSimply placing the product on top of an au-specified wireless
charger product (sold separately) displaying the mark on the
left allows charging without the need to connect a cable. Be
sure to also read the instructions for any supported product.
Products with the mark are compliant with the wireless charging
specifications of the Wireless Power Consortium (WPC).
This product supports "おくだけ充電 ®(okudake juden)"
place-and-charge functionality.
"おくだけ充電" and the "おくだけ充電" logo are registered
trademarks of NTT DOCOMO, INC.
-30-
Turning the Power On/Off
Turning the Power On
F(press and hold for at least 2 seconds)
The Start screen is displayed (▶P.31 "The Start Screen").
•For the first time the product turns ON, the initial settings such as "au
Easy Setting" activate. Make the settings as required.
◎While logos are displayed after the power is on, initial settings for touch
panel are in process. Do not touch the screen. The touch panel may not
work properly.
◎"au Easy Setting" can be set up later even though it is skipped.
◎If the charging light blinks in yellow when you turn the power on, the
remaining battery is not sufficient for activating the product. Charge the
battery before use.
Turning the Power Off
F(press and hold for at least 1 second)
"Power off" →"OK"
-36-
Icon Description
Wi-Fi®signal strength
level 4/ level 0
Alarm set
Silent mode (Vibrate) set
Silent mode (Mute) set
Bluetooth®in use
standby/ connected
Auto Answering set
set/ full
* In Japan, you can use "LTE" and "WiMAX 2+" networks. "4G" is displayed for both
networks. According to the signal congestion etc., the product is connected to the
less congested network.
Notification Panel
Slide the status bar down to display the notification panel and on/off icons,
where you can check notifications and activate corresponding applications as
well as quickly set frequently used functions on/off.
In the Address Book Plus display, display contacts in "Favorites" and "Recent
Calls". Use with your preferred setting.
①
④
②
⑤
⑥
③
①Setting menu icon
Tap " " to display the settings menu.
②On/off icons
Enable/Disable frequently-used
functions.
③/ icon
Tap " / " to enlarge/shrink the on/
off icons area.
④Edit icon
Rearrange on/off icons.
-42-
◎Some cell phones do not support receiving voice messages. For details,
refer to au homepage.
Using Disaster Information
You can check history of Disaster and Evacuation Information delivered by
local government, disaster information portal, etc.
au災害対策 (au Disaster Countermeasure) menu screen →
[災害関連情報 (Disaster Information)]
Follow the onscreen instructions
Related Accessories
■Battery Pack (KYV35UAA)
■Back cover (KYV35TGA/KYV35TRA/KYV35TKA)
■Battery cover (KYV35TBA)
■Kyocera TV antenna cable 03(03KYHSA)
■Common AC Adapter 05 (0501PWA) (sold separately)
■Common AC Adapter 03 (0301PQA) (sold separately)
■Common AC Adapter 03 Navy (0301PBA) (sold separately)
■Common AC Adapter 03 Green (0301PGA) (sold separately)
■Common AC Adapter 03 Pink (0301PPA) (sold separately)
■Common AC Adapter 03 Blue (0301PLA) (sold separately)
■AC Adapter JUPITRIS (White) (L02P001W) (sold separately)
■AC Adapter JUPITRIS (Red) (L02P001R) (sold separately)
■AC Adapter JUPITRIS (Blue) (L02P001L) (sold separately)
■AC Adapter JUPITRIS (Pink) (L02P001P) (sold separately)
■AC Adapter JUPITRIS (Champagne) (L02P001N) (sold separately)
■au Carrying Case G Black (0106FCA) (sold separately)
■Wireless Charging Pad 01 (0101PUA) (sold separately)
■Portable Charger 02 (0301PFA) (sold separately)
■microUSB Cable 01 (0301HVA) (sold separately)
■microUSB Cable 01 Navy (0301HBA) (sold separately)
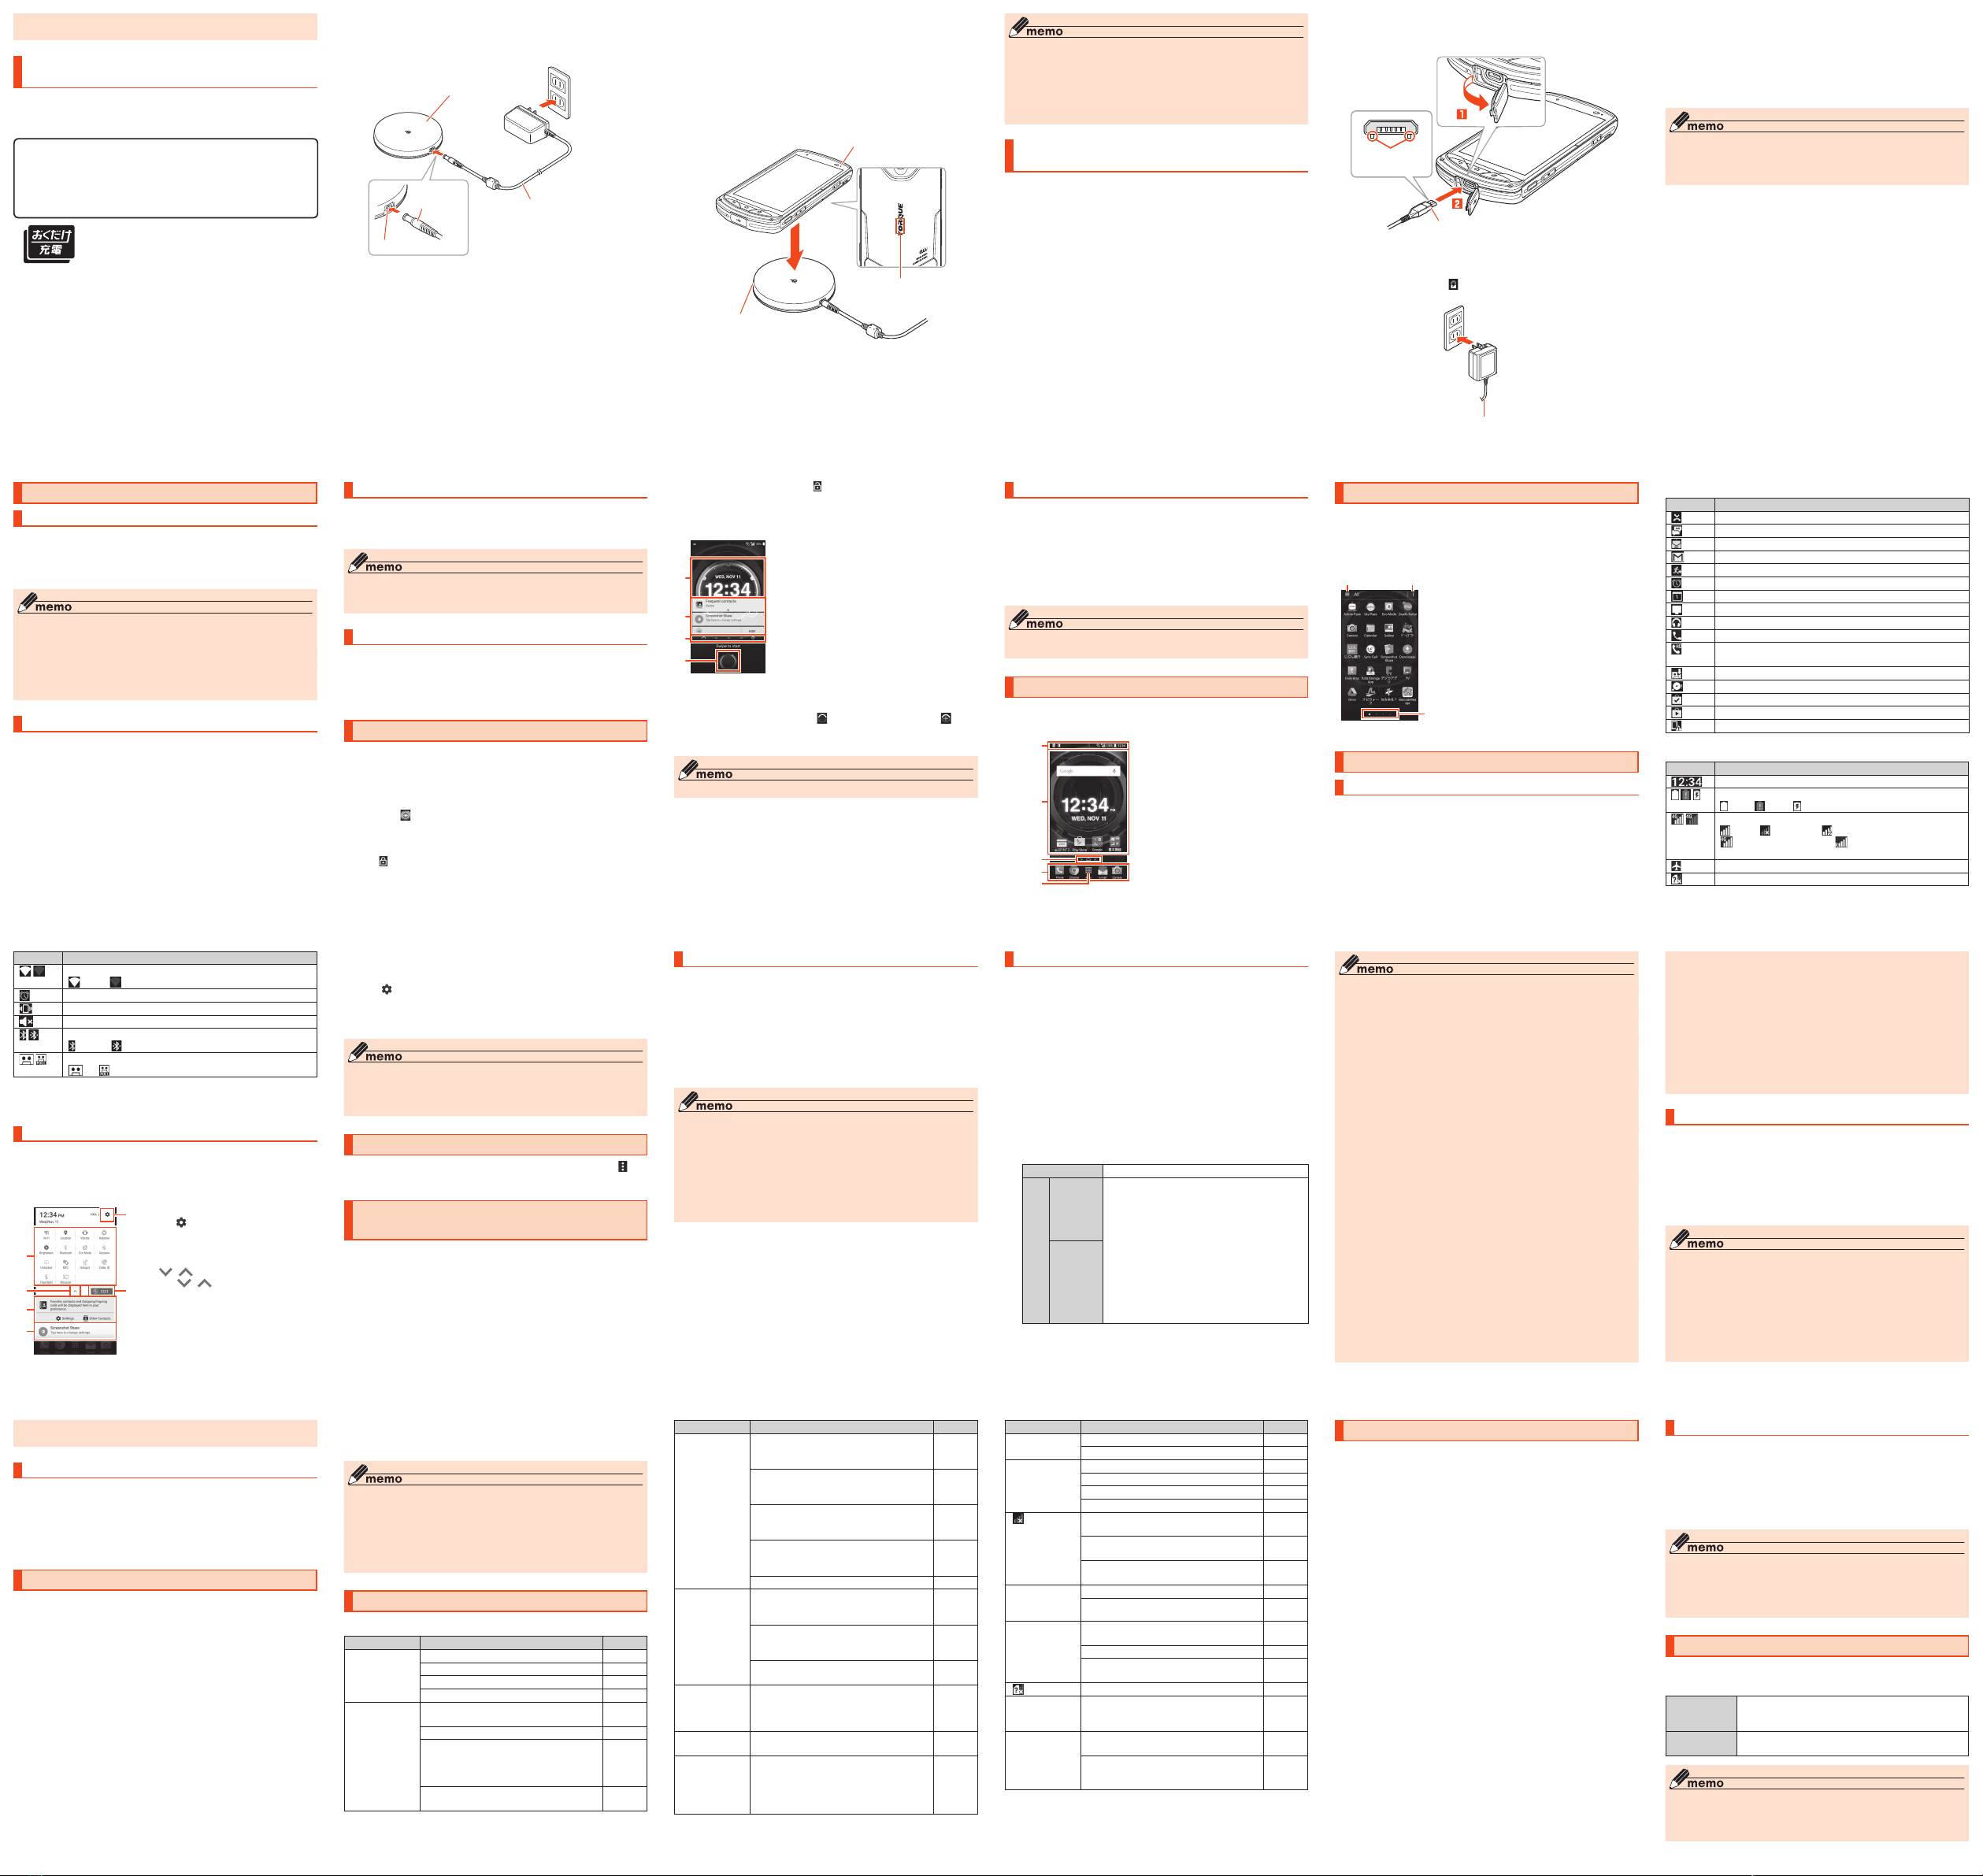
-25-
Connect the DC connector of the special AC adapter into
the DC jack on the Wireless Charging Pad 01 (sold
separately) and plug the special AC adapter into an outlet
(AC 100 V - 240 V)
DC connector
DC jack
Wireless Charging Pad 01
(sold separately)
Special AC adapter included with
Wireless Charging Pad 01
-31-
Force Shutdown and Restarting
Force shutdown and restart the product when the screen freezes or the power
cannot be turned off.
F(press and hold for at least 11 seconds)
◎If the product is forced shutdown and restarted, unsaved data will be
erased. Do not force shutdown except when the product becomes
inoperative.
Switching to English Display
You can switch the display from Japanese to English.
Home screen →[アプリ一覧 (Apps)] →[設定 (Settings)] →
[言語と入力 (Language & input)] →[言語 (Language)] →
"English"
The Start Screen
The Start screen is displayed when you turn the power on or cancel sleep
mode.
■Displaying the Home screen from the Start screen
After the Start screen is displayed, you can display the Home screen as follows.
Touch " " and swipe (flick) toward "START"
The Home screen is displayed (▶P.33). Or, the screen just before
entering sleep mode is displayed.
•Swiping (flicking) toward "CAMERA"/ "PHONE" activates camera/phone.
•If " " is displayed at screen top, the Start screen "Security type" is set
to "Pattern", "PIN", or "Password". Unlock the security feature to display
the Home screen.
-37-
⑤Address Book Plus display
Display different information registered to the address book. You can also
display favorites and other contacts you call frequently.
•Tap " " to change settings for the Address Book Plus display.
⑥Notification area
You can check the status of the product or details of notification. For some
information, tap to activate the corresponding application.
◎You can slide the notification panel up to hide it.
◎When a new notification arrives, a notification is displayed at screen top.
◎If there are notifications that can be erased, tap [CLEAR ALL] at bottom
right of screen.
Displaying a Menu
There are two types of methods to display a menu screen; by tapping " "
and by long-touching entry field or item.
Using the au Disaster Countermeasure
Application
The au Disaster Countermeasure application allows you to use the Disaster
Message Board, Emergency Rapid Mail (Earthquake Early Warning, Disaster
and Evacuation Information, Tsunami Warning), Disaster Voice Messaging
Service, and Disaster Information.
Apps list →[au災害対策 (au Disaster Countermeasure)]
au災害対策 (au Disaster Countermeasure) menu appears. When
activating the application for the first time, the agreement for use and
initial settings appear. Follow the onscreen instructions.
-43-
■microUSB Cable 01 Green (0301HGA) (sold separately)
■microUSB Cable 01 Pink (0301HPA) (sold separately)
■microUSB Cable 01 Blue (0301HLA) (sold separately)
◎With Portable Charger 02 (sold separately), it may not be possible to
adequately charge the product.
◎For the latest information on accessories, visit the au homepage (http://
www.au.kddi.com/english) or contact the Customer Service Center.
◎Accessories on this page can be purchased from au online shop (http://
auonlineshop.kddi.com/). Some accessories may not be purchased
due to the availability.
Troubleshooting
Before you assume that the product is malfunctioning, check the following:
Symptom What you should check Page
Cannot turn on
power.
Is the battery pack charged? P.23
Is the battery pack attached properly? P.14
Are the terminals of the battery pack dirty? P.18
Is Fpressed and held? P.30
Cannot charge
the battery pack.
Is the specified charger (sold separately)
properly connected?
P.23
Is the battery pack attached properly? P.14
Is the temperature of the product or battery
pack high or low? Charging may stop due to
the temperature of the product or battery
pack.
P.23
Are the specified accessories (adapter, etc.)
used to charge?
P.27
-26-
Place the product, with its wireless charging area
downward and centered on the qmark on the Wireless
Charging Pad 01 (sold separately)
Check that the charging indicator is blue, and that the product's charging
light is red. If the charging indicator is red, the product is not placed
where it can charge; adjust the product's position.
Once charging completes, the charging light goes out.
* With this product, the charging indicator on the Wireless Charging Pad 01 (sold
separately) continues to be blue even after charging completes. For further
details on charging indicator display patterns or charging conditions, see the
instructions included with the Wireless Charging Pad 01 (sold separately).
Charging light
Wireless charging area
Charging indicator
Once charging completes, remove the product, and unplug
the special AC adapter
-32-
•If Smart Lock is set, tapping " " at screen top temporarily cancels
Smart Lock, and the screen for the security feature you have set is
displayed.
•If a description for the Home screen appears, read the information and
tap "OK".
《Start screen》
①
②
③
④
①Widget
When you purchase the product, the Dura
Clock & Weather widget is displayed.
•Swipe (flick) to the left or press z
(Direct button) to switch to the Compass/
Barometer/Tide widget.
•To delete a widget, long-touch the widget →
Drag to "Remove" at screen top.
②Notification display
Contacts set to Address Book Plus (▶P.36)
and notifications are displayed.
•Double-tap a notification to activate the
corresponding application.
•To not display notifications, tap "HIDE".
③Indicator
Tap " " to switch widgets, and tap " " to
add a widget.
④Start icon
◎If "Security type" is "None", the Start screen is not displayed.
-38-
Using the Disaster Message Board
Disaster Message Board service enables you to register information of
well-being from an area of distress via LTE NET in case of large-scale disaster
such as earthquake with a seismic intensity of over 6 lower. Registered
information can be viewed on any cell phones and PCs besides by au cell
phone users.
For details, refer to "Disaster Message Board" of au homepage.
au災害対策 (au Disaster Countermeasure) menu screen →
[災害用伝言板 (Disaster Message Board)]
Follow the onscreen instructions to register/confirm.
◎To register information of well-being, E-mail address (〜ezweb.ne.jp) is
required. Set up E-mail address beforehand.
◎Deleting or changing the setting for information of well-being is
unavailable during Wireless LAN (Wi-Fi®) connection.
◎The Company makes no guarantees about the quality of this service. The
Company is not liable in the event of any nonconformities about
registration of well-being information or damages by loss of well-being
information arising from intense access to this service or equipment
failure or damages caused by registered well-being information.
-44-
Symptom What you should check Page
Cannot charge
with the Wireless
Charging Pad
(sold separately).
Is the product placed in the correct
orientation and within a chargeable area on
the Wireless Charging Pad (sold separately)?
P.26
Is another object placed between the
product and the Wireless Charging Pad (sold
separately)?
P.26
Are the Wireless Charging Pad (sold
separately) and special AC Adapter properly
connected?
P.25
Is the product or battery at a high/low
temperature? Charging may stop depending
on the temperature.
P.23
Is the battery cover properly attached? P.14
Charging does
not complete
with the Wireless
Charging Pad
(sold separately).
The charging indicator is still lit after
completing charging, but this is not
abnormal. Check the display on the phone.
P.26
Is the phone or battery at a high/low
temperature? Charging sometimes takes a
long time depending on the temperature.
―
Charging while using the product can also
cause charging to take a long time.
―
Cannot operate/
The screen
freezes/Cannot
turn off power.
Press and hold Ffor 11 seconds or
longer to force shutdown and restart.
P.31
The power goes
off.
Is the battery pack fully charged? P.23
The power is
going off while
the activation
logo is
displaying.
Is the battery pack fully charged? P.
23
-27-
◎If you move the product from where the charging indicator first lights
blue, it may not charge or charging may take a long time. Remove the
product and place it again after about 15 seconds where the charging
indicator is blue.
◎If charging does not start, check that the battery cover is properly
attached. Also check that the charging connection under the battery
cover is not soiled.
Charging with a Specified AC Adapter (Sold
Separately)
Charging with Common AC Adapter 05 (sold separately) is explained. For
information on specified AC adapters (sold separately), see "Related
Accessories" (▶P.42).
Open the external connection terminal cover of the product
-33-
Sleep Mode
While screen backlight is turned on, press For leave the product for a
certain period of time without any operations to turn off the screen temporarily
and the product goes into sleep mode. To cancel sleep mode, operate the
following steps.
While in sleep mode, For H
The Start screen is displayed (▶P.31 "The Start Screen").
•The first time activating, a description of the Start screen is displayed.
Read the information and tap "OK".
◎Do not touch the screen when pressing Fand displaying the screen.
The touch panel may not work properly.
Using the Home Screen
The Home screen consists of multiple screens. Slide/flick right or left to switch
them.
Also, press Hto go to the Home screen any time.
《Home screen》
④
⑤
③
②
①Status bar
②Shortcuts/Widgets/Folders
③Indicator
④Quick launch area
⑤Apps list
-39-
Using Emergency Rapid Mail
Emergency Rapid Mail is a service that distributes Earthquake Early Warning
or Tsunami Warning delivered from the meteorological bureau or Disaster and
Evacuation Information delivered from the government or local public
organization to all au cell phones in specified areas simultaneously.
When you purchase the product, "受信設定 (Receive options)" of the
Emergency Rapid Mail is set to "受信する (Receive)". Reception setting of
Tsunami Warning is available in the settings of Disaster and Evacuation
Information.
When you receive Earthquake Early Warning, ensure your safety and take
proper action according to the situation around you. When you receive a
Tsunami Warning, draw away from sea coast immediately and evacuate to
safe place such as upland or well-built high building.
au災害対策 (au Disaster Countermeasure) menu →[緊急速
報メール (Emergency Rapid Mail)]
Inbox appears.
Select a mail you want to view to check the detail.
削除 (Delete) Delete received mail.
設定
(Set)
緊急地震速報
(Earthquake
Early Warning)
Make settings for Earthquake Early Warning and
Disaster and Evacuation Information.
受信設定 (Receive settings): Set whether to
receive Earthquake Early Warning / Disaster and
Evacuation Information.
音量 (Volume): Set the volume of the alert tone.
マナー時の鳴動 (Alarm in Silent mode): Set
whether alarm sounds in Silent mode.
バイブ (Vibration): Set whether the phone vibrates
when a warning/information is received.
受信音/バイブ確認 (Alert tone/vibration check):
Check operation of the alert tone and vibration.
災害・避難情報
(Disaster and
Evacuation
Information)
-45-
Symptom What you should check Page
Cannot make
calls.
Is the power turned on? P.30
Is your au Nano IC Card 04 inserted? P.19
Cannot receive
calls.
Is signal strong enough? P.35
Is the product out of the service area? P.35
Is the power turned on? P.30
Is your au Nano IC Card 04 inserted? P.19
"" (out of
service area)
appears.
Is the product out of the service area or in an
area where the signal is weak?
P.35
Is the built-in antenna covered with finger
etc.?
P.12
Is a card other than au Nano IC Card 04
inserted?
P.18
Cannot operate
button/touch
panel.
Is the power turned on? P.30
Turn off the power and then turn it on again. P.30
Cannot operate
the touch panel
as intended.
Check the correct way to operate the touch
panel.
―
Turn the power off and then back on. P.30
Place the product in sleep mode and then
cancel sleep mode.
P.33
"" appears. Is your au Nano IC Card 04 inserted? P.19
A message such
as charge the
battery appears.
The battery is almost dead. P.23
Cannot connect
to the party and
the phone beeps
even though a
call is made.
Is the product out of the service area or in an
area where the signal is weak?
P.35
The wireless line is extremely busy or the
party is calling. Retry later.
―
If you cannot find the solution to your problem in the above items, refer to the
au homepage or au Customer Support on the website shown below.
( http://www.au.kddi.com/english/support/)
-28-
Check the orientation of the microUSB plug of Common
AC Adapter 05 (sold separately) and insert it straight into
the external connection terminal
Common AC Adapter 05 (sold separately)
With the projection
facing down
Insert the power plug of Common AC Adapter 05 (sold
separately) into an outlet (100 VAC to 240 VAC)
Check that the charging light on the product lights in red. When the
battery power turns on, " " appears on the status bar.
When charging ends, the charging light turns off.
Common AC Adapter 05 (sold separately)
-34-
Using the Apps List
A list of installed apps is displayed.
Home screen →[Apps]
The Apps list appears.
The first time opening the Apps list, instructions for selecting apps
appears. Read the instructions and tap "OK".
《Apps list》
③
①Category name
Tap to display navigation.
•You can also display navigation by sliding or
flicking the left edge of the screen to the right.
②Menu icon
Displays a menu for the Apps list.
③Indicator
Check current position in the Apps list.
Monitoring the Product's Status
Icons
Notification icons appear on the left of the status bar, showing missed calls,
new mail, operations in progress, etc., and status icons appear on the right,
showing the status of the product.
-40-
◎The service is available only in Japan (it cannot be used overseas).
◎No information fee or communication charge is required for receiving
Emergency Rapid Mail.
◎You cannot receive Emergency Rapid Mail when your cell phone is
turned off.
◎Emergency Rapid Mail may not be received if you are in a place where
signal does not reach even in the service area (e.g. in a tunnel,
basement) or in a place with a poor reception.
◎You cannot receive Emergency Rapid Mail that the reception is failed.
◎Reception of Emergency Rapid Mail is notified by a special warning tone
and vibration. It is not possible to change the warning tone.
* Reception of Earthquake Early Warning is notified by a special warning tone,
voice ("地震です (Jishin-desu)" (An earthquake)) and vibration.
◎When you receive Emergency Rapid Mail during a call, the warning tone
does not sound.
◎Information from someplace other than your current location may be
received.
◎KDDI is not liable for damages suffered by customers resulting from the
service's information, lack or delay in the information caused by
transmission or system breakdowns, or other events that are outside the
responsibility of KDDI.
◎Refer to the Japan Meteorological Agency web page for details about
distribution of Earthquake Early Warning.
( http://www.jma.go.jp/)
Earthquake Early Warning
◎Earthquake Early Warning is sent to areas where strong quakes (over 4
degrees) are expected when the earthquake whose the maximum
seismic intensity 5 lower is anticipated occurs.
◎Immediately after an earthquake occurs, quakes (P waves and initial
tremors) near the epicenter are detected and position, scale, and expected
strength are automatically calculated and notification is sent as soon as
possible within a few seconds to tens of seconds before the strong quakes
(S waves and major tremors) caused by the earthquake start.
-46-
Updating Software or the OS
You can update the product to the most recent software for optimal
performance and to get the latest enhancements.
There are several methods to update software.
•Download software to the product to update
•Use Wi-Fi®to download software to the product and update
■Notes
•You are charged for data communication when connecting to the Internet
from the product using packet communication.
•Information is provided such as through the au homepage when a software
update is required. For details, inquire at an au shop or Customer Service
Center (157/no charges). au may also inform customers using a product that
a software update is required in order to enjoy better usage of the product.
•You are recommended to back up your data before updating software.
•Fully charge before update. If the update is started with the battery power
low or battery power becomes low during update, software update cannot
be done.
•Check the radio wave condition. Software update may fail in poor reception
area.
•Any operations are not available during software update. Calling 110
(Police), 119 (Fire/Ambulance), 118 (Maritime rescue) is not available. Alarm
does not work, either.
•If software update has failed or stopped, perform the same procedure again.
•Update is unavailable during international roaming.
•If you fail to update software, it may become impossible to operate the
product. If this happens, bring it to an au shop or PiPit (not accepted by
some shops).
-29-
When charging ends, pull out the microUSB plug of
Common AC Adapter 05 (sold separately) straight from the
external connection terminal
Close the external connection terminal cover
Pull out the power plug of Common AC Adapter 05 (sold
separately) from the outlet
◎Note that applying unnecessary force with the external connection
terminal connected to the external device might cause damage.
◎When charging starts with the battery empty, the charging light may not
light immediately. But charging has started.
-35-
■Examples of main notification icon
Icon Description
Missed call
New mail message (SMS)
New mail message (E-Mail)
New mail message (Gmail)
New Emergency Rapid Mail
Snoozed alarm/stopped alarm (still set)
New calendar event notification
TV activated
Music playing
Making a call, calling, receiving a call
Displayed when high quality sound call with au VoLTE
compatible phone
New message
Available phone memory low
Installation completed
Update available
New OS update or software update
■Examples of main status icon
Icon Description
Time
Battery level
100%/ empty/ charging
Signal strength/Signal condition (LTE/WiMAX 2+)
level 4/ out of range/ in communication
LTE/WiMAX 2+ available*/ Roaming (Communication
mode according to the network is also shown)
Airplane mode is set
au Nano IC Card 04 uninserted
-41-
◎Earthquake Early Warning may not arrive before strong tremors in arrears
near the epicenter.
◎This delivery system is different from Earthquake Early Warning provided
through TV, radio, or other communication procedures, which means that
the time the Earthquake Early Warning arrives may vary.
Tsunami Warning
◎Tsunami Warning is a notification delivered from the meteorological bureau
(major tidal wave, seismic sea wave) to the area including target coast.
Disaster and Evacuation Information
◎Disaster and Evacuation Information is a service that distributes bulletins
concerning residents' safety including evacuation advisories, evacuation
orders and other warnings issued by the national and local governments.
Using the Disaster Voice Messaging Service
Disaster Voice Messaging Service is a service which allows you to record your
voice and send someone you want to inform your well-being in case of a
large-scale disaster.
au災害対策 (au Disaster Countermeasure) menu screen →
[災害用音声お届けサービス (Disaster Voice Messaging
Service)]
Follow the onscreen instructions to register.
◎For use over Wi-Fi®, it is necessary to carry out initial setting over 4G
(LTE/WiMAX 2+) network.
◎Voice message can be recorded for up to 30 seconds.
◎Messages can be sent and received to or from au cell phones, other
network operators' cell phones and PHS.
◎Voice message may be difficult to hear if the media volume is low or
Silent mode is set.
◎Saving or playing voice messages may fail if a phone does not have
available memory.
-47-
Downloading and Updating Software or the OS
Update files can be downloaded from the Internet web site into the product
directly.
Apps list →[Settings] →[About phone] →[Software
update]
[CHECK FOR UPDATE]
From here on, follow the onscreen instructions.
◎Note that depending on your subscription contract, communication fees
may be incurred when your phone automatically searches for an
available network.
◎After a software or OS update, the product cannot be returned to the
original version.
After-Sales Service
■When asking for repair
For repair, contact Keitai Guarantee Service Center.
During the
warranty period
Repairs will be done based on the terms of services of
the free-of-charge repair warranty described on the
warranty card.
Outside the
warranty period
We shall repair the product for a charge as requested by
the customer if repair renders it usable.
◎Before handing in the product for repair, make a backup of the contents
of memory since they may disappear during repair. Note that the
Company shall not be liable for any damages and loss of income should
the contents of memory be altered or lost.


