Kyungwoo KIGIS IPAS User manual

1
Intelligent Proximity Alert System
180905_Rev. 1.06
KIGIS IPAS User Manual
Vehicle Tag(VT)ㆍPedestrian Tag(PT)
Wired Type [Standard]

2
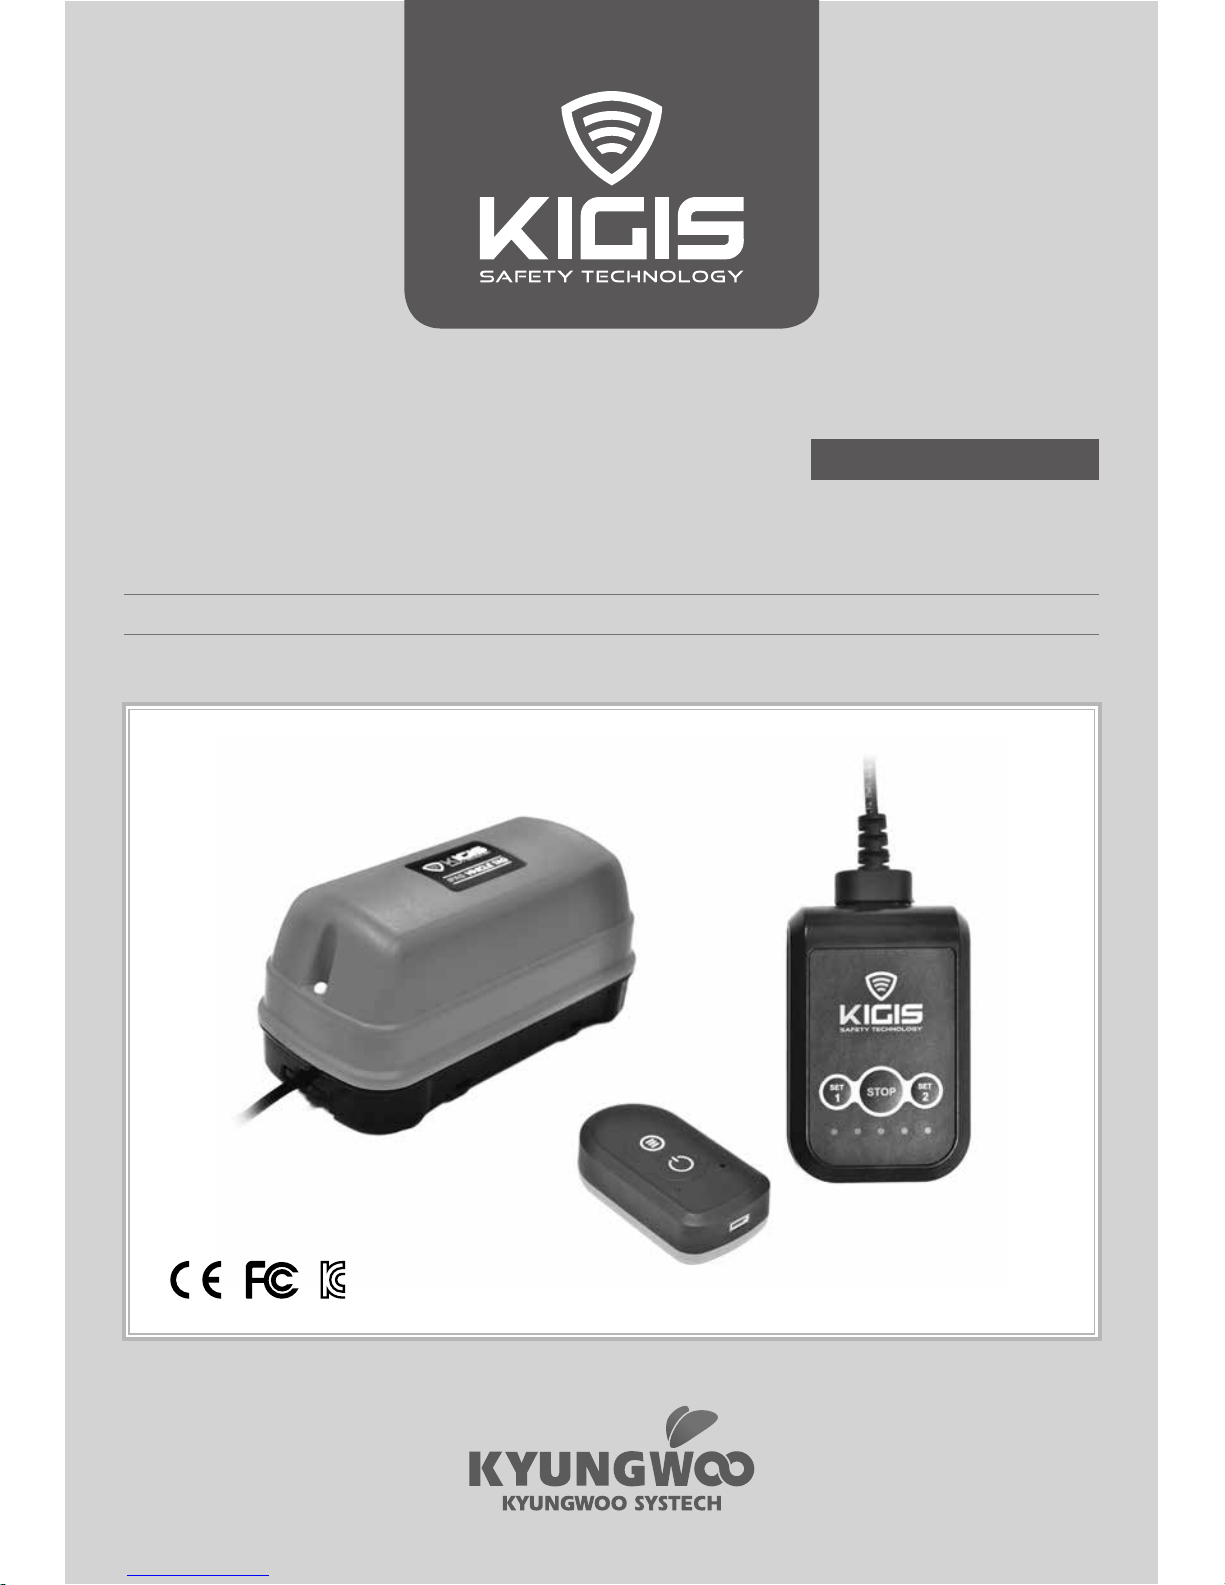
Thank you for purchasing KIGIS IPAS product from KYUNGWOO SYSTECH, Inc.
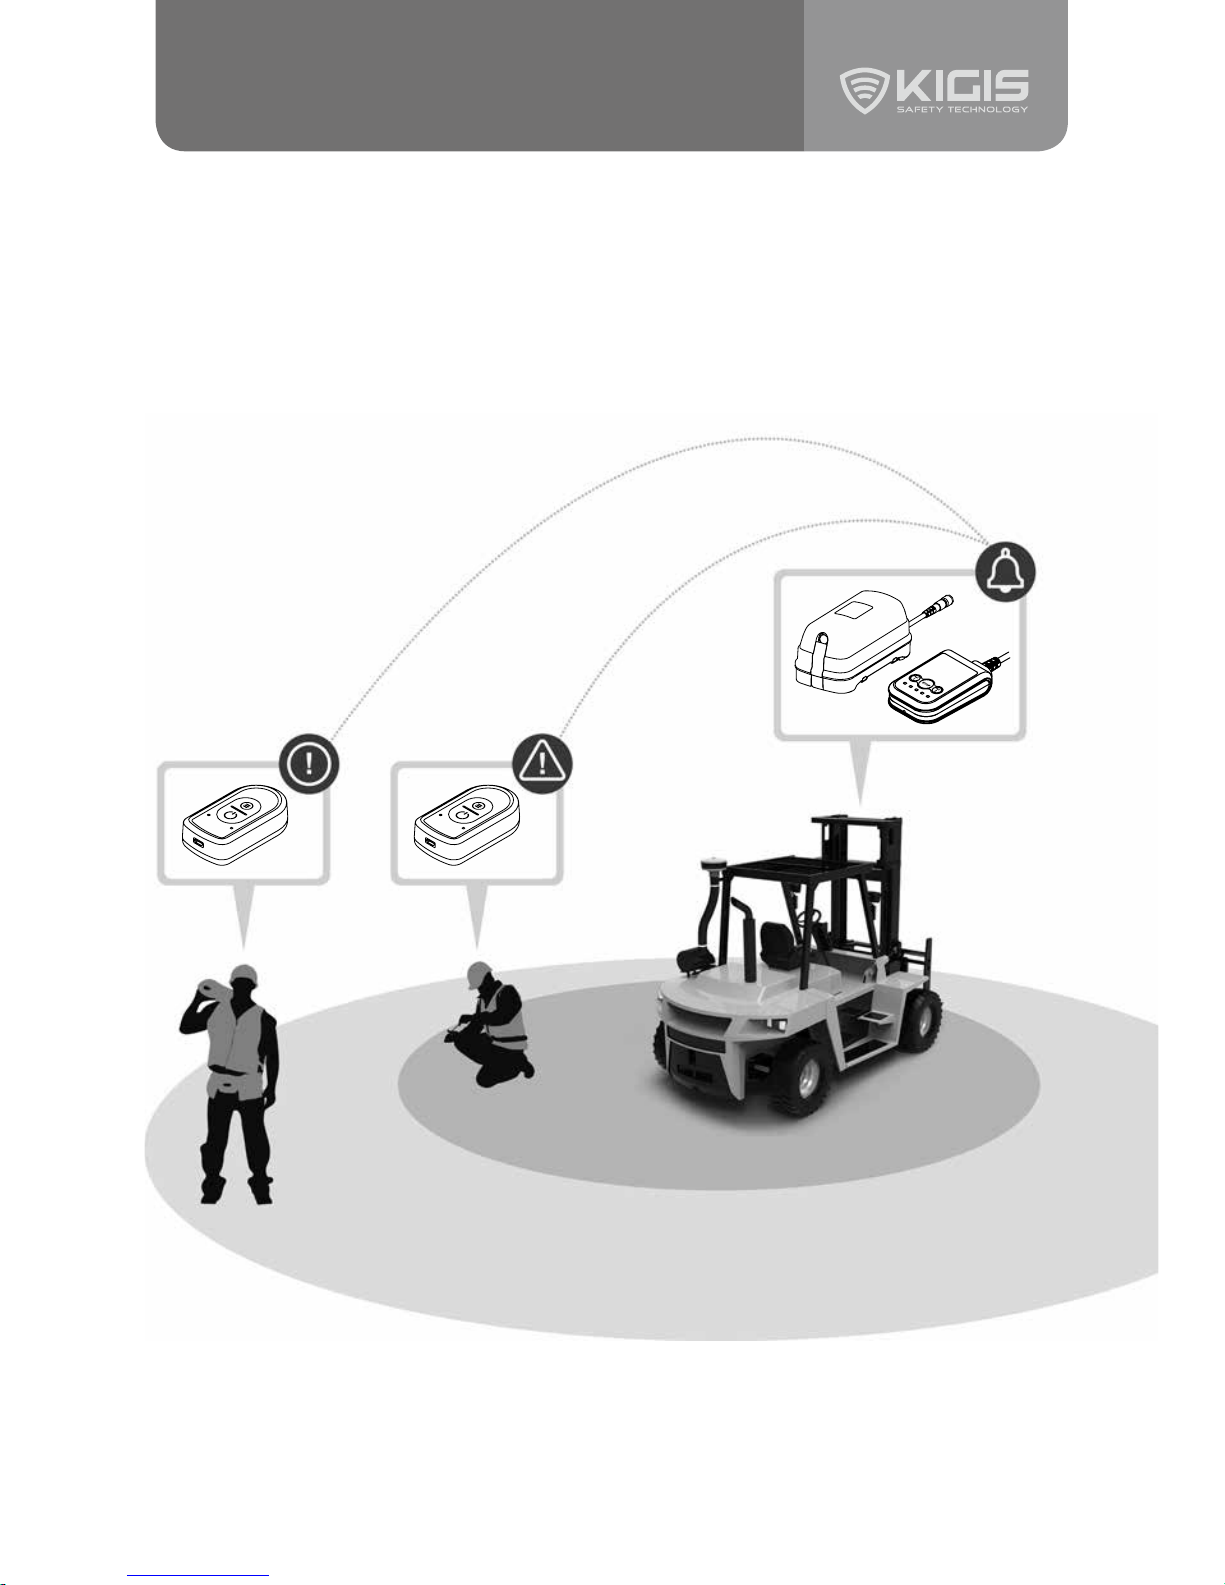
This product is a safety-assisting device to give warning signals by detecting the proximity of vehicles
and pedestrians at industrial working site. Any property or life damage casued by the breach of safety
regulation and users' carelessness will not be held responsibility. Before using this product, please
read this manual carefully.
Contents
1. What is IPAS?
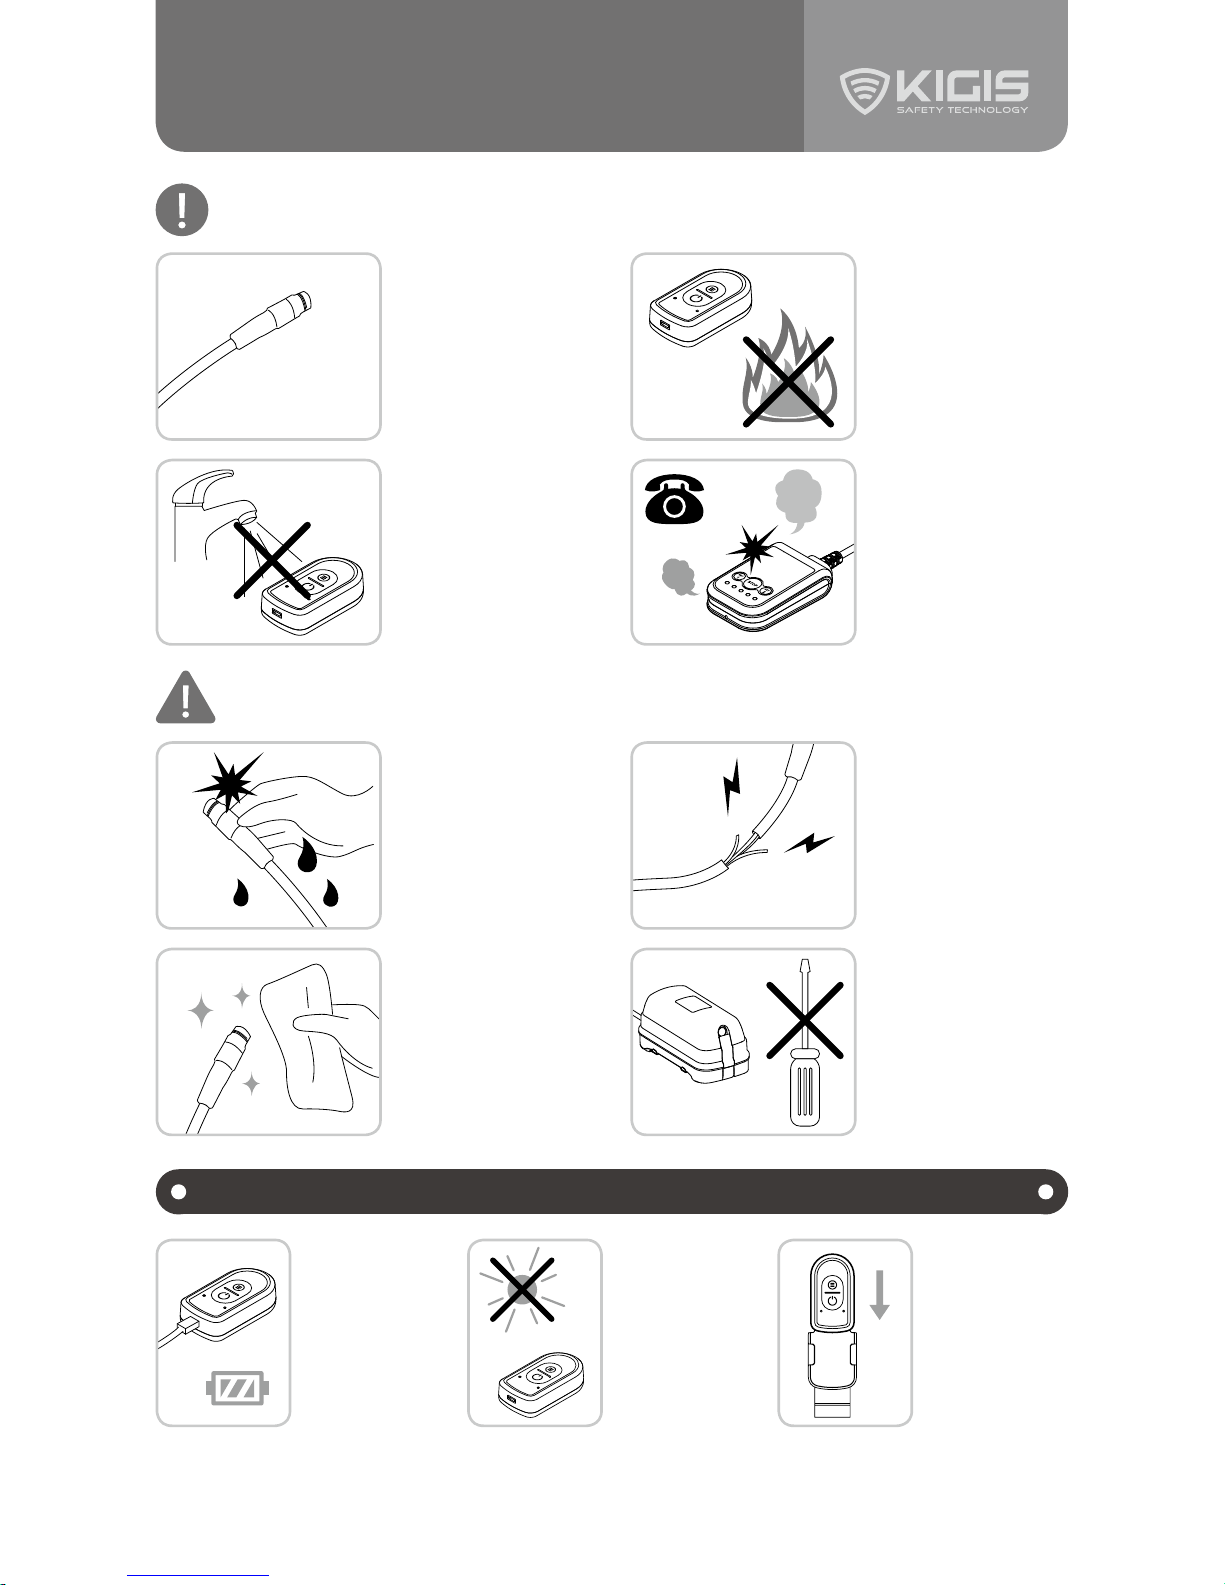
2. Caution / Warning for Safety
3. Components / Names of Parts
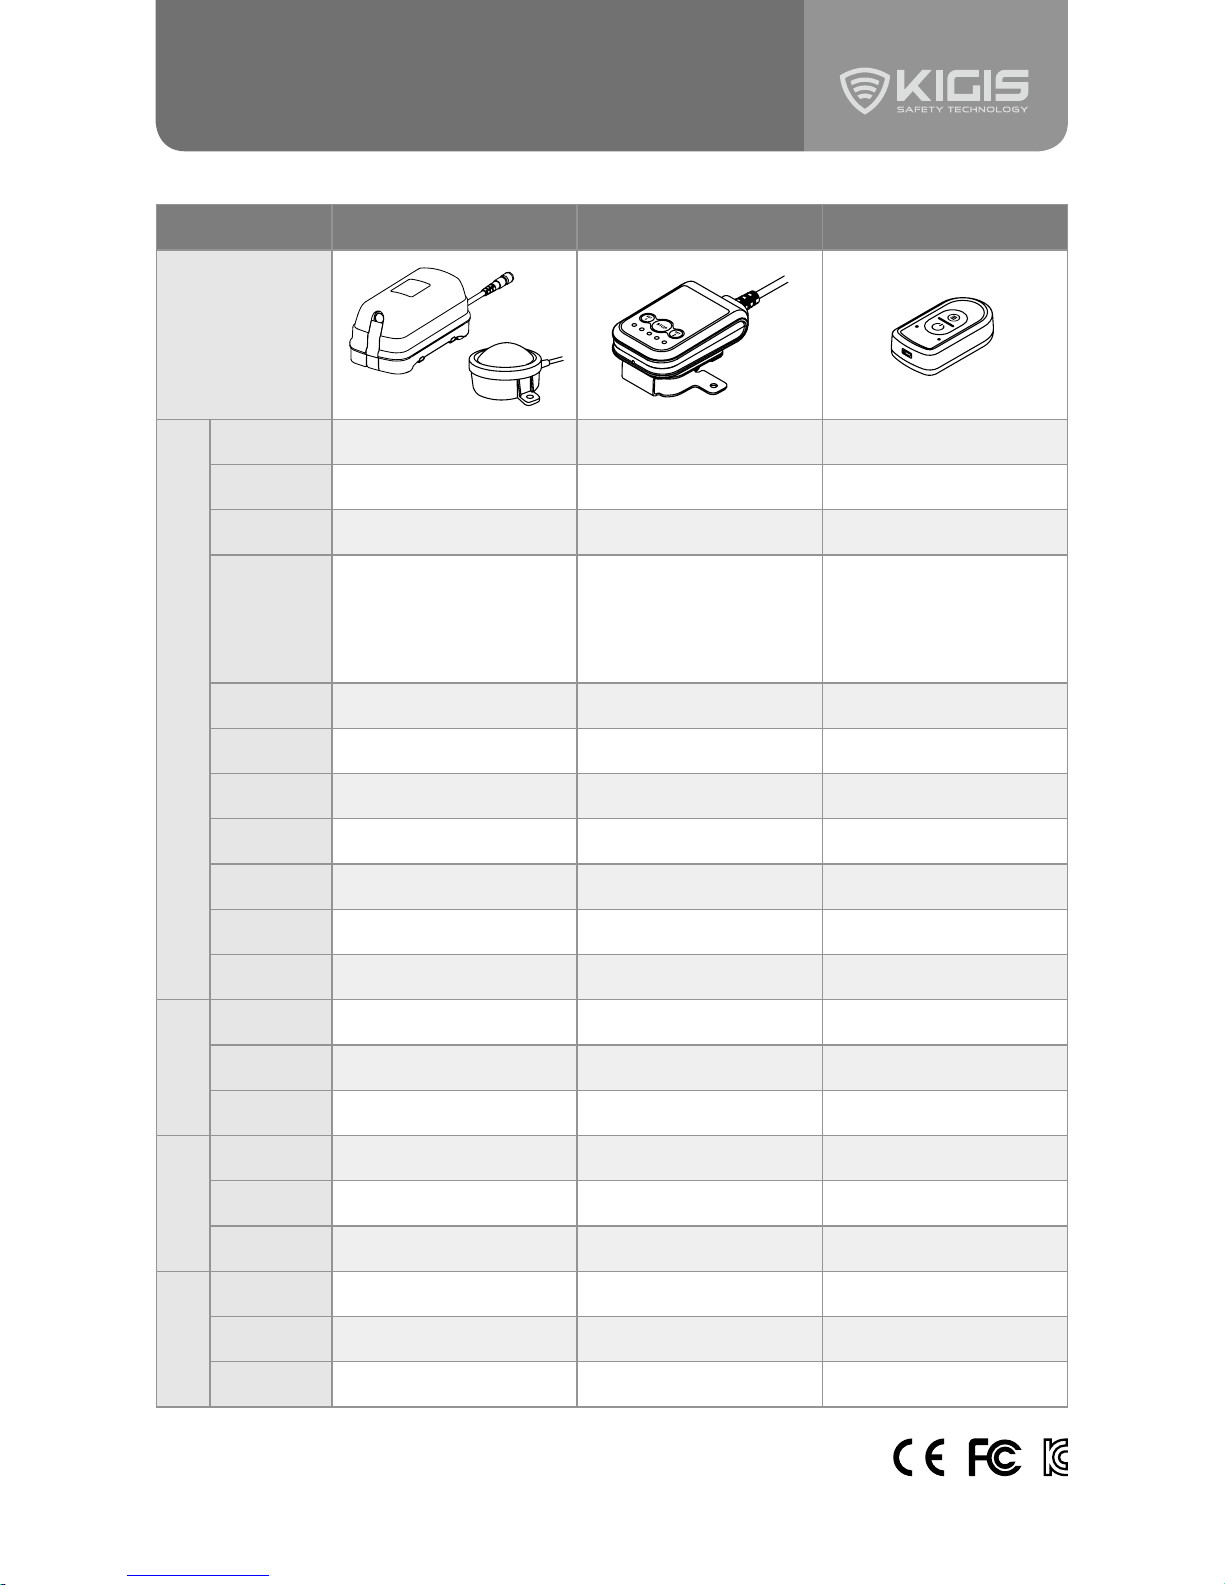
4. Specifications
5. Installation
6. Setting
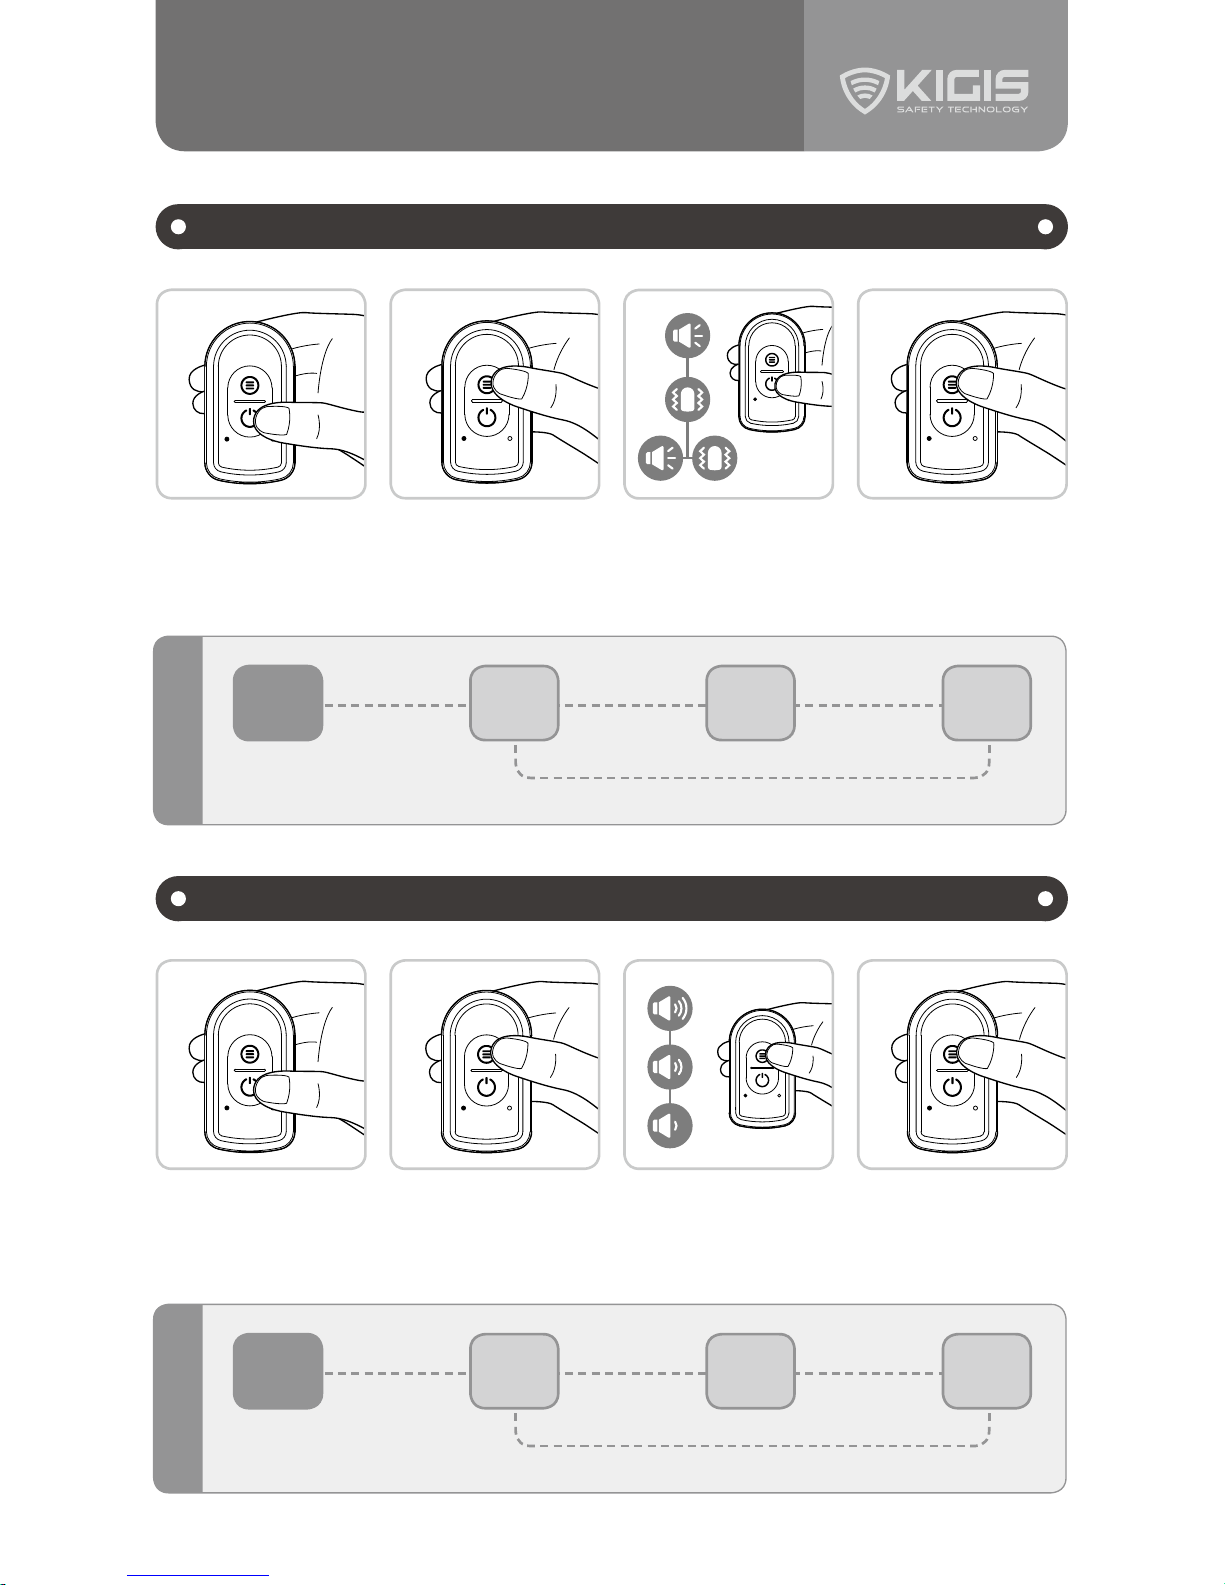
· [IND] Danger / Caution Area Distance Setting
· [IND] Volume Control
· [IND] Setting Initialization
· [IND] How to Set the Distance
· [PT] Alarm type Setting
· [PT] Volume Control
7. How to use
· Indicator Instruction that a driver must know
· PT instruction that a pedestrian must know
· LED status display
8. Check list before reporting failure
9. Warranty
3
4
5
6
7
8 ~ 10
8
8
8
9
10
10
11 ~ 12
11
11
12
13
15
* This device complies with Part 15 of the FCC Rules. Operation is subject to the following two conditions : (1) this device may
not cause harmful interference, and (2) this device must accept any interference received, including interference that may
cause undesired operation.
* CAUTION : Changes or modifications not expressly approved by the party responsible for compliance could void the user's
authority to operate the equipment.
* NOTE : This equipment has been tested and found to comply with the limits for a Class A digital device, pursuant to Part 15 of
the FCC Rules. These limits are designed to provide reasonable protection against harmful interference when the equipment
is operated in a commercial environment. This equipment generates, uses, and can radiate radio frequency energy and, if
not installed and used in accordance with the instruction manual, may cause harmful interference to radio communications.
Operation of this equipment in a residential area is likely to cause harmful interference in which case the user will be required
to correct the interference at his own expense.
·Model No : PAS-K01-10
·FCC ID : [VT]ZE8-PAS-K01-10 / [PT]ZE8- PAS-K01-00
·Manufacturer : KYUNGWOO SYSTECH, Inc. / KOREA

3
KIGIS IPAS is an intelligent proximity alert safety and assistant system that prevents collisions by
signaling dangers in 2 way communication to both drivers and pedestrians when pedestrians
approach to a vehicle or vehicles approach to other vehicles in industrial working site. It is easy
to install without causing any damages to the vehicle, and compared to other products, the
outstanding proximity detection is an advantage that KIGIS IPAS only offers.
※ IPAS is applicable to all industrial vehicles.(excavators, forklifts, loaders, tractors, etc.)
1. What is IPAS?
"Watch Out."
Danger Area
Caution Area
"Danger!"
"Beep-Beep-" "Whee Yooo"

4
2. Caution/Warning for Safety
Usage Precautions
Caution!
※ Failure to observe the precautions in this manual may result in damage to the product or your property.
Caution!
※ Failure to follow the warnings in this manual may result in damage to the product or serious injury.
Use only DC 12/24V.
For vehicles with DC
36/48V, be sure to
connect SMPS module
to use DC 12/24V.
Otherwise, this may
cause trouble.
Do not touch the
connector or wiring
with wet hands.
This may cause
electric shock or fire.
Do not place the
product near
flammable materials,
stoves, candles, or
fire. This may cause
fire and product
deformation.
Do not place heavy
objects on the
product or on wiring,
or shock. It may
cause electric shock
or fire.
Do not intentionally
immerse the product
in water or wash it in
running water. This
may cause trouble.
If a connector or a
wiring gets wet, wipe
it with a dry towel.
Otherwise, it may
cause electric shock
or fire.
If the product smells,
smokes, or makes
abnormal noises, turn
off the power and
contact the customer
service center
immediately.
Do not disassemble or
modify this product.
This may cause
trouble, and After-
Sale Service will not
be available.
※ Any accidents that result from not following the instructions in this manual are the user’s responsibility.
DC 12/24V
* CAUTION Risk of explosion if battery is replaced by anincorrent type. Dispose of used batteries according to the instructions.
The pedestrian
tag (PT) is a
rechargeable
product, so do
not replace the
battery. There
is a risk of
malfunction or
explosion.
Since the
pedestrian
tag(PT) is a
built-in battery
product, please
keep it in a cool
place away from
direct sunlight
when not in use.
Combine PT
and the holder
in the proper
way as shown in
illustration. If not,
a malfunction
may be caused by
an inflow of liquid
matters.
DC 12/24V

5
3. Components/Names of Parts
Clip HolderCigar Jack AdapterExtension Cable
OptionalOptionalOptional
Names of Parts
Components
Menu Button
Power Button
LED Lamp
Charging Port
LED Lamp
SET 1 Button
STOP Button
SET 2 Button
LED Lamp
Detach Lever
※ The appearance of the product may be slightly different from the actual product received.
※ It is strongly recommended
that the tag should be installed
on epaulet or arm band due
to communication problem in
case of installation at waist or
in pocket.
Vehicle Tag(VT)
Vehicle Tag(VT)
Cable Harness(6m) Open Wire Adapter Cable
Indicator
Indicator
User Manual
Helmet HolderPedestrian Tag(PT)
Pedestrian Tag(PT)
Fuse
High Speed Charging Cable(PT)
※ Tag may not be recharged
with general charging cable.

6
Specifications Vehicle Tag(VT) Indicator Pedestrian Tag(PT)
Product Image
Power 12/24V DC Input(9/32Vdc) 12/24V DC Input(9/32Vdc) -
Current 300mA 500mA -
Interface CAN Bus 2.0 CAN Bus 2.0 -
LED Status
and Alarm
method
·Normal operation
: Green LED flashing
·Approaching alarm
: Green/Red LED flashing
·Normal operation
: Green LED flashing
·Approaching alarm
: Green/Red LED flashing
+ Warning voice
·Normal operation
: Green LED flashing
·Approaching alarm
: alarm + vibration(3 options)
Sound Level
/ @Distance - 92dB / 0.1m 87dB / 0.1m
Battery - - Lithium polymer 950mA
Operating
Voltage - - 3.7V
Charge
Interface - - Micro USB Type-B(5V/1A)
Charge Time --Approximately 1 hour 30
minutes
Charge
Current - - 0.85mA
Operating
Time - - 6 days(8 hours/day)
Size 177.8 × 84.1 × 86mm 93 × 130.5 × 47.5mm 40 × 72 × 19.5mm
Weight 444g 207g 58.5g
Mounting
Method Magnet pad
attachment method Fixed with screw
(or adhesive tape) Clip, Necklace chain
Frequency 3993.6MHz - 3993.6MHz
Bandwidth 499.2MHz - 499.2MHz
Detdction
Cycle 0.5sec - 0.5sec
Operating
Temperature -30 ~ 85°C -30 ~ 85°C -20 ~ 55°C
Storage
Temperature -40 ~ 85°C -40 ~ 85°C -20 ~ 55°C
Waterproof IP65 IP65 Basic waterproof
4. Specifications
※ Some features may change without prior notice to improve the performance of the product.
Electrical Feature Mechanical
Feature Opereation
Specification
UWB
Feature

7
5. Installation
KIGIS IPAS is designed with the customer in mind for easy installation without the help of an installer.
The powerful magnet can be attached easily on VT floor without damaging the vehicle and it is also
convenient to detach with detach lever.
It can be easily installed by using cable ties in case of no magnet on vehicle.
It is more desirable to install VT in a 360˚open space for example on top of
cabin, rather than a space insde cabin. This product, as a wireless frequency(RF)
device, is better communicative in operation in a open space.
Setting
Tips
Caution! It is highly recommended to install IPAS with the power off.
Turn on the power after connecting all products.
Magnetic Pad : Easy to install
Pedestrian Tag Helmet Clip
Detach lever : Easy to detach from
vehicle by pulling the lever as shown
Fastening Tie Hole
* Normal operation : Green Flash ON after turning on the power.
Cable Harness(6m)
5m
3m
Open Wire Adapter Cable
Cigar Jack Adapter
or
Vehicle Tag(VT)
or
Indicator
* Caution! Wind up cable terminals to properly
connect them. Disregarding this caution, it may
cause a malfunction caused by liquid matters.

8
6. Setting - Indicator
Danger / Caution Area Distance Setting
Setting Initialization
Volume Control
① Press and hold SET
1 and SET 2 buttons
simultaneously for 2
seconds or more.
④ When the green LED is
on, set the distance to the
Caution Area.
① Press and hold the STOP button for more than 2 seconds.
② When the red LED is flashing sequentially, press and hold the STOP button again for more
than 2 seconds. The LED will turn off and the setting will be initialized. Reboot will take
about 5 seconds.(Do not turn off the vehicle until the green LED flashes.)
※ Default values after initialization : 4m for Danger Area / 8m for Caution Area
SET 1 Button : - Volume SET 2 Button : + Volume
② Set the desired Danger
Area distance by operating
the SET 1 and SET 2
buttons. (Refer to "How
to set the distance" on the
following page)
⑤ Set the desired Caution
Area distance by operating
the SET 1 and SET 2
buttons. (Refer to "How to
set the distance" on the
following page)
③ Press STOP to complete
the Danger Area setting.
⑥ Press STOP to complete
the Caution Area setting.
※ In a condition of normal operation
※ In case of malfunction

9
6. Setting - Indicator
How to Set the Distance
SET 1 button : Distance -2 m
STOP button : OK
Distance setting can be set to even distance [2 / 4 / 6 / 8 / 10m] or
odd distance [1 / 3 / 5 / 7 / 9m]. The default setting is even distance.
SET 2 button : Distance + 2m
: 2m or 1m
: 4m or 3m
: 6m or 5m
: 8m or 7m
: 10m or 9m
2m space per LED lamp [ ]
ON OFF
* Odd distance [1 / 3 / 5 / 7 / 9m] change : Press and hold SET 1 button + STOP
button at the same time.
< Example > Setting Danger Area 3m / Caution Area 9m
① Set an even distance 1m longer than the desired Danger /Caution Area as shown below.
(Set 3m ⇒ 4m / 9m ⇒ 10m)
② Press & hold SET 1 button + STOP button at the same time, It is set to be 1m Shorter
and it changes into 3m distance for Danger Area / 9m distance for Caution Area.
※ If you want to change from odd distance to even distance again, press and hold Set 2 & STOP.
: 4m
: 10m
Danger Area (Red LED)
Caution Area (Green LED)
As IPAS releases warning signals by detecting the proxmity on 0.5 second cycles,
proximity distance must be set considering vehicle speed.
Setting
Tips

10
6. Setting - Pedestrian Tags
Alarm type Setting
Volume Control
① Press and hold the
power button to
turn on the power.
(Charging is required
if the red LED is on.)
① Press and hold the
power button to turn
on the power.
(Charging is required if
the red LED is on.)
② Press and hold the
menu button.
(A short vibration will
occur.)
② Press and hold the
menu button.
(A short vibration will
occur.)
③ Press the power
button to set the
desired alarm type.
(Please refer to the
alarm system below.)
③ Press the menu button
to set the desired
volume level.
(See volume steps
below.)
④ Press and hold the
menu button to
complete the setup.
④ Press and hold the
menu button to
complete the setup.
※ Rotation
Sound
Default
Status
(Sound +
Vibration)
Vibration
Press
Power button
1 time > > >
> >
>
Press
Power button
1 more time
Press
Power button
1 more time
Press Power button 1 more time
Sound
+
Vibration
Alarm
※ Rotation
Stage 3
Default
Status
(Stage 3)
Stage 2
Press
Menu button
1 time > > >
> >
>
Press
Menu button
1 more time
Press
Menu button
1 more time
Press Menu button 1 more time
Stage 1
Volume Stage

11
7. How to use
Indicator Instruction that a driver must know
How to use "PT" that pedestrians must know
* When pedestrian enters and escapes out of Danger/Caution Area, for the safety of
pedestrians, the alarm will go off from the point 1m further away that was set originally.
(Example : If the Danger Area / Caution Area is set at 2m / 4m, the warning sound of PT will
go off until it escapes 3m of Danger Area and 5m of Caution Area from VT)
※ Volume Control : Refer to 8P
* When pedestrian enters and escapes out of Danger/Caution Area, for the safety of pedestrians,
the alarm will go off from the point 1m further away that was set originally.
(Example : If the Danger Area / Caution Area is set at 2m / 4m, the warning sound of PT will go
off until it escapes 3m of Danger Area and 5m of Caution Area from VT)
※ Alarm type setting / Volume Control : Refer to 10P
Situation LED Lamp Status Alarm Mute Alarm
When a pedestrian(PT) trespass
on the Caution Area Red / Green
Light flashes
gradually
Repeating
"Watch Out"
Press STOP Button 1 Time
Even though alarm ismuted (double
clikc), in case that pedestrian escapes
the set Danger / Caution Area and re-
enters them, the alarm will go off again.
When a pedestrian(PT) trespass
on the Danger Area
Repeating
"Danger"
Situation LED Lamp Status Alarm Alarm Pause Mute Alarm
When a pedestrian(PT)
trespass
on the Caution Area
Green Flash
① "Beep-Beep-" sound
② Vibration
(short interval)
③ Both
※ Depends on menu setting
Press menu or
power button
one time.
Alarm will occur
in 10 seconds
automatically
after pause.
Press menu or power
button twice quickly.
("Beep" alarm will
occur.)
Even though alarm
ismuted (double click),
in case that pedestrian
escapes the set Danger
/ Caution Area and re-
enters them, the alarm
will go off again.
When a pedestrian(PT)
trespass
on the Danger Area
① "Whee yooo whee
yooo"(siren)
② Vibration
(long interval)
③ Both
※ Depends on menu setting
When the battery is low
(Less than about
4 hours of use)
Red Flash
"Beebeep Beebeep"
5 times every 10
minutes.
- -
A malfunction
may be caused
by combining
products
backwards.
Charging Port
Caution!
O
Right exemple
Charging Port
X
Wrong exemple

12
7. How to use - LED status display
LED Status Vehicle Tag(VT) Indicator Pedestrian Tag(PT)
Power ON
● ● ○ ○ ○ ○ ●
Green Flash Green Flash Green Flash
Power OFF
○ ○ ○ ○ ○ ○ ●
LED Off LED Off After Red light blinks
once, it turns off
Normal
●●●
Green Flash Green Flash Green Flash
Low Voltage
Battery
- - ●
- - Red Flash
Battery Charging
- - ●
- - Red On
Fully Charged
- - ●
- - Green On
Entering
Caution Area
● + ● ● + ● ●
Green + Red
flashing
Green + Red
flashing Green Flash
Entering
Danger Area
● + ● ● + ● ●
Green + Red
flashing
Green + Red
flashing Green Flash

13
Question Reason Solution
Access to
PT MENU is
unavailable.
You can access the menu after turning on
the power.
If you press and hold the power button for
2 seconds, the green LED will blink. Press
and hold the menu button for 2 seconds
afterward.
There is a red
LED on the PT.
It is a signal indicating low voltage when
the remaining battery power is less than 4
hours.
Please charge it. When it is 100% charged,
the green LED will turn on.
The volume of
VT sound is too
low.
Indicator's volume setting is low.
The indicator can be adjusted up to 5 levels.
(How to adjust the indicator volume
: see 8P)
Can I mute the
alarm when I
drive a vehicle
with a PT?
Mute of alarm sound is possible.
<How to mute alarm>
* PT : Press twice quickly Menu or Power
button with short intervals.
* Indicator : Press STOP button once (When
PT owner deviates and reenters the Danger
/ Caution area, the alarm will go off again)
Can I pause an
alarm to talk to
a VT car driver
for a moment?
It is possible to pause for 10 seconds. After
10 seconds, the alarm will occur again.
<Alarm pause tip>
* PT : 1 time quick press on Menu or Power
button. (PT alarm will go off after 10
seconds automatically)
Previously
set distance
of Danger/
Caution area is
not precise.
A. The alert sounds in shorter horizontal
distance depending on the installation
height of VT.
B. When getting inside and getting out of
the Danger / Caution Area, alarm will go
off 1m further from the set distance for
the safety reason. <Example> In case of
setting 2m for Danger Area and 4m for
Caution Area, alarm will keep going off
until getting out of 3m (Danger Area)
and 5m (Caution Area).
In case of A and B, it is normal function but
when they are thought to be an issue, it is
recommended to initialize the indicator to
reset the distance for use from a scratch.
(See Indicator initialization and distance
setting 8P)
8. Check list before reporting failure
If you have any questions, please feel free to contact us at www.kyungwoo.com.

MEMO

Product Name
Model Name
Place of Purchase
Date of Purchase
Name of Customer
Phone Number
Warranty Term 1 year from the purchase date
* Service information
1. If a performance or functional failure occurs while proper using during the
warranty period, the repair service is free of charge.
2. When the repair service is required, please present the warranty card with all
information filled in.
3. The following cases will be charged for the repair regardless of warranty period.
· Failure due to careless use or improper repair or modification
· Failure due to non-compliance to the specifications stated in this manual
4. After the expiration of warranty period, a certain fee will be charged for the
repair service.
5. The warranty card cannot be reissued.
※ If failures occur when a person who is not in our service team tries to repair the
product and breaks down, or uses components from other companies, we will
not hold the responsibility for those failures.
※ Please contact the store where you purchased the product for the refund or
exchange of the product.
WARRANTY
4F, Daeryung Post Tower 5, 68, Digital-ro 9-gil, Geumcheon-gu,
Seoul, 08512, Republic of Korea

Think Smart,
Work Safe
KYUNGWOO SYSTECH, INC.
4F, Daeryung Post Tower 5, 68, Digital-ro 9-gil, Geumcheon-gu,
Seoul, 08512, Republic of Korea
www.kyungwoo.com / www.kigistec.com
Manufacturer
* Any inquiry about the purchased product is
contactable to distributor(or purchasing store) at below line.
Distributor(or purchasing store)
Table of contents